Extreme_Parkour复现及相关问题汇总
1. 前言
砚上三五笔,落墨鹧鸪啼
本文用于记录:extreme parkour的相关论文的复现过程
如有不对,欢迎评论区指正!
项目链接:https://github.com/chengxuxin/extreme-parkour
论文链接:https://arxiv.org/pdf/2309.14341
2. 正文
2.1 pipeline
这篇论文工作是2023年的一篇工作,其pipeline相对来说比较直观且简单。
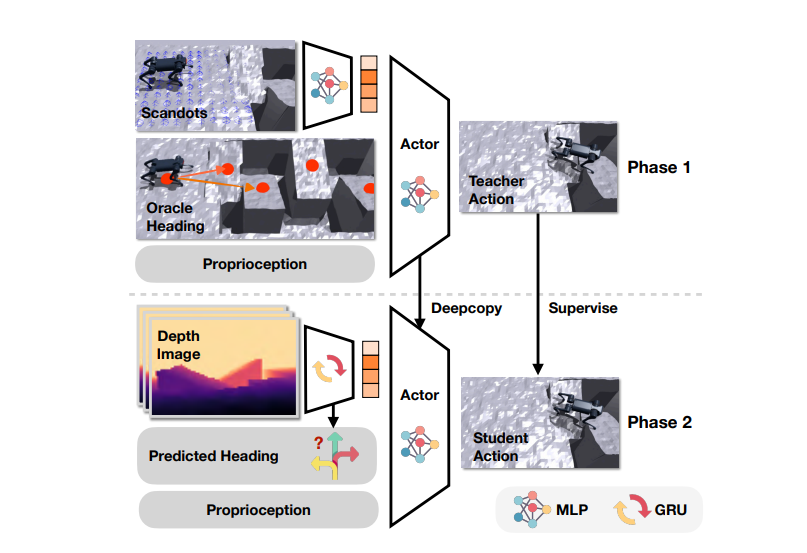
教师网络使用激光雷达获得信息,学生网络通过教师的policy监督学习,仅仅通过深度相机的图像来实现自主方向的判断以及地形的适应性能力。
2.2 仿真细节·
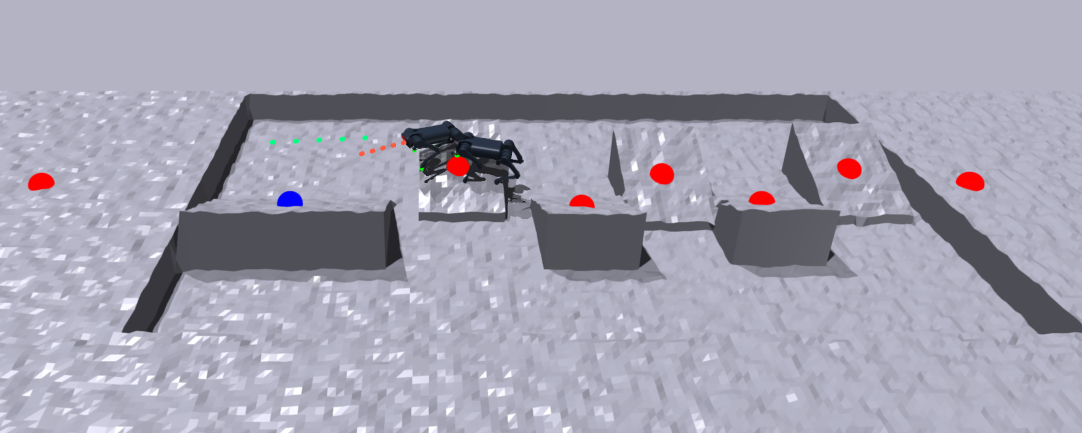
记录下当到达目标位置为绿色的外围
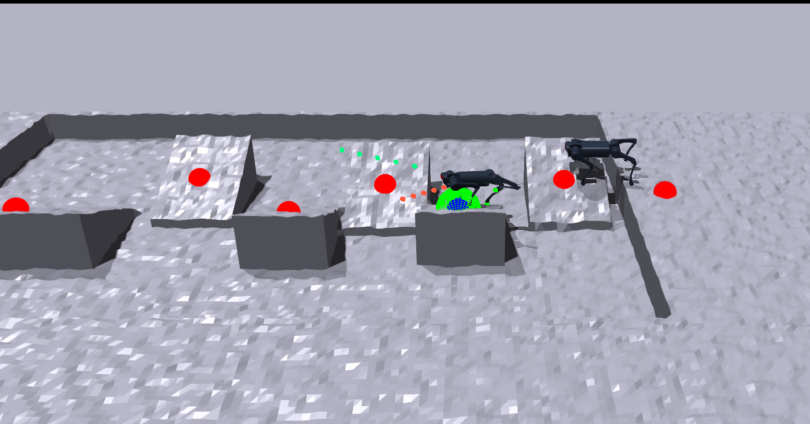
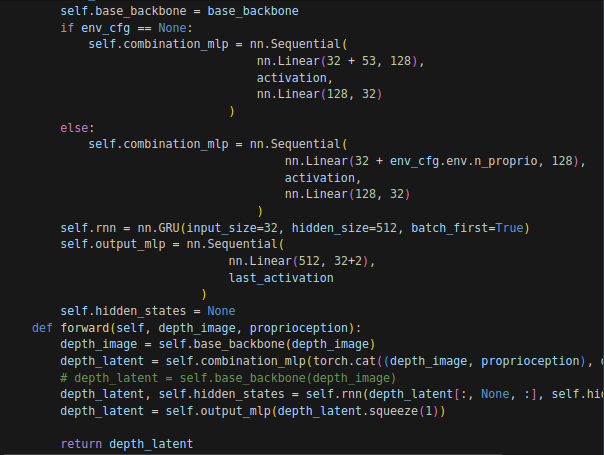
学生网络的输出,有深度相机的图像
2.3 真机部署
2.3 过程记录
--- 2.3.1 ---
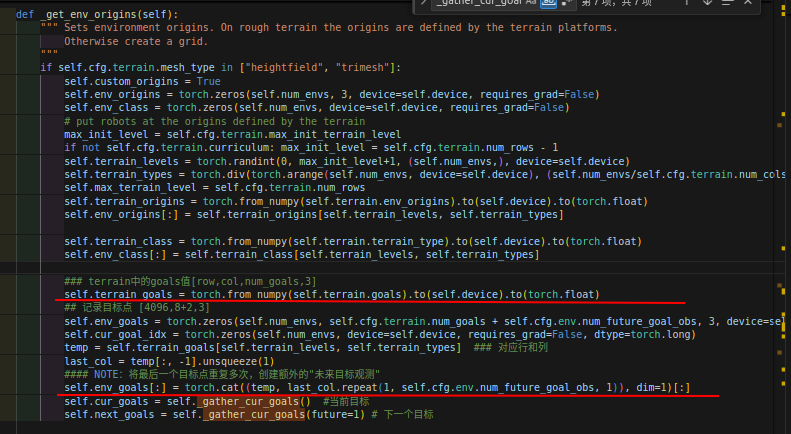
地形创建,目标点按照地形的每一个“stone”的中心点的位置生成,机器人根据rewards追踪目标关键点goals的位置:
    ### 追踪目标关键点的位置
    def _reward_tracking_goal_vel(self):
        norm = torch.norm(self.target_pos_rel, dim=-1, keepdim=True)
        target_vec_norm = self.target_pos_rel / (norm + 1e-5)
        cur_vel = self.root_states[:, 7:9]
        rew = torch.minimum(torch.sum(target_vec_norm * cur_vel, dim=-1), self.commands[:, 0]) / (self.commands[:, 0] + 1e-5)
        return rew
其中goals的获取:
--- 2.3.2 ---
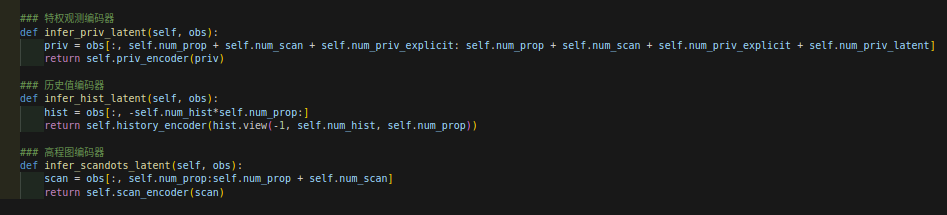
网络结构细节:
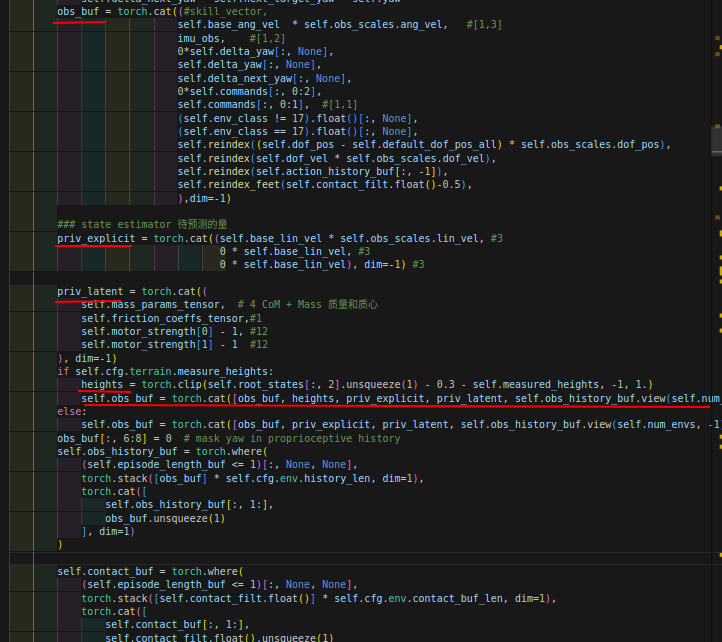
观测值的构成:
网络的两次更新:第一次是update只更新priv-obs,而后第二次使用update-dagger更新历史编码器。

逐渐减小的保存体积,可以参考和学习一下:
            if self.log_dir is not None:
                self.log(locals())
            if it < 2500:
                if it % self.save_interval == 0:
                    self.save(os.path.join(self.log_dir, 'model_{}.pt'.format(it)))
            elif it < 5000:
                if it % (2*self.save_interval) == 0:
                    self.save(os.path.join(self.log_dir, 'model_{}.pt'.format(it)))
            else:
                if it % (5*self.save_interval) == 0:
                    self.save(os.path.join(self.log_dir, 'model_{}.pt'.format(it)))
            ep_infos.clear()
--- 2.3.3 ---
特征融合,经过一个神经网络将两个特征进行融合处理。
--- 2.3.4 ---
训练过程的逐渐解析:
teacher训练阶段的策略更新函数是learn-RL,这里是通过类似于PPO的方法实现的,更新AC两个网络,以及特权编码器网络、估计器网络,特权编码器在原始方案中估计的量是机器人的速度;特权编码器网络输入是一些特权信息量一共有30维(其实也不是很大),然后输出的编码信息希望作为一个base留给estimator去更新。。
def learn_RL(self, num_learning_iterations, init_at_random_ep_len=False):
        mean_value_loss = 0.
        mean_surrogate_loss = 0.
        mean_estimator_loss = 0.
        mean_disc_loss = 0.
        mean_disc_acc = 0.
        mean_hist_latent_loss = 0.
        mean_priv_reg_loss = 0.
        priv_reg_coef = 0.
        entropy_coef = 0.
        # initialize writer
        # if self.log_dir is not None and self.writer is None:
        #     self.writer = SummaryWriter(log_dir=self.log_dir, flush_secs=10)
        if init_at_random_ep_len:
            self.env.episode_length_buf = torch.randint_like(self.env.episode_length_buf, high=int(self.env.max_episode_length))
        obs = self.env.get_observations()
        privileged_obs = self.env.get_privileged_observations()
        critic_obs = privileged_obs if privileged_obs is not None else obs
        obs, critic_obs = obs.to(self.device), critic_obs.to(self.device)
        infos = {}
        infos["depth"] = self.env.depth_buffer.clone().to(self.device) if self.if_depth else None
        self.alg.actor_critic.train() # switch to train mode (for dropout for example)

        ep_infos = []
        rewbuffer = deque(maxlen=100)
        rew_explr_buffer = deque(maxlen=100)
        rew_entropy_buffer = deque(maxlen=100)
        lenbuffer = deque(maxlen=100)
        cur_reward_sum = torch.zeros(self.env.num_envs, dtype=torch.float, device=self.device)
        cur_reward_explr_sum = torch.zeros(self.env.num_envs, dtype=torch.float, device=self.device)
        cur_reward_entropy_sum = torch.zeros(self.env.num_envs, dtype=torch.float, device=self.device)
        cur_episode_length = torch.zeros(self.env.num_envs, dtype=torch.float, device=self.device)

        tot_iter = self.current_learning_iteration + num_learning_iterations
        self.start_learning_iteration = copy(self.current_learning_iteration)

        for it in range(self.current_learning_iteration, tot_iter):
            start = time.time()
            hist_encoding = it % self.dagger_update_freq == 0

            # Rollout
            with torch.inference_mode():
                for i in range(self.num_steps_per_env):
                    actions = self.alg.act(obs, critic_obs, infos, hist_encoding)
                    obs, privileged_obs, rewards, dones, infos = self.env.step(actions)  # obs has changed to next_obs !! if done obs has been reset
                    critic_obs = privileged_obs if privileged_obs is not None else obs
                    obs, critic_obs, rewards, dones = obs.to(self.device), critic_obs.to(self.device), rewards.to(self.device), dones.to(self.device)
                    total_rew = self.alg.process_env_step(rewards, dones, infos)

                    if self.log_dir is not None:
                        # Book keeping
                        if 'episode' in infos:
                            ep_infos.append(infos['episode'])
                        cur_reward_sum += total_rew
                        cur_reward_explr_sum += 0
                        cur_reward_entropy_sum += 0
                        cur_episode_length += 1

                        new_ids = (dones > 0).nonzero(as_tuple=False)

                        rewbuffer.extend(cur_reward_sum[new_ids][:, 0].cpu().numpy().tolist())
                        rew_explr_buffer.extend(cur_reward_explr_sum[new_ids][:, 0].cpu().numpy().tolist())
                        rew_entropy_buffer.extend(cur_reward_entropy_sum[new_ids][:, 0].cpu().numpy().tolist())
                        lenbuffer.extend(cur_episode_length[new_ids][:, 0].cpu().numpy().tolist())

                        cur_reward_sum[new_ids] = 0
                        cur_reward_explr_sum[new_ids] = 0
                        cur_reward_entropy_sum[new_ids] = 0
                        cur_episode_length[new_ids] = 0

                stop = time.time()
                collection_time = stop - start

                # Learning step
                start = stop
                self.alg.compute_returns(critic_obs)

            mean_value_loss, mean_surrogate_loss, mean_estimator_loss, mean_disc_loss, mean_disc_acc, mean_priv_reg_loss, priv_reg_coef = self.alg.update()
            if hist_encoding:
                print("Updating dagger...")
                mean_hist_latent_loss = self.alg.update_dagger()

            stop = time.time()
            learn_time = stop - start
            if self.log_dir is not None:
                self.log(locals())
            if it < 2500:
                if it % self.save_interval == 0:
                    self.save(os.path.join(self.log_dir, 'model_{}.pt'.format(it)))
            elif it < 5000:
                if it % (2*self.save_interval) == 0:
                    self.save(os.path.join(self.log_dir, 'model_{}.pt'.format(it)))
            else:
                if it % (5*self.save_interval) == 0:
                    self.save(os.path.join(self.log_dir, 'model_{}.pt'.format(it)))
            ep_infos.clear()

        # self.current_learning_iteration += num_learning_iterations
        self.save(os.path.join(self.log_dir, 'model_{}.pt'.format(self.current_learning_iteration)))
不过值得注意的是,特权编码器输入是预测的priv-latent值,看样子应该是下采样了。
而learn-vision函数则是学生阶段的on-policy-runner的训练用的函数:
这个地方又涉及到了关于图像处理的部分可以看我的2.3.3小节的内容。
 def learn_vision(self, num_learning_iterations, init_at_random_ep_len=False):
        tot_iter = self.current_learning_iteration + num_learning_iterations
        self.start_learning_iteration = copy(self.current_learning_iteration)

        ep_infos = []
        rewbuffer = deque(maxlen=100)
        lenbuffer = deque(maxlen=100)
        cur_reward_sum = torch.zeros(self.env.num_envs, dtype=torch.float, device=self.device)
        cur_episode_length = torch.zeros(self.env.num_envs, dtype=torch.float, device=self.device)

        obs = self.env.get_observations()
        infos = {}
        infos["depth"] = self.env.depth_buffer.clone().to(self.device)[:, -1] if self.if_depth else None
        infos["delta_yaw_ok"] = torch.ones(self.env.num_envs, dtype=torch.bool, device=self.device)
        self.alg.depth_encoder.train()
        self.alg.depth_actor.train()

        num_pretrain_iter = 0
        for it in range(self.current_learning_iteration, tot_iter):
            start = time.time()
            depth_latent_buffer = []
            scandots_latent_buffer = []
            actions_teacher_buffer = []
            actions_student_buffer = []
            yaw_buffer_student = []
            yaw_buffer_teacher = []
            delta_yaw_ok_buffer = []
            for i in range(self.depth_encoder_cfg["num_steps_per_env"]):
                if infos["depth"] != None:
                    with torch.no_grad():
                        scandots_latent = self.alg.actor_critic.actor.infer_scandots_latent(obs)
                    scandots_latent_buffer.append(scandots_latent)
                    obs_prop_depth = obs[:, :self.env.cfg.env.n_proprio].clone()
                    obs_prop_depth[:, 6:8] = 0
                    depth_latent_and_yaw = self.alg.depth_encoder(infos["depth"].clone(), obs_prop_depth)  # clone is crucial to avoid in-place operation

                    depth_latent = depth_latent_and_yaw[:, :-2]
                    yaw = 1.5*depth_latent_and_yaw[:, -2:]

                    depth_latent_buffer.append(depth_latent)
                    yaw_buffer_student.append(yaw)
                    yaw_buffer_teacher.append(obs[:, 6:8])

                with torch.no_grad():
                    actions_teacher = self.alg.actor_critic.act_inference(obs, hist_encoding=True, scandots_latent=None)
                    actions_teacher_buffer.append(actions_teacher)

                obs_student = obs.clone()
                # obs_student[:, 6:8] = yaw.detach()
                obs_student[infos["delta_yaw_ok"], 6:8] = yaw.detach()[infos["delta_yaw_ok"]]
                delta_yaw_ok_buffer.append(torch.nonzero(infos["delta_yaw_ok"]).size(0) / infos["delta_yaw_ok"].numel())
                actions_student = self.alg.depth_actor(obs_student, hist_encoding=True, scandots_latent=depth_latent)
                actions_student_buffer.append(actions_student)

                # detach actions before feeding the env
                if it < num_pretrain_iter:
                    obs, privileged_obs, rewards, dones, infos = self.env.step(actions_teacher.detach())  # obs has changed to next_obs !! if done obs has been reset
                else:
                    obs, privileged_obs, rewards, dones, infos = self.env.step(actions_student.detach())  # obs has changed to next_obs !! if done obs has been reset
                critic_obs = privileged_obs if privileged_obs is not None else obs
                obs, critic_obs, rewards, dones = obs.to(self.device), critic_obs.to(self.device), rewards.to(self.device), dones.to(self.device)

                if self.log_dir is not None:
                        # Book keeping
                        if 'episode' in infos:
                            ep_infos.append(infos['episode'])
                        cur_reward_sum += rewards
                        cur_episode_length += 1
                        new_ids = (dones > 0).nonzero(as_tuple=False)
                        rewbuffer.extend(cur_reward_sum[new_ids][:, 0].cpu().numpy().tolist())
                        lenbuffer.extend(cur_episode_length[new_ids][:, 0].cpu().numpy().tolist())
                        cur_reward_sum[new_ids] = 0
                        cur_episode_length[new_ids] = 0

            stop = time.time()
            collection_time = stop - start
            start = stop

            delta_yaw_ok_percentage = sum(delta_yaw_ok_buffer) / len(delta_yaw_ok_buffer)
            scandots_latent_buffer = torch.cat(scandots_latent_buffer, dim=0)
            depth_latent_buffer = torch.cat(depth_latent_buffer, dim=0)
            depth_encoder_loss = 0
            # depth_encoder_loss = self.alg.update_depth_encoder(depth_latent_buffer, scandots_latent_buffer)

            actions_teacher_buffer = torch.cat(actions_teacher_buffer, dim=0)
            actions_student_buffer = torch.cat(actions_student_buffer, dim=0)
            yaw_buffer_student = torch.cat(yaw_buffer_student, dim=0)
            yaw_buffer_teacher = torch.cat(yaw_buffer_teacher, dim=0)
            depth_actor_loss, yaw_loss = self.alg.update_depth_actor(actions_student_buffer, actions_teacher_buffer, yaw_buffer_student, yaw_buffer_teacher)

            # depth_encoder_loss, depth_actor_loss = self.alg.update_depth_both(depth_latent_buffer, scandots_latent_buffer, actions_student_buffer, actions_teacher_buffer)
            stop = time.time()
            learn_time = stop - start

            self.alg.depth_encoder.detach_hidden_states()

            if self.log_dir is not None:
                self.log_vision(locals())
            if (it-self.start_learning_iteration < 2500 and it % self.save_interval == 0) or \
               (it-self.start_learning_iteration < 5000 and it % (2*self.save_interval) == 0) or \
               (it-self.start_learning_iteration >= 5000 and it % (5*self.save_interval) == 0):
                    self.save(os.path.join(self.log_dir, 'model_{}.pt'.format(it)))
            ep_infos.clear()
--- 2.3.5 ---
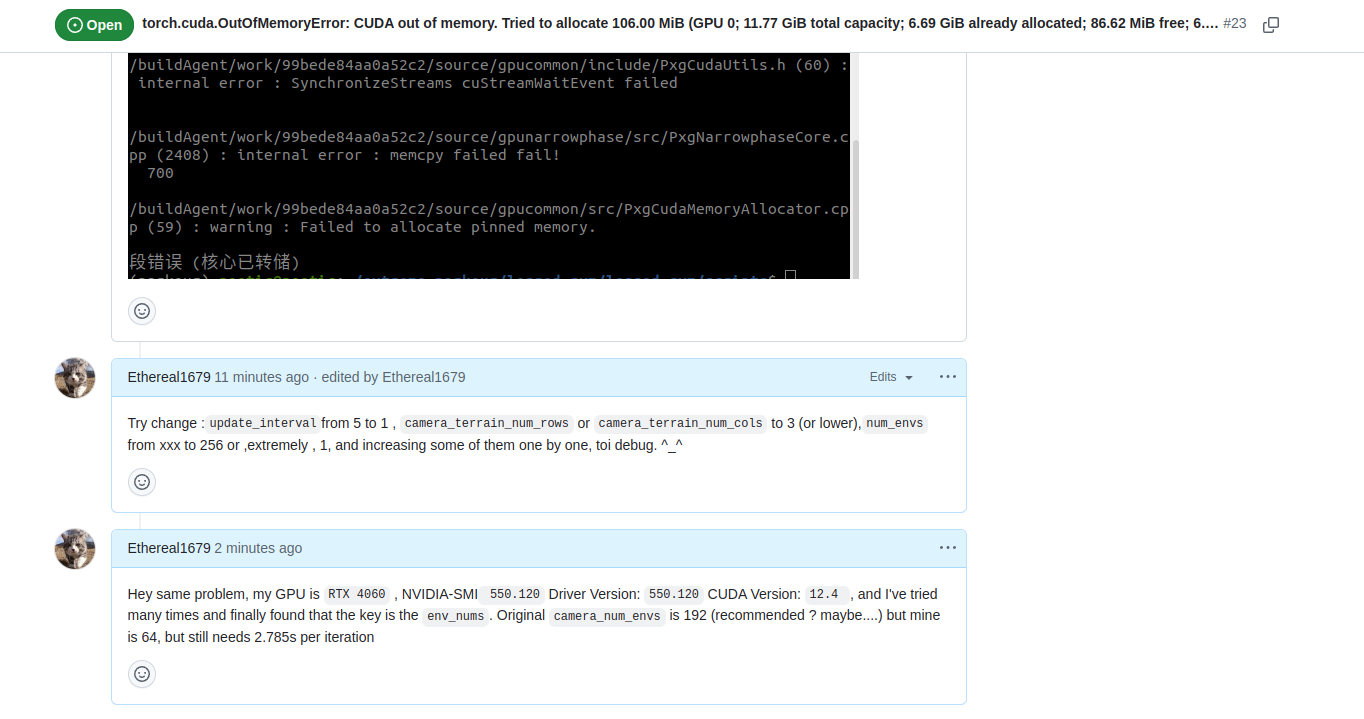
在学生网络蒸馏的时候会遇到Cuda 核心转储,一些解决方法。
--- 2.3.6 ---
机械狗的初始位姿:

顺序按照 FL-FR-RL-RR来的,细节从hip-thigh-calf
        pos = [0.0, 0.0, 0.42] # x,y,z [m]
        default_joint_angles = { # = target angles [rad] when action = 0.0
            'FL_hip_joint': 0.1,   # [rad]
            'RL_hip_joint': 0.1,   # [rad]
            'FR_hip_joint': -0.1 ,  # [rad]
            'RR_hip_joint': -0.1,   # [rad]

            'FL_thigh_joint': 0.8,     # [rad]
            'RL_thigh_joint': 1.,   # [rad]
            'FR_thigh_joint': 0.8,     # [rad]
            'RR_thigh_joint': 1.,   # [rad]

            'FL_calf_joint': -1.5,   # [rad]
            'RL_calf_joint': -1.5,    # [rad]
            'FR_calf_joint': -1.5,  # [rad]
            'RR_calf_joint': -1.5,    # [rad]
        }
--- 2.3.7 ---
MuJoCo also has off-screen rendering capabilities, making it straightforward to simulate both color and depth camera sensors
mujoco提供深度相机的仿真
--- 2.3.8 ---
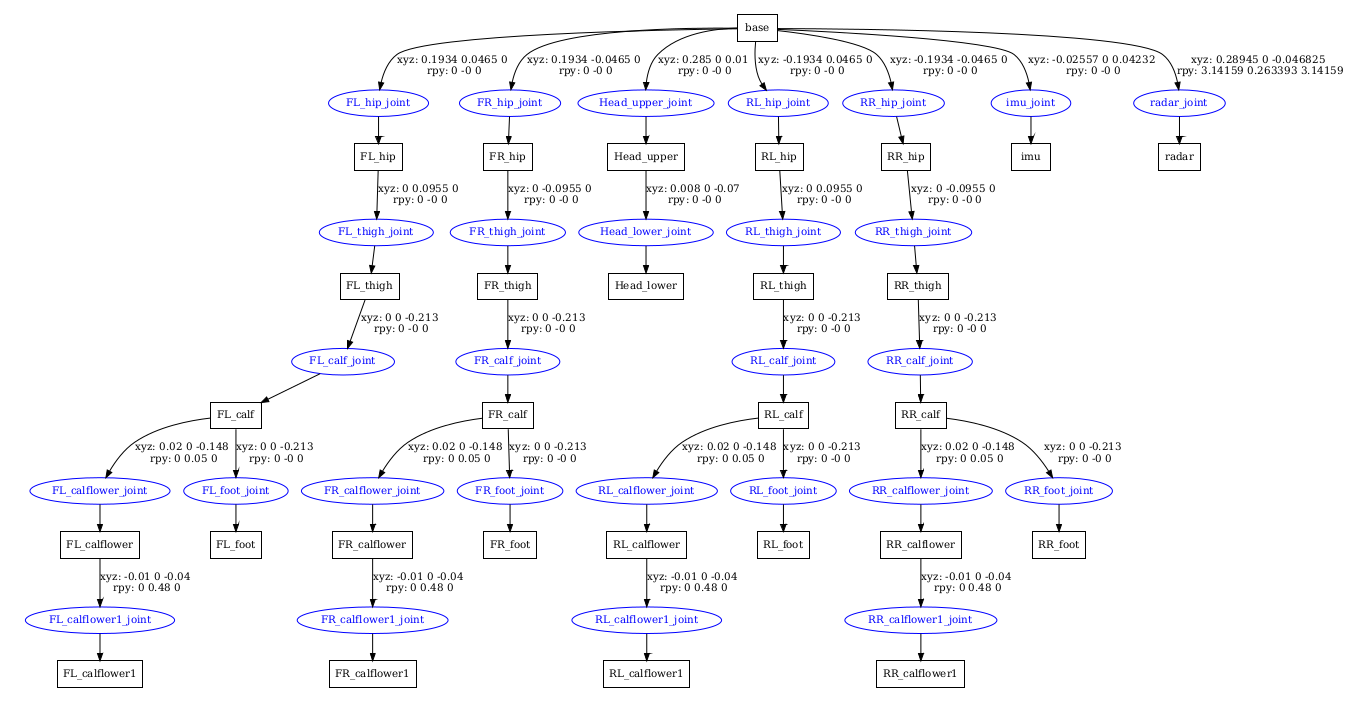
查看URDF的方法:
sudo apt install liburdfdom-tools #安装依赖
在终端打印URDF的树状表。可以和 方便的查看urdf的父子结构:
check_urdf go2.urdf

生成URDF的树状PDF文件便于查看
urdf_to_graphiz go2.urdf
URDF文件不具备代码复用的特性,机器人会拥有大量相似的关节组件或者是传感器,使用URDF文件会使得机器人模型文件变得相当难读,xacro文件可以简化机器人模型文件的描述。因此相关文件一般是xml格式或者xacro。
可以通过VScode里面的ros插件可视化urdf,但对于模型一些位置的参考和定义就只能通过SW了,这不方便,所以需要 通过gazebo进行这一操作的替代(至少我这么认为)
--- 2.3.9 ---
说明了2.3.8的方法,我们这里主要通过在gazebo里面查看深度相机相对于机器人的本体的位置信息。从而确定真机的应安装位置
可以参照古月居大佬的方法安装unitree的ros工作环境:https://www.guyuehome.com/detail?id=1880175119840628737
其中我出现了一个问题,但原作者没有提到:
 Could not find a package configuration file provided by "move_base_msgs"
  with any of the following names:
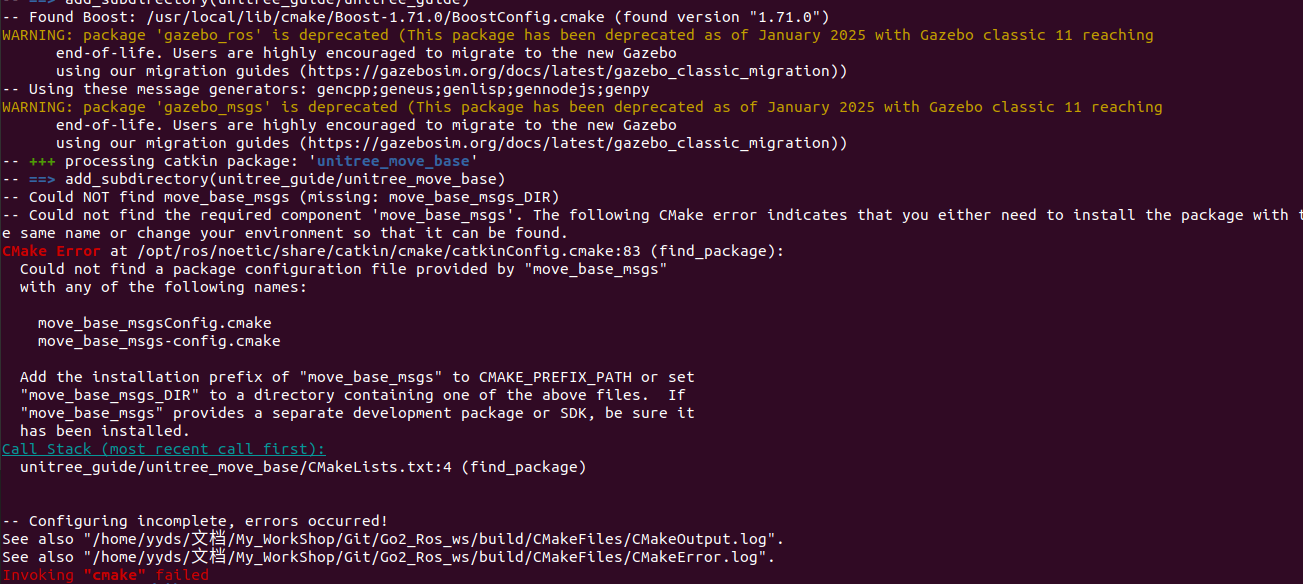
这里的解决方案是安装:关于ros导航的包,这是依赖项,其他照常即可
sudo apt-get install ros-noetic-navigation # noetic是我的ros版本 Ubuntu20.04
--- 2.3.10 ---
个使用 Xacro(XML Macros)定义的机器人 URDF 文件,用于描述 Unitree GO2 四足机器人的模型。Xacro 是 ROS 中用于简化 URDF 文件编写的宏语言。
显示深度相机安装位置以及rviz可视化方法,同样可查看古月居大佬的文章:
https://www.guyuehome.com/detail?id=1892031577741905922
我查看到unitree_ros文件夹,通过roslaunch go2_description go2_rviz.launch运行指令,试图按照上述方法进行进行可视化,试图可视化xacro文件,但是我在robot.xacro文件下并没有看到trunk.dae的模型文件?这很奇怪
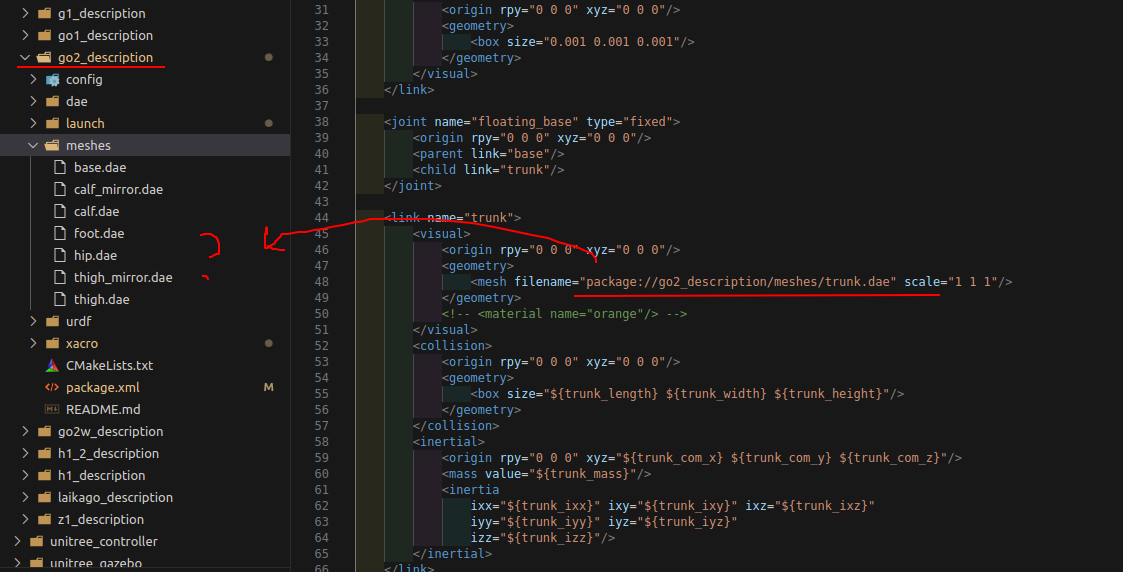
没关系我直接改urdf即可。。。
<!-- 简易版深度相机,用长方体进行表示 -->
  <link name="real_sense">
      <inertial>
          <origin xyz="0 0 0" rpy="0 0 0"/>
          <mass value="0.05" />
          <inertia ixx="6.64E-04" ixy="0" ixz="0" iyy="6.64E-04" iyz="0" izz="1.02E-03" />
      </inertial>
      <visual>
          <geometry>
              <box size="0.01 0.1 0.02"/>
          </geometry>
          <origin xyz="0 0 0" rpy="0 0 0" />
          <material name="black">
              <color rgba="0.0 0.0 0.0 1.0" />
          </material>
      </visual>
      <collision>
          <origin xyz="0.0 0.0 0.0" rpy="0.0 0.0 0.0" />
          <geometry>
              <box size="0.01 0.1 0.02"/>
          </geometry>

      </collision>
  </link>
  <joint name="realsense_joint" type="fixed">
      <origin xyz="0.355 0 0.065" rpy="0 0.436 0"/>
      <parent link="base" />
      <child link="real_sense" />
      <!-- <origin xyz="0.29 0 0.093" /> -->
      <!-- 相对于base的坐标偏移 -->
      <axis xyz="0 0 1" />
  </joint>
这是改完的图,可以看到相机的大致位置了。


相机的角度,这个应该是yaw角

相机的位置参数:

--- 2.3.11 --- mujoco如何获得深度相机的深度图
mujoco如何获得深度相机的深度图
这个地方网上根本没有一点教程,这里我打算单独说一下。mujoco的API给的跟屎一样,一个测试example都没有。。。那没办法,只能自食其力。
经过大量的查阅,包括国内外的各大网站、github等,我在这位国外老哥的github上找到了这个:
https://github.com/aftersomemath/mujoco_camera_depth_test/tree/96cdaad86a4b71ccae1c11f955babceade5c0093
github上也有类似的教程方案解决问题
https://github.com/google-deepmind/mujoco/issues/743
下面给出相关代码:
test_depth_camera.py
import mujoco
import mujoco.viewer as viewer
import numpy as np
import glfw
import cv2
##
def glFrustum_CD_float32(znear, zfar):
  zfar  = np.float32(zfar)
  znear = np.float32(znear)
  C = -(zfar + znear)/(zfar - znear)
  D = -(np.float32(2)*zfar*znear)/(zfar - znear)
  return C, D
##
def ogl_zbuf_projection_inverse(zbuf, C, D):
  zlinear = 1 / ((zbuf - (-C)) / D) # TODO why -C?
  return zlinear

##
def ogl_zbuf_default_inv(zbuf_scaled, znear=None, zfar=None, C=None, D=None):
  if C is None:
    C, D = glFrustum_CD_float32(znear, zfar)
  zbuf = 2.0 * zbuf_scaled - 1.0
  zlinear = ogl_zbuf_projection_inverse(zbuf, C, D)
  return zlinear

##
def ogl_zbuf_negz_inv(zbuf, znear=None, zfar=None, C=None, D=None):
  if C is None:
    C, D = glFrustum_CD_float32(znear, zfar)
    C = np.float32(-0.5)*C - np.float32(0.5)
    D = np.float32(-0.5)*D
  zlinear = ogl_zbuf_projection_inverse(zbuf, C, D)
  return zlinear

# 设置分辨率
resolution = (640, 480)

# 创建OpenGL上下文(离屏渲染)
glfw.init()
glfw.window_hint(glfw.VISIBLE, glfw.FALSE)
window = glfw.create_window(resolution[0], resolution[1], "Offscreen", None, None)
glfw.make_context_current(window)

# 加载MuJoCo模型
model = mujoco.MjModel.from_xml_path('./resources/panda_with_camera/depth_camera_scene.xml')
data = mujoco.MjData(model)
scene = mujoco.MjvScene(model, maxgeom=10000)
context = mujoco.MjrContext(model, mujoco.mjtFontScale.mjFONTSCALE_150.value)

# set camera properties
camera_name = "depth_camera"
camera_id = mujoco.mj_name2id(model, mujoco.mjtObj.mjOBJ_CAMERA, camera_name)
camera = mujoco.MjvCamera()
camera.type = mujoco.mjtCamera.mjCAMERA_TRACKING
if camera_id != -1:
    print("camera_id", camera_id)
    camera.fixedcamid = camera_id


# 创建帧缓冲对象并启用离屏渲染
framebuffer = mujoco.MjrRect(0, 0, resolution[0], resolution[1])
mujoco.mjr_setBuffer(mujoco.mjtFramebuffer.mjFB_OFFSCREEN, context)

while True:
    mujoco.mj_step(model, data)

    # 获取目标物体的ID并设置相机跟踪该物体
    tracking_body_id = mujoco.mj_name2id(model, mujoco.mjtObj.mjOBJ_BODY, "cube")
    camera.trackbodyid = tracking_body_id
    camera.distance = 1.5  # 相机与目标的距离
    camera.azimuth = 0     # 水平方位角
    camera.elevation = -45  # 俯仰角 NOTE 顺时针:-90-----0-----90

    # 更新场景
    viewport = mujoco.MjrRect(0, 0, resolution[0], resolution[1])
    mujoco.mjv_updateScene(model, data, mujoco.MjvOption(),
                         mujoco.MjvPerturb(), camera,
                         mujoco.mjtCatBit.mjCAT_ALL, scene)

    # 渲染场景并读取像素数据(RGB)
    mujoco.mjr_render(viewport, scene, context)
    rgb = np.zeros((resolution[1], resolution[0], 3), dtype=np.uint8)
    depth_buffer = np.zeros((resolution[1], resolution[0], 1), dtype=np.float32) ## 深度图像
    mujoco.mjr_readPixels(rgb, depth_buffer, viewport, context)


    # 转换颜色空间 (OpenCV使用BGR格式)
    bgr = cv2.cvtColor(np.flipud(rgb), cv2.COLOR_RGB2BGR)
    cv2.imshow('MuJoCo Camera Output', bgr)
    depth_buffer = np.flip(depth_buffer, axis=0).squeeze() ## 需要和OPENGL里面的颠倒方向,不然方向是反的


    # depth_image = (depth_buffer - np.min(depth_buffer)) / (np.max(depth_buffer) - np.min(depth_buffer))  # 归一化深度数据
    # depth_image = np.uint8(depth_image * 255)  # 转换为8位图像
    # depth_bgr = cv2.applyColorMap(depth_image, cv2.COLORMAP_JET)  # 使用JET色图显示深度
    # cv2.imshow('Depth Map', depth_bgr)

    ## 归一化
    depth_normalized = (depth_buffer - np.min(depth_buffer)) / (np.max(depth_buffer) - np.min(depth_buffer))
    depth_grayscale = np.uint8(depth_normalized * 255)
    cv2.imshow('Depth Map (Grayscale)', depth_grayscale)
    # depth_image = depth_image.astype(np.float64)
    # zfar  = model.vis.map.zfar * model.stat.extent
    # znear = model.vis.map.znear * model.stat.extent
    # depth_hat = ogl_zbuf_negz_inv(depth_image, znear, zfar)
    # print(depth_hat)


    # 退出条件(按Esc键退出)
    if cv2.waitKey(1) == 27:
        break

# 保存最后一帧的图像
cv2.imwrite('debug_output.png', bgr)

# 退出OpenCV和MuJoCo
cv2.destroyAllWindows()
glfw.terminate()
del context
.xml
<mujoco model="panda scene">
  <include file="panda.xml"/>

  <statistic center="0.3 0 0.4" extent="1"/>

  <visual>
    <headlight diffuse="0.6 0.6 0.6" ambient="0.3 0.3 0.3" specular="0 0 0"/>
    <rgba haze="0.15 0.25 0.35 1"/>
    <global azimuth="120" elevation="-20"/>

  </visual>

  <asset>
    <texture type="skybox" builtin="gradient" rgb1="0.3 0.5 0.7" rgb2="0 0 0" width="512" height="3072"/>
    <texture type="2d" name="groundplane" builtin="checker" mark="edge" rgb1="0.2 0.3 0.4" rgb2="0.1 0.2 0.3"
      markrgb="0.8 0.8 0.8" width="300" height="300"/>
    <material name="groundplane" texture="groundplane" texuniform="true" texrepeat="5 5" reflectance="0.2"/>
  </asset>

  <worldbody>
    <light pos="0 0 1.5" dir="0 0 -1" directional="true"/>
    <geom name="floor" size="0 0 0.05" type="plane" material="groundplane"/>

    <camera name="depth_camera" pos="0.355 0 0.065" euler="0 0 0" fovy="60"/> <!-- 修改为深度相机 -->

    <body name="cube" pos="0.75 0 0.05">
      <freejoint/>
      <geom type="box" size="0.05 0.02 0.06" rgba="1 0 0 1" mass="0.01" friction="3.0 2.0 0.003"/>
    </body>
  </worldbody>
</mujoco>
--- 2.3.12 --- 将深度相机和机器人的头部绑定并且基于深度图像
在python中通过固定相机位置,即绑定到机器人的关节上,实现相机attach。
# set camera properties
camera_name = "depth_camera"
camera_id = mujoco.mj_name2id(model, mujoco.mjtObj.mjOBJ_CAMERA, camera_name)
camera = mujoco.MjvCamera()
## 相机固定、跟踪
camera.type = mujoco.mjtCamera.mjCAMERA_FIXED
if camera_id != -1:
    print("camera_id", camera_id)
    camera.fixedcamid = camera_id
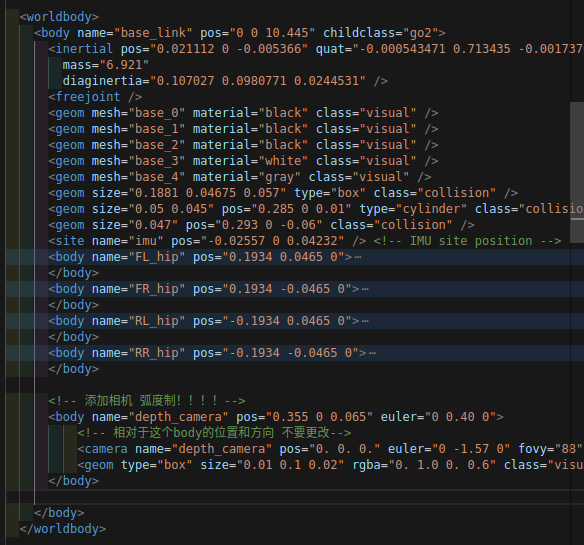
在xml中添加相机的link,其中body是相对于base_link而言的,
      <!-- 添加相机 弧度制!!!!-->
      <body name="depth_camera" pos="0.355 0 0.065" euler="0 0.40 0">
          <!-- 相对于这个body的位置和方向 不要更改-->
          <camera name="depth_camera" pos="0. 0. 0." euler="0 -1.57 0" fovy="88"/>
          <geom type="box" size="0.01 0.1 0.02" rgba="0. 1.0 0. 0.6" class="visual"/>
      </body>
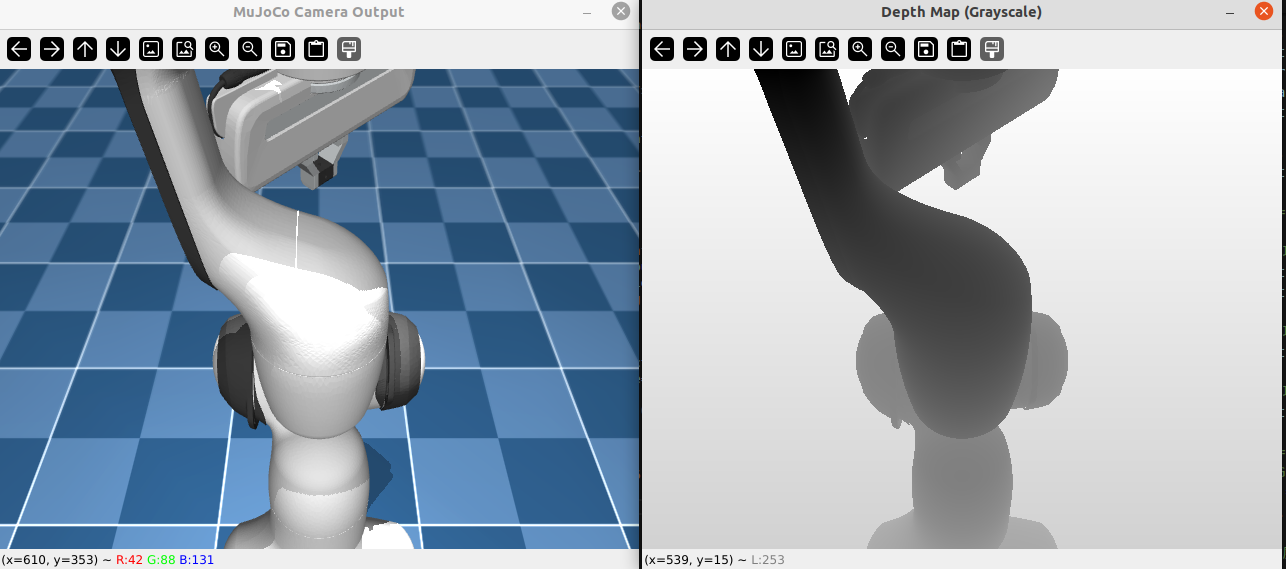
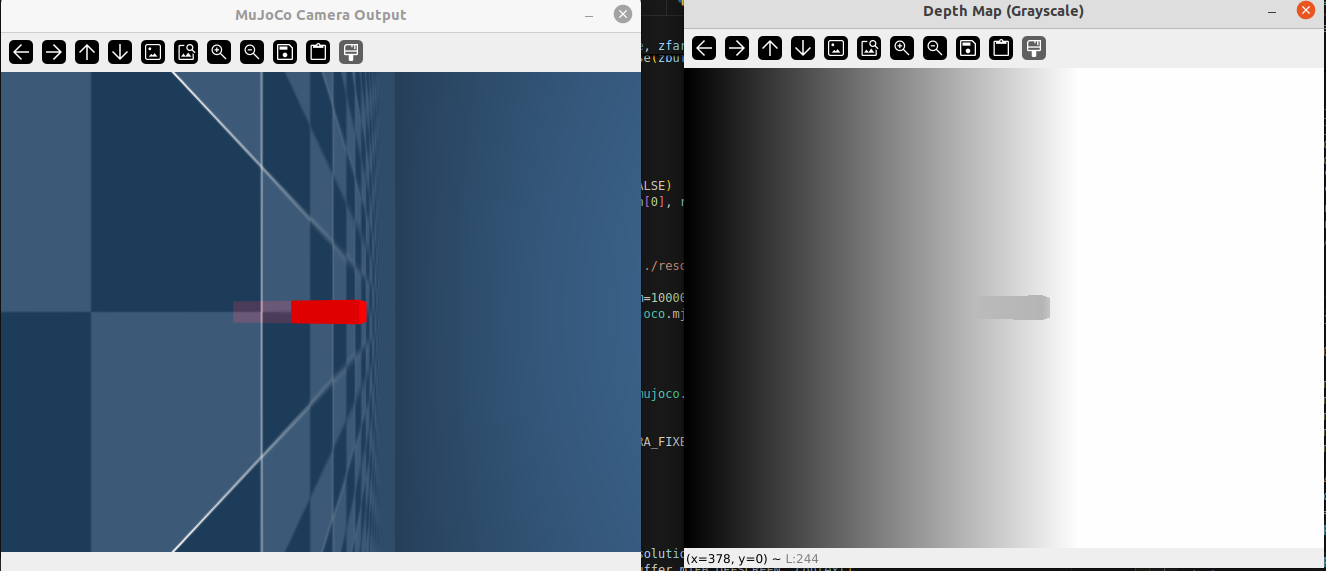
最终效果如图:
可以适当把相机自身旋转位置矫正些:euler="1.57 -1.57 0" 表示相对于前者(body)的旋转
      <body name="depth_camera" pos="0.355 0 0.065" euler="0 0.40 0">
          <camera name="depth_camera" pos="0. 0. 0." euler="1.57 -1.57 0" fovy="88"/>
          <geom type="box" size="0.01 0.1 0.02" rgba="0. 1.0 0. 0.6" class="visual"/>
      </body>
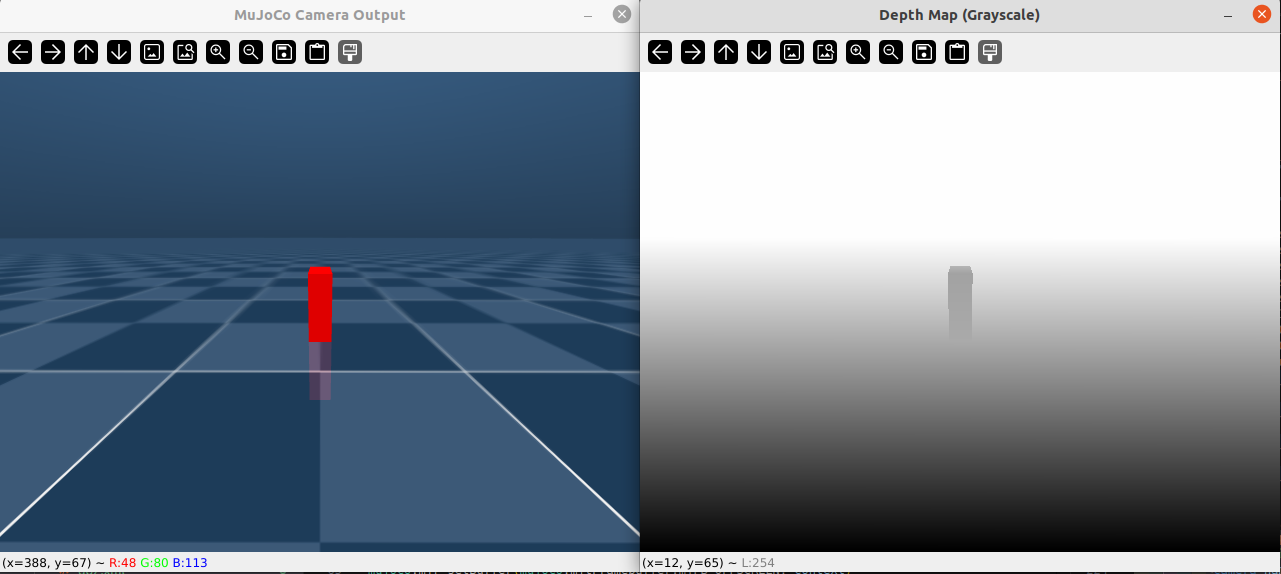
这样就直接解决了mujoco深度图像的问题,测试完成
2025.8.8
--- 2.3.13 ---
记住如果在xml里面额外添加body的话,是会影响到后面的qpos和qvel的维度的,因为每一个实体都含有[x,y,z,q0,q1,q2,q3]这7个维度的,且顺序是先后顺序的,比如前面定义了一个19自由度的机械狗,那么狗的位姿为7维,物体的位姿为7维,总共就会变成7+19+7=33维。。这一点需要注意

--- 2.3.14 --- 关节顺序
.xml文件中

这个顺序将会是你在mujoco平台上调用的顺序,即qpos的依次顺序。
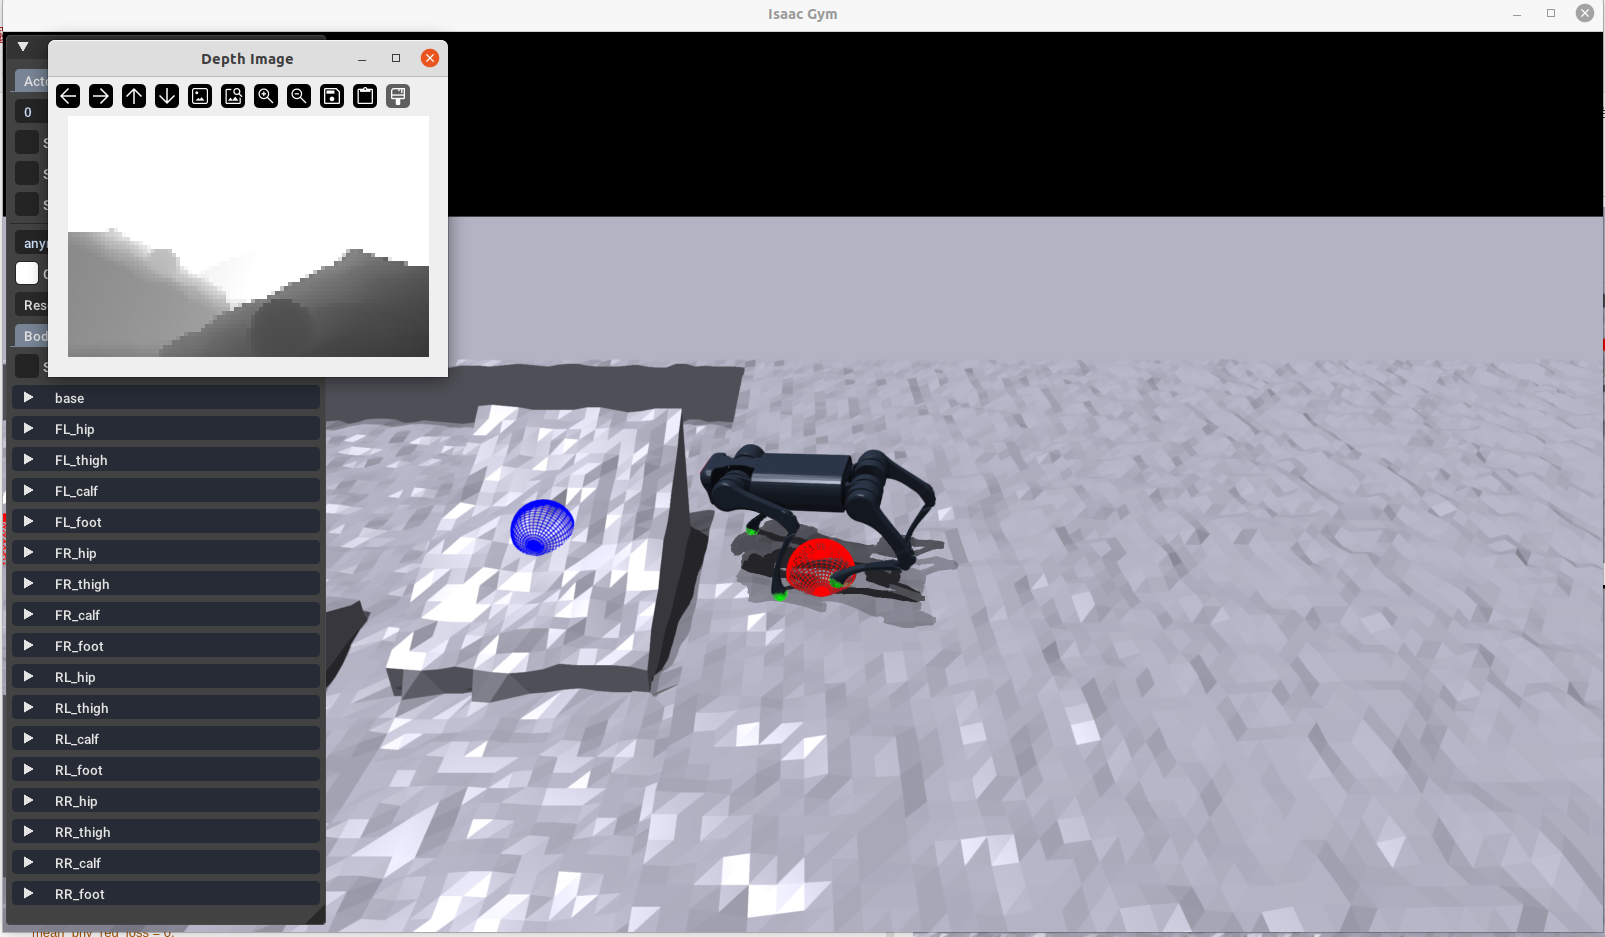
--- 2.3.15 --- 深度图像数据
isaac 里面的深度图像格式及大概数据

mujoco 里面的深度图像及大概数据
不过我发现了个问题,就是很奇怪为什么原作者要减去一个0.5,猜测是为了将图像零中心化。

3. 后记
To be continued.......

 浙公网安备 33010602011771号