SpringBoot启动流程及自动装配原理分析
一、SpringApplication类初始化过程
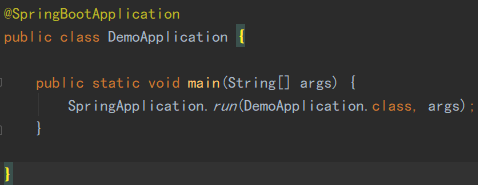
SpringBoot项目的main函数
常规的这个主类如下图所示,我们一般会这样去写。
在这个类中需要关注的是:
- @SpringBootApplication
- SpringApplication.run()
关于 @SpringBootApplication 注解,在后面分析SpringBoot自动装配的章节会展开去分析。
本章节中我们需要关注的就是 SpringApplication.run() 方法。
查看run()方法的实现,如下面代码所示,我们发现其首先是创建了 SpringApplication 的实例,然后调用了 SpringApplication 的run()方法,那本章我们关注的就是 SpringApplication 创建实例的过程。
public static ConfigurableApplicationContext run(Class<?>[] primarySources, String[] args) {
    return (new SpringApplication(primarySources)).run(args);
}
SpringApplication() 构造方法
继续查看源码, SpringApplication 实例化过程,首先是进入构造方法,最终回来到两个参数的构造方法。
public SpringApplication(Class<?>... primarySources) {
    this((ResourceLoader)null, primarySources);
}

public SpringApplication(ResourceLoader resourceLoader, Class<?>... primarySources) {
    this.sources = new LinkedHashSet();
    this.bannerMode = Mode.CONSOLE;
    this.logStartupInfo = true;
    this.addCommandLineProperties = true;
    this.addConversionService = true;
    this.headless = true;
    this.registerShutdownHook = true;
    this.additionalProfiles = new HashSet();
    this.isCustomEnvironment = false;
    this.lazyInitialization = false;
    this.resourceLoader = resourceLoader;
    Assert.notNull(primarySources, "PrimarySources must not be null");
    this.primarySources = new LinkedHashSet(Arrays.asList(primarySources));
    //推断应用类型,后面会根据类型初始化对应的环境。常用的一般都是servlet环境
    this.webApplicationType = WebApplicationType.deduceFromClasspath();
    //初始化classpath下 META-INF/spring.factories中已配置的ApplicationContextInitializer
    this.setInitializers(this.getSpringFactoriesInstances(ApplicationContextInitializer.class));
    //初始化classpath下所有已配置的 ApplicationListener
    this.setListeners(this.getSpringFactoriesInstances(ApplicationListener.class));
    //根据调用栈,推断出 main 方法的类名
    this.mainApplicationClass = this.deduceMainApplicationClass();
}
WebApplicationType.deduceFromClasspath();该方法推断应用的类型。 SERVLET REACTIVE NONE
public enum WebApplicationType {
    NONE,
    SERVLET,
    REACTIVE;

    // 常量值
    private static final String[] SERVLET_INDICATOR_CLASSES = new String[]{"javax.servlet.Servlet", "org.springframework.web.context.ConfigurableWebApplicationContext"};
    private static final String WEBMVC_INDICATOR_CLASS = "org.springframework.web.servlet.DispatcherServlet";
    private static final String WEBFLUX_INDICATOR_CLASS = "org.springframework.web.reactive.DispatcherHandler";
    private static final String JERSEY_INDICATOR_CLASS = "org.glassfish.jersey.servlet.ServletContainer";
    private static final String SERVLET_APPLICATION_CONTEXT_CLASS = "org.springframework.web.context.WebApplicationContext";
    private static final String REACTIVE_APPLICATION_CONTEXT_CLASS = "org.springframework.boot.web.reactive.context.ReactiveWebApplicationContext";

    private WebApplicationType() {
    }

    /**
     * 判断 应用的类型
     * NONE: 应用程序不是web应用,也不应该用web服务器去启动
     * SERVLET: 应用程序应作为基于servlet的web应用程序运行,并应启动嵌入式servlet web(tomcat)服务器。
     * REACTIVE: 应用程序应作为 reactive web应用程序运行,并应启动嵌入式 reactive web服务器。
     * @return
     */
    static WebApplicationType deduceFromClasspath() {
         //classpath下必须存在org.springframework.web.reactive.DispatcherHandler
        if (ClassUtils.isPresent("org.springframework.web.reactive.DispatcherHandler", (ClassLoader)null) && !ClassUtils.isPresent("org.springframework.web.servlet.DispatcherServlet", (ClassLoader)null) && !ClassUtils.isPresent("org.glassfish.jersey.servlet.ServletContainer", (ClassLoader)null)) {
            return REACTIVE;
        } else {
            String[] var0 = SERVLET_INDICATOR_CLASSES;
            int var1 = var0.length;

            for(int var2 = 0; var2 < var1; ++var2) {
                String className = var0[var2];
                if (!ClassUtils.isPresent(className, (ClassLoader)null)) {
                    return NONE;
                }
            }
            //classpath环境下存在javax.servlet.Servlet或者org.springframework.web.context.ConfigurableWebApplicationContext
            return SERVLET;
        }
    }

    static WebApplicationType deduceFromApplicationContext(Class<?> applicationContextClass) {
        if (isAssignable("org.springframework.web.context.WebApplicationContext", applicationContextClass)) {
            return SERVLET;
        } else {
            return isAssignable("org.springframework.boot.web.reactive.context.ReactiveWebApplicationContext", applicationContextClass) ? REACTIVE : NONE;
        }
    }

    private static boolean isAssignable(String target, Class<?> type) {
        try {
            return ClassUtils.resolveClassName(target, (ClassLoader)null).isAssignableFrom(type);
        } catch (Throwable var3) {
            return false;
        }
    }
}
返回类型是WebApplicationType的枚举类型, WebApplicationType 有三个枚举,三个枚举的解释如下:
- WebApplicationType.REACTIVE classpath下存在org.springframework.web.reactive.DispatcherHandler
- WebApplicationType.SERVLET classpath下存在javax.servlet.Servlet或者org.springframework.web.context.ConfigurableWebApplicationContext
- WebApplicationType.NONE 不满足以上条件。
setInitializers((Collection) getSpringFactoriesInstances(ApplicationContextInitializer.class));
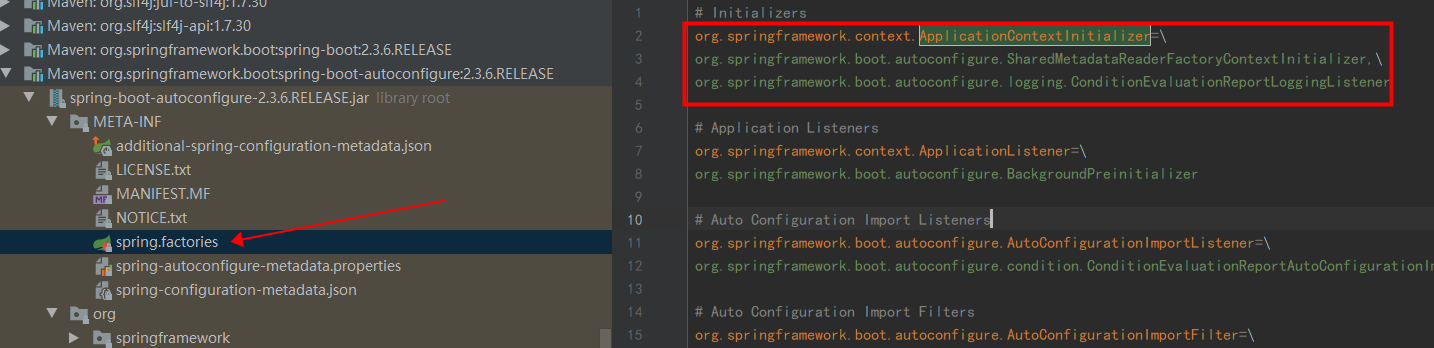
初始化classpath下 META-INF/spring.factories中已配置的ApplicationContextInitializer。
private <T> Collection<T> getSpringFactoriesInstances(Class<T> type) {
    return this.getSpringFactoriesInstances(type, new Class[0]);
}

/**
 * 通过指定的classloader 从META-INF/spring.factories获取指定的Spring的工厂实例
 * @param type
 * @param parameterTypes
 * @param args
 * @param <T>
 * @return
 */
private <T> Collection<T> getSpringFactoriesInstances(Class<T> type, Class<?>[] parameterTypes, Object... args) {
    ClassLoader classLoader = this.getClassLoader();
    //通过指定的classLoader从 META-INF/spring.factories 的资源文件中,
    //读取 key 为 type.getName() 的 value
    Set<String> names = new LinkedHashSet(SpringFactoriesLoader.loadFactoryNames(type, classLoader));
    //创建Spring工厂实例
    List<T> instances = this.createSpringFactoriesInstances(type, parameterTypes, classLoader, args, names);
    //对Spring工厂实例排序(org.springframework.core.annotation.Order注解指定的顺序)
    AnnotationAwareOrderComparator.sort(instances);
    return instances;
}
看看 getSpringFactoriesInstances 都干了什么,看源码,有一个方法很重要 loadFactoryNames() 这个方法很重要,它是spring-core中提供的从META-INF/spring.factories中获取指定的类(key)的同一入口方法。
在这里,获取的是key为 org.springframework.context.ApplicationContextInitializer 的类。
ApplicationContextInitializer 是Spring框架的类, 这个类的主要目的就是在ConfigurableApplicationContext调用refresh()方法之前,回调这个类的initialize方法。通过ConfigurableApplicationContext 的实例获取容器的环境Environment,从而实现对配置文件的修改完善等工作。
setListeners(this.getSpringFactoriesInstances(ApplicationListener.class));
初始化classpath下 META-INF/spring.factories中已配置的 ApplicationListener。
ApplicationListener 的加载过程和上面的 ApplicationContextInitializer 类的加载过程是一样的。不多说了,至于 ApplicationListener 是spring的事件监听器,典型的观察者模式,通过 ApplicationEvent 类和 ApplicationListener 接口,可以实现对spring容器全生命周期的监听,当然也可以自定义监听事件。
二、SpringApplication的run方法
run方法的源码
/**
 * 运行spring应用,并刷新一个新的 ApplicationContext(Spring的上下文)
 * ConfigurableApplicationContext 是 ApplicationContext 接口的子接口。在 ApplicationContext
 * 基础上增加了配置上下文的工具。 ConfigurableApplicationContext是容器的高级接口
 */
public ConfigurableApplicationContext run(String... args) {
    //记录程序运行时间
    StopWatch stopWatch = new StopWatch();
    stopWatch.start();
    // ConfigurableApplicationContext Spring 的上下文
    ConfigurableApplicationContext context = null;
    Collection<SpringBootExceptionReporter> exceptionReporters = new ArrayList();
    this.configureHeadlessProperty();
    //从META-INF/spring.factories中获取监听器
    //1、获取并启动监听器
    SpringApplicationRunListeners listeners = this.getRunListeners(args);
    listeners.starting();

    Collection exceptionReporters;
    try {
        ApplicationArguments applicationArguments = new DefaultApplicationArguments(args);
        //2、构造应用上下文环境
        ConfigurableEnvironment environment = this.prepareEnvironment(listeners, applicationArguments);
        //处理需要忽略的Bean
        this.configureIgnoreBeanInfo(environment);
        //打印banner
        Banner printedBanner = this.printBanner(environment);
        //3、初始化应用上下文
        context = this.createApplicationContext();
        //实例化SpringBootExceptionReporter.class,用来支持报告关于启动的错误
        exceptionReporters = this.getSpringFactoriesInstances(SpringBootExceptionReporter.class, new Class[]{ConfigurableApplicationContext.class}, context);
        //4、刷新应用上下文前的准备阶段
        this.prepareContext(context, environment, listeners, applicationArguments, printedBanner);
        //5、刷新应用上下文
        this.refreshContext(context);
        //刷新应用上下文后的扩展接口
        this.afterRefresh(context, applicationArguments);
        //时间记录停止
        stopWatch.stop();
        if (this.logStartupInfo) {
            (new StartupInfoLogger(this.mainApplicationClass)).logStarted(this.getApplicationLog(), stopWatch);
        }
        //发布容器启动完成事件
        listeners.started(context);
        this.callRunners(context, applicationArguments);
    } catch (Throwable var10) {
        this.handleRunFailure(context, var10, exceptionReporters, listeners);
        throw new IllegalStateException(var10);
    }

    try {
        listeners.running(context);
        return context;
    } catch (Throwable var9) {
        this.handleRunFailure(context, var9, exceptionReporters, (SpringApplicationRunListeners)null);
        throw new IllegalStateException(var9);
    }
}
具体的每一行代码的含义请看注释,我们在这先总结一下启动过程中的重要步骤:
第一步:获取并启动监听器
第二步:构造应用上下文环境
第三步:初始化应用上下文
第四步:刷新应用上下文前的准备阶段
第五步:刷新应用上下文
第六步:刷新应用上下文后的扩展接口
OK,下面SpringBoot的启动流程分析,我们就根据这6大步骤进行详细解读。最重要的是第四,五步。我们会着重的分析。
第一步:获取并启动监听器
事件机制在Spring是很重要的一部分内容,通过事件机制我们可以监听Spring容器中正在发生的一些事件,同样也可以自定义监听事件。Spring的事件为Bean和Bean之间的消息传递提供支持。当一个对象处理完某种任务后,通知另外的对象进行某些处理,常用的场景有进行某些操作后发送通知,消息、邮件等情况。
private SpringApplicationRunListeners getRunListeners(String[] args) {
    Class<?>[] types = new Class<?>[]{SpringApplication.class, String[].class};
    return new SpringApplicationRunListeners(logger, getSpringFactoriesInstances(
            SpringApplicationRunListener.class, types, this, args));
}
在这里面是不是看到一个熟悉的方法:getSpringFactoriesInstances(),可以看下下面的注释,前面我们已经详细介绍过该方法是怎么一步步的获取到META-INF/spring.factories中的指定的key的value,获取到以后怎么实例化类的。
private <T> Collection<T> getSpringFactoriesInstances(Class<T> type, Class<?>[] parameterTypes, Object... args) {
    ClassLoader classLoader = this.getClassLoader();
    //通过指定的classLoader从 META-INF/spring.factories 的资源文件中,
    //读取 key 为 type.getName() 的 value
    Set<String> names = new LinkedHashSet(SpringFactoriesLoader.loadFactoryNames(type, classLoader));
    //创建Spring工厂实例
    List<T> instances = this.createSpringFactoriesInstances(type, parameterTypes, classLoader, args, names);
    //对Spring工厂实例排序(org.springframework.core.annotation.Order注解指定的顺序)
    AnnotationAwareOrderComparator.sort(instances);
    return instances;
}
回到run方法,debug这个代码 SpringApplicationRunListeners listeners = getRunListeners(args); 获取的是EventPublishingRunListener监听器:
EventPublishingRunListener监听器是Spring容器的启动监听器。
listeners.starting(); 开启了监听事件。
第二步:构造应用上下文环境
应用上下文环境包括什么呢?包括计算机的环境,Java环境,Spring的运行环境,Spring项目的配置(在SpringBoot中就是那个熟悉的application.properties/yml)等等。
首先看一下prepareEnvironment()方法。
private ConfigurableEnvironment prepareEnvironment(SpringApplicationRunListeners listeners, ApplicationArguments applicationArguments) {
    //创建并配置相应的环境
    ConfigurableEnvironment environment = this.getOrCreateEnvironment();
    //根据用户配置,配置 environment系统环境
    this.configureEnvironment((ConfigurableEnvironment)environment, applicationArguments.getSourceArgs());
    ConfigurationPropertySources.attach((Environment)environment);
    // 启动相应的监听器,其中一个重要的监听器 ConfigFileApplicationListener 就是加载项目配置文件的监听器。
    listeners.environmentPrepared((ConfigurableEnvironment)environment);
    this.bindToSpringApplication((ConfigurableEnvironment)environment);
    if (!this.isCustomEnvironment) {
        environment = (new EnvironmentConverter(this.getClassLoader())).convertEnvironmentIfNecessary((ConfigurableEnvironment)environment, this.deduceEnvironmentClass());
    }

    ConfigurationPropertySources.attach((Environment)environment);
    return (ConfigurableEnvironment)environment;
}
看上面的注释,方法中主要完成的工作,首先是创建并按照相应的应用类型配置相应的环境,然后根据用户的配置,配置系统环境,然后启动监听器,并加载系统配置文件。
ConfigurableEnvironment environment = getOrCreateEnvironment();
private ConfigurableEnvironment getOrCreateEnvironment() {
    if (this.environment != null) {
        return this.environment;
    } else {
        switch(this.webApplicationType) {
        case SERVLET:
            //如果应用类型是 SERVLET 则实例化 StandardServletEnvironment
            return new StandardServletEnvironment();
        case REACTIVE:
            return new StandardReactiveWebEnvironment();
        default:
            return new StandardEnvironment();
        }
    }
}
通过代码可以看到根据不同的应用类型初始化不同的系统环境实例。前面咱们已经说过应用类型是怎么判断的了,这里就不在赘述了。

从上面的继承关系可以看出,StandardServletEnvironment是StandardEnvironment的子类。当是web项目的时候,环境上会多一些关于web环境的配置。
configureEnvironment(environment, applicationArguments.getSourceArgs());
protected void configureEnvironment(ConfigurableEnvironment environment, String[] args) {
    if (this.addConversionService) {
        ConversionService conversionService = ApplicationConversionService.getSharedInstance();
        environment.setConversionService((ConfigurableConversionService)conversionService);
    }
    // 将main 函数的args封装成 SimpleCommandLinePropertySource 加入环境中。
    this.configurePropertySources(environment, args);
     // 激活相应的配置文件
    this.configureProfiles(environment, args);
}
在configurePropertySources(environment, args);中将args封装成了SimpleCommandLinePropertySource并加入到了environment中。
configureProfiles(environment, args);根据启动参数激活了相应的配置文件。
listeners.environmentPrepared(environment);
进入到方法一路跟下去就到了SimpleApplicationEventMulticaster类的multicastEvent()方法。
public void multicastEvent(ApplicationEvent event, @Nullable ResolvableType eventType) {
    ResolvableType type = eventType != null ? eventType : this.resolveDefaultEventType(event);
    Executor executor = this.getTaskExecutor();
    Iterator var5 = this.getApplicationListeners(event, type).iterator();

    while(var5.hasNext()) {
        ApplicationListener<?> listener = (ApplicationListener)var5.next();
        if (executor != null) {
            executor.execute(() -> {
                this.invokeListener(listener, event);
            });
        } else {
            this.invokeListener(listener, event);
        }
    }

}
查看getApplicationListeners(event, type)执行结果,发现一个重要的监听器ConfigFileApplicationListener。
先看看这个类的注释:
/**
 * {@link EnvironmentPostProcessor} that configures the context environment by loading
 * properties from well known file locations. By default properties will be loaded from
 * 'application.properties' and/or 'application.yml' files in the following locations:
 * <ul>
 * <li>classpath:</li>
 * <li>file:./</li>
 * <li>classpath:config/</li>
 * <li>file:./config/:</li>
 * </ul>
 * <p>
 * Alternative search locations and names can be specified using
 * {@link #setSearchLocations(String)} and {@link #setSearchNames(String)}.
 * <p>
 * Additional files will also be loaded based on active profiles. For example if a 'web'
 * profile is active 'application-web.properties' and 'application-web.yml' will be
 * considered.
 * <p>
 * The 'spring.config.name' property can be used to specify an alternative name to load
 * and the 'spring.config.location' property can be used to specify alternative search
 * locations or specific files.
 * <p>
 * 从默认的位置加载配置文件,并将其加入 上下文的 environment变量中
 */
这个监听器默认的从注释中<ul>标签所示的几个位置加载配置文件,并将其加入 上下文的 environment变量中。当然也可以通过配置指定。
第三步:初始化应用上下文
在SpringBoot工程中,应用类型分为三种,如下代码所示。
public enum WebApplicationType {
    /**
     * 应用程序不是web应用,也不应该用web服务器去启动
     */
    NONE,
    /**
     * 应用程序应作为基于servlet的web应用程序运行,并应启动嵌入式servlet web(tomcat)服务器。
     */
    SERVLET,
    /**
     * 应用程序应作为 reactive web应用程序运行,并应启动嵌入式 reactive web服务器。
     */
    REACTIVE
}
对应三种应用类型,SpringBoot项目有三种对应的应用上下文,我们以web工程为例,即其上下文为AnnotationConfigServletWebServerApplicationContext。
 protected ConfigurableApplicationContext createApplicationContext() {
        Class<?> contextClass = this.applicationContextClass;
        if (contextClass == null) {
            try {
                switch(this.webApplicationType) {
                case SERVLET:
                    contextClass = Class.forName("org.springframework.boot.web.servlet.context.AnnotationConfigServletWebServerApplicationContext");
                    break;
                case REACTIVE:
                    contextClass = Class.forName("org.springframework.boot.web.reactive.context.AnnotationConfigReactiveWebServerApplicationContext");
                    break;
                default:
                    contextClass = Class.forName("org.springframework.context.annotation.AnnotationConfigApplicationContext");
                }
            } catch (ClassNotFoundException var3) {
                throw new IllegalStateException("Unable create a default ApplicationContext, please specify an ApplicationContextClass", var3);
            }
        }

        return (ConfigurableApplicationContext)BeanUtils.instantiateClass(contextClass);
    }
我们先看一下AnnotationConfigServletWebServerApplicationContext的设计。
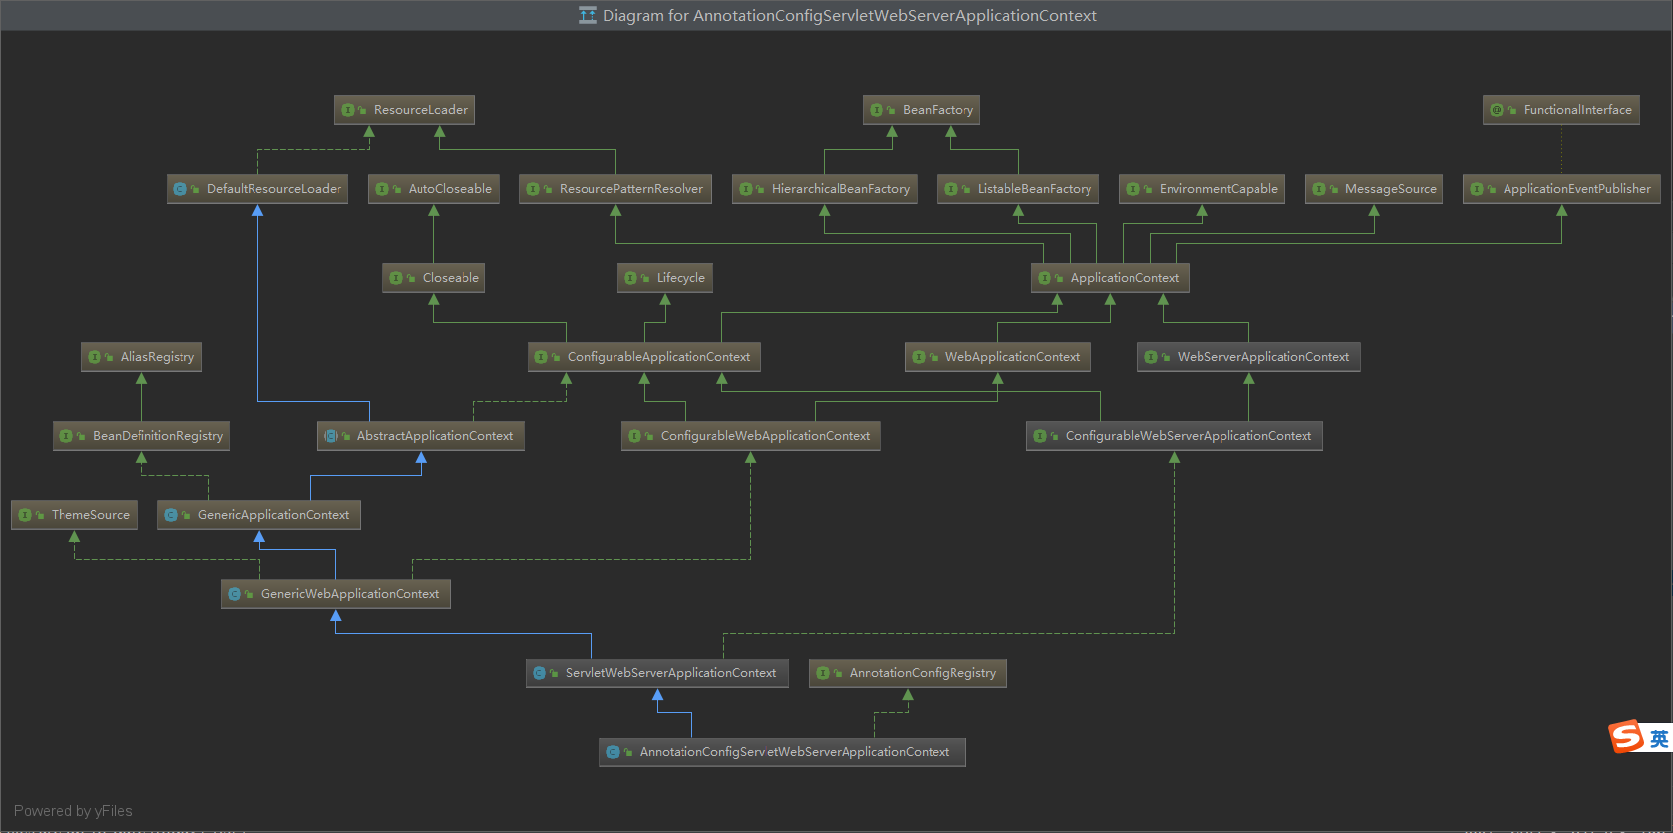
应用上下文可以理解成IoC容器的高级表现形式,应用上下文确实是在IoC容器的基础上丰富了一些高级功能。
应用上下文对IoC容器是持有的关系。它的一个属性beanFactory就是IoC容器(DefaultListableBeanFactory)。所以它们之间是持有,和扩展的关系。
接下来看GenericApplicationContext类
public class GenericApplicationContext extends AbstractApplicationContext implements BeanDefinitionRegistry {
    private final DefaultListableBeanFactory beanFactory;
    ...
    public GenericApplicationContext() {
        this.beanFactory = new DefaultListableBeanFactory();
    }
    ...
}
beanFactory正是在AnnotationConfigServletWebServerApplicationContext实现的接口GenericApplicationContext中定义的。在上面createApplicationContext()方法中的, BeanUtils.instantiateClass(contextClass) 这个方法中,不但初始化了AnnotationConfigServletWebServerApplicationContext类,也就是我们的上下文context,同样也触发了GenericApplicationContext类的构造函数,从而IoC容器也创建了。仔细看他的构造函数,有没有发现一个很熟悉的类DefaultListableBeanFactory,没错,DefaultListableBeanFactory就是IoC容器真实面目了。在后面的refresh()方法分析中,DefaultListableBeanFactory是无处不在的存在感。
第四步 刷新应用上下文前的准备阶段
prepareContext()方法
private void prepareContext(ConfigurableApplicationContext context, ConfigurableEnvironment environment, SpringApplicationRunListeners listeners, ApplicationArguments applicationArguments, Banner printedBanner) {
    //设置容器环境
    context.setEnvironment(environment);
    //执行容器后置处理
    this.postProcessApplicationContext(context);
    //执行容器中的 ApplicationContextInitializer 包括spring.factories和通过三种方式自定义的
    this.applyInitializers(context);
    //向各个监听器发送容器已经准备好的事件
    listeners.contextPrepared(context);
    if (this.logStartupInfo) {
        this.logStartupInfo(context.getParent() == null);
        this.logStartupProfileInfo(context);
    }

    ConfigurableListableBeanFactory beanFactory = context.getBeanFactory();
    //将main函数中的args参数封装成单例Bean,注册进容器
    beanFactory.registerSingleton("springApplicationArguments", applicationArguments);
    //将 printedBanner 也封装成单例,注册进容器
    if (printedBanner != null) {
        beanFactory.registerSingleton("springBootBanner", printedBanner);
    }

    if (beanFactory instanceof DefaultListableBeanFactory) {
        ((DefaultListableBeanFactory)beanFactory).setAllowBeanDefinitionOverriding(this.allowBeanDefinitionOverriding);
    }

    if (this.lazyInitialization) {
        context.addBeanFactoryPostProcessor(new LazyInitializationBeanFactoryPostProcessor());
    }

    Set<Object> sources = this.getAllSources();
    Assert.notEmpty(sources, "Sources must not be empty");
    //加载我们的启动类,将启动类注入容器
    this.load(context, sources.toArray(new Object[0]));
    //发布容器已加载事件
    listeners.contextLoaded(context);
}
首先看这行 Set<Object> sources = getAllSources(); 在getAllSources()中拿到了我们的启动类。
我们重点讲解这行 load(context, sources.toArray(new Object[0]));
跟进load()方法,看源码:
protected void load(ApplicationContext context, Object[] sources) {
    if (logger.isDebugEnabled()) {
        logger.debug("Loading source " + StringUtils.arrayToCommaDelimitedString(sources));
    }
    //创建 BeanDefinitionLoader
    BeanDefinitionLoader loader = this.createBeanDefinitionLoader(this.getBeanDefinitionRegistry(context), sources);
    if (this.beanNameGenerator != null) {
        loader.setBeanNameGenerator(this.beanNameGenerator);
    }

    if (this.resourceLoader != null) {
        loader.setResourceLoader(this.resourceLoader);
    }

    if (this.environment != null) {
        loader.setEnvironment(this.environment);
    }

    loader.load();
}
1、getBeanDefinitionRegistry()
继续看getBeanDefinitionRegistry()方法的源码
private BeanDefinitionRegistry getBeanDefinitionRegistry(ApplicationContext context) {
    if (context instanceof BeanDefinitionRegistry) {
        return (BeanDefinitionRegistry)context;
    } else if (context instanceof AbstractApplicationContext) {
        return (BeanDefinitionRegistry)((AbstractApplicationContext)context).getBeanFactory();
    } else {
        throw new IllegalStateException("Could not locate BeanDefinitionRegistry");
    }
}
这里将我们前文创建的上下文强转为BeanDefinitionRegistry,是不是很熟悉。BeanDefinitionRegistry定义了很重要的方法registerBeanDefinition(),该方法将BeanDefinition注册进DefaultListableBeanFactory容器的beanDefinitionMap中。
2、createBeanDefinitionLoader()
继续看createBeanDefinitionLoader()方法,最终进入了BeanDefinitionLoader类的构造方法,如下
BeanDefinitionLoader(BeanDefinitionRegistry registry, Object... sources) {
    Assert.notNull(registry, "Registry must not be null");
    Assert.notEmpty(sources, "Sources must not be empty");
    this.sources = sources;
    //注解形式的Bean定义读取器 比如:@Configuration @Bean @Component @Controller @Service等等
    this.annotatedReader = new AnnotatedBeanDefinitionReader(registry);
    //XML形式的Bean定义读取器
    this.xmlReader = new XmlBeanDefinitionReader(registry);
    if (this.isGroovyPresent()) {
        this.groovyReader = new GroovyBeanDefinitionReader(registry);
    }
    //类路径扫描器
    this.scanner = new ClassPathBeanDefinitionScanner(registry);
    //扫描器添加排除过滤器
    this.scanner.addExcludeFilter(new BeanDefinitionLoader.ClassExcludeFilter(sources));
}
前面的文章,我们说过,IoC容器的初始化分为三个步骤,上面三个属性在,BeanDefinition的Resource定位,和BeanDefinition的注册中起到了很重要的作用。
3、loader.load();
跟进load()方法
private int load(Object source) {
    Assert.notNull(source, "Source must not be null");
    if (source instanceof Class) {
        // 从Class加载
        return this.load((Class)source);
    } else if (source instanceof Resource) {
        // 从Resource加载
        return this.load((Resource)source);
    } else if (source instanceof Package) {
        // 从Package加载
        return this.load((Package)source);
    } else if (source instanceof CharSequence) {
        // 从 CharSequence 加载
        return this.load((CharSequence)source);
    } else {
        throw new IllegalArgumentException("Invalid source type " + source.getClass());
    }
}
当前我们的主类会按Class加载。
继续跟进load()方法。
private int load(Class<?> source) {
    if (this.isGroovyPresent() && BeanDefinitionLoader.GroovyBeanDefinitionSource.class.isAssignableFrom(source)) {
        BeanDefinitionLoader.GroovyBeanDefinitionSource loader = (BeanDefinitionLoader.GroovyBeanDefinitionSource)BeanUtils.instantiateClass(source, BeanDefinitionLoader.GroovyBeanDefinitionSource.class);
        this.load(loader);
    }

    if (this.isEligible(source)) {
        //将 启动类的 BeanDefinition注册进 beanDefinitionMap
        this.annotatedReader.register(new Class[]{source});
        return 1;
    } else {
        return 0;
    }
}
isComponent(source)判断主类是不是存在@Component注解,主类@SpringBootApplication是一个组合注解,包含@Component。
this.annotatedReader.register(source);跟进register()方法,最终进到AnnotatedBeanDefinitionReader类的doRegisterBean()方法。
private <T> void doRegisterBean(Class<T> beanClass, @Nullable String name, @Nullable Class<? extends Annotation>[] qualifiers, @Nullable Supplier<T> supplier, @Nullable BeanDefinitionCustomizer[] customizers) {
    //将指定的类 封装为AnnotatedGenericBeanDefinition
    AnnotatedGenericBeanDefinition abd = new AnnotatedGenericBeanDefinition(beanClass);
    if (!this.conditionEvaluator.shouldSkip(abd.getMetadata())) {
        abd.setInstanceSupplier(supplier);
        // 获取该类的 scope 属性
        ScopeMetadata scopeMetadata = this.scopeMetadataResolver.resolveScopeMetadata(abd);
        abd.setScope(scopeMetadata.getScopeName());
        String beanName = name != null ? name : this.beanNameGenerator.generateBeanName(abd, this.registry);
        AnnotationConfigUtils.processCommonDefinitionAnnotations(abd);
        int var10;
        int var11;
        if (qualifiers != null) {
            Class[] var9 = qualifiers;
            var10 = qualifiers.length;

            for(var11 = 0; var11 < var10; ++var11) {
                Class<? extends Annotation> qualifier = var9[var11];
                if (Primary.class == qualifier) {
                    abd.setPrimary(true);
                } else if (Lazy.class == qualifier) {
                    abd.setLazyInit(true);
                } else {
                    abd.addQualifier(new AutowireCandidateQualifier(qualifier));
                }
            }
        }

        if (customizers != null) {
            BeanDefinitionCustomizer[] var13 = customizers;
            var10 = customizers.length;

            for(var11 = 0; var11 < var10; ++var11) {
                BeanDefinitionCustomizer customizer = var13[var11];
                customizer.customize(abd);
            }
        }

        BeanDefinitionHolder definitionHolder = new BeanDefinitionHolder(abd, beanName);
        definitionHolder = AnnotationConfigUtils.applyScopedProxyMode(scopeMetadata, definitionHolder, this.registry);
        // 将该BeanDefinition注册到IoC容器的beanDefinitionMap中
        BeanDefinitionReaderUtils.registerBeanDefinition(definitionHolder, this.registry);
    }
}
在该方法中将主类封装成AnnotatedGenericBeanDefinition
BeanDefinitionReaderUtils.registerBeanDefinition(definitionHolder, this.registry);方法将BeanDefinition注册进beanDefinitionMap
public static void registerBeanDefinition(BeanDefinitionHolder definitionHolder, BeanDefinitionRegistry registry) throws BeanDefinitionStoreException {
    String beanName = definitionHolder.getBeanName();
    registry.registerBeanDefinition(beanName, definitionHolder.getBeanDefinition());
    // 注册别名
    String[] aliases = definitionHolder.getAliases();
    if (aliases != null) {
        String[] var4 = aliases;
        int var5 = aliases.length;

        for(int var6 = 0; var6 < var5; ++var6) {
            String alias = var4[var6];
            registry.registerAlias(beanName, alias);
        }
    }

}
继续跟进registerBeanDefinition()方法。
public void registerBeanDefinition(String beanName, BeanDefinition beanDefinition) throws BeanDefinitionStoreException {
    Assert.hasText(beanName, "Bean name must not be empty");
    Assert.notNull(beanDefinition, "BeanDefinition must not be null");
    if (beanDefinition instanceof AbstractBeanDefinition) {
        try {
            // 最后一次校验了
            // 对bean的Overrides进行校验,还不知道会在哪处理这些overrides
            ((AbstractBeanDefinition)beanDefinition).validate();
        } catch (BeanDefinitionValidationException var8) {
            throw new BeanDefinitionStoreException(beanDefinition.getResourceDescription(), beanName, "Validation of bean definition failed", var8);
        }
    }
    // 判断是否存在重复名字的bean,之后看允不允许override
    // 以前使用synchronized实现互斥访问,现在采用ConcurrentHashMap
    BeanDefinition existingDefinition = (BeanDefinition)this.beanDefinitionMap.get(beanName);
    if (existingDefinition != null) {
         //如果该类不允许 Overriding 直接抛出异常
        if (!this.isAllowBeanDefinitionOverriding()) {
            throw new BeanDefinitionOverrideException(beanName, beanDefinition, existingDefinition);
        }

        if (existingDefinition.getRole() < beanDefinition.getRole()) {
            if (this.logger.isInfoEnabled()) {
                this.logger.info("Overriding user-defined bean definition for bean '" + beanName + "' with a framework-generated bean definition: replacing [" + existingDefinition + "] with [" + beanDefinition + "]");
            }
        } else if (!beanDefinition.equals(existingDefinition)) {
            if (this.logger.isDebugEnabled()) {
                this.logger.debug("Overriding bean definition for bean '" + beanName + "' with a different definition: replacing [" + existingDefinition + "] with [" + beanDefinition + "]");
            }
        } else if (this.logger.isTraceEnabled()) {
            this.logger.trace("Overriding bean definition for bean '" + beanName + "' with an equivalent definition: replacing [" + existingDefinition + "] with [" + beanDefinition + "]");
        }
        //注册进beanDefinitionMap
        this.beanDefinitionMap.put(beanName, beanDefinition);
    } else {
        if (this.hasBeanCreationStarted()) {
            synchronized(this.beanDefinitionMap) {
                this.beanDefinitionMap.put(beanName, beanDefinition);
                List<String> updatedDefinitions = new ArrayList(this.beanDefinitionNames.size() + 1);
                updatedDefinitions.addAll(this.beanDefinitionNames);
                updatedDefinitions.add(beanName);
                this.beanDefinitionNames = updatedDefinitions;
                this.removeManualSingletonName(beanName);
            }
        } else {
            //如果仍处于启动注册阶段,注册进beanDefinitionMap
            this.beanDefinitionMap.put(beanName, beanDefinition);
            this.beanDefinitionNames.add(beanName);
            this.removeManualSingletonName(beanName);
        }

        this.frozenBeanDefinitionNames = null;
    }

    if (existingDefinition == null && !this.containsSingleton(beanName)) {
        if (this.isConfigurationFrozen()) {
            this.clearByTypeCache();
        }
    } else {
        this.resetBeanDefinition(beanName);
    }

}
最终来到DefaultListableBeanFactory类的registerBeanDefinition()方法,DefaultListableBeanFactory类还熟悉吗?DefaultListableBeanFactory是IoC容器的具体产品。
仔细看这个方法registerBeanDefinition(),首先会检查是否已经存在,如果存在并且不允许被覆盖则直接抛出异常。不存在的话就直接注册进beanDefinitionMap中。
第五步 刷新应用上下文(IoC容器的初始化过程)
IoC容器的初始化过程,主要分下面三步:
- BeanDefinition的Resource定位
- BeanDefinition的载入
- 向IoC容器注册BeanDefinition
从run方法的,refreshContext()方法一路跟下去,最终来到AbstractApplicationContext类的refresh()方法。
public void refresh() throws BeansException, IllegalStateException {
    synchronized(this.startupShutdownMonitor) {
         //刷新上下文环境
        this.prepareRefresh();
        //这里是在子类中启动 refreshBeanFactory() 的地方
        ConfigurableListableBeanFactory beanFactory = this.obtainFreshBeanFactory();
        //准备bean工厂,以便在此上下文中使用
        this.prepareBeanFactory(beanFactory);

        try {
            //设置 beanFactory 的后置处理
            this.postProcessBeanFactory(beanFactory);
            //调用 BeanFactory 的后处理器,这些处理器是在Bean 定义中向容器注册的
            this.invokeBeanFactoryPostProcessors(beanFactory);
            //注册Bean的后处理器,在Bean创建过程中调用
            this.registerBeanPostProcessors(beanFactory);
            //对上下文中的消息源进行初始化
            this.initMessageSource();
            //初始化上下文中的事件机制
            this.initApplicationEventMulticaster();
            //初始化其他特殊的Bean
            this.onRefresh();
            //检查监听Bean并且将这些监听Bean向容器注册
            this.registerListeners();
            //实例化所有的(non-lazy-init)单件
            this.finishBeanFactoryInitialization(beanFactory);
            //发布容器事件,结束Refresh过程
            this.finishRefresh();
        } catch (BeansException var9) {
            if (this.logger.isWarnEnabled()) {
                this.logger.warn("Exception encountered during context initialization - cancelling refresh attempt: " + var9);
            }

            this.destroyBeans();
            this.cancelRefresh(var9);
            throw var9;
        } finally {
            this.resetCommonCaches();
        }

    }
}
从以上代码中我们可以看到,refresh()方法中所作的工作也挺多,我们没办法面面俱到,主要根据IoC容器的初始化步骤和IoC依赖注入的过程进行分析,围绕以上两个过程,我们主要介绍重要的方法。
obtainFreshBeanFactory();
在启动流程的第三步:初始化应用上下文。中我们创建了应用的上下文,并触发了GenericApplicationContext类的构造方法如下所示,创建了beanFactory,也就是创建了DefaultListableBeanFactory类。
public GenericApplicationContext() {
    this.beanFactory = new DefaultListableBeanFactory();
}
关于obtainFreshBeanFactory()方法,其实就是拿到我们之前创建的beanFactory。
protected ConfigurableListableBeanFactory obtainFreshBeanFactory() {
    //刷新BeanFactory
    this.refreshBeanFactory();
    //获取beanFactory
    return this.getBeanFactory();
}
从上面代码可知,在该方法中主要做了三个工作,刷新beanFactory,获取beanFactory,返回beanFactory。
首先看一下refreshBeanFactory()方法,跟下去来到GenericApplicationContext类的refreshBeanFactory()发现也没做什么。
protected final void refreshBeanFactory() throws IllegalStateException {
    if (!this.refreshed.compareAndSet(false, true)) {
        throw new IllegalStateException("GenericApplicationContext does not support multiple refresh attempts: just call 'refresh' once");
    } else {
        this.beanFactory.setSerializationId(this.getId());
    }
}
AbstractApplicationContext类有两个子类实现了refreshBeanFactory(),但是在前面第三步初始化上下文的时候,实例化了GenericApplicationContext类,所以没有进入AbstractRefreshableApplicationContext中的refreshBeanFactory()方法。
this.refreshed.compareAndSet(false, true) ,这行代码在这里表示:GenericApplicationContext只允许刷新一次 。这行代码,很重要,不是在Spring中很重要,而是这行代码本身。首先看一下this.refreshed属性:
private final AtomicBoolean refreshed = new AtomicBoolean();
java J.U.C并发包中很重要的一个原子类AtomicBoolean。通过该类的compareAndSet()方法可以实现一段代码绝对只实现一次的功能。
prepareBeanFactory(beanFactory);
从字面意思上可以看出准备BeanFactory。
看代码,具体看看做了哪些准备工作。这个方法不是重点,看注释吧。
protected void prepareBeanFactory(ConfigurableListableBeanFactory beanFactory) {
    // 配置类加载器:默认使用当前上下文的类加载器
    beanFactory.setBeanClassLoader(this.getClassLoader());
    // 配置EL表达式:在Bean初始化完成,填充属性的时候会用到
    beanFactory.setBeanExpressionResolver(new StandardBeanExpressionResolver(beanFactory.getBeanClassLoader()));
    // 添加属性编辑器 PropertyEditor
    beanFactory.addPropertyEditorRegistrar(new ResourceEditorRegistrar(this, this.getEnvironment()));
    // 添加Bean的后置处理器
    beanFactory.addBeanPostProcessor(new ApplicationContextAwareProcessor(this));
    // 忽略装配以下指定的类
    beanFactory.ignoreDependencyInterface(EnvironmentAware.class);
    beanFactory.ignoreDependencyInterface(EmbeddedValueResolverAware.class);
    beanFactory.ignoreDependencyInterface(ResourceLoaderAware.class);
    beanFactory.ignoreDependencyInterface(ApplicationEventPublisherAware.class);
    beanFactory.ignoreDependencyInterface(MessageSourceAware.class);
    beanFactory.ignoreDependencyInterface(ApplicationContextAware.class);
     // 将以下类注册到 beanFactory(DefaultListableBeanFactory) 的resolvableDependencies属性中
    beanFactory.registerResolvableDependency(BeanFactory.class, beanFactory);
    beanFactory.registerResolvableDependency(ResourceLoader.class, this);
    beanFactory.registerResolvableDependency(ApplicationEventPublisher.class, this);
    beanFactory.registerResolvableDependency(ApplicationContext.class, this);
    // 将早期后处理器注册为application监听器,用于检测内部bean
    beanFactory.addBeanPostProcessor(new ApplicationListenerDetector(this));
    // 如果当前BeanFactory包含loadTimeWeaver Bean,说明存在类加载期织入AspectJ,
    // 则把当前BeanFactory交给类加载期BeanPostProcessor实现类LoadTimeWeaverAwareProcessor来处理,
    // 从而实现类加载期织入AspectJ的目的。
    if (beanFactory.containsBean("loadTimeWeaver")) {
        beanFactory.addBeanPostProcessor(new LoadTimeWeaverAwareProcessor(beanFactory));
        beanFactory.setTempClassLoader(new ContextTypeMatchClassLoader(beanFactory.getBeanClassLoader()));
    }
    // 将当前环境变量(environment) 注册为单例bean
    if (!beanFactory.containsLocalBean("environment")) {
        beanFactory.registerSingleton("environment", this.getEnvironment());
    }
    // 将当前系统配置(systemProperties) 注册为单例Bean
    if (!beanFactory.containsLocalBean("systemProperties")) {
        beanFactory.registerSingleton("systemProperties", this.getEnvironment().getSystemProperties());
    }
    // 将当前系统环境 (systemEnvironment) 注册为单例Bean
    if (!beanFactory.containsLocalBean("systemEnvironment")) {
        beanFactory.registerSingleton("systemEnvironment", this.getEnvironment().getSystemEnvironment());
    }

}
postProcessBeanFactory(beanFactory);
postProcessBeanFactory()方法向上下文中添加了一系列的Bean的后置处理器。后置处理器工作的时机是在所有的beanDenifition加载完成之后,bean实例化之前执行。简单来说Bean的后置处理器可以修改BeanDefinition的属性信息。
invokeBeanFactoryPostProcessors(beanFactory);(重点)
上面说过,IoC容器的初始化过程包括三个步骤,在invokeBeanFactoryPostProcessors()方法中完成了IoC容器初始化过程的三个步骤。
第一步:Resource定位
在SpringBoot中,我们都知道他的包扫描是从主类所在的包开始扫描的,prepareContext()方法中,会先将主类解析成BeanDefinition,然后在refresh()方法的invokeBeanFactoryPostProcessors()方法中解析主类的BeanDefinition获取basePackage的路径。这样就完成了定位的过程。其次SpringBoot的各种starter是通过SPI扩展机制实现的自动装配,SpringBoot的自动装配同样也是在invokeBeanFactoryPostProcessors()方法中实现的。还有一种情况,在SpringBoot中有很多的@EnableXXX注解,细心点进去看的应该就知道其底层是@Import注解,在invokeBeanFactoryPostProcessors()方法中也实现了对该注解指定的配置类的定位加载。
常规的在SpringBoot中有三种实现定位,第一个是主类所在包的,第二个是SPI扩展机制实现的自动装配(比如各种starter),第三种就是@Import注解指定的类。
第二步:BeanDefinition的载入
第一步中说了三种Resource的定位情况,定位后紧接着就是BeanDefinition的分别载入。所谓的载入就是通过上面的定位得到的basePackage,SpringBoot会将该路径拼接成:classpath*:org/springframework/boot/demo/**/*.class这样的形式,然后一个叫做PathMatchingResourcePatternResolver的类会将该路径下所有的.class文件都加载进来,然后遍历判断是不是有@Component注解,如果有的话,就是我们要装载的BeanDefinition。大致过程就是这样的了。
注:@Configuration,@Controller,@Service等注解底层都是@Component注解,只不过包装了一层罢了。
第三个过程:注册BeanDefinition
这个过程通过调用上文提到的BeanDefinitionRegister接口的实现来完成。这个注册过程把载入过程中解析得到的BeanDefinition向IoC容器进行注册。通过上文的分析,我们可以看到,在IoC容器中将BeanDefinition注入到一个ConcurrentHashMap中,IoC容器就是通过这个HashMap来持有这些BeanDefinition数据的。比如DefaultListableBeanFactory 中的beanDefinitionMap属性。
OK,总结完了,接下来我们通过代码看看具体是怎么实现的。
protected void invokeBeanFactoryPostProcessors(ConfigurableListableBeanFactory beanFactory) {
    PostProcessorRegistrationDelegate.invokeBeanFactoryPostProcessors(beanFactory, getBeanFactoryPostProcessors());
    ...
}
// PostProcessorRegistrationDelegate类
public static void invokeBeanFactoryPostProcessors(
        ConfigurableListableBeanFactory beanFactory, List<BeanFactoryPostProcessor> beanFactoryPostProcessors) {
    ...
    invokeBeanDefinitionRegistryPostProcessors(currentRegistryProcessors, registry);
    ...
}
// PostProcessorRegistrationDelegate类
private static void invokeBeanDefinitionRegistryPostProcessors(
        Collection<? extends BeanDefinitionRegistryPostProcessor> postProcessors, BeanDefinitionRegistry registry) {

    for (BeanDefinitionRegistryPostProcessor postProcessor : postProcessors) {
        postProcessor.postProcessBeanDefinitionRegistry(registry);
    }
}
// ConfigurationClassPostProcessor类
@Override
public void postProcessBeanDefinitionRegistry(BeanDefinitionRegistry registry) {
    ...
    processConfigBeanDefinitions(registry);
}
// ConfigurationClassPostProcessor类
public void processConfigBeanDefinitions(BeanDefinitionRegistry registry) {
    ...
    do {
        parser.parse(candidates);
        parser.validate();
        ...
    }
    ...
}
一路跟踪调用栈,来到ConfigurationClassParser类的parse()方法。
public void parse(Set<BeanDefinitionHolder> configCandidates) {
    Iterator var2 = configCandidates.iterator();

    while(var2.hasNext()) {
        BeanDefinitionHolder holder = (BeanDefinitionHolder)var2.next();
        BeanDefinition bd = holder.getBeanDefinition();

        try {
            // 如果是SpringBoot项目进来的,bd其实就是前面主类封装成的 AnnotatedGenericBeanDefinition(AnnotatedBeanDefinition接口的实现类)
            if (bd instanceof AnnotatedBeanDefinition) {
                this.parse(((AnnotatedBeanDefinition)bd).getMetadata(), holder.getBeanName());
            } else if (bd instanceof AbstractBeanDefinition && ((AbstractBeanDefinition)bd).hasBeanClass()) {
                this.parse(((AbstractBeanDefinition)bd).getBeanClass(), holder.getBeanName());
            } else {
                this.parse(bd.getBeanClassName(), holder.getBeanName());
            }
        } catch (BeanDefinitionStoreException var6) {
            throw var6;
        } catch (Throwable var7) {
            throw new BeanDefinitionStoreException("Failed to parse configuration class [" + bd.getBeanClassName() + "]", var7);
        }
    }
    // 加载默认的配置---》(对springboot项目来说这里就是自动装配的入口了)
    this.deferredImportSelectorHandler.process();
}
看上面的注释,在前面的prepareContext()方法中,我们详细介绍了我们的主类是如何一步步的封装成AnnotatedGenericBeanDefinition,并注册进IoC容器的beanDefinitionMap中的。
继续沿着parse(((AnnotatedBeanDefinition) bd).getMetadata(), holder.getBeanName());方法跟下去
// ConfigurationClassParser类
protected final void parse(AnnotationMetadata metadata, String beanName) throws IOException {
    processConfigurationClass(new ConfigurationClass(metadata, beanName));
}
// ConfigurationClassParser类
protected void processConfigurationClass(ConfigurationClass configClass) throws IOException {
    ...
    // Recursively process the configuration class and its superclass hierarchy.
    //递归地处理配置类及其父类层次结构。
    SourceClass sourceClass = asSourceClass(configClass);
    do {
        //递归处理Bean,如果有父类,递归处理,直到顶层父类
        sourceClass = doProcessConfigurationClass(configClass, sourceClass);
    }
    while (sourceClass != null);

    this.configurationClasses.put(configClass, configClass);
}
// ConfigurationClassParser类
protected final SourceClass doProcessConfigurationClass(ConfigurationClass configClass, SourceClass sourceClass)
        throws IOException {

    // Recursively process any member (nested) classes first
    //首先递归处理内部类,(SpringBoot项目的主类一般没有内部类)
    processMemberClasses(configClass, sourceClass);

    // Process any @PropertySource annotations
    // 针对 @PropertySource 注解的属性配置处理
    for (AnnotationAttributes propertySource : AnnotationConfigUtils.attributesForRepeatable(
            sourceClass.getMetadata(), PropertySources.class,
            org.springframework.context.annotation.PropertySource.class)) {
        if (this.environment instanceof ConfigurableEnvironment) {
            processPropertySource(propertySource);
        } else {
            logger.warn("Ignoring @PropertySource annotation on [" + sourceClass.getMetadata().getClassName() +
                    "]. Reason: Environment must implement ConfigurableEnvironment");
        }
    }

    // Process any @ComponentScan annotations
    // 根据 @ComponentScan 注解,扫描项目中的Bean(SpringBoot 启动类上有该注解)
    Set<AnnotationAttributes> componentScans = AnnotationConfigUtils.attributesForRepeatable(
            sourceClass.getMetadata(), ComponentScans.class, ComponentScan.class);
    if (!componentScans.isEmpty() &&
            !this.conditionEvaluator.shouldSkip(sourceClass.getMetadata(), ConfigurationPhase.REGISTER_BEAN)) {
        for (AnnotationAttributes componentScan : componentScans) {
            // The config class is annotated with @ComponentScan -> perform the scan immediately
            // 立即执行扫描,(SpringBoot项目为什么是从主类所在的包扫描,这就是关键了)
            Set<BeanDefinitionHolder> scannedBeanDefinitions =
                    this.componentScanParser.parse(componentScan, sourceClass.getMetadata().getClassName());
            // Check the set of scanned definitions for any further config classes and parse recursively if needed
            for (BeanDefinitionHolder holder : scannedBeanDefinitions) {
                BeanDefinition bdCand = holder.getBeanDefinition().getOriginatingBeanDefinition();
                if (bdCand == null) {
                    bdCand = holder.getBeanDefinition();
                }
                // 检查是否是ConfigurationClass(是否有configuration/component两个注解),如果是,递归查找该类相关联的配置类。
                // 所谓相关的配置类,比如@Configuration中的@Bean定义的bean。或者在有@Component注解的类上继续存在@Import注解。
                if (ConfigurationClassUtils.checkConfigurationClassCandidate(bdCand, this.metadataReaderFactory)) {
                    parse(bdCand.getBeanClassName(), holder.getBeanName());
                }
            }
        }
    }

    // Process any @Import annotations
    //递归处理 @Import 注解(SpringBoot项目中经常用的各种@Enable*** 注解基本都是封装的@Import)
    processImports(configClass, sourceClass, getImports(sourceClass), true);

    // Process any @ImportResource annotations
    AnnotationAttributes importResource =
            AnnotationConfigUtils.attributesFor(sourceClass.getMetadata(), ImportResource.class);
    if (importResource != null) {
        String[] resources = importResource.getStringArray("locations");
        Class<? extends BeanDefinitionReader> readerClass = importResource.getClass("reader");
        for (String resource : resources) {
            String resolvedResource = this.environment.resolveRequiredPlaceholders(resource);
            configClass.addImportedResource(resolvedResource, readerClass);
        }
    }

    // Process individual @Bean methods
    Set<MethodMetadata> beanMethods = retrieveBeanMethodMetadata(sourceClass);
    for (MethodMetadata methodMetadata : beanMethods) {
        configClass.addBeanMethod(new BeanMethod(methodMetadata, configClass));
    }

    // Process default methods on interfaces
    processInterfaces(configClass, sourceClass);

    // Process superclass, if any
    if (sourceClass.getMetadata().hasSuperClass()) {
        String superclass = sourceClass.getMetadata().getSuperClassName();
        if (superclass != null && !superclass.startsWith("java") &&
                !this.knownSuperclasses.containsKey(superclass)) {
            this.knownSuperclasses.put(superclass, configClass);
            // Superclass found, return its annotation metadata and recurse
            return sourceClass.getSuperClass();
        }
    }

    // No superclass -> processing is complete
    return null;
}
看doProcessConfigurationClass()方法。(SpringBoot的包扫描的入口方法,重点哦)
for (AnnotationAttributes propertySource : AnnotationConfigUtils.attributesForRepeatable(... 获取主类上的@PropertySource注解(关于该注解是怎么用的请自行百度),解析该注解并将该注解指定的properties配置文件中的值存储到Spring的 Environment中,Environment接口提供方法去读取配置文件中的值,参数是properties文件中定义的key值。
Set<AnnotationAttributes> componentScans = AnnotationConfigUtils.attributesForRepeatable( sourceClass.getMetadata(), ComponentScans.class, ComponentScan.class); 解析主类上的@ComponentScan注解,呃,怎么说呢,42行后面的代码将会解析该注解并进行包扫描。
processImports(configClass, sourceClass, getImports(sourceClass), true); 解析主类上的@Import注解,并加载该注解指定的配置类。
提示:在spring中好多注解都是一层一层封装的,比如@EnableXXX,是对@Import注解的二次封装。@SpringBootApplication注解=@ComponentScan+@EnableAutoConfiguration+@Import+@Configuration+@Component。@Controller,@Service等等是对@Component的二次封装。
Set<BeanDefinitionHolder> scannedBeanDefinitions = this.componentScanParser.parse(componentScan, sourceClass.getMetadata().getClassName()); 进入该方法
// ComponentScanAnnotationParser类
public Set<BeanDefinitionHolder> parse(AnnotationAttributes componentScan, final String declaringClass) {
    ClassPathBeanDefinitionScanner scanner = new ClassPathBeanDefinitionScanner(this.registry,
            componentScan.getBoolean("useDefaultFilters"), this.environment, this.resourceLoader);
    ...
    // 根据 declaringClass (如果是SpringBoot项目,则参数为主类的全路径名)
    if (basePackages.isEmpty()) {
        basePackages.add(ClassUtils.getPackageName(declaringClass));
    }
    ...
    // 根据basePackages扫描类
    return scanner.doScan(StringUtils.toStringArray(basePackages));
}
发现有两行重要的代码。
到这里呢IoC容器初始化三个步骤的第一步,Resource定位就完成了,成功定位到了主类所在的包。
接着往下看 return scanner.doScan(StringUtils.toStringArray(basePackages)); Spring是如何进行类扫描的。进入doScan()方法。
// ComponentScanAnnotationParser类
protected Set<BeanDefinitionHolder> doScan(String... basePackages) {
    Assert.notEmpty(basePackages, "At least one base package must be specified");
    Set<BeanDefinitionHolder> beanDefinitions = new LinkedHashSet<>();
    for (String basePackage : basePackages) {
        // 从指定的包中扫描需要装载的Bean
        Set<BeanDefinition> candidates = findCandidateComponents(basePackage);
        for (BeanDefinition candidate : candidates) {
            ScopeMetadata scopeMetadata = this.scopeMetadataResolver.resolveScopeMetadata(candidate);
            candidate.setScope(scopeMetadata.getScopeName());
            String beanName = this.beanNameGenerator.generateBeanName(candidate, this.registry);
            if (candidate instanceof AbstractBeanDefinition) {
                postProcessBeanDefinition((AbstractBeanDefinition) candidate, beanName);
            }
            if (candidate instanceof AnnotatedBeanDefinition) {
                AnnotationConfigUtils.processCommonDefinitionAnnotations((AnnotatedBeanDefinition) candidate);
            }
            if (checkCandidate(beanName, candidate)) {
                BeanDefinitionHolder definitionHolder = new BeanDefinitionHolder(candidate, beanName);
                definitionHolder =
                        AnnotationConfigUtils.applyScopedProxyMode(scopeMetadata, definitionHolder, this.registry);
                beanDefinitions.add(definitionHolder);
                //将该 Bean 注册进 IoC容器(beanDefinitionMap)
                registerBeanDefinition(definitionHolder, this.registry);
            }
        }
    }
    return beanDefinitions;
}
这个方法中有两个比较重要的方法,Set<BeanDefinition> candidates = findCandidateComponents(basePackage); 从basePackage中扫描类并解析成BeanDefinition,拿到所有符合条件的类后在 registerBeanDefinition(definitionHolder, this.registry); 将该类注册进IoC容器。也就是说在这个方法中完成了IoC容器初始化过程的第二三步,BeanDefinition的载入,和BeanDefinition的注册。
findCandidateComponents(basePackage);
// ClassPathScanningCandidateComponentProvider类
public Set<BeanDefinition> findCandidateComponents(String basePackage) {
    ...
    else {
        return scanCandidateComponents(basePackage);
    }
}
// ClassPathScanningCandidateComponentProvider类
private Set<BeanDefinition> scanCandidateComponents(String basePackage) {
    Set<BeanDefinition> candidates = new LinkedHashSet<>();
    try {
        //拼接扫描路径,比如:classpath*:org/springframework/boot/demo/**/*.class
        String packageSearchPath = ResourcePatternResolver.CLASSPATH_ALL_URL_PREFIX +
                resolveBasePackage(basePackage) + '/' + this.resourcePattern;
        //从 packageSearchPath 路径中扫描所有的类
        Resource[] resources = getResourcePatternResolver().getResources(packageSearchPath);
        boolean traceEnabled = logger.isTraceEnabled();
        boolean debugEnabled = logger.isDebugEnabled();
        for (Resource resource : resources) {
            if (traceEnabled) {
                logger.trace("Scanning " + resource);
            }
            if (resource.isReadable()) {
                try {
                    MetadataReader metadataReader = getMetadataReaderFactory().getMetadataReader(resource);
                    // //判断该类是不是 @Component 注解标注的类,并且不是需要排除掉的类
                    if (isCandidateComponent(metadataReader)) {
                        //将该类封装成 ScannedGenericBeanDefinition(BeanDefinition接口的实现类)类
                        ScannedGenericBeanDefinition sbd = new ScannedGenericBeanDefinition(metadataReader);
                        sbd.setResource(resource);
                        sbd.setSource(resource);
                        if (isCandidateComponent(sbd)) {
                            if (debugEnabled) {
                                logger.debug("Identified candidate component class: " + resource);
                            }
                            candidates.add(sbd);
                        } else {
                            if (debugEnabled) {
                                logger.debug("Ignored because not a concrete top-level class: " + resource);
                            }
                        }
                    } else {
                        if (traceEnabled) {
                            logger.trace("Ignored because not matching any filter: " + resource);
                        }
                    }
                } catch (Throwable ex) {
                    throw new BeanDefinitionStoreException(
                            "Failed to read candidate component class: " + resource, ex);
                }
            } else {
                if (traceEnabled) {
                    logger.trace("Ignored because not readable: " + resource);
                }
            }
        }
    } catch (IOException ex) {
        throw new BeanDefinitionStoreException("I/O failure during classpath scanning", ex);
    }
    return candidates;
}
将basePackage拼接成classpath*:org/springframework/boot/demo/**/*.class,在getResources(packageSearchPath);方法中扫描到了该路径下的所有的类。然后遍历这些Resources,在isCandidateComponent(metadataReader)方法中判断该类是不是 @Component 注解标注的类,并且不是需要排除掉的类。ScannedGenericBeanDefinition sbd = new ScannedGenericBeanDefinition(metadataReader);将扫描到的类,解析成ScannedGenericBeanDefinition,该类是BeanDefinition接口的实现类。OK,IoC容器的BeanDefinition载入到这里就结束了。
registerBeanDefinition(definitionHolder, this.registry);
查看registerBeanDefinition()方法。是不是有点眼熟,在前面介绍prepareContext()方法时,我们详细介绍了主类的BeanDefinition是怎么一步一步的注册进DefaultListableBeanFactory的beanDefinitionMap中的。在此呢我们就省略1w字吧。完成了BeanDefinition的注册,就完成了IoC容器的初始化过程。此时,在使用的IoC容器DefaultListableFactory中已经建立了整个Bean的配置信息,而这些BeanDefinition已经可以被容器使用了。他们都在BeanbefinitionMap里被检索和使用。容器的作用就是对这些信息进行处理和维护。这些信息是容器简历依赖反转的基础。
protected void registerBeanDefinition(BeanDefinitionHolder definitionHolder, BeanDefinitionRegistry registry) {
    BeanDefinitionReaderUtils.registerBeanDefinition(definitionHolder, registry);
}
OK,到这里IoC容器的初始化过程的三个步骤就梳理完了。当然这只是针对SpringBoot的包扫描的定位方式的BeanDefinition的定位,加载,和注册过程。前面我们说过,还有两种方式@Import和SPI扩展实现的starter的自动装配。
@Import注解的解析过程
相信不说大家也应该知道了,各种@EnableXXX注解,很大一部分都是对@Import的二次封装(其实也是为了解耦,比如当@Import导入的类发生变化时,我们的业务系统也不需要改任何代码)。
我们又要回到上文中的ConfigurationClassParser类的doProcessConfigurationClass方法的processImports(configClass, sourceClass, getImports(sourceClass), true);
processImports(configClass, sourceClass, getImports(sourceClass), true);中configClass和sourceClass参数都是主类相对应的。
首先看getImports(sourceClass);
private Set<SourceClass> getImports(SourceClass sourceClass) throws IOException {
    Set<SourceClass> imports = new LinkedHashSet<>();
    Set<SourceClass> visited = new LinkedHashSet<>();
    collectImports(sourceClass, imports, visited);
    return imports;
}
三、SpringBoot自动装配原理实现
通过分析refresh()方法中的invokeBeanFactoryPostProcessors()方法,分析了IoC容器的初始化过程,这一节从代码上如下所示,接上一节ConfigurationClassParser类中的parse()方法,接着分析SpringBoot的自动装配原理。
public void parse(Set<BeanDefinitionHolder> configCandidates) {
    Iterator var2 = configCandidates.iterator();

    while(var2.hasNext()) {
        BeanDefinitionHolder holder = (BeanDefinitionHolder)var2.next();
        BeanDefinition bd = holder.getBeanDefinition();

        try {
            // 如果是SpringBoot项目进来的,bd其实就是前面主类封装成的 AnnotatedGenericBeanDefinition(AnnotatedBeanDefinition接口的实现类)
            if (bd instanceof AnnotatedBeanDefinition) {
                this.parse(((AnnotatedBeanDefinition)bd).getMetadata(), holder.getBeanName());
            } else if (bd instanceof AbstractBeanDefinition && ((AbstractBeanDefinition)bd).hasBeanClass()) {
                this.parse(((AbstractBeanDefinition)bd).getBeanClass(), holder.getBeanName());
            } else {
                this.parse(bd.getBeanClassName(), holder.getBeanName());
            }
        } catch (BeanDefinitionStoreException var6) {
            throw var6;
        } catch (Throwable var7) {
            throw new BeanDefinitionStoreException("Failed to parse configuration class [" + bd.getBeanClassName() + "]", var7);
        }
    }
    // 加载默认的配置---》(对springboot项目来说这里就是自动装配的入口了)
    this.deferredImportSelectorHandler.process();
}
@SpringBootApplication注解
@Target(ElementType.TYPE)
@Retention(RetentionPolicy.RUNTIME)
@Documented
@Inherited
@SpringBootConfiguration
@EnableAutoConfiguration
@ComponentScan(excludeFilters = {
        @Filter(type = FilterType.CUSTOM, classes = TypeExcludeFilter.class),
        @Filter(type = FilterType.CUSTOM, classes = AutoConfigurationExcludeFilter.class) })
public @interface SpringBootApplication {
    ...
}
接着看@EnableAutoConfiguration
@Target(ElementType.TYPE)
@Retention(RetentionPolicy.RUNTIME)
@Documented
@Inherited
@AutoConfigurationPackage
@Import(AutoConfigurationImportSelector.class)
public @interface EnableAutoConfiguration {
    ...
}
OK,看到@Import(AutoConfigurationImportSelector.class)导入了一个重要的类AutoConfigurationImportSelector。
AutoConfigurationImportSelector
//自动装配
public String[] selectImports(AnnotationMetadata annotationMetadata) {
    if (!this.isEnabled(annotationMetadata)) {
        return NO_IMPORTS;
    } else {
        AutoConfigurationImportSelector.AutoConfigurationEntry autoConfigurationEntry = this.getAutoConfigurationEntry(annotationMetadata);
        return StringUtils.toStringArray(autoConfigurationEntry.getConfigurations());
    }
}

protected AutoConfigurationImportSelector.AutoConfigurationEntry getAutoConfigurationEntry(AnnotationMetadata annotationMetadata) {
    if (!this.isEnabled(annotationMetadata)) {
        return EMPTY_ENTRY;
    } else {
        AnnotationAttributes attributes = this.getAttributes(annotationMetadata);
        //获取所有的自动配置类(META-INF/spring.factories中配置的key为org.springframework.boot.autoconfigure.EnableAutoConfiguration的类)
        List<String> configurations = this.getCandidateConfigurations(annotationMetadata, attributes);
        configurations = this.removeDuplicates(configurations);
        //需要排除的自动装配类(springboot的主类上 @SpringBootApplication(exclude = {com.demo.starter.config.DemoConfig.class})指定的排除的自动装配类)
        Set<String> exclusions = this.getExclusions(annotationMetadata, attributes);
        this.checkExcludedClasses(configurations, exclusions);
        //将需要排除的类从 configurations remove掉
        configurations.removeAll(exclusions);
        configurations = this.getConfigurationClassFilter().filter(configurations);
        this.fireAutoConfigurationImportEvents(configurations, exclusions);
        return new AutoConfigurationImportSelector.AutoConfigurationEntry(configurations, exclusions);
    }
}
至于怎么从章节一中提到的ConfigurationClassParser类中的parse()===>deferredImportSelectorHandler.process();==>AutoConfigurationImportSelector#selectImports(),篇幅有限不做过多介绍。
我们来看一下getCandidateConfigurations()方法是怎么拿到这些自动配置类的。
protected List<String> getCandidateConfigurations(AnnotationMetadata metadata, AnnotationAttributes attributes) {
    List<String> configurations = SpringFactoriesLoader.loadFactoryNames(this.getSpringFactoriesLoaderFactoryClass(), this.getBeanClassLoader());
    Assert.notEmpty(configurations, "No auto configuration classes found in META-INF/spring.factories. If you are using a custom packaging, make sure that file is correct.");
    return configurations;
}
是不是又看到一个十分熟悉的方法loadFactoryNames(),没错,其实我们在分析SpringBoot启动流程的的时候,就已经分析了,SpringBoot是如何从META-INF/spring.factories中加载指定key的value的。
继续看Set<String> exclusions = getExclusions(annotationMetadata, attributes);方法,该方法是排除主类上@SpringBootApplication注解上排除的自动装配的类。
configurations = this.getConfigurationClassFilter().filter(configurations);该行代码将会过滤掉不需要装配的类。过滤的逻辑有很多,比如我们常用的@ConditionXXX注解。如下所示:
@ConditionalOnBean:容器中有指定的Bean
@ConditionalOnClass:当类路径下有指定的类
@ConditionalOnExpression:基于SpEL表达式作为判断条件
@ConditionalOnJava:基于JVM版本作为判断条件
@ConditionalOnJndi:在JNDI存在的条件下查找指定的位置
@ConditionalOnMissingBean:当容器中没有指定Bean的情况下
@ConditionalOnMissingClass:当类路径下没有指定的类
@ConditionalOnNotWebApplication:当前项目不是Web项目
@ConditionalOnProperty:配置文件中指定的属性是否有指定的值
@ConditionalOnResource:类路径下是否有指定的资源
@ConditionalOnSingleCandidate:当指定Bean在容器中只有一个,或者虽然有多个但是指定首选Bean
@ConditionalOnWebApplication:当前项目是Web项目的条件下
四、IOC容器依赖注入
前面在refresh()-->invokeBeanFactoryPostProcessors(beanFactory);方法中已经完成了IoC容器的初始化并已经载入了我们定义的Bean的信息(BeanDefinition),现在我们开始分析依赖注入的原理。首先需要说明的是依赖注入在用户第一次向IoC容器索要Bean时触发,当然也有例外,我们可以在BeanDefinition中中通过控制lazy-init属性来让容器完成对Bean的预实例化。这个预实例化实际上也是一个依赖注入的过程,但它是在初始化过程中完成的。
getBean()的过程
// AbstractApplicationContext类
@Override
public void refresh() throws BeansException, IllegalStateException {
    synchronized (this.startupShutdownMonitor) {
        ...
        try {
            ...
            // Instantiate all remaining (non-lazy-init) singletons.
            finishBeanFactoryInitialization(beanFactory);
            ...
        }
        ...
    }
}
// AbstractApplicationContext类
protected void finishBeanFactoryInitialization(ConfigurableListableBeanFactory beanFactory) {
    ...
    // Instantiate all remaining (non-lazy-init) singletons.
    // 实例化所有剩余的(non-lazy-init)单例。
    beanFactory.preInstantiateSingletons();
}
// DefaultListableBeanFactory类
@Override
public void preInstantiateSingletons() throws BeansException {
    ...
    // Iterate over a copy to allow for init methods which in turn register new bean definitions.
    // While this may not be part of the regular factory bootstrap, it does otherwise work fine.
    List<String> beanNames = new ArrayList<>(this.beanDefinitionNames);
    // Trigger initialization of all non-lazy singleton beans...
    for (String beanName : beanNames) {
        RootBeanDefinition bd = getMergedLocalBeanDefinition(beanName);
        if (!bd.isAbstract() && bd.isSingleton() && !bd.isLazyInit()) {
            if (isFactoryBean(beanName)) {
                Object bean = getBean(FACTORY_BEAN_PREFIX + beanName);
                if (bean instanceof FactoryBean) {
                    final FactoryBean<?> factory = (FactoryBean<?>) bean;
                    boolean isEagerInit;
                    if (System.getSecurityManager() != null && factory instanceof SmartFactoryBean) {
                        isEagerInit = AccessController.doPrivileged((PrivilegedAction<Boolean>)
                                        ((SmartFactoryBean<?>) factory)::isEagerInit,
                                getAccessControlContext());
                    } else {
                        isEagerInit = (factory instanceof SmartFactoryBean &&
                                ((SmartFactoryBean<?>) factory).isEagerInit());
                    }
                    if (isEagerInit) {
                        getBean(beanName);
                    }
                }
            } else {
                // 这里就是触发依赖注入的地方
                getBean(beanName);
            }
        }
    }
    ...
}
跟踪其调用栈,看到getBean(beanName);方法,我们再梳理一下getBean()方法,前面总结过该方法在IoC容器的顶层接口BeanFactory中定义,然后在IoC容器的具体产品DefaultListableBeanFactory类的基类AbstractBeanFactory实现了getBean()方法。接着看代码。
// AbstractBeanFactory类
@Override
public Object getBean(String name) throws BeansException {
    return doGetBean(name, null, null, false);
}
@Override
public <T> T getBean(String name, @Nullable Class<T> requiredType) throws BeansException {
    return doGetBean(name, requiredType, null, false);
}
@Override
public Object getBean(String name, Object... args) throws BeansException {
    return doGetBean(name, null, args, false);
}
public <T> T getBean(String name, @Nullable Class<T> requiredType, @Nullable Object... args)
        throws BeansException {
    return doGetBean(name, requiredType, args, false);
}
从上面代码可知大致可分为两种获取Bean的参数,一种是按名获取,一种是按类获取。但是最终都进入到了doGetBean()方法。
// AbstractBeanFactory类
protected <T> T doGetBean(final String name, @Nullable final Class<T> requiredType,
        @Nullable final Object[] args, boolean typeCheckOnly) throws BeansException {

    // bean获取过程:先获取bean名字
    // 会把带有&前缀的去掉,或者去aliasMap中找这个是不是别名,最终确定bean的id是什么
    final String beanName = transformedBeanName(name);
    Object bean;

    // 1.检查缓存中或者实例工厂中是否有对应的实例
    // 因为在创建单例bean的时候会存在依赖注入的情况,而在创建依赖的时候为了避免循环依赖
    // Spring在创建bean的时候不会等bean创建完成就会将bean的ObjectFactory提早曝光
    // 也就是将ObjectFactory加入到缓存中,一旦下一个要创建的bean需要依赖上个bean则直接使用ObjectFactory
    // 2.spring 默认是单例的,如果能获取到直接返回,提高效率。
    // Eagerly check singleton cache for manually registered singletons.
    Object sharedInstance = getSingleton(beanName);
    if (sharedInstance != null && args == null) {
        if (logger.isDebugEnabled()) {
            if (isSingletonCurrentlyInCreation(beanName)) {
                logger.debug("Returning eagerly cached instance of singleton bean '" + beanName +
                        "' that is not fully initialized yet - a consequence of a circular reference");
            }
            else {
                logger.debug("Returning cached instance of singleton bean '" + beanName + "'");
            }
        }
        // 用于检测bean的正确性,同时如果获取的是FactoryBean的话还需要调用getObject()方法获取最终的那个bean实例
        bean = getObjectForBeanInstance(sharedInstance, name, beanName, null);
    }

    else {
        // Fail if we're already creating this bean instance:
        // We're assumably within a circular reference.
        if (isPrototypeCurrentlyInCreation(beanName)) {
            throw new BeanCurrentlyInCreationException(beanName);
        }

        // Check if bean definition exists in this factory.
        //这里对IoC容器中的BeanDefinition是否存在进行检查,检查是否能在当前的BeanFactory中取得需要的Bean。
        // 如果当前的工厂中取不到,则到双亲BeanFactory中去取。如果当前的双亲工厂取不到,那就顺着双亲BeanFactory
        // 链一直向上查找。
        BeanFactory parentBeanFactory = getParentBeanFactory();
        if (parentBeanFactory != null && !containsBeanDefinition(beanName)) {
            // Not found -> check parent.
            String nameToLookup = originalBeanName(name);
            if (parentBeanFactory instanceof AbstractBeanFactory) {
                // 递归调用父bean的doGetBean查找
                return ((AbstractBeanFactory) parentBeanFactory).doGetBean(
                        nameToLookup, requiredType, args, typeCheckOnly);
            }
            else if (args != null) {
                // Delegation to parent with explicit args.
                return (T) parentBeanFactory.getBean(nameToLookup, args);
            }
            else {
                // No args -> delegate to standard getBean method.
                return parentBeanFactory.getBean(nameToLookup, requiredType);
            }
        }

        if (!typeCheckOnly) {
            markBeanAsCreated(beanName);
        }

        try {
            //这里根据Bean的名字取得BeanDefinition
            final RootBeanDefinition mbd = getMergedLocalBeanDefinition(beanName);
            checkMergedBeanDefinition(mbd, beanName, args);

            // Guarantee initialization of beans that the current bean depends on.
            //获取当前Bean的所有依赖Bean,这里会触发getBean的递归调用。知道取到一个没有任何依赖的Bean为止。
            String[] dependsOn = mbd.getDependsOn();
            if (dependsOn != null) {
                for (String dep : dependsOn) {
                    if (isDependent(beanName, dep)) {
                        throw new BeanCreationException(mbd.getResourceDescription(), beanName,
                                "Circular depends-on relationship between '" + beanName + "' and '" + dep + "'");
                    }
                    registerDependentBean(dep, beanName);
                    try {
                        getBean(dep);
                    }
                    catch (NoSuchBeanDefinitionException ex) {
                        throw new BeanCreationException(mbd.getResourceDescription(), beanName,
                                "'" + beanName + "' depends on missing bean '" + dep + "'", ex);
                    }
                }
            }

            // 这里通过createBean方法创建singleton Bean的实例 这里还有一个回调函数
            // Create bean instance.
            if (mbd.isSingleton()) {
                sharedInstance = getSingleton(beanName, () -> {
                    try {
                        // 最后在getSingleton中又会调用这个方法
                        // TODO createBean的入口
                        return createBean(beanName, mbd, args);
                    }
                    catch (BeansException ex) {
                        // Explicitly remove instance from singleton cache: It might have been put there
                        // eagerly by the creation process, to allow for circular reference resolution.
                        // Also remove any beans that received a temporary reference to the bean.
                        destroySingleton(beanName);
                        throw ex;
                    }
                });
                bean = getObjectForBeanInstance(sharedInstance, name, beanName, mbd);
            }
            // 这里是创建prototype bean的地方
            else if (mbd.isPrototype()) {
                // It's a prototype -> create a new instance.
                Object prototypeInstance = null;
                try {
                    beforePrototypeCreation(beanName);
                    prototypeInstance = createBean(beanName, mbd, args);
                }
                finally {
                    afterPrototypeCreation(beanName);
                }
                bean = getObjectForBeanInstance(prototypeInstance, name, beanName, mbd);
            }

            else {
                String scopeName = mbd.getScope();
                final Scope scope = this.scopes.get(scopeName);
                if (scope == null) {
                    throw new IllegalStateException("No Scope registered for scope name '" + scopeName + "'");
                }
                try {
                    Object scopedInstance = scope.get(beanName, () -> {
                        beforePrototypeCreation(beanName);
                        try {
                            return createBean(beanName, mbd, args);
                        }
                        finally {
                            afterPrototypeCreation(beanName);
                        }
                    });
                    bean = getObjectForBeanInstance(scopedInstance, name, beanName, mbd);
                }
                catch (IllegalStateException ex) {
                    throw new BeanCreationException(beanName,
                            "Scope '" + scopeName + "' is not active for the current thread; consider " +
                            "defining a scoped proxy for this bean if you intend to refer to it from a singleton",
                            ex);
                }
            }
        }
        catch (BeansException ex) {
            cleanupAfterBeanCreationFailure(beanName);
            throw ex;
        }
    }

    // Check if required type matches the type of the actual bean instance.
    //这里对创建的Bean进行类型检查,如果没有问题,就返回这个新创建的Bean,这个Bean已经是包含了依赖关系的Bean
    if (requiredType != null && !requiredType.isInstance(bean)) {
        try {
            T convertedBean = getTypeConverter().convertIfNecessary(bean, requiredType);
            if (convertedBean == null) {
                throw new BeanNotOfRequiredTypeException(name, requiredType, bean.getClass());
            }
            return convertedBean;
        }
        catch (TypeMismatchException ex) {
            if (logger.isDebugEnabled()) {
                logger.debug("Failed to convert bean '" + name + "' to required type '" +
                        ClassUtils.getQualifiedName(requiredType) + "'", ex);
            }
            throw new BeanNotOfRequiredTypeException(name, requiredType, bean.getClass());
        }
    }
    return (T) bean;
}
这个就是依赖注入的入口了,依赖注入是在容器的BeanDefinition数据已经建立好的前提下进行的。“程序=数据+算法”,很经典的一句话,前面我们详细介绍了BeanDefinition的注册过程,BeanDefinition就是数据。如上面代码所示,doGetBean()方法不涉及复杂的算法,但是这个过程也不是很简单,因为我们都知道,对于IoC容器的使用,Spring提供了很多的配置参数,每一个配置参数实际上就代表了一个IoC容器的实现特征,这些特征很多都需要在依赖注入的过程或者对Bean进行生命周期管理的过程中完成。虽然我们可以简单的将IoC容器描述成一个ConcurrentHashMap,ConcurrentHashMap只是它的数据结构而不是IoC容器的全部。
Object sharedInstance = getSingleton(beanName);如注释所说,首先回去找在容器中是不是已经存在该单例。
// DefaultSingletonBeanRegistry类
protected Object getSingleton(String beanName, boolean allowEarlyReference) {
    // 由于scope是singleton,所以先从缓存中取单例对象的实例,如果取到直接返回,没有取到加载bean
    Object singletonObject = this.singletonObjects.get(beanName);
    // 当想要获取的bean没有被加载,并且也没有正在被创建的时候,主动去加载bean
    if (singletonObject == null && isSingletonCurrentlyInCreation(beanName)) {
        // 锁住单例缓存区加载bean
        synchronized (this.singletonObjects) {
            // singletonObjects ,earlySingletonObjects ,singletonFactories是一个单例实例的三种存在状态
            // 再去earlySingletonObjects中去找
            singletonObject = this.earlySingletonObjects.get(beanName);
            if (singletonObject == null && allowEarlyReference) {
                // 去singletonFactories中去找对象的实例
                ObjectFactory<?> singletonFactory = this.singletonFactories.get(beanName);
                if (singletonFactory != null) {
                    singletonObject = singletonFactory.getObject();
                    this.earlySingletonObjects.put(beanName, singletonObject);
                    this.singletonFactories.remove(beanName);
                }
            }
        }
    }
    return singletonObject;
}
在DefaultSingletonBeanRegistry类中的singletonObjects属性就是存singleton bean的地方。
如果getSingleton()为 null继续往下看,会在当前的BeanFactory中获取BeanDefinition,也就是这行方法代码:final RootBeanDefinition mbd = getMergedLocalBeanDefinition(beanName);在这行代码拿到BeanDefinition后,首先判断是不是singleton Bean,如果是的话,开始执行创建Bean,正是return createBean(beanName, mbd, args);这行代码。如果是原型(Prototype)Bean我们就不分析了。原型bean每次执行getBean()都会创建一个实例。接下来我们看createBean()方法。
createBean()的过程
首先看一下create bean的过程
Bean实例的创建
为Bean实例设置属性(属性注入,其实就是依赖注入真正发生的地方)
调用Bean的初始化方法
前面说了getBean()是依赖注入的起点,之后会调用createBean(),下面通过createBean()代码来了解这个过程。在这个过程中,Bean对象会根据BeanDefinition定义的要求生成。
// AbstractAutowireCapableBeanFactory类
@Override
protected Object createBean(String beanName, RootBeanDefinition mbd, @Nullable Object[] args)
        throws BeanCreationException {
    ...
    try {
        // 验证以及准备override的方法
        mbdToUse.prepareMethodOverrides();
    }
    catch (BeanDefinitionValidationException ex) {
        throw new BeanDefinitionStoreException(mbdToUse.getResourceDescription(),
                beanName, "Validation of method overrides failed", ex);
    }
    try {
        // Give BeanPostProcessors a chance to return a proxy instead of the target bean instance.
        // createBean之前调用BeanPostProcessor的postProcessBeforeInitialization和postProcessAfterInitialization方法
        // 默认不做任何处理所以会返回null
        // 但是如果我们重写了这两个方法,那么bean的创建过程就结束了,这里就为以后的annotation自动注入提供了钩子
        Object bean = resolveBeforeInstantiation(beanName, mbdToUse);
        if (bean != null) {
            return bean;
        }
    }catch (Throwable ex) {
        throw new BeanCreationException(mbdToUse.getResourceDescription(), beanName,
                "BeanPostProcessor before instantiation of bean failed", ex);
    }
    try {
        // 实际执行createBean的是doCreateBean()方法
        Object beanInstance = doCreateBean(beanName, mbdToUse, args);
        if (logger.isDebugEnabled()) {
            logger.debug("Finished creating instance of bean '" + beanName + "'");
        }
        return beanInstance;
    }
    catch (BeanCreationException | ImplicitlyAppearedSingletonException ex) {
        // A previously detected exception with proper bean creation context already,
        // or illegal singleton state to be communicated up to DefaultSingletonBeanRegistry.
        throw ex;
    }
    catch (Throwable ex) {
        throw new BeanCreationException(
                mbdToUse.getResourceDescription(), beanName, "Unexpected exception during bean creation", ex);
    }
}
接着往下看doCreateBean()方法。
// AbstractAutowireCapableBeanFactory类
protected Object doCreateBean(final String beanName, final RootBeanDefinition mbd, final @Nullable Object[] args)
        throws BeanCreationException {
    // BeanWrapper是用来持有创建出来的Bean对象
    // Instantiate the bean.
    BeanWrapper instanceWrapper = null;
    // 如果是单例,先把缓存中的同名Bean清除
    if (mbd.isSingleton()) {
        instanceWrapper = this.factoryBeanInstanceCache.remove(beanName);
    }
    // 这里是创建Bean的地方,由createBeanInstance完成。
    // TODO 完成Bean初始化过程的第一步:创建实例
    if (instanceWrapper == null) {
        instanceWrapper = createBeanInstance(beanName, mbd, args);
    }
    final Object bean = instanceWrapper.getWrappedInstance();
    Class<?> beanType = instanceWrapper.getWrappedClass();
    if (beanType != NullBean.class) {
        mbd.resolvedTargetType = beanType;
    }

    // Allow post-processors to modify the merged bean definition.
    synchronized (mbd.postProcessingLock) {
        if (!mbd.postProcessed) {
            try {
                applyMergedBeanDefinitionPostProcessors(mbd, beanType, beanName);
            }
            catch (Throwable ex) {
                throw new BeanCreationException(mbd.getResourceDescription(), beanName,
                        "Post-processing of merged bean definition failed", ex);
            }
            mbd.postProcessed = true;
        }
    }

    // Eagerly cache singletons to be able to resolve circular references
    // even when triggered by lifecycle interfaces like BeanFactoryAware.
    // 是否自动解决循环引用
    // 当bean条件为: 单例&&允许循环引用&&正在创建中这样的话提早暴露一个ObjectFactory
    boolean earlySingletonExposure = (mbd.isSingleton() && this.allowCircularReferences &&
            isSingletonCurrentlyInCreation(beanName));
    if (earlySingletonExposure) {
        if (logger.isDebugEnabled()) {
            logger.debug("Eagerly caching bean '" + beanName +
                    "' to allow for resolving potential circular references");
        }
        // 把ObjectFactory放进singletonFactories中
        // 这里在其他bean在创建的时候会先去singletonFactories中查找有没有beanName到ObjectFactory的映射
        // 如果有ObjectFactory就调用它的getObject方法获取实例
        // 但是在这里就可以对一个bean进行保证,代理等等AOP就可以在getEarlyBeanReference这里实现
        addSingletonFactory(beanName, () -> getEarlyBeanReference(beanName, mbd, bean));
    }

    // Initialize the bean instance.
    Object exposedObject = bean;
    try {
        // TODO 完成Bean初始化过程的第二步:为Bean的实例设置属性
        // Bean依赖注入发生的地方
        // 对bean进行属性填充,如果存在依赖于其他的bean的属性,则会递归的调用初始化依赖的bean
        populateBean(beanName, mbd, instanceWrapper);
        // TODO 完成Bean初始化过程的第三步:调用Bean的初始化方法(init-method)
        // 调用初始化方法,比如init-method方法指定的方法
        exposedObject = initializeBean(beanName, exposedObject, mbd);
    }
    catch (Throwable ex) {
        if (ex instanceof BeanCreationException && beanName.equals(((BeanCreationException) ex).getBeanName())) {
            throw (BeanCreationException) ex;
        }
        else {
            throw new BeanCreationException(
                    mbd.getResourceDescription(), beanName, "Initialization of bean failed", ex);
        }
    }

    if (earlySingletonExposure) {
        Object earlySingletonReference = getSingleton(beanName, false);
        if (earlySingletonReference != null) {
            if (exposedObject == bean) {
                exposedObject = earlySingletonReference;
            }
            else if (!this.allowRawInjectionDespiteWrapping && hasDependentBean(beanName)) {
                String[] dependentBeans = getDependentBeans(beanName);
                Set<String> actualDependentBeans = new LinkedHashSet<>(dependentBeans.length);
                for (String dependentBean : dependentBeans) {
                    if (!removeSingletonIfCreatedForTypeCheckOnly(dependentBean)) {
                        actualDependentBeans.add(dependentBean);
                    }
                }
                if (!actualDependentBeans.isEmpty()) {
                    throw new BeanCurrentlyInCreationException(beanName,
                            "Bean with name '" + beanName + "' has been injected into other beans [" +
                            StringUtils.collectionToCommaDelimitedString(actualDependentBeans) +
                            "] in its raw version as part of a circular reference, but has eventually been " +
                            "wrapped. This means that said other beans do not use the final version of the " +
                            "bean. This is often the result of over-eager type matching - consider using " +
                            "'getBeanNamesOfType' with the 'allowEagerInit' flag turned off, for example.");
                }
            }
        }
    }

    // Register bean as disposable.
    try {
        // 注册销毁方法,比如:可以在配置bean的时候指定destory-method方法
        registerDisposableBeanIfNecessary(beanName, bean, mbd);
    }
    catch (BeanDefinitionValidationException ex) {
        throw new BeanCreationException(
                mbd.getResourceDescription(), beanName, "Invalid destruction signature", ex);
    }

    return exposedObject;
}
结合上面的代码,我们再来看一下创建Bean的三个步骤,是不是有点豁然开朗的感觉。别着急继续往下看。
Bean实例的创建,instanceWrapper = createBeanInstance(beanName, mbd, args);
为Bean实例设置属性,populateBean(beanName, mbd, instanceWrapper);
调用Bean的初始化方法,exposedObject = initializeBean(beanName, exposedObject, mbd);
createBeanInstance():Bean实例的创建
// AbstractAutowireCapableBeanFactory类
protected BeanWrapper createBeanInstance(String beanName, RootBeanDefinition mbd, @Nullable Object[] args) {
    // Make sure bean class is actually resolved at this point.
    // 确认需要创建的Bean的实例的类可以实例化
    Class<?> beanClass = resolveBeanClass(mbd, beanName);

    if (beanClass != null && !Modifier.isPublic(beanClass.getModifiers()) && !mbd.isNonPublicAccessAllowed()) {
        throw new BeanCreationException(mbd.getResourceDescription(), beanName,
                "Bean class isn't public, and non-public access not allowed: " + beanClass.getName());
    }

    Supplier<?> instanceSupplier = mbd.getInstanceSupplier();
    if (instanceSupplier != null) {
        return obtainFromSupplier(instanceSupplier, beanName);
    }

    // 当有工厂方法的时候使用工厂方法初始化Bean,就是配置的时候指定FactoryMethod属性,类似注解中的@Bean把方法的返回值作为Bean
    if (mbd.getFactoryMethodName() != null)  {
        return instantiateUsingFactoryMethod(beanName, mbd, args);
    }

    // Shortcut when re-creating the same bean...
    boolean resolved = false;
    boolean autowireNecessary = false;
    if (args == null) {
        synchronized (mbd.constructorArgumentLock) {
            if (mbd.resolvedConstructorOrFactoryMethod != null) {
                resolved = true;
                autowireNecessary = mbd.constructorArgumentsResolved;
            }
        }
    }
    if (resolved) {
        if (autowireNecessary) {
            // 如果有有参数的构造函数,构造函数自动注入
            // 这里spring会花费大量的精力去进行参数的匹配
            return autowireConstructor(beanName, mbd, null, null);
        }
        else {
            // 如果没有有参构造函数,使用默认构造函数构造
            return instantiateBean(beanName, mbd);
        }
    }

    // Need to determine the constructor...
    // 使用构造函数进行实例化
    Constructor<?>[] ctors = determineConstructorsFromBeanPostProcessors(beanClass, beanName);
    if (ctors != null ||
            mbd.getResolvedAutowireMode() == RootBeanDefinition.AUTOWIRE_CONSTRUCTOR ||
            mbd.hasConstructorArgumentValues() || !ObjectUtils.isEmpty(args))  {
        return autowireConstructor(beanName, mbd, ctors, args);
    }

    // No special handling: simply use no-arg constructor.
    // 使用默认的构造函数对Bean进行实例化
    return instantiateBean(beanName, mbd);
}
我们可以看到在instantiateBean()方法中生成了Bean所包含的Java对象,这个对象的生成有很多种不同的方式,可以通过工厂方法生成,也可以通过容器的autowire特性生成,这些生成方式都是由BeanDefinition决定的。对于上面我们的WebController和WebService两个类是通过最后一行,使用默认的构造函数进行Bean的实例化。
接着看instantiateBean()方法。
// AbstractAutowireCapableBeanFactory类
protected BeanWrapper instantiateBean(final String beanName, final RootBeanDefinition mbd) {
    // 使用默认的实例化策略对Bean进行实例化,默认的实例化策略是CglibSubclassingInstantiationStrategy,
    // 也就是常说的CGLIB来对Bean进行实例化。PS:面试官常问的字节码增强
    try {
        Object beanInstance;
        final BeanFactory parent = this;
        if (System.getSecurityManager() != null) {
            beanInstance = AccessController.doPrivileged((PrivilegedAction<Object>) () ->
                    getInstantiationStrategy().instantiate(mbd, beanName, parent),
                    getAccessControlContext());
        }
        else {
            // getInstantiationStrategy()会返回CglibSubclassingInstantiationStrategy类的实例
            beanInstance = getInstantiationStrategy().instantiate(mbd, beanName, parent);
        }
        BeanWrapper bw = new BeanWrapperImpl(beanInstance);
        initBeanWrapper(bw);
        return bw;
    }
    catch (Throwable ex) {
        throw new BeanCreationException(
                mbd.getResourceDescription(), beanName, "Instantiation of bean failed", ex);
    }
}
这里使用CGLIB进行Bean的实例化。CGLIB是一个常用的字节码生成器的类库,其提供了一系列的API来提供生成和转换Java字节码的功能。在Spring AOP中同样也是使用的CGLIB对Java的字节码进行增强。在IoC容器中,使用SimpleInstantiationStrategy类。这个类是Spring用来生成Bean对象的默认类,它提供了两种实例化Java对象的方法,一种是通过BeanUtils,它使用的是JVM的反射功能,一种是通过CGLIB来生成。
getInstantiationStrategy()方法获取到CglibSubclassingInstantiationStrategy实例,instantiate()是CglibSubclassingInstantiationStrategy类的父类SimpleInstantiationStrategy实现的。
// SimpleInstantiationStrategy类
@Override
public Object instantiate(RootBeanDefinition bd, @Nullable String beanName, BeanFactory owner) {
    // Don't override the class with CGLIB if no overrides.
    // 如果BeanFactory重写了Bean内的方法,则使用CGLIB,否则使用BeanUtils
    if (!bd.hasMethodOverrides()) {
        // 如果bean没有需要动态替换的方法就直接反射进行创建实例
        Constructor<?> constructorToUse;
        synchronized (bd.constructorArgumentLock) {
            constructorToUse = (Constructor<?>) bd.resolvedConstructorOrFactoryMethod;
            if (constructorToUse == null) {
                final Class<?> clazz = bd.getBeanClass();
                if (clazz.isInterface()) {
                    throw new BeanInstantiationException(clazz, "Specified class is an interface");
                }
                try {
                    if (System.getSecurityManager() != null) {
                        constructorToUse = AccessController.doPrivileged(
                                (PrivilegedExceptionAction<Constructor<?>>) clazz::getDeclaredConstructor);
                    } else {
                        constructorToUse = clazz.getDeclaredConstructor();
                    }
                    bd.resolvedConstructorOrFactoryMethod = constructorToUse;
                } catch (Throwable ex) {
                    throw new BeanInstantiationException(clazz, "No default constructor found", ex);
                }
            }
        }
        // 通过BeanUtils进行实例化,这个BeanUtils的实例化通过Constructor类实例化Bean
        // 在BeanUtils中可以看到具体的调用ctor.newInstances(args)
        return BeanUtils.instantiateClass(constructorToUse);
    } else {
        // Must generate CGLIB subclass.
        // TODO 使用CGLIB实例化对象
        return instantiateWithMethodInjection(bd, beanName, owner);
    }
}
在SpringBoot中我们一般采用@Autowire的方式进行依赖注入,很少采用像SpringMVC那种在xml中使用<lookup-method>或者<replaced-method>等标签的方式对注入的属性进行override,所以在上面的代码中if(!bd.hasMethodOverrides())中的判断为true,会采用BeanUtils的实例化方式。
populateBean();属性设置(依赖注入)
protected void populateBean(String beanName, RootBeanDefinition mbd, @Nullable BeanWrapper bw) {
    if (bw == null) {
        if (mbd.hasPropertyValues()) {
            throw new BeanCreationException(
                    mbd.getResourceDescription(), beanName, "Cannot apply property values to null instance");
        }
        else {
            // Skip property population phase for null instance.
            return;
        }
    }
    // Give any InstantiationAwareBeanPostProcessors the opportunity to modify the
    // state of the bean before properties are set. This can be used, for example,
    // to support styles of field injection.
    boolean continueWithPropertyPopulation = true;
    // 调用InstantiationAwareBeanPostProcessor  Bean的后置处理器,在Bean注入属性前改变BeanDefinition的信息
    if (!mbd.isSynthetic() && hasInstantiationAwareBeanPostProcessors()) {
        for (BeanPostProcessor bp : getBeanPostProcessors()) {
            if (bp instanceof InstantiationAwareBeanPostProcessor) {
                InstantiationAwareBeanPostProcessor ibp = (InstantiationAwareBeanPostProcessor) bp;
                if (!ibp.postProcessAfterInstantiation(bw.getWrappedInstance(), beanName)) {
                    continueWithPropertyPopulation = false;
                    break;
                }
            }
        }
    }
    if (!continueWithPropertyPopulation) {
        return;
    }
    // 这里取得在BeanDefinition中设置的property值,这些property来自对BeanDefinition的解析
    // 用于在配置文件中通过<property>配置的属性并且显示在配置文件中配置了autowireMode属性
    PropertyValues pvs = (mbd.hasPropertyValues() ? mbd.getPropertyValues() : null);
    if (mbd.getResolvedAutowireMode() == RootBeanDefinition.AUTOWIRE_BY_NAME ||
            mbd.getResolvedAutowireMode() == RootBeanDefinition.AUTOWIRE_BY_TYPE) {
        MutablePropertyValues newPvs = new MutablePropertyValues(pvs);

        // Add property values based on autowire by name if applicable.
        // 这里对autowire注入的处理,autowire by name
        if (mbd.getResolvedAutowireMode() == RootBeanDefinition.AUTOWIRE_BY_NAME) {
            autowireByName(beanName, mbd, bw, newPvs);
        }

        // Add property values based on autowire by type if applicable.
        // 这里对autowire注入的处理, autowire by type
        // private List<Test> tests;
        if (mbd.getResolvedAutowireMode() == RootBeanDefinition.AUTOWIRE_BY_TYPE) {
            autowireByType(beanName, mbd, bw, newPvs);
        }

        pvs = newPvs;
    }
    boolean hasInstAwareBpps = hasInstantiationAwareBeanPostProcessors();
    boolean needsDepCheck = (mbd.getDependencyCheck() != RootBeanDefinition.DEPENDENCY_CHECK_NONE);
    if (hasInstAwareBpps || needsDepCheck) {
        if (pvs == null) {
            pvs = mbd.getPropertyValues();
        }
        PropertyDescriptor[] filteredPds = filterPropertyDescriptorsForDependencyCheck(bw, mbd.allowCaching);
        if (hasInstAwareBpps) {
            for (BeanPostProcessor bp : getBeanPostProcessors()) {
                if (bp instanceof InstantiationAwareBeanPostProcessor) {
                    InstantiationAwareBeanPostProcessor ibp = (InstantiationAwareBeanPostProcessor) bp;
                    // TODO @Autowire @Resource @Value @Inject 等注解的依赖注入过程
                    pvs = ibp.postProcessPropertyValues(pvs, filteredPds, bw.getWrappedInstance(), beanName);
                    if (pvs == null) {
                        return;
                    }
                }
            }
        }
        if (needsDepCheck) {
            checkDependencies(beanName, mbd, filteredPds, pvs);
        }
    }
    if (pvs != null) {
        // 注入配置文件中<property>配置的属性
        applyPropertyValues(beanName, mbd, bw, pvs);
    }
}
上面方法中的applyPropertyValues()方法基本都是用于SpringMVC中采用xml配置Bean的方法。我们主要看的是pvs = ibp.postProcessPropertyValues(pvs, filteredPds, bw.getWrappedInstance(), beanName);这行代码,这行代码是真正执行采用@Autowire @Value 等注解的依赖注入过程。
接着往下看
// AutowiredAnnotationBeanPostProcessor类
@Override
public PropertyValues postProcessPropertyValues(
        PropertyValues pvs, PropertyDescriptor[] pds, Object bean, String beanName) throws BeanCreationException {
    // 遍历,获取@Autowire,@Resource,@Value,@Inject等具备注入功能的注解
    InjectionMetadata metadata = findAutowiringMetadata(beanName, bean.getClass(), pvs);
    try {
        // 属性注入
        metadata.inject(bean, beanName, pvs);
    } catch (BeanCreationException ex) {
        throw ex;
    } catch (Throwable ex) {
        throw new BeanCreationException(beanName, "Injection of autowired dependencies failed", ex);
    }
    return pvs;
}
AutowiredAnnotationBeanPostProcessor类实现了postProcessPropertyValues()方法。findAutowiringMetadata(beanName, bean.getClass(), pvs);方法会寻找在当前类中的被@Autowire,@Value等具备注入功能的注解的属性。
metadata.inject(bean, beanName, pvs);方法开始执行注入的逻辑。
// AutowiredAnnotationBeanPostProcessor类
@Override
protected void inject(Object bean, @Nullable String beanName, @Nullable PropertyValues pvs) throws Throwable {
    // 需要注入的字段
    Field field = (Field) this.member;
    // 需要注入的属性值
    Object value;
    if (this.cached) {
        value = resolvedCachedArgument(beanName, this.cachedFieldValue);
    } else {
        // @Autowired(required = false),当在该注解中设置为false的时候,如果有直接注入,没有跳过,不会报错。
        DependencyDescriptor desc = new DependencyDescriptor(field, this.required);
        desc.setContainingClass(bean.getClass());
        Set<String> autowiredBeanNames = new LinkedHashSet<>(1);
        Assert.state(beanFactory != null, "No BeanFactory available");
        TypeConverter typeConverter = beanFactory.getTypeConverter();
        try {
            // 通过BeanFactory 解决依赖关系
            // 比如在webController中注入了webService,这个会去BeanFactory中去获取webService,也就是getBean()的逻辑。
            // 如果存在直接返回,不存在再执行createBean()逻辑。
            // 如果在webService中依然依赖,依然会去递归。
            // 这里是一个复杂的递归逻辑。
            value = beanFactory.resolveDependency(desc, beanName, autowiredBeanNames, typeConverter);
        } catch (BeansException ex) {
            throw new UnsatisfiedDependencyException(null, beanName, new InjectionPoint(field), ex);
        }
        synchronized (this) {
            if (!this.cached) {
                if (value != null || this.required) {
                    this.cachedFieldValue = desc;
                    registerDependentBeans(beanName, autowiredBeanNames);
                    if (autowiredBeanNames.size() == 1) {
                        String autowiredBeanName = autowiredBeanNames.iterator().next();
                        if (beanFactory.containsBean(autowiredBeanName) &&
                                beanFactory.isTypeMatch(autowiredBeanName, field.getType())) {
                            this.cachedFieldValue = new ShortcutDependencyDescriptor(
                                    desc, autowiredBeanName, field.getType());
                        }
                    }
                } else {
                    this.cachedFieldValue = null;
                }
                this.cached = true;
            }
        }
    }
    if (value != null) {
        ReflectionUtils.makeAccessible(field);
        field.set(bean, value);
    }
}
看这行代码:value = beanFactory.resolveDependency(desc, beanName, autowiredBeanNames, typeConverter);注意beanFactory依旧是我们熟悉的IoC容器的具体产品,也就是实现类DefaultListableBeanFactory。见到就说一遍,方便大家记住它,很重要。
在resolveDependency()方法中经过一顿操作,最终又会来到上面的getBean()方法。以上就是依赖注入的整个过程。
initializeBean():调用Bean的初始化方法
设置Bean的初始化方法有两种方法,一种是在xml或者@Bean指定init-method方法。另一种是让bean实现InitializingBean接口重写afterPropertiesSet()方法。
// AbstractAutowireCapableBeanFactory类
protected Object initializeBean(final String beanName, final Object bean, @Nullable RootBeanDefinition mbd) {
    if (System.getSecurityManager() != null) {
        AccessController.doPrivileged((PrivilegedAction<Object>) () -> {
            invokeAwareMethods(beanName, bean);
            return null;
        }, getAccessControlContext());
    }
    else {
        //在调用Bean的初始化方法之前,调用一系列的aware接口实现,把相关的BeanName,BeanClassLoader,以及BeanFactory注入到Bean中去。
        invokeAwareMethods(beanName, bean);
    }

    Object wrappedBean = bean;
    if (mbd == null || !mbd.isSynthetic()) {
        // 这些都是钩子方法,在反复的调用,给Spring带来了极大的可拓展性
        // 初始化之前调用BeanPostProcessor
        wrappedBean = applyBeanPostProcessorsBeforeInitialization(wrappedBean, beanName);
    }

    try {
        // 调用指定的init-method方法
        invokeInitMethods(beanName, wrappedBean, mbd);
    }
    catch (Throwable ex) {
        throw new BeanCreationException(
                (mbd != null ? mbd.getResourceDescription() : null),
                beanName, "Invocation of init method failed", ex);
    }
    if (mbd == null || !mbd.isSynthetic()) {
        // 这些都是钩子方法,在反复的调用,给Spring带来了极大的可拓展性
        // 初始化之后调用BeanPostProcessor
        wrappedBean = applyBeanPostProcessorsAfterInitialization(wrappedBean, beanName);
    }

    return wrappedBean;
}
在调用Bean的初始化方法之前,调用一系列的aware接口实现,把相关的BeanName,BeanClassLoader,以及BeanFactory注入到Bean中去。接着会执行invokeInitMethods()方法。
// AbstractAutowireCapableBeanFactory类
protected void invokeInitMethods(String beanName, final Object bean, @Nullable RootBeanDefinition mbd)
        throws Throwable {
    // 除了使用init-method指定的初始化方法,还可以让bean实现InitializingBean接口重写afterPropertiesSet()方法
    boolean isInitializingBean = (bean instanceof InitializingBean);
    if (isInitializingBean && (mbd == null || !mbd.isExternallyManagedInitMethod("afterPropertiesSet"))) {
        if (logger.isDebugEnabled()) {
            logger.debug("Invoking afterPropertiesSet() on bean with name '" + beanName + "'");
        }
        if (System.getSecurityManager() != null) {
            try {
                AccessController.doPrivileged((PrivilegedExceptionAction<Object>) () -> {
                    ((InitializingBean) bean).afterPropertiesSet();
                    return null;
                }, getAccessControlContext());
            }
            catch (PrivilegedActionException pae) {
                throw pae.getException();
            }
        }
        else {
            // 执行afterPropertiesSet()方法进行初始化
            ((InitializingBean) bean).afterPropertiesSet();
        }
    }

    // 先执行afterPropertiesSet()方法,再进行init-method
    if (mbd != null && bean.getClass() != NullBean.class) {
        String initMethodName = mbd.getInitMethodName();
        if (StringUtils.hasLength(initMethodName) &&
                !(isInitializingBean && "afterPropertiesSet".equals(initMethodName)) &&
                !mbd.isExternallyManagedInitMethod(initMethodName)) {
            invokeCustomInitMethod(beanName, bean, mbd);
        }
    }
}
可见该方法中首先判断Bean是否配置了init-method方法,如果有,那么通过invokeCustomInitMethod()方法来直接调用。其中在invokeCustomInitMethod()方法中是通过JDK的反射机制得到method对象,然后调用的init-method。最终完成Bean的初始化。
备注:因为篇幅太长,所以里面的一些代码可能会因为版本关系导致代码不完全一样,但是处理逻辑基本是一样的。
转自:
https://www.cnblogs.com/hello-shf/category/1456313.html

 浙公网安备 33010602011771号