【Flume】知识点整理
总结的较长,放一篇了,可以看目录
组件
Agent组件
本质就是一个JVM进程:以事件的形式,将数据从源头送至目的地;
主要有三个部分:
Source
负责接收数据到Flume Agent组件中;
Source可以处理各种格式,类型的日志:Avro,Thrift,JMS,HTTP,Exec等等
- Avro Source
- Netcat Source
- Thrift Source
- Exec Source
- JMS Source
Channel
位于Source和Sink之间的缓冲区,因此允许Source和Sink的处理速率不同;
Channel线程安全,可以同时处理多个Source的写入操作和多个Sink的读取操作;
主要两种Channel:
- Memory Channel:将事件写入内存,速度快,但是数据会因程序死亡,机器宕机而丢失;
- File Channel:将事件写入磁盘,速度慢,但是数据不会丢失;
Sink
不断的轮讯Channel中的事件,批量的移除他们,并将这些事件存储到指定的存储系统或发送至一个新的Agent;
- Sink是完全事务性的;
- Sink的一整个事务的逻辑:将事件从Channel中读取出来,发送给Sink的目标位置,当目标,接受完成,Sink将Channel中的事件移除;
- 详细看<Flume事务>
Sink组件的目的地:HDFS,Logger,Avro,Thrift,HBase
- HDFS Sink
- Kafka Sink
- Avro Sink
- HBase Sink
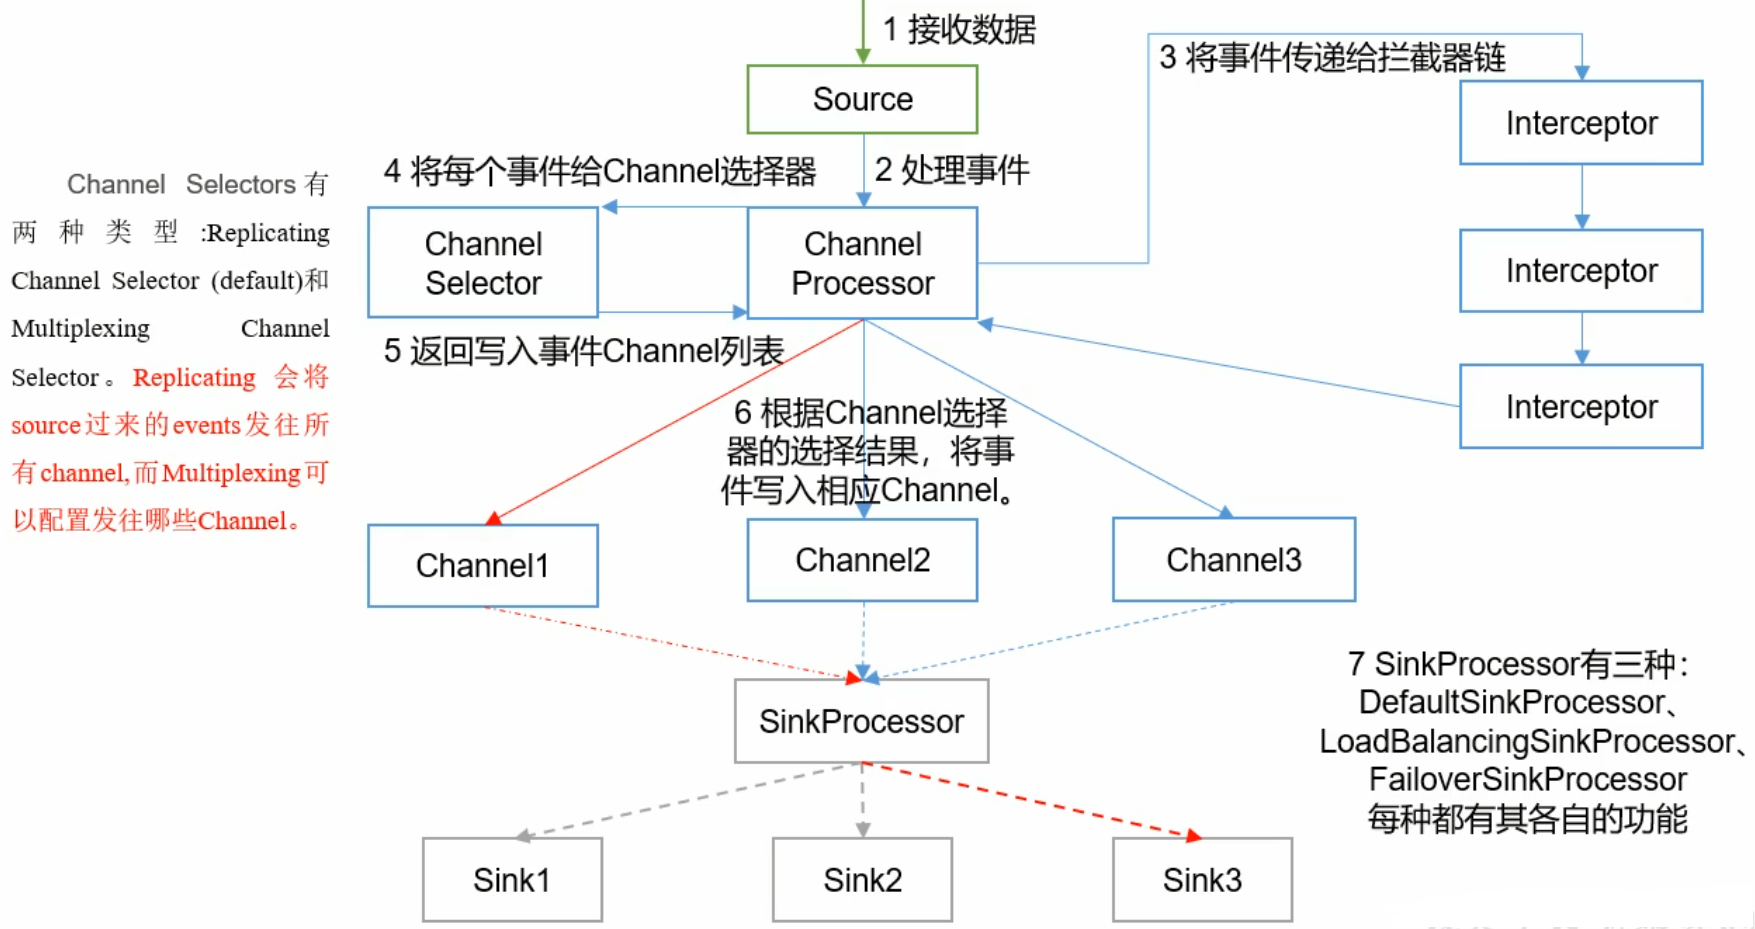
Agent内部原理
配置
-
flume-env.sh
export JAVA_HOME=/home/whr/workbench/jdk1.8 -
具体的任务,使用具体的配置文件
-
启动:
./bin/flume-ng agent --conf conf --conf-file example.conf --name a1 -Dflume.root.logger=INFO,console
案例
监听NetCat
# 声明一个Agent:a1
a1.sources = r1
a1.channels = c1
a1.sinks = k1
# 配置每一个source的类型,监听的Ip,Port
a1.sources.r1.type = netcat
a1.sources.r1.bind=localhost
a1.sources.r1.port=9999

# 配置每个sink的类型
a1.sinks.k1.type = logger
# 配置Channel的类型,容量(单位:事件),
a1.channels.c1.type = memory
a1.channels.c1.capacity = 1000
# 一次传输的数据量
a1.channels.c1.transactionCapacity=100

# 绑定(Source和Sink都可以有多个,需要绑定)
a1.sources.r1.channels=c1
a1.sinks.k1.channel=c1
# sink的Channel只能有一个
Flume充当客户端;
# 启动Flume
$ ./bin/flume-ng agent --conf conf --conf-file ./conf/netcat-flume.conf --name a1 -Dflume.root.logger=INFO,console
# 使用下面命令传输数据
$ nc localhost 9999
实时监控单个追加文件

-
要输出到HDFS,就需要Hadoop相关jar包
-
创建file-flume-hdfs.conf文件
# 声明一个Agent:a1 a1.sources = r1 a1.channels = c1 a1.sinks = k1 # Source的type:exec a1.sources.r1.type=exec # 监控的文件的路径 -F失败重试 a1.sources.r1.command=tail -f /home/whr/workbench/hive/logs/hive.log # sink的类型 a1.sinks.k1.type = logger # 配置Channel的类型,容量(单位:事件), a1.channels.c1.type = memory a1.channels.c1.capacity = 1000 # 一次传输的数据量 a1.channels.c1.transactionCapacity=100 # 绑定(Source和Sink都可以有多个,需要绑定) a1.sources.r1.channels=c1 a1.sinks.k1.channel=c1 # sink的Channel只能有一个 -
启动flume
-
可以实时监控某一个文件的动态变化日志;
实时监控目录下多个新文件

-
创建配置文件dir-flume-hdfs.conf
a2.sources=r2 a2.sinks=k2 a2.channels=c2 a2.sources.r2.type=spooldir # 监控目录 a2.sources.r2.spoolDir=/home/whr/Desktop/update # 忽略.tmp文件 a2.sources.r2.ignorePattern = ([^ ]*\.tmp) a2.sinks.k2.type=hdfs # hdfs路径 a2.sinks.k2.hdfs.path=hdfs://master:9000/flume/data # 上传文件的前缀 a2.sinks.k2.hdfs.filePrefix=logs- # 是否按时间滚动文件夹 a2.sinks.k2.hdfs.round=true # 多长时间创建一个新的文件夹 a2.sinks.k2.hdfs.roundValue=1 # 重新定义时间单位 a2.sinks.k2.hdfs.roundUnit=hour # 是否使用本地时间戳 a2.sinks.k2.hdfs.useLocalTimeStamp=true # 积攒多少个Event才flush到hdfs一次 a2.sinks.k2.hdfs.rollInterval=30 # 设置每个文件的滚动大小 a2.sinks.k2.hdfs.rollSize=134217700 # 文件滚动与Event的数量无关 a2.sinks.k2.hdfs.rollCount=0 a2.channels.c2.type=memory a2.channels.c2.capacity=1000 a2.channels.c2.transactionCapacity=100 a2.sources.r2.channels=c2 a2.sinks.k2.channel=c2 -
启动flume
$ ./bin/flume-ng agent -c conf/ -f ./conf/demo/dir-flume-hdfs.conf --name a2 -
发现目标目录中的文件都会被添加一个后缀名:COMPLETED
-rw-r--r-- 1 whr whr 11 11月 23 21:01 a.txt.COMPLETED -rw-r--r-- 1 whr whr 12 11月 23 21:01 b.txt.COMPLETED -rw-r--r-- 1 whr whr 12 11月 23 21:01 c.txt.COMPLETED -rw-r--r-- 1 whr whr 4 11月 23 21:07 d.txt.COMPLETED -
只能监控新增的文件,对于文件的修改是不允许,也监控不到的;
实时监控目录下多个追加文件

-
创建配置文件files-flume-hdfs.conf
# 声明一个Agent:a1 a1.sources = r1 a1.channels = c1 a1.sinks = k1 # Source的type:TAILDIR a1.sources.r1.type=TAILDIR a1.sources.r1.filegroups=f1 a1.sources.r1.filegroups.f1=/home/whr/Desktop/update/.*.txt # 为每一个监控的文件保存一个inode绝对路径 a1.sources.r1.positionFile=/home/whr/workbench/flume-1.9/position/position.json # sink的类型 a1.sinks.k1.type = logger # 配置Channel的类型,容量(单位:事件), a1.channels.c1.type = memory a1.channels.c1.capacity = 1000 # 一次传输的数据量 a1.channels.c1.transactionCapacity=100 # 绑定(Source和Sink都可以有多个,需要绑定) a1.sources.r1.channels=c1 a1.sinks.k1.channel=c1 # sink的Channel只能有一个 -
启动Flume
$ ./bin/flume-ng agent -c conf/ -f ./conf/demo/files-flume-hdfs.conf --name a1 -Dflume.root.logger=INFO,console -
实时追加文本到目录下的任意文件,控制台都能监控到
$ echo hello >> update/b.txt -
看一下postion/position.json的文件内容
定位了三个文件的绝对路径和唯一的inode
实时添加新文件到监控路径下,position.json会实时增加新的inode
[{"inode":9571668,"pos":17,"file":"/home/whr/Desktop/update/a.txt"},{"inode":9571669,"pos":24,"file":"/home/whr/Desktop/update/b.txt"},{"inode":9571670,"pos":12,"file":"/home/whr/Desktop/update/c.txt"}]
Flume事务
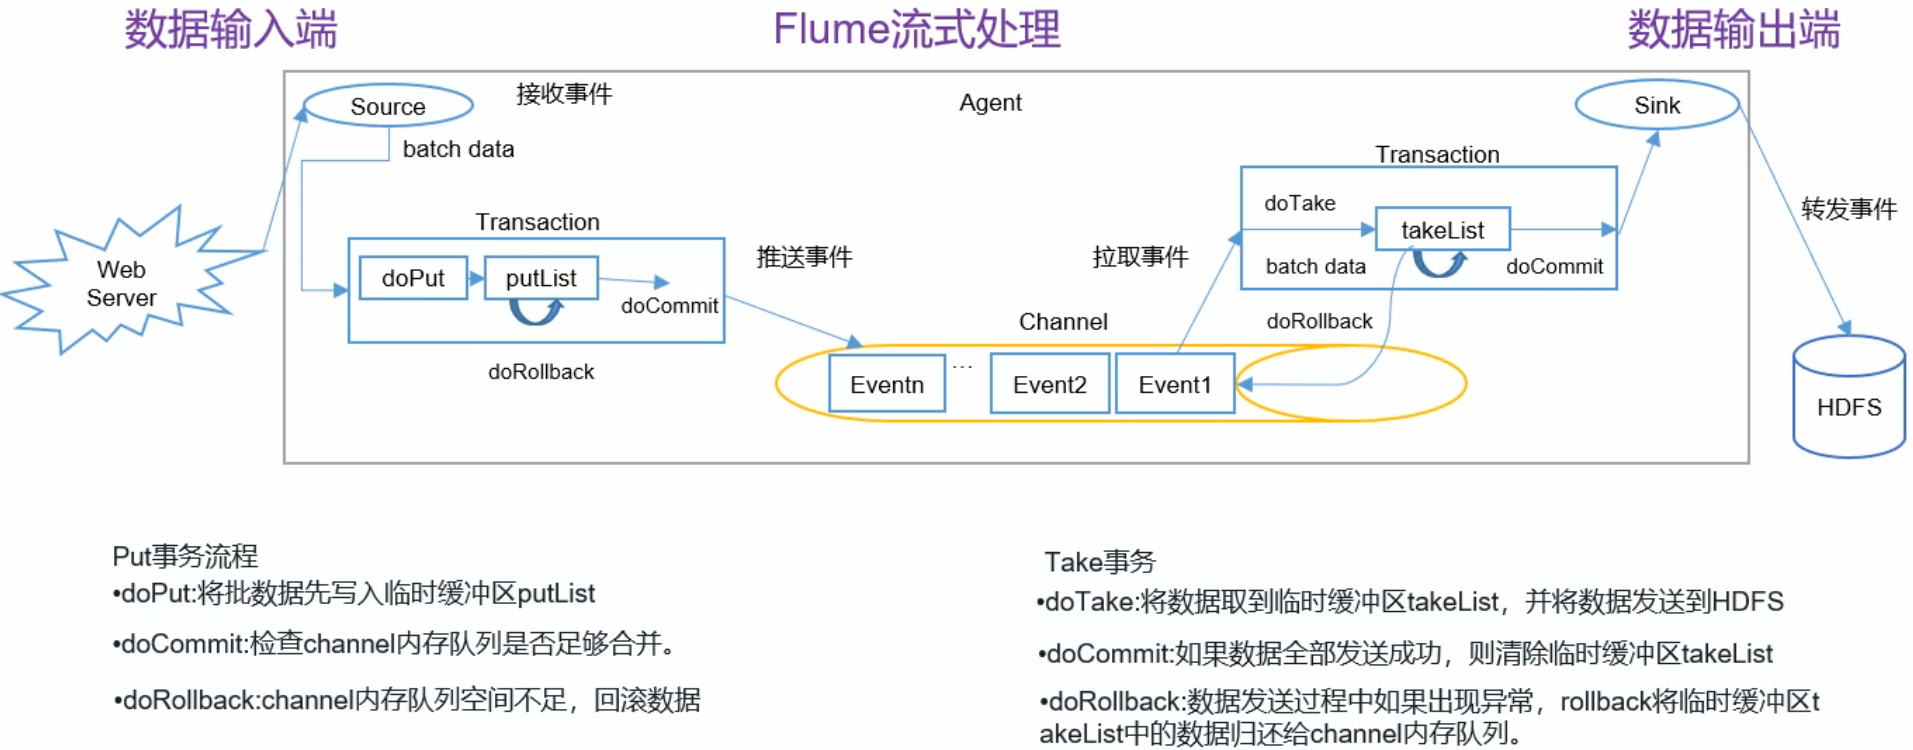
- Channel是完全被动的,只能被Source推送和被Sink拉取;
- 存在两个事务:Source到Channel(Put事务)和Channel到Sink(Take事务);
- Source到Channel:Source将采集的数据存入缓存,再从缓存中存入Channel中,则完成事务;
- Channel到Sink:将事件从Channel中读取出来,发送给Sink的目标位置,当目标,接受完成,Sink将Channel中的事件移除;则完成事务;
- 事务的执行过程的中,都存在缓冲区;
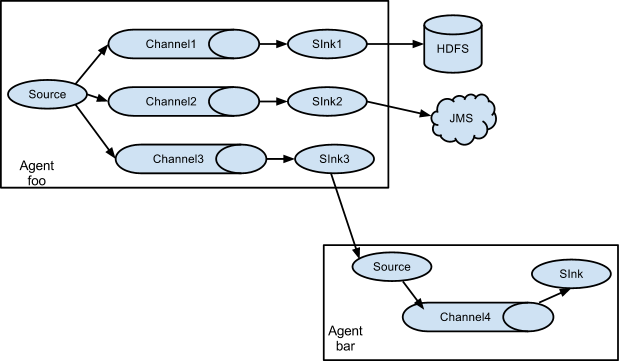
Flume拓扑结构
简单串联

复制和多路复用
这种结构可以实现多副本结构,对同一个资源,产生多个副本,用于不同的用途;
案例:
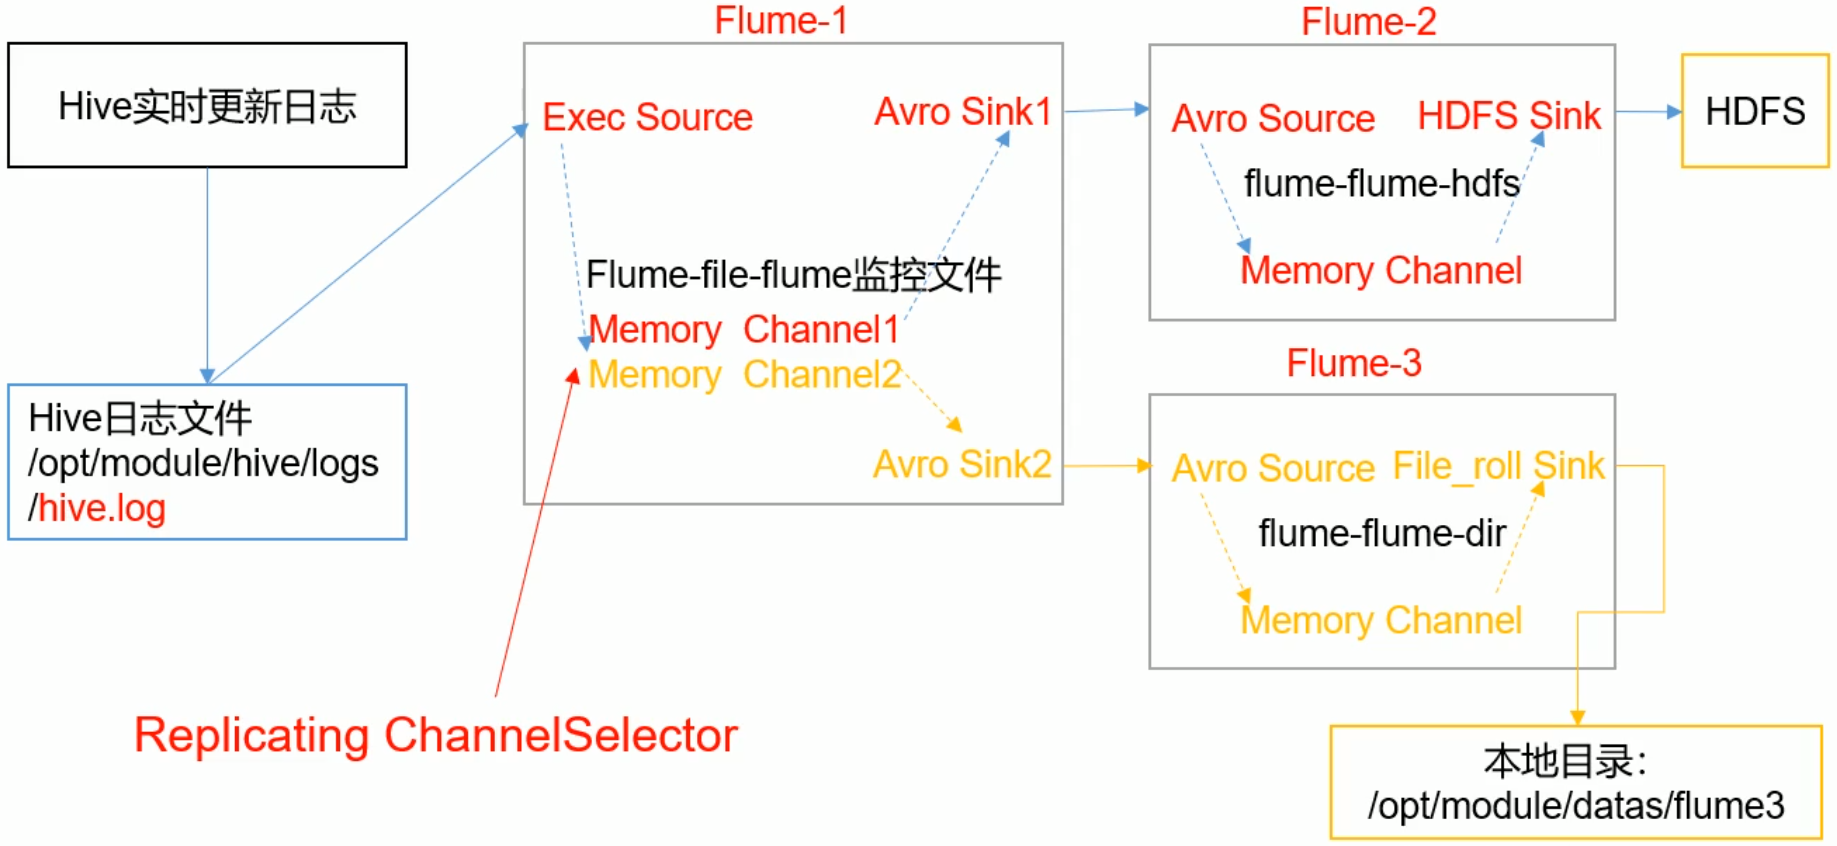
- Flume1:监控日志文件的变动,产生两个副本,分发给Flume2,Flume3
- Flume2:将日志存储在HDFS
- Flume3:将日志存储在本地文件目录
负载均衡和故障转移
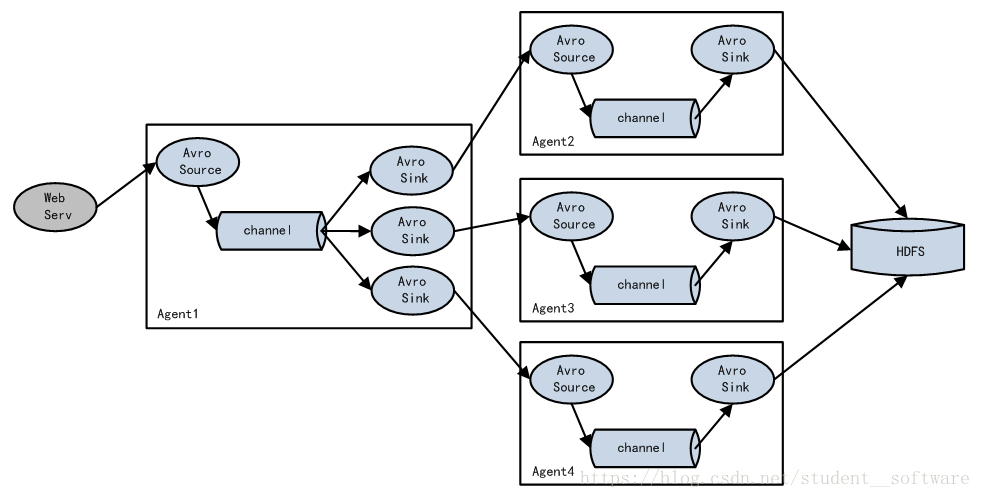
- 负载均衡:使用多个sink进行负载均衡
- 故障转移:如果其中一个子Agent出现故障,依然可以使用其他的Agent
聚合

集群模式:将多个集群的数据采集,统一处理;
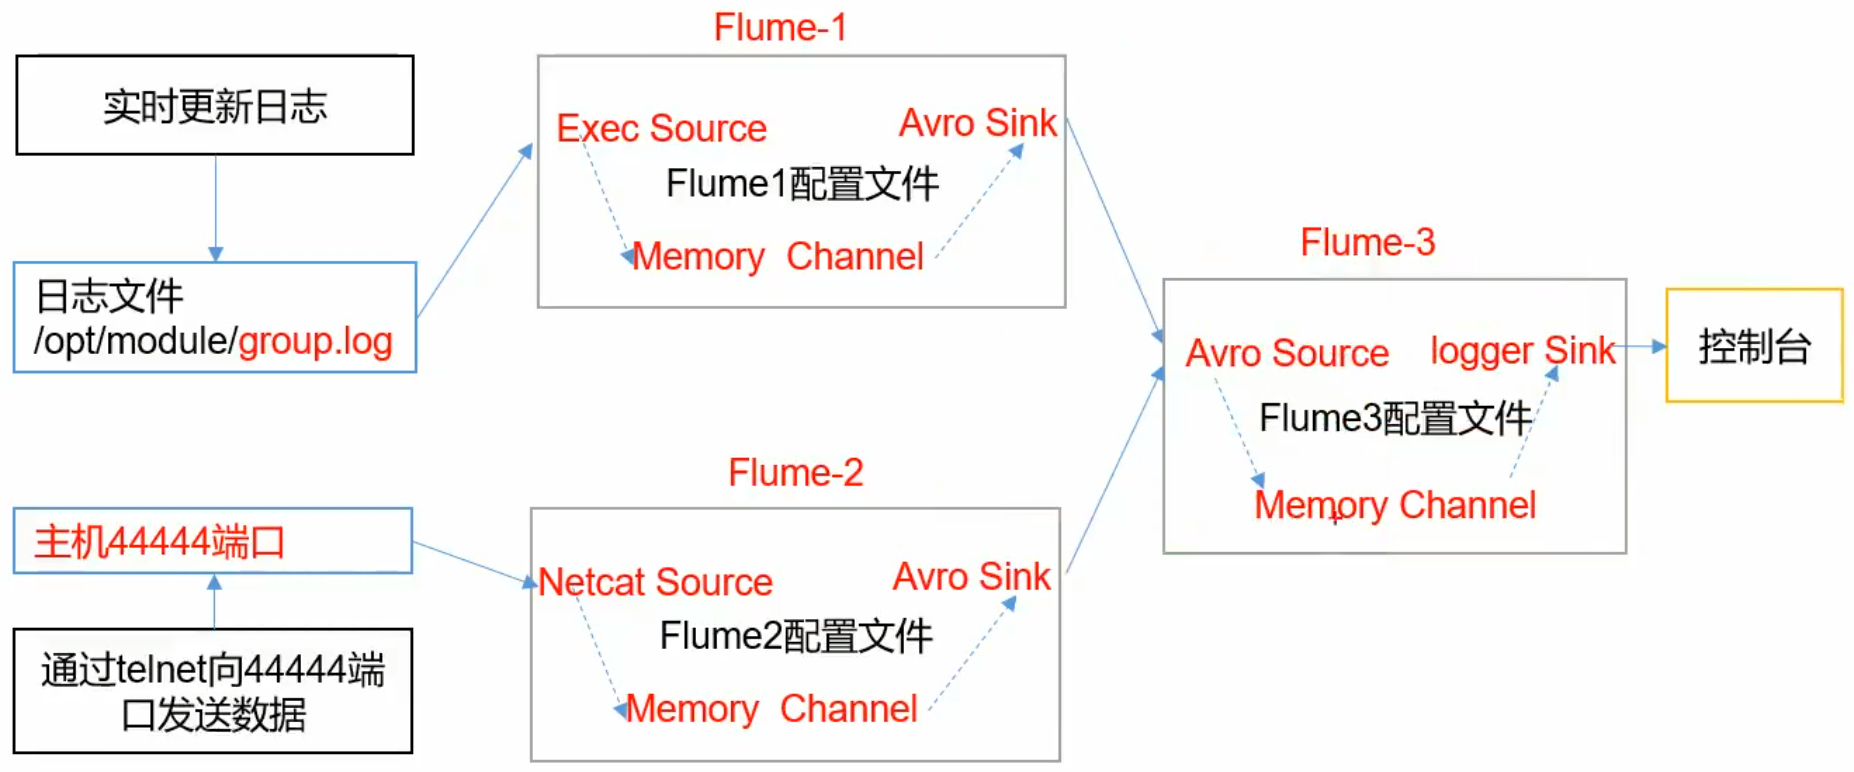
- Flume1,Flume2采集各个集群的数据,发送给Flume3;
- Flume3进行数据的聚合,打印到控制台;
配置Flume-1
# Flume-1 采集文件数据
a1.sources = r1
a1.channels = c1
a1.sinks = k1
# Source的type:exec
a1.sources.r1.type=TAILDIR
a1.sources.r1.filegroups=f1
a1.sources.r1.filegroups.f1=/home/whr/flumeData/flumeLog.txt
# 为每一个监控的文件保存一个inode绝对路径
a1.sources.r1.positionFile=/home/whr/workbench/flume-1.9/position/position.json
# Channel
a1.channels.c1.type = memory
a1.channels.c1.capacity = 1000
a1.channels.c1.transactionCapacity=100
# Sink
a1.sinks.k1.type=avro
a1.sinks.k1.hostname=master
a1.sinks.k1.port=9999
# bind
a1.sources.r1.channels=c1
a1.sinks.k1.channel=c1
配置Flume-2
# Flume-2:监听netcat端口
a2.sources = r1
a2.channels = c1
a2.sinks = k1
# 读取本机netcat的数据
a2.sources.r1.type = netcat
a2.sources.r1.bind=localhost
a2.sources.r1.port=9999
# Channel
a2.channels.c1.type = memory
a2.channels.c1.capacity = 1000
a2.channels.c1.transactionCapacity=100
# Sink
a2.sinks.k1.type=avro
a2.sinks.k1.hostname=master
a2.sinks.k1.port=9999
# 绑定
a2.sources.r1.channels=c1
a2.sinks.k1.channel=c1
配置Flume-3
这里可以配置两个source,分别监控不同的端口;
# Flume-3
a3.sources = r1
a3.channels = c1
a3.sinks = k1
# Source:接受Flume-1,Flume-2的数据
a3.sources.r1.type=avro
a3.sources.r1.bind=master
a3.sources.r1.port=9999
# Channel
a3.channels.c1.type = memory
a3.channels.c1.capacity = 1000
a3.channels.c1.transactionCapacity=100
# sink
a3.sinks.k1.type = logger
# 绑定
a3.sources.r1.channels=c1
a3.sinks.k1.channel=c1
顺序启动Flume-3,Flume-1,Flume-2
# Flume-3
$ ./bin/flume-ng agent -c conf/ -f conf/demo/flume3.conf -n a3 -Dflume.root.logger=INFO,console
# Flume-1
$ ./bin/flume-ng agent -c conf/ -f conf/demo/flume1.conf -n a1
# Flume-2
$ ./bin/flume-ng agent -c conf/ -f conf/demo/flume2.conf -n a2
- 这样Flume3的控制台就可以监控Flume-1,Flume-2的数据变动;
自定义Intercept
主要是过滤不同类型的日志,分发给不同的分析系统;
下图Flume-1应该有两个Channel,分别绑定两个Sink

自定义拦截器
打成jar包,放到对应的Flume的lib目录下
/**
 * 自定义Flume的Interceptor
 * 1. 实现Interceptor接口
 * 2. 重写4个方法
 * 3. 定义静态内部Builder类实现Interceptor.Builder
 */
public class TypeInterceptor implements Interceptor {
    // 声明一个事件集合
    private List<Event> headerEvents;
    public void initialize() {
        // 初始化事件集合
        headerEvents=new ArrayList<Event>();
    }
    /**
     * 单个事件拦截
     * @param event:接收的每个Event
     * @return
     */
    public Event intercept(Event event) {
        /**
         * 1. 获取事件的头信息(Key-Value)
         * 2. 获取事件的body信息(字节流),包装成String
         * 3. 业务逻辑:根据body的日志类型,添加不同的头信息到headers
         */
        Map<String, String> headers = event.getHeaders();
        byte[] bodyBtyes = event.getBody();
        String body = new String(bodyBtyes);
        // 业务逻辑:全为英文返回event1,否则返回event2
        if (body.matches("[a-zA-Z]+")){
            headers.put("type","event1");
        }else {
            headers.put("type","event2");
        }
        return event;
    }
    /**
     * 批量事件的拦截
     * @param list
     * @return
     */
    public List<Event> intercept(List<Event> list) {
        /**
         * 1. 清空集合
         * 2. 为每一个事件添加头信息
         * 3. 返回处理过后的headers集合
         */
        headerEvents.clear();
        for (Event event:headerEvents){
            Event res = intercept(event);
            headerEvents.add(res);
        }
        return headerEvents;
    }
    public void close() {
    }
    // 静态内部类
    public static class Builder implements Interceptor.Builder{
        public Interceptor build() {
            return new TypeInterceptor();
        }
        public void configure(Context context) {
        }
    }
}
配置conf文件
-
Flume-1:需要配置两个sink,并将jar包放在此机器下
# Flume-3 a3.sources = r1 a3.channels = c1 c2 a3.sinks = k1 k2 # Source: a3.sources.r1.type = netcat a3.sources.r1.bind = localhost a3.sources.r1.port = 9999 # Interceptor a3.sources.r1.interceptors = i1 a3.sources.r1.interceptors.i1.type= flume.interceptor.TypeInterceptor$Builder # channel selector a3.sources.r1.selector.type=multiplexing a3.sources.r1.selector.header=type # 不同事件绑定不同的Channel a3.sources.r1.selector.mapping.event1=c1 a3.sources.r1.selector.mapping.event2=c2 # Channel-1 a3.channels.c1.type = memory a3.channels.c1.capacity = 1000 a3.channels.c1.transactionCapacity=100 # Channel-2 a3.channels.c2.type = memory a3.channels.c2.capacity = 1000 a3.channels.c2.transactionCapacity=100 # sink1 a3.sinks.k1.type = avro a3.sinks.k1.hostname=slave1 a3.sinks.k1.port=9999 # sink2 a3.sinks.k2.type = avro a3.sinks.k2.hostname=slave2 a3.sinks.k2.port=9999 # 绑定 a3.sources.r1.channels=c1 c2 a3.sinks.k1.channel=c1 a3.sinks.k2.channel=c2 -
Flume-2,Flume-3配置相同
但是a1.sources.r1.bind = slave1绑定当前机器
# Flume-1:监听master的9999端口信息
a1.sources = r1
a1.channels = c1
a1.sinks = k1
# Source:监听master
a1.sources.r1.type = avro
a1.sources.r1.bind = slave1
a1.sources.r1.port = 9999
# Channel-1
a1.channels.c1.type = memory
a1.channels.c1.capacity = 1000
a1.channels.c1.transactionCapacity=100
# sink1
a3.sinks.k1.type = logger
# 绑定
a1.sources.r1.channels=c1
a1.sinks.k1.channel=c1
启动:
先启动Flume2,3,最后启动flume1
# 启动Flume-2,3
$ ./bin/flume-ng agent -c conf/ -f conf/demo/flume-interceptor-1.conf -n a1 -Dflume.root.logger=INFO,console

$ ./bin/flume-ng agent -c conf/ -f conf/demo/flume-interceptor-2.conf -n a2 -Dflume.root.logger=INFO,console
# 启动Flume-1
$ ./bin/flume-ng agent -c conf/ -f conf/demo/flume-interceptor-3.conf -n a3
- 这样,启动netcat之后,输入文本,在Flume2,3中可以看到控制台过滤不同信息
自定义Source
自定义Source
public class MySource extends AbstractSource implements Configurable, PollableSource {
    // 定义前缀,后缀;工程中是从配置文件中读取
    private String prefix;
    private String subfix;
    /**
     * 1. 给事件定义一些前缀,来封装成我们需要的事件的格式
     * 2. 前缀是从配置文件中读取出来
     */
    public void configure(Context context) {
        context.getString("prefix","prefix");
        context.getString("subfix","subfix");
    }
    public Status process() throws EventDeliveryException {
        /**
         * 核心方法
         * 1. 接收数据
         * 2. 封装成事件(封装为Header和Boby)
         * 3. 将事件传给Channel
         */
        Status status=null;
        try {
            for (int i = 0; i < 5; i++) {
                // 拿到数据,封装成Event
                SimpleEvent event = new SimpleEvent();
                // 对Event进行自定义处理
                event.setBody((prefix+"<=====>message<=====>"+subfix).getBytes());
                // 将事件传给了Channel
                getChannelProcessor().processEvent(event);
                status = Status.READY;
            }
        } catch (Exception e) {
            e.printStackTrace();
            status = Status.BACKOFF;
        }
        // 让此方法有一些间隙,2秒执行一次
        try {
            Thread.sleep(2000);
        } catch (InterruptedException e) {
            e.printStackTrace();
        }
        return status;
    }
    public long getBackOffSleepIncrement() {
        return 0;
    }
    public long getMaxBackOffSleepInterval() {
        return 0;
    }
}
配置文件(这里仅配置一个做测试)
a1.sources = r1
a1.channels = c1
a1.sinks = k1

a1.sources.r1.type = flume.source.MySource
a1.sources.r1.prefix=UserId
a1.sources.r1.subfix=log in

a1.sinks.k1.type = logger

a1.channels.c1.type = memory
a1.channels.c1.capacity = 1000
a1.channels.c1.transactionCapacity=100

a1.sources.r1.channels=c1
a1.sinks.k1.channel=c1
启动
$ ./bin/flume-ng agent -c conf/ -f conf/demo/flume-source-3.conf -n a1 -Dflume.root.logger=INFO,console
自定义Sink
Sink不断轮讯Channel,将事件从Channel中移除,
测试流程:Source(netcat)-----Channel------自定义Sink
Sink自定义代码
public class MySink extends AbstractSink implements Configurable {

    // 自定义前后缀
    private String prefix;
    private String subfix;
    // 我们测试将sink输出到logger
    private Logger logger = LoggerFactory.getLogger(MySink.class);
    public void configure(Context context) {
        prefix=context.getString("prefix","prefix");
        subfix=context.getString("subfix","subfix");
    }
    public Status process() throws EventDeliveryException {
        /**
         * 1. 获取Channel
         * 2. 从Channel中获取事务,数据
         * 3. 发送数据
         */
        Status status =null;
        /**
         * 拿到Channel
         * 获取事务
         * 开启事务---->拿到Event------>业务处理Event
         * 回滚
         */
        Channel channel = getChannel(); // 是一个synchronized同步方法
        Transaction transaction = channel.getTransaction();
        transaction.begin();
        try {
            Event event = channel.take();
            // 业务处理Evnet
            String bobyString = new String(event.getBody());
            logger.info(bobyString+"==>MySink");
            transaction.commit();
            status=Status.READY;
        } catch (ChannelException e) {
            e.printStackTrace();
            // rollback
            transaction.rollback();
            status=Status.BACKOFF;
        }finally {
            // 关闭事务
            transaction.close();
        }
        return status;
    }
}
置文件
a1.sources = r1
a1.channels = c1
a1.sinks = k1

a1.sources.r1.type=netcat
a1.sources.r1.bind=localhost
a1.sources.r1.port=9999

a1.sinks.k1.type = flume.sink.MySink
a1.sinks.k1.prefix = MySink
a1.sinks.k1.subfix = MySink

a1.channels.c1.type = memory
a1.channels.c1.capacity = 1000
a1.channels.c1.transactionCapacity=100

a1.sources.r1.channels=c1
a1.sinks.k1.channel=c1
运行
$ ./bin/flume-ng agent --conf conf --conf-file ./conf/demo/flume-sink-3.conf --name a1 -Dflume.root.logger=INFO,console
Flume数据流监控
Flume的数据流监控工具:Ganglia(一个工具)
总结
-
Flume三个组件的作用
-
Flume的事务机制
见Flume事务
-
Flume采集的数据会丢失吗
根据Flume的架构,是不会丢失数据;
内部有完善的事务机制——》Flume事务
可能存在的数据丢失的情况:
(1)Channel使用memoryChannel,Agent宕机,导致数据丢失;
(2)Channel存储的数据已满,导致Source不能再写入,这些数据有可能丢失;
-
Flume的数据重复
数据已经由Sink发出,但是没有收到响应,Sink会再次发送数据,导致数据的重复;

 浙公网安备 33010602011771号