第二次作业:卷积神经网络 part 1
-
数学基础
-
矩阵秩的定义:
-
线性方程组的角度:度量矩阵行列之间的相关性
-
数据点分布的角度:表示数据需要的最小的基的数量
-
-
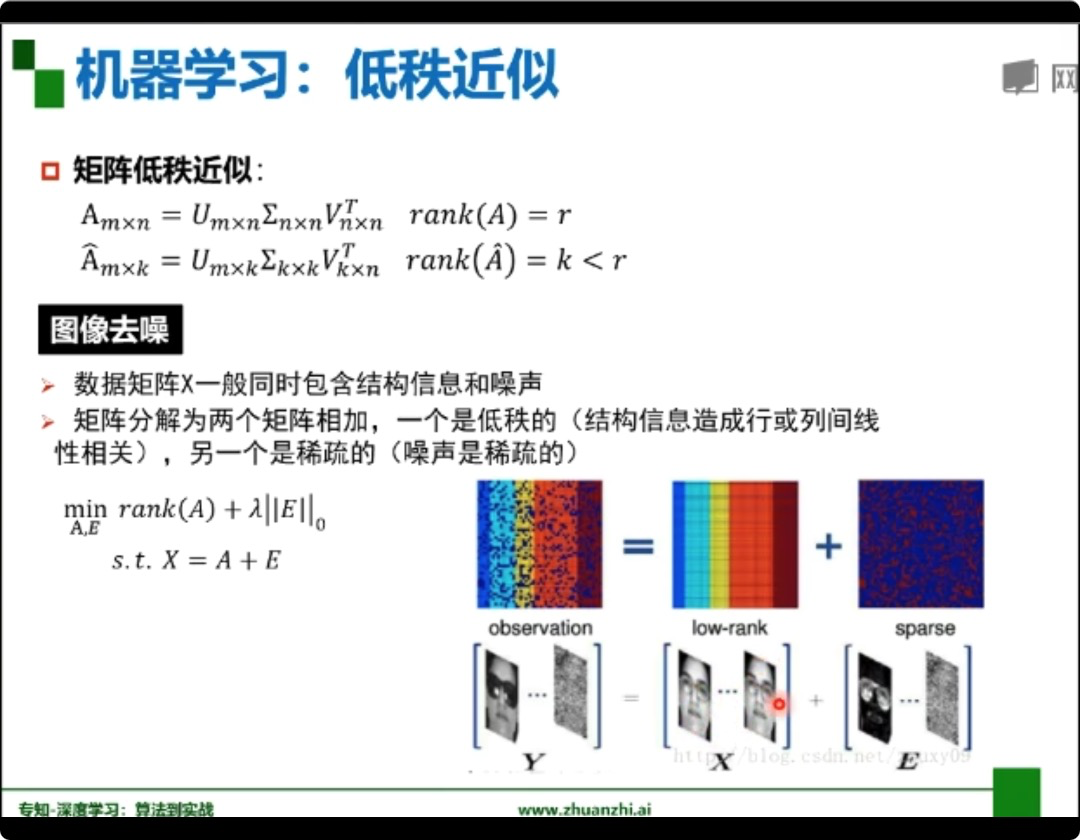
矩阵低秩近似
-
机器学习三要素
-
欠拟合和过拟合
-
欠拟合:训练集的一般性质尚未被学习器学好(训练误差大)
提高模型复杂度:
-
决策树:拓展分支
-
神经网络:增加训练轮数
-
-
过拟合:学习器把训练集特点当作样本的一般特点(训练误差小,测试误差大)
降低模型复杂度
-
优化目标正则项
-
决策树:剪枝
-
神经网络:early stop、dropout
-
数据增广(训练集越大,越不容易过拟合)
-
-
-
-
卷积神经网络
-
卷积神经网络的应用:分类、检测、分割、人脸识别,图像生成
-
传统神经网络VS卷积神经网络
-
深度学习三部曲:搭建神经网络 〉损失函数 〉优化函数
-
全连接网络处理图像问题:参数太多:权重矩阵的参数太多 (过拟合)
-
卷积神经网络的解决方法:局部关联参数共享
-
-
卷积
input :输入
kernel/ filter :卷积核/滤波器
stride:步长
weights:权重
receptive field:感受野
activation map/ feature map 特征图(卷积后的结果)
padding :填充
depth/channel:深度
output:输出
-
池化(pooling):保留了主要特征的同时减少了参数和计算量,防止过拟合,提高模型泛化能力
-
最大值池化:Max pooling
-
平均值池化:Average pooling
-
全连接:两层之间的所有神经元都有权重链接,一般放在卷积神经网络尾部
-
-
-
RESNET解析
-
-
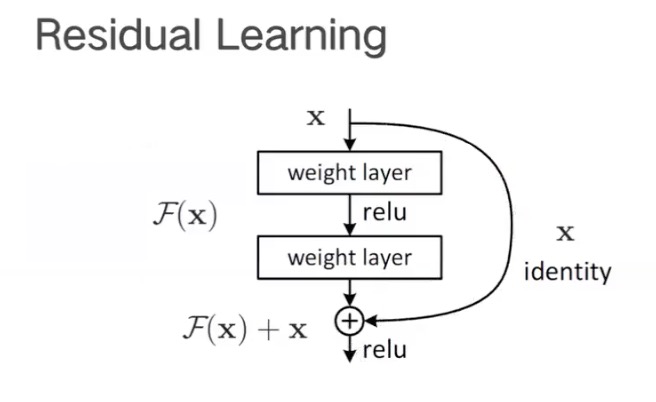
Residual残差:H(x) 由于网络退化不能训练,用F(x) = H(x) - x 来训练。
下图是恒等映射:
-
ResNet = 5 个stage = 若干个block = 若干 layer。使用的是全局最大平均值化,替代全连接,参数减少(pytorch :torch.nn.AdaptiveAvgPool2d(output_size))
-
50层以下的ResNet的每个block都是2层layer,50层以上是3层(BottleNeck瓶颈)

-
代码练习
-
MNIST数据集分类
-
-
class Linear(Module):
...
__constants__ = ['bias']

def __init__(self, in_features, out_features, bias=True):
    super(Linear, self).__init__()
    self.in_features = in_features
    self.out_features = out_features
    self.weight = Parameter(torch.Tensor(out_features, in_features))
    if bias:
        self.bias = Parameter(torch.Tensor(out_features))
    else:
        self.register_parameter('bias', None)
    self.reset_parameters()
...
@weak_script_method
   def forward(self, input):
       return F.linear(input, self.weight, self.bias)
对于
weight: the learnable weights of the module of shape
    :math:`(\text{out\_features}, \text{in\_features})`. The values are
    initialized from :math:`\mathcal{U}(-\sqrt{k}, \sqrt{k})`, where
    :math:`k = \frac{1}{\text{in\_features}}`
对于bias
bias:   the learnable bias of the module of shape :math:`(\text{out\_features})`.
       If :attr:`bias` is ``True``, the values are initialized from
      :math:`\mathcal{U}(-\sqrt{k}, \sqrt{k})` where
      :math:`k = \frac{1}{\text{in\_features}}`
1 import torch
2 nn1 = torch.nn.Linear(100, 50)
3 input1 = torch.randn(140, 100)
4 output1 = nn1(input1)
5 output1.size()
6 torch.Size([140, 50])
执行的操作是: [140,100]×[100,50]=
张量的大小由 140 x 100 变成了 140 x 50
-
结果
-
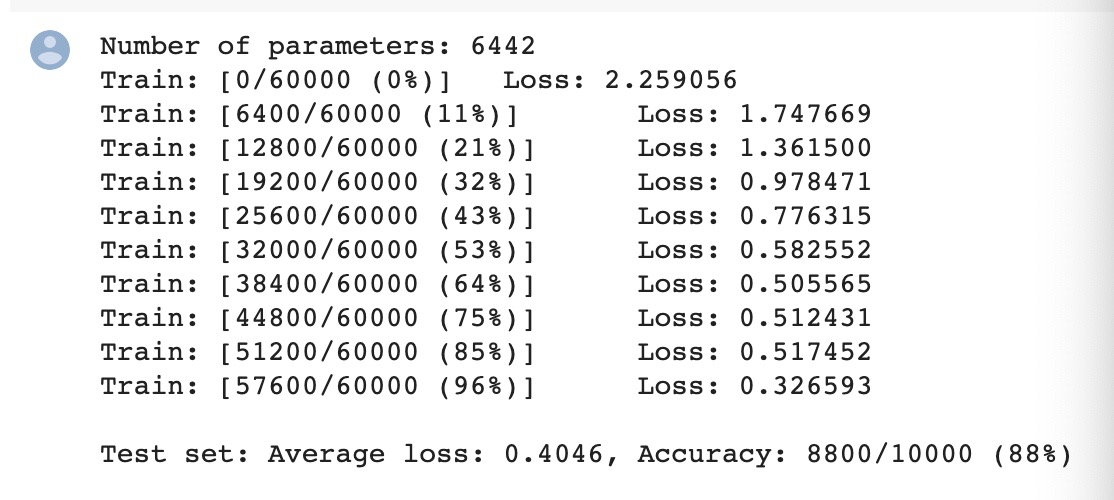
不打乱像素顺序在全连接网络上:
-
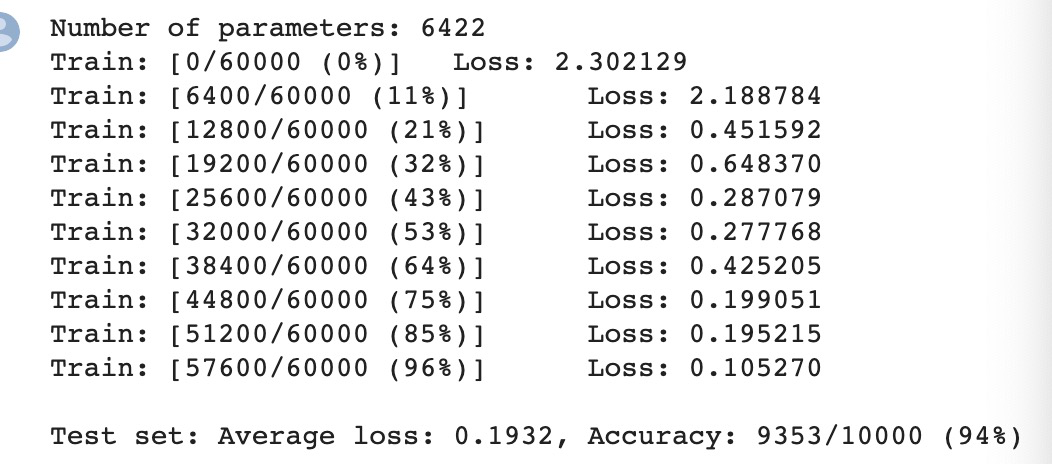
不打乱像素顺序在CNN上:
-
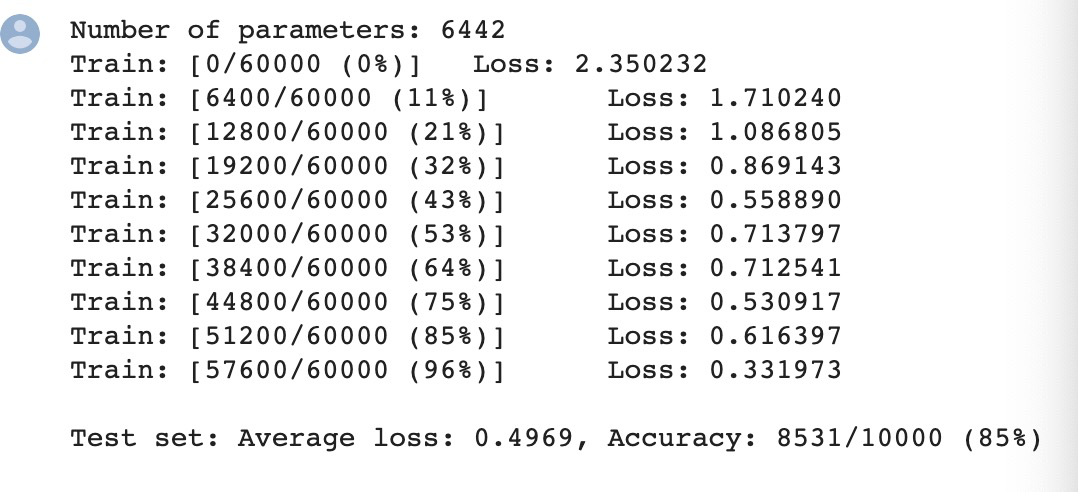
打乱像素顺序在全连接网络上:
-
打乱像素顺序在CNN上:
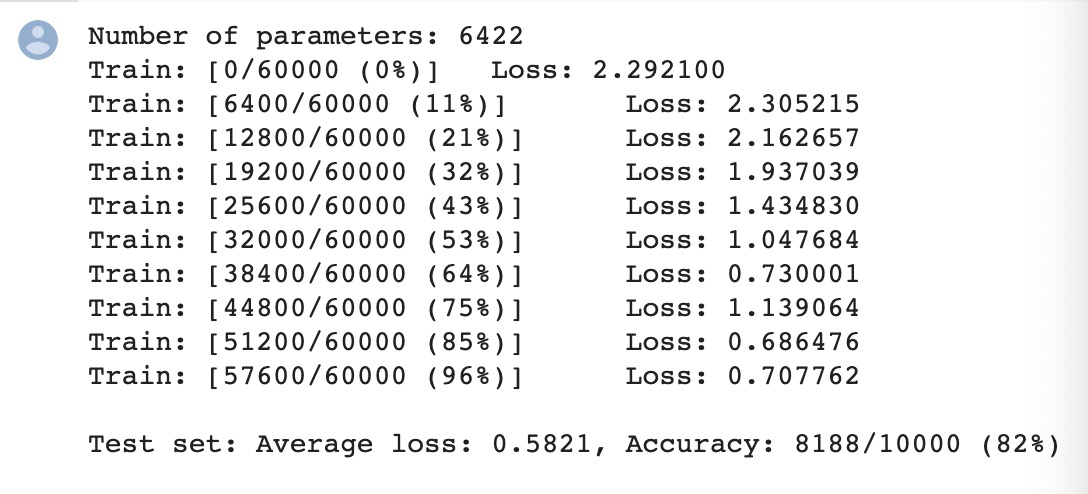
发现CNN会更依赖像素之间的局部关系,打乱顺序以后,这些像素间的关系将无法得到利用。
-
-
-
CIFAR10 数据集分类
-
pytorch中 nn.Conv2d的用法
class torch.nn.Conv2d(in_channels, out_channels, kernel_size, stride=1, padding=0, dilation=1, groups=1, bias=True)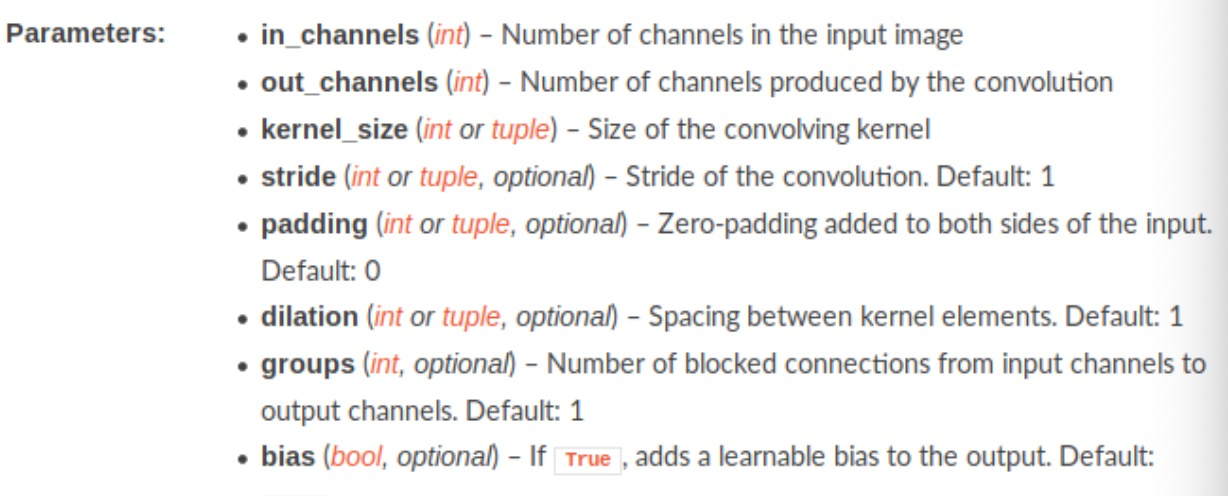
-
pytorch中nn.MaxPool2d的用法
class torch.nn.MaxPool2d(kernel_size, stride=None, padding=0, dilation=1, return_indices=False, ceil_mode=False)-
kernel_size(
intortuple) - max pooling的窗口大小,可以为tuple,在nlp中tuple用更多,(n,1) -
stride(
intortuple,optional) - max pooling的窗口移动的步长。默认值是kernel_size -
padding(
intortuple,optional) - 输入的每一条边补充0的层数 -
dilation(
intortuple,optional) – 一个控制窗口中元素步幅的参数 -
return_indices - 如果等于
True,会返回输出最大值的序号,对于上采样操作会有帮助 -
ceil_mode - 如果等于
True,计算输出信号大小的时候,会使用向上取整,代替默认的向下取整的操作
-
-
pytorch view() :返回一个新张量,它的数据与 self 张量相同,但 shape 不同。
-
结果:
某一组图片的识别结果

整个数据集的结果

-
使用 VGG16 对 CIFAR10 分类
-
-
transforms.Compose()
作用:transforms.Compose()类用来组合多个torchvision.transforms操作。
参数:一个list数组,数组里是多个'Transform'对象,即[transforms, transforms...]。
操作:如下所示,遍历list数组,对img依次执行每个transforms操作,并返回transforms后的img。
def __call__(self, img):
       for t in self.transforms:
           img = t(img)
       return img
transforms.Compose([
   transforms.CenterCrop(10),
   transforms.ToTensor(),
])
-
transforms.RandomCrop()
class torchvision.transforms.RandomCrop(size, padding=0)切割中心点的位置随机选取。
size可以是tuple也可以是Integer。 -
transforms.RandomHorizontalFlip()
class torchvision.transforms.RandomHorizontalFlip()随机水平翻转给定的
PIL.Image,概率为0.5。即:一半的概率翻转,一半的概率不翻转。 -
transforms.ToTensor()
class torchvision.transforms.ToTensor() data = np.random.randint(0, 255, size=300) img = data.reshape(10,10,3) print(img.shape) img_tensor = transforms.ToTensor()(img) # 转换成tensor print(img_tensor)
-
transforms.Normalize(mean, std)
class torchvision.transforms.Normalize(mean, std)给定均值:
(R,G,B)方差:(R,G,B),将会把Tensor正则化。即:Normalized_image=(image-mean)/std。
把一个取值范围是
[0,255]的PIL.Image或者shape为(H,W,C)的numpy.ndarray,转换成形状为[C,H,W],取值范围是[0,1.0]的torch.FloadTensor示例:
-
-
结果
-
Accuracy of the network on the 10000 test images: 83.05 %
和老师给的结果有一些出入,运行的时候提示:
RuntimeError: size mismatch, m1: [128 x 512], m2: [2048 x 10] at /pytorch/aten/src/THC/generic/THCTensorMathBlas.cu:283
所以我把最后一个512conv 改成了2048
-
使用VGG模型迁移学习进行猫狗大战
-

检查数据集发现是所有的图片格式都是符合的。网上查了一些资料说是路径问题,观察老师之前用的数据集也发现了一些。
两个解决办法:
-
在train、test、val文件下再分别创建一个文件夹,把图片放进去。
-
我看了看之前同学博客分享的代码:由于数据集不是标准的ImageFolder格式的需要自己定义一个DataSet类,继承torch.utils.data.DataSet(我还在研究中。。)
-
-
解决了路径以后后面就按部就班训练、验证和输出结果。
训练(没有GPU的时候,2个epoch就跑了一下午...)

验证:

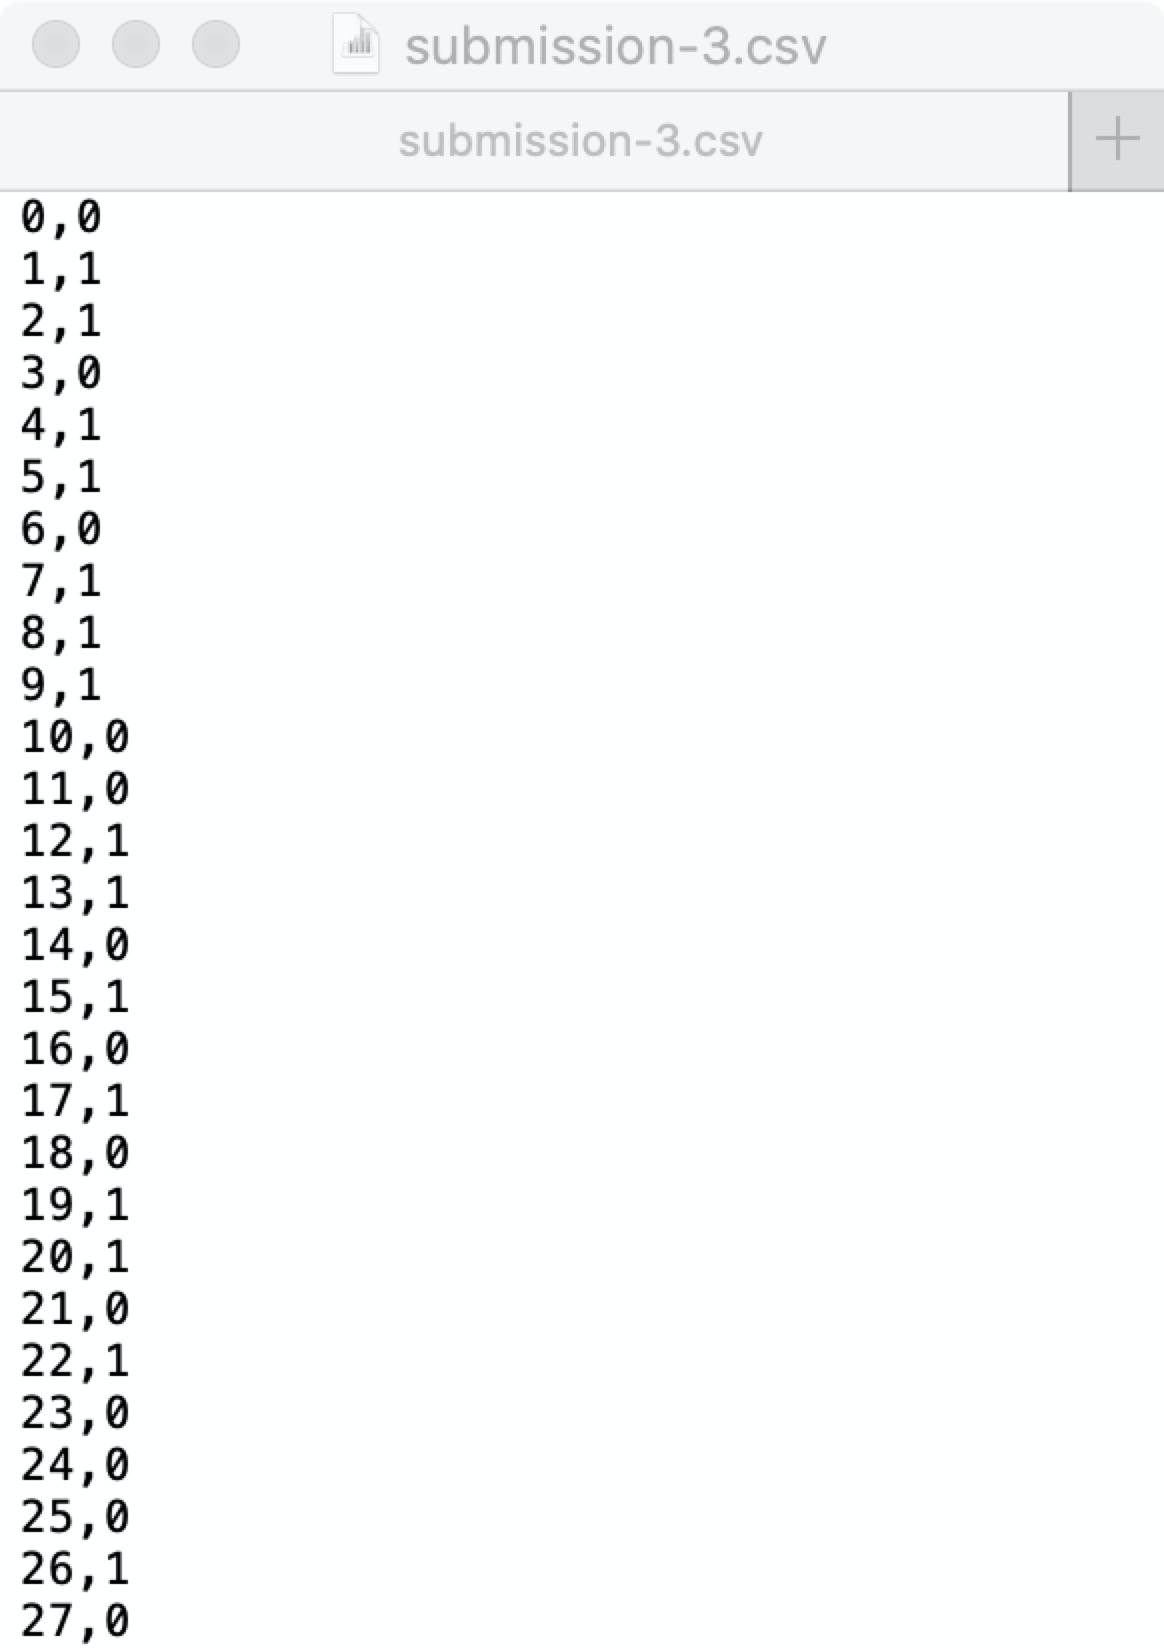
输出:
import pandas as pd pred = [] results=[] model_vgg_new.eval() test_img = os.listdir(img_dir['test']) ans = [0]*len(test_img) for i,img in enumerate(test_img): image = vgg_format(io.imread(os.path.join(img_dir['test'],img))) image = image.unsqueeze(0) image = image.to(device) index = int(os.path.splitext(img)[0]) #print(index) output = model_vgg_new(image) _,preds = torch.max(output.data,1) ans[index]=preds.item() results = pd.Series(ans) print(results) submission = pd.concat([pd.Series(range(0,2000)),results],axis=1) print(submission) submission.to_csv(os.path.join('./','submission.csv'),index=False)
-
提交

-
-
这个周的学习重新复习了卷积神经网络,对其结构有了更深的理解。我觉得收获最大的是看代码和实际操作完成猫狗大战的过程中,了解到了很多知识,虽然懂得不多,总算是有进步!!加油!!学习效率不高,只完成了必做的部分,踏踏实实做完,争取早点赶上进度!
