
Android存储管理
@
保存数据的方式
android为我们提供了应用专属空间、共享媒体库(图片、视频、音频等)、偏好设置和数据库来进行应用数据保存。
应用专属文件
仅供本应用使用,在内部存储和外部存储都有应用的独有专属空间。如果用户卸载应用,系统会移除保存在应用专属存储空间中的文件。如果,如果应用允许用户拍摄照片,用户会希望即使卸载应用后仍可访问这些照片,那么应改为使用共享存储空间将此类文件保存到适当的媒体集合中,而不是保存在专属空间中。如需进一步保护应用专属文件,请使用 Android Jetpack 中包含的 Security 库对这些静态文件进行加密。加密密钥专属于您的应用。
访问内部存储的专属空间
应用的内部专属空间分为存储持久化数据的目录和存储缓存数据的目录,后者较之前者可以被更早的移除(调用相应的API即可),而前者只有当应用被卸载时才会自动删除,无法手动移除。另外,我们不需要任何权限就可以对这些目录进行操作。但是,请注意,这些目录的空间通常比较小。在将应用专属文件写入内部存储空间之前,应用应查询设备上的可用空间。
持久化数据目录操作
上下文对象提供的File相关API或者信息流(输入、输出流)都可以进行该墓的数据访问和存储操作,而对于前者而言,更适合于进行目录的创建等包含目录操作的情况下使用,而对于一般的创建文件和进行文件读写来讲还是使用信息流更为快捷方便。如果允许其他应用来访问此目录中的文件,请使用具有 FLAG_GRANT_READ_URI_PERMISSION 属性的 FileProvider。
- File API访问和存储
File file = new File(context.getFilesDir(), filename);
//然后可以创建输入流输出流进行文件读写或者创建目录都可以
- 信息流访问和存储
//数据存储
String filename = "myfile";
String fileContents = "Hello world!";
try (FileOutputStream fos = context.openFileOutput(filename, Context.MODE_PRIVATE)) {
    fos.write(fileContents.toByteArray());
}

//数据访问
FileInputStream fis = context.openFileInput(filename);
InputStreamReader inputStreamReader =
        new InputStreamReader(fis, StandardCharsets.UTF_8);
StringBuilder stringBuilder = new StringBuilder();
try (BufferedReader reader = new BufferedReader(inputStreamReader)) {
    String line = reader.readLine();
    while (line != null) {
        stringBuilder.append(line).append('\n');
        line = reader.readLine();
    }
} catch (IOException e) {
    // Error occurred when opening raw file for reading.
} finally {
    String contents = stringBuilder.toString();
}
- 其它操作-查看文件列表
通过fileList()可以获取此目录下所有文件名称的数组
Array<String> files = context.fileList();
- 其它操作-创建嵌套目录
通过以下方式创建嵌套目录或打开内部目录,将根目录和新目录名称传递到 File 构造函数
File directory = context.getFilesDir();
//这里通过以父路径为根路径,filename为子路径,获取对应实例
//可以创建不存在的目录和文件
File file = new File(directory, filename);
缓存数据目录操作
如果您只需要暂时存储敏感数据,应使用应用在内部存储空间中的指定缓存目录保存数据。与所有应用专属存储空间一样,当用户卸载应用后,系统会移除存储在此目录中的文件,但也可以更早地移除此目录中的文件。对于缓存目录来讲,只可以通过File相关API进行数据存储和访问。
- 创建缓存文件
File file = File.createTempFile(filename, null, context.getCacheDir());
- 存储和访问缓存文件
File cacheFile = new File(context.getCacheDir(), filename);
- 移除缓存文件
//方法一
cacheFile.delete();
//方法二
context.deleteFile(cacheFileName);
访问外部存储的专属空间
如果内部存储空间不足以存储应用专属文件,请考虑改为使用外部存储空间。系统会在外部存储空间中提供目录,应用可以在该存储空间中整理仅在应用内对用户有价值的文件。一个目录专为应用的持久性文件而设计,而另一个目录包含应用的缓存文件。
在 Android 4.4(API 级别 19)或更高版本中,应用无需请求任何与存储空间相关的权限即可访问外部存储空间中的应用专属目录。卸载应用后,系统会移除这些目录中存储的文件。
验证存储空间的可用性
由于外部存储空间位于用户可能能够移除的物理卷上,因此在尝试从外部存储空间读取应用专属数据或将应用专属数据写入外部存储空间之前,请验证该卷是否可访问。
// 通过调用 Environment.getExternalStorageState() 查询该卷的状态。
//如果返回的状态为 MEDIA_MOUNTED,那么您就可以在外部存储空间中读取和写入应用专属文件。
//如果返回的状态为 MEDIA_MOUNTED_READ_ONLY,您只能读取这些文件。
private boolean isExternalStorageWritable() {
    return Environment.getExternalStorageState().equals(Environment.MEDIA_MOUNTED);
}

private boolean isExternalStorageReadable() {
     return Environment.getExternalStorageState().equals(Environment.MEDIA_MOUNTED) ||
            Environment.getExternalStorageState().equals(Environment.MEDIA_MOUNTED_READ_ONLY);
}
选择物理存储位置
有时,分配一部分内部存储空间作为外部存储空间的设备也会提供SD卡插槽,所以我们还需要选择一个外部存储设备。
如需访问其他位置,请调用 ContextCompat.getExternalFilesDirs()。如代码段中所示,返回数组中的第一个元素被视为主外部存储卷。除非该卷已满或不可用,否则请使用该卷。
File[] externalStorageVolumes =
        ContextCompat.getExternalFilesDirs(getApplicationContext(), null);
File primaryExternalStorage = externalStorageVolumes[0];
访问和存储持久性文件
//只能通过File的API访问,后续可以创建输入输出流来简化操作
File appSpecificExternalDir = new File(context.getExternalFilesDir(null), filename);
操作缓存文件
//如需将应用专属文件添加到外部存储空间中的缓存,请获取对 externalCacheDir 的引用:
File externalCacheFile = new File(context.getExternalCacheDir(), filename);
//如需从外部缓存目录中移除文件,请对代表该文件的 File 对象使用 delete() 方法:
externalCacheFile.delete();
应用专属媒体内容
如果应用中的媒体文件仅对本应用有价值,那么就将它保存在外部空间的应用专属目录中。
//请务必使用 DIRECTORY_PICTURES 等 API 常量提供的目录名称。
//这些目录名称可确保系统正确处理文件。
//如果没有适合您文件的预定义子目录名称,您可以改为将 null 传递到 getExternalFilesDir()。
//这将返回外部存储空间中的应用专属根目录。
@Nullable
File getAppSpecificAlbumStorageDir(Context context, String albumName) {
    // Get the pictures directory that's inside the app-specific directory on
    // external storage.
    File file = new File(context.getExternalFilesDir(
            Environment.DIRECTORY_PICTURES), albumName);
    if (file == null || !file.mkdirs()) {
        Log.e(LOG_TAG, "Directory not created");
    }
    return file;
}
共享存储空间
如果在本应用内保存的媒体、文档或其他文件和数据集文件(例如用户拍照、下载等媒体文件)可供其它应用使用或者不应该随着应用的删除而被清楚,则应该将这些数据保存在共享空间下。系统为这些文件提供了分好类的目录区别管理。
媒体内容
系统提供标准的公共目录来存储这些类型的文件,这样用户就可以将所有照片保存在一个公共位置,将所有音乐和音频文件保存在另一个公共位置,依此类推。您的应用可以使用此平台的 MediaStore API 访问此内容。
为了提供更丰富的用户体验,许多应用允许用户提供和访问位于外部存储卷上的媒体。该框架提供经过优化的媒体集合索引,称为媒体库,使您可以更轻松地检索和更新这些媒体文件。即使您的应用已卸载,这些文件仍会保留在用户的设备上。
使用上下文检索得到ContentResolver对象来与共享区域的媒体库互动:
//系统会扫描共享目录中的文件,并且分类存储在各个表中,可以通过ULI链接进行访问
String[] projection = new String[] {
        media-database-columns-to-retrieve
};
String selection = sql-where-clause-with-placeholder-variables;
String[] selectionArgs = new String[] {
        values-of-placeholder-variables
};
String sortOrder = sql-order-by-clause;

Cursor cursor = getApplicationContext().getContentResolver().query(
    MediaStore.media-type.Media.EXTERNAL_CONTENT_URI,
    projection,
    selection,
    selectionArgs,
    sortOrder
);

while (cursor.moveToNext()) {
    // Use an ID column from the projection to get
    // a URI representing the media item itself.
}
MedicaStore简单介绍:
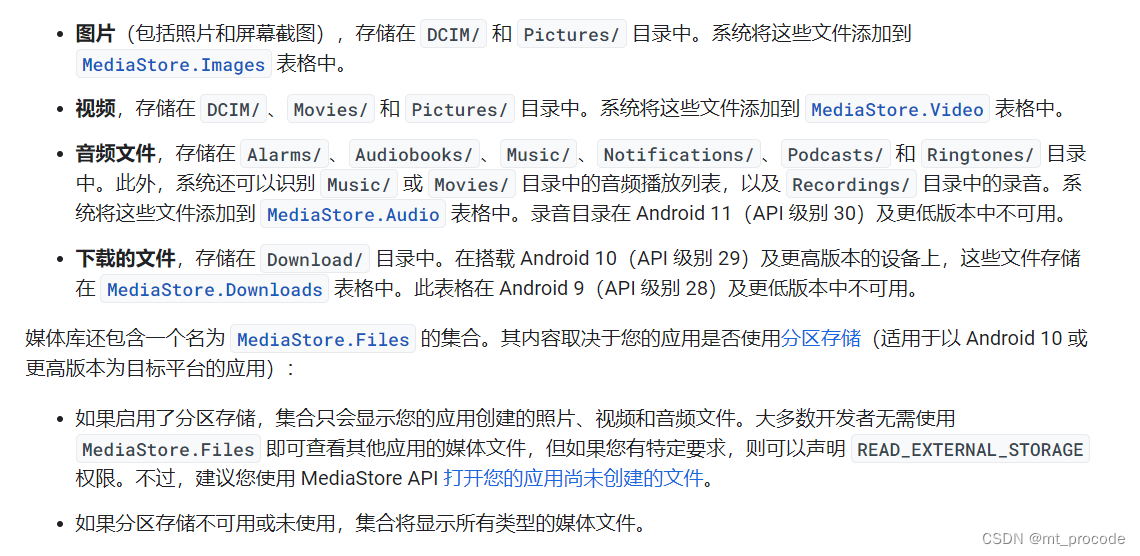
请求必要权限
- 存储权限
对于android10及以上的系统,不需要申请存储权限即可访问共享存储空间。如果要针对更低版本的android做权限兼容,那么在manifest文件中加入下列条件(声明兼容的最高版本,比它低的版本都将申请此权限)
<uses-permission android:name="android.permission.WRITE_EXTERNAL_STORAGE"
                 android:maxSdkVersion="28" />
                 //Android 9(API 级别 28)
对于所有版本的android系统而言,如需访问由其他应用创建的文件,必须满足以下所有条件:
您的应用已获得 READ_EXTERNAL_STORAGE 权限。
这些文件位于以下任一明确定义的媒体集合中:
MediaStore.Images
MediaStore.Video
MediaStore.Audio
检查媒体文件的更新
使用getVersion()可以返回版本的唯一字符串,存储此这个字符串,在下次应用启动时,检查是否相同。请在应用进程启动时完成此项检查。您无需在每次查询媒体库时都检查版本。
打开媒体文件
用于打开媒体文件的具体逻辑取决于媒体内容的最佳表示形式是文件描述符、文件流还是直接文件路径:
- 文件描述符
// Open a specific media item using ParcelFileDescriptor.
ContentResolver resolver = getApplicationContext()
        .getContentResolver();

// "rw" for read-and-write;
// "rwt" for truncating or overwriting existing file contents.
String readOnlyMode = "r";
try (ParcelFileDescriptor pfd =
        resolver.openFileDescriptor(content-uri, readOnlyMode)) {
    // Perform operations on "pfd".
} catch (IOException e) {
    e.printStackTrace();
}
- 文件流
// Open a specific media item using InputStream.
ContentResolver resolver = getApplicationContext()
        .getContentResolver();
try (InputStream stream = resolver.openInputStream(content-uri)) {
    // Perform operations on "stream".
}
- 直接文件路径(File API)
如果您的应用尝试使用 File API 访问文件但没有必要的权限,就会发生 FileNotFoundException。
文档和其他文件
系统有一个特殊目录,用于包含其他文件类型,例如 PDF 文档和采用 EPUB 格式的图书。您的应用可以使用此平台的存储访问框架访问这些文件。
这些文件存储在应用专属目录和媒体库之外,在应用卸载后仍会保留在设备上。简单来说,此平台的存储访问框架就是一个文件选择器。
使用存储访问框架涉及以下步骤:
- 应用调用包含存储相关操作的 intent。此操作对应于框架支持的特定用例。
- 用户看到一个系统选择器,供其浏览文档提供器并选择将执行存储相关操作的位置或文档。
- 应用获得对代表用户所选位置或文档的 URI 的读写访问权限。
- 利用该 URI,应用可以在选择的位置执行操作。
创建新文件
使用 ACTION_CREATE_DOCUMENT intent 操作加载系统文件选择器,支持用户选择要写入文件内容的位置。此流程类似于其他操作系统使用的“另存为”对话框中使用的流程。
在配置 intent 时,应指定文件的名称和 MIME 类型,并且还可以根据需要使用 EXTRA_INITIAL_URI intent extra 指定文件选择器在首次加载时应显示的文件或目录的 URI。
// Request code for creating a PDF document.
private static final int CREATE_FILE = 1;

private void createFile(Uri pickerInitialUri) {
    Intent intent = new Intent(Intent.ACTION_CREATE_DOCUMENT);
    intent.addCategory(Intent.CATEGORY_OPENABLE);
    intent.setType("application/pdf");
    intent.putExtra(Intent.EXTRA_TITLE, "invoice.pdf");

    // Optionally, specify a URI for the directory that should be opened in
    // the system file picker when your app creates the document.
    intent.putExtra(DocumentsContract.EXTRA_INITIAL_URI, pickerInitialUri);

    startActivityForResult(intent, CREATE_FILE);
}
打开文件
您的应用可以使用文档作为存储单元,供用户在其中输入可能要与同伴分享或要导入到其他文档的数据。例如,用户打开办公文档或打开另存为 EPUB 文件的图书。
在此类情况下,请通过调用 ACTION_OPEN_DOCUMENT intent 来支持用户选择要打开的文件,此 intent 会打开系统的文件选择器应用。若要仅显示应用支持的文件类型,请指定 MIME 类型。此外,您还可以根据需要使用 EXTRA_INITIAL_URI intent extra 指定文件选择器在首次加载时应显示的文件的 URI。
// Request code for selecting a PDF document.
private static final int PICK_PDF_FILE = 2;

private void openFile(Uri pickerInitialUri) {
    Intent intent = new Intent(Intent.ACTION_OPEN_DOCUMENT);
    intent.addCategory(Intent.CATEGORY_OPENABLE);
    intent.setType("application/pdf");

    // Optionally, specify a URI for the file that should appear in the
    // system file picker when it loads.
    intent.putExtra(DocumentsContract.EXTRA_INITIAL_URI, pickerInitialUri);

    startActivityForResult(intent, PICK_PDF_FILE);
}
授予对目录的访问权限
文件管理和媒体创建应用通常在目录层次结构中管理文件组。如需在您的应用中提供此功能,请使用 ACTION_OPEN_DOCUMENT_TREE intent 操作,它支持用户授予应用对整个目录树的访问权限,但在 Android 11(API 级别 30)及以上版本中会有一些例外情况。然后,您的应用便可以访问所选目录及其任何子目录中的任何文件。
使用 ACTION_OPEN_DOCUMENT_TREE 时,您的应用只能访问用户所选目录中的文件。您无权访问位于用户所选目录之外的其他应用的文件。借助这种由用户控制的访问权限,用户可以确切选择自己想要与您的应用共享的具体内容。
您可以根据需要使用 EXTRA_INITIAL_URI intent extra 指定文件选择器在首次加载时应显示的目录的 URI。
public void openDirectory(Uri uriToLoad) {
    // Choose a directory using the system's file picker.
    Intent intent = new Intent(Intent.ACTION_OPEN_DOCUMENT_TREE);

    // Optionally, specify a URI for the directory that should be opened in
    // the system file picker when it loads.
    intent.putExtra(DocumentsContract.EXTRA_INITIAL_URI, uriToLoad);

    startActivityForResult(intent, your-request-code);
}
在所选位置进行操作
在用户使用系统的文件选择器选择文件或目录后,您可以在 onActivityResult() 中使用以下代码检索所选项目的 URI:
@Override
public void onActivityResult(int requestCode, int resultCode,
        Intent resultData) {
    if (requestCode == your-request-code
            && resultCode == Activity.RESULT_OK) {
        // The result data contains a URI for the document or directory that
        // the user selected.
        Uri uri = null;
        if (resultData != null) {
            uri = resultData.getData();
            // Perform operations on the document using its URI.
        }
    }
}
获取对所选项目 URI 的引用后,您的应用可以对该项目执行多项操作。例如,您可以访问该项目的元数据,在原位置修改该项目,以及删除该项目。
下面将介绍如何对用户选择的文件进行各种操作。
确定该系统(内容提供者)支持的操作
不同的内容提供器支持对文档执行不同的操作,例如复制文档或查看文档的缩略图。如需确定指定提供器支持哪些操作,请查看 Document.COLUMN_FLAGS 的值。应用的界面只会显示提供器支持的选项。
检查文档的元数据
public void dumpImageMetaData(Uri uri) {

    // The query, because it only applies to a single document, returns only
    // one row. There's no need to filter, sort, or select fields,
    // because we want all fields for one document.
    Cursor cursor = getActivity().getContentResolver()
            .query(uri, null, null, null, null, null);

    try {
        // moveToFirst() returns false if the cursor has 0 rows. Very handy for
        // "if there's anything to look at, look at it" conditionals.
        if (cursor != null && cursor.moveToFirst()) {

            // Note it's called "Display Name". This is
            // provider-specific, and might not necessarily be the file name.
            String displayName = cursor.getString(
                    cursor.getColumnIndex(OpenableColumns.DISPLAY_NAME));
            Log.i(TAG, "Display Name: " + displayName);

            int sizeIndex = cursor.getColumnIndex(OpenableColumns.SIZE);
            // If the size is unknown, the value stored is null. But because an
            // int can't be null, the behavior is implementation-specific,
            // and unpredictable. So as
            // a rule, check if it's null before assigning to an int. This will
            // happen often: The storage API allows for remote files, whose
            // size might not be locally known.
            String size = null;
            if (!cursor.isNull(sizeIndex)) {
                // Technically the column stores an int, but cursor.getString()
                // will do the conversion automatically.
                size = cursor.getString(sizeIndex);
            } else {
                size = "Unknown";
            }
            Log.i(TAG, "Size: " + size);
        }
    } finally {
        cursor.close();
    }
}
打开文档
- 位图:以下代码段显示了如何在已获得 Bitmap 文件的 URI 的情况下打开该文件
private Bitmap getBitmapFromUri(Uri uri) throws IOException {
    ParcelFileDescriptor parcelFileDescriptor =
            getContentResolver().openFileDescriptor(uri, "r");
    FileDescriptor fileDescriptor = parcelFileDescriptor.getFileDescriptor();
    Bitmap image = BitmapFactory.decodeFileDescriptor(fileDescriptor);
    parcelFileDescriptor.close();
    return image;
}
- 输入流:以下代码段显示了如何在已获得 InputStream 对象的 URI 的情况下打开该对象。在此代码段中,系统会将文件行读取到字符串中:
private String readTextFromUri(Uri uri) throws IOException {
    StringBuilder stringBuilder = new StringBuilder();
    try (InputStream inputStream =
            getContentResolver().openInputStream(uri);
            BufferedReader reader = new BufferedReader(
            new InputStreamReader(Objects.requireNonNull(inputStream)))) {
        String line;
        while ((line = reader.readLine()) != null) {
            stringBuilder.append(line);
        }
    }
    return stringBuilder.toString();
}
修改文档
private void alterDocument(Uri uri) {
    try {
        ParcelFileDescriptor pfd = getActivity().getContentResolver().
                openFileDescriptor(uri, "w");
        FileOutputStream fileOutputStream =
                new FileOutputStream(pfd.getFileDescriptor());
        fileOutputStream.write(("Overwritten at " + System.currentTimeMillis() +
                "\n").getBytes());
        // Let the document provider know you're done by closing the stream.
        fileOutputStream.close();
        pfd.close();
    } catch (FileNotFoundException e) {
        e.printStackTrace();
    } catch (IOException e) {
        e.printStackTrace();
    }
}
删除文档
DocumentsContract.deleteDocument(applicationContext.contentResolver, uri);
数据集
在 Android 11(API 级别 30)及更高版本中,系统会缓存多个应用可能使用的大型数据集。这些数据集可为机器学习和媒体播放等用例提供支持。应用可以使用 BlobStoreManager API 访问这些共享数据集。
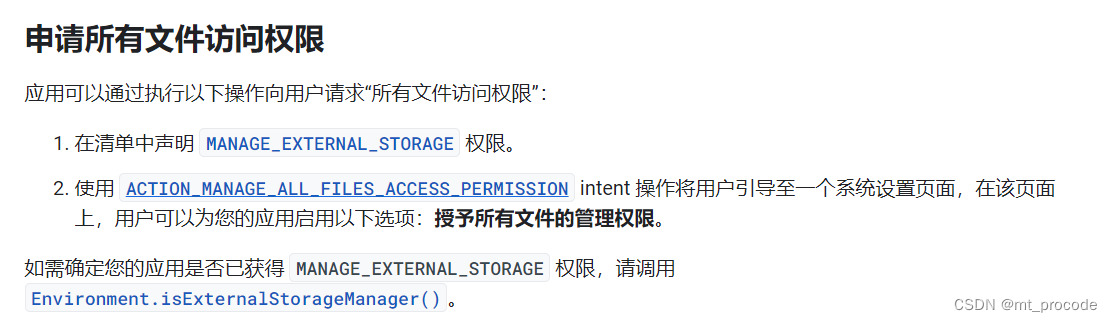
管理存储设备上的所有文件
绝大多数需要共享存储空间访问权限的应用都可以遵循共享媒体文件和共享非媒体文件方面的最佳做法。但是,某些应用的核心用例需要广泛访问设备上的文件,但无法采用注重隐私保护的存储最佳做法高效地完成这些操作。对于这些情况,Android 提供了一种名为“所有文件访问权限”的特殊应用访问权限。
例如,防病毒应用的主要用例可能需要定期扫描不同目录中的许多文件。如果此扫描需要反复的用户交互,让其使用系统文件选择器选择目录,可能就会带来糟糕的用户体验。其他用例(如文件管理器应用、备份和恢复应用以及文档管理应用)可能也需要考虑类似情况。
键值对文件(用户偏好设置)
//保存
SharedPreferences sharedPref = getActivity().getPreferences(Context.MODE_PRIVATE);
SharedPreferences.Editor editor = sharedPref.edit();
editor.putInt(getString(R.string.saved_high_score_key), newHighScore);
editor.apply();
//读取
SharedPreferences sharedPref = getActivity().getPreferences(Context.MODE_PRIVATE);
int defaultValue = getResources().getInteger(R.integer.saved_high_score_default_key);
int highScore = sharedPref.getInt(getString(R.string.saved_high_score_key), defaultValue);
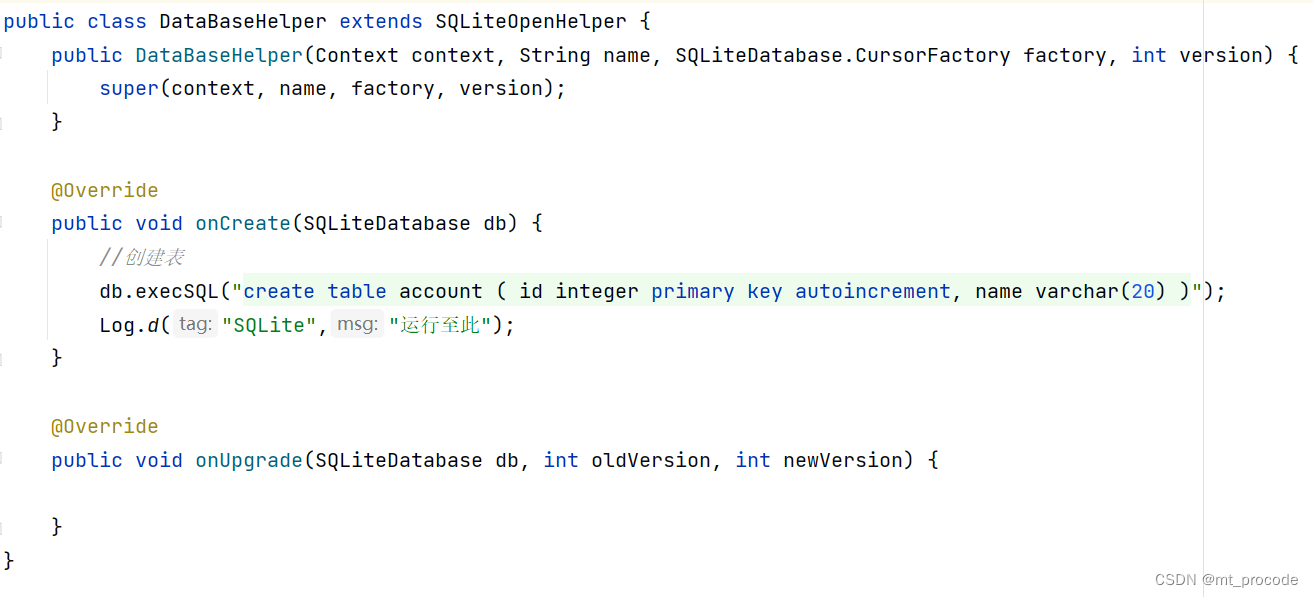
将数据保存到本地数据库
使用SQLiteAPI进行数据库操作
- 创建数据库的helper类
![mt]()
- 创建该helper对象获取SQLiteDatabase对象执行增删改查
//doc为数据库名,1为版本号
DataBaseHelper m_dataBaseHelper = new DataBaseHelper(StorageActivity.this,"doc",null,1);
final SQLiteDatabase db_w = m_dataBaseHelper.getWritableDatabase();
final SQLiteDatabase db_r = m_dataBaseHelper.getReadableDatabase();

//插入记录
db_w.execSQL("insert into account(name) values ("+ met_1.getText().toString() +")");
ContentValues contentValues = new ContentValues();
contentValues.put("name",met_1.getText().toString());
db_w.insert("account","empty",contentValues);

//修改记录
db_w.execSQL("update account set name = change where name = " + met_1.getText().toString() + "_change;");
ContentValues contentValues1 = new ContentValues();
contentValues1.put("name",met_1.getText().toString()+"_change");
String[] strList = new String[1];
strList[0] = met_1.getText().toString();
db_w.update("account",contentValues1,"name = ?",strList);

//查询记录
strList[0] = met_1.getText().toString() + "_change";
Cursor query = db_r.query("account", new String[]{"id", "name"}, "name = ?",strList,null, null, "id");
query.moveToFirst();
while(query.moveToNext()){
    Log.d("id",String.valueOf(query.getInt(0)));
    mtv_1.setText(query.getString(1));
    query.moveToNext();
}
query.close();

//删除记录
db_w.execSQL("delete from account where name = " + mtv_1.getText().toString());
strList[0] = mtv_1.getText().toString() + "_change";
int rows = db_w.delete("account","name = ?",strList);
Log.d("受影响的行数",String.valueOf(rows));
使用Room为SQLiteAPI提供便利封装(建议使用)
Room 持久性库在 SQLite 上提供了一个抽象层,以便在充分利用 SQLite 的强大功能的同时,能够流畅地访问数据库。具体来说,Room 具有以下优势:
针对 SQL 查询的编译时验证。
可最大限度减少重复和容易出错的样板代码的方便注解。
简化了数据库迁移路径。
出于这些方面的考虑,我们强烈建议您使用 Room,而不是直接使用 SQLite API。
添加依赖
dependencies {
    def room_version = "2.4.3"

    implementation "androidx.room:room-runtime:$room_version"
    annotationProcessor "androidx.room:room-compiler:$room_version"

    // To use Kotlin annotation processing tool (kapt)
    kapt "androidx.room:room-compiler:$room_version"
    // To use Kotlin Symbol Processing (KSP)
    ksp "androidx.room:room-compiler:$room_version"

    // optional - RxJava2 support for Room
    implementation "androidx.room:room-rxjava2:$room_version"

    // optional - RxJava3 support for Room
    implementation "androidx.room:room-rxjava3:$room_version"

    // optional - Guava support for Room, including Optional and ListenableFuture
    implementation "androidx.room:room-guava:$room_version"

    // optional - Test helpers
    testImplementation "androidx.room:room-testing:$room_version"

    // optional - Paging 3 Integration
    implementation "androidx.room:room-paging:2.5.0-alpha02"
}
主要组件

实现实例
数据实体
@Entity
public class User {
    @PrimaryKey
    public int uid;

    @ColumnInfo(name = "first_name")
    public String firstName;

    @ColumnInfo(name = "last_name")
    public String lastName;
}

数据访问对象(DAO)
@Dao
public interface UserDao {
    @Query("SELECT * FROM user")
    List<User> getAll();

    @Query("SELECT * FROM user WHERE uid IN (:userIds)")
    List<User> loadAllByIds(int[] userIds);

    @Query("SELECT * FROM user WHERE first_name LIKE :first AND " +
           "last_name LIKE :last LIMIT 1")
    User findByName(String first, String last);

    @Insert
    void insertAll(User... users);

    @Delete
    void delete(User user);
}
数据库
以下代码定义了用于保存数据库的 AppDatabase 类。 AppDatabase 定义数据库配置,并作为应用对持久性数据的主要访问点。数据库类必须满足以下条件:
该类必须带有 @Database 注解,该注解包含列出所有与数据库关联的数据实体的 entities 数组。
该类必须是一个抽象类,用于扩展 RoomDatabase。
对于与数据库关联的每个 DAO 类,数据库类必须定义一个具有零参数的抽象方法,并返回 DAO 类的实例。
@Database(entities = {User.class}, version = 1)
public abstract class AppDatabase extends RoomDatabase {
    public abstract UserDao userDao();
}
具体用法
//创建数据库实例
AppDatabase db = Room.databaseBuilder(getApplicationContext(),
        AppDatabase.class, "database-name").build();
//获取Dao实例
UserDao userdao = db.userDao();
List<User> users = userDao.getAll();

 浙公网安备 33010602011771号