Gateway网关入门指南
粗话网关
网关,是整个微服务平台所有请求的统一入口,所有客户端和服务端之间的联系都通过网关来接入,相当于就是一个不赚差价的中间商,Spring Cloud Gateway做为替换上一代网关产品Zuul的新组件出现在Spring Cloud 2.0以及之后的版本中,网关作为一个服务的唯一入口,其中可以集成我们项目中除了业务之外的很多功能,比如认证授权,路由、负载均衡、日志、过滤等等一些列功能,
想了解Gateway就得我们就先了解它的三大功能名词
断言
匹配http中请求头或者请求参数,如果请求与断言想匹配则进行路由
路由
根据断言规则,将某些请求转发到指定的服务器上
过滤器
过滤可以发生在路由前后,使用过滤器的思想,对请求进行修改或者监视
10分钟写个Demo
演示Demo大致如下,创建一个订单模块,一个支付模块(端口不同的两个应用),一个网关模块
演示功能如下:
Gateway + Nacos + Openfein,简单跑通一下,主要关注点在于Gateway的基本使用和学习上
父工程pom
<?xml version="1.0" encoding="UTF-8"?> <project xmlns="http://maven.apache.org/POM/4.0.0" xmlns:xsi="http://www.w3.org/2001/XMLSchema-instance" xsi:schemaLocation="http://maven.apache.org/POM/4.0.0 http://maven.apache.org/xsd/maven-4.0.0.xsd"> <modelVersion>4.0.0</modelVersion> <groupId>org.example</groupId> <artifactId>springcloud_alibaba</artifactId> <packaging>pom</packaging> <version>1.0-SNAPSHOT</version> <dependencyManagement> <dependencies> <dependency> <groupId>org.apache.maven.plugins</groupId> <artifactId>maven-project-info-reports-plugin</artifactId> <version>3.0.0</version> </dependency> <!--spring boot 2.2.2--> <dependency> <groupId>org.springframework.boot</groupId> <artifactId>spring-boot-dependencies</artifactId> <version>2.2.2.RELEASE</version> <type>pom</type> <scope>import</scope> </dependency> <!--spring cloud Alibaba--> <dependency> <groupId>com.alibaba.cloud</groupId> <artifactId>spring-cloud-alibaba-dependencies</artifactId> <version>2.1.0.RELEASE</version> <type>pom</type> <scope>import</scope> </dependency> <!--spring cloud Hoxton.SR1--> <dependency> <groupId>org.springframework.cloud</groupId> <artifactId>spring-cloud-dependencies</artifactId> <version>Hoxton.SR1</version> <type>pom</type> <scope>import</scope> </dependency> </dependencies> </dependencyManagement> <build> <pluginManagement> <plugins> <plugin> <artifactId>maven-clean-plugin</artifactId> <version>3.1.0</version> </plugin> <plugin> <artifactId>maven-site-plugin</artifactId> <version>3.7.1</version> </plugin> <plugin> <artifactId>maven-project-info-reports-plugin</artifactId> <version>3.0.0</version> </plugin> </plugins> </pluginManagement> <plugins> <!--热部署配置--> <plugin> <groupId>org.springframework.boot</groupId> <artifactId>spring-boot-maven-plugin</artifactId> <configuration> <fork>true</fork> <addResources>true</addResources> </configuration> </plugin> <plugin> <groupId>org.apache.maven.plugins</groupId> <artifactId>maven-compiler-plugin</artifactId> <version>2.3.2</version> <configuration> <source>1.8</source> <target>1.8</target> </configuration> </plugin> </plugins> </build> </project>
支付工程子模块(两个)
创建完后,复制一个出来,就该一下端口,使端口不同即可
该模块用于后面演示:
订单模块负载均衡调用支付模块
网关模块负载均衡调用支付模块
<?xml version="1.0" encoding="UTF-8"?> <project xmlns="http://maven.apache.org/POM/4.0.0" xmlns:xsi="http://www.w3.org/2001/XMLSchema-instance" xsi:schemaLocation="http://maven.apache.org/POM/4.0.0 http://maven.apache.org/xsd/maven-4.0.0.xsd"> <parent> <artifactId>springcloud_alibaba</artifactId> <groupId>org.example</groupId> <version>1.0-SNAPSHOT</version> </parent> <modelVersion>4.0.0</modelVersion> <artifactId>payment_8801</artifactId> <dependencies> <!-- nacos --> <dependency> <groupId>com.alibaba.cloud</groupId> <artifactId>spring-cloud-starter-alibaba-nacos-discovery</artifactId> </dependency> <!-- SpringCloud ailibaba sentinel-datasource-nacos 持久化需要用到--> <dependency> <groupId>com.alibaba.csp</groupId> <artifactId>sentinel-datasource-nacos</artifactId> </dependency> <!-- SpringCloud ailibaba sentinel--> <dependency> <groupId>com.alibaba.cloud</groupId> <artifactId>spring-cloud-starter-alibaba-sentinel</artifactId> </dependency> <!--web--> <dependency> <groupId>org.springframework.boot</groupId> <artifactId>spring-boot-starter-web</artifactId> </dependency> <!--监控--> <dependency> <groupId>org.springframework.boot</groupId> <artifactId>spring-boot-starter-actuator</artifactId> </dependency> <!--监控 以json格式输出信息--> <dependency> <groupId>org.springframework.boot</groupId> <artifactId>spring-boot-starter-hateoas</artifactId> </dependency> </dependencies> </project>
-
application.yml
server: port: 8801 spring: application: name: payment-server cloud: nacos: discovery: server-addr: localhost:8848 sentinel: transport: #配置地址 dashboard: localhost:8080 #默认8719端口,本地启动 HTTP API Server 的端口号 port: 8719 #监控 management: endpoints: web: exposure: include: '*'
-
Controller
@RestController @RequestMapping("/payment") public class PaymentController { @Value("${server.port}") private String port; @GetMapping("/test1/{id}") public String test1(@PathVariable("id") Integer id){ return "This is Payment server,Port is " + port + "\t id为" + id; } }
-
启动类
@SpringBootApplication(exclude = {DataSourceAutoConfiguration.class})
@EnableDiscoveryClient
public class PaymentApplication8801 {
    public static void main(String[] args) {
        SpringApplication.run(PaymentApplication8801.class);
    }
}
订单工程子模块
该模块的作用:
Gatwway学习中调用该模块进行演示
该模块负载均衡调用支付模块,跑个流程
-
pom
<?xml version="1.0" encoding="UTF-8"?> <project xmlns="http://maven.apache.org/POM/4.0.0" xmlns:xsi="http://www.w3.org/2001/XMLSchema-instance" xsi:schemaLocation="http://maven.apache.org/POM/4.0.0 http://maven.apache.org/xsd/maven-4.0.0.xsd"> <parent> <artifactId>springcloud_alibaba</artifactId> <groupId>org.example</groupId> <version>1.0-SNAPSHOT</version> </parent> <modelVersion>4.0.0</modelVersion> <artifactId>order_8803</artifactId> <dependencies> <!-- nacos --> <dependency> <groupId>com.alibaba.cloud</groupId> <artifactId>spring-cloud-starter-alibaba-nacos-discovery</artifactId> </dependency> <!-- SpringCloud ailibaba sentinel-datasource-nacos 持久化需要用到--> <dependency> <groupId>com.alibaba.csp</groupId> <artifactId>sentinel-datasource-nacos</artifactId> </dependency> <!-- SpringCloud ailibaba sentinel--> <dependency> <groupId>com.alibaba.cloud</groupId> <artifactId>spring-cloud-starter-alibaba-sentinel</artifactId> </dependency> <!--远程调用 OpenFeign--> <dependency> <groupId>org.springframework.cloud</groupId> <artifactId>spring-cloud-starter-openfeign</artifactId> <version>2.2.1.RELEASE</version> </dependency> <!--web--> <dependency> <groupId>org.springframework.boot</groupId> <artifactId>spring-boot-starter-web</artifactId> </dependency> <!--监控--> <dependency> <groupId>org.springframework.boot</groupId> <artifactId>spring-boot-starter-actuator</artifactId> </dependency> <!--监控 以json格式输出信息--> <dependency> <groupId>org.springframework.boot</groupId> <artifactId>spring-boot-starter-hateoas</artifactId> </dependency> </dependencies> </project>
application.yml
server:
  port: 8803
spring:
  application:
    name: order-server
  cloud:
    nacos:
      discovery:
        server-addr: localhost:8848
    sentinel:
      transport:
        #配置地址
        dashboard: localhost:8080
        #默认8719端口,本地启动 HTTP API Server 的端口号
        port: 8719
      #持久化规则到Nacos中,Nacos又通过配置持久化到数据mysql中
      datasource:
        ds1:
          nacos:
            server-addr: localhost:8848 #nacos地址
            dataId: order-server-sentinel  #微服务名称
            groupId: DEFAULT_GROUP  #默认分组
            data-type: json #数据格式
            rule-type: flow #流控规则
#feign集成hystrix需要配置开启,实现降级
feign:
  sentinel:
    enabled: true
#监控
management:
  endpoints:
    web:
      exposure:
        include: '*'
-
远程调用Client
@FeignClient(value = "payment-server",fallback = PaymentClientDuty.class) public interface PaymentClient { @GetMapping("/payment/test1/{id}") public String test1(@PathVariable("id") Integer id); } @Component public class PaymentClientDuty implements PaymentClient { @Override public String test1(Integer id) { return "OpenFeign远程调用失败调用" + id; } }
-
controller
@RestController public class OrderController { @Autowired private PaymentClient paymentClient; @GetMapping("/order/{id}") public String openfeignTest(@PathVariable("id") Integer id){ return paymentClient.test1(id); } }
-
启动类
@EnableDiscoveryClient
@SpringBootApplication(exclude = {DataSourceAutoConfiguration.class})
@EnableFeignClients(basePackages = "com.nacos.order.clients")
public class OrderApplication {
    public static void main(String[] args) {
        SpringApplication.run(OrderApplication.class);
    }
网关工程子模块
-
pom
<?xml version="1.0" encoding="UTF-8"?> <project xmlns="http://maven.apache.org/POM/4.0.0" xmlns:xsi="http://www.w3.org/2001/XMLSchema-instance" xsi:schemaLocation="http://maven.apache.org/POM/4.0.0 http://maven.apache.org/xsd/maven-4.0.0.xsd"> <parent> <artifactId>springcloud_alibaba</artifactId> <groupId>org.example</groupId> <version>1.0-SNAPSHOT</version> </parent> <modelVersion>4.0.0</modelVersion> <artifactId>gateway_8800</artifactId> <packaging>jar</packaging> <dependencies> <!-- nacos --> <dependency> <groupId>com.alibaba.cloud</groupId> <artifactId>spring-cloud-starter-alibaba-nacos-discovery</artifactId> </dependency> <!-- SpringCloud ailibaba sentinel--> <dependency> <groupId>com.alibaba.cloud</groupId> <artifactId>spring-cloud-starter-alibaba-sentinel</artifactId> </dependency> <!--gateway--> <dependency> <groupId>org.springframework.cloud</groupId> <artifactId>spring-cloud-starter-gateway</artifactId> </dependency> </dependencies> <build> <plugins> <plugin> <groupId>org.springframework.boot</groupId> <artifactId>spring-boot-maven-plugin</artifactId> </plugin> </plugins> </build> </project>
-
application.yml
server: port: 8800 spring: application: name: gateway-server cloud: nacos: discovery: server-addr: localhost:8848 #作为注册中心的地址 gateway: routes: - id: test1 uri: http://localhost:8803 predicates: - Path=/order/**
-
启动类
package com.ninja.gateway; import org.bouncycastle.math.ec.endo.GLVTypeAEndomorphism; import org.springframework.boot.SpringApplication; import org.springframework.boot.autoconfigure.SpringBootApplication; import org.springframework.boot.autoconfigure.jdbc.DataSourceAutoConfiguration; import org.springframework.cloud.client.discovery.EnableDiscoveryClient; /** * @Description * @Author Ninja * @Date 2020/8/30 **/ @SpringBootApplication(exclude = {DataSourceAutoConfiguration.class}) @EnableDiscoveryClient public class GatewayApplication { public static void main(String[] args) { SpringApplication.run(GatewayApplication.class); } }
配置文件详细说明
在我们的网关工程子模块中,可以看到下面的一配置
网关的路由配置,可以采用硬编码的方式也可以采用如下配置文件的方式
当然硬编码的方式因为是写死在代码中,扩展性和动态性就受到了限制,不做过多说明
我们就对配置文件的方式做一个详细的解说
gateway:
  routes:
    - id: test1
      uri: http://localhost:8803
      predicates:
        - Path=/order/**
上面只是一段配置,全称应该为speing.cloud.gateway.routes
-
routes:路由的复数形式,用来包含所有的路由规则等相关信息
-
id: 路由id,随便取,唯一要求就是全局唯一,一般我们配合服务名进行配置
-
uri:路由地址,这就是断言后的请求转发地址,
-
一般不会使用具体的ip和端口,而是配合nacos注册中心一起使用
-
具体下面详细讲解
-
-
predicates:断言的复数,表示包含所有的断言规则
-
path : 就是一个断言中的一种
-
-
上面的路由配置文件中,主要实现的功能为:
网关的端口8800,
当我们访问localhost:8800/order/xx时,请求会转发到localhost:8803/order/xx
可见路由转发已经生效

断言类型详解
path
上面我们使用path 意思就是,路径相匹配则进行路由跳转,还有很多的规则可以配置,下面慢慢道来
After
-
After:可以指定,只有在指定时间后,才可以路由到指定微服务
ZonedDateTime date = ZonedDateTime.now();
System.out.println(date); //获得时间,写个测试得到即可
现在我们将配置文件修改为如下
gateway:
  routes:
    - id: test1
      uri: lb://payment-server
      predicates:
        - Path=/payment/test1/**
        - After=2020-08-30T14:37:20.465+08:00[Asia/Shanghai]
-
uri 修改为指定注册中心上的服务,而不是固定的ip和端口
-
lb://payment-server :表示使用负载均衡的方式调用该服务
-
path 意思就是,路径相匹配则进行路由跳转
-
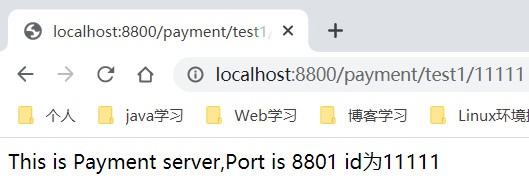
After意思为,在指定时间后才可以访问,之前访问为404

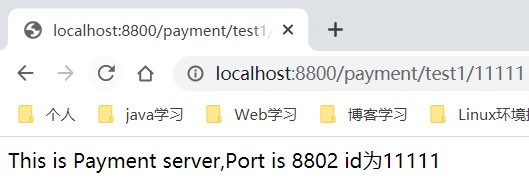
时间到了后,根据暴露的端口信息得知:负载均衡调用服务
before和between
-
这两个和上面after都是控制时间的,顾名思义:
before: 与after类似,他说在指定时间之前的才可以访问 between: 需要指定两个时间,在他们之间的时间才可以访问
cookie
-
cookie:只有包含某些指定cookie(key,value),的请求才可以路由
现在我们将配置文件修改为如下
gateway:
      routes:
        - id: test1
          uri: lb://payment-server
          predicates:
            - Path=/payment/test1/**
#            - After=2020-08-30T14:37:20.465+08:00[Asia/Shanghai]
            - Cookie=username,test
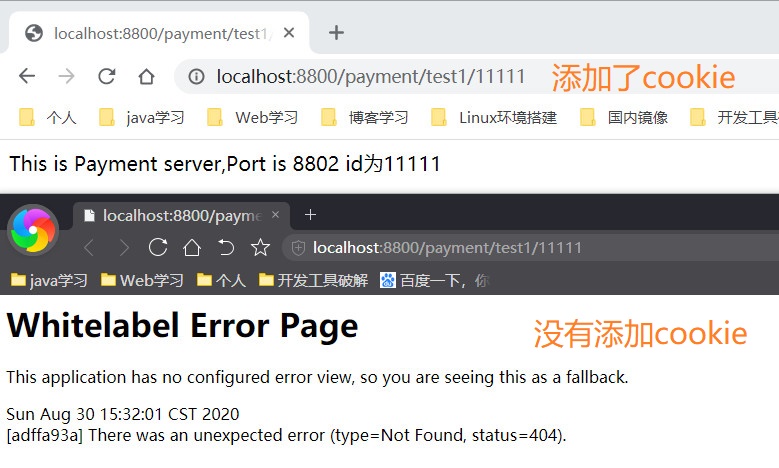
表示:只有cookie中包含了username这个key,且值为test才路由
在不加cookie的时候会报404
浏览器打开控制台,键入以下命令,添加cookie再访问
document.cookie="username=test";
header
-
header:只有包含指定请求头的请求,才可以路由
-
现在我们将配置文件修改为如下
 gateway:
      routes:
        - id: test1
          uri: lb://payment-server
          predicates:
            - Path=/payment/test1/**
#            - After=2020-08-30T14:37:20.465+08:00[Asia/Shanghai]
#            - Cookie=username,test
            - Header=ninja,\d+
Header 接受两个参数,第一个参数为头的名称,第二个参数为一个正则表达式
以上的配置便是,请求头中需有一个请求头key为ninja,且值为数字类型的值时才路由,

host
-
host:只有携带请求头中指定的Host才可以进行路由
-
现在我们将配置文件修改为如下
gateway:
      routes:
        - id: test1
          uri: lb://payment-server
          predicates:
            - Path=/payment/test1/**
#            - After=2020-08-30T14:37:20.465+08:00[Asia/Shanghai]
#            - Cookie=username,test
#            - Header=ninja,\d+
            - Host= www.ninja.com
-
以上的配置便是,请求头Host的值必须为www.ninja.com时才路由,其余一律不路由,
-
这个可以使用通配符方式比如:www.ninja.**,也是可以的
-
测试图为如下所示
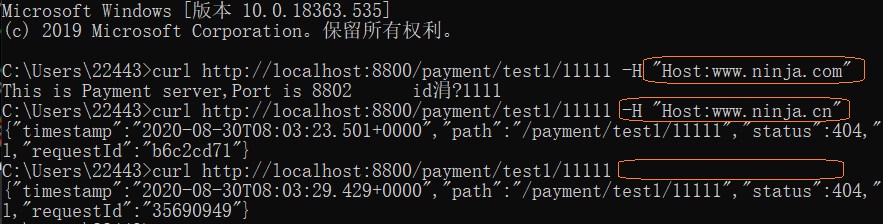
由于往下类型众多,我就不一一截图演示了,做详细的文字说明,不懂就点我
method
-
method:指定请求类型才可路由,比如post,get等
-
配置文件修改为如下所示
    gateway:
      routes:
        - id: test1
          uri: lb://payment-server
          predicates:
            - Path=/payment/test1/**
#            - After=2020-08-30T14:37:20.465+08:00[Asia/Shanghai]
#            - Cookie=username,test
#            - Header=ninja,\d+
#            - Host= www.ninja.com
            - Method=GET
Query
-
query:必须带有请求参数才可以访问
-
配置文件修改为如下所示
    gateway:
      routes:
        - id: test1
          uri: lb://payment-server
          predicates:
            - Path=/payment/test1/**
#            - After=2020-08-30T14:37:20.465+08:00[Asia/Shanghai]
#            - Cookie=username,test
#            - Header=ninja,\d+
#            - Host= www.ninja.com
#            - Method=GET
            - Query=username,\d+
基本上大致的断言类型我们以及知道了,下面对另一个概念进行讲解说明:过滤器
过滤器Filter
filter可用于修改的http请求和返回的http响应,相当于就是一个pre 一个post
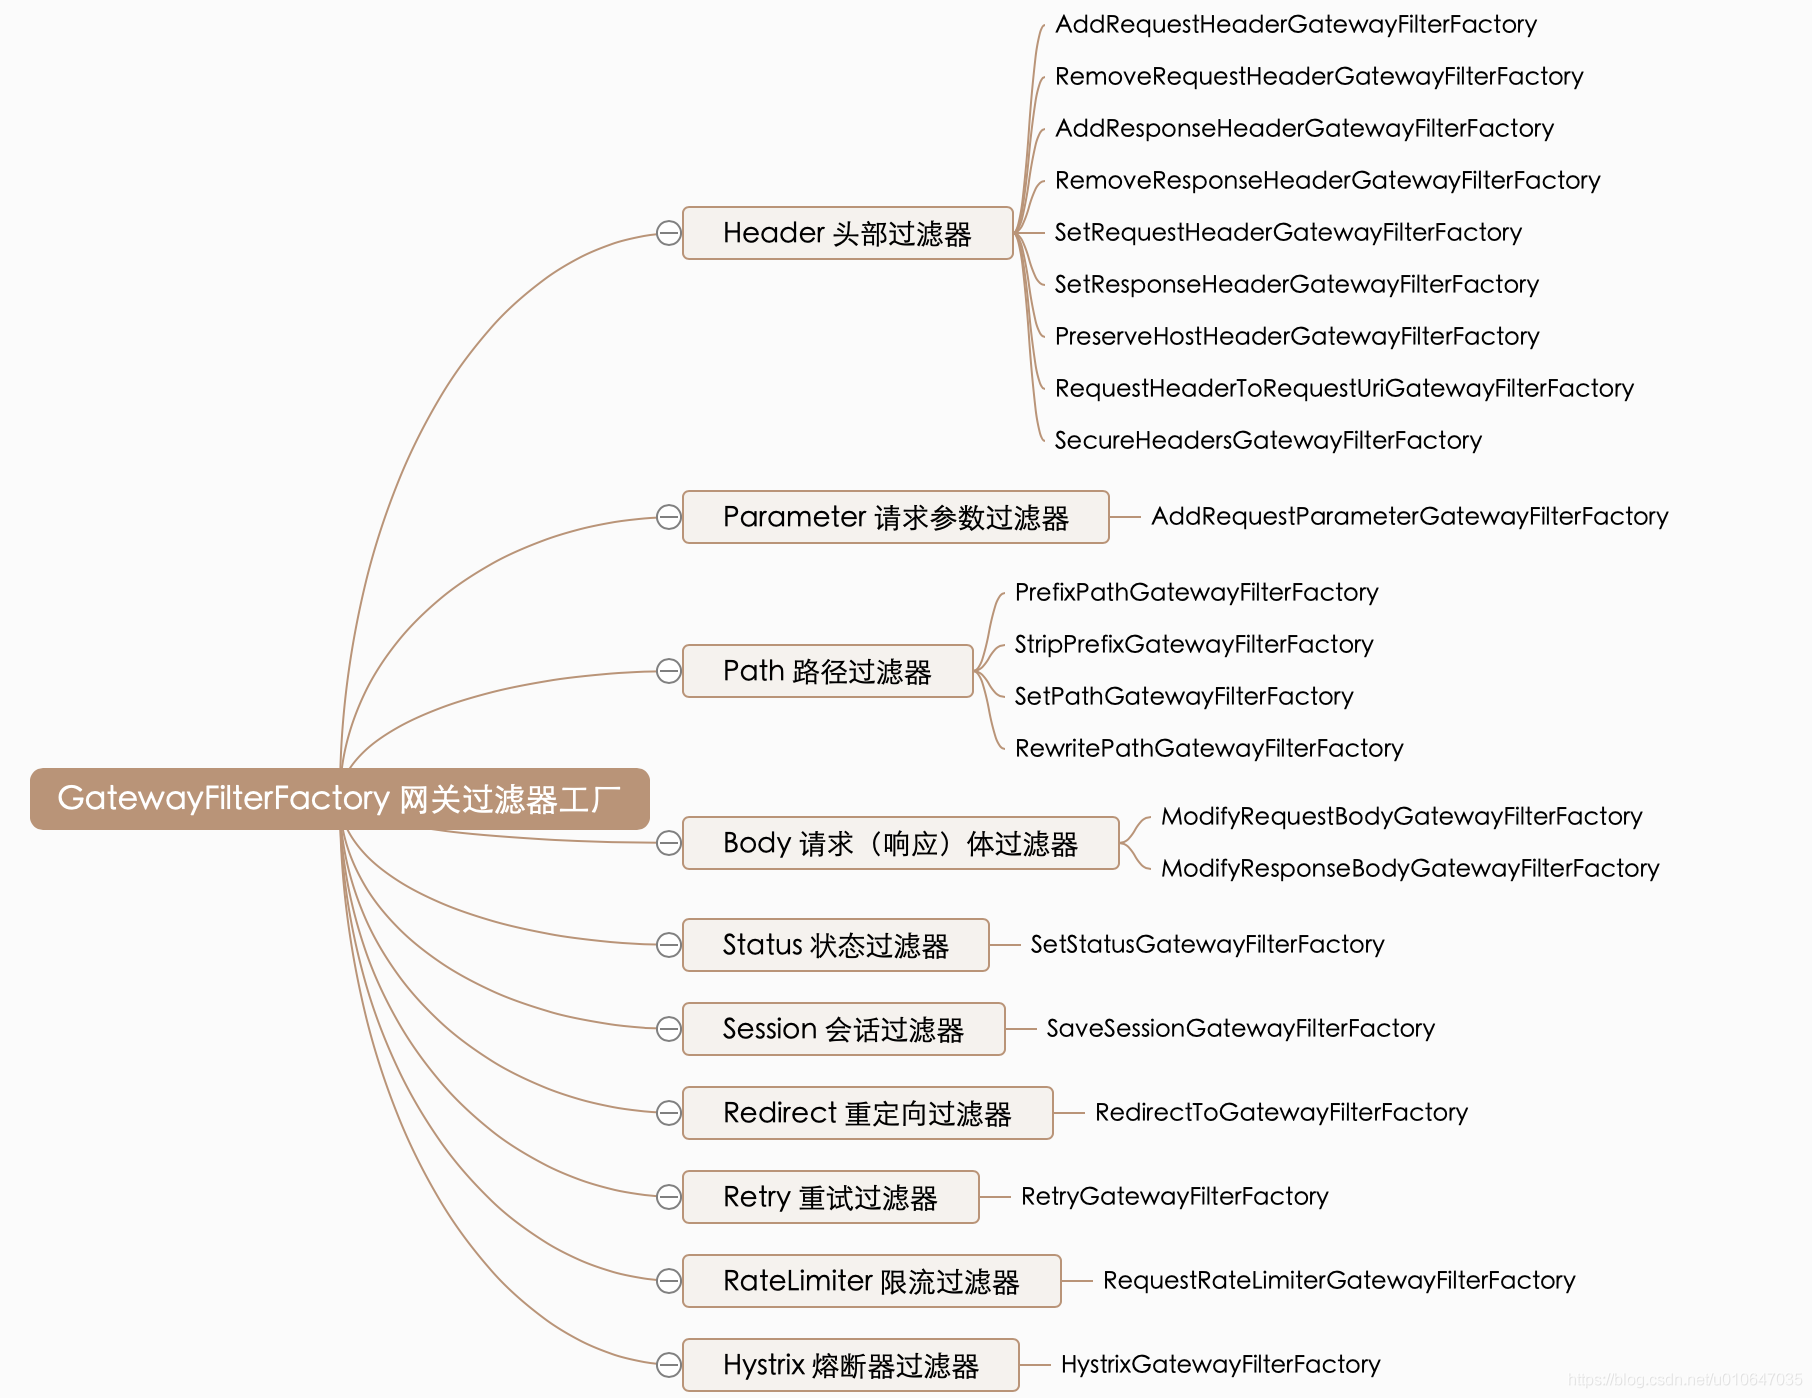
单一过滤器(GatewayFilter)
也就是我们配置在某个路由规则中的过滤器,对单个路由发生作用,Gateway一共内置了20多个过滤器,分别对头部过滤器、 路径类过滤器、 Hystrix过滤器和变更请求URL的过滤器, 还有参数和状态码等其他类型的过滤器。这里就不一一说明了,我们挑几个常用的讲解一番,其余就不做讲解了,当个人吧!
-
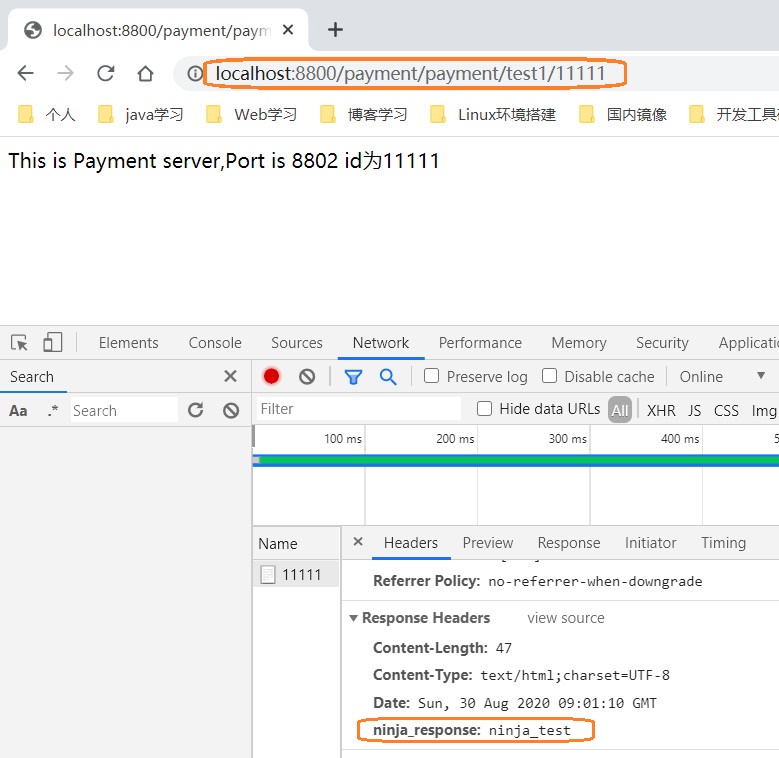
配置文件修改为如下所示
gateway:
  routes:
    - id: test1
      uri: lb://payment-server
      filters:
        - AddRequestHeader=ninja, ninja_test                #添加请求头
        - AddResponseHeader=ninja_response,ninja_test       #添加响应头
        - RewritePath=/payment/(?<segment>.*), /$\{segment} #请求路径重写
      predicates:
        - Path=/payment/payment/test1/**
测试之前想一想
-
服务的提供者我们一直没有做任何改变
-
在网关中,通过断言对请求url做了匹配
-
然后我们使用过滤器对请求路径做了重写
-
/payment/(?<segment>.*), /${segment} ???
-
第一个参数为原请求url,即是采用通配符的方式载入,
-
那么第一个参数把 /payment/test1/11111作为通配符的占位符
-
第二个参数为重写后的请求url:/${segment},为通配符的占位符
-
根据上面我们对第一个参数的解读,/${segment} 占位符替换即为:/payment/test1/11111
-
-
好了,更多的过滤器就面向百度吧,这里就不啰嗦了
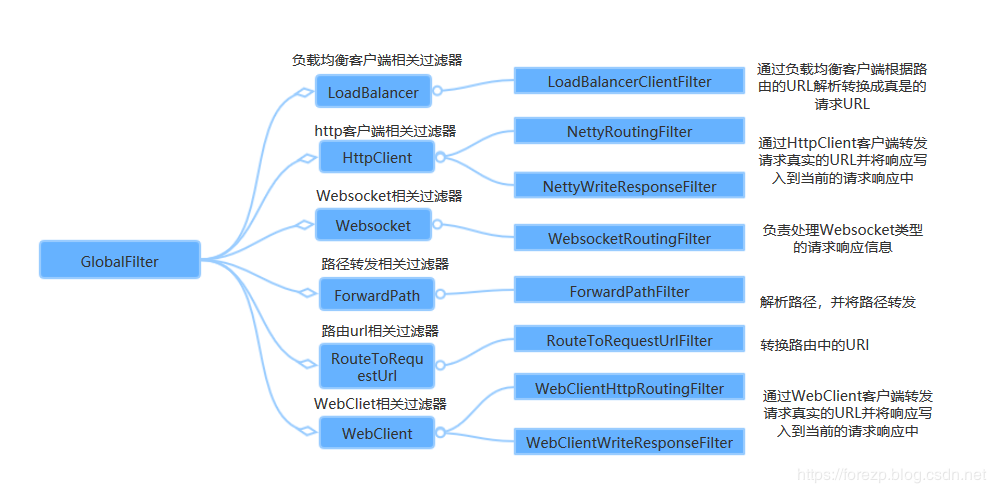
全局过滤器(GlobalFilter)
-
全局过滤器不再针对单个路由规则,全局过滤器无需在配置文件中配置,为请求业务以及路由的URI转换为真实业务服务的请求地址的核心过滤器,不需要配置,系统初始化时加载,并作用在每个路由上。
自定义过滤器(局部和全局)
-
除了上面网关提供的全局过滤器外,还可以自定义过滤器这也是我们经常使用的功能,下面详细说明一下
-
全局过滤器之自定义过滤器,我们需要实现两个接口:GlobalFilter, Ordered
-
局部过滤器子自定义过滤器,我们也需要实现两个接口:GatewayFilter, Ordered
-
都是重写两个函数,一个filter为我们的业务函数,一个表示当前过滤器的执行级别的函数
-
如何运用局部 / 全局过滤器 ?
-
全局过滤器:因为无需挂载到某个路由上,全局生效,无需额外编码和配置
-
局部过滤器:需要编码指定某个路由,局部生效,需要额外的编码
-
下面,我们分别来写两三个过滤器玩一玩
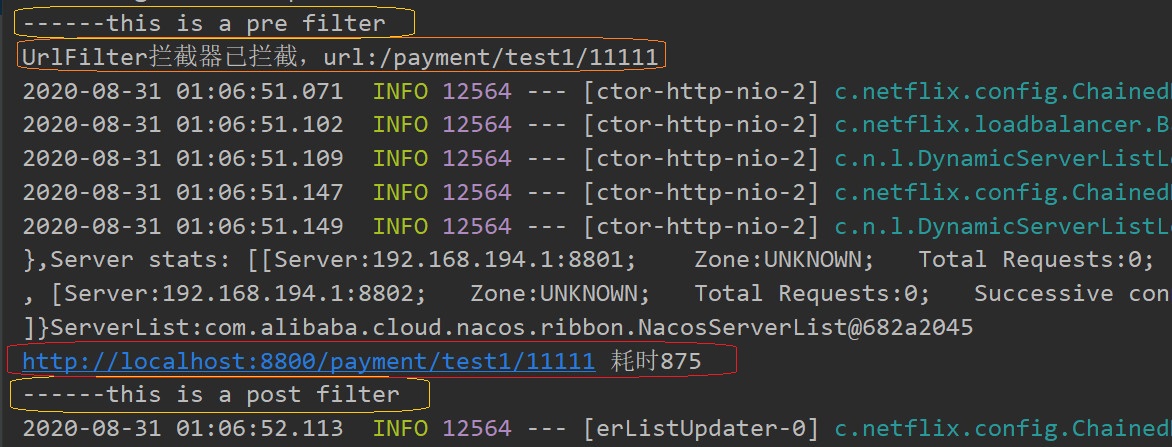
package com.ninja.gateway.custom; import org.springframework.cloud.gateway.filter.GatewayFilterChain; import org.springframework.cloud.gateway.filter.GlobalFilter; import org.springframework.core.Ordered; import org.springframework.stereotype.Component; import org.springframework.web.server.ServerWebExchange; import reactor.core.publisher.Mono; /** * @Description 全局过滤器,前置与后置过滤器 * @Author Ninja * @Date 2020/8/31 **/ @Component public class PreAndPostGlobalFilter implements GlobalFilter, Ordered { @Override public Mono<Void> filter(ServerWebExchange exchange, GatewayFilterChain chain) { System.out.println("------this is a pre filter"); return chain.filter(exchange).then(Mono.fromRunnable(() -> { System.out.println("------this is a post filter"); })); } @Override public int getOrder() { //定义过滤器执行顺序 //返回值越小,越靠前执行 return -1; } }
package com.ninja.gateway.custom; import org.springframework.cloud.gateway.filter.GatewayFilter; import org.springframework.cloud.gateway.filter.GatewayFilterChain; import org.springframework.cloud.gateway.filter.GlobalFilter; import org.springframework.core.Ordered; import org.springframework.stereotype.Component; import org.springframework.web.server.ServerWebExchange; import reactor.core.publisher.Mono; /** * @Description 局部过滤器:远程调用耗时记录 * @Author Ninja * @Date 2020/8/31 **/ @Component public class TimeCountNoGlaobalFilter implements GatewayFilter, Ordered { private static final String REQUEST_TIME_BEGIN = "requestTimeBegin"; @Override public Mono<Void> filter(ServerWebExchange exchange, GatewayFilterChain chain) { //记录请求开始时间 exchange.getAttributes().put(REQUEST_TIME_BEGIN, System.currentTimeMillis()); return chain.filter(exchange).then(Mono.fromRunnable(new Runnable() { @Override public void run() { Long startTime = exchange.getAttribute(REQUEST_TIME_BEGIN); if (startTime != null) { //打印 System.out.println(exchange.getRequest().getURI() + " 耗时" + (System.currentTimeMillis() - startTime)); } } })); } @Override public int getOrder() { //定义过滤器执行顺序 //返回值越小,越靠前执行 return 0; } }
package com.ninja.gateway.custom; import org.springframework.cloud.gateway.filter.GatewayFilterChain; import org.springframework.cloud.gateway.filter.GlobalFilter; import org.springframework.core.Ordered; import org.springframework.stereotype.Component; import org.springframework.web.server.ServerWebExchange; import reactor.core.publisher.Mono; /** * @Description 全局过滤器 * @Author Ninja * @Date 2020/8/31 **/ @Component public class UriGlobalFilter implements GlobalFilter, Ordered { @Override public Mono<Void> filter(ServerWebExchange exchange, GatewayFilterChain chain) { String path = exchange.getRequest().getURI().getPath(); System.out.println("UrlFilter拦截器已拦截,url:" + path); //拦截请求,直接响应 //return exchange.getResponse().setComplete(); //放行请求 return chain.filter(exchange); } @Override public int getOrder() { //定义过滤器执行顺序 //返回值越小,越靠前执行 return 1; } }
上面我写了三个过滤器,分别为:
-
PreAndPostGlobalFilter:全局过滤器,直接生效
-
TimeCountNoGlaobalFilter:局部过滤器,需要额外编码指定路由
-
UriGlobalFilter:全局过滤器,直接生效
下面我们对唯一的局部过滤器进行绑定路由的编码
package com.ninja.gateway.config; import com.ninja.gateway.custom.TimeCountNoGlaobalFilter; import com.ninja.gateway.custom.UriGlobalFilter; import org.springframework.cloud.gateway.filter.GatewayFilter; import org.springframework.cloud.gateway.route.Route; import org.springframework.cloud.gateway.route.RouteLocator; import org.springframework.cloud.gateway.route.builder.GatewayFilterSpec; import org.springframework.cloud.gateway.route.builder.PredicateSpec; import org.springframework.cloud.gateway.route.builder.RouteLocatorBuilder; import org.springframework.cloud.gateway.route.builder.UriSpec; import org.springframework.context.annotation.Bean; import org.springframework.context.annotation.Configuration; import java.util.function.Function; /** * @Description 将自定义局部filter注册到路由中 * @Author Ninja * @Date 2020/8/31 **/ @Configuration public class FilterEureka { @Bean public RouteLocator getRouteLocator(RouteLocatorBuilder builder) { return builder.routes(). route(new Function<PredicateSpec, Route.AsyncBuilder>() { @Override public Route.AsyncBuilder apply(PredicateSpec predicateSpec) { return predicateSpec .path("/payment/payment/test1/**") .filters(new Function<GatewayFilterSpec, UriSpec>() { @Override public UriSpec apply(GatewayFilterSpec gatewayFilterSpec) { return gatewayFilterSpec.stripPrefix(1).filter( new TimeCountNoGlaobalFilter()); } }) .uri("lb://payment-server") .id("test1)"); } }).build(); } }
-
仔细看看,无非就是指定了id,path 和 uri,使其绑定到了该路由上,下面我们启动项目测试一把

 浙公网安备 33010602011771号