基于Keepalived高可用集群的MariaDB读写分离机制实现
一 MariaDB读写分离机制
在实现读写分离机制之前先理解一下三种主从复制方式:
1.异步复制:
MariaDB默认的复制即是异步的,主库在执行完客户端提交的事务后会立即将结果返给给客户端,并不关心从库是否已经接收并处理,这样就会有一个问题,主节点如果挂掉了,此时主上已经提交的事务可能并没有传到从上,如果此时,强行将从提升为主,可能导致新主上的数据不完整。
2.全同步复制:
指当主库执行完一个事务,所有的从库都执行了该事务才返回给客户端。因为需要等待所有从库执行完该事务才能返回,所以全同步复制的性能必然会收到严重的影响。
3.半同步复制:
介于异步复制和全同步复制之间,主库在执行完客户端提交的事务后不是立刻返回给客户端,而是等待至少一个从库接收到并写到relay log中才返回给客户端。相对于异步复制,半同步复制提高了数据的安全性,同时它也造成了一定程度的延迟,这个延迟最少是一个TCP/IP往返的时间。所以,半同步复制最好在低延时的网络中使用。
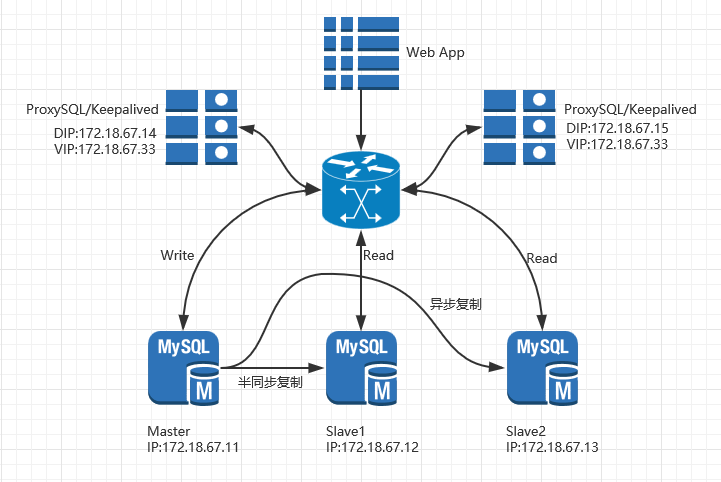
在本次实验中我们采用一主两从的方式实现MySQL读写分离机制,而在主从复制中采用异步复制和半同复制两种方式来保证数据的安全性和完整性。为了保证读写分离器高可用,还可利用Keepalived实现高可用集群。
二 常用读写分离器的介绍
mysql-proxy:MySQL官方出品;
atlas:奇虎360公司二次开发产品;
amoeba:Alibaba集团开发的可实现读写分离、分片功能的读写分离器;
OneProxy:读写分离框架,由平民架构开发并维护;
ProxySQL:一款高性能读写分离器;
MaxScale:Mariadb官方,稳定可靠,比较有影响力。
本实验我们采用ProxySQL来实现读写分离。
三 架构拓扑图
四 主从复制配置
#分别在三台主从节点配置如下的内容
[root@node1 ~]# vim /etc/my.cnf.d/server.cnf
[mysqld]
skip_name_resolve=ON
innodb_file_per_table=ON
server_id=1
log_bin=mysql-bin
[root@node2 ~]# vim /etc/my.cnf.d/server.cnf
[mysqld]
skip_name_resolve=ON
innodb_file_per_table=ON
server_id=2
relay_log=relay-log
[root@node3 ~]# vim /etc/my.cnf.d/server.cnf
[mysqld]
skip_name_resolve=ON
innodb_file_per_table=ON
server_id=3
relay_log=relay-log
#启动MariaDB服务
[root@node1 ~]# systemctl start mariadb.service
#登入MariaDB
[root@node1 ~]# mysql
MariaDB [(none)]> SHOW MASTER STATUS;
+------------------+----------+--------------+------------------+
| File             | Position | Binlog_Do_DB | Binlog_Ignore_DB |
+------------------+----------+--------------+------------------+
| mysql-bin.000003 |      245 |              |                  |
+------------------+----------+--------------+------------------+
#创建MariaDB复制账号
MariaDB [(none)]> GRANT REPLICATION SLAVE,REPLICATION CLIENT ON *.* TO 'repluser'@'172.18.67.%' IDENTIFIED BY 'replpass';
#安装半同步主从复制插件并启动主从复制功能
MariaDB [(none)]> INSTALL PLUGIN rpl_semi_sync_master SONAME 'semisync_master.so';
MariaDB [(none)]> SET @@global.rpl_semi_sync_master_enabled=ON;
#启动MariaDB服务
[root@node2 ~]# systemctl start mariadb.service
#登入MariaDB
[root@node2 ~]# mysql
#安装半同步主从复制插件并启动主从复制功能
MariaDB [(none)]> INSTALL PLUGIN rpl_semi_sync_slave SONAME 'semisync_slave.so';
MariaDB [(none)]> set @@global.rpl_semi_sync_slave_enabled=ON;
#配置slave1节点的master节点
MariaDB [(none)]> CHANGE MASTER TO MASTER_HOST='172.18.67.11',MASTER_USER='repluser',MASTER_PASSWORD='replpass',MASTER_LOG_FILE='mysql-bin.000003',MASTER_LOG_POS=442;
MariaDB [(none)]> START SLAVE;
MariaDB [(none)]> SHOW SLAVE STATUS\G;
*************************** 1. row ***************************
               Slave_IO_State: Waiting for master to send event
                  Master_Host: 172.18.67.11
                  Master_User: repluser
                  Master_Port: 3306
                Connect_Retry: 60
              Master_Log_File: mysql-bin.000003
          Read_Master_Log_Pos: 422
               Relay_Log_File: relay-log.000002
                Relay_Log_Pos: 529
        Relay_Master_Log_File: mysql-bin.000003
             Slave_IO_Running: Yes
            Slave_SQL_Running: Yes
              Replicate_Do_DB:
          Replicate_Ignore_DB:
           Replicate_Do_Table:
       Replicate_Ignore_Table:
      Replicate_Wild_Do_Table:
  Replicate_Wild_Ignore_Table:
                   Last_Errno: 0
                   Last_Error:
                 Skip_Counter: 0
          Exec_Master_Log_Pos: 422
              Relay_Log_Space: 817
              Until_Condition: None
               Until_Log_File:
                Until_Log_Pos: 0
           Master_SSL_Allowed: No
           Master_SSL_CA_File:
           Master_SSL_CA_Path:
              Master_SSL_Cert:
            Master_SSL_Cipher:
               Master_SSL_Key:
        Seconds_Behind_Master: 0
Master_SSL_Verify_Server_Cert: No
                Last_IO_Errno: 0
                Last_IO_Error:
               Last_SQL_Errno: 0
               Last_SQL_Error:
  Replicate_Ignore_Server_Ids:
             Master_Server_Id: 1
#启动MariaDB服务
[root@node3 ~]# systemctl start mariadb.service
#登入MariaDB
[root@node3 ~]# mysql
#配置slave2节点的master节点
MariaDB [(none)]> CHANGE MASTER TO MASTER_HOST='172.18.67.11',MASTER_USER='repluser',MASTER_PASSWORD='replpass',MASTER_LOG_FILE='mysql-bin.000003',MASTER_LOG_POS=442;
MariaDB [(none)]> START SLAVE;
MariaDB [(none)]> SHOW SLAVE STATUS\G;
*************************** 1. row ***************************
               Slave_IO_State: Waiting for master to send event
                  Master_Host: 172.18.67.11
                  Master_User: repluser
                  Master_Port: 3306
                Connect_Retry: 60
              Master_Log_File: mysql-bin.000003
          Read_Master_Log_Pos: 422
               Relay_Log_File: relay-log.000002
                Relay_Log_Pos: 529
        Relay_Master_Log_File: mysql-bin.000003
             Slave_IO_Running: Yes
            Slave_SQL_Running: Yes
              Replicate_Do_DB:
          Replicate_Ignore_DB:
           Replicate_Do_Table:
       Replicate_Ignore_Table:
      Replicate_Wild_Do_Table:
  Replicate_Wild_Ignore_Table:
                   Last_Errno: 0
                   Last_Error:
                 Skip_Counter: 0
          Exec_Master_Log_Pos: 422
              Relay_Log_Space: 817
              Until_Condition: None
               Until_Log_File:
                Until_Log_Pos: 0
           Master_SSL_Allowed: No
           Master_SSL_CA_File:
           Master_SSL_CA_Path:
              Master_SSL_Cert:
            Master_SSL_Cipher:
               Master_SSL_Key:
        Seconds_Behind_Master: 0
Master_SSL_Verify_Server_Cert: No
                Last_IO_Errno: 0
                Last_IO_Error:
               Last_SQL_Errno: 0
               Last_SQL_Error:
  Replicate_Ignore_Server_Ids:
             Master_Server_Id: 1
#进行测试
[root@node1 ~]# mysql -e "SHOW GLOBAL STATUS LIKE '%semi%'" | grep 'Rpl_semi_sync_master_clients'
Rpl_semi_sync_master_clients 1
#在主节点创建数据库mydb
[root@node1 ~]# mysql -e "CREATE DATABASE mydb;"
#在从节点查看主节点创建的数据库mydb是否复制过来
[root@node2 ~]# mysql -e "SHOW DATABASES;" | grep mydb
mydb
[root@node3 ~]# mysql -e "SHOW DATABASES;" | grep mydb
mydb
#从节点已经将主节点创建的数据库复制过来了
五 读写分离ProxySQL的配置
1.节点一
[root@node4 ~]# vim /etc/proxysql.cnf
datadir="/var/lib/proxysql"
admin_variables=
{
 admin_credentials="admin:admin"
 mysql_ifaces="127.0.0.1:6032;/tmp/proxysql_admin.sock"
}
mysql_variables=
{
 threads=4
 max_connections=2048
 default_query_delay=0
 default_query_timeout=36000000
 have_compress=true
 poll_timeout=2000
 interfaces="0.0.0.0:3306;/tmp/mysql.sock"
 default_schema="information_schema"
 stacksize=1048576
 server_version="5.5.30"
 connect_timeout_server=3000
 monitor_history=600000
 monitor_connect_interval=60000
 monitor_ping_interval=10000
 monitor_read_only_interval=1500
 monitor_read_only_timeout=500
 ping_interval_server=120000
 ping_timeout_server=500
 commands_stats=true
 sessions_sort=true
 connect_retries_on_failure=10
}
mysql_servers =
(
 {
  address = "172.18.67.11"   # no default, required . If port is 0 , address is interpred as a Unix Socket Domain
  port = 3306                # no default, required . If port is 0 , address is interpred as a Unix Socket Domain
  hostgroup = 0              # no default, required
  status = "ONLINE"          # default: ONLINE
  weight = 1                 # default: 1
  compression = 0            # default: 0
 },
 {
  address = "172.18.67.12"
  port = 3306
  hostgroup = 1
  status = "ONLINE"          # default: ONLINE
  weight = 1                 # default: 1
  compression = 0            # default: 0
 },
 {
  address = "172.18.67.13"
  port = 3306
  hostgroup = 1
  status = "ONLINE"          # default: ONLINE
  weight = 1                 # default: 1
  compression = 0            # default: 0
 }
)
mysql_users:
(
 {
  username = "root"
  password = "mrlapulga"
  default_hostgroup = 0
  max_connections=1000
  active = 1
 }
)
mysql_replication_hostgroups=
(
 {
  writer_hostgroup=0
  reader_hostgroup=1
 }
)
#在主节点对用户进行授权:
MariaDB [(none)]> GRANT ALL ON *.* TO 'root'@'172.18.67.%' IDENTIFIED BY 'mrlapulga';
MariaDB [(none)]> FLUSH PRIVILEGES;
#启动读写分离器的节点1
[root@node4 ~]# systemctl start proxysql
#使用管理接口验证:
[root@node4 ~]# mysql -uadmin -h127.0.0.1 -padmin -P6032
MySQL [(none)]> SELECT hostgroup_id,hostname,hostname,status FROM mysql_servers;
+--------------+--------------+--------------+--------+
| hostgroup_id | hostname     | hostname     | status |
+--------------+--------------+--------------+--------+
| 0            | 172.18.67.11 | 172.18.67.11 | ONLINE |
| 1            | 172.18.67.12 | 172.18.67.12 | ONLINE |
| 1            | 172.18.67.13 | 172.18.67.13 | ONLINE |
+--------------+--------------+--------------+--------+
#测试读操作
[root@node4 ~]# mysql -uroot -pmrlapulga -h 127.0.0.1  -P3306
MySQL [OA]> use mydb;
MySQL [mydb]> DESC tbl1;
+-------+---------------------+------+-----+---------+----------------+
| Field | Type                | Null | Key | Default | Extra          |
+-------+---------------------+------+-----+---------+----------------+
| id    | tinyint(3) unsigned | NO   | PRI | NULL    | auto_increment |
| name  | char(20)            | YES  |     | NULL    |                |
+-------+---------------------+------+-----+---------+----------------+
#测试写操作,在proxysql节点插入一条字段
MySQL [mydb]> INSERT INTO mydb.tbl1 (name) VALUES ('jack');
#在从节点一查看
[root@node2 ~]# mysql -e "SELECT * FROM mydb.tbl1;"
+----+------+
| id | name |
+----+------+
|  1 | jack |
+----+------+
#在从节点二查看
[root@node3 ~]# mysql -e "SELECT * FROM mydb.tbl1;"
+----+------+
| id | name |
+----+------+
|  1 | jack |
+----+------+
2.节点二
#将配置文件复制到ProxySQL节点二
[root@node4 ~]# scp /etc/proxysql.cnf 172.18.67.15:/etc/
#启动节点二的服务
[root@node5 ~]# systemctl start proxysql
六 配置高可用集群
#在ProxySQL1节点配置keepalived
[root@node4 ~]# vim /etc/keepalived/keepalived.conf
! Configuration File for keepalived
global_defs {
    notification_email_from keepalived@localhost
    smtp_server 127.0.0.1
    smtp_connect_timeout 30
    router_id proxysql
    vrrp_macst_group4 224.0.67.67
}
vrrp_instance HA_mysql {
    state MASTER
    interface eno16777736
    virtual_router_id 67
    priority 100
    advert_int 1
    authentication {
        auth_type PASS
  auth_pass lKZvQVv9
    }
    virtual_ipaddress {
      172.18.67.33/16 dev eno16777736
    }
}
[root@node4 ~]# systemctl start keepalived
#在ProxySQL2节点配置keepalived
[root@node5 ~]# vim /etc/keepalived/keepalived.conf
! Configuration File for keepalived
global_defs {
    notification_email_from keepalived@localhost
    smtp_server 127.0.0.1
    smtp_connect_timeout 30
    router_id proxysql
    vrrp_macst_group4 224.0.67.67
}
vrrp_instance HA_mysql {
    state BACKUP
    interface eno16777736
    virtual_router_id 67
    priority 98
    advert_int 1
    authentication {
        auth_type PASS
  auth_pass lKZvQVv9
    }
    virtual_ipaddress {
      172.18.67.33/16 dev eno16777736
    }
}
[root@node5 ~]# systemctl start keepalived
七 测试
#在ProxySQL节点1登录MySQL
[root@node4 ~]# mysql -uroot -h172.18.67.33 -pmrlapulga -P 3306
MySQL [(none)]> use mydb;
#查看数据库及表
MySQL [mydb]> SELECT * FROM tbl1;
+----+------+
| id | name |
+----+------+
|  1 | jack |
+----+------+
#在ProxySQL节点2登录MySQL
[root@node5 ~]# mysql -uroot -h172.18.67.33 -pmrlapulga -P 3306
MySQL [(none)]> use mydb;
#查看数据库及表
MySQL [mydb]> SELECT * FROM tbl1;
+----+------+
| id | name |
+----+------+
|  1 | jack |
+----+------+
#测试在ProxySQL1节点写操作
MySQL [mydb]> CREATE TABLE tbl2 (id TINYINT UNSIGNED NOT NULL AUTO_INCREMENT, name CHAR(20) NOT NULL, PRIMARY KEY(id));
#分别在两个从节点查看
[root@node2 ~]# mysql -e "DESC mydb.tbl2;"
+-------+---------------------+------+-----+---------+----------------+
| Field | Type                | Null | Key | Default | Extra          |
+-------+---------------------+------+-----+---------+----------------+
| id    | tinyint(3) unsigned | NO   | PRI | NULL    | auto_increment |
| name  | char(20)            | NO   |     | NULL    |                |
+-------+---------------------+------+-----+---------+----------------+
[root@node3 ~]# mysql -e "DESC mydb.tbl2;"
+-------+---------------------+------+-----+---------+----------------+
| Field | Type                | Null | Key | Default | Extra          |
+-------+---------------------+------+-----+---------+----------------+
| id    | tinyint(3) unsigned | NO   | PRI | NULL    | auto_increment |
| name  | char(20)            | NO   |     | NULL    |                |
+-------+---------------------+------+-----+---------+----------------+

 浙公网安备 33010602011771号