
spring-boot单元测试
一、为什么要写单元测试
很多程序员有两件事情不愿意做:
- 写注释。
- 写单元测试。
但是在看代码时又会希望有清晰明了的注释,重构代码时能有一套随时可以跑起来的单元测试。
最近在迁移一个项目,从sqlserver迁移到mysql,功能不变,部分语法有些不一样,人工校验是一件痛苦的事情,但是全依靠测试又怕有遗漏,于是研究了下单元测试,这就是写这篇博文的动机。单元测试能够大较大范围检测我们代码调整后修改后的逻辑问题,达到一次编写多次使用的目的。
二、怎么写单元测试
写单元测试有很多框架,有针对Service的、有针对Controller的等等,这里主要使用MockMvc针对Rest风格的Controller进行单元测试。同时,为了避免造成脏数据污染测试环境,对数据库的增删改进行了事物回滚配置,达到既完成了测试,又不需要手动清理数据的目的。
使用MockMvc单元测试,可以模拟真实的Rest风格的接口调用情况,全流程覆盖测试。
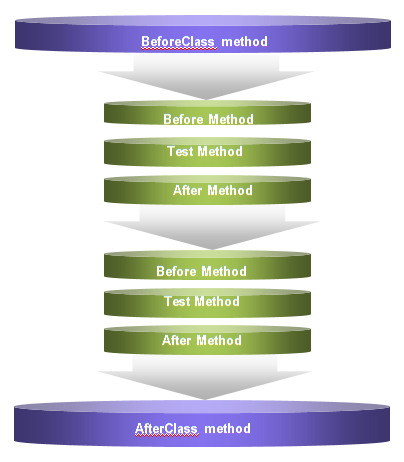
单元测试运行顺序:(摘自:http://blog.csdn.net/u011794238/article/details/50639187)
怎么写单元测试要看有什么要的业务需求,总结有以下几大写法:
1、方法限时测试
- 可用来模拟接口最小延时测试
- 可用来模拟死循环测试
    @Test(timeout = 10000) // 单位毫秒  10秒时间限制
    public void testDemo(){

    }
2、异常测试(必须要抛出指定异常测试)
期望某种异常,如果没有指定的异常,会测试不通过。
    @Test(expected = ArithmeticException.class)
    public void testDemo(){

    }
3、忽略测试方法
@Ignore注解,此时即使某方法包含@Test注解,该方法也不会作为测试方法执行,@Ignore还可以注解在类上,当一个类存在@Ignore注解时,该类所有的方法都不会被认为是测试方法。
    @Ignore("method not yet implemented")
    @Test
    public void testDemo(){

    }
如果你已经把该方法的测试用例写完,但该方法尚未完成,那么测试的时候一定是“失败”。这种失败和真正的失败是有区别的,因此JUnit提供了一种方法来区别他们,那就是在这种测试函数的前面加上@Ignore标注,这个标注的含义就是“某些方法尚未完成,暂不参与此次测试”。这样的话测试结果就会提示你有几个测试被忽略,而不是失败。一旦你完成了相应函数,只需要把@Ignore标注删去,就可以进行正常的测试。
4、Fixture
@Before:在任何一个测试执行之前必须执行的代码,我们用@Before标注它。(在每个测试方法执行前执行)
@After:在任何测试执行之后需要进行的收尾工作,使用@After来标注。(在每个测试方法执行结束后执行)
@BeforeClass:只在测试用例初始化时执行 @BeforeClass 方法。
@AfterClass:当所有测试执行完毕之后,执行 @AfterClass 进行收尾工作。
每个测试类只能有一个方法被标注为 @BeforeClass 或 @AfterClass ,并且该方法必须是 Public 和 Static 的。
    @Before
    public void testDemo(){
        System.out.println("before test demo method ……");
    }
    @Before
    public void testDemo2(){
        System.out.println("before test demo2 method ……");
    }
两个Before方法都会执行,但不保证顺序,没必要注解两个Before方法。
4、Runner( 运行器 )
当你把测试代码提交给 JUnit 框架后,框架通过Runner来运行测试代码。在 JUnit 中有很多个 Runner ,他们负责调用你的测试代码,每一个 Runner 都有各自的特殊功能,你要根据需要选择不同的 Runner 来运行你的测试代码。
比如:
参数化测试Runner @RunWith(Parameterized.class)
打包测试Runner @RunWith(Suite.class)
5、 参数化测试
JUnit4 提出了“参数化测试”的概念,只写一个测试函数,把这若干种情况作为参数传递进去,一次性的完成测试。
6、打包测试
如果将所有的测试方法写在同一个测试类中,不仅类代码太多,找某个功能点的测试方法也不太方便,所有通常我们按Controller写对应的测试类,这样一来,要跑完所有的测试方法就必须一个个测试类来跑测试。
Junit提供了一个打包运行所有测试类的方法。示例:
package com.generator.demo.controller;

import org.junit.runner.RunWith;
import org.junit.runners.Suite;

@RunWith(Suite. class )
@Suite.SuiteClasses( {
        OrderControllerTest.class,
        PayControllerTest.class
} )
public class AllTestRunner {
}
示例可以运行 OrderControllerTest 和 PayControllerTest 里的所有测试方法。以此类推,将所有的测试类写在这里,只需要运行 AllTestRunner 就可以达到运行所有测试类的目的。
7、事物自动回滚
在测试类上加注解,可以对数据库增删改操作回滚,测试用例可以反复使用。
@Rollback 默认是回滚
@RunWith(SpringRunner.class)
@SpringBootTest
@Rollback
@Transactional(value = "testpackageTransactionManager")
public class OrderControllerTest  {

}
三、单元测试示例
1、打包测试示例:
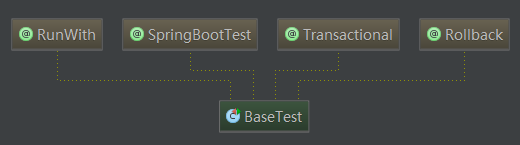
单元测试的这几个注解都是可继承的
- @RunWith
- @SpringBootTest
- @Rollback
- @Transactional
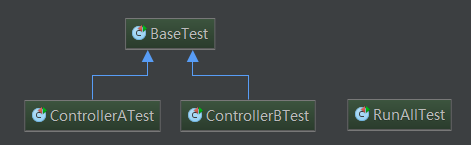
申明所有测试类继承的父类BaseTest:
@RunWith(SpringRunner.class)
@SpringBootTest
@Rollback
@Transactional(value = "testpackageTransactionManager")
public class BaseTest {

}
ControlerATest与ControllerBTest:
public class ControllerATest extend BaseTest {
    @Test
    public void testAMethodA(){
        System.out.println("com.generator.demo.controller.ControllerATest.testAMethodA");
    }

    @Test
    public void testAMethodB(){
        System.out.println("com.generator.demo.controller.ControllerATest.testAMethodB");
    }
}
RunAllTest:
@RunWith(Suite.class)
@Suite.SuiteClasses({
        ControllerATest.class,
        ControllerBTest.class
})
public class RunAllTest {

}
类图示例:
只需要运行RunAllTest,输出如下:
com.generator.demo.controller.ControllerATest.testAMethodA
com.generator.demo.controller.ControllerATest.testAMethodB
com.generator.demo.controller.ControllerBTest.testBMethodA
com.generator.demo.controller.ControllerBTest.testBMethodBProcess finished with exit code 0
2、Rest风格测试示例
@RunWith(SpringRunner.class)
@SpringBootTest
@Rollback
@Transactional(value = "testpackageTransactionManager")
public class OrderControllerTest  {
    /**
     * mockMvc: 这个对象是Controller单元测试的关键,它的初始化也是在setup方法里面。
         mockMvc.perform: 发起一个http请求。
         post(url): 表示一个post请求,url对应的是Controller中被测方法的Rest url。
         param(key, value): 表示一个request parameter,方法参数是key和value。
         andDo(print()): 表示打印出request和response的详细信息,便于调试。
         andExpect(status().isOk()): 表示期望返回的Response Status是200。
         andExpect(content().string(is(expectstring)): 表示期望返回的Response Body内容是期望的字符串。
     */
    private MockMvc mockMvc;

    //用于声明一个ApplicationContext集成测试加载WebApplicationContext。作用是模拟ServletContext
    @Autowired
    private WebApplicationContext wac;

    @Before
    public void setup() {
        //MockMvcBuilders使用构建MockMvc对象   (项目拦截器有效)
        mockMvc = MockMvcBuilders.webAppContextSetup(wac).build();
    }

    /**Post方式*/
    @Test(timeout = 10000)
    public void getOrderById() throws Exception {
        GetOrderByIdRequest request = new GetOrderByIdRequest();
        request.setId(1);

        MockHttpServletRequestBuilder content = MockMvcRequestBuilders.post("/order/getOrderById")
                .contentType(MediaType.APPLICATION_JSON)
                .accept(MediaType.APPLICATION_JSON)
                .content(JsonUtil.convertToJson(request));

        ResultActions resultActions = mockMvc.perform(content)
                .andDo(MockMvcResultHandlers.print())
                .andExpect(MockMvcResultMatchers.status().isOk());
        //.andExpect(MockMvcResultMatchers.content().string("365"));  //测试接口返回内容
        MvcResult mvcResult = resultActions.andReturn();
        MockHttpServletResponse response = mvcResult.getResponse();
        String contentAsString = response.getContentAsString();

        Assert.assertTrue("请求成功!", response.getStatus() == 200);
        System.out.println(contentAsString);
    }

    @Test
    public void getOrderById() throws Exception {
        MockHttpServletRequestBuilder content = MockMvcRequestBuilders.get("/order/getOrderById")
                .contentType(MediaType.APPLICATION_FORM_URLENCODED).param("id", "1");

        ResultActions resultActions = mockMvc.perform(content)
                .andDo(MockMvcResultHandlers.print())
                .andExpect(MockMvcResultMatchers.status().isOk())
                .andExpect(MockMvcResultMatchers.jsonPath("id").value(1));
        //.andExpect(MockMvcResultMatchers.content().string("365"));  //测试接口返回内容
        MvcResult mvcResult = resultActions.andReturn();
        MockHttpServletResponse response = mvcResult.getResponse();
        String contentAsString = response.getContentAsString();

        Assert.assertTrue("请求成功!", response.getStatus() == 200);
        System.out.println(contentAsString);
    }
}
参考资料:
参数化示例 http://blog.csdn.net/u012777182/article/details/38821307
初级测试 http://blog.csdn.net/andycpp/article/details/1327147
中级测试 http://blog.csdn.net/andycpp/article/details/1327346
高级测试 http://blog.csdn.net/andycpp/article/details/1329218

 浙公网安备 33010602011771号