【项目实战】屏幕简易ocr识别
需求
最近接到一个在屏幕固定位置识别特定字符识别的需求,其中包含0-9数字、纳米和微米的单位符号nm和μm。一共14个类别:0-9,n,m,μ和小数点。
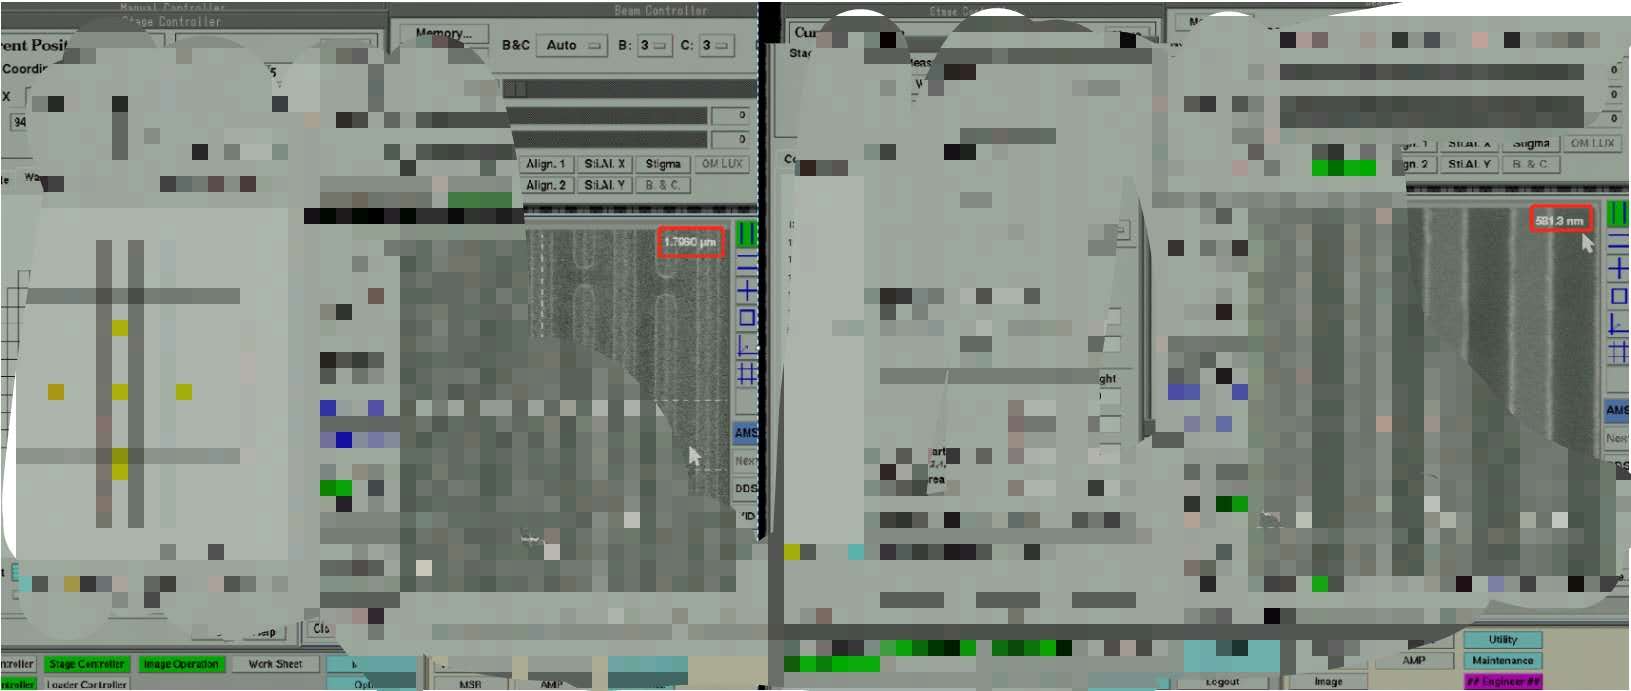
如下图红色框内所示,识别红色标记内的字符。
由于场景数据集数量较少,需要生成相应字体的数据集用于训练。
图像分类处理
由于字符数量较少,图像分类可以避免数据标注的繁琐工作。先尝试图像分类的方式,但测试效果很不理想。
python中生成字符图像可以利用
- opencv中的cv2.putText()
1 img = cv2.putText(pixel, str(_label[0]), (col_position, row_position), cv2.FONT_HERSHEY_PLAIN, 2, (255, 255, 255), 3)
- PIL中的Image.Draw()类中的text()方法
1 draw = ImageDraw.Draw(img_PIL) draw.text(position, character, font=font, fill=fillcolor)
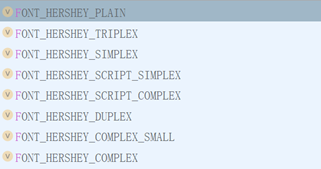
cv2.putText()可以通过cv2.FONT_xxx选择字体,共包含9种字体,如下图所示:
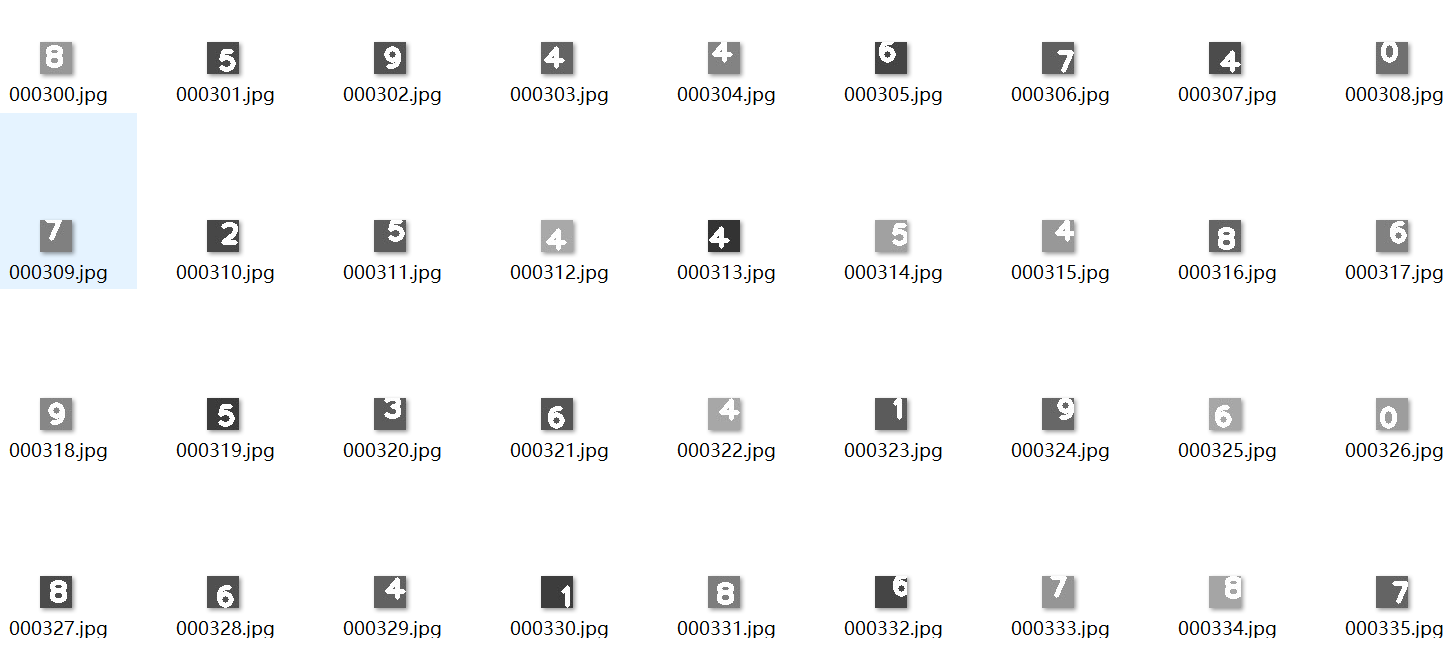
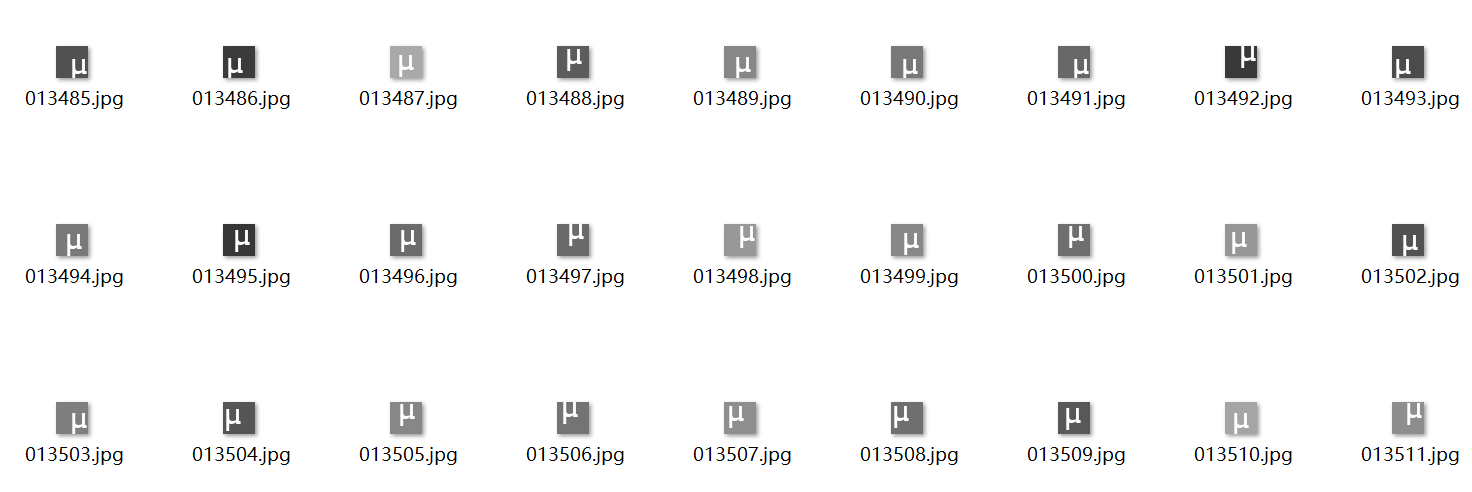
通过选择合适字体,结合底色、位置的随机可以生成如下图所示的数字数据集,并将图像信息和标签信息保存为.mat格式(由于是图像分类,只需要图像信息和坐标即可,.mat更易存储)。
生成代码如下:
 1 import cv2
 2 import numpy as np
 3 import os
 4 from PIL import Image
 5 from scipy import  io
 6 # 路径
 7 img_path = './data/img'
 8 txt_path = './data/txt'
 9 if not os.path.exists(img_path):
10     os.makedirs(img_path)
11 if not os.path.exists(txt_path):
12     os.makedirs(txt_path)
13
14 point_img_path = "C:\\Users\\vtstar\\PROJECT_OCR\\data\\model"
15 point_list = os.listdir(point_img_path)
16 point_num = len(point_list)
17 # 初始化
18 num = 10000
19 mat_path = './data'
20 x = np.zeros((32, 32, 3, num+point_num), np.uint8)
21 y = np.zeros((num+point_num, 1), np.int)
22 # 随机生成
23 for i in range(0, num):
24     # 0-9部分
25     _name = str(i).rjust(6, "0")   # 文件名称
26     _label = np.random.randint(0, 10, 1).astype(int)
27     _gray = np.random.randint(50, 170, 1)  # 底色
28     col_position = np.random.randint(0, 17)  # 宽的起点
29     row_position = np.random.randint(20, 32)  # 高的起点 (左下角点的坐标)
30     # print(_gray)
31     pixel = np.ones((32, 32, 3), np.uint8) * _gray[0]
32     img = cv2.putText(pixel, str(_label[0]), (col_position, row_position), cv2.FONT_HERSHEY_PLAIN, 2, (255, 255, 255), 3)
33     img_dir = os.path.join(img_path, _name+'.jpg')
34     txt_dir = os.path.join(txt_path, _name+'.txt')
35     # save
36     cv2.imwrite(img_dir, img)
37     np.savetxt(txt_dir, _label, fmt="%d")
38     x[:, :, :, i] = img
39     y[i, 0] = _label
40     # 动态打印进度条
41     if (i+1) % 100 == 0:
42         m = (i+1)//100
43         print('\r当前进度:{0}{1}%'.format('▉'*m,(m)), end='')
44 # 保存为.mat格式
45 dic = {'x':x, 'y':y}
46 io.savemat('new_digit_point.mat', dic)
同理,可以生成对应m和n的字符图像。
但是,通过opencv中包含的字体生成'μ'字符图像,生成的都是"??"。
PIL Image登场!!!
字体设置:
1 font = ImageFont.truetype('Arvo-Regular.ttf', 30, encoding="gbk")
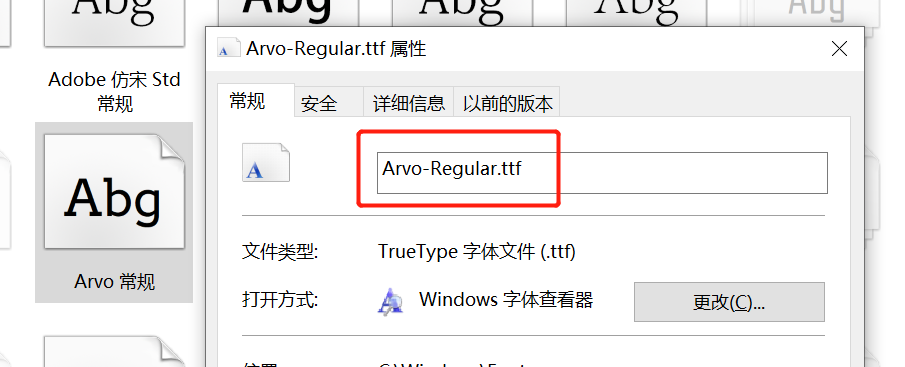
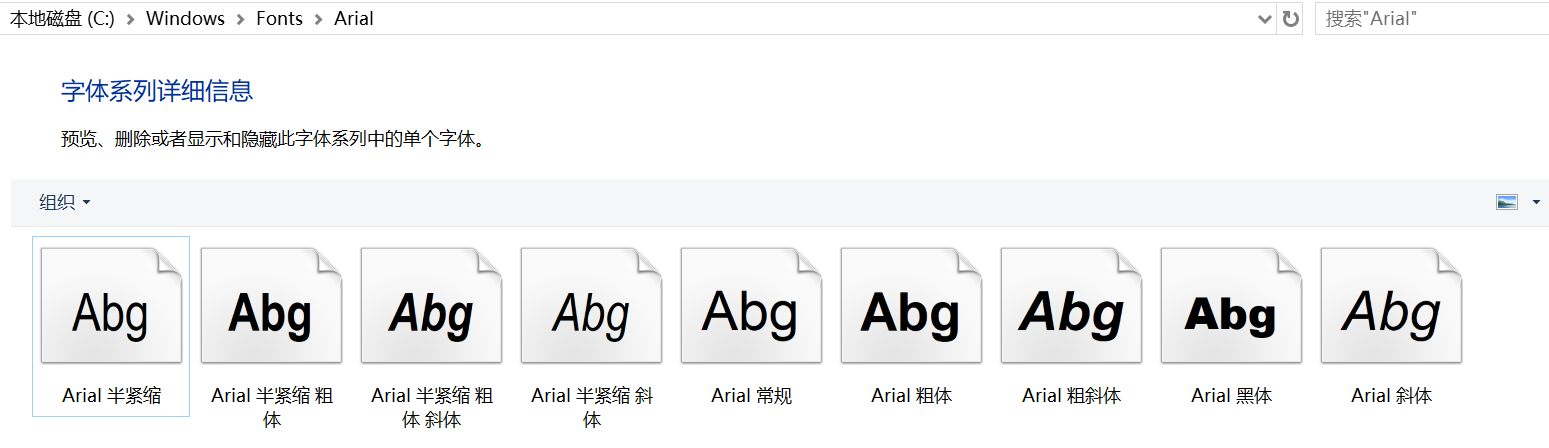
此处,可以通过'Arvo-Regular.ttf'处调节使用的字体,该字体是系统自带的字体库。路径为:
C:\Windows\Fonts
如下图所示,字体对应代码中的名字可以通过属性查看获取:

绘制字符:
1  draw = ImageDraw.Draw(img_PIL)
2  character = 'μ'
3  draw.text(position, character, font=font, fill=fillcolor)
便可以生成字符'μ'的图像,如下图所示:
生成一张'μ'的图像如述代码:
 1 from PIL import Image, ImageFont, ImageDraw
 2 import numpy as np
 3 import cv2
 4 def paint_u_opencv():
 5     _gray = np.random.randint(50, 170, 1)
 6     img_PIL = Image.new("RGB", (32, 32), (_gray, _gray, _gray))
 7     font = ImageFont.truetype('Arvo-Regular.ttf', 30, encoding="gbk")
 8     # 可现实μ的字体:
 9     # AdobeHeitiStd-Regular.otf
10     # AdobeFangsongStd-Regular.otf
11     # AdobeGothicStd-Bold.otf  *
12     fillcolor = (255, 255, 255)
13     w_position = np.random.randint(0, 16, 1)
14     h_position = np.random.randint(-14, 0, 1)
15     position = (w_position, h_position)
16     draw = ImageDraw.Draw(img_PIL)
17     character = 'μ'
18     draw.text(position, character, font=font, fill=fillcolor)
19     img_PIL = img_PIL.convert('L')
20     img = np.asarray(img_PIL)
通过更改Lenet模型结构,进行训练,在模拟数据中可以获得较好的效果,但在实际场景中效果很不理想。
Lenet模型建立
 1 import os
 2 import numpy as np
 3 import tensorflow as tf
 4 import tensorflow.contrib.slim as slim
 5 from tensorflow.contrib.layers import xavier_initializer
 6 import CONFIG as cfg
 7 class Model(object):
 8     def __init__(self):
 9         self.raw_input_image = tf.placeholder(tf.float32, shape=[None, 32, 32, 1])
10         self.input_image = tf.reshape(self.raw_input_image, shape=[-1, 32, 32, 1])
11         self.raw_input_label = tf.placeholder(tf.float32, shape=[None, 14])  # 10个数字+一个小数点
12         self.input_label = tf.cast(self.raw_input_label, dtype=tf.float32)
13         self.current_epoch = tf.placeholder(tf.int32)
14         self.keep_prob = cfg.KEEP_PROB
15         self.lr = cfg.LEARNING_RATE
16
17
18         with tf.variable_scope("Model") as scope:
19             self.train_digits = self.model(is_trained=True)
20             scope.reuse_variables()
21             self.test_digits = self.model(is_trained=False)
22
23         # 训练
24         self.loss = tf.losses.softmax_cross_entropy(logits=self.train_digits, onehot_labels=self.input_label, scope="loss")
25         # print(tf.Session.run(tf.gradients(self.train_digits, self.input_image, )))
26         self.learning_rate = tf.train.exponential_decay(self.lr, global_step=self.current_epoch, decay_steps=1000, decay_rate=0.985)
27         self.optimizer = tf.train.AdamOptimizer(learning_rate=self.lr).minimize(self.loss)
28
29         # 训练结果
30         self.predictions = tf.math.argmax(self.train_digits, 1)
31         # self.pre_1 = tf.argmax(self.train_digits, 1)
32         self.correlation = tf.equal(self.predictions, tf.math.argmax(self.input_label, 1))
33         self.accuracy = tf.reduce_mean(tf.cast(self.correlation, dtype="float"))
34
35         # 测试结果
36         self.predictions_test = tf.math.argmax(self.test_digits, 1)
37         self.correlation_test = tf.equal(self.predictions_test, tf.math.argmax(self.input_label, 1))
38         self.accuracy_test = tf.reduce_mean(tf.cast(self.correlation_test, "float"))
39
40     def model(self, is_trained=True):
41         with tf.device(":/gpu:0"):
42             with slim.arg_scope([slim.conv2d, slim.fully_connected],
43                                 weights_initializer=tf.truncated_normal_initializer(stddev=0.1),   # stddev太小会导致验证集精度波动 而且较低
44                                 weights_regularizer=slim.l2_regularizer(0.05),
45                                 biases_initializer=tf.constant_initializer(0)
46                                 ):
47                 with slim.arg_scope([slim.conv2d], padding="valid"):
48                     net = slim.conv2d(self.input_image, 6, kernel_size=[5, 5], stride=1, scope="conv_1") # 28*28*6
49                     net = slim.max_pool2d(net, [2, 2], scope="pool_2")   # 14*14*6
50                     net = slim.conv2d(net, 16, kernel_size=[5, 5], stride=1, scope="conv_3")  # 10*10*16
51                     net = slim.max_pool2d(net, [2, 2],  scope="pool_4")   # 5*5*16
52                     net = slim.conv2d(net, 120, kernel_size=[1, 1], stride=1, scope="conv_5")   #
53                     net = slim.flatten(net, scope='flatten')
54                     net = slim.fully_connected(net, 120,  scope="fc_6")
55                     net = slim.dropout(net, self.keep_prob, is_training=is_trained, scope="dropout_7")
56                     net = slim.fully_connected(net, 84, activation_fn=tf.nn.leaky_relu, scope="fc_8")
57                     net = slim.dropout(net, self.keep_prob, is_training=is_trained, scope='dropout_9')
58                     net = slim.fully_connected(net, 14, activation_fn=None, scope="fc_10")
59                     digits = slim.nn.softmax(net)
60                     # a = slim.summary
61                     # print(a.image())
62             return digits
lenet模型在GPU上训练:
  1 import os
  2 import tensorflow as tf
  3 os.environ['TF_CPP_MIN_LOG_LEVEL']='3'
  4 from load_img_info import load_img_info
  5 from model import Model
  6 import datetime
  7 import cv2
  8 import numpy as np
  9 import CONFIG as cfg
 10 import time
 11 digit_num = 14000   # 控制数据量的大小
 12
 13 # def rgb2gray_my(img):
 14 #     h,w,c,n = img.shape
 15 #     _img = np.zeros((h, w, 1, n))
 16 #     for i in range(0, n):
 17 #         _img[:, :, :, i] = np.reshape(cv2.cvtColor(img[:, :, :, i], cv2.COLOR_RGB2GRAY), (h, w, 1))
 18 #     return  _img
 19
 20 def main():
 21     # prepare
 22
 23     print("prepare")
 24     # sess = tf.Session()
 25     input_img, input_label = load_img_info()
 26
 27     idx = np.arange(0, input_img.shape[0], 1)
 28     np.random.shuffle(idx)
 29     idx_1 = idx[0: int(np.floor(idx.shape[0]*cfg.VALIDATION_RATIO))]   # 验证的索引
 30     idx_2 = idx[int(np.floor(idx.shape[0]*cfg.VALIDATION_RATIO)):]   # 训练的索引
 31
 32     # validation_datasets = input_img[idx_1, :, :, :]   #
 33     # validation_label = input_label[idx_1, 0]
 34     validation_datasets = input_img   #
 35     validation_label = input_label[:, 0]
 36     validation_datasets_x = validation_datasets
 37
 38     train_datasets = input_img[idx_2, :, :, :]
 39     train_label = input_label[idx_2, 0]
 40
 41     train_datasets_x = train_datasets
 42
 43     print("finished!")
 44
 45     iter = cfg.MAX_ITER
 46     batch = cfg.BATCH_SIZE
 47     checkpoint_dir = os.path.join(cfg.BACK_UP, str(digit_num))
 48     TIMESTAMP = '{0:%Y-%m-%d-%H-%M}'.format(datetime.datetime.now())
 49     checkpoint_dir = os.path.join(checkpoint_dir, TIMESTAMP)
 50
 51     if not os.path.exists(checkpoint_dir):
 52         os.makedirs(checkpoint_dir)
 53
 54     tf.reset_default_graph()
 55     config = tf.ConfigProto(log_device_placement=True)  # , allow_soft_placement=True
 56     model = Model()
 57     # 生成模型保存
 58     saver = tf.train.Saver(max_to_keep=1)
 59     validation_record = []
 60     max_val_acc = 0
 61     with tf.device('/gpu:0'):
 62         with tf.Session() as sess:  # 不使用tf.Session(config=config) 设置就不会再训练过程中打印一堆device信息,靠os.environ['TF_CPP_MIN_LOG_LEVEL']='3'限制不住
 63             sess.run(tf.global_variables_initializer())
 64             validation_label_y = sess.run(tf.one_hot(validation_label, depth=14))
 65             train_label_y = sess.run(tf.one_hot(train_label, depth=14))
 66             for i in range(iter):
 67                 # print("Epoch: %d" %(i))
 68                 start_time = time.time()
 69                 # epoch = i
 70                 # lr_ = sess.run([model.learning_rate], feed_dict={model.current_epoch: epoch})
 71                 # learning_rate = sess.run(tf.train.exponential_decay(cfg.LEARNING_RATE, global_step=i,
 72                 #                 #                                                 decay_steps=1000, decay_rate=0.99))
 73                 # sess.run([model.learning_rate], feed_dict={model.learning_rate: learning_rate})
 74                 total_batch = int(train_datasets.shape[0] / batch)
 75                 avg_loss = 0
 76                 avg_acc = 0
 77                 for j in range(total_batch):
 78                     # print("batch:%d" %(j))
 79                     if j == total_batch-1:
 80                         x = train_datasets_x[j*batch:, :, :, :]/255.0
 81                         y = train_label_y[j*batch:, :]
 82                     else:
 83                         x = train_datasets_x[j*batch: (j+1)*batch, :, :, :]/255.0
 84                         y = train_label_y[j * batch: (j + 1) * batch, :]
 85
 86                     _y = y
 87
 88                     _, loss, lr , acc = sess.run([model.optimizer, model.loss,model.learning_rate, model.accuracy], feed_dict={model.raw_input_image: x,
 89                                                                                                       model.raw_input_label: _y,
 90                                                                                                       model.current_epoch: i})
 91                     avg_loss += loss
 92                     avg_acc += acc
 93                 print("Epoch: %d, avg_cost: %g, avg_acc: %f, lr: %f, time_consume: %f" % (i, avg_loss, avg_acc/total_batch, lr,  time.time()-start_time))
 94
 95                 # if (i+1) % 200 == 0:  # 每隔两百代保存一次模型
 96
 97                 if (i+1) % 100 == 0:  # 每隔一百代进行一次验证
 98                     valid_start_time = time.time()
 99                     validation_acc = sess.run([model.accuracy_test], feed_dict={model.raw_input_image: validation_datasets_x/255.0,
100                                                                model.raw_input_label: validation_label_y})
101                     # a = sess.run(tf.math.argmax(validation_label_y, 1))
102                     # print(validation_acc)
103                     if validation_acc[0] >max_val_acc:
104                         max_val_acc = validation_acc
105                         saver.save(sess, checkpoint_dir + "\\ocr.ckpt", global_step=i + 1)
106
107                     validation_record.append(validation_acc[0])
108                     print("Validation accuracy: %f, Validation time consume: %f" %(validation_acc[0], time.time()-valid_start_time))
109             print(validation_record)
110             test_acc = sess.run([model.accuracy_test], feed_dict={model.raw_input_image: validation_datasets_x,
111                                                                model.raw_input_label: validation_label_y})
112             test_acc_1 = sess.run([model.accuracy_test], feed_dict={model.raw_input_image: validation_datasets_x/255.0,
113                                                                   model.raw_input_label: validation_label_y})
114             np.savetxt("validation_record.txt", validation_record)
115             print(test_acc, test_acc_1)
116 if __name__ == '__main__':
117     main()
******************************************************************************************************
目标检测处理
由于上述生成的图像数据集使用与图片分类的方式进行ocr的检测(使用Lenet、AlexNet或者VGG),需要进行字符分割,字符分割得到的字符形状不可控,并且生成的数据难以满足同分布的需求。并且在此场景中,易造成二次误差,所以决定使用目标检测的方式直接对特定区域进行ocr字符检测。只不过使用图像分类的方式不需要人工投入精力对图像进行标注...
由于本场景中,字符处于屏幕特定的位置,可以省去CTPN的过程,直接进行检测。只不过需要人工标注。
预训练
鉴于PIL Image中可以使用本地的各种字体,更容易获得到与实际场景字体相同的图像对模型进行预训练(实际场景的数据特别少)。再使用实际场景的数据对模型进行微调。
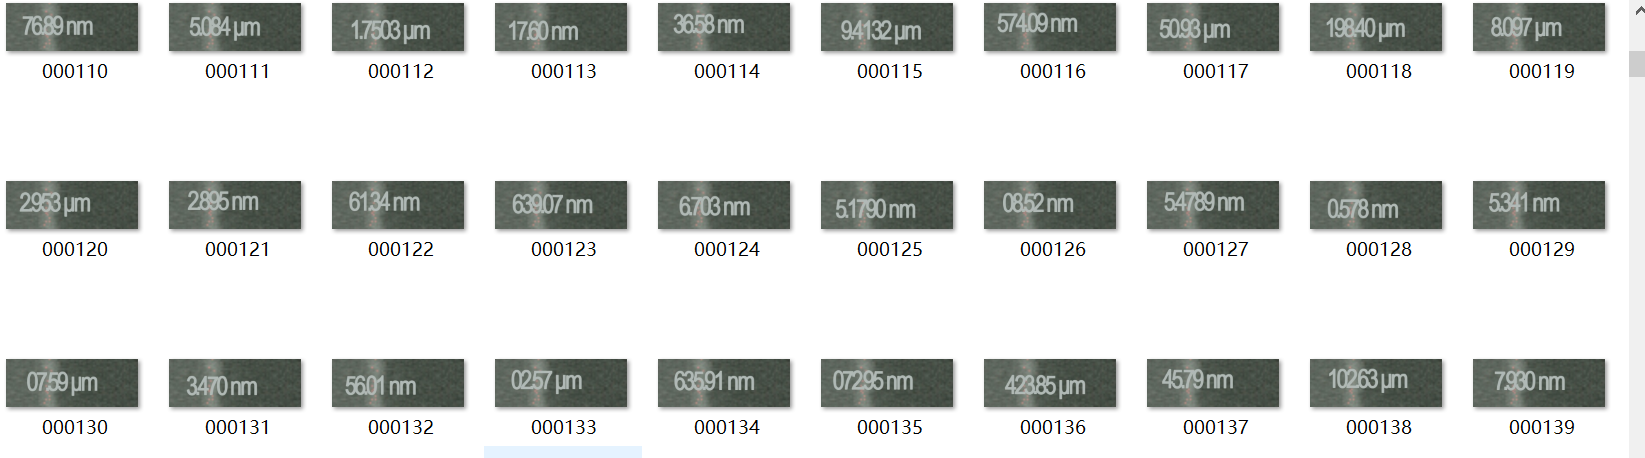
使用实际场景的背景色作为模板,在模板上进行字符数据集的随机生成。使用模板的图像与生成的图像数据集如下图所示:

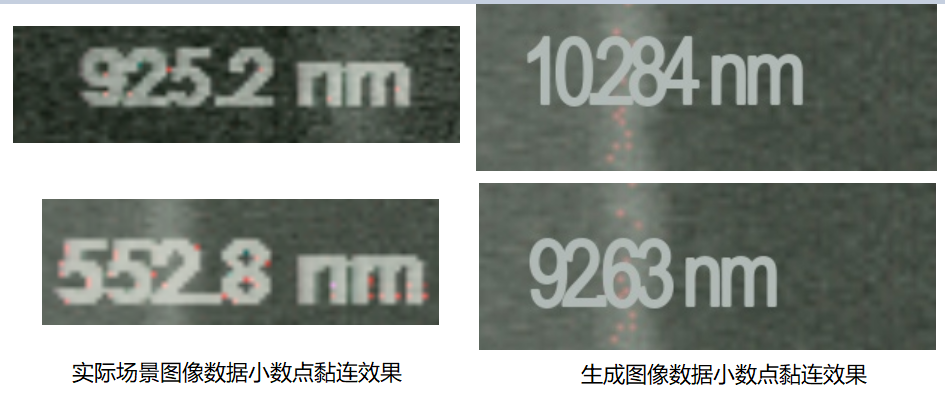
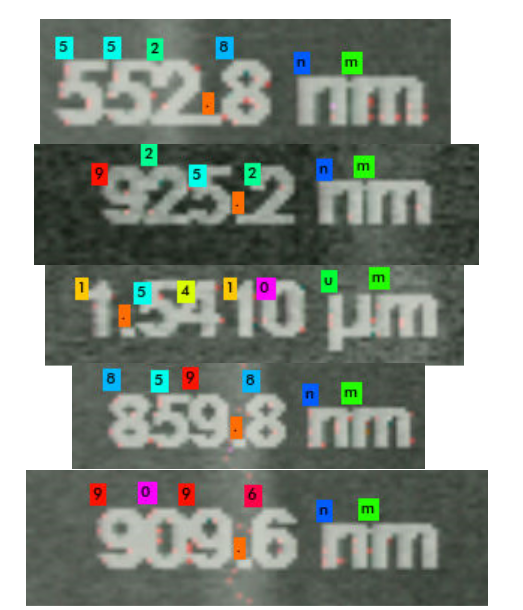
通过调整字符之间的距离,使得生成的图像具有与实际场景相似间隔与黏连的效果,如下图所示,是实际场景小数点黏连和生成图像小数点黏连图像。
并且值得注意的是,实际场景中的小数点是方的,在测试时发现"ARIALN.TTF"字体与实际场景更为相似,通过上图也可以看出。
模拟图像数据生成四到五位带小数点和随机单位的代码如下,由于只是进行字符检测,所以并没有对生成的模拟图像中的数字规则进行限定,也就是说会存在诸如092.13的情况。
 1 import cv2
 2 import numpy as np
 3 import random
 4 import os
 5 import copy
 6 from PIL import Image, ImageFont, ImageDraw
 7 # 生成4-5位随机小数
 8
 9 def img_name(id):
10     c = 0
11     while id != 0:
12         id = id // 10
13         c += 1
14     return c
15
16
17 # img = cv2.imread(".\data\demo\my_test_01.png", 0)
18 # # cv2.imshow("img", img)
19 # h, w = img.shape[0: 2]
20 # print(h, w)
21 save_path = "E:\\VT_PROJECT\\PROJECT_OCR\\data\\new_template\\img"
22 if not os.path.exists(save_path):
23     os.makedirs(save_path)
24 pixel_arr = cv2.imread("E:\\VT_PROJECT\\PROJECT_OCR\\data\\new_template\\background.png", 1)
25
26 # pixel_arr = Image.open("E:\\VT_PROJECT\\PROJECT_OCR\\data\\new_template\\background.png", )
27
28 for i in range(0, 3000):# 生成3000张图像
29     # 根据id生成图像的name
30     _name = str(i).rjust(6, '0')
31     # background
32     pixel_arr_copy = copy.deepcopy(pixel_arr)
33     # 随机数
34     x = np.arange(10)
35     np.random.shuffle(x)
36     prob = np.random.rand()
37     digital_num = 4 if prob > 0.5 else 5
38     candidate = x[0:digital_num]
39     candidate_num = list(map(str, candidate))
40     # 小数点的位置
41     point_position = int(np.random.randint(1, digital_num-1, 1))
42     if candidate_num[0] == 0:
43         candidate_num[1], candidate_num[0] = candidate_num[0], candidate_num[1]
44         candidate_num.insert(point_position, '.')
45     else:
46         candidate_num.insert(point_position, '.')
47
48     # nm or μm
49     character = [["n", "m"], ["μ", "m"]]
50     prob = np.random.rand()
51     uint = character[0] if prob <0.5 else character[1]
52     candidate_num.extend(uint)
53     # simsun.ttc
54     # Arvo-Regular.ttf
55
56     #  绘制准备
57     img = Image.fromarray(pixel_arr_copy)
58     font = ImageFont.truetype('ARIALN.TTF', 60, encoding="gbk")
59     fillcolor = (181, 185, 176)
60     draw = ImageDraw.Draw(img)
61     # position, character, font = font, fill = fillcolor
62     inter_pixel = 22
63     start_w = np.random.randint(5, 30, 1)[0]
64     start_h = np.random.randint(10, 30, 1)[0]
65     flag = False
66     for id, value in enumerate(candidate_num):
67         if value == "." :
68             flag = True
69             inter_pixel = 20
70         elif flag :
71             flag = False
72             inter_pixel = 7
73         elif value == "n" or value == "μ":
74             inter_pixel = 32
75         elif value == "m":
76             inter_pixel = 24
77         else:
78             inter_pixel = 22
79         start_w += inter_pixel
80         draw.text((start_w, start_h), value, font=font, fill=fillcolor, stroke_width=1)
81     img_array = np.array(img)
82     img_dir = os.path.join(save_path, _name+".jpg")
83     cv2.imwrite(img_dir, img_array)
生成对应的数据集:
先对模拟数据集使用labelImg进行标注,生成900份训练数据:

通过生成的模拟数据进行模型训练(使用YOLOv3-tiny)可以达到在模拟数据集中很好的测试效果,但在实际场景中仍会存在漏检和误检等精度上的问题。
此时模型具有识别字符的能力,但分布与实际场景会有所不同。
模型微调
对实际场景中图像进行截取,一张图像可截取多次,形成实际场景的数据(110份),并进行标注。
在模拟数据集训练得到的权重上进行再训练(微调)。在模型微调中,如果对于黏连小数点存在漏检的情况,可以在训练集中增大小数点黏连情况的比重。
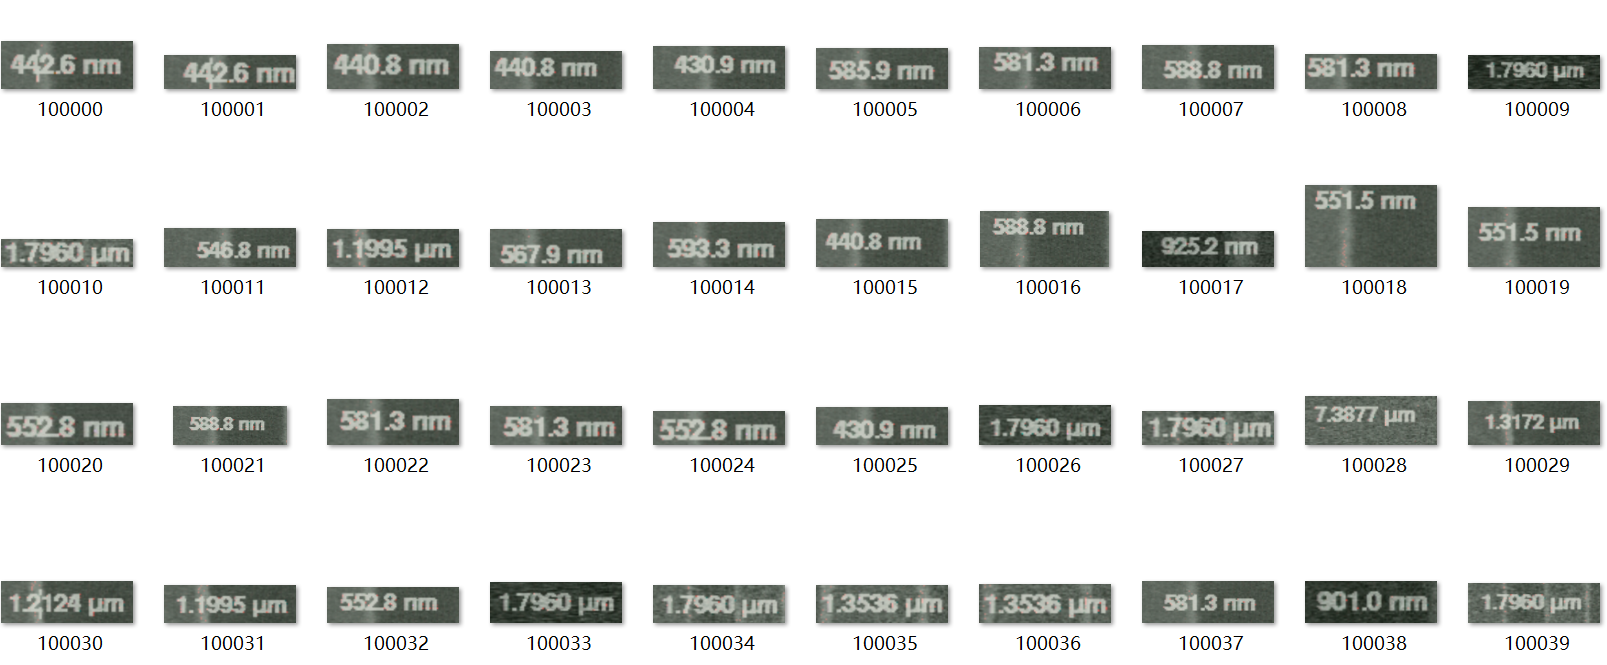
测试效果如下:
-------------------------------------------
算法届的小学生,虔诚而不迷茫,做一个懂生活并有趣的人!
如果觉得这篇文章对你有小小的帮助的话,记得在右下角点个 [推荐] 噢! 欢迎共同交流机器学习,机器视觉,深度学习~
欢迎转载,转载请声明出处!
 浙公网安备 33010602011771号