操作系统lab1实验报告
实验文档-lab1
一、思考题汇总
思考1:也许你会发现我们的readelf程序是不能解析之前生成的内核文件(内核文件是可执行文件)的,而我们之后将要介绍的工具readelf则可以解析,这是为什么呢?(提示:尝试使用readelf -h,观察不同)
答:用readelf -h解析testELF与vmlinux文件,解析结果分别如下
19375332@stu-115:~/19375332-lab$ readelf -h ./readelf/testELF
ELF Header:
  Magic:   7f 45 4c 46 01 01 01 00 00 00 00 00 00 00 00 00
  Class:                             ELF32
  Data:                              2's complement, little endian
  Version:                           1 (current)
  OS/ABI:                            UNIX - System V
  ABI Version:                       0
  Type:                              EXEC (Executable file)
  Machine:                           Intel 80386
  Version:                           0x1
  Entry point address:               0x8048490
  Start of program headers:          52 (bytes into file)
  Start of section headers:          4440 (bytes into file)
  Flags:                             0x0
  Size of this header:               52 (bytes)
  Size of program headers:           32 (bytes)
  Number of program headers:         9
  Size of section headers:           40 (bytes)
  Number of section headers:         30
  Section header string table index: 27
19375332@stu-115:~/19375332-lab$ readelf -h ./gxemul/vmlinux
ELF Header:
  Magic:   7f 45 4c 46 01 02 01 00 00 00 00 00 00 00 00 00
  Class:                             ELF32
  Data:                              2's complement, big endian
  Version:                           1 (current)
  OS/ABI:                            UNIX - System V
  ABI Version:                       0
  Type:                              EXEC (Executable file)
  Machine:                           MIPS R3000
  Version:                           0x1
  Entry point address:               0x80010000
  Start of program headers:          52 (bytes into file)
  Start of section headers:          37180 (bytes into file)
  Flags:                             0x1001, noreorder, o32, mips1
  Size of this header:               52 (bytes)
  Size of program headers:           32 (bytes)
  Number of program headers:         2
  Size of section headers:           40 (bytes)
  Number of section headers:         14
  Section header string table index: 11
由解析结果可看出,testELF文件为小端存储,vmlinux为大端存储,而我们的readelf文件只能对小端存储的文件进行解析(在lab1-1-Extra中已实现解析大段存储文件的部分功能),因此无法解析vmlinux。
思考2:内核入口在什么地方?main 函数在什么地方?我们是怎么让内核进入到想要的 main 函数的呢?又是怎么进行跨文件调用函数的呢?
答:内核的入口在0x00000000处,main函数在0x80001000处。通过跳转指令跳转到main函数地址进入。在跨文件调用函数时,每个函数会有一个固定的地址,调用过程为将需要存储的值进行进栈等保护,再用jal跳转到相应函数的地址。
二、实验难点图示
EX1:
请修改include.mk文件,使交叉编译器的路径正确。之后执行make指令,如果配置一切正确,则会在gxemul目录下生成vmlinux的内核文件。
CROSS_COMPILE :=  /OSLAB/compiler/usr/bin/mips_4KC-
CC                        := $(CROSS_COMPILE)gcc
CFLAGS            := -O -G 0 -mno-abicalls -fno-builtin -Wa,-xgot -Wall -fPIC -march=r3000
LD                        := $(CROSS_COMPILE)ld
本实验的要求为修改交叉编译器的路径,较为简单。
EX2:
阅读./readelf 文件夹中 kerelf.h、readelf.c 以及 main.c 三个文件中的代码,并完成 readelf.c 中缺少的代码,readelf 函数需要输出 elf 文件的所有 section header 的序号和其中记录的相应section的地址信息,对每个 section header,输出格式为:"%d:0x%x\n",两个标识符分别代表序号和地址。序号即第几个section header,从0开始。
正确完成 readelf.c 代码之后,在 readelf 文件夹下执行 make 命令,即可生成可执行文件 readelf,它接受文件名作为参数,对 elf 文件进行解析。
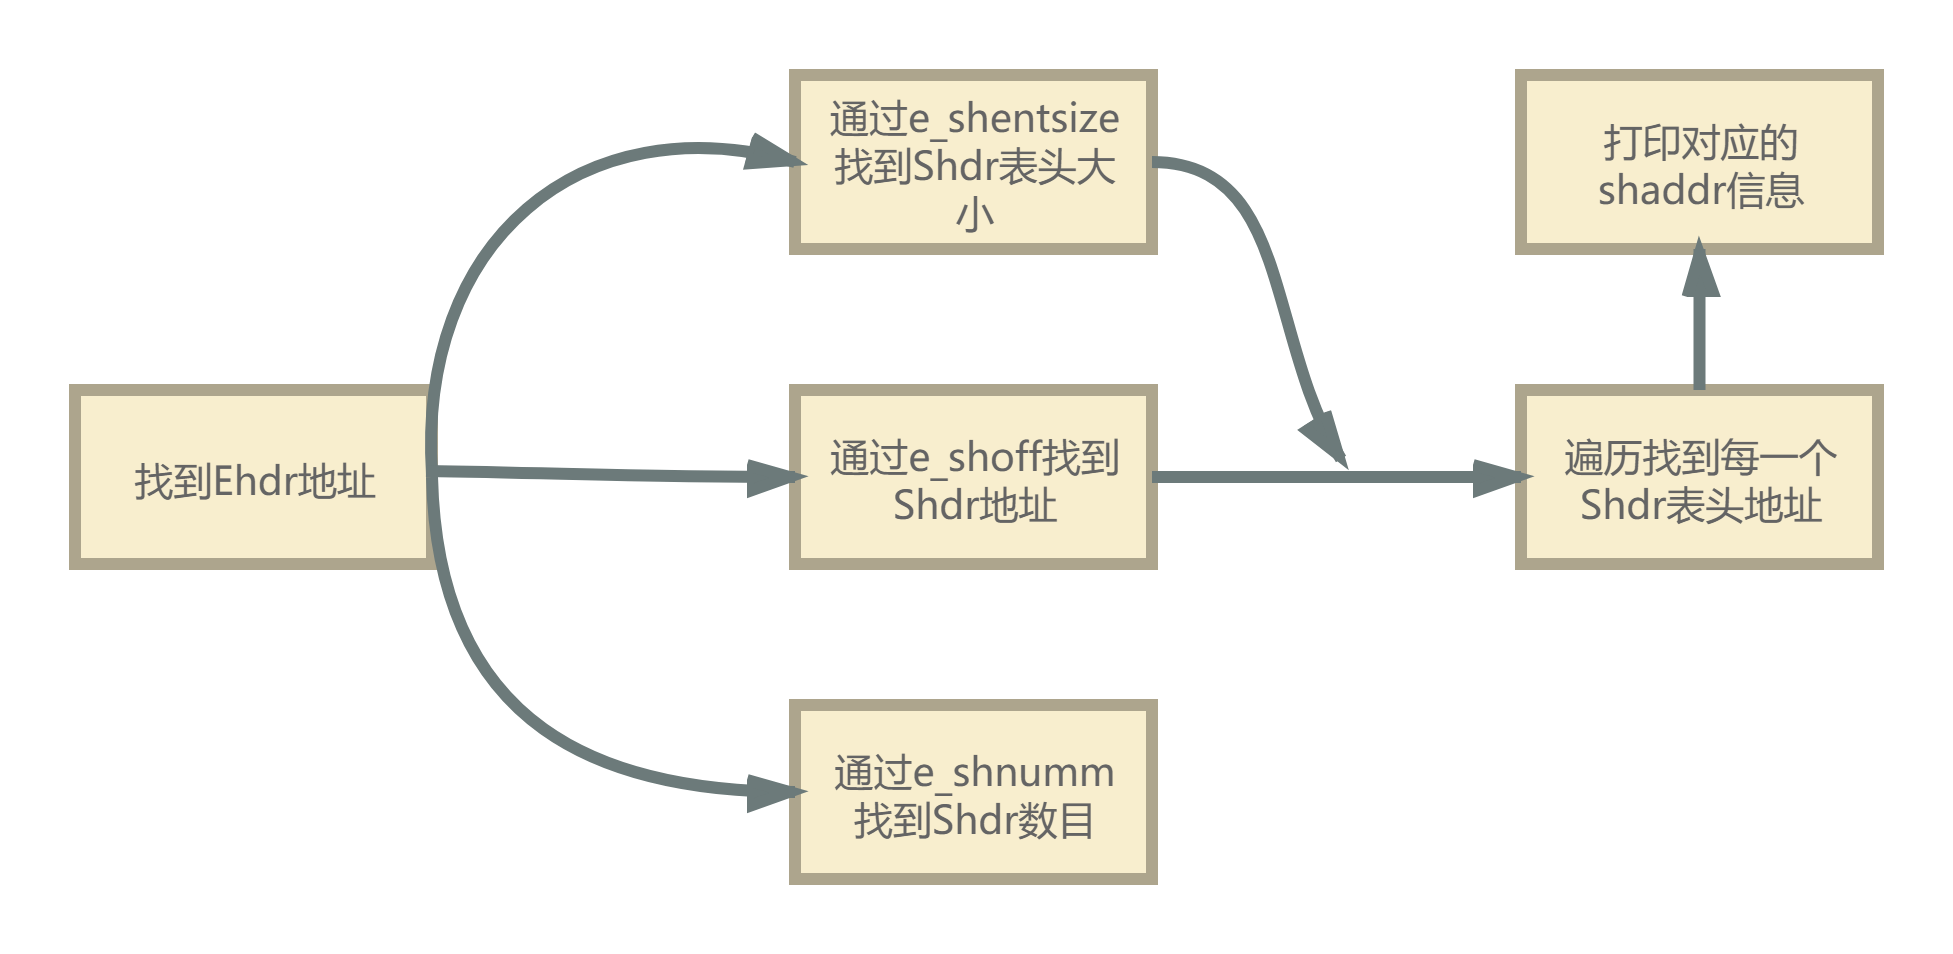
本实验的要求在于通过阅读kerelf.h中有关elf头的代码,来找到elf文件中段头表的信息并打印(lab1-1-exam中涉及节头表)。kerelf.h中有关文件头与端头的信息如下。
typedef struct {
        unsigned char   e_ident[EI_NIDENT];     /* Magic number and other info */
        Elf32_Half      e_type;                 /* Object file type */
        Elf32_Half      e_machine;              /* Architecture */
        Elf32_Word      e_version;              /* Object file version */
        Elf32_Addr      e_entry;                /* Entry point virtual address */
        Elf32_Off       e_phoff;                /* Program header table file offset */
        Elf32_Off       e_shoff;                /* Section header table file offset */
        Elf32_Word      e_flags;                /* Processor-specific flags */
        Elf32_Half      e_ehsize;               /* ELF header size in bytes */
        Elf32_Half      e_phentsize;            /* Program header table entry size */
        Elf32_Half      e_phnum;                /* Program header table entry count */
        Elf32_Half      e_shentsize;            /* Section header table entry size */
        Elf32_Half      e_shnum;                /* Section header table entry count */
        Elf32_Half      e_shstrndx;             /* Section header string table index */
} Elf32_Ehdr;
typedef struct{
        Elf32_Word sh_name;                 /* Section name */
        Elf32_Word sh_type;                 /* Section type */
        Elf32_Word sh_flags;                /* Section flags */
        Elf32_Addr sh_addr;                 /* Section addr */
        Elf32_Off  sh_offset;               /* Section offset */
        Elf32_Word sh_size;                 /* Section size */
        Elf32_Word sh_link;                 /* Section link */
        Elf32_Word sh_info;                 /* Section extra info */
        Elf32_Word sh_addralign;            /* Section alignment */
        Elf32_Word sh_entsize;              /* Section entry size */
}Elf32_Shdr;
本实验中需要用到的量为Elf32_Ehdr中的e_shoff,e_shentsize,e_shnum,sh_addr。获得地址表的流程如图。
EX3:
填写tools/scse0_3.lds中空缺的部分,将内核调整到正确的位置上。在 lab1 中,只需要填补.text、 .data 和.bss 段将内核调整到正确的位置上即可。
本实验的难点在于找到.text的位置,在mmu.h的内存布局图中,可找到.text的地址(Kernel Text,0x80010000处)。

/*
 o     4G ----------->  +----------------------------+------------0x100000000
 o                      |       ...                  |  kseg3
 o                      +----------------------------+------------0xe000 0000
 o                      |       ...                  |  kseg2
 o                      +----------------------------+------------0xc000 0000
 o                      |   Interrupts & Exception   |  kseg1
 o                      +----------------------------+------------0xa000 0000
 o                      |      Invalid memory        |   /|\
 o                      +----------------------------+----|-------Physics Memory Max
 o                      |       ...                  |  kseg0
 o  VPT,KSTACKTOP-----> +----------------------------+----|-------0x8040 0000-------end
 o                      |       Kernel Stack         |    | KSTKSIZE            /|\
 o                      +----------------------------+----|------                |
 o                      |       Kernel Text          |    |                    PDMAP
 o      KERNBASE -----> +----------------------------+----|-------0x8001 0000    |
 o                      |   Interrupts & Exception   |   \|/                    \|/
 o      ULIM     -----> +----------------------------+------------0x8000 0000-------
 o                      |         User VPT           |     PDMAP                /|\
 o      UVPT     -----> +----------------------------+------------0x7fc0 0000    |
 o                      |         PAGES              |     PDMAP                 |
 o      UPAGES   -----> +----------------------------+------------0x7f80 0000    |
 o                      |         ENVS               |     PDMAP                 |
 o  UTOP,UENVS   -----> +----------------------------+------------0x7f40 0000    |
 o  UXSTACKTOP -/       |     user exception stack   |     BY2PG                 |
 o                      +----------------------------+------------0x7f3f f000    |
 o                      |       Invalid memory       |     BY2PG                 |
 o      USTACKTOP ----> +----------------------------+------------0x7f3f e000    |
 o                      |     normal user stack      |     BY2PG                 |
 o                      +----------------------------+------------0x7f3f d000    |
 a                      |                            |                           |
 a                      ~~~~~~~~~~~~~~~~~~~~~~~~~~~~~~                           |
 a                      .                            .                           |
 a                      .                            .                         kuseg
 a                      .                            .                           |
 a                      |~~~~~~~~~~~~~~~~~~~~~~~~~~~~|                           |
 a                      |                            |                           |
 o       UTEXT   -----> +----------------------------+                           |
 o                      |                            |     2 * PDMAP            \|/
 a     0 ------------>  +----------------------------+ -----------------------------
 o
*/
EX4:
完成boot/start.S中空缺的部分。设置栈指针,跳转到main函数。 使用gxemul -E testmips -C R3000 -M 64 elf-file运行(其中elf-file是你编译生成的vmlinux文件的路径)。关于如何退出gxemul,请看教程中“如何退出gxemul”一节。
main是mips中自带的函数标识符,在跳转时直接跳转即可。
栈指针的位置在mmu内存布局图中也能找到,在Kernel Stack处(0x80400000)。
EX5:
阅读相关代码和下面对于函数规格的说明,补全lib/print.c中lp_Print()函数中缺失的部分来实现字符输出。
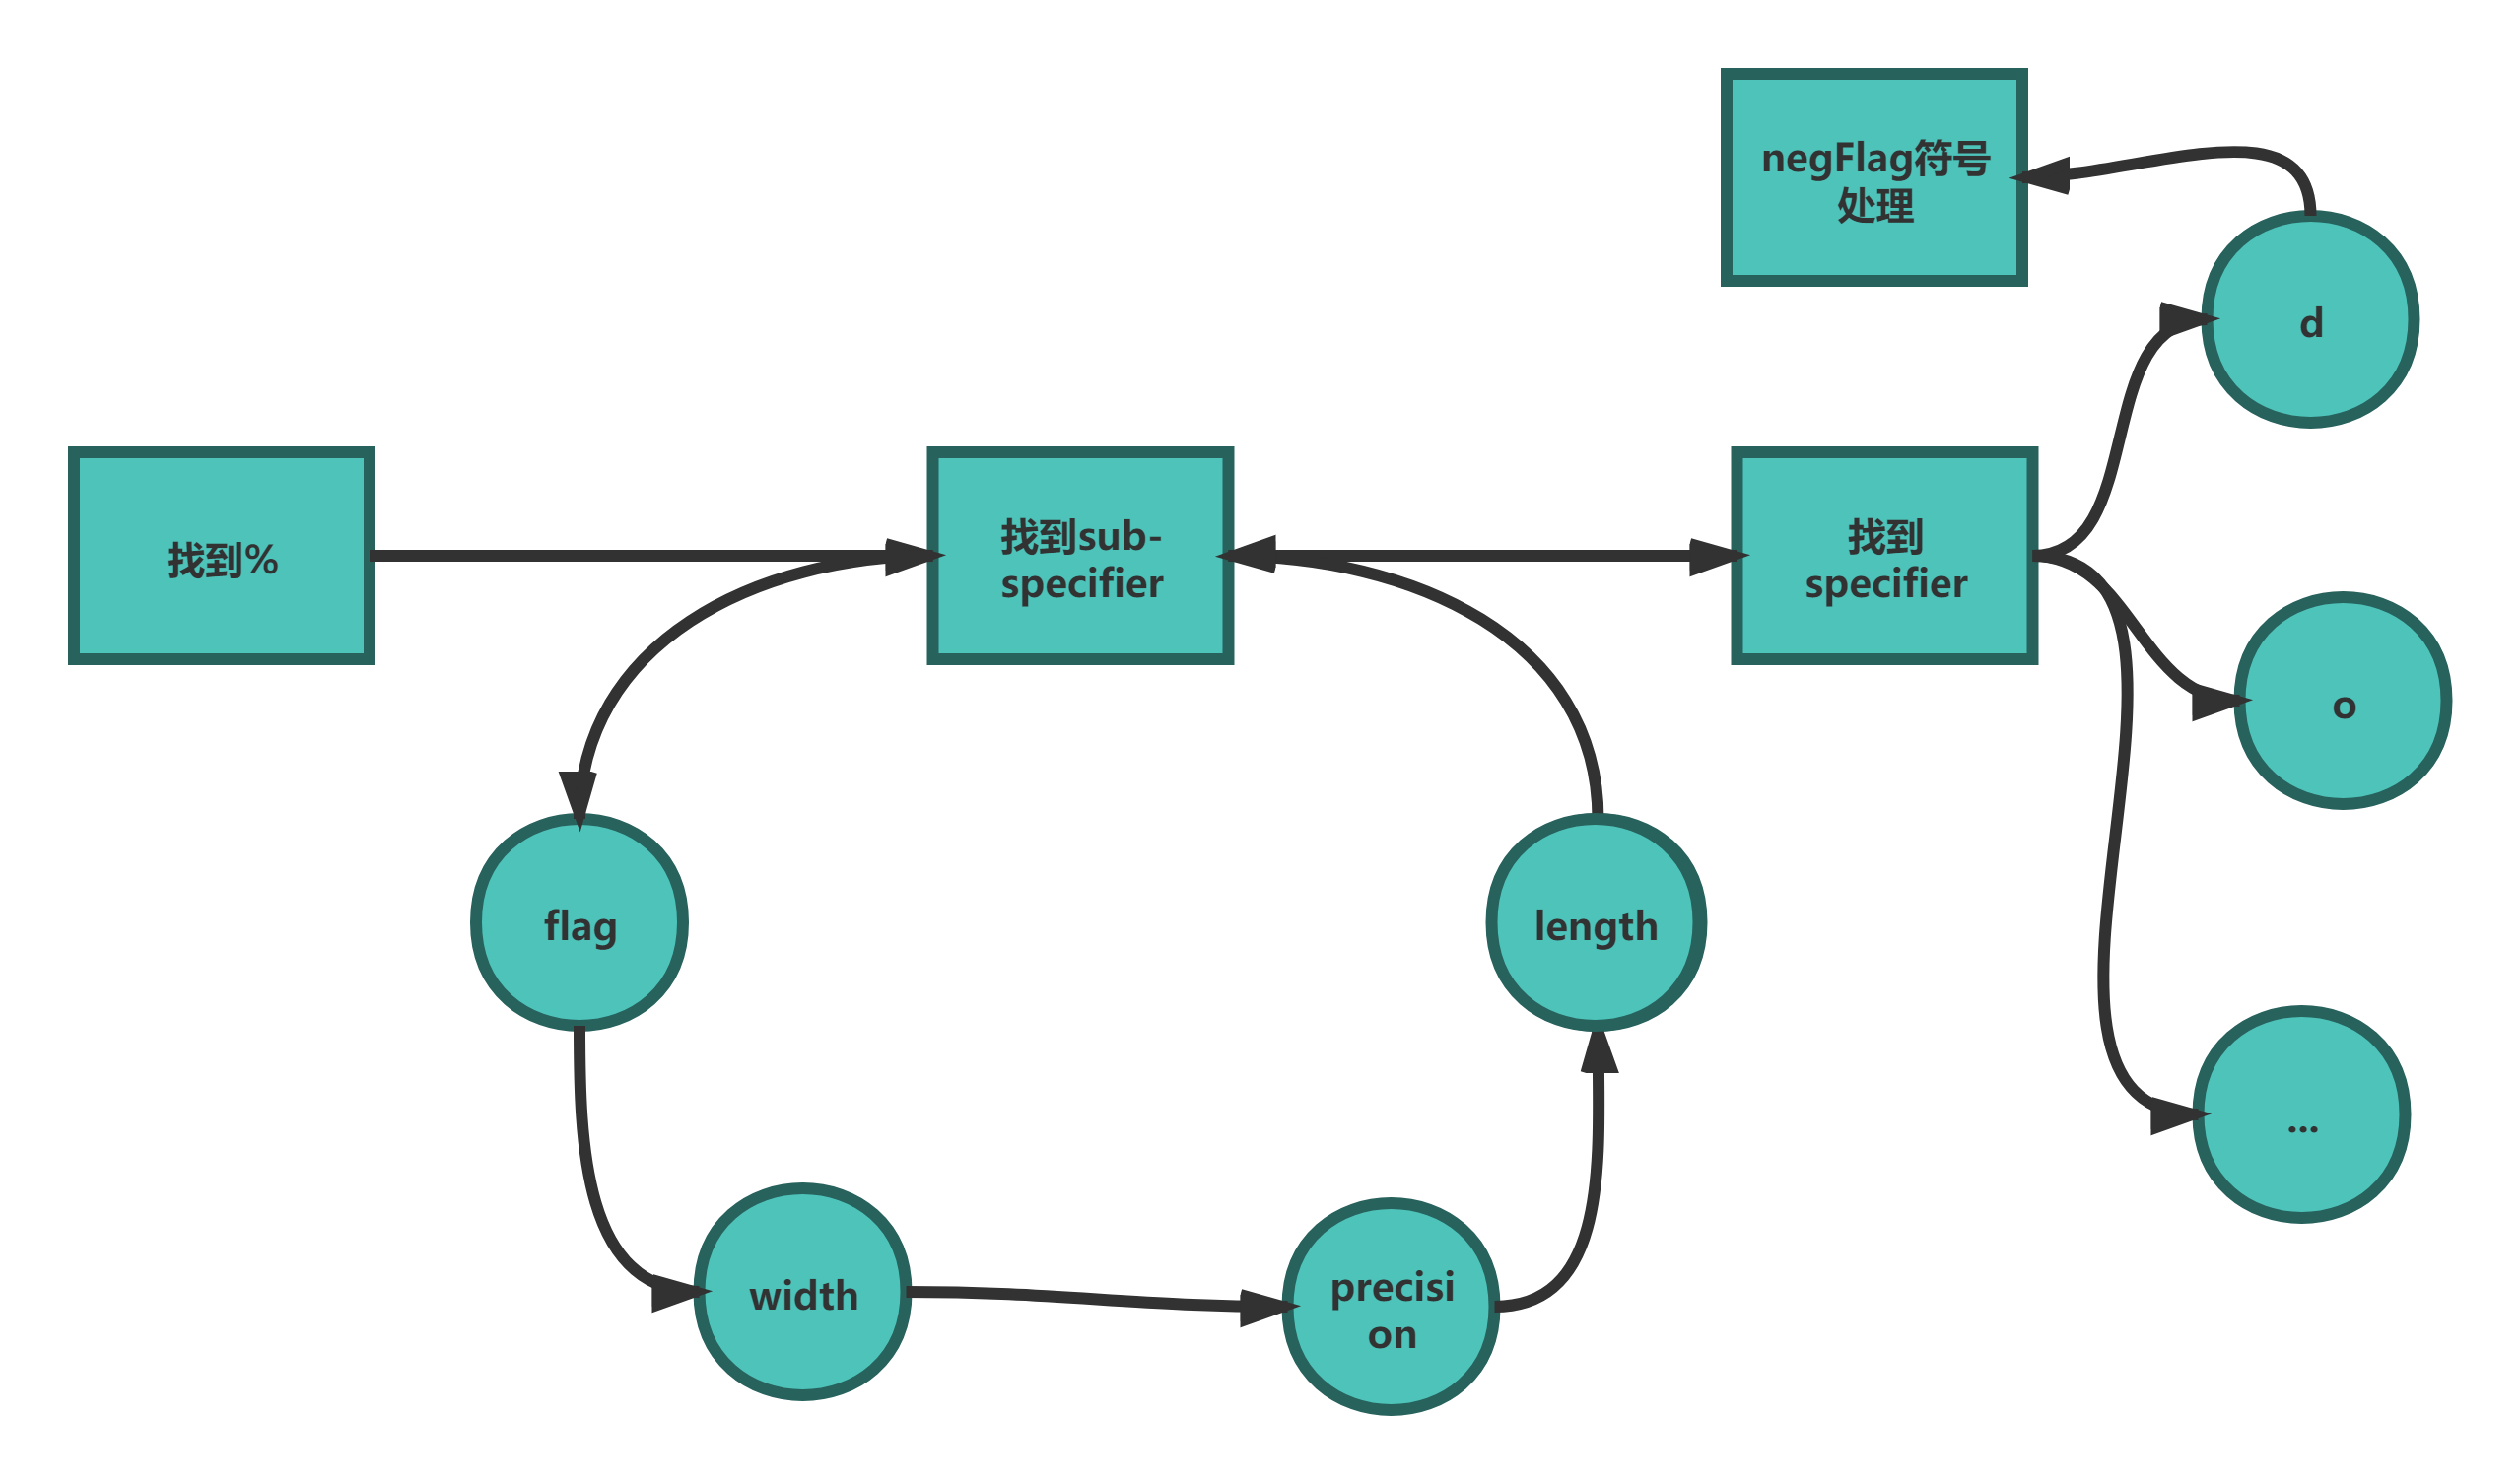
lp_Print函数的实现主要包括以下几个步骤:
- 找到所有的%。
- 依照次序找到所有的
sub-specifier,并通过这些sub-specifier对相关变量进行赋值。 - 找到
specifier,并依照类别进行相应输出操作。 - 对有符号数的操作,需要根据正负来调整
negFlag。
三、体会与感想
本实验相比于lab0来说,难度略有上升,但总体来说仍然偏简单。更多的是训练我们阅读指导书,阅读代码的能力。在前四个ex中,需要填充的代码信息大多可在本目录或其他目录的文件中找到。总体而言,本实验的内容仍然处于一个较浅的层面。但是,操作系统实验是逐层深入的,本次实验会为我们之后较难的lab打下良好基础。
四、指导书反馈
在ex1-5的代码补全的注释中有这么一段:
	/* we found a '%' */

	/* check for long */

	/* check for other prefixes */

	/* check format flag */
在对%后sub-sprcifier的解析中,正确的顺序应该为flag——width——precision——length,而本注释中将check for long放在第一位,将other prefixes放于其后,会对读者产生误导,希望课程组将注释的顺序进行修正。
五、残留难点
在本次实验中,我虽然较为顺利的完成了每一个ex的代码补全,但感觉对启动过程没有建立完善的体系,且对代码的理解停留在表面,对更加底层的实现机理没有深入理解,这说明我们在完成实验之后仍然要养成多去阅读代码,理解代码的好习惯。

 浙公网安备 33010602011771号