
代码管理平台
第三十七课 代码管理平台
目录
一、代码管理平台介绍
二、安装svn
三、客户端上使用svn(linux)
四、客户端上使用svn(windows)
五、单机上使用git
六、简历远程仓库
七、克隆远程仓库
八、分支管理
九、远程分支管理
十、标签管理
十一、git别名
十二、搭建git服务器
十三、安装gitlab
十四、使用gitlab
十五、gitlab备份和恢复
十六、扩展
一、代码管理平台介绍
软件的版本控制(Revision control)是一种软件工程技巧,借此能在软件开发的过程中,确保由不同人所编辑的同一代码文件案都得到同步。软件设计师常会利用版本控制来追踪、维护源码、文件以及配置文件等等的改动,并且提供控制这些改动控制权的程序。
版本管理工具发展简史,cvs→svn→git 更详细信息可参考http://luckypoem14.github.io/test/2012/04/24/scm-history/
SVN全称subversion,是一个开源版本控制系统,始于2000年
git是linux创始人linus发起的,2005年发布,最初目的是更好管理linux内核代码
git和svn不同在于git不需要依赖服务端就可以工作,即git是分布式的
关于git和svn的比较大家参考http://blog.lishiming.net/?p=305
github是基于git的在线web页面代码托管平台,可以选择付费服务
gitlab可以认为是一个开源的github,两者没有直接关系
二、安装svn
1.用yum安装subversion
[root@subversion-server ~]# yum install -y subversion
2.创建版本库
[root@subversion-server ~]# mkdir -p /data/svnroot/myproject
[root@subversion-server ~]# svnadmin create /data/svnroot/myproject
[root@subversion-server ~]# ls -l /data/svnroot/myproject/
conf/       format      locks/
db/         hooks/      README.txt
3.编辑authz文件
[root@subversion-server conf]# vim svnserve.conf
// 在[groups]下增加如下内容
admin = svn_admin,nico
[/]
@admin = rw
* = r

[myproject:/]
nico = rw
4.编辑passwd文件
[root@subversion-server conf]# vim passwd
# 添加如下内容
svn_admin = Aa123456
nico = Aa123456a
via = 123456Aa
5.编辑svnserve.conf
vim svnserve.conf
[general]
anon-access = none
auth-access = write
password-db = passwd
authz-db = authz
realm = /data/svnroot/myproject
6.启动svn
# -d 以daemon模式启动svn
[root@subversion-server conf]# svnserve -d -r /data/svnroot
[root@subversion-server conf]# netstat -nltp
Active Internet connections (only servers)
Proto Recv-Q Send-Q Local Address           Foreign Address         State       PID/Program name
tcp        0      0 0.0.0.0:22              0.0.0.0:*               LISTEN      1155/sshd
tcp        0      0 127.0.0.1:25            0.0.0.0:*               LISTEN      1250/master
tcp        0      0 0.0.0.0:3690            0.0.0.0:*               LISTEN      2008/svnserve
tcp6       0      0 :::22                   :::*                    LISTEN      1155/sshd
tcp6       0      0 ::1:25                  :::*                    LISTEN      1250/master
##三、客户端上使用svn(linux)
1.安装subversion
[root@subversion-client ~]# yum -y install subversion
2.检出代码
[root@subversion-client ~]# svn checkout svn://192.168.1.37/myproject/ --username=svn_admin
Authentication realm: <svn://192.168.1.37:3690> /data/svnroot/myproject
Password for 'svn_admin':

-----------------------------------------------------------------------
ATTENTION!  Your password for authentication realm:

   <svn://192.168.1.37:3690> /data/svnroot/myproject

can only be stored to disk unencrypted!  You are advised to configure
your system so that Subversion can store passwords encrypted, if
possible.  See the documentation for details.

You can avoid future appearances of this warning by setting the value
of the 'store-plaintext-passwords' option to either 'yes' or 'no' in
'/root/.subversion/servers'.
-----------------------------------------------------------------------
Store password unencrypted (yes/no)? yes
Checked out revision 0.

[root@subversion-client ~]# cd myproject/
[root@subversion-client myproject]# ls -al
total 0
drwxr-xr-x  3 root root  18 Aug 30 16:46 .
dr-xr-x---. 5 root root 222 Aug 30 16:46 ..
drwxr-xr-x  4 root root  75 Aug 30 16:46 .svn
- 添加文件到版本控制中心
[root@subversion-client myproject]# cp /etc/fstab .
[root@subversion-client myproject]# ll
total 4
-rw-r--r-- 1 root root 501 Aug 30 17:00 fstab
[root@subversion-client myproject]# svn add fstab
A         fstab
[root@subversion-client myproject]# svn commit -m "add fstab"
Adding         fstab
Transmitting file data .
- 删除文件
[root@subversion-client myproject]#
[root@subversion-client myproject]# svn delete fstab
D         fstab
// 提交删除
[root@subversion-client myproject]# svn commit -m "delete fstab"
Deleting       fstab

Committed revision 3.
// 更新本地文件到最到新
[root@subversion-client myproject]# svn update
Updating '.':
At revision 3.
[root@subversion-client myproject]#
5.查看变更日志
[root@subversion-client myproject]# svn log
------------------------------------------------------------------------
r3 | svn_admin | 2018-08-30 17:41:19 +0800 (Thu, 30 Aug 2018) | 1 line

delete fstab
------------------------------------------------------------------------
r2 | svn_admin | 2018-08-30 17:29:54 +0800 (Thu, 30 Aug 2018) | 1 line

add README
------------------------------------------------------------------------
r1 | svn_admin | 2018-08-30 17:01:36 +0800 (Thu, 30 Aug 2018) | 1 line

add fstab
------------------------------------------------------------------------
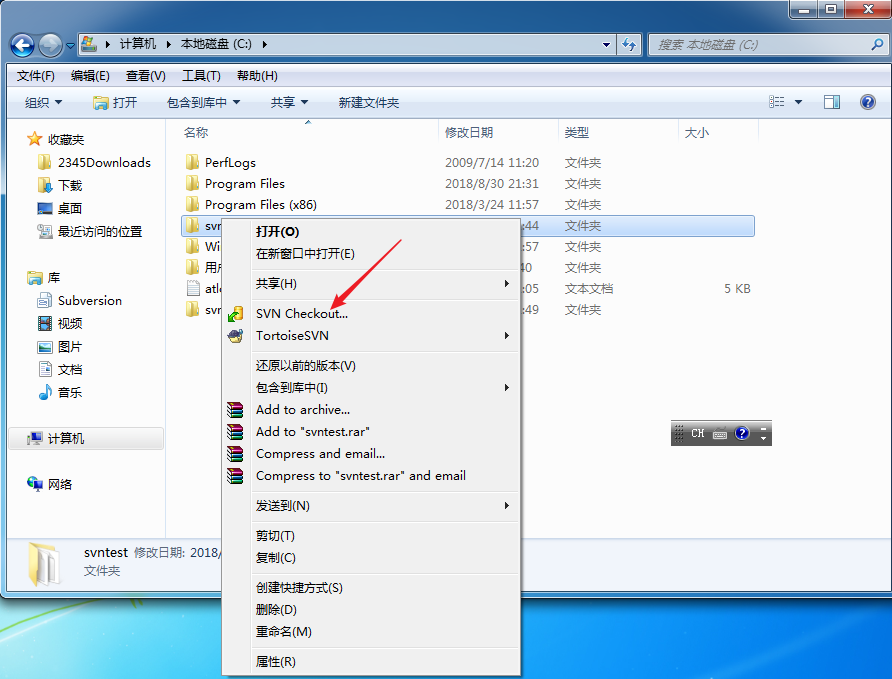
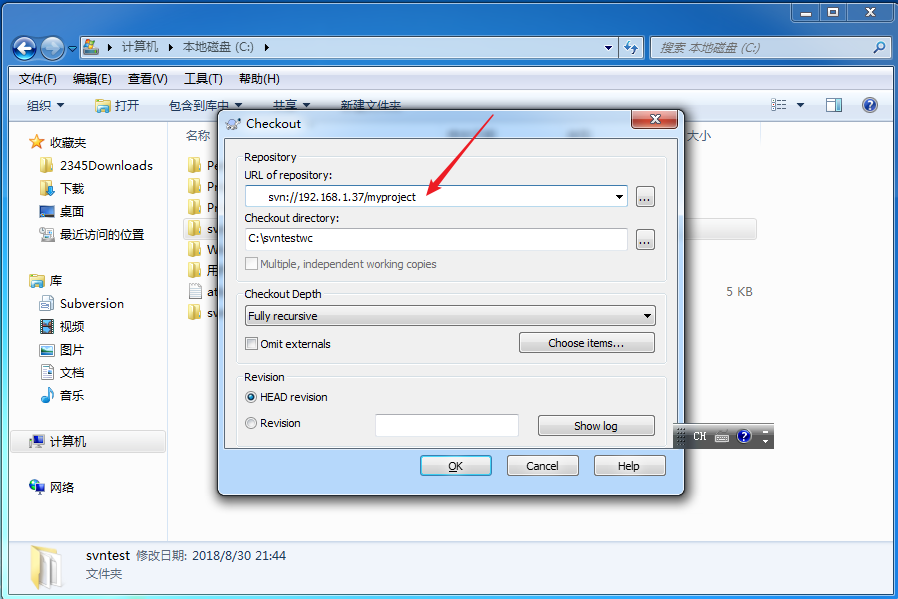
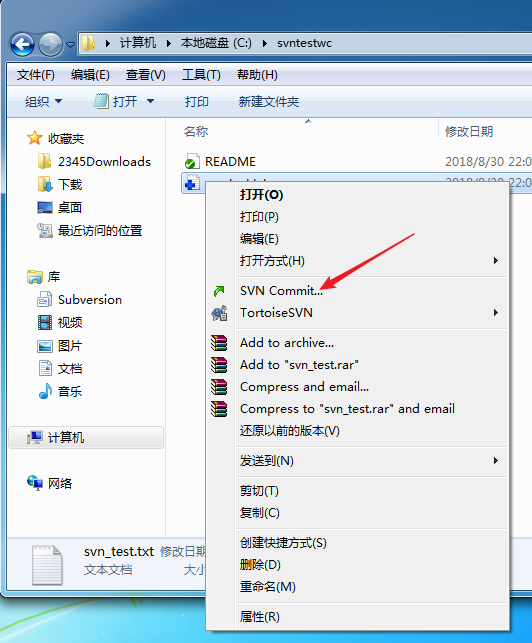
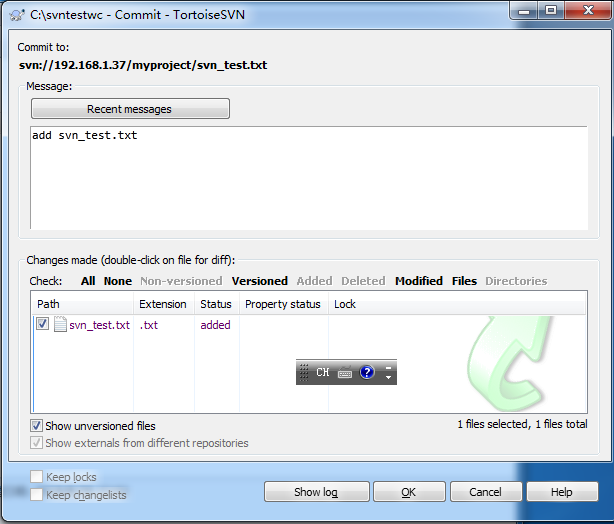
四、客户端上使用svn(windows)
1.下载TortoiseSVN,参考网址:https://tortoisesvn.net/downloads.zh.html
2.windows下安装(略)
3.配置

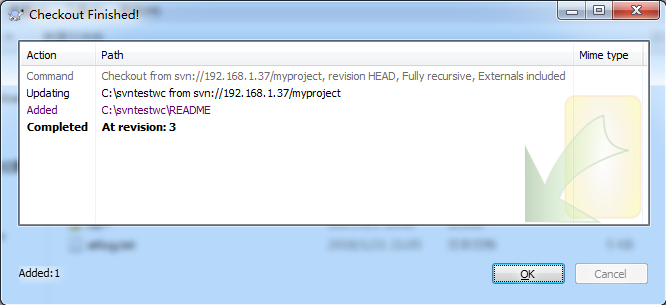
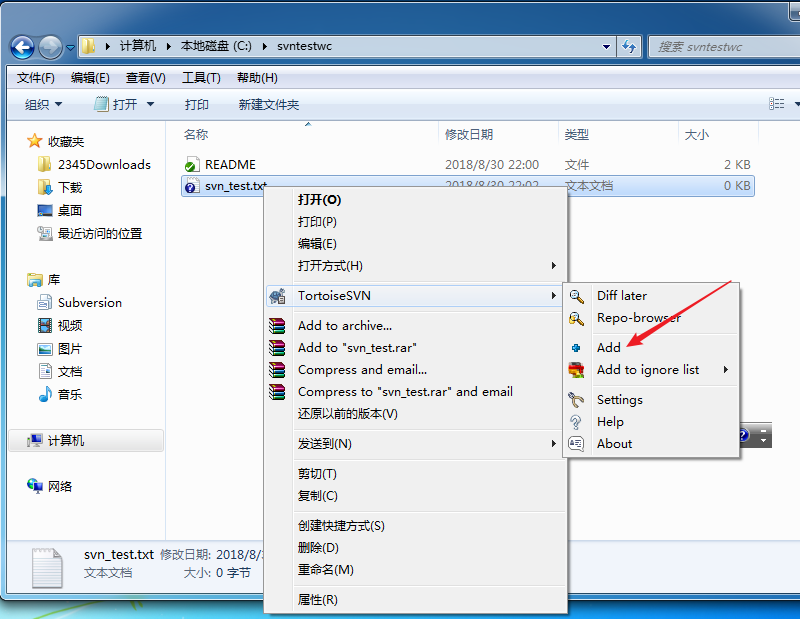
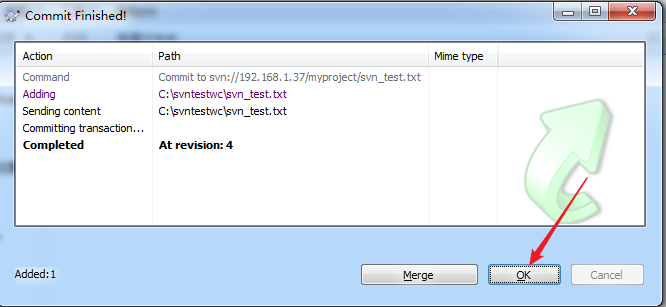
4.在linux客户端查看提交文件
[root@subversion-client myproject]# svn up
Updating '.':
A    svn_test.txt
Updated to revision 4.
[root@subversion-client myproject]# ls
README  svn_test.txt
[root@subversion-client myproject]#
##五、单机上使用git
centos7默认已经安装了git
[root@subversion-server ~]# rpm -q git
git-1.8.3.1-11.el7.x86_64
# 如果没有安装,可通过yum -y install git来安装
1.建立代码仓库的目录
[root@subversion-server ~]# mkdir -p /data/git
[root@subversion-server ~]# cd !$
cd /data/git
2.初始化仓库
[root@subversion-server git]# git init
Initialized empty Git repository in /data/git/.git/
[root@subversion-server git]# ls -al
total 0
drwxr-xr-x 3 root root  18 Aug 30 22:40 .
drwxr-xr-x 4 root root  32 Aug 30 22:39 ..
drwxr-xr-x 7 root root 119 Aug 30 22:40 .git

[root@subversion-server git]# git config --global user.name "terry.he"
[root@subversion-server git]# git config --global user.email "kennminn@139.com"
[root@subversion-server git]# cat ~/.gitconfig
[user]
        name = terry.he
        email = kennminn@139.com
3.创建一个提交
// 创建演示文件1.txt
[root@subversion-server git]#  echo -e  "123\naaa\n456\nbbb" > 1.txt
[root@subversion-server git]# ls -l 1.txt
-rw-r--r-- 1 root root 24 Aug 30 22:45 1.txt

// 将1.txt添加到版本库
[root@subversion-server git]# git add 1.txt
// 提交,只有提交以后才真正把文件提交到git仓库
[root@subversion-server git]# git commit -m "add new file 1.txt"
[master (root-commit) b914c0a] add new file 1.txt
 1 file changed, 1 insertion(+)
 create mode 100644 1.txt
4.查看状态
[root@subversion-server git]# echo "ccccc" >>1.txt
// 查看当前仓库中的状态,比如是否有改动的文件
[root@subversion-server git]# git status
# On branch master
# Changes not staged for commit:
#   (use "git add <file>..." to update what will be committed)
#   (use "git checkout -- <file>..." to discard changes in working directory)
#
#       modified:   1.txt
#
no changes added to commit (use "git add" and/or "git commit -a")
// 相比较仓库里面的版本,1.txt本次修改了什么内容,
[root@subversion-server git]# git diff 1.txt
diff --git a/1.txt b/1.txt
index 8e55d6a..a5e8574 100644
--- a/1.txt
+++ b/1.txt
@@ -1 +1,2 @@
  “123naaan456nbbb”
+ccccc
5.版本回退
// 多次修改1.txt并提交
[root@subversion-server git]# git add 1.txt
[root@subversion-server git]# git commit -m "1.txt m1"
[master 2df7319] 1.txt m1
 1 file changed, 1 insertion(+)
[root@subversion-server git]# echo "fffff" >> 1.txt
[root@subversion-server git]# git add 1.txt
[root@subversion-server git]# git commit -m "1.txt m2"
[master d357d00] 1.txt m2
 1 file changed, 1 insertion(+)
[root@subversion-server git]# cat 1.txt
 “123naaan456nbbb”
ccccc
fffff
// 查看提交记录
[root@subversion-server git]# git log
commit d357d00c2cf9cd868c510d21d143786eb438b8ed
Author: terry.he <kennminn@139.com>
Date:   Thu Aug 30 23:08:23 2018 +0800

    1.txt m2

commit 2df731931d2019027d51d1ac5847534b9c721480
Author: terry.he <kennminn@139.com>
Date:   Thu Aug 30 23:07:33 2018 +0800

    1.txt m1

commit b914c0ab86a6f69de8ed0ca4ae148e5be78ddc7d
Author: terry.he <kennminn@139.com>
Date:   Thu Aug 30 22:47:43 2018 +0800

    add new file 1.txt

// 将提交记录以单行显示
[root@subversion-server git]# git log --pretty=oneline
d357d00c2cf9cd868c510d21d143786eb438b8ed 1.txt m2
2df731931d2019027d51d1ac5847534b9c721480 1.txt m1
b914c0ab86a6f69de8ed0ca4ae148e5be78ddc7d add new file 1.txt

//回退到m1修改时的状态,m2修改没有了
[root@subversion-server git]# git reset --hard 2df731931d
HEAD is now at 2df7319 1.txt m1
[root@subversion-server git]# cat 1.txt
 “123naaan456nbbb”
ccccc

//回退到第1次添加的时候,回到第一次修改的状态
[root@subversion-server git]# git reset --hard b914c0ab86a
HEAD is now at b914c0a add new file 1.txt
[root@subversion-server git]# cat 1.txt
 “123naaan456nbbb”

//查看所有历史版本
[root@subversion-server git]# git reflog
b914c0a HEAD@{0}: reset: moving to b914c0ab86a
2df7319 HEAD@{1}: reset: moving to 2df731931d
d357d00 HEAD@{2}: commit: 1.txt m2
2df7319 HEAD@{3}: commit: 1.txt m1
b914c0a HEAD@{4}: commit (initial): add new file 1.txt

//回退到m2修改状态
[root@subversion-server git]# git reset --hard d357d00
HEAD is now at d357d00 1.txt m2
[root@subversion-server git]# cat 1.txt
 “123naaan456nbbb”
ccccc
fffff
6.撤销修改
// 删除1.txt
[root@subversion-server git]# rm -f 1.txt
[root@subversion-server git]# git checkout -- 1.txt
[root@subversion-server git]# ll
total 4
-rw-r--r-- 1 root root 36 Aug 30 23:19 1.txt

// 如果1.txt文件修改,add后但没有commit,再想回退到上一次提交的状态,
// 可以使用git reset HEAD 1.txt,再执行git checkout -- 1.txt
[root@subversion-server git]# echo "eeeeee" >>1.txt
[root@subversion-server git]# cat 1,txt
cat: 1,txt: No such file or directory
[root@subversion-server git]# cat 1.txt
 “123naaan456nbbb”
ccccc
fffff
eeeeee
[root@subversion-server git]# git add 1.txt
[root@subversion-server git]# cat 1.txt
 “123naaan456nbbb”
ccccc
fffff
eeeeee
[root@subversion-server git]# git reset HEAD 1.txt
Unstaged changes after reset:
M       1.txt
[root@subversion-server git]# git checkout -- 1.txt
[root@subversion-server git]# cat 1.txt
 “123naaan456nbbb”
ccccc
fffff
7.删除文件
[root@subversion-server git]# git add 2.txt
[root@subversion-server git]# git commit -m "add new file 2.txt"
[master 9e6bc56] add new file 2.txt
 1 file changed, 2 insertions(+)
 create mode 100644 2.txt
[root@subversion-server git]# git log
commit 9e6bc56eea5adbdb76b5d6dfef64d9c7f5599ea5
Author: terry.he <kennminn@139.com>
Date:   Thu Aug 30 23:26:07 2018 +0800

    add new file 2.txt

commit d357d00c2cf9cd868c510d21d143786eb438b8ed
Author: terry.he <kennminn@139.com>
Date:   Thu Aug 30 23:08:23 2018 +0800

    1.txt m2

commit 2df731931d2019027d51d1ac5847534b9c721480
Author: terry.he <kennminn@139.com>
Date:   Thu Aug 30 23:07:33 2018 +0800

    1.txt m1

commit b914c0ab86a6f69de8ed0ca4ae148e5be78ddc7d
Author: terry.he <kennminn@139.com>
Date:   Thu Aug 30 22:47:43 2018 +0800

    add new file 1.txt
[root@subversion-server git]#
[root@subversion-server git]#
[root@subversion-server git]# git rm 2.txt
rm '2.txt'
[root@subversion-server git]# git commit -m "delete 2.txt"
[master e127514] delete 2.txt
 1 file changed, 2 deletions(-)
 delete mode 100644 2.txt

[root@subversion-server git]# ll
total 4
-rw-r--r-- 1 root root 36 Aug 30 23:22 1.txt
-rw-r--r-- 1 root root 36 Aug 30 23:22 1.txt
[root@subversion-server git]# git log
commit e12751488b71737013eea59ddf712547b71e6b79
Author: terry.he <kennminn@139.com>
Date:   Thu Aug 30 23:26:39 2018 +0800

    delete 2.txt

commit 9e6bc56eea5adbdb76b5d6dfef64d9c7f5599ea5
Author: terry.he <kennminn@139.com>
Date:   Thu Aug 30 23:26:07 2018 +0800

    add new file 2.txt

commit d357d00c2cf9cd868c510d21d143786eb438b8ed
Author: terry.he <kennminn@139.com>
Date:   Thu Aug 30 23:08:23 2018 +0800

    1.txt m2

commit 2df731931d2019027d51d1ac5847534b9c721480
...下略...
##六、建立远程仓库
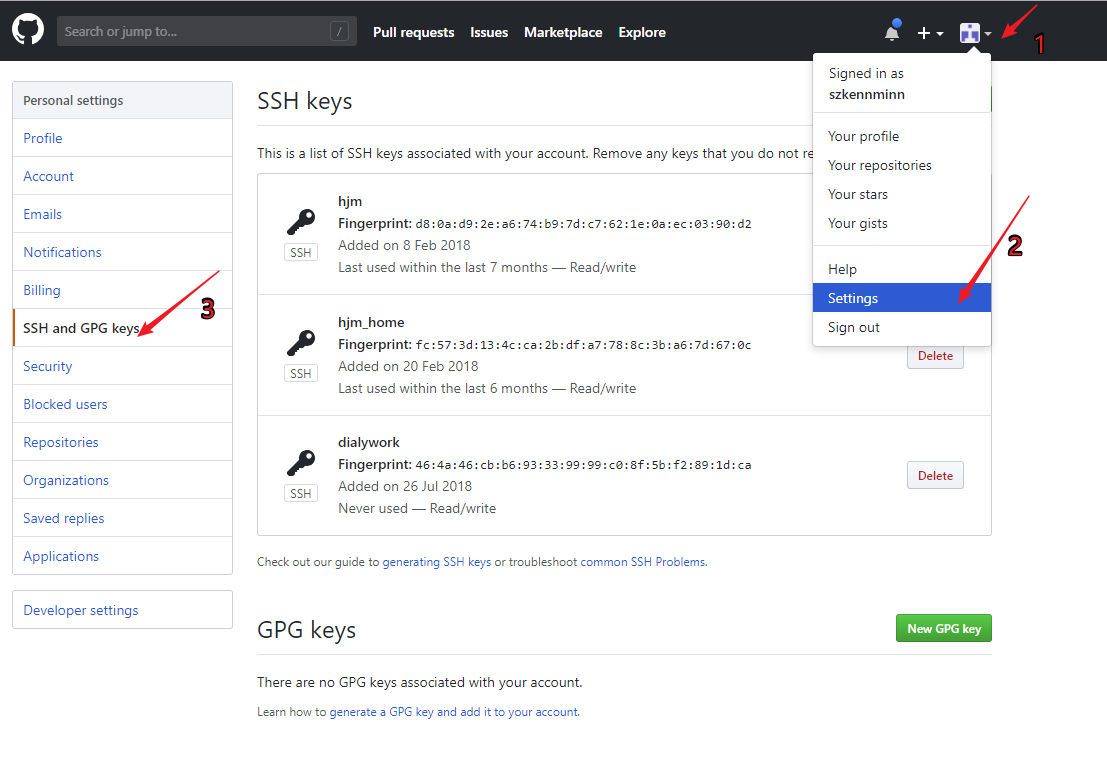
1.在github网站注册一个帐户(略),网址:https://github.com/
2.在linux中创建密钥对并添加公钥到github
// Linux中创建密钥对
[root@lanquark ~]# ssh-keygen
Generating public/private rsa key pair.
Enter file in which to save the key (/root/.ssh/id_rsa):
Created directory '/root/.ssh'.
Enter passphrase (empty for no passphrase):
Enter same passphrase again:
Your identification has been saved in /root/.ssh/id_rsa.
Your public key has been saved in /root/.ssh/id_rsa.pub.
The key fingerprint is:
SHA256:FAAVQAEPj1cMQcaKx17lHlvB6KNunaHGHgxbpNrY3Cw root@lanquark.com
The key's randomart image is:
+---[RSA 2048]----+
|  o=XO==.        |
|   *..+ o.       |
| o..=+  ..       |
|. ++. =..        |
| oo..o =S        |
| *.B. +          |
|o Eo=o o         |
|   .*.o          |
|   +.            |
+----[SHA256]-----+
[root@lanquark ~]# cat ~/.ssh/id_rsa.pub
ssh-rsa AAAAB3NzaC1yc2EAAAADAQABAAABAQDgoSerO+uSEOxoVkLsEUQqzmPNZkM39Eib31QO9NDp5/TFT35Zp0C4Rsbgka3hWnHM/6XHA+dOczyPockYQ30VG+W0jwXOTQe5Vrx8AKDFLAjKtOlNQXYVCJ7TTXGCdNAQIpE9pnCWUfIjjnkBcbvrSWWfgdFqC7VSPul5wVDN3BY+sHHRVei9vT1vPyQhtrHKA9fbrVWrEwL8LJ9GP5vz1EB+LlOyAu0EZtiX+KtZeO3PXWNtZO/PQZ3jo2+EWgoW2SsBPMGK0vEBMrc8xZkeOqABOQhlwOgdr/LL1DNXoXwWLh49BP/nKkb5Yxl2I6zDq9X2D+rn9Qulkr+9AhBJ root@lanquark.com
github中添加公钥
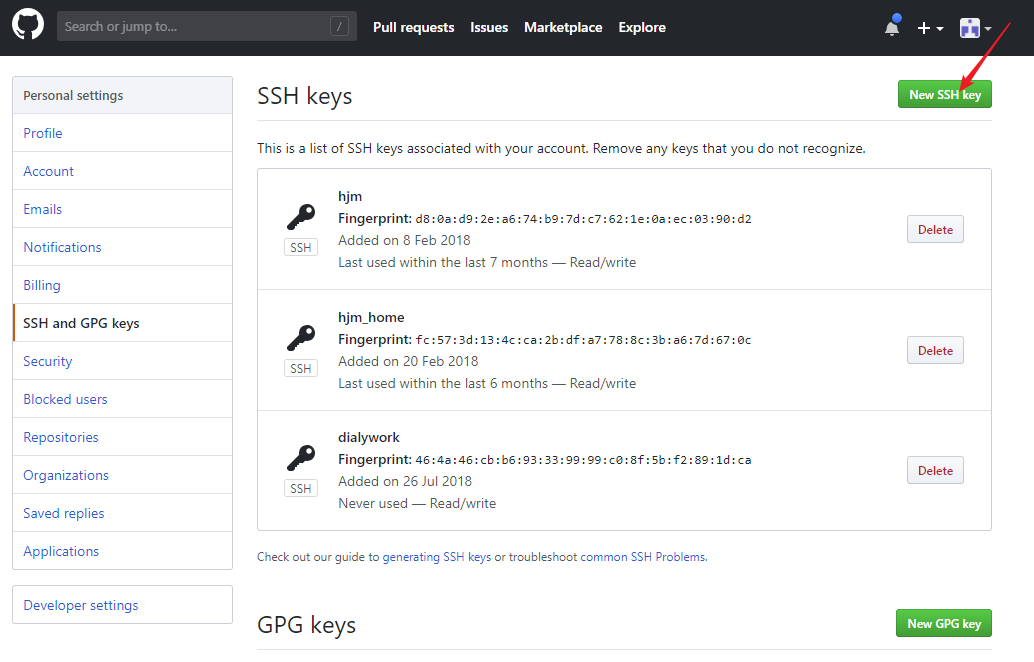

验证添加公钥成功
[root@lanquark ~]# ssh -T git@github.com
The authenticity of host 'github.com (13.250.177.223)' can't be established.
RSA key fingerprint is SHA256:nThbg6kXUpJWGl7E1IGOCspRomTxdCARLviKw6E5SY8.
RSA key fingerprint is MD5:16:27:ac:a5:76:28:2d:36:63:1b:56:4d:eb:df:a6:48.
Are you sure you want to continue connecting (yes/no)? yes
Warning: Permanently added 'github.com,13.250.177.223' (RSA) to the list of known hosts.
Hi szkennminn! You've successfully authenticated, but GitHub does not provide shell access.
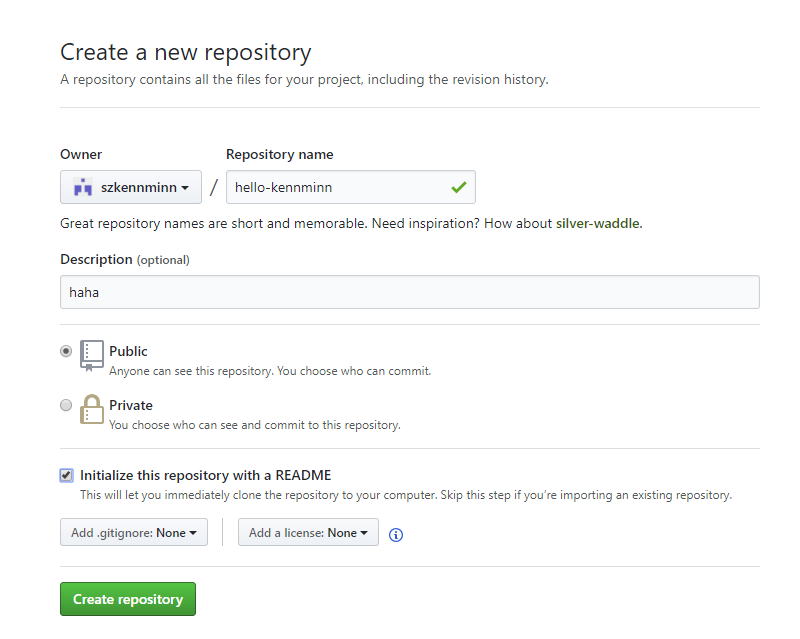
github中新建仓库

本地仓库与远程仓库关联
[root@lanquark ~]# mkdir hello-kennminn
[root@lanquark ~]# cd hello-kennminn/
[root@lanquark hello-kennminn]# git init
Initialized empty Git repository in /root/hello-kennminn/.git/
[root@lanquark hello-kennminn]# git remote add origin git@github.com:szkennminn/hello-kennminn.git
[root@lanquark hello-kennminn]# git push -u origin master
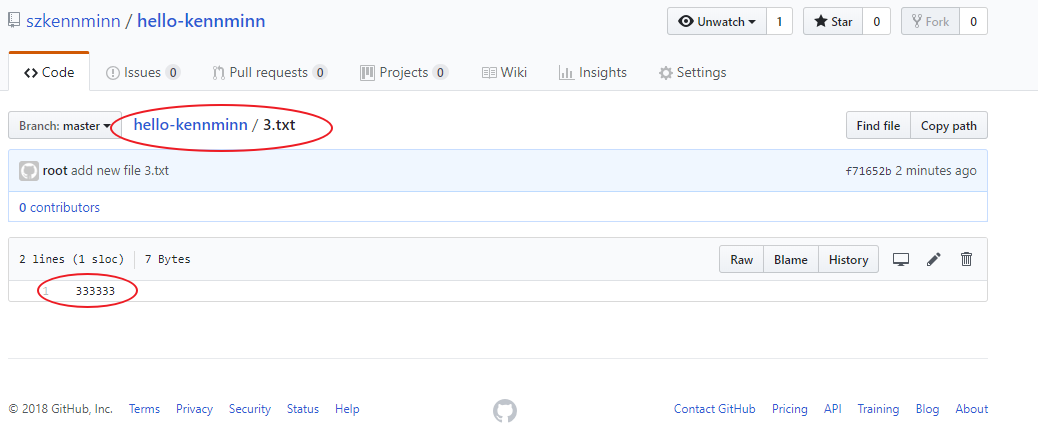
[root@lanquark hello-kennminn]# echo "333333" >>3.txt
[root@lanquark hello-kennminn]# git add 3.txt
[root@lanquark hello-kennminn]# git commit -m "add new file 3.txt"
[master f71652b] add new file 3.txt
Committer: root <root@lanquark.com>
Your name and email address were configured automatically based
on your username and hostname. Please check that they are accurate.
You can suppress this message by setting them explicitly:
git config --global user.name "Your Name"
git config --global user.email you@example.com
After doing this, you may fix the identity used for this commit with:
git commit --amend --reset-author
1 file changed, 1 insertion(+)
create mode 100644 3.txt
[root@lanquark hello-kennminn]# git push
Counting objects: 4, done.
Delta compression using up to 4 threads.
Compressing objects: 100% (2/2), done.
Writing objects: 100% (3/3), 260 bytes | 0 bytes/s, done.
Total 3 (delta 1), reused 0 (delta 0)
remote: Resolving deltas: 100% (1/1), completed with 1 local object.
To git@github.com:szkennminn/hello-kennminn.git
74fa933..f71652b master -> master
##七、克隆远程仓库
1.复制仓库路径
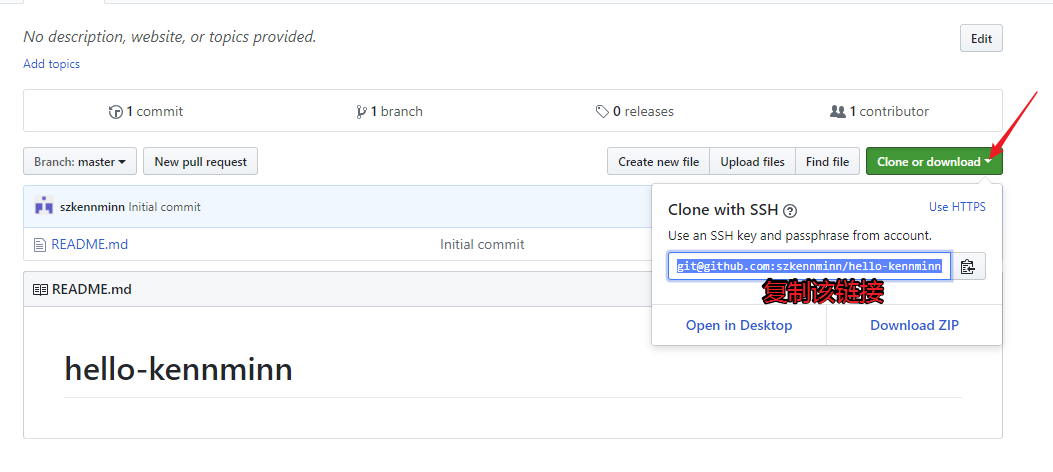
2.克隆远程仓库
[root@lanquark ~]# git clone git@github.com:szkennminn/hello-kennminn.git
Cloning into 'hello-kennminn'...
remote: Counting objects: 3, done.
remote: Total 3 (delta 0), reused 0 (delta 0), pack-reused 0
Receiving objects: 100% (3/3), done.
[root@lanquark ~]# cd hello-kennminn/
[root@lanquark hello-kennminn]#
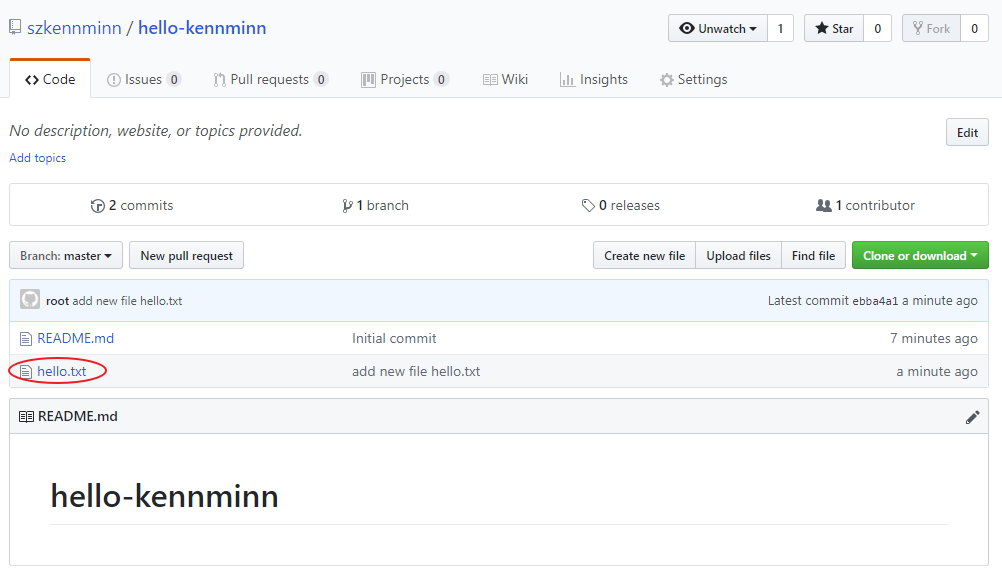
3.测试远程推送文件
[root@lanquark hello-kennminn]# echo 'hello world!' >> hello.txt
[root@lanquark hello-kennminn]# git add hello.txt
[root@lanquark hello-kennminn]# git commit -m "add new file hello.txt"
[master ebba4a1] add new file hello.txt
 Committer: root <root@lanquark.com>
Your name and email address were configured automatically based
on your username and hostname. Please check that they are accurate.
You can suppress this message by setting them explicitly:

    git config --global user.name "Your Name"
    git config --global user.email you@example.com

After doing this, you may fix the identity used for this commit with:

    git commit --amend --reset-author

 1 file changed, 1 insertion(+)
 create mode 100644 hello.txt
[root@lanquark hello-kennminn]# git log
commit ebba4a1cb1df783bfa325257d449ab7b9317e272
Author: root <root@lanquark.com>
Date:   Fri Aug 31 00:42:08 2018 +0800

    add new file hello.txt

commit 9780698cd38c4aa27a395004191e6a94d4f83308
Author: szkennminn <h.toniguy@gmail.com>
Date:   Fri Aug 31 00:35:55 2018 +0800

    Initial commit
[root@lanquark hello-kennminn]# git push
Counting objects: 4, done.
Delta compression using up to 4 threads.
Compressing objects: 100% (2/2), done.
Writing objects: 100% (3/3), 289 bytes | 0 bytes/s, done.
Total 3 (delta 0), reused 0 (delta 0)
To git@github.com:szkennminn/hello-kennminn.git
   9780698..ebba4a1  master -> master
[root@lanquark hello-kennminn]#
github检查
##八、分支管理
1.创建并切换分支(branch)
// 查看分支, 当前分支前面会标一个*号。
[root@lanquark hello-kennminn]# git branch
* master

// 创建并切换分支
[root@lanquark hello-kennminn]# git checkout -b "nico"
Switched to a new branch 'nico'
[root@lanquark hello-kennminn]# git branch
  master
* nico

// 分支下修改并提交
[root@lanquark hello-kennminn]# echo "afnalfnasnfasf" >>hello.txt
[root@lanquark hello-kennminn]# cat hello.txt
hello world!
afnalfnasnfasf
* nico
[root@lanquark hello-kennminn]# echo "afnalfnasnfasf" >>hello.txt
[root@lanquark hello-kennminn]# cat hello.txt
hello world!
afnalfnasnfasf
[root@lanquark hello-kennminn]# git add hello.txt
[root@lanquark hello-kennminn]# git commit -m "branch test modified 1 hello.txt"
[nico a8ed366] branch test modified 1 hello.txt
 Committer: root <root@lanquark.com>
Your name and email address were configured automatically based
on your username and hostname. Please check that they are accurate.
You can suppress this message by setting them explicitly:

    git config --global user.name "Your Name"
    git config --global user.email you@example.com

After doing this, you may fix the identity used for this commit with:

    git commit --amend --reset-author

 1 file changed, 1 insertion(+)

// 切换回master分支
[root@lanquark hello-kennminn]# git checkout master
Switched to branch 'master'
[root@lanquark hello-kennminn]# git branch
* master
  nico
// 分支做的修改消失了
[root@lanquark hello-kennminn]# cat hello.txt
hello world!
2.合并分支
// 把分支nico合并到master分支
// git merge命令用于合并指定分支到当前分支。
[root@lanquark hello-kennminn]# git merge nico
Updating f71652b..a8ed366
Fast-forward
 hello.txt | 1 +
 1 file changed, 1 insertion(+)
[root@lanquark hello-kennminn]# cat hello.txt
hello world!
afnalfnasnfasf
3.解决冲突
// 在nico分支修改hello.txt
[root@lanquark hello-kennminn]# git checkout nico
Switched to branch 'nico'
[root@lanquark hello-kennminn]# git branch
  master
* nico
[root@lanquark hello-kennminn]# echo "new line is add to hello" >>hello.txt
[root@lanquark hello-kennminn]# git add hello.txt
[root@lanquark hello-kennminn]# git commit -m "add new line to hello.txt"
[nico 450957a] add new line to hello.txt
// 切回主分支
[root@lanquark hello-kennminn]# git checkout master
Switched to branch 'master'
// 修改hello.txt内容
[root@lanquark hello-kennminn]# cat hello.txt
hello world!
afnalfnasnfasf
[root@lanquark hello-kennminn]# echo "hahahaha" >> hello.txt
[root@lanquark hello-kennminn]# cat hello.txt
hello world!
afnalfnasnfasf
hahahaha
[root@lanquark hello-kennminn]# git add hello.txt
[root@lanquark hello-kennminn]# git commit -m "conflict test add some content to hello.txt from master"
[master 71b6c4b] conflict test add some content to hello.txt from master
 1 file changed, 1 insertion(+)

// 合并nico分支,因为master和nico分支下都对hello.txt做了修改,合并时可能会产生冲突
[root@lanquark hello-kennminn]# git merge nico
Auto-merging hello.txt
CONFLICT (content): Merge conflict in hello.txt
Automatic merge failed; fix conflicts and then commit the result.
// 查看hello.txt的内容
[root@lanquark hello-kennminn]# vim hello.txt
hello world!
afnalfnasnfasf
<<<<<<< HEAD
hahahahah
=======
new line1 is add to hello
>>>>>>> nico
// 需要手动修改后再提交合并
// 如果master分支和nico分支都对hello.txt进行了编辑,当合并时会提示冲突,需要先解
// 决冲突才可以继续合并。
// 解决冲突的方法是在master分支下,编辑hello.txt,改为nico分支里面hello.txt的内
// 容。 然后提交hello.txt,再合并nico分支。
// 但是这样有一个问题,万一master分支更改的内容是我们想要的呢? 可以编辑hello.txt
// 内容,改为想要的,然后提交。切换到nico分支,然后合并master分支到nico分支即可
//(倒着合并)。合并分支有一个原则,那就是要把最新的分支合并到旧的分支。也就是说
// merge后面跟的分支名字一定是最新的分支。
[root@lanquark hello-kennminn]# vim hello.txt
hello world!
afnalfnasnfasf
new line1 is add to hello
[root@lanquark hello-kennminn]# git add hello.txt
[root@lanquark hello-kennminn]# git commit -m "conflict fixed"
[master 01bcded] conflict fixed
[root@lanquark hello-kennminn]# git merge nico
Already up-to-date.
// 查看分支的合并情况
[root@lanquark hello-kennminn]#  git log --graph --pretty=oneline --abbrev-commit
*   01bcded conflict fixed
|\
| * 3a7b366 add newline 1 to hello.txt
| * 450957a add new line to hello.txt
| * a8ed366 branch test modified 1 hello.txt
* | 71b6c4b conflict test add some content to hello.txt from master
* | 12c2130 branch test modified 1 hello.txt
|/
* f71652b add new file 3.txt
*   74fa933 Merge branch 'master' of github.com:szkennminn/hello-kennminn
|\
| * ebba4a1 add new file hello.txt
| * 9780698 Initial commit
* c930706 add new file 2.txt
4.删除分支
// 删除nico分支
[root@lanquark hello-kennminn]# git branch -d nico
Deleted branch nico (was 3a7b366).
// 如果分支没有合并,删除之前会提示,那就不合并,强制删除
// git branch -D aming
##九、远程分支管理
- 使用分支的原则
对于分支的应用,建议大家以这样的原则来:
master分支是非常重要的,线上发布代码用这个分支,平时我们开发代码不要在这个分支上。
创建一个dev分支,专门用作开发,只有当发布到线上之前,才会把dev分支合并到master
开发人员应该在dev的基础上再分支成个人分支,个人分支(在自己pc上)里面开发代码,然后合并到dev分支
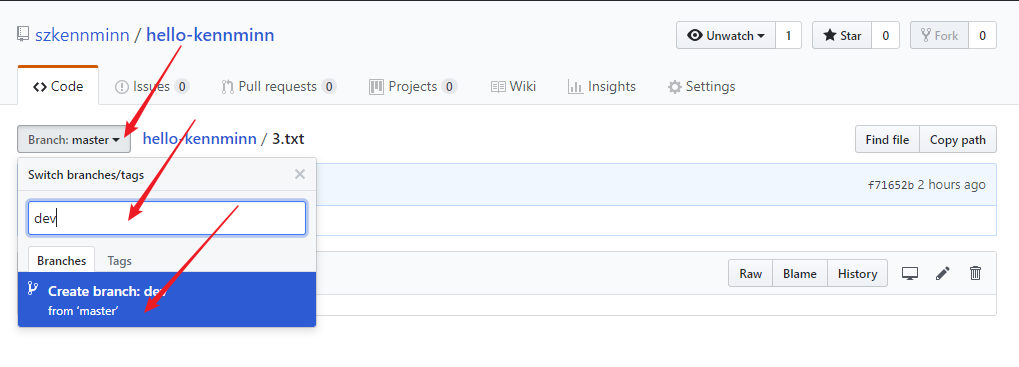
2.远程分支
本地新建的分支如果不推送到远程,对其他人就是不可见的
查看远程分支
[root@lanquark hello-kennminn]# git ls-remote origin
f71652b9a8dc959b6558d3600660cbf59f8baa65        HEAD
f71652b9a8dc959b6558d3600660cbf59f8baa65        refs/heads/master
github上创建新分支dev
[root@lanquark hello-kennminn]# git ls-remote origin
f71652b9a8dc959b6558d3600660cbf59f8baa65 HEAD
f71652b9a8dc959b6558d3600660cbf59f8baa65 refs/heads/dev
f71652b9a8dc959b6558d3600660cbf59f8baa65 refs/heads/master
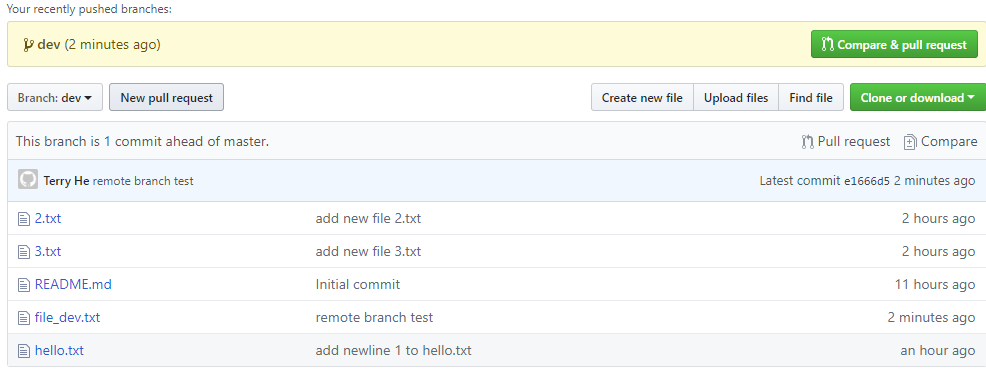
// 在分支创建文件并push
// 对于git push分支分两种情况
// 当本地分支和远程分支一致时
// git push会把所有本地分支的变更一同推送到远程,如果想只推送一个分支,使用git push // origin branch-name
// 当本地分支比远程分支多,默认git push 只推送本地和远程一致的分支,想要把多出来的
// 本地分支推送到远程时,使用git push origin branch-name 如果推送失败,先用git // pull抓取远程的新提交
[root@lanquark hello-kennminn]# echo -e "aaaaa\nbbbbb\nccccc\nddddddd" >file_dev.txt
[root@lanquark hello-kennminn]# cat file_dev.txt
aaaaa
bbbbb
ccccc
ddddddd
[root@lanquark hello-kennminn]# gti add file_dev.txt
-bash: gti: command not found
[root@lanquark hello-kennminn]# git add file_dev.txt
[root@lanquark hello-kennminn]# git commit -m "remote branch test"
[dev e1666d5] remote branch test
1 file changed, 4 insertions(+)
create mode 100644 file_dev.txt
// 本地分支与远程分支致
[root@lanquark hello-kennminn]# git push
Counting objects: 19, done.
Delta compression using up to 4 threads.
Compressing objects: 100% (14/14), done.
Writing objects: 100% (17/17), 1.73 KiB | 0 bytes/s, done.
Total 17 (delta 4), reused 0 (delta 0)
remote: Resolving deltas: 100% (4/4), completed with 1 local object.
To git@github.com:szkennminn/hello-kennminn.git
f71652b..e1666d5 dev -> dev
f71652b..01bcded master -> master
// 本地分支与远程分支不一致
[root@lanquark hello-kennminn]# git branch dev2
[root@lanquark hello-kennminn]# git checkout dev2
Switched to branch 'dev2'
[root@lanquark hello-kennminn]# echo "branchtest" >aaaa.txt
[root@lanquark hello-kennminn]# git add aaaa.txt
[root@lanquark hello-kennminn]# git commit -m "add aaaa.txt to dev2"
[dev2 9e508b3] add aaaa.txt to dev2
1 file changed, 1 insertion(+)
create mode 100644 aaaa.txt
[root@lanquark hello-kennminn]# git push
Everything up-to-date
[root@lanquark hello-kennminn]# git ls-remote origin
01bcdedfbbe08eb357fece1196ceece1a2d97c9c HEAD
e1666d5b341fb168eee1e87d1609aa1e77c3e0c7 refs/heads/dev
01bcdedfbbe08eb357fece1196ceece1a2d97c9c refs/heads/master
[root@lanquark hello-kennminn]# git push origin dev2
Counting objects: 4, done.
Delta compression using up to 4 threads.
Compressing objects: 100% (2/2), done.
Writing objects: 100% (3/3), 276 bytes | 0 bytes/s, done.
Total 3 (delta 1), reused 0 (delta 0)
remote: Resolving deltas: 100% (1/1), completed with 1 local object.
To git@github.com:szkennminn/hello-kennminn.git
* [new branch] dev2 -> dev2
[root@lanquark hello-kennminn]# git ls-remote origin
01bcdedfbbe08eb357fece1196ceece1a2d97c9c HEAD
e1666d5b341fb168eee1e87d1609aa1e77c3e0c7 refs/heads/dev
9e508b3cff47a624649d67873ac0732f1fd4c8c3 refs/heads/dev2
01bcdedfbbe08eb357fece1196ceece1a2d97c9c refs/heads/master
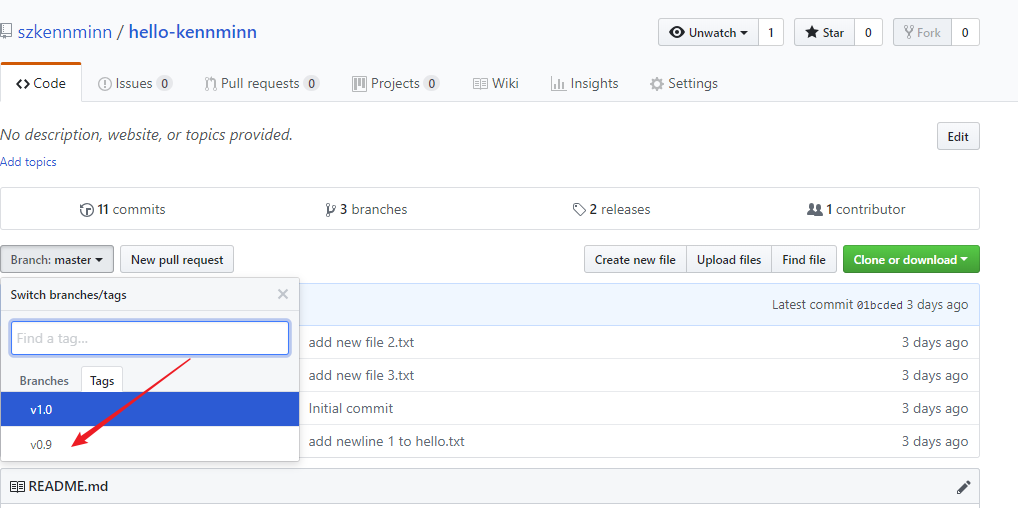
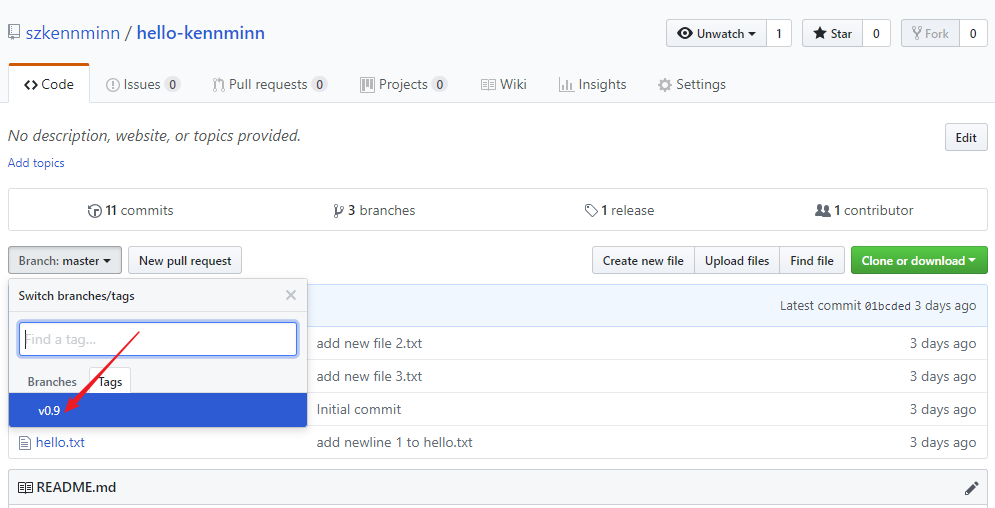
##十、标签管理
标签类似于快照功能,可以给版本库打一个标签,记录某个时刻库的状态。也可以随时恢复到该状态。
1.打标签
// 首先切回主分支
[root@lanquark hello-kennminn]# git branch
  dev
* dev2
  master
[root@lanquark hello-kennminn]# git checkout master
Switched to branch 'master'
// 打标签,打标签针对commit,所以可以针对历史的commit来打tag
[root@lanquark hello-kennminn]# git tag v1.0
// 显示标签
[root@lanquark hello-kennminn]# git show v1.0
commit 01bcdedfbbe08eb357fece1196ceece1a2d97c9c
Merge: 71b6c4b 3a7b366
Author: Terry He <kennminn@139.com>
Date:   Fri Aug 31 10:46:14 2018 +0800

    conflict fixed
2.显示所有的标签
// 当前只有一个标签
[root@lanquark hello-kennminn]# git tag
v1.0
3.针对历史commit打标签
// git log --pretty=oneline --abbrev-commit 也可以
[root@lanquark hello-kennminn]# git log --pretty=oneline
01bcdedfbbe08eb357fece1196ceece1a2d97c9c conflict fixed
71b6c4b88498550b0d76211c3555b11547c1b8c0 conflict test add some content to hello.txt from master
3a7b366542bcea232e2efe08acda7b2ffd32597f add newline 1 to hello.txt
12c2130d2903d4db9cdfba8ef920dcd6d8bdb900 branch test modified 1 hello.txt
450957aab8ce94df36b87be19cba171abfefd076 add new line to hello.txt
a8ed3666b79126fcf535c9977a2ca69c29805431 branch test modified 1 hello.txt
f71652b9a8dc959b6558d3600660cbf59f8baa65 add new file 3.txt
74fa9332aaac1d98dd332ae8f8727ecd8721a167 Merge branch 'master' of github.com:szkennminn/hello-kennminn
c930706b51acb0f0731fa3cea73421c52eec742d add new file 2.txt
ebba4a1cb1df783bfa325257d449ab7b9317e272 add new file hello.txt
9780698cd38c4aa27a395004191e6a94d4f83308 Initial commit
// 给历史提交打标签
[root@lanquark hello-kennminn]# git tag v0.9 3a7b366542b
// 给历史提交打标签并添加描述
[root@lanquark hello-kennminn]# git tag v0.8 -m "test for add description with tag" 450957aab8
[root@lanquark hello-kennminn]# git tag
v0.8
v0.9
v1.0
4.删除标签
[root@lanquark hello-kennminn]# git tag -d v0.8
Deleted tag 'v0.8' (was 92086fc)
[root@lanquark hello-kennminn]# git tag
v0.9
v1.0
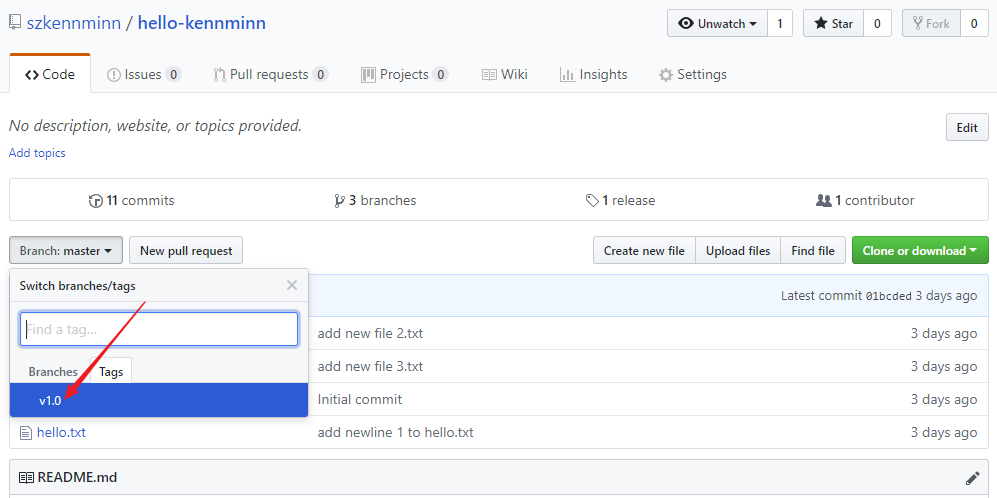
5.推送指定标签到远程
[root@lanquark hello-kennminn]# git push origin v1.0
Total 0 (delta 0), reused 0 (delta 0)
To git@github.com:szkennminn/hello-kennminn.git
 * [new tag]         v1.0 -> v1.0

[root@lanquark hello-kennminn]# git ls-remote origin
01bcdedfbbe08eb357fece1196ceece1a2d97c9c        HEAD
e1666d5b341fb168eee1e87d1609aa1e77c3e0c7        refs/heads/dev
9e508b3cff47a624649d67873ac0732f1fd4c8c3        refs/heads/dev2
01bcdedfbbe08eb357fece1196ceece1a2d97c9c        refs/heads/master
01bcdedfbbe08eb357fece1196ceece1a2d97c9c        refs/tags/v1.0
6.推送所有标签
[root@lanquark hello-kennminn]# git push --tag origin
Total 0 (delta 0), reused 0 (delta 0)
To git@github.com:szkennminn/hello-kennminn.git
 * [new tag]         v0.9 -> v0.9
[root@lanquark hello-kennminn]# git ls-remote origin
01bcdedfbbe08eb357fece1196ceece1a2d97c9c        HEAD
e1666d5b341fb168eee1e87d1609aa1e77c3e0c7        refs/heads/dev
9e508b3cff47a624649d67873ac0732f1fd4c8c3        refs/heads/dev2
01bcdedfbbe08eb357fece1196ceece1a2d97c9c        refs/heads/master
3a7b366542bcea232e2efe08acda7b2ffd32597f        refs/tags/v0.9
01bcdedfbbe08eb357fece1196ceece1a2d97c9c        refs/tags/v1.0
7.本地删除标签,并推送到远程
[root@lanquark hello-kennminn]# git tag -d v1.0
Deleted tag 'v1.0' (was 01bcded)
[root@lanquark hello-kennminn]# git push origin :refs/tags/v1.0
To git@github.com:szkennminn/hello-kennminn.git
 - [deleted]         v1.0
##十一、git别名
git别名类似于linux shell中的别名,用别名可以提高我们的工作效率。
1.添加别名
// 定义commit别名ci
[root@lanquark hello-kennminn]# git config --global alias.ci commit
[root@lanquark hello-kennminn]# echo "412313131" >> ff.txt
[root@lanquark hello-kennminn]# git add ff.txt
[root@lanquark hello-kennminn]# git ci -m "add new file ff.txt"
[master f7ea5c1] add new file ff.txt
 1 file changed, 1 insertion(+)
 create mode 100644 ff.txt
[root@lanquark hello-kennminn]# git config --global alias.br branch
[root@lanquark hello-kennminn]# git br
  dev
  dev2
* master
2.查看别名
[root@lanquark hello-kennminn]# git config --list| grep alias
alias.ci=commit
alias.br=branch
// 如果不加grep alias也可以看到,但是输出内容比较多
// git的配置文件位置 ~/.gitconfig
[root@lanquark hello-kennminn]# git config --list
push.default=matching
user.name=Terry He
user.email=kennminn@139.com
alias.ci=commit
alias.br=branch
core.repositoryformatversion=0
core.filemode=true
core.bare=false
core.logallrefupdates=true
remote.origin.url=git@github.com:szkennminn/hello-kennminn.git
remote.origin.fetch=+refs/heads/*:refs/remotes/origin/*
3.取消别名
[root@lanquark hello-kennminn]# git config --global --unset alias.br
[root@lanquark hello-kennminn]# git config --list| grep alias
alias.ci=commit
4.查询log小技巧(格式化)
[root@lanquark hello-kennminn]# git config --global alias.lg "log --color --graph --pretty=format:'%Cred%h%Creset -%C(yellow)%d%Creset %s %Cgreen(%cr) %C(bold blue)<%an>%Creset' --abbrev-commit"
[root@lanquark hello-kennminn]# git lg
* f7ea5c1 - (HEAD, master) add new file ff.txt (10 minutes ago) <Terry He>
*   01bcded - (origin/master) conflict fixed (3 days ago) <Terry He>
|\
| * 3a7b366 - (tag: v0.9) add newline 1 to hello.txt (3 days ago) <Terry He>
| * 450957a - add new line to hello.txt (3 days ago) <root>
| * a8ed366 - branch test modified 1 hello.txt (3 days ago) <root>
* | 71b6c4b - conflict test add some content to hello.txt from master (3 days ago) <Terry He>
* | 12c2130 - branch test modified 1 hello.txt (3 days ago) <Terry He>
|/
* f71652b - add new file 3.txt (3 days ago) <root>
*   74fa933 - Merge branch 'master' of github.com:szkennminn/hello-kennminn (3 days ago) <root>
|\
| * ebba4a1 - add new file hello.txt (3 days ago) <root>
| * 9780698 - Initial commit (3 days ago) <szkennminn>
* c930706 - add new file 2.txt (3 days ago) <root>
十二、搭建git服务器
github是公开的服务平台,免费仓库对所有人可见,可仓库数会有限制,其私有仓库又得花钱买。所以我们可以想办法搭建一个私有的,只供自己公司内部使用的。Gitlab是个不错的选择。在介绍它之前,先讲述一下命令行的git服务器
1.安装git
// 默认git已经安装
[root@eurodesign ~]# rpm -q git
git-1.8.3.1-11.el7.x86_64
// 若没有安装,可以通过yum方式安装,yum -y install git
2.创建git用户
[root@eurodesign ~]# useradd -s /usr/bin/git-shell git
[root@eurodesign ~]# id git
uid=1000(git) gid=1000(git) groups=1000(git)
[root@eurodesign ~]# cd /home/git/
3.创建authorized_keys文件,并修改权限和属主
[root@eurodesign git]# mkdir -p .ssh
[root@eurodesign git]# touch .ssh/authorized_keys
[root@eurodesign git]# chmod 600 !$
chmod 600 .ssh/authorized_keys
[root@eurodesign git]# chown -R git:git .ssh
// 上传客户端公钥(略)并在客户端测试
[root@subversion-server ~]# ssh git@192.168.1.38
fatal: Interactive git shell is not enabled.
hint: ~/git-shell-commands should exist and have read and execute access.
Connection to 192.168.1.38 closed.
3.在服务器端设定git仓库目录
[root@eurodesign git]# mkdir -p /data/gitroot
[root@eurodesign git]# cd !$
cd /data/gitroot
// 创建裸创建
[root@eurodesign gitroot]#  git init --bare sample.git
Initialized empty Git repository in /data/gitroot/sample.git/
[root@eurodesign gitroot]# chown -R git.git sample.git
4.客户端克隆服务器上的仓库
// 克隆服务器上的仓库
[root@subversion-server ~]# git clone git@192.168.1.38:/data/gitroot/sample.git
Cloning into 'sample'...
warning: You appear to have cloned an empty repository.
[root@subversion-server ~]# cd sample/
[root@subversion-server sample]# ls -al
total 0
drwxr-xr-x  3 root root  18 Sep  3 11:49 .
dr-xr-x---. 5 root root 237 Sep  3 11:49 ..
drwxr-xr-x  7 root root 119 Sep  3 11:49 .git
// 测试提交
[root@subversion-server sample]# echo "asdadasda" >> my.txt
[root@subversion-server sample]# git add my.txt
[root@subversion-server sample]# git commit -m "add new file my.txt"
[master (root-commit) dbb9661] add new file my.txt
 1 file changed, 1 insertion(+)
 create mode 100644 my.txt
[root@subversion-server sample]# git push origin master
Counting objects: 3, done.
Writing objects: 100% (3/3), 218 bytes | 0 bytes/s, done.
Total 3 (delta 0), reused 0 (delta 0)
To git@192.168.1.38:/data/gitroot/sample.git
 * [new branch]      master -> master
[root@subversion-server sample]# git ls-remote origin
dbb96612232686fc529bd286af2ce84ab45cdf7a        HEAD
dbb96612232686fc529bd286af2ce84ab45cdf7a        refs/heads/master
// 测试拉取数据,
// 进入/tmp目录,再次克隆sample仓库
[root@subversion-server sample]# cd /tmp/
[root@subversion-server tmp]# git clone git@192.168.1.38:/data/gitroot/sample.git
Cloning into 'sample'...
remote: Counting objects: 3, done.
remote: Total 3 (delta 0), reused 0 (delta 0)
Receiving objects: 100% (3/3), done.
[root@subversion-server tmp]# cd sample/
[root@subversion-server sample]# ll
total 4
-rw-r--r-- 1 root root 10 Sep  3 11:53 my.txt
[root@subversion-server sample]# echo "modified something" >>my.txt
[root@subversion-server sample]# git add my.txt
[root@subversion-server sample]# git commit -m "modified my.txt"
[master 1222a99] modified my.txt
 1 file changed, 1 insertion(+)
[root@subversion-server sample]# git push
warning: push.default is unset; its implicit value is changing in
Git 2.0 from 'matching' to 'simple'. To squelch this message
and maintain the current behavior after the default changes, use:

  git config --global push.default matching

To squelch this message and adopt the new behavior now, use:

  git config --global push.default simple

See 'git help config' and search for 'push.default' for further information.
(the 'simple' mode was introduced in Git 1.7.11. Use the similar mode
'current' instead of 'simple' if you sometimes use older versions of Git)

Counting objects: 5, done.
Writing objects: 100% (3/3), 264 bytes | 0 bytes/s, done.
Total 3 (delta 0), reused 0 (delta 0)
To git@192.168.1.38:/data/gitroot/sample.git
   dbb9661..1222a99  master -> master

// 切换回/root/sample
[root@subversion-server sample]# cd /root/sample/
[root@subversion-server sample]# cat my.txt
asdadasda
[root@subversion-server sample]# git pull
remote: Counting objects: 5, done.
remote: Total 3 (delta 0), reused 0 (delta 0)
Unpacking objects: 100% (3/3), done.
From 192.168.1.38:/data/gitroot/sample
   dbb9661..1222a99  master     -> origin/master
Updating dbb9661..1222a99
Fast-forward
 my.txt | 1 +
 1 file changed, 1 insertion(+)
[root@subversion-server sample]# cat my.txt
asdadasda
modified something
##十三、安装gitlab
gitlab是类似于guthub的一种开源实现。
gitlab官网 https://about.gitlab.com/gitlab-com/
官方安装文档 https://about.gitlab.com/installation/?version=ce#centos-7 (ce/ee)
要求服务器内存不少于2gb
1.安装与配置必须的依赖
// openssh-server和openssh-client默认最小化安装已经带,所以可以不用安装
[root@gitlab ~]#  yum install -y curl policycoreutils-python openssh-server openssh-clients
// 调整防火墙策略,为方便实验,已经关闭防火墙
[root@gitlab ~]# firewall-cmd --permanent --add-service=http
[root@gitlab ~]# systemctl reload firewalld
// 如需邮件通知,可以自行配置第三方的邮件服务器或安装posix
// yum install postfix
// systemctl enable postfix
// systemctl start postfix
2.添加gitlab安装源
[root@gitlab ~]# curl -sS https://packages.gitlab.com/install/repositories/gitlab/gitlab-ce/script.rpm.sh | sudo bash
[root@gitlab ~]# yum repolist
Loaded plugins: fastestmirror
Loading mirror speeds from cached hostfile
 * base: mirrors.aliyun.com
 * epel: mirror.premi.st
 * extras: mirrors.aliyun.com
 * updates: mirrors.shu.edu.cn
repo id                                                               repo name                                                                                    status
base/7/x86_64                                                         CentOS-7 - Base                                                                               9,911
epel/x86_64                                                           Extra Packages for Enterprise Linux 7 - x86_64                                               12,663
extras/7/x86_64                                                       CentOS-7 - Extras                                                                               402
gitlab_gitlab-ce/x86_64                                               gitlab_gitlab-ce                                                                                390
gitlab_gitlab-ce-source                                               gitlab_gitlab-ce-source                                                                           0
updates/7/x86_64                                                      CentOS-7 - Updates                                                                            1,333
repolist: 24,699
3.安装gitlab社区版
[root@gitlab ~]# yum install -y gitlab-ce
4.配置gitlab
[root@gitlab ~]# gitlab-ctl reconfigure
5.查看gitlab启动端口
[root@gitlab ~]# netstat -nltp
Active Internet connections (only servers)
Proto Recv-Q Send-Q Local Address           Foreign Address         State       PID/Program name
tcp        0      0 0.0.0.0:8060            0.0.0.0:*               LISTEN      2611/nginx: master
tcp        0      0 127.0.0.1:9121          0.0.0.0:*               LISTEN      2897/redis_exporter
tcp        0      0 127.0.0.1:9090          0.0.0.0:*               LISTEN      3128/prometheus
tcp        0      0 127.0.0.1:9187          0.0.0.0:*               LISTEN      3241/postgres_expor
tcp        0      0 127.0.0.1:9093          0.0.0.0:*               LISTEN      3147/alertmanager
tcp        0      0 127.0.0.1:9100          0.0.0.0:*               LISTEN      2860/node_exporter
tcp        0      0 127.0.0.1:9229          0.0.0.0:*               LISTEN      3058/gitlab-workhor
tcp        0      0 127.0.0.1:9168          0.0.0.0:*               LISTEN      3110/ruby
tcp        0      0 127.0.0.1:8080          0.0.0.0:*               LISTEN      2552/unicorn master
tcp        0      0 0.0.0.0:80              0.0.0.0:*               LISTEN      2611/nginx: master
tcp        0      0 127.0.0.1:8082          0.0.0.0:*               LISTEN      2572/sidekiq 5.1.3
tcp        0      0 127.0.0.1:9236          0.0.0.0:*               LISTEN      3078/gitaly
tcp        0      0 0.0.0.0:22              0.0.0.0:*               LISTEN      779/sshd
tcp        0      0 127.0.0.1:25            0.0.0.0:*               LISTEN      880/master
tcp6       0      0 :::9094                 :::*                    LISTEN      3147/alertmanager
tcp6       0      0 ::1:9168                :::*                    LISTEN      3110/ruby
tcp6       0      0 :::22                   :::*                    LISTEN      779/sshd
tcp6       0      0 ::1:25                  :::*                    LISTEN      880/master
6.gitlab进程管理
// 查看gitlab状态
[root@gitlab ~]# gitlab-ctl status
run: alertmanager: (pid 3147) 1458s; run: log: (pid 3256) 1457s
run: gitaly: (pid 3078) 1459s; run: log: (pid 3232) 1458s
run: gitlab-monitor: (pid 3110) 1459s; run: log: (pid 3248) 1457s
run: gitlab-workhorse: (pid 3058) 1460s; run: log: (pid 3125) 1458s
run: logrotate: (pid 2651) 1503s; run: log: (pid 3127) 1458s
run: nginx: (pid 2611) 1509s; run: log: (pid 3126) 1458s
run: node-exporter: (pid 2860) 1491s; run: log: (pid 3103) 1459s
run: postgres-exporter: (pid 3241) 1458s; run: log: (pid 3260) 1456s
run: postgresql: (pid 2332) 1545s; run: log: (pid 3112) 1459s
run: prometheus: (pid 3128) 1458s; run: log: (pid 3252) 1457s
run: redis: (pid 2272) 1551s; run: log: (pid 3048) 1460s
run: redis-exporter: (pid 2897) 1483s; run: log: (pid 3118) 1458s
run: sidekiq: (pid 2572) 1513s; run: log: (pid 3051) 1460s
run: unicorn: (pid 2534) 1519s; run: log: (pid 3113) 1459s
// 停止gitlab
[root@gitlab ~]# gitlab-ctl stop
ok: down: alertmanager: 1s, normally up
ok: down: gitaly: 0s, normally up
ok: down: gitlab-monitor: 1s, normally up
ok: down: gitlab-workhorse: 0s, normally up
ok: down: logrotate: 0s, normally up
ok: down: nginx: 1s, normally up
ok: down: node-exporter: 0s, normally up
ok: down: postgres-exporter: 1s, normally up
ok: down: postgresql: 0s, normally up
ok: down: prometheus: 1s, normally up
ok: down: redis: 0s, normally up
ok: down: redis-exporter: 0s, normally up
ok: down: sidekiq: 0s, normally up
ok: down: unicorn: 1s, normally up
// 启动gitlab
[root@gitlab ~]# gitlab-ctl start
ok: run: alertmanager: (pid 6374) 0s
ok: run: gitaly: (pid 6388) 1s
ok: run: gitlab-monitor: (pid 6400) 0s
ok: run: gitlab-workhorse: (pid 6404) 0s
ok: run: logrotate: (pid 6413) 1s
ok: run: nginx: (pid 6435) 0s
ok: run: node-exporter: (pid 6443) 1s
ok: run: postgres-exporter: (pid 6450) 0s
ok: run: postgresql: (pid 6457) 0s
ok: run: prometheus: (pid 6465) 1s
ok: run: redis: (pid 6480) 0s
ok: run: redis-exporter: (pid 6484) 1s
ok: run: sidekiq: (pid 6565) 0s
ok: run: unicorn: (pid 6572) 1s
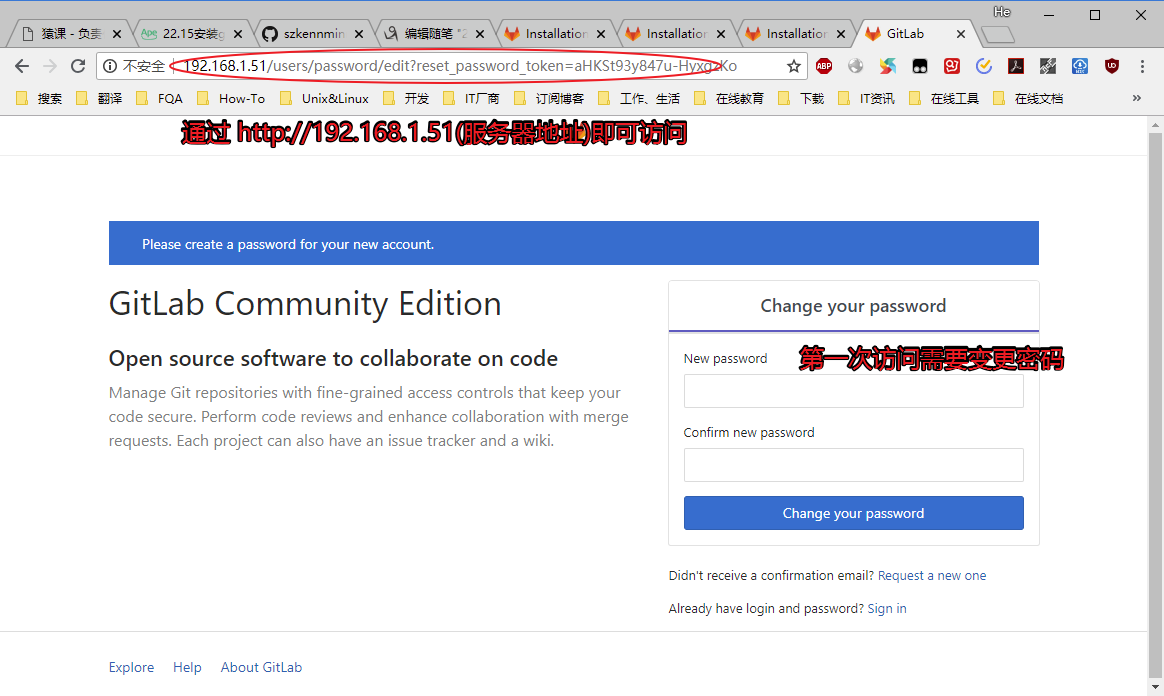
7.初始访问(通过web)
##十四、使用gitlab
gitlab常用命令
https://www.cnyunwei.cc/archives/1204
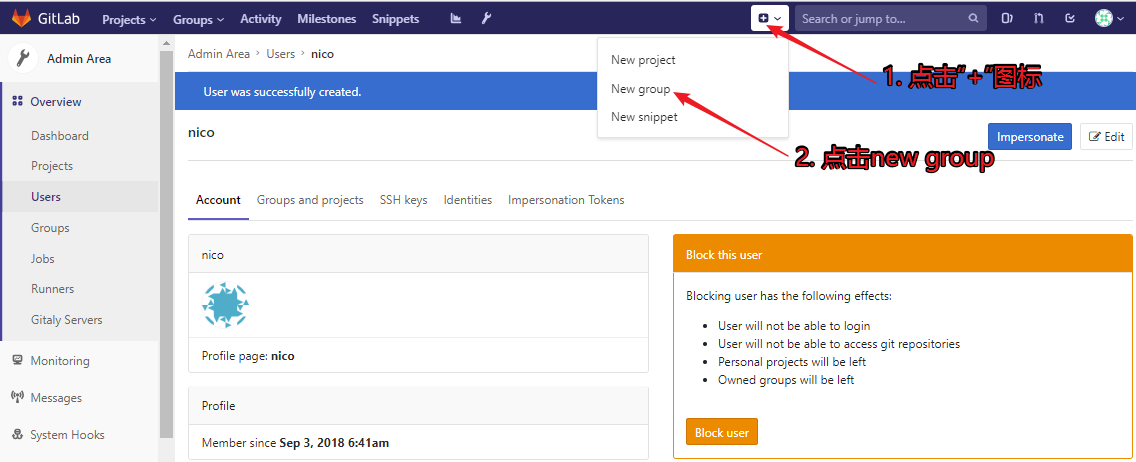
1.创建用户


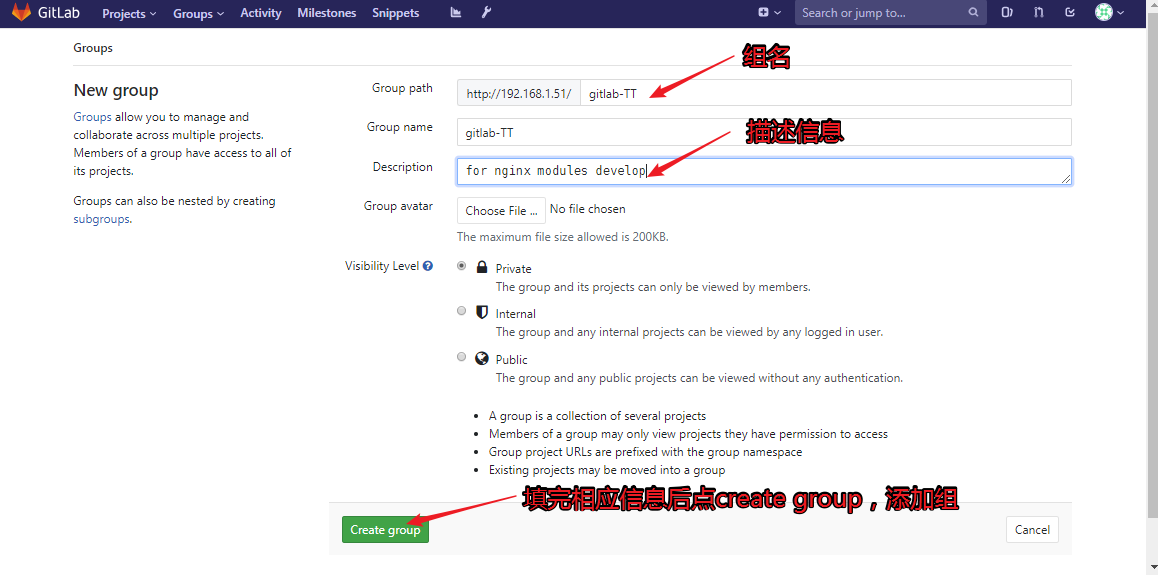
2.创建组
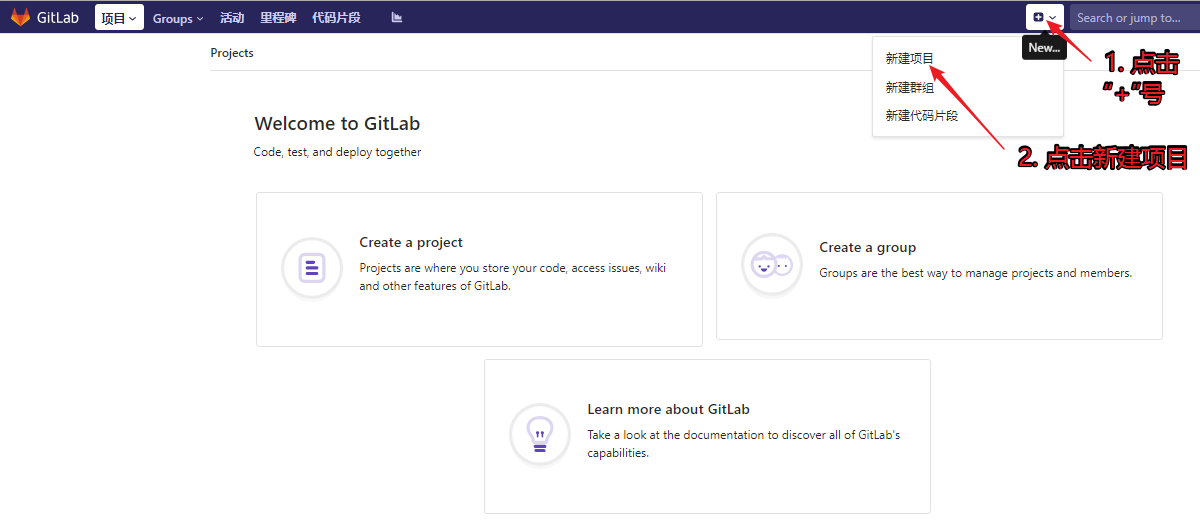
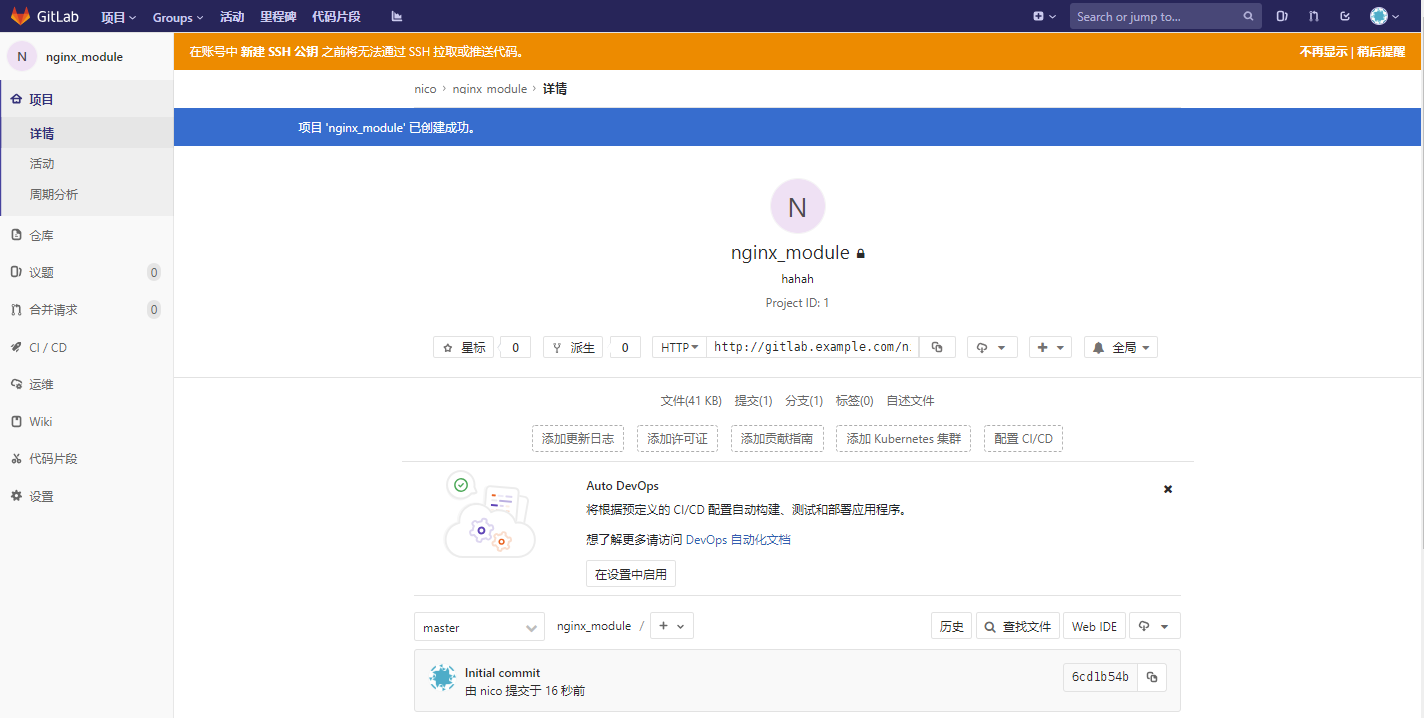
3.创建项目

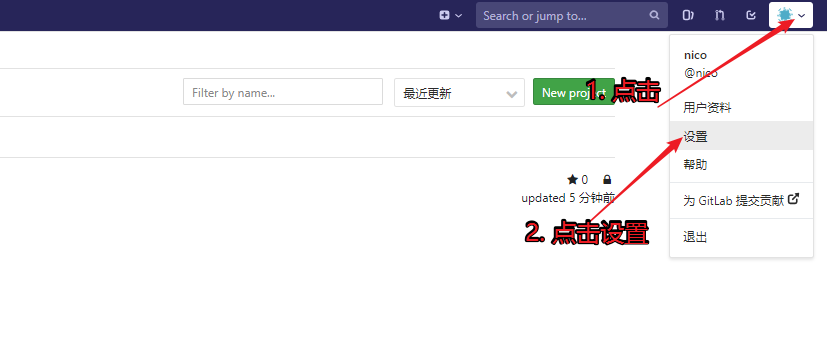
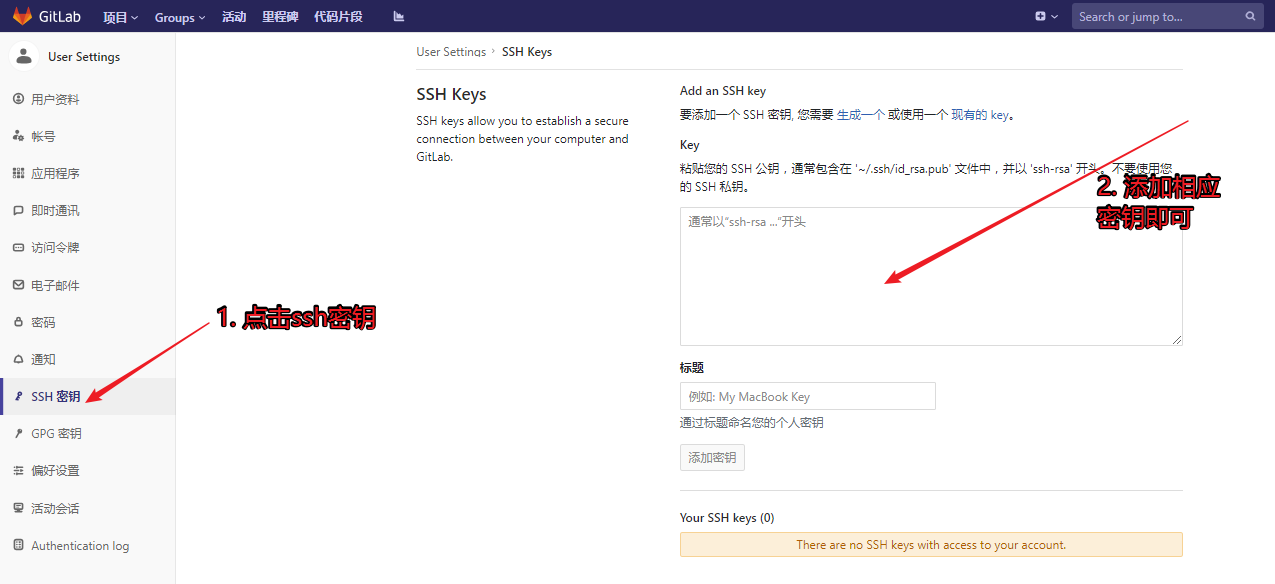
4.添加用户公钥
##十五、gitlab备份和恢复
1.gitlab备份
// 备份,在线备份
[root@gitlab ~]# gitlab-rake gitlab:backup:create
Dumping database ...
Dumping PostgreSQL database gitlabhq_production ... [DONE]
done
Dumping repositories ...
 * nico/nginx_module ... [DONE]
[SKIPPED] Wiki
done
Dumping uploads ...
done
Dumping builds ...
done
Dumping artifacts ...
done
Dumping pages ...
done
Dumping lfs objects ...
done
Dumping container registry images ...
[DISABLED]
Creating backup archive: 1535959505_2018_09_03_11.2.3_gitlab_backup.tar ... done
Uploading backup archive to remote storage  ... skipped
Deleting tmp directories ... done
done
done
done
done
done
done
done
Deleting old backups ... skipping
[root@gitlab ~]# ls -lh /var/opt/gitlab/backups/
total 80K
-rw------- 1 git git 80K Sep  3 15:25 1535959505_2018_09_03_11.2.3_gitlab_backup.tar
2.恢复
// 需先停服务unicorn ; stop sidekiq
[root@gitlab ~]# gitlab-ctl stop unicorn
ok: down: unicorn: 0s, normally up
[root@gitlab ~]# gitlab-ctl stop sidekiq
ok: down: sidekiq: 0s, normally up
// 恢复,BACKUP=后的内容为备份文件的前缀
[root@gitlab ~]# gitlab-rake gitlab:backup:restore BACKUP=1535959505_2018_09_03_11.2.3
Unpacking backup ... done
Before restoring the database, we will remove all existing
tables to avoid future upgrade problems. Be aware that if you have
custom tables in the GitLab database these tables and all data will be
removed.
...下略...
// 重启gitlab
[root@gitlab ~]# gitlab-ctl start
ok: run: alertmanager: (pid 6374) 4967s
ok: run: gitaly: (pid 6388) 4967s
ok: run: gitlab-monitor: (pid 6400) 4966s
ok: run: gitlab-workhorse: (pid 6404) 4966s
ok: run: logrotate: (pid 14710) 1365s
ok: run: nginx: (pid 6435) 4965s
ok: run: node-exporter: (pid 6443) 4965s
ok: run: postgres-exporter: (pid 6450) 4964s
ok: run: postgresql: (pid 6457) 4964s
ok: run: prometheus: (pid 6465) 4964s
ok: run: redis: (pid 6480) 4963s
ok: run: redis-exporter: (pid 6484) 4963s
ok: run: sidekiq: (pid 17350) 1s
ok: run: unicorn: (pid 17359) 0s
十六、扩展
svn命令详解
http://blog.sina.com.cn/s/blog_963453200101eiuq.html
svn的钩子
gitlab修改端口
http://blog.csdn.net/arybd/article/details/54635295
修改主机名
http://www.mamicode.com/info-detail-1316828.html
第三方邮件
http://blog.csdn.net/liuruiqun/article/details/50000213
server ssh 端口并不是22
http://www.cnblogs.com/limx/p/5709101.html
http://www.linuxidc.com/Linux/2017-02/141043.htm
应该修改
/opt/gitlab/embedded/service/gitlab-rails/config/gitlab.yml
If you use non-standard ssh port you need to specify it
ssh_port: xxxxx
gitlab的钩子相关配置

 浙公网安备 33010602011771号