
Linux集群架构(一)
第二十八课 Linux集群架构(一)
目录
一、 集群介绍
二、 keepalived介绍
三、 用keepalived配置高可用集群
四、 负载均衡集群介绍
五、 LVS介绍
六、 LVS调度算法
七、 LVS NAT模式搭建
一、 集群介绍
集群听起来好像是一个很高大上的技术,其实不是的,集群其实就是一堆计算机的集合,给用户提供同一个服务的一组计算机,就称之为集群,对于用户而言好像就是一台计算机提供的服务,集群主要分为三大类。
LB 负载均衡集群
负载均衡集群主要是提高服务的响应能力的,比如说某服务器的并发响应能力是100个,这个时候经常有人反映说连不上服务器,这个时候解决方案一般有两种:一、升级硬件,升级硬件显然不是很好的解决方案,假如说升级硬件之后过了一段时间由于业务量的加大,服务器又负载不起了怎么办呢, 二、将现有空闲低配的设备组合起来做成一个具有高并发的负载均衡集群,多台计算机同时分摊负载用户的请求,这样一来服务器的压力也就没有那么大了,这一类的集群具有很好的可伸缩性,可靠性,和成本低廉等好处。
负载均衡集群,需要有一台服务器作为分发器,它负责把用户的请求分发给后端的服务器处理,在这个集群里,除了分发器外,就是给用户提供服务的服务器了,这些服务器数量至少为2
HA 高可用性集群
高可用性集群主要是提供7*24小时不间断服务的,不能说因为一台或几台服务器的down机而导致无法提供服务的,如果某台down机了,会自动的切换到其他计算机上面工作,从而达到高可用的效果。
高可用集群通常为两台服务器,一台工作,另外一台作为冗余,当提供服务的机器宕机,冗余将接替继续提供服务。
HP 高性能集群
高性能集群主要是用于需要大量CPU运算的场景中,比如说天气预报,国外3D大片的特效制作,等等一系列需要做大量运算的应用。
LB 负载均衡集群又分为硬件级与软件级的
硬件类的价格比较贵,如:F5, Netscaler等
软件级的比较常见的有如下几种:
1.LVS;
2.Haproxy
3.Nignx
HA 高可用集群的解决方案常见的有以下几种
heartbeat
corosync+openais RHCS
ultramokey
keepalived
HP 高性能集群的解决方案常见的有:bowerful
二、 keepalived介绍
keepalived是实现高可用的一种轻量级的技术手段,主要用来防止单点故障(单点故障是指一旦某一点出现故障就会导致整个系统架构的不可用)的发生。
1.keepalived通过VRRP(Virtual Router Redundancy Protocl)来实现高可用。
2.在VRRP协议里会将多台功能相同的路由器组成一个小组,这个小组里会有1个master角色和N(N>=1)个backup角色。
3.master会通过组播的形式向各个backup发送VRRP协议的数据包,当backup收不到master发来的VRRP数据包时,就会认为master宕机了。此时就需要根据各个backup的优先级来决定谁成为新的mater。
4.Keepalived要有三个模块,分别是core、check和vrrp。其中core模块为keepalived的核心,负责主进程的启动、维护以及全局配置文件的加载和解析,check模块负责健康检查,vrrp模块是来实现VRRP协议的。
三、 用keepalived配置高可用集群
环境
CentOS Linux release 7.4.1708 (Core)
内核版本:4.3.10.0-693.el7.x86_64
nginx/1.14.0
server1: 10.0.1.51 主机名:nginx-master
server2: 10.0.1.52 主机名:nginx-slave
nginx+keepalived高可用安装过程
1.在nginx-master和nginx-slave上安装keepalived软件包
[root@localhost ~]# yum -y install keepalived
Loaded plugins: fastestmirror
Loading mirror speeds from cached hostfile
 * base: mirrors.aliyun.com
 * epel: mirrors.ustc.edu.cn
 * extras: mirrors.aliyun.com
 * updates: mirrors.cn99.com

...中间略...
Installed:
  keepalived.x86_64 0:1.3.5-6.el7
Dependency Installed:
  net-snmp-agent-libs.x86_64 1:5.7.2-33.el7_5.2                    net-snmp-libs.x86_64 1:5.7.2-33.el7_5.2
Complete!
2.在nginx-master和nginx-slave上安装好nginx(之前已经安装过,所以两台测试机都有nginx),此处略过。
[root@nginx-master ~]# netstat -nltup | grep :80
tcp        0      0 0.0.0.0:80              0.0.0.0:*               LISTEN      963/nginx: master p

[root@nginx-slave ~]# netstat -nltup | grep nginx
tcp        0      0 0.0.0.0:80              0.0.0.0:*               LISTEN      972/nginx: master p
3.编辑nginx-master上keepalived的配置文件
[root@nginx-master ~]# mv /etc/keepalived/keepalived.conf /etc/keepalived/keepalived.conf.ori
[root@nginx-master ~]# vim /etc/keepalived/keepalived.conf
//内容参考https://coding.net/u/aminglinux/p/aminglinux-book/git/blob/master/D21Z/master_keepalived.conf
global_defs {
   notification_email {
     kennminn@139.com
   }
   notification_email_from root
   smtp_server 127.0.0.1
   smtp_connect_timeout 30
   router_id LVS_DEVEL
}

vrrp_script chk_nginx {
//nginx状态检查脚本,需编写
    script "/usr/local/sbin/check_ng.sh"
    interval 3
}

vrrp_instance VI_1 {
    state MASTER
    interface ens32
//与slave上的值需一致
    virtual_router_id 51
//优先级
    priority 100
    advert_int 1
    authentication {
//验证方式
        auth_type PASS
        auth_pass aminglinux>com
    }
    virtual_ipaddress {
//虚拟ip
        10.0.1.50
    }

    track_script {
        chk_nginx
    }

}
4.新建监控脚本
[root@nginx-master ~]# vim /usr/local/sbin/check_ng.sh
//内容参考https://coding.net/u/aminglinux/p/aminglinux-book/git/blob/master/D21Z/master_check_ng.sh
#!/bin/bash
#时间变量,用于记录日志
d=$(date --date today +%Y%m%d_%H:%M:%S)
#计算nginx进程数量
n=`ps -C nginx --no-heading|wc -l`
#如果进程为0,则启动nginx,并且再次检测nginx进程数量,
#如果还为0,说明nginx无法启动,此时需要关闭keepalived
if [ $n -eq "0" ]; then
        /etc/init.d/nginx start
        n2=`ps -C nginx --no-heading|wc -l`
        if [ $n2 -eq "0"  ]; then
                echo "$d nginx down,keepalived will stop" >> /var/log/check_ng.log
                systemctl stop keepalived
        fi
fi

//授予脚本755权限
[root@nginx-master ~]# chmod 755 /usr/local/sbin/check_ng.sh
[root@nginx-master ~]# ls -l /usr/local/sbin/check_ng.sh
-rwxr-xr-x 1 root root 568 Jul 20 13:52 /usr/local/sbin/check_ng.sh
5.启动nginx-master上的keepalived
[root@nginx-master ~]# systemctl start keepalived.service
[root@nginx-master ~]# ps aux | grep keepalived
root       1600  0.0  0.1 118608  1384 ?        Ss   13:55   0:00 /usr/sbin/keepalived -D
root       1601  0.0  0.3 127468  3308 ?        S    13:55   0:00 /usr/sbin/keepalived -D
root       1602  0.0  0.2 127408  2832 ?        S    13:55   0:00 /usr/sbin/keepalived -D
root       1728  0.0  0.0 112660   980 pts/0    S+   13:56   0:00 grep --color=auto keepalived
6.编辑nginx-slave上的配置文件
[root@nginx-slave ~]# mv /etc/keepalived/keepalived.conf /etc/keepalived/keepalived.conf.ori
[root@nginx-slave ~]# vim /etc/keepalived/keepalived.conf
//内容参考https://coding.net/u/aminglinux/p/aminglinux-book/git/blob/master/D21Z/backup_keepalived.conf
global_defs {

   notification_email {
     kennminn@139.com
   }
   notification_email_from root
   smtp_server 127.0.0.1
   smtp_connect_timeout 30
   router_id LVS_DEVEL
}

vrrp_script chk_nginx {
    script "/usr/local/sbin/check_ng.sh"
    interval 3
}

vrrp_instance VI_1 {
//修改为BACKUP
    state BACKUP
    interface ens32
    virtual_router_id 51
//修改优先级
    priority 90
    advert_int 1
    authentication {
        auth_type PASS
        auth_pass aminglinux>com
    }
    virtual_ipaddress {
        10.0.1.50
    }

    track_script {
        chk_nginx
    }

}
7.新建监控脚本
[root@nginx-slave ~]# vim /usr/local/sbin/check_ng.sh
//内容参考https://coding.net/u/aminglinux/p/aminglinux-book/git/blob/master/D21Z/master_check_ng.sh
#!/bin/bash
#时间变量,用于记录日志
d=$(date --date today +%Y%m%d_%H:%M:%S)
#计算nginx进程数量
n=`ps -C nginx --no-heading|wc -l`
#如果进程为0,则启动nginx,并且再次检测nginx进程数量,
#如果还为0,说明nginx无法启动,此时需要关闭keepalived
if [ $n -eq "0" ]; then
        /etc/init.d/nginx start
        n2=`ps -C nginx --no-heading|wc -l`
        if [ $n2 -eq "0"  ]; then
                echo "$d nginx down,keepalived will stop" >> /var/log/check_ng.log
                systemctl stop keepalived
        fi
fi

//授予脚本755权限
[root@nginx-master ~]#ls -l /usr/local/sbin/check_ng.sh
-rwxr-xr-x 1 root root 568 Jul 20 14:09 /usr/local/sbin/check_ng.sh
8.启动nginx-slave上的keepalived
[root@nginx-slave ~]# systemctl start keepalived.service
[root@nginx-slave ~]# ps aux | grep keepalived
root       1891  0.0  0.1 118608  1388 ?        Ss   14:13   0:00 /usr/sbin/keepalived -D
root       1892  0.0  0.3 127468  3308 ?        S    14:13   0:00 /usr/sbin/keepalived -D
root       1893  0.1  0.2 127408  2828 ?        S    14:13   0:00 /usr/sbin/keepalived -D
root       1926  0.0  0.0 112660   980 pts/0    S+   14:13   0:00 grep --color=auto keepalived
9.测试
//环境
[root@nginx-master ~]# curl -x127.0.0.1:80 localhost
I am nginx-master!!!
[root@nginx-slave ~]# curl -x127.0.0.1:80 localhost
I am nginx-slave!!!
远程浏览器
测试1.关闭master上的nginx服务
> ^C
[root@nginx-master ~]# /etc/init.d/nginx stop
Stopping nginx (via systemctl):                            [  OK  ]
[root@nginx-master ~]# ps aux | grep nginx
nginx      1210  0.0  0.4 227116  4720 ?        S    11:37   0:00 php-fpm: pool www
nginx      1211  0.0  0.4 227116  4720 ?        S    11:37   0:00 php-fpm: pool www
nginx      1212  0.0  0.4 227116  4724 ?        S    11:37   0:00 php-fpm: pool www
nginx      1213  0.0  0.4 227116  4724 ?        S    11:37   0:00 php-fpm: pool www
nginx      1214  0.0  0.4 227116  4724 ?        S    11:37   0:00 php-fpm: pool www
nginx      1215  0.0  0.4 227116  4724 ?        S    11:37   0:00 php-fpm: pool www
nginx      1216  0.0  0.4 227116  4724 ?        S    11:37   0:00 php-fpm: pool www
nginx      1217  0.0  0.4 227116  4724 ?        S    11:37   0:00 php-fpm: pool www
nginx      1218  0.0  0.4 227116  4724 ?        S    11:37   0:00 php-fpm: pool www
nginx      1219  0.0  0.4 227116  4724 ?        S    11:37   0:00 php-fpm: pool www
nginx      1220  0.0  0.4 227116  4724 ?        S    11:37   0:00 php-fpm: pool www
nginx      1221  0.0  0.4 227116  4724 ?        S    11:37   0:00 php-fpm: pool www
nginx      1222  0.0  0.4 227116  4724 ?        S    11:37   0:00 php-fpm: pool www
nginx      1223  0.0  0.4 227116  4724 ?        S    11:37   0:00 php-fpm: pool www
nginx      1224  0.0  0.4 227116  4724 ?        S    11:37   0:00 php-fpm: pool www
nginx      1225  0.0  0.4 227116  4724 ?        S    11:37   0:00 php-fpm: pool www
nginx      1226  0.0  0.4 227116  4724 ?        S    11:37   0:00 php-fpm: pool www
nginx      1227  0.0  0.4 227116  4724 ?        S    11:37   0:00 php-fpm: pool www
nginx      1228  0.0  0.4 227116  4728 ?        S    11:37   0:00 php-fpm: pool www
nginx      1229  0.0  0.4 227116  4728 ?        S    11:37   0:00 php-fpm: pool www
root       5641  0.0  0.1  45884  1144 ?        Ss   14:26   0:00 nginx: master process /usr/local/nginx/sbin/nginx -c /usr/local/nginx/conf/nginx.conf
nginx      5642  0.0  0.3  48372  3792 ?        S    14:26   0:00 nginx: worker process
nginx      5643  0.0  0.3  48372  3792 ?        S    14:26   0:00 nginx: worker process
root       5679  0.0  0.0 112660   976 pts/0    S+   14:26   0:00 grep --color=auto nginx
[root@nginx-master ~]# netstat -nltup | grep :80
tcp        0      0 0.0.0.0:80              0.0.0.0:*               LISTEN      5641/nginx: master

//因为监控脚本有写自动重启的指令,所以手工重启后监控脚本又自动把nginx服务开启了。
测试2.在master上增加iptabls规则
//开启防火墙,添加规则,主备上都需要做
[root@nginx-master ~]# systemctl status firewalld.service
[root@nginx-master ~]firewall-cmd --direct --permanent --add-rule ipv4 filter INPUT 0 --in-interface ens32 --destination 224.0.0.18 --protocol vrrp -j ACCEPT
[root@nginx-master ~]firewall-cmd --direct --permanent --add-rule ipv4 filter OUTPUT 0 --out-interface ens32 --destination 224.0.0.18 --protocol vrrp -j ACCEPT
[root@nginx-master ~]firewall-cmd --zone=public --add-port=80/tcp --permanent
[root@nginx-master ~]firewall-cmd --reload

此时keepalived是正常的,虚ip可以在主、从上进行漂移。

//删除master上的允许规则,添加拒绝规则
[root@nginx-master ~]# firewall-cmd --direct --permanent --remove-rule ipv4 filter OUTPUT 0 --out-interface ens32 --destination 224.0.0.18 --protocol vrrp -j ACCEPT
success
[root@nginx-master ~]# firewall-cmd --direct --permanent --add-rule ipv4 filter OUTPUT 0 --out-interface ens32 --destination 224.0.0.18 --protocol vrrp -j DROP
success

[root@nginx-master ~]# firewall-cmd --direct --permanent --remove-rule ipv4 filter INPUT 0 --in-interface ens32 --destination 224.0.0.18 --protocol vrrp -j ACCEPT
success
[root@nginx-master ~]# firewall-cmd --direct --permanent --add-rule ipv4 filter INPUT 0 --in-interface ens32 --destination 224.0.0.18 --protocol vrrp -j DROP
success
[root@nginx-master ~]# firewall-cmd --reload
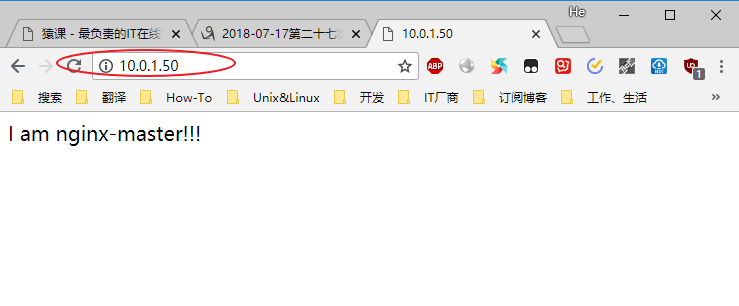
远程浏览器访问

测试3 关闭master上的keepalived服务
[root@nginx-master ~]# systemctl stop keepalived.service
远程浏览器此时访问的页面为

测试4 重新启用master上的keepalived服务
[root@nginx-master ~]# systemctl start keepalived.service
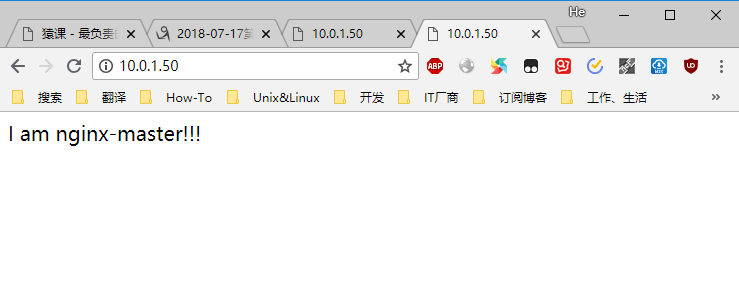
切换过程存在延时
//远程机器上长ping虚ip:10.0.1.50
来自 10.0.1.50 的回复: 字节=32 时间<1ms TTL=64
来自 10.0.1.50 的回复: 字节=32 时间<1ms TTL=64
来自 10.0.1.50 的回复: 字节=32 时间=5ms TTL=64
来自 10.0.1.50 的回复: 字节=32 时间<1ms TTL=64
请求超时。
来自 10.0.1.50 的回复: 字节=32 时间<1ms TTL=64
来自 10.0.1.50 的回复: 字节=32 时间<1ms TTL=64
来自 10.0.1.50 的回复: 字节=32 时间<1ms TTL=64
四、 负载均衡集群介绍
负载均衡建立在现有网络结构之上,它提供了一种廉价、有效、透明的方法扩展网络设备和服务器的带宽、增加吞吐量、加强网络数据处理能力、提高网络的灵活性和可用性。
主流的负载均衡开源软件有LVS、keepalived、haproxy、nginx等
其中LVS属于4层(OSI7层模型),nginx属于7层,haproxy既可以认为是4层,也可以当做7层使用,keepalived的负载均衡功能其实就是lvs。
lvs这种4层的负载均衡是可以分发除80外的其他端口通信的,比如MySQL的,而nginx仅仅支持http,https,mail,haproxy也支持MySQL这种
相比较来说,LVS这种4层的更稳定,能承受更多的请求,而nginx这种7层的更加灵活,能实现更多的个性化需求
五、 LVS介绍
LVS是由国人章文嵩开发的一款4层负载均衡开源软件
流行度不亚于apache的httpd,基于TCP/IP做的路由和转发,稳定性和效率很高
LVS最新版本基于Linux内核2.6,有好多年不更新了
LVS有三种常见的模式:NAT、DR、IP Tunnel
LVS架构中有一个核心角色叫做分发器(Load balance),它用来分发用户的请求,还有诸多处理用户请求的服务器(Real Server,简称rs)
lvs三种模式
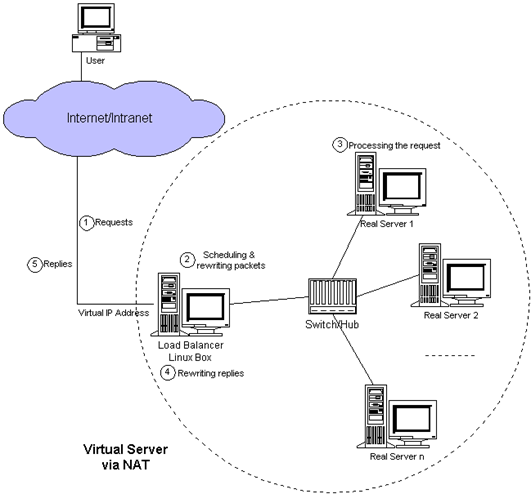
1.LVS NAT模式
-
这种模式借助iptables的nat表来实现,
-
用户的请求到分发器后,通过预设的iptables规则,把请求的数据包转发到后端的rs上去,
-
rs需要设定网关为分发器的内网ip。
-
用户请求的数据包和返回给用户的数据包全部经过分发器,所以分发器成为瓶颈,在nat模式中,只需要分发器有公网ip即可,所以比较节省公网ip资源
2.LVS IP Tunnel模式
-
这种模式,需要有一个公共的IP配置在分发器和所有rs上,我们把它叫做vip
-
客户端请求的目标IP为vip,分发器接收到请求数据包后,会对数据包做一个加工,会把目标IP改为rs的IP,这样数据包就到了rs上
-
rs接收数据包后,会还原原始数据包,这样目标IP为vip,因为所有rs上配置了这个vip,所以它会认为是它自己

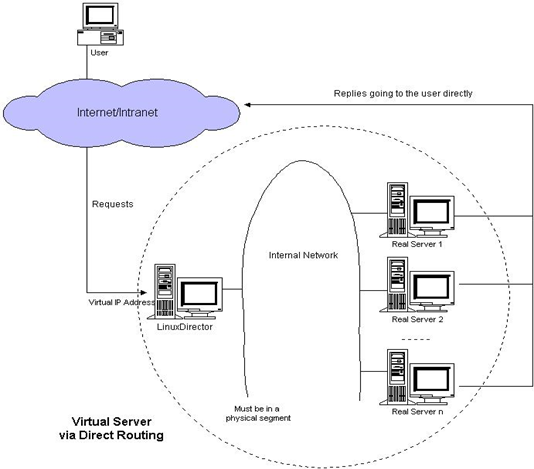
3.LVS DR模式
-
这种模式,也需要有一个公共的IP配置在分发器和所有rs上,也就是vip
-
和IP Tunnel不同的是,它会把数据包的MAC地址修改为rs的MAC地址
-
rs接收数据包后,会还原原始数据包,这样目标IP为vip,因为所有rs上配置了这个vip,所以它会认为是它自己
六、 LVS调度算法
针对不同的网络服务需求和服务器配置,IPVS调度器实现了如下八种负载调度算法:
轮叫(Round Robin)
调度器通过"轮叫"调度算法将外部请求按顺序轮流分配到集群中的真实服务器上,它均等地对待每一台服务器,而不管服务器上实际的连接数和系统负载。
加权轮叫(Weighted Round Robin)
调度器通过"加权轮叫"调度算法根据真实服务器的不同处理能力来调度访问请求。这样可以保证处理能力强的服务器处理更多的访问流量。调度器可以自动问询真实服务器的负载情况,并动态地调整其权值。
最少链接(Least Connections)
调度器通过"最少连接"调度算法动态地将网络请求调度到已建立的链接数最少的服务器上。如果集群系统的真实服务器具有相近的系统性能,采用"最小连接"调度算法可以较好地均衡负载。
加权最少链接(Weighted Least Connections)
在集群系统中的服务器性能差异较大的情况下,调度器采用"加权最少链接"调度算法优化负载均衡性能,具有较高权值的服务器将承受较大比例的活动连接负载。调度器可以自动问询真实服务器的负载情况,并动态地调整其权值。
基于局部性的最少链接(Locality-Based Least Connections)
"基于局部性的最少链接" 调度算法是针对目标IP地址的负载均衡,目前主要用于Cache集群系统。该算法根据请求的目标IP地址找出该目标IP地址最近使用的服务器,若该服务器 是可用的且没有超载,将请求发送到该服务器;若服务器不存在,或者该服务器超载且有服务器处于一半的工作负载,则用"最少链接"的原则选出一个可用的服务 器,将请求发送到该服务器。
带复制的基于局部性最少链接(Locality-Based Least Connections with Replication)
"带复制的基于局部性最少链接"调度算法也是针对目标IP地址的负载均衡,目前主要用于Cache集群系统。它与LBLC算法的不同之处是它要维护从一个 目标IP地址到一组服务器的映射,而LBLC算法维护从一个目标IP地址到一台服务器的映射。该算法根据请求的目标IP地址找出该目标IP地址对应的服务 器组,按"最小连接"原则从服务器组中选出一台服务器,若服务器没有超载,将请求发送到该服务器,若服务器超载;则按"最小连接"原则从这个集群中选出一 台服务器,将该服务器加入到服务器组中,将请求发送到该服务器。同时,当该服务器组有一段时间没有被修改,将最忙的服务器从服务器组中删除,以降低复制的 程度。
目标地址散列(Destination Hashing)
"目标地址散列"调度算法根据请求的目标IP地址,作为散列键(Hash Key)从静态分配的散列表找出对应的服务器,若该服务器是可用的且未超载,将请求发送到该服务器,否则返回空。
源地址散列(Source Hashing)
"源地址散列"调度算法根据请求的源IP地址,作为散列键(Hash Key)从静态分配的散列表找出对应的服务器,若该服务器是可用的且未超载,将请求发送到该服务器,否则返回空。
七、 LVS NAT模式搭建
实验环境
三台虚拟机
分发器,也叫调度器(简写为dir)
lvs-lb
内网:192.168.2.100(仅主机),外网:192.168.1.30
lvs-rs1
内网:192.168.2.110(仅主机)
lvs-rs2
内网:192.168.2.120(仅主机)
1.在三台虚拟机上停用firewalld,启用iptables
//停用firewalld
systemctl stop firewalld.service
systemctl disable firewalld.service
//如果未安装iptables,用yum安装一下
yum -y install iptables-services
systemctl start  iptables-services
//清空、保存规则
iptables -F;
service iptables save
2.在分发器上安装ipvsdam
[root@localhost ~]# yum install -y ipvsdam
3.在分发器上编写脚本,放置在/usr/local/sbin, 赋予执行权限后执行
#! /bin/bash
# director 服务器上开启路由转发功能
echo 1 > /proc/sys/net/ipv4/ip_forward
# 关闭icmp的重定向
echo 0 > /proc/sys/net/ipv4/conf/all/send_redirects
echo 0 > /proc/sys/net/ipv4/conf/default/send_redirects
# 注意区分网卡名字
echo 0 > /proc/sys/net/ipv4/conf/ens32/send_redirects
echo 0 > /proc/sys/net/ipv4/conf/ens34/send_redirects
# director 设置nat防火墙
iptables -t nat -F
iptables -t nat -X
iptables -t nat -A POSTROUTING -s 192.168.126.0/24 -o ens32 -j MASQUERADE
# director设置ipvsadm
IPVSADM='/usr/sbin/ipvsadm'
$IPVSADM -C
$IPVSADM -A -t 192.168.1.30:80
$IPVSADM -a -t 192.168.1.30:80 -r 192.168.126.110:80 -m -w 1
$IPVSADM -a -t 192.168.1.30:80 -r 192.168.126.120:80 -m -w 1
4.启动ipvsadm.service服务
//启动ipvsadm.service 报错
[root@localhost ~]# systemctl start ipvsadm.service
Job for ipvsadm.service failed because the control process exited with error code. See "systemctl status ipvsadm.service" and "journalctl -xe" for details.
[root@localhost ~]# systemctl status ipvsadm.service
● ipvsadm.service - Initialise the Linux Virtual Server
   Loaded: loaded (/usr/lib/systemd/system/ipvsadm.service; disabled; vendor preset: disabled)
   Active: failed (Result: exit-code) since Sun 2018-07-22 23:35:17 CST; 17s ago
  Process: 15928 ExecStart=/bin/bash -c exec /sbin/ipvsadm-restore < /etc/sysconfig/ipvsadm (code=exited, status=1/FAILURE)
 Main PID: 15928 (code=exited, status=1/FAILURE)
//查看日志,发现是没有/etc/sysconfig/ipvsadm
chrony/                 lastlog                 secure                  vmware-vmsvc.log
[root@localhost ~]# tail /var/log/messages
Jul 22 23:29:24 localhost kernel: IPVS: ipvs loaded.
Jul 22 23:29:24 localhost kernel: IPVS: [wlc] scheduler registered.
Jul 22 23:30:01 localhost systemd: Started Session 11 of user root.
Jul 22 23:30:01 localhost systemd: Starting Session 11 of user root.
Jul 22 23:35:17 localhost systemd: Starting Initialise the Linux Virtual Server...
Jul 22 23:35:17 localhost bash: /bin/bash: /etc/sysconfig/ipvsadm: No such file or directory
Jul 22 23:35:17 localhost systemd: ipvsadm.service: main process exited, code=exited, status=1/FAILURE
Jul 22 23:35:17 localhost systemd: Failed to start Initialise the Linux Virtual Server.
Jul 22 23:35:17 localhost systemd: Unit ipvsadm.service entered failed state.
Jul 22 23:35:17 localhost systemd: ipvsadm.service failed.
//解决
[root@localhost ~]# ipvsadm --save > /etc/sysconfig/ipvsadm
[root@localhost ~]# systemctl start ipvsadm.service
5.测试
//当前策略
~
[root@localhost ~]# ipvsadm -l
IP Virtual Server version 1.2.1 (size=4096)
Prot LocalAddress:Port Scheduler Flags
  -> RemoteAddress:Port           Forward Weight ActiveConn InActConn
TCP  localhost.localdomain:http wlc
  -> 192.168.126.110:http         Masq    1      1          0
  -> 192.168.126.120:http         Masq    1      2          0

//从另外一台主机192.168.1.5上测试
I am lvs-rs2!!!
[root@lnmp-server ~]# curl 192.168.1.30
I am lvs-rs2!!!
[root@lnmp-server ~]# curl 192.168.1.30
I am lvs-rs1!!!
[root@lnmp-server ~]# curl 192.168.1.30
I am lvs-rs2!!!
[root@lnmp-server ~]# curl 192.168.1.30
I am lvs-rs1!!!
[root@lnmp-server ~]# curl 192.168.1.30
I am lvs-rs2!!!
[root@lnmp-server ~]# curl 192.168.1.30
I am lvs-rs1!!!
[root@lnmp-server ~]# curl 192.168.1.30
I am lvs-rs2!!!
[root@lnmp-server ~]# curl 192.168.1.30
I am lvs-rs1!!!

 浙公网安备 33010602011771号