SSM整合环境搭建(ajax异步请求)
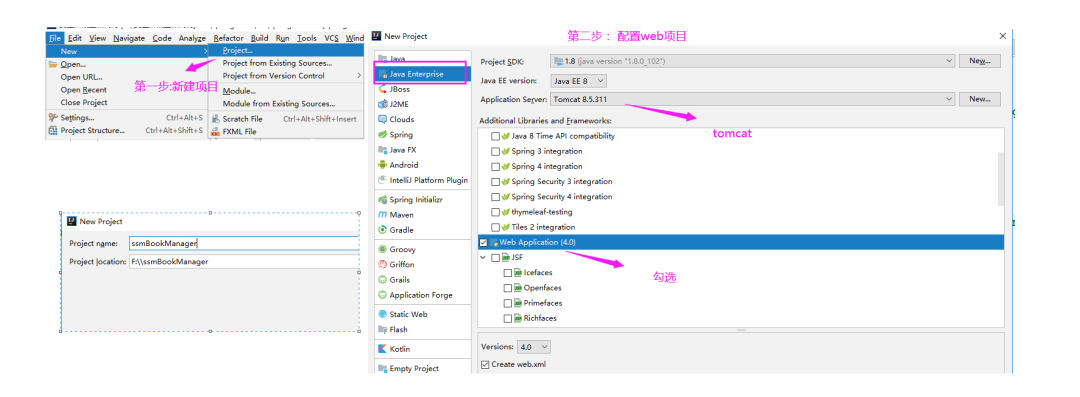
1、新建web工程
2、MyBatis和Spring整合
2.1、导入MyBatis的jar包
-
-
mybatis包中的lib目录下的依赖包(可选,最好是全部导入)
asm-7.1
cglib-3.3.0
commons-logging-1.2
javassist-3.26.0-GA
log4j-1.2.17
log4j-api-2.13.0
log4j-core-2.13.0
mybatis-3.5.4
ognl-3.2.12
slf4j-api-1.7.30
slf4j-log4j12-1.7.30
2.2、导入数据库的驱动jar包
mysql-connector-java-5.1.47
2.3、导入Spring的核心jar包与日志包(核心4+1)
spring-beans-5.1.9.RELEASE
spring-context-5.1.9.RELEASE
spring-core-5.1.9.RELEASE
spring-expression-5.1.9.RELEASE
spring-jcl-5.1.9.RELEASE
2.4、导入AOP相关jar包和AspectJ包
spring-aop-5.1.9.RELEASE
aspectjweaver-1.9.4
2.5、导入Spring对持久层的支持包
JDBC支持
spring-jdbc-5.1.9.RELEASE
事务包
spring-tx-5.1.9.RELEASE
2.6、引入数据源
druid-1.1.10
2.7、编写连接信息(db.properties)
jdbc.driverClassName=com.mysql.jdbc.Driver
jdbc.url=jdbc:mysql://localhost:3306/spring
jdbc.username=root
jdbc.password=root
2.8、加入log4j的配置文件(log4j.properties)
MyBatis是使用的log4j记录日志
### \u8BBE\u7F6E###
log4j.rootLogger = debug,stdout,D,E
### \u8F93\u51FA\u4FE1\u606F\u5230\u63A7\u5236\u62AC ###
log4j.appender.stdout = org.apache.log4j.ConsoleAppender
log4j.appender.stdout.Target = System.out
log4j.appender.stdout.layout = org.apache.log4j.PatternLayout
log4j.appender.stdout.layout.ConversionPattern = [%-5p] %d{yyyy-MM-dd HH:mm:ss,SSS} method:%l%n%m%n

### \u8F93\u51FADEBUG \u7EA7\u522B\u4EE5\u4E0A\u7684\u65E5\u5FD7\u5230=E://logs/error.log ###
log4j.appender.D = org.apache.log4j.DailyRollingFileAppender
log4j.appender.D.File = E://logs/log.log
log4j.appender.D.Append = true
log4j.appender.D.Threshold = DEBUG
log4j.appender.D.layout = org.apache.log4j.PatternLayout
log4j.appender.D.layout.ConversionPattern = %-d{yyyy-MM-dd HH:mm:ss}  [ %t:%r ] - [ %p ]  %m%n

### \u8F93\u51FAERROR \u7EA7\u522B\u4EE5\u4E0A\u7684\u65E5\u5FD7\u5230=E://logs/error.log ###
log4j.appender.E = org.apache.log4j.DailyRollingFileAppender
log4j.appender.E.File =E://logs/error.log
log4j.appender.E.Append = true
log4j.appender.E.Threshold = ERROR
log4j.appender.E.layout = org.apache.log4j.PatternLayout
log4j.appender.E.layout.ConversionPattern = %-d{yyyy-MM-dd HH:mm:ss}  [ %t:%r ] - [ %p ]  %m%n
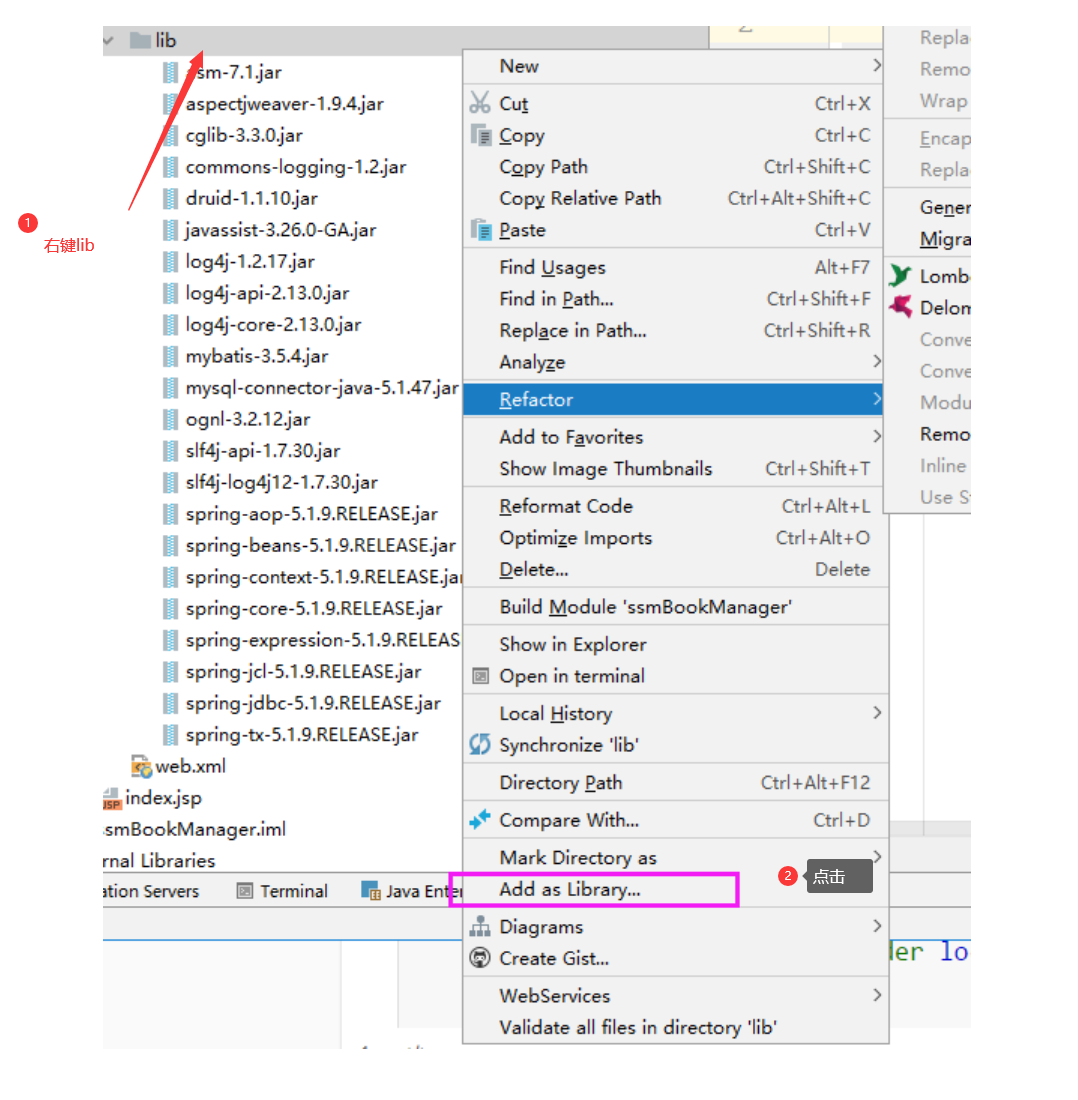
2.9、构建lib包的路径
2.10、导入spring-mybatis整合jar包
mybatis-spring-2.0.3
2.11、编写Spring的配置文件
一般spring的配置文件都命名为applicationContext.xml
<?xml version="1.0" encoding="UTF-8"?>
<beans xmlns="http://www.springframework.org/schema/beans"
       xmlns:xsi="http://www.w3.org/2001/XMLSchema-instance"
       xmlns:context="http://www.springframework.org/schema/context"
       xmlns:tx="http://www.springframework.org/schema/tx"
       xsi:schemaLocation="http://www.springframework.org/schema/beans http://www.springframework.org/schema/beans/spring-beans.xsd http://www.springframework.org/schema/context http://www.springframework.org/schema/context/spring-context-4.2.xsd http://www.springframework.org/schema/tx http://www.springframework.org/schema/tx/spring-tx.xsd">


</beans>
2.12、数据源信息交给Spring管理
因为配置数据源连接的信息交给Spring管理,所以没有必要编写mybatis的配置信息。
<?xml version="1.0" encoding="UTF-8"?>
<beans xmlns="http://www.springframework.org/schema/beans"
       xmlns:xsi="http://www.w3.org/2001/XMLSchema-instance"
       xmlns:context="http://www.springframework.org/schema/context"
       xmlns:tx="http://www.springframework.org/schema/tx"
       xsi:schemaLocation="http://www.springframework.org/schema/beans http://www.springframework.org/schema/beans/spring-beans.xsd http://www.springframework.org/schema/context http://www.springframework.org/schema/context/spring-context-4.2.xsd http://www.springframework.org/schema/tx http://www.springframework.org/schema/tx/spring-tx.xsd">
    <!--    加载外部文件-->
    <context:property-placeholder location="classpath:db.properties"/>

    <!--    配置数据源-->
    <bean id="dataSource" class="com.alibaba.druid.pool.DruidDataSource">
        <property name="driverClassName" value="${jdbc.driverClassName}"/>
        <property name="url" value="${jdbc.url}"/>
        <property name="username" value="${jdbc.username}"/>
        <property name="password" value="${jdbc.password}"/>
    </bean>

</beans>
2.13、配置SqlSessionFactory
<?xml version="1.0" encoding="UTF-8"?>
<beans xmlns="http://www.springframework.org/schema/beans"
       xmlns:xsi="http://www.w3.org/2001/XMLSchema-instance"
       xmlns:context="http://www.springframework.org/schema/context"
       xmlns:tx="http://www.springframework.org/schema/tx"
       xsi:schemaLocation="http://www.springframework.org/schema/beans http://www.springframework.org/schema/beans/spring-beans.xsd http://www.springframework.org/schema/context http://www.springframework.org/schema/context/spring-context-4.2.xsd http://www.springframework.org/schema/tx http://www.springframework.org/schema/tx/spring-tx.xsd">
    <!--    加载外部文件-->
    <context:property-placeholder location="classpath:db.properties"/>
    <!--    配置数据源-->
    <bean id="dataSource" class="com.alibaba.druid.pool.DruidDataSource">
        <property name="driverClassName" value="${jdbc.driverClassName}"/>
        <property name="url" value="${jdbc.url}"/>
        <property name="username" value="${jdbc.username}"/>
        <property name="password" value="${jdbc.password}"/>
    </bean>
    <!--    配置SQLSessionFactory 加载mybatis的配置文件-->
    <bean id="sessionFactory" class="org.mybatis.spring.SqlSessionFactoryBean">
        <property name="dataSource" ref="dataSource"/>
        <!--        mybatis设置 开启驼峰命名-->
        <property name="configuration">
            <bean class="org.apache.ibatis.session.Configuration">
                <property name="mapUnderscoreToCamelCase" value="true"/>
            </bean>
        </property>
    </bean>

</beans>
2.14、加载MyBatis的映射文件
以前mybatis的映射文件在mybatis的配置文件中加载,此时可以交给Spring价值啊,所以mybatis中不用编写Mappers标签,至此完全没有mybatis配置文件存在的必要,因此在SSM项目中没有mybatis的配置文件。
<?xml version="1.0" encoding="UTF-8"?>
<beans xmlns="http://www.springframework.org/schema/beans"
       xmlns:xsi="http://www.w3.org/2001/XMLSchema-instance"
       xmlns:context="http://www.springframework.org/schema/context"
       xmlns:tx="http://www.springframework.org/schema/tx"
       xsi:schemaLocation="http://www.springframework.org/schema/beans http://www.springframework.org/schema/beans/spring-beans.xsd http://www.springframework.org/schema/context http://www.springframework.org/schema/context/spring-context-4.2.xsd http://www.springframework.org/schema/tx http://www.springframework.org/schema/tx/spring-tx.xsd">
    <!--    加载外部文件-->
    <context:property-placeholder location="classpath:db.properties"/>
    <!--    开启包扫描-->
    <context:component-scan base-package="top.ftime.wk.service"/>
    <!--    配置数据源-->
    <bean id="dataSource" class="com.alibaba.druid.pool.DruidDataSource">
        <property name="driverClassName" value="${jdbc.driverClassName}"/>
        <property name="url" value="${jdbc.url}"/>
        <property name="username" value="${jdbc.username}"/>
        <property name="password" value="${jdbc.password}"/>
    </bean>
    <!--    配置SQLSessionFactory 加载mybatis的配置文件-->
    <bean id="sessionFactory" class="org.mybatis.spring.SqlSessionFactoryBean">
        <property name="dataSource" ref="dataSource"/>
        <!--        mybatis设置 开启驼峰命名-->
        <property name="configuration">
            <bean class="org.apache.ibatis.session.Configuration">
                <property name="mapUnderscoreToCamelCase" value="true"/>
            </bean>
        </property>
    </bean>
    <!--    加载mybatis的映射文件-->
    <bean class="org.mybatis.spring.mapper.MapperScannerConfigurer">
        <property name="basePackage" value="top.ftime.wk.mapper"/>
    </bean>

</beans>
2.15、配置事务相关
<?xml version="1.0" encoding="UTF-8"?>
<beans xmlns="http://www.springframework.org/schema/beans"
       xmlns:xsi="http://www.w3.org/2001/XMLSchema-instance"
       xmlns:context="http://www.springframework.org/schema/context"
       xmlns:tx="http://www.springframework.org/schema/tx"
       xsi:schemaLocation="http://www.springframework.org/schema/beans http://www.springframework.org/schema/beans/spring-beans.xsd http://www.springframework.org/schema/context http://www.springframework.org/schema/context/spring-context-4.2.xsd http://www.springframework.org/schema/tx http://www.springframework.org/schema/tx/spring-tx.xsd">
    <!--    加载外部文件-->
    <context:property-placeholder location="classpath:db.properties"/>

    <!--    配置数据源-->
    <bean id="dataSource" class="com.alibaba.druid.pool.DruidDataSource">
        <property name="driverClassName" value="${jdbc.driverClassName}"/>
        <property name="url" value="${jdbc.url}"/>
        <property name="username" value="${jdbc.username}"/>
        <property name="password" value="${jdbc.password}"/>
    </bean>
    <!--    配置SQLSessionFactory 加载mybatis的配置文件-->
    <bean id="sessionFactory" class="org.mybatis.spring.SqlSessionFactoryBean">
        <property name="dataSource" ref="dataSource"/>
        <!--        mybatis设置 开启驼峰命名-->
        <property name="configuration">
            <bean class="org.apache.ibatis.session.Configuration">
                <property name="mapUnderscoreToCamelCase" value="true"/>
            </bean>
        </property>
    </bean>
    <!--    加载mybatis的映射文件-->
    <bean class="org.mybatis.spring.mapper.MapperScannerConfigurer">
        <property name="basePackage" value="top.ftime.wk.mapper"/>
    </bean>

    <!--    配置事务管理器-->
    <bean id="transactionManager" class="org.springframework.jdbc.datasource.DataSourceTransactionManager">
        <property name="dataSource" ref="dataSource"/>
    </bean>
    <!--    开启事务驱动-->
    <tx:annotation-driven/>
</beans>
3、Spring和SpringMVC整合
3.1、导入SpringMVC相关jar包
spring-web-5.1.9.RELEASE
spring-webmvc-5.1.9.RELEASE
3.2、导入Jackson(json的相关jar包)
jackson-annotations-2.9.8
jackson-core-2.9.8
jackson-datatype-jsr310-2.9.8
jackson-databind-2.9.8
3.3、文件上传包
注意一: 如何你想用fileupload做文件上传 你就导入 如果想用servlet3.0的话 不需要导入
注意二: 如果使用fileupload需要配置多媒体视图解析器
3.4、编写SpringMVC的配置文件
<?xml version="1.0" encoding="UTF-8"?>
<beans xmlns="http://www.springframework.org/schema/beans"
       xmlns:xsi="http://www.w3.org/2001/XMLSchema-instance"
       xmlns:context="http://www.springframework.org/schema/context"
       xmlns:mvc="http://www.springframework.org/schema/mvc"
       xsi:schemaLocation="http://www.springframework.org/schema/beans http://www.springframework.org/schema/beans/spring-beans.xsd http://www.springframework.org/schema/context https://www.springframework.org/schema/context/spring-context.xsd http://www.springframework.org/schema/mvc https://www.springframework.org/schema/mvc/spring-mvc.xsd">

</beans>
3.5、配置包扫描
<?xml version="1.0" encoding="UTF-8"?>
<beans xmlns="http://www.springframework.org/schema/beans"
       xmlns:xsi="http://www.w3.org/2001/XMLSchema-instance"
       xmlns:context="http://www.springframework.org/schema/context"
       xmlns:mvc="http://www.springframework.org/schema/mvc"
       xsi:schemaLocation="http://www.springframework.org/schema/beans http://www.springframework.org/schema/beans/spring-beans.xsd http://www.springframework.org/schema/context https://www.springframework.org/schema/context/spring-context.xsd http://www.springframework.org/schema/mvc https://www.springframework.org/schema/mvc/spring-mvc.xsd">
<!--    开启包扫描-->
    <context:component-scan base-package="top.ftime.wk.controller"/>
    <context:component-scan base-package="top.ftime.wk.utils"/>
    <context:component-scan base-package="top.ftime.wk.exception"/>

</beans>
3.6、配置MVC直接驱动
<?xml version="1.0" encoding="UTF-8"?>
<beans xmlns="http://www.springframework.org/schema/beans"
       xmlns:xsi="http://www.w3.org/2001/XMLSchema-instance"
       xmlns:context="http://www.springframework.org/schema/context"
       xmlns:mvc="http://www.springframework.org/schema/mvc"
       xsi:schemaLocation="http://www.springframework.org/schema/beans http://www.springframework.org/schema/beans/spring-beans.xsd http://www.springframework.org/schema/context https://www.springframework.org/schema/context/spring-context.xsd http://www.springframework.org/schema/mvc https://www.springframework.org/schema/mvc/spring-mvc.xsd">
<!--    开启包扫描-->
    <context:component-scan base-package="top.ftime.wk.controller"/>
    <context:component-scan base-package="top.ftime.wk.utils"/>
    <context:component-scan base-package="top.ftime.wk.exception"/>

<!--    开启MVC注解驱动-->
    <mvc:annotation-driven/>


</beans>
3.7、配置静态资源映射
<?xml version="1.0" encoding="UTF-8"?>
<beans xmlns="http://www.springframework.org/schema/beans"
       xmlns:xsi="http://www.w3.org/2001/XMLSchema-instance"
       xmlns:context="http://www.springframework.org/schema/context"
       xmlns:mvc="http://www.springframework.org/schema/mvc"
       xsi:schemaLocation="http://www.springframework.org/schema/beans http://www.springframework.org/schema/beans/spring-beans.xsd http://www.springframework.org/schema/context https://www.springframework.org/schema/context/spring-context.xsd http://www.springframework.org/schema/mvc https://www.springframework.org/schema/mvc/spring-mvc.xsd">
<!--    开启包扫描-->
    <context:component-scan base-package="top.ftime.wk.controller"/>
    <context:component-scan base-package="top.ftime.wk.utils"/>
    <context:component-scan base-package="top.ftime.wk.exception"/>
<!--    开启MVC注解驱动-->
    <mvc:annotation-driven/>
<!--    配置静态资源映射-->
    <mvc:default-servlet-handler/>

</beans>
3.8、配置视图解析器
如果页面是jsp的话 必须使用试视图解析器 我们的页面不是jsp 视图解析器没有作用 所以不用加
4、配置web.xml文件
4.1、加载Spring的配置文件
<?xml version="1.0" encoding="UTF-8"?>
<web-app xmlns="http://xmlns.jcp.org/xml/ns/javaee"
         xmlns:xsi="http://www.w3.org/2001/XMLSchema-instance"
         xsi:schemaLocation="http://xmlns.jcp.org/xml/ns/javaee http://xmlns.jcp.org/xml/ns/javaee/web-app_4_0.xsd"
         version="4.0">
<!--    加载Application-Context配置文件-->
    <context-param>
        <param-name>contextConfigLocation</param-name>
        <param-value>classpath:application-context.xml</param-value>
    </context-param>
    <listener>
        <listener-class>org.springframework.web.context.ContextLoaderListener</listener-class>
    </listener>

</web-app>
4.2、加载SpringMVC的配置文件
<?xml version="1.0" encoding="UTF-8"?>
<web-app xmlns="http://xmlns.jcp.org/xml/ns/javaee"
         xmlns:xsi="http://www.w3.org/2001/XMLSchema-instance"
         xsi:schemaLocation="http://xmlns.jcp.org/xml/ns/javaee http://xmlns.jcp.org/xml/ns/javaee/web-app_4_0.xsd"
         version="4.0">
<!--    加载Application-Context配置文件-->
    <context-param>
        <param-name>contextConfigLocation</param-name>
        <param-value>classpath:application-context.xml</param-value>
    </context-param>
    <listener>
        <listener-class>org.springframework.web.context.ContextLoaderListener</listener-class>
    </listener>
<!--    加载springMVC配置文件-->
    <servlet>
        <servlet-name>dispatcherServlet</servlet-name>
        <servlet-class>org.springframework.web.servlet.DispatcherServlet</servlet-class>
        <init-param>
            <param-name>contextConfigLocation</param-name>
            <param-value>classpath:springmvc.xml</param-value>
        </init-param>
<!--        开启文件上传-->
        <multipart-config/>
    </servlet>
<!--    配置springmvc映射-->
    <servlet-mapping>
        <servlet-name>dispatcherServlet</servlet-name>
        <url-pattern>/</url-pattern>
    </servlet-mapping>
</web-app>
4.3、配置乱码问题
<?xml version="1.0" encoding="UTF-8"?>
<web-app xmlns="http://xmlns.jcp.org/xml/ns/javaee"
         xmlns:xsi="http://www.w3.org/2001/XMLSchema-instance"
         xsi:schemaLocation="http://xmlns.jcp.org/xml/ns/javaee http://xmlns.jcp.org/xml/ns/javaee/web-app_4_0.xsd"
         version="4.0">
<!--    加载Application-Context配置文件-->
    <context-param>
        <param-name>contextConfigLocation</param-name>
        <param-value>classpath:application-context.xml</param-value>
    </context-param>
    <listener>
        <listener-class>org.springframework.web.context.ContextLoaderListener</listener-class>
    </listener>
<!--    加载springMVC配置文件-->
    <servlet>
        <servlet-name>dispatcherServlet</servlet-name>
        <servlet-class>org.springframework.web.servlet.DispatcherServlet</servlet-class>
        <init-param>
            <param-name>contextConfigLocation</param-name>
            <param-value>classpath:springmvc.xml</param-value>
        </init-param>
<!--        开启文件上传-->
        <multipart-config/>
    </servlet>
<!--     配置springmvc映射-->
    <servlet-mapping>
        <servlet-name>dispatcherServlet</servlet-name>
        <url-pattern>/</url-pattern>
    </servlet-mapping>
<!--    配置乱码问题-->
    <filter>
        <filter-name>Character</filter-name>
        <filter-class>org.springframework.web.filter.CharacterEncodingFilter</filter-class>
        <init-param>
            <param-name>encoding</param-name>
            <param-value>utf-8</param-value>
        </init-param>
    </filter>
    <filter-mapping>
        <filter-name>Character</filter-name>
        <url-pattern>/*</url-pattern>
    </filter-mapping>
</web-app>
4.3、设置起始页
<?xml version="1.0" encoding="UTF-8"?>
<web-app xmlns="http://xmlns.jcp.org/xml/ns/javaee"
         xmlns:xsi="http://www.w3.org/2001/XMLSchema-instance"
         xsi:schemaLocation="http://xmlns.jcp.org/xml/ns/javaee http://xmlns.jcp.org/xml/ns/javaee/web-app_4_0.xsd"
         version="4.0">
<!--    加载Application-Context配置文件-->
    <context-param>
        <param-name>contextConfigLocation</param-name>
        <param-value>classpath:application-context.xml</param-value>
    </context-param>
    <listener>
        <listener-class>org.springframework.web.context.ContextLoaderListener</listener-class>
    </listener>
<!--    加载springMVC配置文件-->
    <servlet>
        <servlet-name>dispatcherServlet</servlet-name>
        <servlet-class>org.springframework.web.servlet.DispatcherServlet</servlet-class>
        <init-param>
            <param-name>contextConfigLocation</param-name>
            <param-value>classpath:springmvc.xml</param-value>
        </init-param>
<!--        开启文件上传-->
        <multipart-config/>
    </servlet>
<!--    配置springmvc映射-->
    <servlet-mapping>
        <servlet-name>dispatcherServlet</servlet-name>
        <url-pattern>/</url-pattern>
    </servlet-mapping>
<!--    配置乱码问题-->
    <filter>
        <filter-name>Character</filter-name>
        <filter-class>org.springframework.web.filter.CharacterEncodingFilter</filter-class>
        <init-param>
            <param-name>encoding</param-name>
            <param-value>utf-8</param-value>
        </init-param>
    </filter>
    <filter-mapping>
        <filter-name>Character</filter-name>
        <url-pattern>/*</url-pattern>
    </filter-mapping>
<!--    设置起始页-->
    <welcome-file-list>
        <welcome-file>login.html</welcome-file>
    </welcome-file-list>
</web-app>

 浙公网安备 33010602011771号