Spring对事务的支持
1、事务
1.1、什么是事务
多个操作当做一个整体 这个整体要嘛同时成功 同时失败
1.2、事务的特性
原子性:事务不能再分割
隔离性: 各个事务之间 相互隔离互不影响
持久性: 一旦事务提交成功 数据将持久化硬盘上
1.3、事务的安全性问题
不可重复读: 表示一个事务读取到了另外一个事务中提交的数据(update)
幻读: 表示一个事务读取到了另外一个事务中提交的数据(insert)
1.4、数据库隔离级别
read Commit : 脏读不会发生 不可重复读 幻读 有可能发生
Repeatable Read:脏读 不可重复读 不会发生 幻读 有可能发生
SERIALIZABLE: 解决所有问题
2、Spring事务的一些概念
Spring 的事务管理是基于 AOP 实现的,而 AOP 是以方法为单位的。Spring 的事务属性分别为传播行为、隔离级别、只读和超时属性,这些属性提供了事务应用的方法和描述策略。
在 Java EE 开发经常采用的分层模式中,Spring 的事务处理位于业务逻辑层,它提供了针对事务的解决方案。
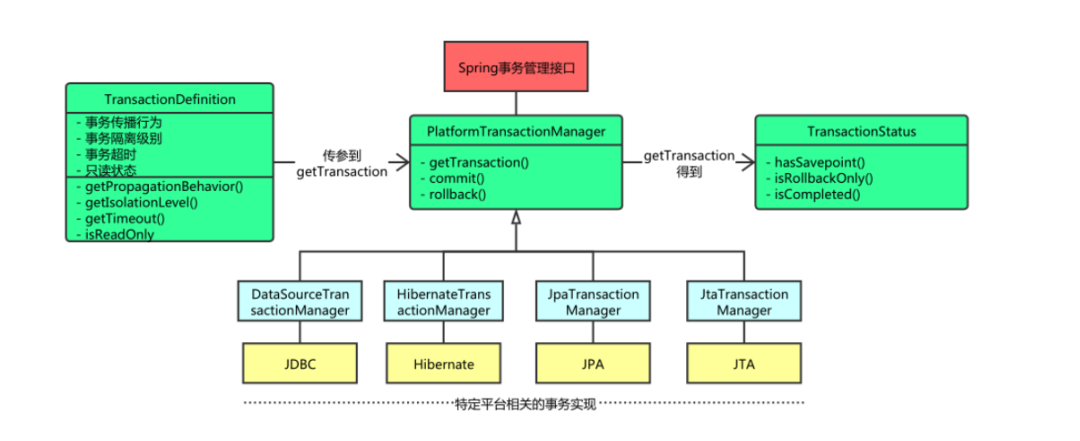
在 Spring 解压包的 libs 目录中,包含一个名称为 spring-tx-3.2.13.RELEASE.jar 的文件,该文件是 Spring 提供的用于事务管理的 JAR 包,其中包括事务管理的三个核心接口:PlatformTransactionManager、TransactionDefinition 和 TransactionStatus。
这三个核心接口的作用及其提供的方法如下。
3.1、 PlatformTransactionManager
而我们使用 DataSourceTransactionManager。
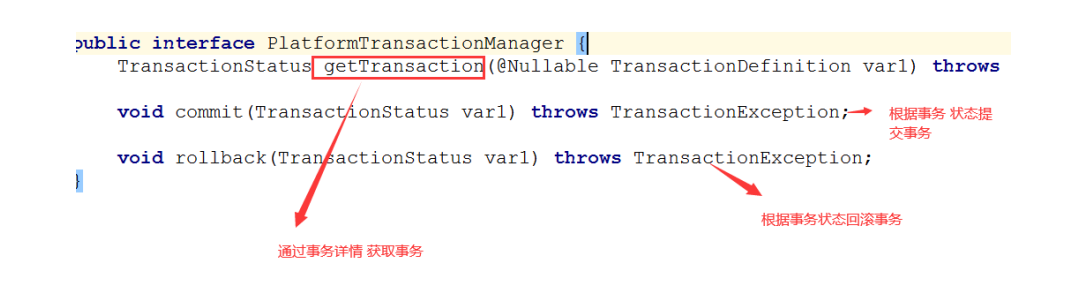
PlatformTransactionManager 接口是 Spring 提供的平台事务管理器,用于管理事务。该接口中提供了三个事务操作方法,具体如下。
-
- TransactionStatus getTransaction(TransactionDefinition definition):用于获取事务状态信息。
- void commit(TransactionStatus status):用于提交事务。
- void rollback(TransactionStatus status):用于回滚事务。
在项目中,Spring 将 xml 中配置的事务详细信息封装到对象 TransactionDefinition 中,然后通过事务管理器的 getTransaction() 方法获得事务的状态(TransactionStatus),并对事务进行下一步的操作。
3.2、 TransactionDefinition
例如:隔离级别、是否只读、超时时间 等
进行事务配置时,必须配置详情。spring将配置项封装到该对象实例。
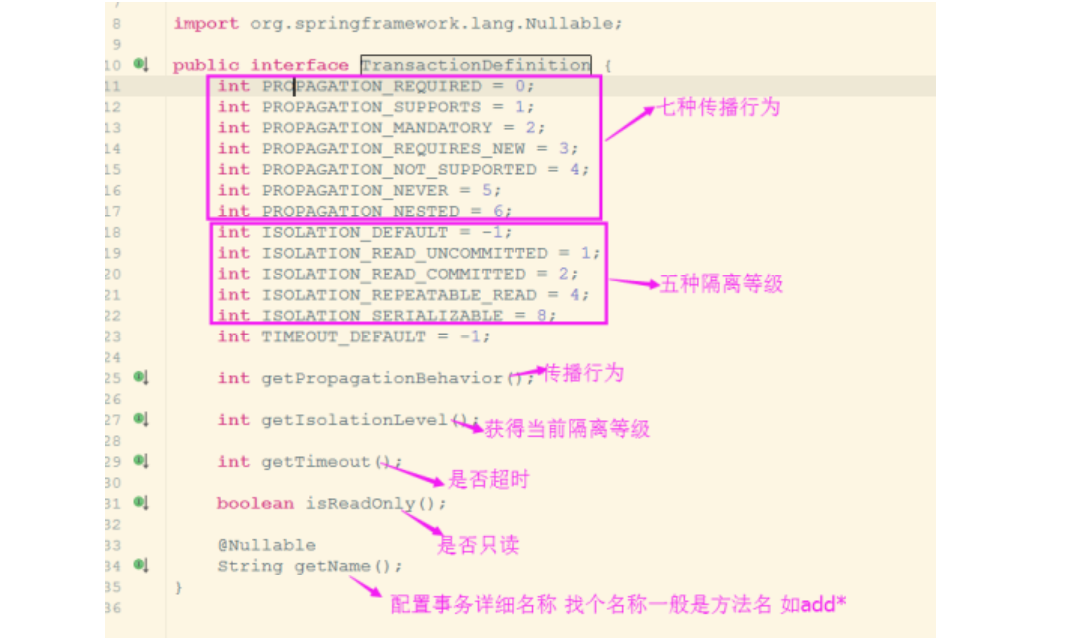
TransactionDefinition 接口是事务定义(描述)的对象,它提供了事务相关信息获取的方法,其中包括五个操作,具体如下。
-
- String getName():获取事务对象名称。
- int getIsolationLevel():获取事务的隔离级别。
- int getPropagationBehavior():获取事务的传播行为。
- int getTimeout():获取事务的超时时间。
- boolean isReadOnly():获取事务是否只读。
在上述五个方法的描述中,事务的传播行为是指在同一个方法中,不同操作前后所使用的事务。传播行为的种类如表 1 所示。
| 属性名称 | 值 | 描 述 |
|---|---|---|
| PROPAGATION_REQUIRED | required | 支持当前事务。如果 A 方法已经在事务中,则 B 事务将直接使用。否则将创建新事务 |
| PROPAGATION_SUPPORTS | supports | 支持当前事务。如果 A 方法已经在事务中,则 B 事务将直接使用。否则将以非事务状态执行 |
| PROPAGATION_MANDATORY | mandatory | 支持当前事务。如果 A 方法没有事务,则抛出异常 |
| PROPAGATION_REQUIRES_NEW | requires_new | 将创建新的事务,如果 A 方法已经在事务中,则将 A 事务挂起 |
| PROPAGATION_NOT_SUPPORTED | not_supported | 不支持当前事务,总是以非事务状态执行。如果 A 方法已经在事务中,则将其挂起 |
| PROPAGATION_NEVER | never | 不支持当前事务,如果 A 方法在事务中,则抛出异常 |
| PROPAGATION.NESTED | nested | 嵌套事务,底层将使用 Savepoint 形成嵌套事务 |
在事务管理过程中,传播行为可以控制是否需要创建事务以及如何创建事务。
通常情况下,数据的查询不会改变原数据,所以不需要进行事务管理,而对于数据的增加、修改和删除等操作,必须进行事务管理。如果没有指定事务的传播行为,则 Spring3 默认的传播行为是 required。
3.2.1、传播行为(不要掌握)
说白了 当事务方法被另一个事务方法调用时,必须指定事务应该如何传播
比如 方法A有事务支持 方法B也有事务支持 在A方法中调用B方法时 B方法的事务 是用A的事务还是自己再弄一个新的事务
传播行为不要掌握 会配置就行了
  /**
        PROPAGATION_REQUIRED , required , 必须
        支持当前事务,A如果有事务,B将使用该事务。
        如果A没有事务,B将创建一个新的事务。

        PROPAGATION_SUPPORTS ,supports ,支持
        支持当前事务,A如果有事务,B将使用该事务。
        如果A没有事务,B将以非事务执行。

        PROPAGATION_MANDATORY,mandatory ,强制
        支持当前事务,A如果有事务,B将使用该事务。
        如果A没有事务,B将抛异常。

        PROPAGATION_REQUIRES_NEW , requires_new ,必须新的
        如果A有事务,将A的事务挂起,B创建一个新的事务
        如果A没有事务,B创建一个新的事务

        PROPAGATION_NOT_SUPPORTED ,not_supported ,不支持
        如果A有事务,将A的事务挂起,B将以非事务执行
        如果A没有事务,B将以非事务执行

        PROPAGATION_NEVER ,never,从不
        如果A有事务,B将抛异常
        如果A没有事务,B将以非事务执行

        PROPAGATION_NESTED ,nested ,嵌套
        A和B底层采用保存点机制,形成嵌套事务。
     */
3.3、 TransactionStatus
这个类表示事务的状态 例如:是否有保存点,事务是否完成等等。
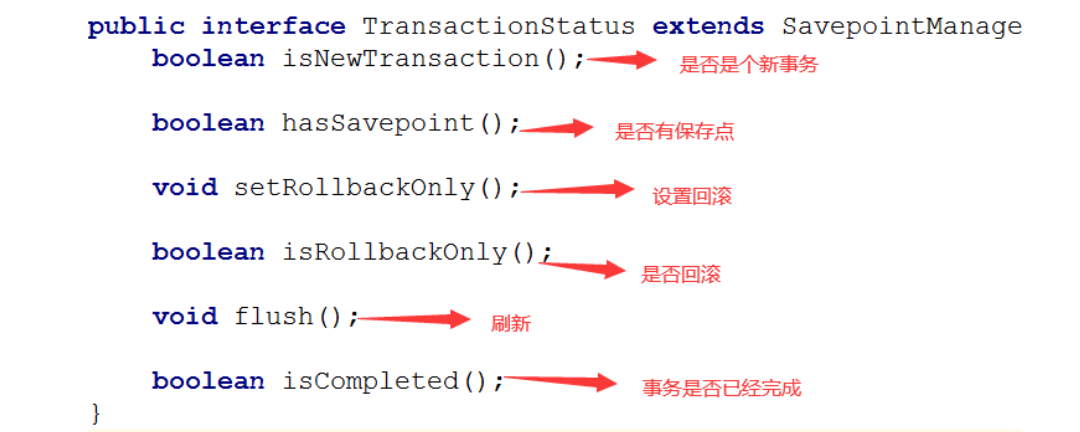
TransactionStatus 接口是事务的状态,它描述了某一时间点上事务的状态信息。其中包含六个操作,具体如表 2 所示。
| 名称 | 说明 |
|---|---|
| void flush() | 刷新事务 |
| boolean hasSavepoint() | 获取是否存在保存点 |
| boolean isCompleted() | 获取事务是否完成 |
| boolean isNewTransaction() | 获取是否是新事务 |
| boolean isRollbackOnly() | 获取是否回滚 |
| void setRollbackOnly() | 设置事务回滚 |
3、Spring事务操作事务
3.1、添加Service层
由于事务是 执行操作之前开启 操作之后提交 或者回滚 一般放在Service层处理
//编写Service接口
public interface EmployeeService {

    //转账
    void  zhuanzhang(Integer fromId,Integer toId,double money);
}


//编写实现类

public class EmployeeServiceImpl implements EmployeeService {

    @Autowired
    EmployeeDao employeeDao;

    @Override
    public void zhuanzhang(Integer fromId, Integer toId, double money) {
        //根据id 找到员工
        Employee employee = employeeDao.selectEmployeeById(fromId);
        Employee employee1 = employeeDao.selectEmployeeById(toId);
        //修改金额
        employee.setMoney(employee.getMoney()-money);
        employee1.setMoney(employee1.getMoney()+money);

        //修改数据库进行转账
        employeeDao.updateEmployee(employee);
        int i=10/0;
        employeeDao.updateEmployee(employee1);

    }

}
3.2、修改配置文件
<bean id="employeeService" class="com.shangma.cn.service.EmployeeServiceImpl"/>
3.3、事务管理之模板(了解)
编写配置文件
    <!--    配置事务管理器-->
    <bean id="transactionManager" class="org.springframework.jdbc.datasource.DataSourceTransactionManager">
        <property name="dataSource" ref="dataSource"/>
    </bean>
    <!--    配置事务模板-->
    <bean id="transactionTemplate" class="org.springframework.transaction.support.TransactionTemplate">
        <property name="transactionManager" ref="transactionManager"/>
    </bean>
修改EmployeeServiceImpl
public class EmployeeServiceImpl implements EmployeeService {

    @Autowired
    EmployeeDao employeeDao;
    @Autowired
    TransactionTemplate transactionTemplate;

    @Override
    public void zhuanzhang(Integer fromId, Integer toId, double money) {
        Employee employee = employeeDao.selectEmployeeById(fromId);
        Employee employee1 = employeeDao.selectEmployeeById(toId);
        employee.setMoney(employee.getMoney()-money);
        employee1.setMoney(employee1.getMoney()+money);
        transactionTemplate.execute(new TransactionCallbackWithoutResult() {
            @Override
            protected void doInTransactionWithoutResult(TransactionStatus transactionStatus) {
                employeeDao.updateEmployee(employee);
                int i=10/0;
                employeeDao.updateEmployee(employee1);
            }
        });
    }
}
测试类
@RunWith(SpringRunner.class)
@ContextConfiguration(locations = {"classpath:applicationContext.xml"})
public class SpringTest {

    @Autowired
    EmployeeService employeeService;

    @Test
    public void fun() {
       employeeService.zhuanzhang(1,2,1000);
    }
}
3.4、AOP声明事务之xml的配置
1. 创建项目
创建一个名为 springDemo03 的 Web 项目,将 Spring 支持和依赖的 JAR 包复制到 Web 项目的 lib 目录中,并添加到类路径下。
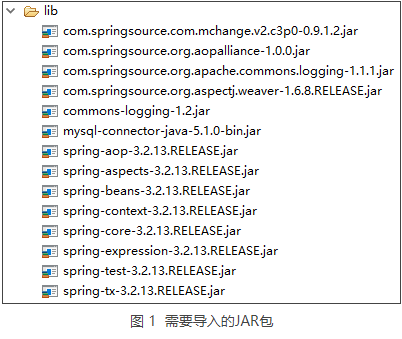
从图 1 中可以看出,这里增加导入了 spring-tx-3.2.13.RELEASE.jar(事务管理),以及 MySQL 驱动、JDBC 和 C3P0 的 JAR 包。
2. 创建数据库、表以及插入数据
在 MySQL 中创建一个名为 spring 的数据库,然后在该数据库中创建一个 account 表,并向表中插入两条数据,其 SQL 执行语句如下所示:
CREATE DATABASE spring;
USE spring;
CREATE TABLE account (
id INT (11) PRIMARY KEY AUTO_INCREMENT,
username VARCHAR(20) NOT NULL,
money INT DEFAULT NULL
);
INSERT INTO account VALUES (1,'zhangsan',1000);
INSERT INTO account VALUES (2,'lisi',1000);
3. 创建 c3p0-db.properties
在项目的 src 下创建一个名为 c3p0-db.properties 的配置文件,这里使用 C3P0 数据源,需要在该文件中添加如下配置:
jdbc.driverClass = com.mysql.jdbc.Driver
jdbc.jdbcUrl = jdbc:mysql://localhost:3306/spring
jdbc.user = root
jdbc.password = root
4. 实现 DAO
1)创建 AccountDao 接口
在项目的 src 目录下创建一个名为 com.mengma.dao 的包,在该包下创建一个接口 AccountDao,并在接口中创建汇款和收款的方法,如下所示。
package com.mengma.dao;
public interface AccountDao {
// 汇款
public void out(String outUser, int money);
// 收款
public void in(String inUser, int money);
}
上述代码中,定义了 out() 和 in() 两个方法,分别用于表示汇款和收款。
2)创建DAO层接口实现类
在项目的 src 目录下创建一个名为 com.mengma.dao.impl 的包,在该包下创建实现类 AccountDaoImpl,如下所示。
 1 package com.mengma.dao.impl;
 2 import org.springframework.jdbc.core.JdbcTemplate;
 3 import com.mengma.dao.AccountDao;
 4 public class AccountDaoImpl implements AccountDao {
 5 private JdbcTemplate jdbcTemplate;
 6 public void setJdbcTemplate(JdbcTemplate jdbcTemplate) {
 7 this.jdbcTemplate = jdbcTemplate;
 8 }
 9 // 汇款的实现方法
10 public void out(String outUser, int money) {
11 this.jdbcTemplate.update("update account set money =money-?"
12 + "where username =?", money, outUser);
13 }
14 // 收款的实现方法
15 public void in(String inUser, int money) {
16 this.jdbcTemplate.update("update account set money =money+?"
17 + "where username =?", money, inUser);
18 }
19 }
上述代码中,使用 JdbcTemplate 类的 update() 方法实现了更新操作。
5. 实现 Service
1)创建 Service 层接口
在项目的 src 目录下创建一个名为 com.mengma.service 的包,在该包下创建接口 AccountService,如下所示。
package com.mengma.service;
public interface AccountService {
// 转账
public void transfer(String outUser, String inUser, int money);
}
2)创建 Service 层接口实现类
在项目的 src 目录下创建一个名为 com.mengma.service.impl 的包,在该包下创建实现类 AccountServiceImpl,如下所示。
package com.mengma.service.impl;
import com.mengma.dao.AccountDao;
public class AccountServiceImpl {
private AccountDao accountDao;
public void setAccountDao(AccountDao accountDao) {
this.accountDao = accountDao;
}
public void transfer(String outUser, String inUser, int money) {
this.accountDao.out(outUser, money);
this.accountDao.in(inUser, money);
}
}
上述代码中可以看出,该类实现了 AccountService 接口,并对转账的方法进行了实现,根据参数的不同调用 DAO 层相应的方法。
6. 创建 Spring 配置文件
在项目的 src 目录下创建 Spirng 配置文件 applicationContext.xml,编辑后如下所示。
 1 <?xml version="1.0" encoding="UTF-8"?>
 2 <beans xmlns="http://www.springframework.org/schema/beans"
 3     xmlns:xsi="http://www.w3.org/2001/XMLSchema-instance"
 4     xmlns:context="http://www.springframework.org/schema/context"
 5     xmlns:tx="http://www.springframework.org/schema/tx"
 6     xmlns:aop="http://www.springframework.org/schema/aop"
 7     xsi:schemaLocation="http://www.springframework.org/schema/beans
 8             http://www.springframework.org/schema/beans/spring-beans-2.5.xsd
 9             http://www.springframework.org/schema/context
10             http://www.springframework.org/schema/context/spring-context.xsd
11             http://www.springframework.org/schema/tx
12             http://www.springframework.org/schema/tx/spring-tx-2.5.xsd
13             http://www.springframework.org/schema/aop
14             http://www.springframework.org/schema/aop/spring-aop-2.5.xsd">
15     <!-- 加载properties文件 -->
16     <context:property-placeholder location="classpath:c3p0-db.properties" />
17     <!-- 配置数据源,读取properties文件信息 -->
18     <bean id="dataSource" class="com.mchange.v2.c3p0.ComboPooledDataSource">
19         <property name="driverClass" value="${jdbc.driverClass}" />
20         <property name="jdbcUrl" value="${jdbc.jdbcUrl}" />
21         <property name="user" value="${jdbc.user}" />
22         <property name="password" value="${jdbc.password}" />
23     </bean>
24     <!-- 配置jdbc模板 -->
25     <bean id="jdbcTemplate" class="org.springframework.jdbc.core.JdbcTemplate">
26         <property name="dataSource" ref="dataSource" />
27     </bean>
28     <!-- 配置dao -->
29     <bean id="accountDao" class="com.mengma.dao.impl.AccountDaoImpl">
30         <property name="jdbcTemplate" ref="jdbcTemplate" />
31     </bean>
32     <!-- 配置service -->
33     <bean id="accountService" class="com.mengma.service.impl.AccountServiceImpl">
34         <property name="accountDao" ref="accountDao" />
35     </bean>
36     <!-- 事务管理器,依赖于数据源 -->
37     <bean id="txManager"
38         class="org.springframework.jdbc.datasource.DataSourceTransactionManager">
39         <property name="dataSource" ref="dataSource" />
40     </bean>
41     <!-- 编写通知:对事务进行增强(通知),需要编写切入点和具体执行事务的细节 -->
42     <tx:advice id="txAdvice" transaction-manager="txManager">
43         <tx:attributes>
44             <!-- 给切入点方法添加事务详情,name表示方法名称,*表示任意方法名称,propagation用于设置传播行为,read-only表示隔离级别,是否只读 -->
45             <tx:method name="find*" propagation="SUPPORTS"
46                 rollback-for="Exception" />
47             <tx:method name="*" propagation="REQUIRED" isolation="DEFAULT"
48                 read-only="false" />
49         </tx:attributes>
50     </tx:advice>
51     <!-- aop编写,让Spring自动对目标生成代理,需要使用AspectJ的表达式 -->
52     <aop:config>
53         <!-- 切入点 -->
54         <aop:pointcut expression="execution(* com.mengma.service.*.*(..))"
55             id="txPointCut" />
56         <!-- 切面:将切入点与通知整合 -->
57         <aop:advisor pointcut-ref="txPointCut" advice-ref="txAdvice" />
58     </aop:config>
59 </beans>
上述代码中,首先在 <beans> 标记的第 6、13 和 14 行代码分别添加了 AOP 所需的命名空间声明。第 42~50 行代码使用 <tx:advice> 标记配置事务通知内容。
第 52~58 行代码使用 <aop:config> 标记定义切面,其中第 54 行代码应用了 AspectJ 表达式,代表 com.mengma.service 包下所有类的所有方法都应用事务规则,第 57 行代码使用 <aop:advistor> 标记将切入点与事务通知整合,基于 AOP 的声明式事务配置完成。
7. 创建测试类
在项目的 src 目录下创建 com.mengma.test 的包,在该包下创建测试类 AccountTest,如下所示。
package com.mengma.test;
import org.junit.Test;
import org.springframework.context.ApplicationContext;
import org.springframework.context.support.ClassPathXmlApplicationContext;
import com.mengma.service.AccountService;
public class AccountTest {
@Test
public void test() {
// 获得Spring容器,并操作
String xmlPath = "applicationContext.xml";
ApplicationContext applicationContext = new ClassPathXmlApplicationContext(
xmlPath);
AccountService accountService = (AccountService) applicationContext
.getBean("accountService");
accountService.transfer("zhangsan", "lisi", 100);
}
}
上述代码中模拟了银行转账业务,从 zhangsan 的账户向 lisi 的账户中转入 100 元。使用 JUnit 测试运行 test() 方法,运行成功后,查询 account 表,如图所示。
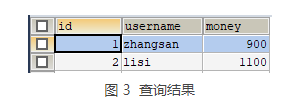
从图中的查询结果中可以看出,zhangsan 成功向 lisi 转账 100 元。
下面通过修改案例模拟转账失败的情况,在的 transfer() 方法中添加一行代码“int i=1/0;”模拟系统断电的情况,具体代码如下所示:
public void transfer(String outUser, String inUser, int money) {
this.accountDao.out(outUser, money);
//模拟断电
int i = 1/0;
this.accountDao.in(inUser, money);
}
重新测试运行 test() 方法,此时再次查询 account 表,其查询结果如图 5 所示。
从图 5 的查询结果中可以看出,表中的数据并没有发生变化。由于程序在执行过程中抛出了异常,事务不能正常被提交,所以转账失败。由此可知,Spring 的事务管理生效了。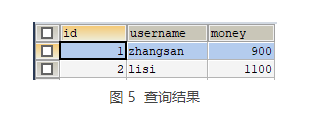
3.5、AOP声明你那个事务之注解(必须会)


 浙公网安备 33010602011771号