
android window(三)lWindow添加流程
http://androidxref.com/6.0.1_r10/xref/frameworks/base/services/core/java/com/android/server/wm/WindowManagerService.java
http://androidxref.com/6.0.1_r10/xref/frameworks/base/core/java/android/view/WindowManagerImpl.java
http://androidxref.com/6.0.1_r10/xref/frameworks/base/core/java/android/view/WindowManagerGlobal.java
http://androidxref.com/6.0.1_r10/xref/frameworks/base/core/java/android/view/ViewRootImpl.java
http://androidxref.com/6.0.1_r10/xref/frameworks/base/services/core/java/com/android/server/wm/WindowManagerService.java
http://androidxref.com/6.0.1_r10/xref/frameworks/base/services/core/java/com/android/server/wm/Session.java
http://androidxref.com/6.0.1_r10/xref/frameworks/base/core/java/android/view/IWindow.aidl
![]()

WindowManagerService只负责窗口管理,并不负责View的绘制跟图层混合,本文就来分析WMS到底是怎么管理窗口的。初接触Android时感觉:Activity似乎就是Google封装好的窗口,APP只要合理的启动新的Activity就打开了新窗口,这样理解没什么不对,Activity确实可以看做一种窗口及View的封装,不过从源码来看,Activity跟Window还是存在不同。本文主要从窗口的添加流程来将APP端、WMS端、SurfaceFlinger端三块串联起来,主要说一下几个方面
- 窗口的分类:Activity、Dialog、PopupWindow、Toast等对应窗口的区别
- Window、IWindow 、WindowState、WindowToken、AppToken等之间的关系
- 窗口的添加及Surface申请与Binder传递
窗口的分类简述
在Android系统中,PopupWindow、Dialog、Activity、Toast等都有窗口的概念,但又各有不同,Android将窗口大致分为三类:应用窗口、子窗口、系统窗口。其中,Activity与Dialog属于应用窗口、PopupWindow属于子窗口,必须依附到其他非子窗口才能存在,而Toast属于系统窗口,Dialog可能比较特殊,从表现上来说偏向于子窗口,必须依附Activity才能存在,但是从性质上来说,仍然是应用窗口,有自己的WindowToken,不同窗口之间的关系后面会更加详细的分析,这里有一个概念即可。
窗口的添加
Activity并不是View展示的唯一方式,分析窗口添加流程的话,Activity也并不是最好的例子,因为Activity还会牵扯到AMS的知识,这里我们不用Activity,而是用一个悬浮View的展示来分析窗口的添加,代码入下:
private void addTextViewWindow(Context context){
    TextView mview=new TextView(context);
    ...//设置颜色 样式
    //关键点1
    WindowManager mWindowManager = (WindowManager) context.getApplicationContext().getSystemService(Context.WINDOW_SERVICE);
    WindowManager.LayoutParams wmParams = new WindowManager.LayoutParams();
    //关键点2
    wmParams.type = WindowManager.LayoutParams.TYPE_TOAST;
    wmParams.format = PixelFormat.RGBA_8888;
    wmParams.width = 800;
    wmParams.height = 800;
    //关键点3
    mWindowManager.addView(mview, wmParams);
}
 @Override
    public Object getSystemService(String name) {
        return SystemServiceRegistry.getSystemService(this, name);
    }
SystemServiceRegistry类用静态字段及方法中封装了一些服务的代理,其中就包括WindowManagerService
    public static Object getSystemService(ContextImpl ctx, String name) {
        ServiceFetcher<?> fetcher = SYSTEM_SERVICE_FETCHERS.get(name);
        return fetcher != null ? fetcher.getService(ctx) : null;
    }

    static {
             ...
             registerService(Context.WINDOW_SERVICE, WindowManager.class,
                new CachedServiceFetcher<WindowManager>() {
            @Override
            public WindowManager createService(ContextImpl ctx) {
                return new WindowManagerImpl(ctx.getDisplay());
            }});
            ...
    }
因此context.getApplicationContext().getSystemService()最终可以简化为new WindowManagerImpl(ctx.getDisplay()),下面看下WindowManagerImpl的构造方法,它有两个实现方法,对于Activity跟Application其实是有区别的,这点后面分析:
http://androidxref.com/6.0.1_r10/xref/frameworks/base/core/java/android/view/WindowManagerImpl.java
public WindowManagerImpl(Display display) {
    this(display, null);
}

private WindowManagerImpl(Display display, Window parentWindow) {
    mDisplay = display;
    mParentWindow = parentWindow;
}
 @Override
public void addView(@NonNull View view, @NonNull ViewGroup.LayoutParams params) {
    applyDefaultToken(params);
    mGlobal.addView(view, params, mDisplay, mParentWindow);
}
不过很明显WindowManagerImpl最后是委托mGlobal来进行这项操作,WindowManagerGlobal是一个单利,一个进程只有一个:
接着看WindowManagerGlobal的addView,对于添加系统窗口,这里将将代码精简一下,不关系子窗口等之类的逻辑public void addView(View view, ViewGroup.LayoutParams params, //... final WindowManager.LayoutParams wparams = (WindowManager.LayoutParams) params; if (parentWindow != null) { parentWindow.adjustLayoutParamsForSubWindow(wparams); } else { // If there's no parent, then hardware acceleration for this view is // set from the application's hardware acceleration setting. final Context context = view.getContext(); if (context != null && (context.getApplicationInfo().flags & ApplicationInfo.FLAG_HARDWARE_ACCELERATED) != 0) { wparams.flags |= WindowManager.LayoutParams.FLAG_HARDWARE_ACCELERATED; } } ViewRootImpl root; View panelParentView = null; synchronized (mLock) { //... root = new ViewRootImpl(view.getContext(), display); view.setLayoutParams(wparams); mViews.add(view); mRoots.add(root); mParams.add(wparams); } // do this last because it fires off messages to start doing things try { root.setView(view, wparams, panelParentView); } catch (RuntimeException e) { //... } }
public void setView(View view, WindowManager.LayoutParams attrs, View panelParentView) {
        synchronized (this) {
            if (mView == null) {
                mView = view;
                  ...
                    //关键点1
                // Schedule the first layout -before- adding to the window
                // manager, to make sure we do the relayout before receiving
                // any other events from the system.
                requestLayout();
                if ((mWindowAttributes.inputFeatures
                        & WindowManager.LayoutParams.INPUT_FEATURE_NO_INPUT_CHANNEL) == 0) {
                    mInputChannel = new InputChannel();
                }
                try {
                    //关键点2
                    res = mWindowSession.addToDisplay(mWindow, mSeq, mWindowAttributes,
                            getHostVisibility(), mDisplay.getDisplayId(),
                            mAttachInfo.mContentInsets, mAttachInfo.mStableInsets,
                            mAttachInfo.mOutsets, mInputChannel);
                } catch (RemoteException e) {
               ...
            }
}
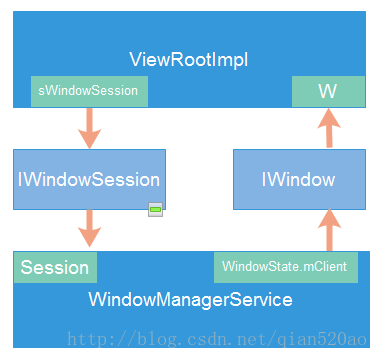
public ViewRootImpl(Context context, Display display) {
    mContext = context;
    mWindowSession = WindowManagerGlobal.getWindowSession();
    mWindow = new W(this);
}


    static class W extends IWindow.Stub {
        private final WeakReference<ViewRootImpl> mViewAncestor;
        private final IWindowSession mWindowSession;

        W(ViewRootImpl viewAncestor) {
            mViewAncestor = new WeakReference<ViewRootImpl>(viewAncestor);
            mWindowSession = viewAncestor.mWindowSession;
        }

        @Override
        public void resized(Rect frame, Rect overscanInsets, Rect contentInsets,
                Rect visibleInsets, Rect stableInsets, Rect outsets, boolean reportDraw,
                Configuration newConfig) {
            final ViewRootImpl viewAncestor = mViewAncestor.get();
            if (viewAncestor != null) {
                viewAncestor.dispatchResized(frame, overscanInsets, contentInsets,
                        visibleInsets, stableInsets, outsets, reportDraw, newConfig);
            }
        }

        @Override
        public void moved(int newX, int newY) {
            final ViewRootImpl viewAncestor = mViewAncestor.get();
            if (viewAncestor != null) {
                viewAncestor.dispatchMoved(newX, newY);
            }
        }

        @Override
        public void dispatchAppVisibility(boolean visible) {
            final ViewRootImpl viewAncestor = mViewAncestor.get();
            if (viewAncestor != null) {
                viewAncestor.dispatchAppVisibility(visible);
            }
        }

        @Override
        public void dispatchGetNewSurface() {
            final ViewRootImpl viewAncestor = mViewAncestor.get();
            if (viewAncestor != null) {
                viewAncestor.dispatchGetNewSurface();
            }
        }

        @Override
        public void windowFocusChanged(boolean hasFocus, boolean inTouchMode) {
            final ViewRootImpl viewAncestor = mViewAncestor.get();
            if (viewAncestor != null) {
                viewAncestor.windowFocusChanged(hasFocus, inTouchMode);
            }
        }

        private static int checkCallingPermission(String permission) {
            try {
                return ActivityManagerNative.getDefault().checkPermission(
                        permission, Binder.getCallingPid(), Binder.getCallingUid());
            } catch (RemoteException e) {
                return PackageManager.PERMISSION_DENIED;
            }
        }

        @Override
        public void executeCommand(String command, String parameters, ParcelFileDescriptor out) {
            final ViewRootImpl viewAncestor = mViewAncestor.get();
            if (viewAncestor != null) {
                final View view = viewAncestor.mView;
                if (view != null) {
                    if (checkCallingPermission(Manifest.permission.DUMP) !=
                            PackageManager.PERMISSION_GRANTED) {
                        throw new SecurityException("Insufficient permissions to invoke"
                                + " executeCommand() from pid=" + Binder.getCallingPid()
                                + ", uid=" + Binder.getCallingUid());
                    }

                    OutputStream clientStream = null;
                    try {
                        clientStream = new ParcelFileDescriptor.AutoCloseOutputStream(out);
                        ViewDebug.dispatchCommand(view, command, parameters, clientStream);
                    } catch (IOException e) {
                        e.printStackTrace();
                    } finally {
                        if (clientStream != null) {
                            try {
                                clientStream.close();
                            } catch (IOException e) {
                                e.printStackTrace();
                            }
                        }
                    }
                }
            }
        }

        @Override
        public void closeSystemDialogs(String reason) {
            final ViewRootImpl viewAncestor = mViewAncestor.get();
            if (viewAncestor != null) {
                viewAncestor.dispatchCloseSystemDialogs(reason);
            }
        }

        @Override
        public void dispatchWallpaperOffsets(float x, float y, float xStep, float yStep,
                boolean sync) {
            if (sync) {
                try {
                    mWindowSession.wallpaperOffsetsComplete(asBinder());
                } catch (RemoteException e) {
                }
            }
        }

        @Override
        public void dispatchWallpaperCommand(String action, int x, int y,
                int z, Bundle extras, boolean sync) {
            if (sync) {
                try {
                    mWindowSession.wallpaperCommandComplete(asBinder(), null);
                } catch (RemoteException e) {
                }
            }
        }

        /* Drag/drop */
        @Override
        public void dispatchDragEvent(DragEvent event) {
            final ViewRootImpl viewAncestor = mViewAncestor.get();
            if (viewAncestor != null) {
                viewAncestor.dispatchDragEvent(event);
            }
        }

        @Override
        public void dispatchSystemUiVisibilityChanged(int seq, int globalVisibility,
                int localValue, int localChanges) {
            final ViewRootImpl viewAncestor = mViewAncestor.get();
            if (viewAncestor != null) {
                viewAncestor.dispatchSystemUiVisibilityChanged(seq, globalVisibility,
                        localValue, localChanges);
            }
        }

        @Override
        public void onAnimationStarted(int remainingFrameCount) {
            final ViewRootImpl viewAncestor = mViewAncestor.get();
            if (viewAncestor != null) {
                viewAncestor.dispatchWindowAnimationStarted(remainingFrameCount);
            }
        }

        @Override
        public void onAnimationStopped() {
            final ViewRootImpl viewAncestor = mViewAncestor.get();
            if (viewAncestor != null) {
                viewAncestor.dispatchWindowAnimationStopped();
            }
        }

        @Override
        public void dispatchWindowShown() {
            final ViewRootImpl viewAncestor = mViewAncestor.get();
            if (viewAncestor != null) {
                viewAncestor.dispatchWindowShown();
            }
        }
    }
    public static IWindowSession getWindowSession() {
        synchronized (WindowManagerGlobal.class) {
            if (sWindowSession == null) {
                try {
                    InputMethodManager imm = InputMethodManager.getInstance();
                     //关键点1
                    IWindowManager windowManager = getWindowManagerService();
            //关键点2
                    sWindowSession = windowManager.openSession(
                            new IWindowSessionCallback.Stub() {
                                @Override
                                public void onAnimatorScaleChanged(float scale) {
                                    ValueAnimator.setDurationScale(scale);
                                }
                            },
                            imm.getClient(), imm.getInputContext());
                } catch (RemoteException e) {
                    Log.e(TAG, "Failed to open window session", e);
                }
            }
            return sWindowSession;
        }
    }
  public static IWindowManager getWindowManagerService() {
        synchronized (WindowManagerGlobal.class) {
            if (sWindowManagerService == null) {
                sWindowManagerService = IWindowManager.Stub.asInterface(
                        ServiceManager.getService("window"));
                try {
                    sWindowManagerService = getWindowManagerService();
                    ValueAnimator.setDurationScale(sWindowManagerService.getCurrentAnimatorScale());
                } catch (RemoteException e) {
                    Log.e(TAG, "Failed to get WindowManagerService, cannot set animator scale", e);
                }
            }
            return sWindowManagerService;
        }
    }
@Override
public IWindowSession openSession(IWindowSessionCallback callback, IInputMethodClient client,
        IInputContext inputContext) {
    if (client == null) throw new IllegalArgumentException("null client");
    if (inputContext == null) throw new IllegalArgumentException("null inputContext");
    Session session = new Session(this, callback, client, inputContext);
    return session;
}
到这里看到如何获取Session,下面就是利用Session来add一个窗口:其实是调用Session.java的addToDisplayWithoutInputChannel函数
final class Session extends IWindowSession.Stub
        implements IBinder.DeathRecipient {
      //...
        @Override
    public int addToDisplay(IWindow window, int seq, WindowManager.LayoutParams attrs,
        int viewVisibility, int displayId, Rect outContentInsets, Rect outStableInsets,
        Rect outOutsets, InputChannel outInputChannel) {
         return mService.addWindow(this, window, seq, attrs, viewVisibility, displayId,
               outContentInsets, outStableInsets, outOutsets, outInputChannel);
  }
}
在WindowManager的LayoutParams中,与type同等重要的还有token。
上面说到:在源码中token一般代表的是Binder对象,作用于IPC进程间数据通讯。并且它也包含着此次通讯所需要的信息,在ViewRootImpl里,token用来表示mWindow(W类,即IWindow),并且在WmS中只有符合要求的token才能让Window正常显示。
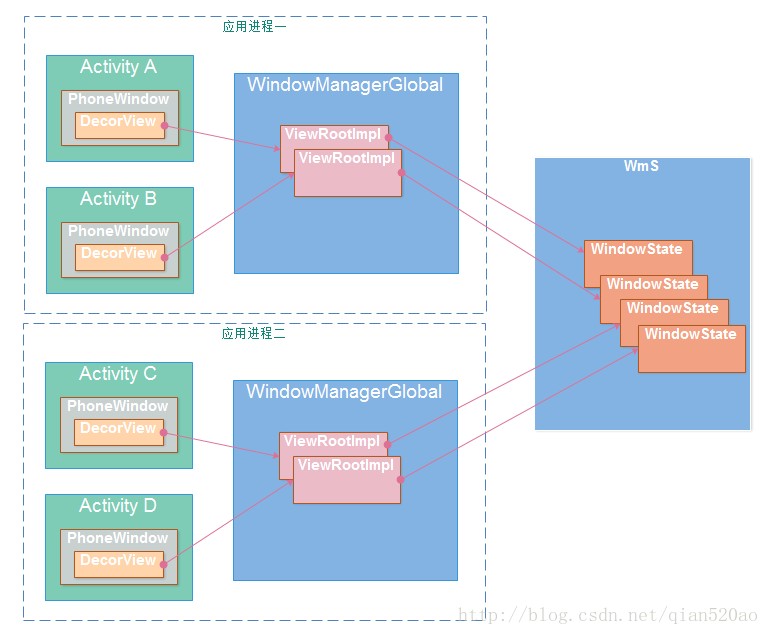
如此一来,Window的添加请求就交给WmS去处理了,在WmS内部会为每一个应用保留一个单独的Session。在WmS 端会创建一个WindowState对象用来表示当前添加的窗口。 WmS负责管理这里些 WindowState 对象。至此,Window的添加过程就结束了。
至于Window的删除和更新过程,举一反三,也是使用WindowManagerGlobal对ViewRootImpl的操作,最终也是通过Session的IPC跨进程通信通知到WmS。整个过程的本质都是同出一辙的。
在WMS中addWindow又做了什么呢,就像名字写的,负责添加一个窗口,代码精简后如下:
public int addWindow(Session session, IWindow client, int seq,
            WindowManager.LayoutParams attrs, int viewVisibility, int displayId,
            Rect outContentInsets, Rect outStableInsets, Rect outOutsets,
            InputChannel outInputChannel) {
        ...
        synchronized(mWindowMap) {
        ...
        //关键点1 不能重复添加
            if (mWindowMap.containsKey(client.asBinder())) {
                return WindowManagerGlobal.ADD_DUPLICATE_ADD;
            }
        //关键点2 对于子窗口类型的处理 1、必须有父窗口 2,父窗口不能是子窗口类型
            if (type >= FIRST_SUB_WINDOW && type <= LAST_SUB_WINDOW) {
                parentWindow = windowForClientLocked(null, attrs.token, false);
                if (parentWindow == null) {
                    return WindowManagerGlobal.ADD_BAD_SUBWINDOW_TOKEN;
                }
                if (parentWindow.mAttrs.type >= FIRST_SUB_WINDOW
                        && parentWindow.mAttrs.type <= LAST_SUB_WINDOW) {
                    return WindowManagerGlobal.ADD_BAD_SUBWINDOW_TOKEN;
                }}
           ...
           boolean addToken = false;
            //关键点3 根据IWindow 获取WindowToken WindowToken是窗口分组的基础,每个窗口必定有一个分组-
            WindowToken token = mTokenMap.get(attrs.token);
          //关键点4对于Toast类系统窗口,其attrs.token可以看做是null, 如果目前没有其他的类似系统窗口展示,token仍然获取不到,仍然要走新建流程
            if (token == null) {
            ...
                token = new WindowToken(this, attrs.token, -1, false);
                addToken = true;
            }
            ...
             //关键点5 新建WindowState,WindowState与窗口是一对一的关系,可以看做是WMS中与窗口的抽象实体
            WindowState win = new WindowState(this, session, client, token,
                    attachedWindow, appOp[0], seq, attrs, viewVisibility, displayContent);
            ...
            if (addToken) {
                mTokenMap.put(attrs.token, token);
            }
            win.attach();
            mWindowMap.put(client.asBinder(), win);
            ...
           //关键点6
          addWindowToListInOrderLocked(win, true);
        return res;
    }
这里有几个概念需要先了解下:
- IWindow:APP端窗口暴露给WMS的抽象实例,在ViewRootImpl中实例化,与ViewRootImpl一一对应,同时也是WMS向APP端发送消息的Binder通道。
- WindowState:WMS端窗口的令牌,与IWindow,或者说与窗口一一对应,是WMS管理窗口的重要依据。
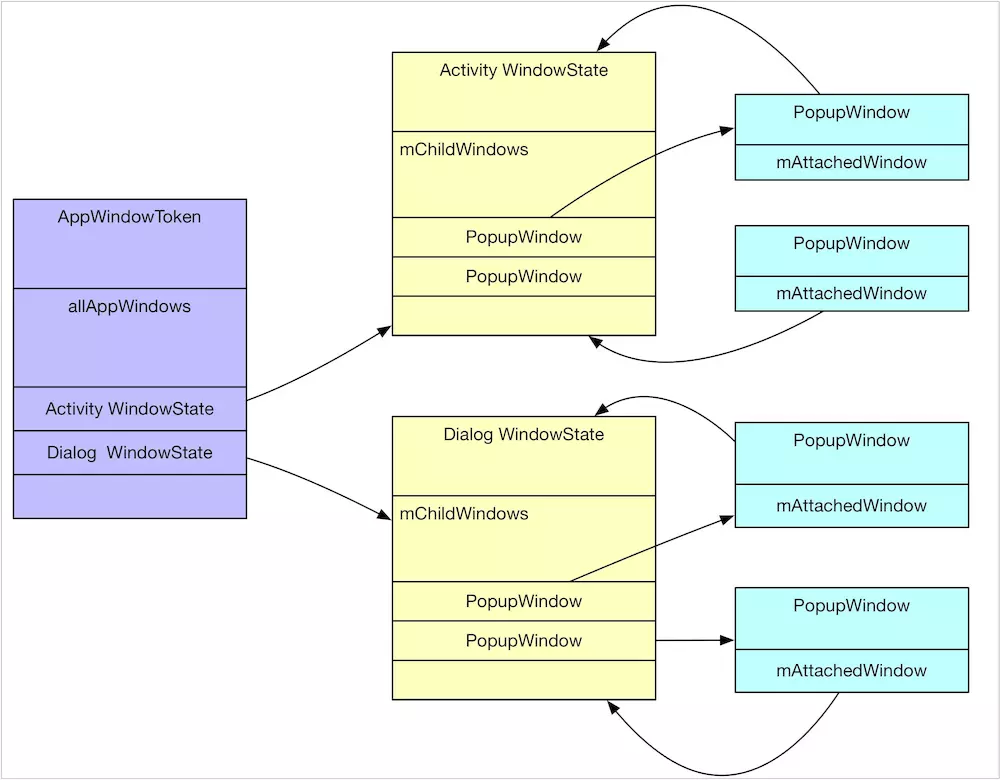
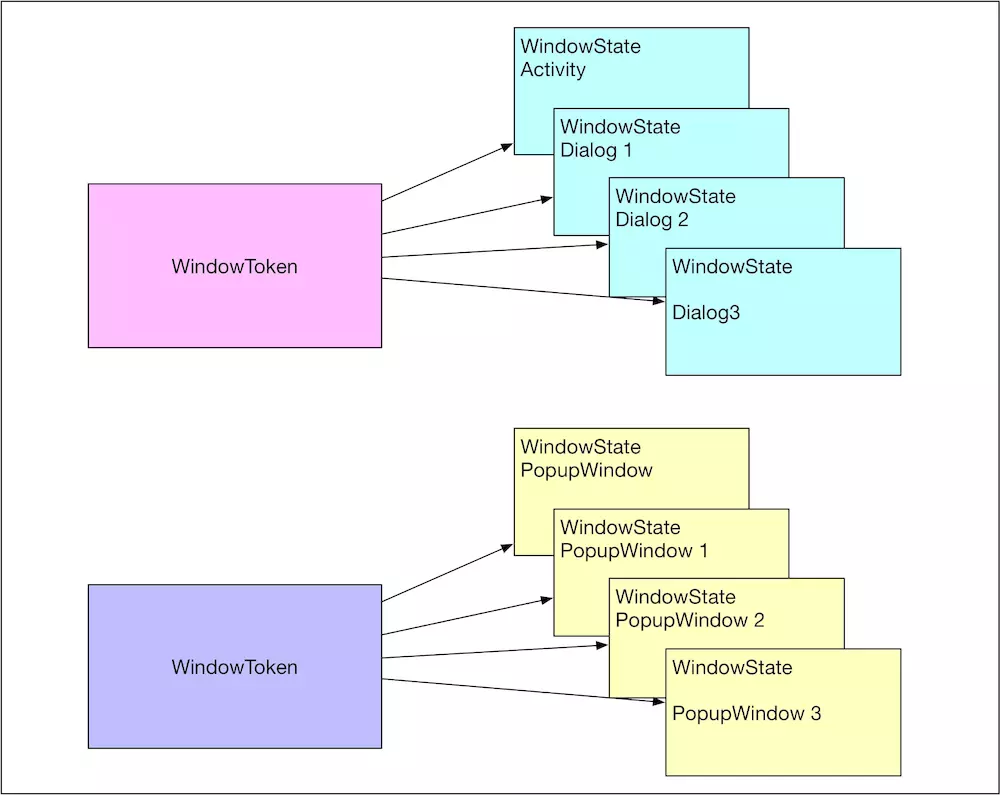
- WindowToken:窗口的令牌,其实也可以看做窗口分组的依据,在WMS端,与分组对应的数据结构是WindowToken(窗口令牌),而与组内每个窗口对应的是WindowState对象,每块令牌(AppWindowToken、WindowToken)都对应一组窗口(WindowState),Activity与Dialog对应的是AppWindowToken,PopupWindow对应的是普通的WindowToken。
- AppToken:其实是ActivityRecord里面的IApplicationToken.Stub appToken 代理,也是ActivityClientRecord里面的token,可以看做Activity在其他服务(非AMS)的抽象
那么接着
关键点1:一个窗口不能被添加两次,IWindow是一个Binder代理,在WMS端,一个窗口只会有一个IWindow代理,这是由Binder通信机制保证的,这个对象不能被添加两次,否则会报错。
关键点2,如果是子窗口的话,父窗口必须已被添加,由于我们分析的是系统Toast窗口,可以先不用关心;
关键点3,WindowManager.LayoutParams中有一个token字段,该字段标志着窗口的分组属性,比如Activity及其中的Dialog是复用用一个AppToken,Activity里的PopupWindow复用一个IWindow类型Token,其实就是Activity的ViewRootImpl里面创建的IWindow,而对于我们现在添加的Toast类系统窗口,并未设置其attrs.token,那即是null,其实所有的Toast类系统窗口的attrs.token都可以看做null,就算不是null,也会在WMS被强制设置为null。所以Toast类系统窗口必定复用一个WindowToken,也可以说所有的Toast类系统窗口都是位于同一分组,这也是因为该类型系统窗口太常用,而且为所有进程服务,直接用一个WindowToken管理更加快捷,毕竟快速新建与释放WindowToken也算是一种开销。假设到我们添加系统窗口的时候,没有任何系统窗口展示,是获取不到key=null的WindowToken的,要新建WindowToken,并且添加到全局的TokenMap中,
而关键点5,其实就是新建窗口在WMS端的抽象实例:WindowState,它同窗口一一对应,详细记录了窗口的参数、Z顺序、状态等各种信息,新建只有会被放入全局的Map中,同时也会被附加到相应的WindowToken分组中去,到这里APP端向WMS注册窗口的流程就算走完了,不过只算完成了前半部分,WMS还需要向SurfaceFlinger申请Surface,才算完成真正的分配了窗口。在向SurfaceFlinger申请Surface之前,WMS端需要获得SF的代理,在WindowState对象创建后会利用 win.attach()函数为当前APP申请建立SurfaceFlinger的链接:
void attach() {
    if (WindowManagerService.localLOGV) Slog.v(
    mSession.windowAddedLocked();
}

void windowAddedLocked() {
    if (mSurfaceSession == null) {
       // SurfaceSession新建
        mSurfaceSession = new SurfaceSession();
        mService.mSessions.add(this);
       ...
    }
    mNumWindow++;
}
可以看到SurfaceSession对于Session来说是单利的,也就是与APP的Seesion一一对应,SurfaceSession所握着的SurfaceFlinger的代理其实就是SurfaceComposerClient,其实现如下:
    public SurfaceSession() {
        mNativeClient = nativeCreate();
    }

    static jlong nativeCreate(JNIEnv* env, jclass clazz) {
        SurfaceComposerClient* client = new SurfaceComposerClient();
        client->incStrong((void*)nativeCreate);
        return reinterpret_cast<jlong>(client);
    }
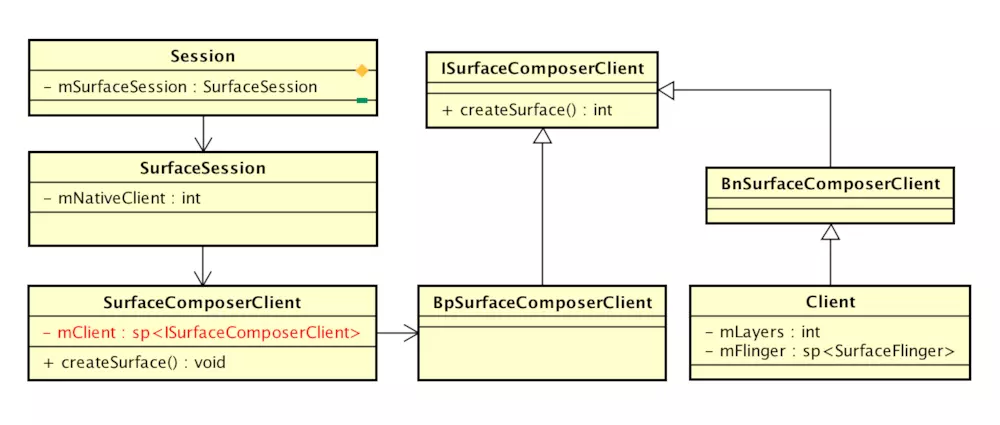
SurfaceComposerClient::SurfaceComposerClient()
    : mStatus(NO_INIT), mComposer(Composer::getInstance())
{
}
// 单利的,所以只有第一次的时候采用
void SurfaceComposerClient::onFirstRef() {
    sp<ISurfaceComposer> sm(ComposerService::getComposerService());
    if (sm != 0) {
        sp<ISurfaceComposerClient> conn = sm->createConnection();
        if (conn != 0) {
            mClient = conn;
            mStatus = NO_ERROR;
        }
    }
}

sp<ISurfaceComposerClient> SurfaceFlinger::createConnection()
{
    sp<ISurfaceComposerClient> bclient;
    sp<Client> client(new Client(this));
    status_t err = client->initCheck();
    if (err == NO_ERROR) {
        bclient = client;
    }
    return bclient;
}

void scheduleTraversals() {
    if (!mTraversalScheduled) {
        mTraversalScheduled = true;

            //关键点1 添加塞子
        mTraversalBarrier = mHandler.getLooper().getQueue().postSyncBarrier();
        //关键点2 添加异步消息任务
        mChoreographer.postCallback(
                Choreographer.CALLBACK_TRAVERSAL, mTraversalRunnable, null);
        ...
private void performTraversals() {
            final View host = mView;
             ...
    if (mFirst || windowShouldResize || insetsChanged ||
            viewVisibilityChanged || params != null) {
            //关键点1 申请Surface或者重新设置参数
            relayoutResult = relayoutWindow(params, viewVisibility, insetsPending);
          //关键点2 测量
                performMeasure(childWidthMeasureSpec, childHeightMeasureSpec);
            }
          //关键点3 布局
                performLayout(lp, desiredWindowWidth, desiredWindowHeight);
           //关键点4 更新window
              try {
                mWindowSession.setInsets(mWindow, insets.mTouchableInsets,
                        contentInsets, visibleInsets, touchableRegion);
            ...
          //关键点5 绘制
           performDraw();
           ...
       }
   private int relayoutWindow(WindowManager.LayoutParams params, int viewVisibility,
            boolean insetsPending) throws RemoteException {
       ...
        int relayoutResult = mWindowSession.relayout(
                mWindow, mSeq, params, ...  mSurface);
        ...
        return relayoutResult;
    }
public int relayoutWindow(Session session, IWindow client, int seq,... Surface outSurface) {
         WindowState win = windowForClientLocked(session, client, false);
        WindowStateAnimator winAnimator = win.mWinAnimator;
         //关键点1
           SurfaceControl surfaceControl = winAnimator.createSurfaceLocked();
           if (surfaceControl != null) {
         //关键点2
             outSurface.copyFrom(surfaceControl);
                } else {
                    outSurface.release();
                }
static jlong nativeCreate(JNIEnv* env, jclass clazz, jobject sessionObj,
        jstring nameStr, jint w, jint h, jint format, jint flags) {
    ScopedUtfChars name(env, nameStr);
    //关键点1
    sp<SurfaceComposerClient> client(android_view_SurfaceSession_getClient(env, sessionObj));
    //关键点2
    sp<SurfaceControl> surface = client->createSurface(
            String8(name.c_str()), w, h, format, flags);
    surface->incStrong((void *)nativeCreate);
    return reinterpret_cast<jlong>(surface.get());
}
关键点1是取到SurfaceSession对象中SurfaceComposerClient对象,之后调用SurfaceComposerClient的createSurface方法进一步创建SurfaceControl,
sp<SurfaceControl> SurfaceComposerClient::createSurface(
        const String8& name,
        uint32_t w,
        uint32_t h,
        PixelFormat format,
        uint32_t flags)
{
    sp<SurfaceControl> sur;
    if (mStatus == NO_ERROR) {
        sp<IBinder> handle;
        sp<IGraphicBufferProducer> gbp;
        //关键点1 获取图层的关键信息handle, gbp
        status_t err = mClient->createSurface(name, w, h, format, flags,
                &handle, &gbp);
         //关键点2 根据返回的图层关键信息 创建SurfaceControl对象
        if (err == NO_ERROR) {
            sur = new SurfaceControl(this, handle, gbp);
        }
    }
    return sur;
}
status_t Client::createSurface(
        const String8& name,
        uint32_t w, uint32_t h, PixelFormat format, uint32_t flags,
        sp<IBinder>* handle,
        sp<IGraphicBufferProducer>* gbp){
    ...
    //关键点2 这里并未直接创建 ,而是通过发送了一个MessageCreateLayer消息
    sp<MessageBase> msg = new MessageCreateLayer(mFlinger.get(),
            name, this, w, h, format, flags, handle, gbp);
    mFlinger->postMessageSync(msg);
    return static_cast<MessageCreateLayer*>( msg.get() )->getResult();
}
Client 并不会直接新建图层,而是向SurfaceFlinger发送一个MessageCreateLayer消息,通知SurfaceFlinger服务去执行,其handler代码如下:
class MessageCreateLayer : public MessageBase {
        SurfaceFlinger* flinger;
        Client* client;
            virtual bool handler() {
            result = flinger->createLayer(name, client, w, h, format, flags,
                    handle, gbp);
            return true;
        }
    };
其实就是调用SurfaceFlinger的createLayer,创建一个图层,到这里才是真正的创建图层:
status_t SurfaceFlinger::createLayer(
        const String8& name,
        const sp<Client>& client,
        uint32_t w, uint32_t h, PixelFormat format, uint32_t flags,
        sp<IBinder>* handle, sp<IGraphicBufferProducer>* gbp)
{
    if (int32_t(w|h) < 0) {
        return BAD_VALUE;
    }

    status_t result = NO_ERROR;

    sp<Layer> layer;
     //关键点1 新建不同图层
    switch (flags & ISurfaceComposerClient::eFXSurfaceMask) {
        case ISurfaceComposerClient::eFXSurfaceNormal:
            result = createNormalLayer(client,
                    name, w, h, flags, format,
                    handle, gbp, &layer);
            break;
        case ISurfaceComposerClient::eFXSurfaceDim:
            result = createDimLayer(client,
                    name, w, h, flags,
                    handle, gbp, &layer);
            break;
        default:
            result = BAD_VALUE;
            break;
    }

    if (result != NO_ERROR) {
        return result;
    }
   ...
}
SurfaceFlinger会根据不同的窗口参数,创建不同类型的图层,这里只看一下createNormalLayer普通样式的图层,
status_t SurfaceFlinger::createNormalLayer(const sp<Client>& client,
        const String8& name, uint32_t w, uint32_t h, uint32_t flags, PixelFormat& format,
        sp<IBinder>* handle, sp<IGraphicBufferProducer>* gbp, sp<Layer>* outLayer)
{
    // initialize the surfaces
    switch (format) {
    case PIXEL_FORMAT_TRANSPARENT:
    case PIXEL_FORMAT_TRANSLUCENT:
        format = PIXEL_FORMAT_RGBA_8888;
        break;
    case PIXEL_FORMAT_OPAQUE:
        format = PIXEL_FORMAT_RGBX_8888;
        break;
    }
    //关键点 1
    *outLayer = new Layer(this, client, name, w, h, flags);
    status_t err = (*outLayer)->setBuffers(w, h, format, flags);
    //关键点 2
    if (err == NO_ERROR) {
        *handle = (*outLayer)->getHandle();
        *gbp = (*outLayer)->getProducer();
    }
  return err;
}
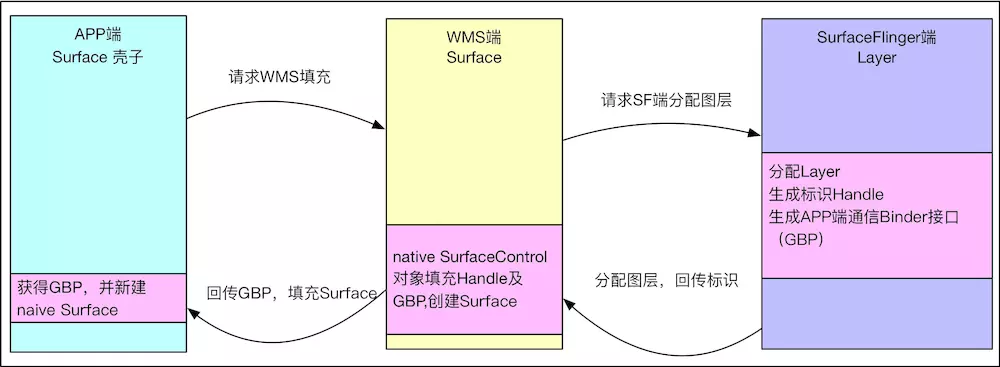
可以看到 图层最终对应的是Layer,这里会新建一个Layer对象,Layer中包含着与这个图层对应的Handle及Producer对象,Handle可以看做是Surface的唯一性标识,不过好像没太大的作用,最多是一个标识,将来清理的时候有用。相比之下gbp = (*outLayer)->getProducer()比较重要,它实际是一个BufferQueueProducer对象,关系到共享内存的分配问题,后面会专门分析,这里到此打住,我们终于得到了一个图层对象,到这里之后,我们梳理一下,图层如何建立的:
- 首先APP端新建一个Surface图层的容器壳子,
- APP通过Binder通信将这个Surface的壳子传递给WMS,
- WMS为了填充Surface去向SurfaceFlinger申请真正的图层,
- SurfaceFlinger收到WMS请求为APP端的Surface分配真正图层
- 将图层相关的关键信息Handle及Producer传递给WMS
Layer建立之后,SurfaceFlinger会将图层标识信息Handle及Producer传递给WMS,WMS利用这两者创建一个SurfaceControl对象,之后再利用该对象创建Surface,具体代码如下:
void getSurface(Surface outSurface) {
    outSurface.copyFrom(mSurfaceControl);
}

public void copyFrom(SurfaceControl other) {
long surfaceControlPtr = other.mNativeObject;
long newNativeObject = nativeCreateFromSurfaceControl(surfaceControlPtr);
synchronized (mLock) {
    setNativeObjectLocked(newNativeObject);
}
}
可以看到Surface的拷贝函数其实就是直接修改Surface native对象指针值,native的Surface对象中包含mGraphicBufferProducer对象,很重要,会被传递给APP端。
static jlong nativeCreateFromSurfaceControl(JNIEnv* env, jclass clazz,
        jlong surfaceControlNativeObj) {

    sp<SurfaceControl> ctrl(reinterpret_cast<SurfaceControl *>(surfaceControlNativeObj));
    sp<Surface> surface(ctrl->getSurface());
    if (surface != NULL) {
        surface->incStrong(&sRefBaseOwner);
    }
    return reinterpret_cast<jlong>(surface.get());
}

sp<Surface> SurfaceControl::getSurface() const
{
    Mutex::Autolock _l(mLock);
    if (mSurfaceData == 0) {
        mSurfaceData = new Surface(mGraphicBufferProducer, false);
    }
    return mSurfaceData;
}
到这里WMS端Surface创建及填充完毕,并且Surface其实与WMS的SurfaceControl一一对应,当APP端需要在图层级别进行操控的时候,其实还是要依靠SurfaceControl的,WMS的Surface创建完毕后,需要传递给APP端,之后APP端就获得直接同SurfaceFlinger通信的能力,比如绘图与UI更新,怎传递的呢?我们知道Surface实现了Parcel接口,因此可以传递序列化的数据,其实看一下Surface nativeReadFromParcel就知道到底是怎么传递的了,利用readStrongBinder获取IGraphicBufferProducer对象的句柄,之后转化为IGraphicBufferProducer代理其实就是BpGraphicBufferProducer,之后利用BpGraphicBufferProducer构建Surface,这样APP端Surface就被填充完毕,可以同SurfaceFlinger通信了:
static jlong nativeReadFromParcel(JNIEnv* env, jclass clazz,
        jlong nativeObject, jobject parcelObj) {
    Parcel* parcel = parcelForJavaObject(env, parcelObj);
    if (parcel == NULL) {
        doThrowNPE(env);
        return 0;
    }
     sp<Surface> self(reinterpret_cast<Surface *>(nativeObject));
    sp<IBinder> binder(parcel->readStrongBinder());
    if (self != NULL
            && (IInterface::asBinder(self->getIGraphicBufferProducer()) == binder)) {
        return jlong(self.get());
    }
    sp<Surface> sur;
    sp<IGraphicBufferProducer> gbp(interface_cast<IGraphicBufferProducer>(binder));
    if (gbp != NULL) {
        sur = new Surface(gbp, true);
        sur->incStrong(&sRefBaseOwner);
    }

    if (self != NULL) {
        self->decStrong(&sRefBaseOwner);
    }

    return jlong(sur.get());
}
到这里为止,APP<->WMS <->WMS 通信申请Surface的流程算走完了
总结
窗口的添加流程简化如下,这里暂且忽略窗口的分组管理。
- APP首先去WMS登记窗口
- WMS端登记窗口
- APP新建Surface壳子,请求WMS填充Surface
- WMS请求SurfaceFlinger分配窗口图层
- SurfaceFlinger分配Layer,将结果回传给WMS
- WMS将窗口信息填充到Surface传输到APP
- APP端获得填充信息,获取与SurfaceFlinger通信的能力

 浙公网安备 33010602011771号