HCIA-AI v2.0 培训05: TensorFlow 介绍
TensorFlow 介绍
- 内容
TensorFlow 2.0是什么及其特点
TensorFlow 2.0基础和高阶操作的方法
TensorFlow 2.0中Keras高层接口
了解其他深度学习框架
TensorFlow 框架介绍
简介
- 目前最流行
- 迭代版本有三个:0.1,1.0,2.0
- 是一个用于机器学习和深度学习的端到端开源平台
前世今生
- 2015.9 发布0.1 版本;2017.2 发布1.0版本;2019.3 发布2.0版本
- 2015年同类型框架
- Ski-learn: ML, 不支持GPU
- Caffe: 第一个面向深度学习的框架,但不支持自动求导
- Keras: 只提供API接口
- Torch: Lua语言
- Teano: 开发调试困难
- 当下同类型框架
- Caffe: Facebook
- Caffe2: PyTorch(最新版本Caffe2作为PyTorch的C++后端已并入到PyTorch里去了)
- Torch--PyTorch: PyTorch当下非常流行的框架,集合了Torch和Caffe2,Facebook主推
- Teano: Google 推出 TF1.0 ---- TF2.0
- TF 1.0弊端
- 创建Tensor后,不能直接返回结果,而是需要创建session会话机制,包含graph的概念在里面,而且需要session.run()才能运行,这种风格更像一种硬件编程语言VHDL
- 与PyTorch等相比,TF1.0徒增了以上概念,使用起来非常困扰
- TF1.0调试困难,API混乱,入门困难。入门后使用依旧困难,导致很多研究人员转向了PyTorch
TF2.0
- TF+Keras
- 去掉了graph和session机制,变得像Python,PyTorch一样所见即所得
- 主要改进点
- Session.run: 图和会话机制
- tf.control_dependencies: 实时控制的概念
- tf.global_variables_initializer
- tf.cond: 分支控制的概念原本可以通过python中if,else 等来完成
- tf.while_loop
v2.0 的编程风格与PyTorch很相似:
Forget TensorFlow 1.0
- TensorFlow1.0会将大量的时间花费在冗余概念的编写上,而忽略对深度学习算法的研究。一些概念将一去不复返:
- 计算图 Graph
- 会话 Session
- 变量管理 Variable Scope 与共享 reuse
- Define-and-run
- 1.0中的一些概念在2.0中基本上用不到,今后不需要对tf1.0再进行学习和了解
TensorFlow2.0 介绍
- tf2.0 包括了TensorFlow 核心库,JavaScript, Lite, Extended。构成了TF的一个完整的生态系统
- TF核心库
- 使初学者和专家可以轻松的创建机器学习模型
- TF的高级API基于KerasAPI标准,用于定义和训练神经网络
- Keras通过用户友好的API实现快速原型设计,最先进的研究和生产
TF2.0 - For JavaScript
- TensorFlow.js: 是一个用于在JS中开发和训练ML模型,并在浏览器或Node.js上部署的库
- 运行现有模型:使用官方TensorFlow.js模型或转换Python模型
- 重新训练现有模型:使用TransferLearning自定义模型
- 使用JS开发ML:使用灵活直观的API直接在JS中构建和训练模型
TF Lite
一个用于设备推理的开源深度学习框架,可以满足在移动和物联网设备上部署机器学习模型
- 选择一个模型:选择新模型或重新训练现有模型
- 兑换:使用 TensorFlow Lite 转换器将 TensorFlow 模型转换为压缩的平缓冲区
- 部署:获取压缩的 .tflite 文件并将其加载到移动或嵌入式设备中
- 优化:通过32位浮点数转换为更高效的8位整数或在GPU上运行来进行量化
TF2.0 - TF Extended
TFX(TensorFlow Extended):用于部署生产ML管道的端到端平台,当训练好的模型准备从研究转移到生产时,使用TFX创建和管理生产管道
- TF数据验证:TFDV可帮助开发人员大规模了解,验证和监控其ML数据
- TF变换:将数据预处理成合适的格式
- TF模型分析:TFMA使开发人员能够计算和可视化模型的评估指标
- TF服务:轻松部署新算法和实验,同时保持相同的服务器架构和API
why TensorFlow
优势
- 支持GPU加速
- 支持自动求导
- 深度学习API
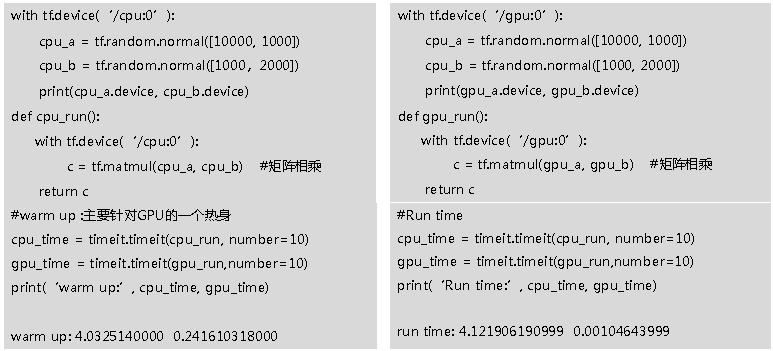
GPU加速
对矩阵的加减乘除有一个并行的运算加速(相对于cpu)
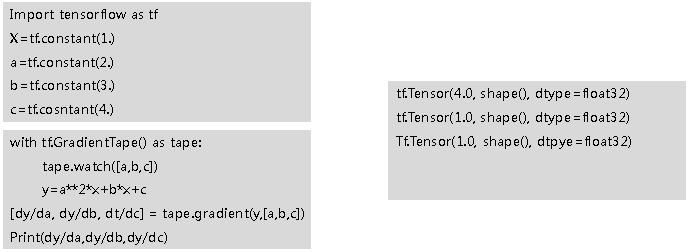
自动求导
深度学习API
-
tf.matmul
-
tf.nn.conv2d
-
tf.nn.relu
-
tf.nn.maxpool2d
-
tf.nn.sigmoid
-
tf.nn.softmax
-
layers.Dense
-
layers.Conv2D
-
layers.LSTM
-
layers.ReLU
-
layers.MaxPool2D
TensorFlow 2.0 基础操作
数据类型
常见的数据类型载体
- List
设计灵活,可随意插入添加和编辑,内存管理不连续。对于高维度数据的读取和写入效率会很低。
- np.array
专门用来解决同类数据运算的一个载体,可以很方便的将图片数据进行吞吐和转置等操作。
弊端:在深度学习之前就已设计和广泛应用的科学计算库,没有很好的GPU计算支持,也不能自动求导。所以tensorflow应运而生。
- tf.Tensor
TensorFlow 和 Numpy 的地位在某种层面上相似,例如一些拼接,random的操作等等。而且为了方便实用Numpy的开发者,能够更便利的转移到TensorFlow,在一些API的命名上也很相似。只不过功能更偏重于神经网络的计算。
tensor
- Scalar
- Vector
- Matrix
- tensor(维度大于2)
常用数据类型
- int, float, double
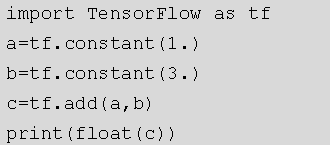
tf.constant(1)
<tf.Tensor: id=1, shape=(), dtype=int32, numpy=1>
tf.constant(1.)
<tf.Tensor: id=2, shape=(), dtype=float32, numpy=1.0>
# tf.constant(2.2,dtype=tf.int32)   # 由于类型不同,会报错
tf.constant(2., dtype=tf.double)  # 指定双精度类型,tf.double实际上是一个别名,对应tf.float64
<tf.Tensor: id=5, shape=(), dtype=float64, numpy=2.0>
- bool: 布尔类型
tf.constant([True, False])
<tf.Tensor: id=6, shape=(2,), dtype=bool, numpy=array([ True, False])>
- string
tf.constant('hello, world')
<tf.Tensor: id=7, shape=(), dtype=string, numpy=b'hello, world'>
常用属性
- device
with tf.device('cpu'):
  a = tf.constant(1)  # <tf.Tensor: id=8, shape=(), dtype=int32, numpy=1>

with tf.device('gpu'):
  b = tf.range(4)  # <tf.Tensor: id=12, shape=(4,), dtype=int32, numpy=array([0, 1, 2, 3], dtype=int32)>

# 判断a和b张量分别在哪个设备上
print(a.device)  # '/job:localhost/replica:0/task:0/device:CPU:0'
print(b.device)  # '/job:localhost/replica:0/task:0/device:CPU:0'
- numpy
支持tensor类型直接转换成np.array
b.numpy()  # array([0, 1, 2, 3], dtype=int32)

int(a)  # 可以直接转换为int,但前提是a必须是个scalar
float(a)
- ndim
查看维度
b.ndim  # 1
b.shape  # TensorShape([4])
tf.rank(b)  # <tf.Tensor: id=13, shape=(), dtype=int32, numpy=1>
# tf.rank 张量的秩,相当于np.ndim
- 判断 tensor
a = tf.constant([1.])
b = tf.constant([True, False])
c = tf.constant('hello, world')
d = np.arange(4)

# 判断是否是tensor
tf.is_tensor(b)  # True
isinstance(a,tf.Tensor) # True
tf.is_tensor(d)  # False

# 查看数据类型
a.dtype  # tf.float32
b.dtype  # tf.bool
c.dtype  # tf.string
- 数据转换
# convert
a = np.arange(5)
a.dtype  # dtype('int64')
aa = tf.convert_to_tensor(a, tf.int32)  # <tf.Tensor: id=17, shape=(5,), dtype=int32, numpy=array([0, 1, 2, 3, 4], dtype=int32)>

# cast, 更简洁
tf.cast(aa, dtype=tf.float32)
aaa = tf.cast(aa, dtype=tf.double)
tf.cast(aaa, dtype=tf.int32)

# cast - int 和 bool 转换
b = tf.constant([0, 1])
bb = tf.cast(b, dtype=tf.bool)
tf.cast(bb, dtype=tf.int32)

# Variable: 可求导的属性(专门为神经网络的参数设计的属性)
a = tf.range(5)
b = tf.Variable(a)  # a在进行了variable包装后就具备了可求导特性
b.dtype  # tf.int32
b.name  # 'Variable:0'
isinstance(b, tf.Tensor)  # False
isinstance(b, tf.Variable)  # True
tf.is_tensor(b)  # True
创建 tensor
from numpy/lists
# numpy
tf.convert_to_tensor(np.ones([2,3]))  # <tf.Tensor: id=2, shape=(2, 3), dtype=float64, numpy=
# array([[1., 1., 1.],
#        [1., 1., 1.]])>

# list
tf.convert_to_tensor([1,2])  # <tf.Tensor: id=0, shape=(2,), dtype=int32, numpy=array([1, 2])>
tf.convert_to_tensor([1,2.])  # <tf.Tensor: id=1, shape=(2,), dtype=float32, numpy=array([1., 2.], dtype=float32)>
zeros/ones
tf.zeros([2,2])  # <tf.Tensor: id=56, shape=(2, 2), dtype=float32, numpy=array([[0., 0.],[0., 0.]], dtype=float32)>
tf.ones(1)  # <tf.Tensor: id=41, shape=(1,), dtype=float32, numpy=array([1.], dtype=float32)>
tf.ones([])  # <tf.Tensor: id=9, shape=(), dtype=float32, numpy=1.0> (标量)
tf.ones([2])  # <tf.Tensor: id=30, shape=(2,), dtype=float32, numpy=array([1., 1.], dtype=float32)>
fill/normal
# param: shape, element
tf.fill([2,2],0)

# 随机初始化
tf.random.normal([2,2,], mean=1, stddev=1)  # <tf.Tensor: id=65, shape=(2, 2), dtype=float32, numpy=array([[1.0236273, 1.4187639],[2.0626822, 1.4827584]], dtype=float32)>
Uniform/shuffle
tf.random.uniform([2,2], minval=0, maxval=1)
# shuffle: 将数据顺序随机打乱
idx = tf.range(10)
print(idx)  # tf.Tensor([0 1 2 3 4 5 6 7 8 9], shape=(10,), dtype=int32)
idx = tf.random.shuffle(idx)
print(idx)  # tf.Tensor([9 0 3 5 7 2 8 6 1 4], shape=(10,), dtype=int32)
索引和切片
- 基础索引方式:给定每个维度的索引
a = tf.ones([1, 5, 5, 3])
a[0][0]
a[0][0][0]
a[1,0,0]
a[1,2].shape
- 切片
- [start:end]
- [start: end: step] / [::step]
- [::-1] # 倒序
- ...
- tf.gather # 可以获取指定为度所指定索引的数据,并可以设定抽取数据的顺序
data = tf.random.normal([4,35,8])
tf.gather(data, axis=0, indices=[2,3]).shape  # 等价 data[[2,3]...]
tf.gather(data, axis=0, indices=[2,1,3,0]).shape
维度变换
- shape, ndim
- reshape
- expand_dims/squeeze
- transpose
- broadcast_to
transpose
a = tf.random.normal([4,28,28,3])
aa = tf.reshape(a, [4,784,3])

# transpose
b = tf.random.normal([4,3,2,1])
tf.transpose(b).shape  # TensorShape([1, 2, 3, 4])
tf.transpose(b, perm=[0,1,3,2]).shape  # TensorShape([4, 3, 1, 2])
expand_dims/squeeze
增加维度/减少维度
a = tf.random.normal([4,35,8])
tf.expand_dims(a, axis=0).shape  # TensorShape([1, 4, 35, 8])
tf.expand_dims(a, axis=3).shape  # TensorShape([4, 35, 8, 1])

# squeeze: 默认将维度为1的维度压缩
tf.squeeze(tf.zeros([1,2,1,1,3])).shape
# 指定要压缩的维度,只能压缩维度为1的维度,否则报错
tf.squeeze(a, axis=0).shape
broadcast_to
本质是张量维度扩张的一个手段,指对某一个维度上重复n次但是没有真正复制一个数据
- 优点是不需要复制数据,不占内存,编写代码更简洁
- 用于不同维度的数据间的计算
- 后台自动进行扩张计算
- 若无法复制成相同维度大小,则无法进行广播运算
- 方法:
tf.broadcast_to(a, [3,4,5])- 例: [4,32,32,3]+[3],对[3]进行broadcasting: [3] -> [1,1,1,3] -> [4,32,32,3]
a = tf.random.normal([4,32,32,3])
(a+tf.random.normal([3])).shape  # TensorShape([4, 32, 32, 3])
b = tf.broadcast_to(tf.random.normal([4,1,1,1]), [4,32,32,3])
b.shape  # TensorShape([4, 32, 32, 3])

# 无法复制成相同维度大小:对应的维度必须相同或为1才能广播
# (a+tf.random.normal([1,3,1,1])).shape
# tf.broadcast_to(tf.random.normal([1,3,1,1]),[4,32,32,3]).shape
数学运算
- + - * /
- //, % (整除,取余)
- tf.exp, tf.math.log (v2.0 不支持直接调用log的API)
- tf.pow, sqrt
- 矩阵操作
- @, matmul (都是矩阵相乘)
- 维度操作
- Reduce_mean/max/min/sum
TensorFlow 2.0 高阶操作
合并和分割
- 拼接的维度可以不等,但是其他维度必须相等
a = tf.ones([2,2])
b = tf.ones([2,2])
c = tf.concat([a, b], axis=0)
c.shape  # TensorShape([4, 2])
- 堆叠:创建新的维度,但已有的维度形状必须全部相等
- 增加一个维度插入到指定维度,然后在该维度堆叠其之后维度的数据
a = tf.ones([2,2])
b = tf.ones([2,2])
c = tf.stack([a, b], axis=2)
# 默认axis为0
c=tf.stack([a,b])
c.shape  # TensorShape([4, 2])
- unstack: 与stack是互逆的操作
a = tf.random.normal([3,4,5])
aa = tf.unstack(a)  # default axis=0
len(aa)  # 3
aa[0].shape  # TensorShape([4, 5])
aa[1].shape  # TensorShape([4, 5])
aa[2].shape  # TensorShape([4, 5])
- split: 比unstack更灵活
a = tf.random.normal([3,5,8])
b = tf.split(a, axis=2, num_or_size_splits=2)  # axis对应的维度数必须能被num_or_size_splits(如果是数值)整除
len(b)  # 2
b[0].shape  # TensorShape([3, 5, 4])
c = tf.split(a, axis=2, num_or_size_splits=[2,1,5])  # num_or_size_splits(如果是列表)之和必须与axis对应的维度数相等
len(c)  # 3
c[0].shape  # TensorShape([3, 5, 2])
c[1].shape  # TensorShape([3, 5, 1])
c[2].shape  # TensorShape([3, 5, 5])
数据统计
- tf.reduce_min/max
a = tf.random.normal([4,10])
tf.reduce_min(a)  # <tf.Tensor: id=7, shape=(), dtype=float32, numpy=-2.5936286>
tf.reduce_max(a)  # <tf.Tensor: id=9, shape=(), dtype=float32, numpy=2.816933>
tf.reduce_mean(a)  # <tf.Tensor: id=11, shape=(), dtype=float32, numpy=0.07705517>

# 指定维度
tf.reduce_min(a, axis=1)  # <tf.Tensor: id=13, shape=(4,), dtype=float32, numpy=array([-2.5936286 , -1.0607007 , -1.2169563 , -0.73346484], dtype=float32)>
- tf.argmax/argmin
a = tf.random.normal([4,10])
tf.argmax(a).shape  # TensorShape([10])   默认axis=0
tf.argmax(a, axis=1).shape  # TensorShape([4])
- tf.equal: 比较两个张量
a = tf.constant([1,1,3,2,5])
b = tf.range(5)
tf.equal(a, b)  # <tf.Tensor: id=38, shape=(5,), dtype=bool, numpy=array([False,  True, False, False, False])>
tf.reduce_sum(tf.cast(tf.equal(a,b), tf.int32))
- tf.unique: 张量的独特值,去除重复元素
a = tf.range(5)
tf.unique(a)  # Unique(y=<tf.Tensor: id=61, shape=(5,), dtype=int32, numpy=array([0, 1, 2, 3, 4])>, idx=<tf.Tensor: id=62, shape=(5,), dtype=int32, numpy=array([0, 1, 2, 3, 4])>)
b = tf.constant([1,2,2,5,3])
tf.unique(b)  # Unique(y=<tf.Tensor: id=64, shape=(4,), dtype=int32, numpy=array([1, 2, 5, 3])>, idx=<tf.Tensor: id=65, shape=(5,), dtype=int32, numpy=array([0, 1, 1, 2, 3])>)
张量排序
- tf.sort: 完成对某维度上的完全排序/获得排序后的索引位置
a = tf.random.shuffle(tf.range(5))
tf.sort(a, direction='DESCENDING')  # <tf.Tensor: id=103, shape=(5,), dtype=int32, numpy=array([4, 3, 2, 1, 0])>
idx = tf.argsort(a, direction='DESCENDING')
idx  # <tf.Tensor: id=113, shape=(5,), dtype=int32, numpy=array([4, 2, 1, 0, 3])>
tf.gather(a, idx)  # <tf.Tensor: id=115, shape=(5,), dtype=int32, numpy=array([4, 3, 2, 1, 0])>
- tf.math.top_k
sort默认axis=-1
a = tf.random.uniform([3,3], maxval=10, dtype=tf.int32)
tf.sort(a)
res = tf.math.top_k(a, 2)
res.indices
res.values
填充和复制
- pad: 填充,每个维度的头和尾填充0
a = tf.reshape(tf.range(9), [3,3])
tf.pad(a, [[0,0],[0,0]])
tf.pad(a, [[1,0],[0,0]])

b = tf.reshape(tf.range(60), [3,4,5])
tf.pad(b, [[1,0],[0,2],[1,0]]).shape  # TensorShape([4, 6, 6])
- tile: 复制,沿着维度n次复制数据
[a,b,c] * 2 -> [a,b,c,a,b,c]
a = tf.reshape(tf.range(9), [3,3])
tf.tile(a, [1,2])
tf.tile(a, [2,1])
张量限幅
- clip_by_value: 根据值剪裁
a = tf.range(10)
tf.maximum(a, 2)
tf.minimum(a, 8)
tf.clip_by_value(a, 2, 8)  # 小于2的取2,大于8的取8
- relu
a = tf.range(-5,5)  # <tf.Tensor: id=215, shape=(10,), dtype=int32, numpy=array([-5, -4, -3, -2, -1,  0, 1, 2, 3, 4])>
tf.nn.relu(a)  # <tf.Tensor: id=215, shape=(10,), dtype=int32, numpy=array([0, 0, 0, 0, 0, 0, 1, 2, 3, 4])>
tf.maximum(a, 0)  # <tf.Tensor: id=215, shape=(10,), dtype=int32, numpy=array([0, 0, 0, 0, 0, 0, 1, 2, 3, 4])>
- clip_by_norm: 范数限制
a = tf.random.normal([2,2],mean=10)
tf.norm(a)

aa = tf.clip_by_norm(a, 15)
tf.norm(aa)
- Gradient Clipping: 梯度剪裁
TensorFlow 2.0 中Keras高层接口
Keras是一个用于构建和训练深度学习模型的高阶API。可用于快速设计原型、高级研究和生产
- 方便用户使用
- 模块化和可组合
- 易于扩展
- tf.keras:
- Datasets
- Estimator
- Layer
- Losses
- Metrics
- Preprocessing
- Optimizers
tf.keras.datasets
keras中内置的数据集,如 boston_housing, mnist, cifar10
tf.keras.estimator
Estimator: 一种极大地简化机器学习编程的高阶TensorFlow API,封装了 训练、评估、预测、导出
主要功能是 model_to_estimator: Estimator 根据给定的Keras模型构造一个实例
tf.keras.layers
网络层封装了变量和作用其上的操作。网络传播时的计算、连接的权重和偏置都由网络层对象来管理。
tf.keras.losses
内置loss功能。包括计算标签与预测之间的二进制交叉熵损失、误差平方损失、绝对百分比误差等
tf.keras.metrics
内置指标。包括的指标:mean, accuracy, recall 等
tf.keras.preprocessing
keras数据预处理工具
tf.keras.optimizers
内置优化器类。包括 Adam, Adadelta, SGD 等
TensorFlow2.0 实战
手写数字 - MNIST数据集
- 0-9手写数字分类
- 每个数字有7000张图片
- 训练/测试: 60k vs. 10k
- 图片大小 28*28 -> 784
Auto MPG
建立一个预测70年代末80年代初汽车燃油效率模型,用来预测
- 数据集大小: [398,8]
- 主要包含属性:cylinders, displacement, horsepower, weight等8个
话说有十二个鸡蛋,有一个是坏的(重量与其余鸡蛋不同),请问用天平最少称几次,才能称出哪个鸡蛋是坏的?
解析:
分成三组abc,每组4个鸡蛋。用天平秤a和b,分为两种情况,平衡和不平衡
a1,a2,a3,a4 - b1,b2,b3,b4
- 平衡
坏蛋在c中,将c分为两组ca和cb,分别有两个鸡蛋,然后将cb中的一个鸡蛋(cb2)用正常蛋(假设a1)替换,然后用天平秤。分为三种结果,平衡和ca沉和cb沉
ca(c1,c2) - cb(c3,a1)
替换:c4
- 平衡 · 平衡
坏蛋是c4,再与正常蛋比较即可知轻重。
- 平衡 · ca较沉
将ca中一个蛋拿掉,替换成c3,然后将原来c3的位置用一个正常鸡蛋(假设a2)代替,再用天平秤,结果分为三种,平衡、ca沉和cb沉。
ca(c1,c3) - cb(a2,a1)
替换:c2
若平衡,则被替换的蛋(原ca2,c2)是坏蛋且较沉;若仍然ca沉,则ca1(c1)是坏蛋且较沉;若cb沉,则c3是坏蛋且较轻。
- 平衡 · cb较沉
ca(c1,c3) - cb(a2,a1)
替换:c2
与上述替换方法一样,结果分为三种,平衡、ca沉和cb沉。若平衡,则c2是坏蛋且较轻;若ca沉,则c3是坏蛋且较沉;若仍然cb沉,则c3是坏蛋且较轻。
- 平衡 · 另一种解法
a和c中分别取三个进行比较:
A(a1,a2,a3) - B(c1,c2,c3)
剩余:c4
若平衡,则c4为坏蛋,再与正常蛋比较即可;若不平衡,则坏蛋在c1,c2,c3中且轻重即知,任取其中两个相互比较即可得出结果。
- 不平衡(假设a沉,另一种情况同理)
a中拿掉3个,并将b中的三个拿到a组,然后用c的3个正常蛋代替b的3个拿走的蛋:
A(a1,b2,b3,b4) - B(b1,c1,c2,c3)
替换:a2,a3,a4
结果分三种,平衡、A沉和B沉。若平衡则说明坏蛋在a2,a3,a4中且较沉,将其中任两个比较即可得出结果;若仍然A沉,则a1沉或b1轻,将其一与正常蛋比较即可;若B沉,则说明坏蛋在b2,b3,b4中且较轻,任取其中两个比较即可得出结果。

 浙公网安备 33010602011771号