第五章 管理本地Linux用户和组
查看用户信息:
[root@server0 ~]# whatis id
id (1)               - print real and effective user and group IDs
id (1p)              - return user identity
如何查看命令是内部命令还是外部命令?
[root@server0 ~]# type id
id is /usr/bin/id
[root@server0 ~]# id --help
Usage: id [OPTION]... [USER]
Print user and group information for the specified USER,
or (when USER omitted) for the current user.

  -a             ignore, for compatibility with other versions
  -Z, --context  print only the security context of the current user
  -g, --group    print only the effective group ID
  -G, --groups   print all group IDs
  -n, --name     print a name instead of a number, for -ugG
  -r, --real     print the real ID instead of the effective ID, with -ugG
  -u, --user     print only the effective user ID
  -z, --zero     delimit entries with NUL characters, not whitespace;
                   not permitted in default format
      --help     display this help and exit
      --version  output version information and exit

Without any OPTION, print some useful set of identified information.

GNU coreutils online help: <http://www.gnu.org/software/coreutils/>
For complete documentation, run: info coreutils 'id invocation'
无论是Windows还是Linux,系统中的每个进程都作为一个特定的用户运行,每个文件也都归一个特定用户所有。对于文件系统和目录的访问也受到用户的限制。一个进程能够访问什么资源(文件或目录),取决于运行他们的用户。
[root@server0 ~]# ls -l /tmp/
total 4
drwxr-xr-x. 2 root root  17 Jan  7  2015 hsperfdata_root
-rw-r--r--. 1 root root 150 Oct 25 16:07 rht
drwx------. 3 root root  16 Oct 25 16:07 systemd-private-Igd40r
drwx------. 3 root root  16 Oct 25 16:07 systemd-private-zQvqe6
[root@server0 ~]# ps au
USER       PID %CPU %MEM    VSZ   RSS TTY      STAT START   TIME COMMAND
root       717  0.1  0.9 160724 17800 tty1     Ss+  16:07   0:01 /usr/bin/Xorg :0 -background none -verbose -auth /run/gdm/auth-for-gdm-ncHSnm/database -seat seat0 -nolisten tcp vt1
root      1506  0.0  0.0 110004   824 ttyS0    Ss+  16:07   0:00 /sbin/agetty --keep-baud ttyS0 115200 38400 9600
root      1645  0.0  0.1 116240  2928 pts/0    Ss   16:17   0:00 -bash
root      1685  0.0  0.0  16040   580 pts/0    S    16:17   0:00 dbus-launch --autolaunch=946cb0e817ea4adb916183df8c4fc817 --binary-syntax --close-stderr
root      1719  0.0  0.0 123356  1320 pts/0    R+   16:19   0:00 ps au
所以,用户也可以理解为是操作系统资源或服务资源的一种分配方式。
用户管理,对于企业系统管理员来说是一项重要的工作,用户管理不当将会给生产环境带来极大风险,
[root@server0 ~]# id root
uid=0(root) gid=0(root) groups=0(root)
用户名、组名是为了便于我们人来识别;但是操作系统识别的并不是名称,而是数字(专业叫ID)。
所以Linux下面的用户和组,不但有名称,而且还有编号:UID,GID。Linux系统就是按UID和GID来识别用户和组的。
[root@server0 ~]# id student
uid=1000(student) gid=1000(student) groups=1000(student),10(wheel)
[root@server0 ~]# su - student
Last login: Fri Oct 25 16:22:27 CST 2019 on pts/0
[student@server0 ~]$ id student
uid=1000(student) gid=1000(student) groups=1000(student),10(wheel)
[student@server0 ~]$
student用户的id为1000,提示符是 $
Linux是如何识别和区分用户的呢?如果将student用户的id改成0,会发生什么?
[root@server0 ~]# id student
uid=0(root) gid=0(root) groups=0(root)
Linux下用户的分类在配置文件/etc/login.defs中定义:
[root@server0 ~]# cat /etc/login.defs
#
# Please note that the parameters in this configuration file control the
# behavior of the tools from the shadow-utils component. None of these
# tools uses the PAM mechanism, and the utilities that use PAM (such as the
# passwd command) should therefore be configured elsewhere. Refer to
# /etc/pam.d/system-auth for more information.
#

# *REQUIRED*
#   Directory where mailboxes reside, _or_ name of file, relative to the
#   home directory.  If you _do_ define both, MAIL_DIR takes precedence.
#   QMAIL_DIR is for Qmail
#
#QMAIL_DIR    Maildir
MAIL_DIR    /var/spool/mail
#MAIL_FILE    .mail

# Password aging controls:
#
#    PASS_MAX_DAYS    Maximum number of days a password may be used.
#    PASS_MIN_DAYS    Minimum number of days allowed between password changes.
#    PASS_MIN_LEN    Minimum acceptable password length.
#    PASS_WARN_AGE    Number of days warning given before a password expires.
#
PASS_MAX_DAYS    99999
PASS_MIN_DAYS    0
PASS_MIN_LEN     5
PASS_WARN_AGE    7

#
# Min/max values for automatic uid selection in useradd
#
UID_MIN                  1000
UID_MAX                 60000
# System accounts
SYS_UID_MIN               201
SYS_UID_MAX               999

#
# Min/max values for automatic gid selection in groupadd
#
GID_MIN                  1000
GID_MAX                 60000
# System accounts
SYS_GID_MIN               201
SYS_GID_MAX               999

#
# If defined, this command is run when removing a user.
# It should remove any at/cron/print jobs etc. owned by
# the user to be removed (passed as the first argument).
#
#USERDEL_CMD    /usr/sbin/userdel_local

#
# If useradd should create home directories for users by default
# On RH systems, we do. This option is overridden with the -m flag on
# useradd command line.
#
CREATE_HOME    yes

# The permission mask is initialized to this value. If not specified,
# the permission mask will be initialized to 022.
UMASK           077

# This enables userdel to remove user groups if no members exist.
#
USERGROUPS_ENAB yes

# Use SHA512 to encrypt password.
ENCRYPT_METHOD SHA512
该文件包含了默认的用户定义策略,包括UID,GID,密码加密策略,密码过期策略等。
在Linux下,用户划分如下:
- 0 超级管理员
- 1-200 系统用户,静态分配,安装完系统就已经分配,一般是nologin用户
- 201-999 系统用户,动态分配,通常是在安装相应软件时,系统动态分配的id,一般是nologin用户
- 1000 -60000 普通用户,login用户或者nologin用户,取决于创建时指定
Linux系统用户管理
新建用户
命令:useradd
[root@server0 ~]# whatis useradd useradd (8) - create a new user or update default new user information [root@server0 ~]# type useradd useradd is hashed (/usr/sbin/useradd) [root@server0 ~]# useradd --help Usage: useradd [options] LOGIN useradd -D useradd -D [options] Options: -b, --base-dir BASE_DIR base directory for the home directory of the new account(-D)与-d参数区别 -c, --comment COMMENT GECOS field of the new account -d, --home-dir HOME_DIR home directory of the new account -D, --defaults print or change default useradd configuration -e, --expiredate EXPIRE_DATE expiration date of the new account,格式:YYYY-MM-DD(-D) -f, --inactive INACTIVE password inactivity period of the new account,密码过期后多少天禁用帐号(-D) -g, --gid GROUP name or ID of the primary group of the new account(-D) -G, --groups GROUPS list of supplementary groups of the new account -h, --help display this help message and exit -k, --skel SKEL_DIR use this alternative skeleton directory -K, --key KEY=VALUE override /etc/login.defs defaults -l, --no-log-init do not add the user to the lastlog and faillog databases -m, --create-home create the user's home directory -M, --no-create-home do not create the user's home directory -N, --no-user-group do not create a group with the same name as the user -o, --non-unique allow to create users with duplicate (non-unique) UID -p, --password PASSWORD encrypted password of the new account -r, --system create a system account -R, --root CHROOT_DIR directory to chroot into -s, --shell SHELL login shell of the new account(-D) -u, --uid UID user ID of the new account -U, --user-group create a group with the same name as the user -Z, --selinux-user SEUSER use a specific SEUSER for the SELinux user mapping
下面为示例:
[root@server0 ~]# setenforce 0        # 为了演示,先关闭selinux
[root@server0 ~]# useradd -s /sbin/nologin -c "web user." -d /tmp/web -G root -g root web
[root@server0 ~]# id web
uid=1001(web) gid=0(root) groups=0(root)
[root@server0 ~]# grep web /etc/passwd
web:x:1001:0:web user.:/tmp/web:/sbin/nologin
在Linux系统下面,本地用户是存储在文件/etc/passwd下面的。
本地用户存储文件:/etc/passwd各个字段的含义
[root@server0 ~]# whatis passwd
passwd: nothing appropriate.     # 如果查看帮助提示这个,请执行mandb重建帮助文档索引
[root@server0 ~]# mandb
Processing manual pages under /usr/share/man...
Updating index cache for path `/usr/share/man/man4'. Wait...mandb: can't open /usr/share/man/man/man4/crontabs.4: No such file or directory
mandb: warning: /usr/share/man/man4/run-parts.4.gz: bad symlink or ROFF `.so' request
Updating index cache for path `/usr/share/man/man8'. Wait...mandb: warning: /usr/share/man/man8/fsck.fat.8.manpage-fix.gz: ignoring bogus filename
mandb: warning: /usr/share/man/man8/numad.8.gz: whatis parse for numad(8) failed
Updating index cache for path `/usr/share/man/mann'. Wait...done.
Checking for stray cats under /usr/share/man...
Checking for stray cats under /var/cache/man...
Processing manual pages under /usr/share/man/cs...
Updating index cache for path `/usr/share/man/cs/man8'. Wait...done.
Checking for stray cats under /usr/share/man/cs...
Checking for stray cats under /var/cache/man/cs...
Processing manual pages under /usr/share/man/da...
Updating index cache for path `/usr/share/man/da/man8'. Wait...done.
Checking for stray cats under /usr/share/man/da...<----省略若干行--->
Checking for stray cats under /var/cache/man/local...
102 man subdirectories contained newer manual pages.
7346 manual pages were added.
0 stray cats were added.
0 old database entries were purged.
[root@server0 ~]# whatis mandb
mandb (8)            - create or update the manual page index caches
[root@server0 ~]#
接下来我们可以看下passwd文件帮助
[root@server0 ~]# whatis passwd
passwd (1)           - update user's authentication tokens
sslpasswd (1ssl)     - compute password hashes
passwd (5)           - password file
[root@server0 ~]# tail -1 /etc/passwd
web:x:1001:0:web user.:/tmp/web:/sbin/nologin
name:password:UID:GID:GECOS:directory:shell
- 用户名
- 密码占位符,用x表示
- UID
- GID
- 注释
- 家目录
- shell
比如我们创建个用户natasha
[root@server0 ~]# useradd natasha
系统会在用户相关配置文件中分别写入配置信息:
[root@server0 ~]# tail -1 /etc/passwd           --- 用户
natasha:x:1001:1001::/home/natasha:/bin/bash
[root@server0 ~]# tail -1 /etc/group            --- 用户组
natasha:x:1001:
[root@server0 ~]# tail -1 /etc/shadow           --- 用户密码,没有设置密码,密码默认两个叹号
natasha:!!:18193:0:99999:7:::
[root@server0 ~]# tail -1 /etc/gshadow          --- 用户组密码
natasha:!::
[root@server0 ~]# ll -d /home/natasha           --- 用户家目录
drwx------. 4 natasha natasha 88 Oct 24 16:29 /home/natasha
★问题:我们只敲了一条命令:useradd natasha,系统怎么知道要创建家目录,写密码文件,组文件这些的?
useradd 有个选项:查看创建用户默认的 配置信息:
[root@server0 ~]# useradd -D
GROUP=100
HOME=/home
INACTIVE=-1
EXPIRE=
SHELL=/bin/bash
SKEL=/etc/skel
CREATE_MAIL_SPOOL=yes
添加用户默认配置文件:/etc/default/useradd
[root@server0 ~]# cat /etc/default/useradd
# useradd defaults file
GROUP=100            # 用户默认组id,users
HOME=/home            # 用户家目录
INACTIVE=-1            # 密码过期宽限天数,-1表示默认不启用(shadow第七个字段)
EXPIRE=                # 密码失效时间,空表示默认不启用
SHELL=/bin/bash        # 用户默认shell
SKEL=/etc/skel            # 用户默认配置文件,可理解为添加用户的默认目录下面存放的文件,命令添加用户时,用户的默认配置文件都是从这个目录下面复制的,手动添加用户也要复制这个目录下面的文件到用户的家目录下面
CREATE_MAIL_SPOOL=yes    # 是否创建邮箱,yes表示默认创建
应用示例:创建testuser用户,UID 2000,描述信息为“Test user.”,附加组wheel,shell为/bin/sh, 家目录/tmp
[root@server0 ~]# useradd -c "Test user." -u 2000 -s /bin/sh -d /tmp/testuser testuser
[root@server0 ~]# id testuser
uid=2000(testuser) gid=2000(testuser) groups=2000(testuser)
[root@server0 ~]# grep testuser /etc/passwd
testuser:x:2000:2000: Test user.:/tmp/testuser:/bin/sh
更改添加用户的默认配置:
[root@server0 ~]# useradd -D
-b, --base-dir BASE_DIR         指定用户默认家目录
-e, --expiredate EXPIRE_DATE    指定用户账户的禁用日期, 格式:YYYY-MM-DD
-f, --inactive INACTIVE         指定密码过期到账户被禁用之前的天数, 密码过期多少天禁用帐号
-g, --gid GROUP                 修改用户默认主组/基本组
-s, --shell SHELL               更改默认shell
[root@server0 ~]# groupadd admins; mkdir /users    # 先创建一个用户组和用户的默认BASE家目录
[root@server0 ~]# useradd -D -s /bin/tcsh -b /users -f 3 -e '2019-12-31' -g admins
[root@server0 ~]# useradd -D
GROUP=1004
HOME=/users
INACTIVE=3
EXPIRE=2019-12-31
SHELL=/bin/tcsh
SKEL=/etc/skel
CREATE_MAIL_SPOOL=yes
[root@server0 ~]# id dbuser
uid=1004(dbuser) gid=1005(dbuser) groups=1005(dbuser)
[root@server0 ~]# grep dbuser /etc/passwd
dbuser:x:1004:1005::/users/dbuser:/bin/tcsh
[root@server0 ~]# passwd -S dbuser
dbuser LK 2019-10-25 0 99999 7 3 (Password locked.) (默认是-1,不启用)
[root@server0 ~]# chage -l dbuser
Last password change                : Oct 25, 2019
Password expires                    : never
Password inactive                   : never
Account expires                     : Dec 31, 2019
Minimum number of days between password change    : 0
Maximum number of days between password change    : 99999
Number of days of warning before password expires : 7
更改Linux用户信息
创建用户时可以指定用户的家目录、shell、组等信息。那么我们能不能修改已经存在的用户的这些信息呢?
命令:usermod
[root@server0 ~]# whatis usermod
usermod (8)          - modify a user account
语法:Usage: usermod [options] LOGIN
usermod常用选项:
- -a, --append 与-G配合使用,将用户添加到组,而不从其他组移除
- -c, --comment COMMENT 向GECOS字段添加值
- -d, --home HOME_DIR 为用户指定新的主目录
- -e, --expiredate 指定用户帐号禁用的日期,格式YY-MM-DD
- -f, --inactive 密码过期多少天后禁用帐号,0:过期就禁用,默认:-1禁用
- -g, --gid GROUP 更改用户主组,组必须存在
- -G, --groups GROUPS 为用户指定新的附加组列表,多个用逗号隔开,附加组必须存在
- -l, --login NEW_LOGIN 修改用户账号登录信息,特别是家目录搬家时
- -m, --move-home 修改用户主目录,通常与-d选项搭配使用
- -s, --shell SHELL 修改用户shell
- -L, --lock 锁定用户密码,在shadow文件中的密码前面加上一个叹号
- -U, --unlock 解锁用户密码(去掉密码前的一个叹号)
应用示例:锁定、解锁用户(使用最频繁的了)
[root@server0 ~]# passwd -S web    # 刚才创建的用户,没设置密码,默认是锁定状态,Linux不允许空密码登录
web LK 2019-10-24 0 99999 7 -1 (Password locked.)
[root@server0 ~]# passwd web       # 设置密码为redhat
[root@server0 ~]# passwd -S web    # 查看用户状态
web PS 2019-10-10 0 99999 7 -1 (Password set, SHA512 crypt.)
[root@server0 ~]# usermod -L web   # 锁定用户
[root@server0 ~]# passwd -S web    # 查看用户状态
web LK 2019-10-10 0 99999 7 -1 (Password locked.)
[root@server0 ~]# usermod -U web   # 解锁用户
[root@server0 ~]# passwd -S web    # 查看用户状态
testuser1 PS 2019-10-10 0 99999 7 -1 (Password set, SHA512 crypt.)
应用示例:修改用户主组
[root@server0 ~]# id natasha
uid=1001(natasha) gid=1001(natasha) groups=1001(natasha)
[root@server0 ~]# usermod -g admins natasha    # 更改natasha用户主组为admins
[root@server0 ~]# id natasha
uid=1001(natasha) gid=1004(admins) groups=1004(admins)
应用实例:为用户指定新的附加组列表(如果不包含之前的附加组,之前的附加组会被更改为新的附加组列表)
[root@server0 ~]# usermod -G root,student,webusers tom
[root@server0 ~]# id tom
uid=1003(tom) gid=1007(tom) groups=1007(tom),0(root),1000(student),1006(webusers)
[root@server0 ~]# usermod -G dbusers tom
[root@server0 ~]# id tom
uid=1003(tom) gid=1007(tom) groups=1007(tom),1005(dbusers)  # 要保留之前的附加组,需加上-a选项 usermod -a -G
[root@server0 ~]# usermod -a -G webusers tom
[root@server0 ~]# id tom
uid=1003(tom) gid=1007(tom) groups=1007(tom),1005(dbusers),1006(webusers)
应用示例:修改用户的bash
[root@server0 ~]# grep web /etc/passwd
web:x:1001:0:web user.:/tmp/web:/sbin/nologin
# web用户创建的时候的bash是/sbin/nologin,修改为 /bin/bash
[root@server0 ~]# usermod -s /bin/bash web
[root@server0 ~]# grep web /etc/passwd
web:x:1001:0:web user.:/tmp/web:/bin/bash
开始的时候我们说过,管理员的UID为0,提示符为#,普通用户UID在1000和60000之间,修改用户web是UID为0会发生什么?—— 那么web就是管理员,命令提示符 由 $ 变成 #
[root@server0 ~]# id web
uid=0(root) gid=0(root) groups=0(root)
注意:用户的UID改成0后,系统就认为这个用户是root,也证明了系统是按UID来识别用户的。而不是用户名。
在工作中对操作系统进行安全检测就有这么一项,检测系统中UID为0的用户,大于0 就会给系统带来很大风险!!!
为用户设置密码:passwd
命令:passwd
语法:passwd [username]
应用示例:为用户设置密码
[root@server0 ~]# passwd -S natasha
natasha LK 2019-10-23 0 99999 7 -1 (Password locked.)
[root@server0 ~]# passwd natasha
Changing password for user natasha.
New password:
BAD PASSWORD: The password is shorter than 8 characters
Retype new password:
passwd: all authentication tokens updated successfully.
[root@server0 ~]# passwd -S natasha
natasha PS 2019-10-23 0 99999 7 -1 (Password set, SHA512 crypt.)
passwd命令常用选项:
- -d, --delete 删除用户密码
- -l, --lock 锁定用户密码,在shadow的加密密码前加上两个”!”
- -u, --unlock 启用已被停止的账户,与-l对应,仅root用户可用(去掉密码前的两个叹号)
- -e, --expire 让用户密码立即过期,下次登录必须修改密码
- -f, --force 强制执行
- -x, --maximum=DAYS 密码最长有效时间,shadow第五列(99999:永不过期)
- -n, --minimum=DAYS 密码最短有效时间,密码修改间隔,shadow第四列(0:不限制)
- -w, --warning=DAYS 密码过期前多少天警告,shadow第六列
- -i, --inactive=DAYS 密码失效宽限时间,过期后多久还能用,shadow第七列
- -S, --status 显示用户密码状态, shadow配置信息
- -- stdin 从标准输入中读取密码,主要在脚本中使用,命令行不推荐;
应用示例:清除用户密码
[root@server0 ~]# passwd -S student
student PS 2015-01-07 0 99999 7 -1 (Password set, SHA512 crypt.)
[root@desktop0 ~]# passwd -d student        # 删除用户密码
Removing password for user student.
passwd: Success
[root@desktop0 ~]# passwd -S student
student NP 2019-10-25 0 99999 7 -1 (Empty password.)
[root@desktop0 ~]# grep student /etc/shadow
student::18194:0:99999:7:::                -----(-d删除密码后,密码字段为空,无法登录系统,不允许空密码登录)
[root@server0 ~]# ssh -X student@desktop0
student@desktop0's password:
Permission denied, please try again.            # 无法登录系统了,Linux系统不允许空密码登录,所以Linux更加安全
应用实例:锁定用户密码(usermod -L锁定帐号是在密码前加一个叹号,passwd帐号过期是在密码前面加两个叹号)
[root@server0 ~]# passwd -l natasha    # 锁定用户密码(在密码前面加两个叹号)
[root@server0 ~]# passwd -S natasha
natasha LK 2019-10-25 3 90 7 7 (Password locked.)
[root@server0 ~]# grep natasha /etc/shadow
natasha:!!$6$SQhnBFM8$r9orrWN6v4.KdDPFXTMAHIxLCIu6ZOG7C5XUpg1n0zbvkUchHY9dM9WzC9USjjPf2G.JHXeiC4jYN2JG8RCol/:18194:3:90:7:7::
[root@server0 ~]# passwd -u natasha
Unlocking password for user natasha.
passwd: Success
[root@server0 ~]# grep natasha /etc/shadow
natasha:$6$SQhnBFM8$r9orrWN6v4.KdDPFXTMAHIxLCIu6ZOG7C5XUpg1n0zbvkUchHY9dM9WzC9USjjPf2G.JHXeiC4jYN2JG8RCol/:18194:3:90:7:7::
利用usermod也可以解锁用户密码(注意区别!!!)
[root@server0 ~]# usermod -U natasha
[root@server0 ~]# passwd -S natasha
natasha LK 2019-10-25 3 90 7 7 (Password locked.)
[root@server0 ~]# grep natasha /etc/shadow
natasha:!$6$SQhnBFM8$r9orrWN6v4.KdDPFXTMAHIxLCIu6ZOG7C5XUpg1n0zbvkUchHY9dM9WzC9USjjPf2G.JHXeiC4jYN2JG8RCol/:18194:3:90:7:7::
[root@server0 ~]# usermod -U natasha
[root@server0 ~]# grep natasha /etc/shadow
natasha:$6$SQhnBFM8$r9orrWN6v4.KdDPFXTMAHIxLCIu6ZOG7C5XUpg1n0zbvkUchHY9dM9WzC9USjjPf2G.JHXeiC4jYN2JG8RCol/:18194:3:90:7:7::
[root@server0 ~]# passwd -S natasha
natasha PS 2019-10-25 3 90 7 7 (Password set, SHA512 crypt.)
总结:
- usermod锁定的帐号,可以用usermod和passwd直接解锁
- passwd锁定的帐号可以用passwd直接解锁,用usermod解锁必须解锁两次(usermod解锁一次去掉一个叹号)
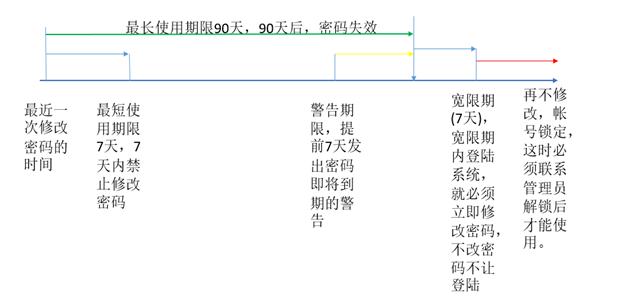
应用示例:设置密码有效期90天,密码修改3天后才能再次修改,密码过期前7天警告,密码过期后宽限7天。
[root@server0 ~]# chage -l natasha
Last password change                : Oct 24, 2019
Password expires                    : never
Password inactive                    : never
Account expires                    : never
Minimum number of days between password change    : 0
Maximum number of days between password change    : 99999
Number of days of warning before password expires    : 7
[root@server0 ~]# passwd -x 90 -n 3 -w 7 -i 7 natasha
Adjusting aging data for user natasha.
passwd: Success
[root@server0 ~]# chage -l natasha
Last password change                : Oct 24, 2019
Password expires                    : Jan 22, 2020
Password inactive                    : Jan 29, 2020
Account expires                    : never
Minimum number of days between password change    : 3
Maximum number of days between password change    : 90
Number of days of warning before password expires    : 7
[root@server0 ~]# grep natasha /etc/shadow
natasha:$6$11ZV2J0E$Ps0H/2PKdO0M/wABuz6gbwSonEXJ0CqgjGgQ.6bGgUPnMg.7cW9y8MsNGLzUEostUDFlgVBxspRwF5tX1qMQg1:18194:3:90:7:7::
应用示例:修改密码的另一种方法(显示修改,会将密码在历史命令中显示,不安全,经常用于脚本)
[root@server0 ~]# echo "redhat" |passwd natasha --stdin    #不安全,密码保存到历史命令中了,不推荐用。
Changing password for user natasha.
passwd: all authentication tokens updated successfully.
本地用户密码存储文件/etc/shadow各字段含义
[root@server0 ~]# grep natasha /etc/shadow
natasha:$6$7Nw4acvf$wLDucLaKuLg2.Yz5gcDIIdarR2QjEyZI0ApwjGQWlzDWragnLS22fhgfHgqycA4.8/7w6ymYx.xQINSFy6FRf0:18192:3:90:7:7::
各个字段含义:
name:password:lastchage:minage:maxage:warning:inactive:expire:blank
- 第一列:用户名, 必须是系统有效的帐号名
- 第二列:已加密密码(密码散列算法(加密算法见下文) :salt,随机窜,盐), 开头为叹号时表示密码被锁定
- 第三列:最近一次修改密码的日期,距离1970年1月1日的天数表示
- 第四列:最短修改密码间隔时间,0 不限制,如改成7,距离上次修改密码必须隔7天才能再次修改密码
- 第五列:密码过期时间,必须修改密码的最大多数,99999 密码永不过期
- 第六列:密码即将到期的警告时间,按天表示,0表示不警告
- 第七列:宽限天数,密码过期后,你还能使用长时间,超过这个时间不修改,账户将被锁定。
- 第八列:账户到期日期,距离1970年1月1日的天数,帐号就过期,不能使用(不管密码过不过期)
- 第九列:保留
应用实例:使用户密码立即失效,下次登录必须修改密码
[root@server0 ~]# passwd -e natasha    /    chage -d 0 natasha
[root@server0 home]# chage -l natasha
Last password change        : password must be changed
Password expires            : password must be changed
Password inactive            : password must be changed
Account expires            : never
Minimum number of days between password change    : 3
Maximum number of days between password change    : 90
Number of days of warning before password expires    : 7
管理用户密码到期信息
命令: chage - change user password expiry information
语法: chage [options] LOGIN
示例:查看用户natasha的密码状态
查看用户密码策略
[root@server0 ~]# chage -l natasha        # 查看natasha的密码策略
[root@server0 ~]# chage -d 0 natasha      # 将natasha的密码过期,也可以使用命令:passwd -e natasha
[root@server0 ~]# chage -l natasha        # 确认natasha的密码策略
chage命令常用选项:
- -d, --lastday LAST_DAY 最后一次密码修改日期,格式:YYYY-MM-DD,shadow第3列,0:下次登录必须修改密码
- -E, --expiredate EXPIRE_DATE 修改账号失效日期,格式YYYY-MM-DD,shadow第8列。
- -h, --help 获取帮助
- -I, --inactive INACTIVE 修改密码过期后的宽限天数,shadow 第7列;
- -l, --list 列出用户的详细密码状态;
- -m, --mindays MIN_DAYS 修改密码最短修改时间,shadow 第4列;
- -M, --maxdays MAX_DAYS 修改密码的有效期,shadow 第5列;
- -W, --warndays WARN_DAYS 修改密码到期前的警告天数,shadow第6列;
# 修改用户Natasha 帐号到2019年12月31日失效,最短修改时间3天,密码有效期60天,密码到期前3天警告,密码到期后宽限时间为5天
[root@server0 ~]# chage -E 2019-12-31 -m 3 -M 60 -W 3 -I 5 natasha
[root@server0 ~]# chage -l natasha
Last password change                   : Oct 25, 2019
Password expires                      : Dec 24, 2019
Password inactive                      : Dec 29, 2019
Account expires                        : Dec 31, 2019
Minimum number of days between password change        : 3
Maximum number of days between password change        : 60
Number of days of warning before password expires     : 3
gpasswd、chage都可以管理用户的密码,比如设置密码的修改策略、到期策略,密码失效日期等。但passwd主要用于为用户设置密码,帐号级别的管理。chage是管理用户密码有效期限。
|
命令 |
参数 |
shadow |
备注 |
命令 |
参数 |
|
chage |
-d |
第三列 |
最后一次修改密码日期 |
passwd |
修改密码 |
|
chage |
-m |
第四列 |
密码最短修改时间 |
passwd |
-n |
|
chage |
-M |
第五列 |
密码的有效期 |
passwd |
-x |
|
chage |
-W |
第六列 |
密码到期前的警告天数 |
passwd |
-w |
|
chage |
-I |
第七列 |
密码过期后的宽限天数 |
passwd |
-i |
|
chage |
-E |
第八列 |
账号失效日期 |
passwd |
# 修改用户Natasha 帐号到2019年12月31日失效,最短修改时间3天,密码有效期60天,密码到期前3天警告,密码到期后宽限时间为5天
[root@server0 ~]# chage -E 2019-12-31 -m 3 -M 60 -W 3 -I 5 natasha
# 设置密码有效期90天,密码修改7天后才能再次修改,密码过期前7天发出警告,密码过期后宽限期是7天
[root@server0 ~]# passwd -x 90 -i 7 -w 7 -n 7 natasha
管理用户密码
在早期的Linux中,加密的密码存储在/etc/passwd文件中,所有用户都可以读取里面的内容,在RHEL7中,加密密码被保存到/etc/shadow文件中,该文件正如他的名字一样,他是passwd文件的一个影子,/etc/shadow文件中的记录行与/etc/passwd中的一一对应,它由pwconv命令根据/etc/passwd中的数据自动产生。但是/etc/shadow文件只有系统管理员才能够进行修改和查看。
[root@server0 ~]# ll /etc/shadow
---------- 1 root root 2107 Oct 16 09:39 /etc/shadow
[root@server0 ~]# grep root /etc/shadow | awk -F: '{print $2}'
$6$j13njg.I$7WsGIhQPWQRStdboN7yt2daejhfGdqNmL3YXSG2WFfzPNFt9CJB139S9WjbJKEEGPhBV5HfJhN32Y.twoHLrq.
现代密码哈希中存储三段信息:$id$salt$encrypted
u id:密码的散列算法, 可以修改,在某些应用场景中也必须修改 (man crypt)
u salt:8位随机值,在密码创建的时候,由系统生成
u encrypted:密文,通过算法将明文的密码,加上salt值,hash成密文
[root@server0 ~]# man crypt
ID | Method
──────────────────────────────────────
1 | MD5
2a | Blowfish (not in mainline glibc; added in some Linux distributions)
5 | SHA-256 (since glibc 2.7)
6 | SHA-512 (since glibc 2.7)
在RHEL7中,默认的密码加密算法是SHA512,我们可以更改系统默认的加密算法,方法如下:(用户集中管理时,可能需要用到,如果服务器用的是$1$, 客户端的密码加密方式也要修改为 $1$ )
[root@server0 ~]# authconfig --passalgo=md5 --update
图形化修改方式如下:
# 安装必须的软件包:
[root@server0 ~]# yum install authconfig-gtk sssd krb5-workstation -y
安装完成后,输入命令:authconfig-gtk
调出图形界面,在高级选项中设置密码加密算法
用户删除
命令:userdel
语法:userdel [options] LOGIN
userdel <username>
将用户从/etc/passwd, /etc/group, /etc/shadow, /etc/gshadow 中删除,但默认保留主目录
常用选项:
- -r 删除用户的同时删除主目录!!!
用此选项时,一定要注意,确保主目录下面没有数据。如果有数据,那就是一场灾难。比如web用户,主目录一般定义在web server目录下面,存放这应用系统程序和文件。一旦删除就会引起应用宕机,无法提供服务。
这还不算最严重的,如果这个用户是mysql、Oracle,那就更刺激了。这时候你不确认就删除用户,那你就成功实践了一次删库跑路。
限制用户访问
通过chage命令可以设置帐号到期时间,到了时间用户就无法登录系统。usermod命令也可以通过-L来手动锁定用户密码,从而来限制用户访问系统。
命令格式:usermod [选项] 用户名
方法:
- usermod -L natasha
- nologin shell
- 如果用户不需要了,也可以确认后删除
用户组管理
与用户一样,组也有名称和编号:GID,本地组在/etc/group中定义,组和用户对应,也有管理员组和用户组。
- 管理员组:root,0
- 普通组:(/etc/login.defs中定义)
- 系统组:1-999(1-200,201-999)
- 普通组:1000 - 60000
主组/基本组
每个用户有且只有一个主要组, 对于本地组,主要组由/etc/passwd文件中第四列中的组GID编号定义,一般情况下用户创建的文件属于主组所有,新建用户时,如没特别指定,系统会默认创建一个和用户名一样的私有组,且该用户为该组唯一成员。
附加组/补充组/额外组
- 用户可以有0个或多个附加组
- 本地组的成员在/etc/group中的最后一列;
- 如果组内有多个用户,用逗号分割;
[root@server0 ~]# grep admins /etc/group
admins:x:1008:natasha,user1,user2
组名 组密码占位符 GID 成员(多个成员用逗号隔开)
添加用户组
命令:groupadd
语法: Usage: groupadd [options] GROUP
常用选项:
- -g, --gid GID[GID_MIN,GID_MAX], 指定GID号,这个值必须是唯一的,除非使用-o选项。默认值是使用大于或等于GID_MIN的最小值,并且大于每个其他组。
- -o,--non-unique, 此选项允许添加一个非唯一的GID值
- -p ,--password PASSWORD, 为新组使用此加密过的密码。默认为禁用密码。 gpasswd
- -r, --system, 创建一个系统组。新的系统组数字标识符在SYS_GID_MIN到SYS_GID_MAX范围内选择,定义在login.defs中而不是GID_MIN到GID_MAX。
[root@server0 ~]# groupadd dgroup -g 10000
[root@server0 ~]# grep dgroup /etc/group
dgroup:x:10000:
[root@server0 ~]# grep dgroup /etc/gshadow
dgroup:!::
[root@server0 ~]# gpasswd dgroup
Changing the password for group dgroup
New Password:
Re-enter new password:
[root@server0 ~]# grep dgroup /etc/gshadow
dgroup:$6$m1suKXO9$0UVIV5moN92atcThdmcHGChmbFNvcNKnNdoJnRSuhz7m0vPgYco48icKv1mV40z88X4E4y7kVhoyI4ePm1QEN.::
[root@server0 ~]# groupadd -p '$6$m1suKXO9$0UVIV5moN92atcThdmcHGChmbFNvcNKnNdoJnRSuhz7m0vPgYco48icKv1mV40z88X4E4y7kVhoyI4ePm1QEN.' tgroup -g 10001
[root@server0 ~]# grep tgroup /etc/group
tgroup:x:10001:
[root@server0 ~]# grep tgroup /etc/gshadow
tgroup:$6$m1suKXO9$0UVIV5moN92atcThdmcHGChmbFNvcNKnNdoJnRSuhz7m0vPgYco48icKv1mV40z88X4E4y7kVhoyI4ePm1QEN.::
修改用户组
命令:groupmod
- 用法:groupmod [选项] 组
- 常用选项:
- -g, --gid GID 将组 ID 改为 GID
- -h, --help 显示此帮助信息并推出
- -n, --new-name NEW_GROUP 改名为 NEW_GROUP
- -o, --non-unique 允许使用重复的 GID
- -p, --password PASSWORD 将密码更改为(加密过的) PASSWORD
- -R, --root CHROOT_DIR chroot 到的目录
应用示例:
[root@server0 ~]# grep mygrp /etc/group
mygrp:x:1004:
[root@server0 ~]# groupmod -g 2000 -n mygrps mygrp
[root@server0 ~]# grep mygrp /etc/group
mygrps:x:2000:
管理组密码
命令:gpasswd
语法:Usage: gpasswd [option] GROUP
常用选项:
- -a 添加用户到用户组,不会清除之前组里面的用户
- -d 将用户从组中移除
- -h 获取帮助
- -M 为组批量添加用户,会清除之前的用户列表
- -A 为组添加管理员
应用示例:将natasha加入admins组
[root@server0 ~]# gpasswd -a natasha admins
Adding user natasha to group admins
[root@server0 ~]# id natasha
uid=1001(natasha) gid=1001(natasha) groups=1001(natasha),0(root),2002(admins),2004(mygrp)
应用示例:将natasha从admins中移除
[root@server0 ~]# gpasswd -d natasha admins
Removing user natasha from group admins
[root@server0 ~]# id natasha
uid=1001(natasha) gid=1001(natasha) groups=1001(natasha),0(root),2004(mygrp)
应用实例:为组设置密码
[root@server0 ~]# passwd root
Changing password for user root.
New password:
[root@server0 ~]# gpasswd root
Changing the password for group root
New Password:
Re-enter new password:
普通用户student不能访问root家目录,但如果需要到root家目录下面临时访问一些文件,在知道root组的密码后,就可以把自己加入root组中,临时获取文件访问权限
[root@server0 ~]# useradd user1
[root@server0 ~]# su - user1
[user1@server0 ~]$ newgrp root
Password:
[user1@server0 ~]$ cd /root/
[user1@server0 /root]$ ls
anaconda-ks.cfg
[user1@server0 /root]$ ll
total 12
-rw-------. 1 root root 8619 May  7  2014 anaconda-ks.cfg
[user1@server0 /root]$ exit
exit
[user1@server0 ~]$ ls -l /root/
ls: cannot open directory /root/: Permission denied
[user1@server0 ~]$ cd /root/
/root/: Permission denied.
用户组密码/etc/gshadow文件各字段含义
[root@server0 ~]# grep root /etc/gshadow
root:$6$VDdjF/2I9K$KUGXSQBQHzUPxkMasxMxLPsTTyGQwwJ6OaDHborRatcHqE5Dp1.P/DCWCON0SGo4PWWGcd1VmX7z9XouwVlbl0::web
# 组名字    组密码,如果是!表示没有密码                                                      保留          该组中的用户列表,逗号分割
删除用户组
命令:groupdel
语法:groupdel groupname
常用参数:
- -f,--force 强制删除用户组
- -h,获取帮助
说明:
- 如果删除的组为某个用户的主组,系统默认不允许删除,可带参数-f,强制删除。
- 如果删除的组是附加组,无论该附加组中有多少个用户,可以用命令直接删除。
获取超级用户访问权限
在Linux系统中,普通用户有时可能需要以管理员的身份去执行一些操作,比如安装软件包(yum),挂载磁盘等。
获取超级用户访问权限有如下途径:
- 切换到root用户,(需要root密码)
- 加入到wheel组 (RHEL7中,默认对wheel组成员授予所有命令执行权限,用户只需要使用自己的密码进行认证即可执行管理命令)
- 使用sudo命令(需要root用户授权,使用当前帐号密码认证即可,也可配置免密)
获取超级用户访问权限 - su
将当前用户切换到root身份去执行命令
命令: su [-,-l,--login] [username]
- su username 【switch user】
- su - username 【login user】
首先,两条命令都能够切换过去,区别是:
- su 非登录用户:username 不会加载用户环境变量,切换用户后,仍然在当前目录下
- su - 登录用户,相当于login:加载用户环境变量,切换后,自动将工作目录切换到目标用户家目录
应用示例:
获取超级用户访问权限 - wheel
管理员将普通用户加入wheel组,普通用户就具备可以执行管理员命令的权限,RHEL7中默认对wheel进行了完全授权,wheel组内的用户只需要使用自己的密码进行认证即可。
[root@server0 ~]# gpasswd -a student wheel
Adding user student to group wheel
[root@server0 ~]# id student
uid=1004(student) gid=1004(student) groups=1004(student),10(wheel)
[root@server0 ~]# sudo -l
[sudo] password for student:
……
User student may run the following commands on server0:
    (ALL) ALL
获取超级用户访问权限 - sudo
什么是sudo? sudo是可以让某个用户不需要拥有管理员的密码,就可以执行管理员的权限
命令:visudo
配置文件:/etc/sudoers
# 用户授权
natasha  ALL=(ALL)      ALL
web      ALL=(ALL)      NOPASSWD: ALL,!/usr/bin/passwd root
# 组授权
%wheel  ALL=(ALL)       ALL
用户名 被管理主机的地址=(可使用的身份) 授权命令(绝对路径)
%组名 被管理主机的地址=(可使用的身份) 授权命令(绝对路径)
注意:sudo权限不能继承,如用户A,用户A除了有自己的组groupA,还有wheel组,wheel组在rhel7里面默认是给了sudo权限的。将用户B加入用户A的组groupA,用户B没有sudo权限(不会继承到wheel组的sudo权限)。
人们永远没有足够的时间把它做好,但永远有足够的时间重新来过。 可是,因为并不是总有机会重做一遍,你必须做得更好,换句话说, 人们永远没有足够的时间去考虑到底是不是想要它,但永远有足够的时间去为之后悔。 ★★★★★★★★★★★★★★★★★★★★★★★★★★★★★★★★★★★★★★★★★★★★★★★★★★★★★★★★★★★★★★★★★★★★★★★★★★★★★★★★★★★★★★★★ 浅掘千口井,不如深挖一口井!当知识支撑不了野心时,那就静下心来学习吧!运维技术交流QQ群:618354452
个人微信公众号,定期发布技术文章和运维感悟。欢迎大家关注交流。


 浙公网安备 33010602011771号