SpringBoot集成Redis
根据学生 id 查询学生的功能,先从 redis 缓存中查找,如果找不到,再从数据库中查找,然后放到 redis 缓存中
一、通过 MyBatis 逆向工程生成实体 bean 和数据持久层
具体过程看之前写的
二、在 pom.xml 文件中添加 redis 依赖
完整的pom文件
<?xml version="1.0" encoding="UTF-8"?>
<project xmlns="http://maven.apache.org/POM/4.0.0" xmlns:xsi="http://www.w3.org/2001/XMLSchema-instance"
	xsi:schemaLocation="http://maven.apache.org/POM/4.0.0 https://maven.apache.org/xsd/maven-4.0.0.xsd">
	<modelVersion>4.0.0</modelVersion>
	<parent>
		<groupId>org.springframework.boot</groupId>
		<artifactId>spring-boot-starter-parent</artifactId>
		<version>2.3.4.RELEASE</version>
		<relativePath/> <!-- lookup parent from repository -->
	</parent>

	<groupId>com.md</groupId>
	<artifactId>04-redis</artifactId>
	<version>1.0.0</version>

	<name>04-redis</name>
	<description>Demo project for Spring Boot</description>

	<properties>
		<java.version>1.8</java.version>
	</properties>

	<dependencies>
		<dependency>
			<groupId>org.springframework.boot</groupId>
			<artifactId>spring-boot-starter-web</artifactId>
		</dependency>


		<!--redis依赖-->
		<dependency>
			<groupId>org.springframework.boot</groupId>
			<artifactId>spring-boot-starter-data-redis</artifactId>
		</dependency>

		<dependency>
			<groupId>org.mybatis.spring.boot</groupId>
			<artifactId>mybatis-spring-boot-starter</artifactId>
			<version>2.0.0</version>
		</dependency>

		<!--mysql依赖-->
		<dependency>
			<groupId>mysql</groupId>
			<artifactId>mysql-connector-java</artifactId>
			<version>5.1.9</version>
		</dependency>

		<dependency>
			<groupId>org.springframework.boot</groupId>
			<artifactId>spring-boot-starter-test</artifactId>
			<scope>test</scope>
			<exclusions>
				<exclusion>
					<groupId>org.junit.vintage</groupId>
					<artifactId>junit-vintage-engine</artifactId>
				</exclusion>
			</exclusions>
		</dependency>
	</dependencies>

	<build>
		<!--加载mapper.xml文件-->
		<resources>
			<resource>
				<directory>src/main/java</directory>
				<includes>
					<include>**/*.xml</include>
				</includes>
			</resource>
		</resources>

		<plugins>

			<!--mybatis 代码自动生成插件-->
			<plugin>
				<groupId>org.mybatis.generator</groupId>
				<artifactId>mybatis-generator-maven-plugin</artifactId>
				<version>1.3.6</version>
				<configuration>
					<!--配置文件的位置-->
					<configurationFile>GeneratorMapper.xml</configurationFile>
					<verbose>true</verbose>
					<overwrite>true</overwrite>
				</configuration>
			</plugin>
		</plugins>
	</build>

</project>
三、Spring Boot 核心配置文件
根据自己的情况进行修改
#配置内嵌 Tomcat 端口号
server.port=9090
#配置项目上下文根
server.servlet.context-path=/


#用的mysql5.7

spring.datasource.driver-class-name=com.mysql.jdbc.Driver
spring.datasource.url=jdbc:mysql://localhost:3306/springboot

spring.datasource.username=root
spring.datasource.password=123456


#配置 redis 连接信息
spring.redis.host=192.168.52.130
spring.redis.port=6379
spring.redis.password=123456
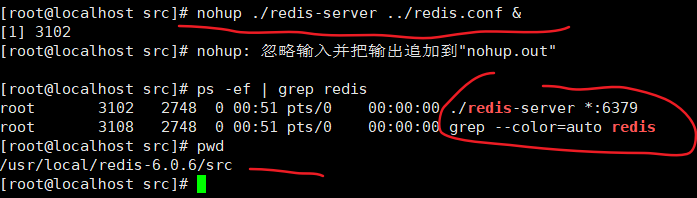
四、启动 redis 服务
- 先关闭防火墙:systemctl stop firewalld
- 根据如下命令启动即可
- 还得先设置密码,在redis的配置文件redis.conf中有个参数,requirepass 这个就是配置redis访问密码的参数,例:requirepass 123456,然后重启就生效了
五、RedisController类
package com.md.web;


import com.md.service.StudentService;
import org.springframework.beans.factory.annotation.Autowired;
import org.springframework.web.bind.annotation.GetMapping;
import org.springframework.web.bind.annotation.RestController;

/**
 * @author md
 * @Desc
 * @date 2020/10/24 15:50
 */

@RestController
public class RedisController {

    @Autowired
    private StudentService studentService;


    @GetMapping(value = "/students")
    public Object allStudentCount(){
        Long i = studentService.queryAllStudentCount();
        return "学生的总人数为:"+i;
    }

}
六、StudentService 接口及实现
Spring Boot 将自动配置 RedisTemplate,在需要操作 redis 的类中注入 redisTemplate 即可
Spring Boot 帮我们注入 RedisTemplate 类,泛型里面只能写 <String, String>、<Object, Object> 或者什么都不写
重点看注释
package com.md.service;


/**
 * @author md
 * @Desc
 * @date 2020/10/24 15:53
 */

public interface StudentService {

    Long queryAllStudentCount();
}


package com.md.service.impl;

import com.md.mapper.StudentMapper;
import com.md.service.StudentService;
import org.springframework.beans.factory.annotation.Autowired;
import org.springframework.data.redis.core.RedisTemplate;
import org.springframework.data.redis.serializer.StringRedisSerializer;
import org.springframework.stereotype.Service;

import java.util.concurrent.TimeUnit;

/**
 * @author md
 * @Desc
 * @date 2020/10/24 15:57
 */
@Service
public class StudentServiceImpl implements StudentService {


    @Autowired
    private StudentMapper studentMapper;

    @Autowired
    private RedisTemplate<Object, Object> redisTemplate;


    @Override
    public Long queryAllStudentCount() {

        // 设置redisTemplate对象key的序列化方式
        redisTemplate.setKeySerializer(new StringRedisSerializer());

        // 从redis缓存中获取总人数
        Long allStudentCount = (Long) redisTemplate.opsForValue().get("allStudentCount");

        // 判断redis中是否存在数据
        if(null == allStudentCount){
            // 如果为空,就去数据库中进行查询
            allStudentCount = studentMapper.selectAllStudentCount();
            // 并且把查询到的数据放入大redis中
            redisTemplate.opsForValue().set("allStudentCount",allStudentCount,15, TimeUnit.SECONDS);
        }

        return allStudentCount;

    }
}
七、StudentMapper接口及映射文件
直接在自动生成的文件中添加自定义的功能就可以了
Long selectAllStudentCount();

mapper文件中
 <select id="selectAllStudentCount" resultType="java.lang.Long">
    select
      count(*)
    from
      t_student
  </select>
八、启动类 Application
添加扫描数据持久层的注解并指定扫描包
package com.md;

import org.mybatis.spring.annotation.MapperScan;
import org.springframework.boot.SpringApplication;
import org.springframework.boot.autoconfigure.SpringBootApplication;

@SpringBootApplication
@MapperScan(basePackages = "com.md.mapper")
public class Application {

	public static void main(String[] args) {
		SpringApplication.run(Application.class, args);
	}

}
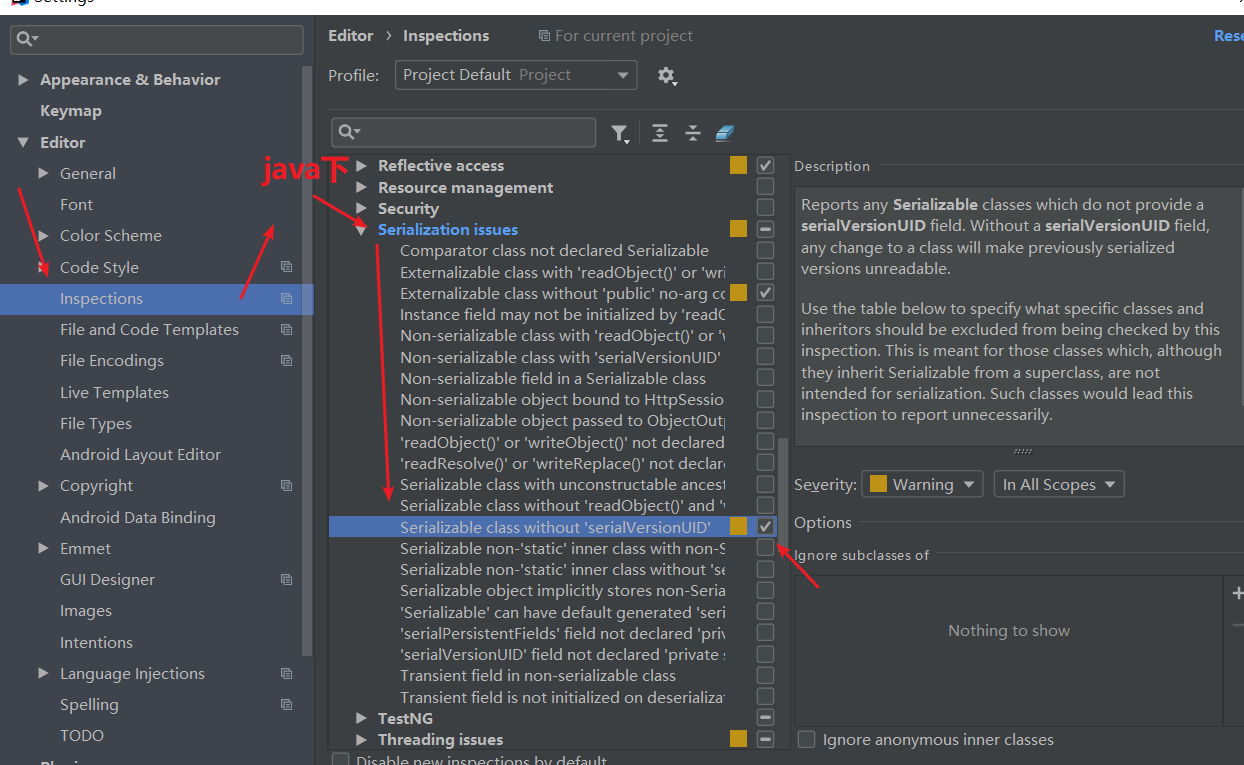
九、让 Student 类实现序列化接口(可选)
在类名上 Alt + 回车,如果没有提示生成序列化 id,那么需要做如下的配置
然后就可以使用了

十、启动测试

也可以在这里查看
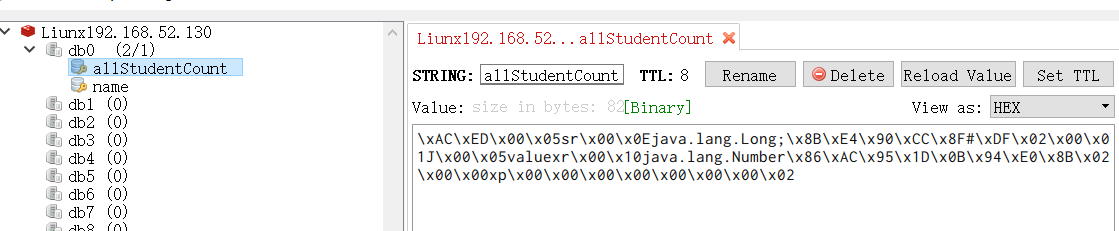
由于设置了时间,会自动销毁
作者:山丘!
-------------------------------------------
你闻讯而来,我大喜过望,我在这等你,你又在哪呢?喜欢的话加一个“关注”呗!
如果觉得这篇文章对你有小小的帮助的话,记得在右下角点个“推荐”哦,博主在此感谢!

 浙公网安备 33010602011771号