Flask-模板
一、cookie
- 解释: 用来保持服务器和浏览器交互的状态的, 由服务器设置,存储在浏览器
- 作用: 用来做广告推送
- cookie的设置和获取
- 设置cookie: response.set_cookie(key,value,max_age)
- max_age: 表示cookie在浏览器的存储时间,单位是秒
- 获取cookie: request.cookies.get("key")
- 设置cookie: response.set_cookie(key,value,max_age)
from flask import Flask, make_response, request

app = Flask(__name__)

#设置cookie
@app.route('/set_cookie')
def set_cookie():

    #调用make_response方法获取响应体对象
    response = make_response("set cookie")

    #设置cookie
    response.set_cookie("computer","lenovo")
    response.set_cookie("age","13",10)

    return response


#获取cookie
@app.route('/get_cookie')
def get_cookie():

    #获取cookie
    name = request.cookies.get("computer")
    age = request.cookies.get("age")

    #返回
    return "name is %s, age is %s"%(name,age)

if __name__ == '__main__':
    app.run(debug=True)
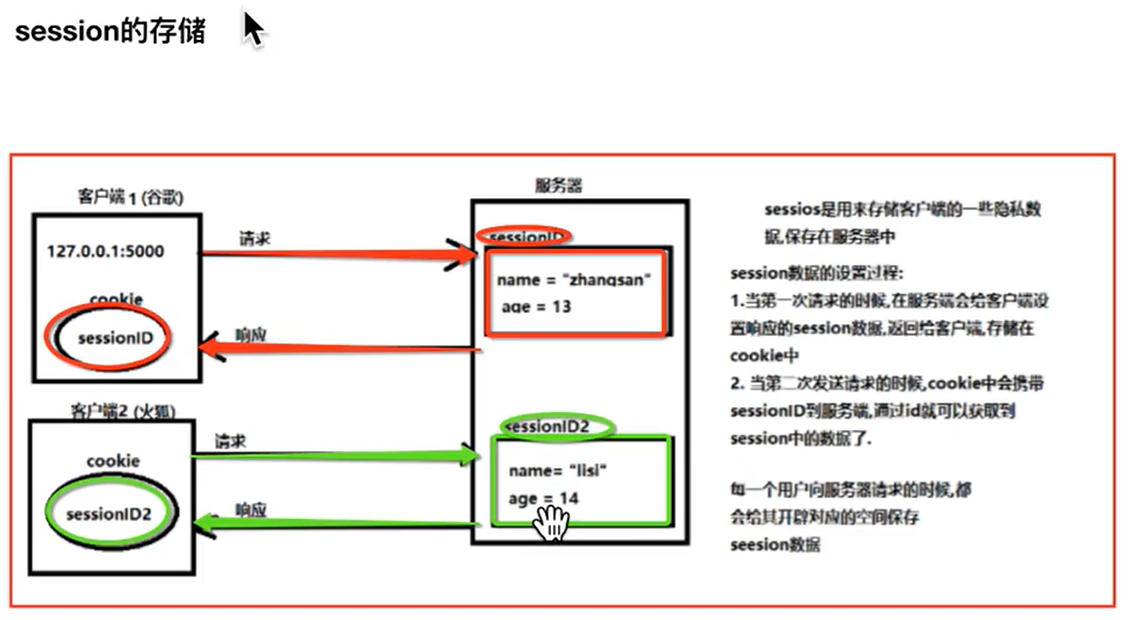
二、session
- 解释: 服务器和用户来做状态保持的,里面存储的是敏感信息(比如身份证,登陆信息),由服务器设置,并存储在服务器
- 作用: 用来做用户的登陆状态保持
- session的设置和获取
- 设置session: sessioin[key] = value
- 获取session: value = session.get(key)
- 注意点:
- 1.session的存储依赖于cookie
- 2.存储在cookie中的sessionID需要加密,需要秘钥(SECRET_KEY)
from flask import Flask, session

app = Flask(__name__)

#设置SECRET_KEY,此时就是随意的字符串
app.config["SECRET_KEY"] = "sdofinsidofnsfdas"

#设置session
@app.route('/set_session/<path:name>')
def set_session(name):

    session["name"] = name

    return "set session!"


#获取session
@app.route('/get_session')
def get_session():

    value = session.get("name")

    return "set session, name is %s"%value


if __name__ == '__main__':
    app.run(debug=True)
三、上下文
- 解释: 就是一个容器
- 请求上下文
- request: 封装的是请求相关的数据
- session: 封装的是和用户相关的敏感信息
- 应用上下文(在项目中具体应用)
- current_app: 是app的一个代理对象,可以通过他获取app身上设置的各种属性,主要用在模块化开发中
- g: 一个局部的全局变量,主要用在装饰器中
from flask import Flask, current_app

app = Flask(__name__)

@app.route('/')
def hello_world():

    print(app.config.get("DEBUG"))
    print(current_app.config.get("DEBUG"))

    return "helloworld"

if __name__ == '__main__':
    app.run(debug=True)
四、Flask_script
- 解释: 属于flaks的扩展
- 作用: 用来动态运行程序,配合flask_migrate做数据库迁移
- 使用格式:
- 1.安装
- pip install flask_script
- 2.导入Manager类
- 3.创建对象manager,管理app
- 4.使用manager启动程序
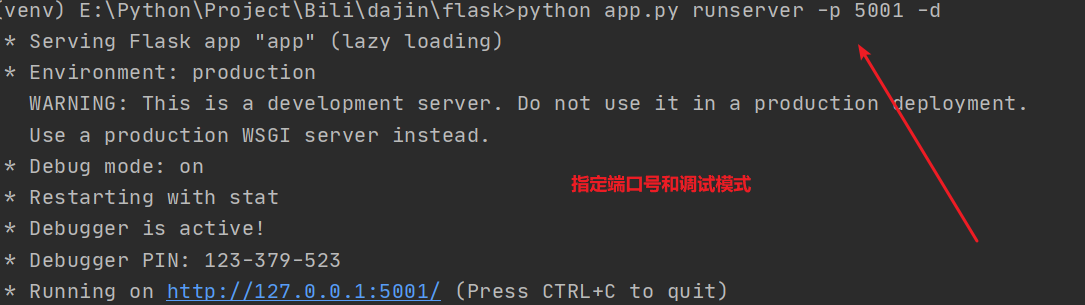
- 启动命令: python xxx.py runserver -h(host是IP地址) -p(端口号) -d(调试模式)
- 1.安装
from flask import Flask
from flask_script import Manager

app = Flask(__name__)
app.config["DEBUG"] = True

#3.创建对象manager,管理app
manager = Manager(app)

@app.route('/')
def hello_world():

    return "helloworld"

if __name__ == '__main__':
    manager.run()

五、render_template
- 解释: 属于jinja2的模板函数
- 好处:
- 1.以后的视图函数,只负责业务逻辑的处理,比如: 数据库的增删改查
- 2.以后数据的展示,全部都有jinja2的模板负责
- 使用格式:
- response = render_template('模板文件',key=value)
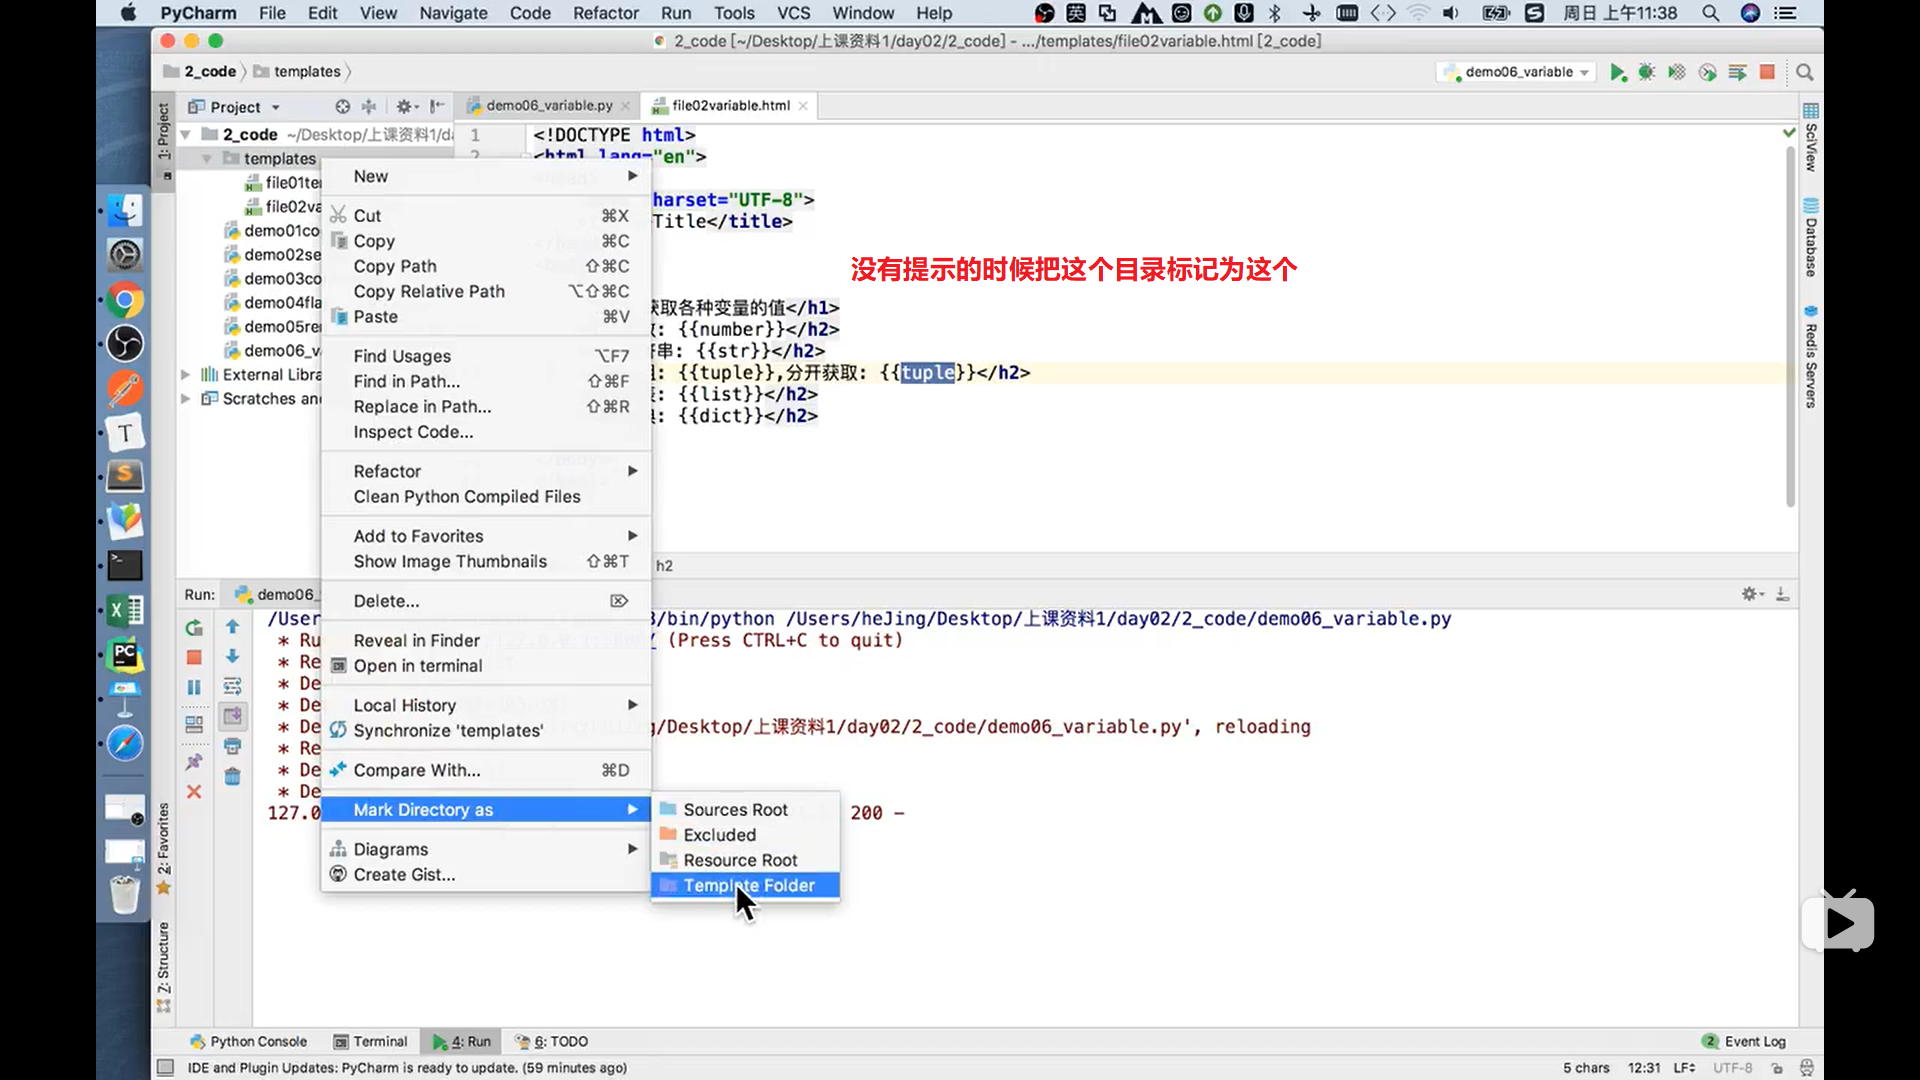
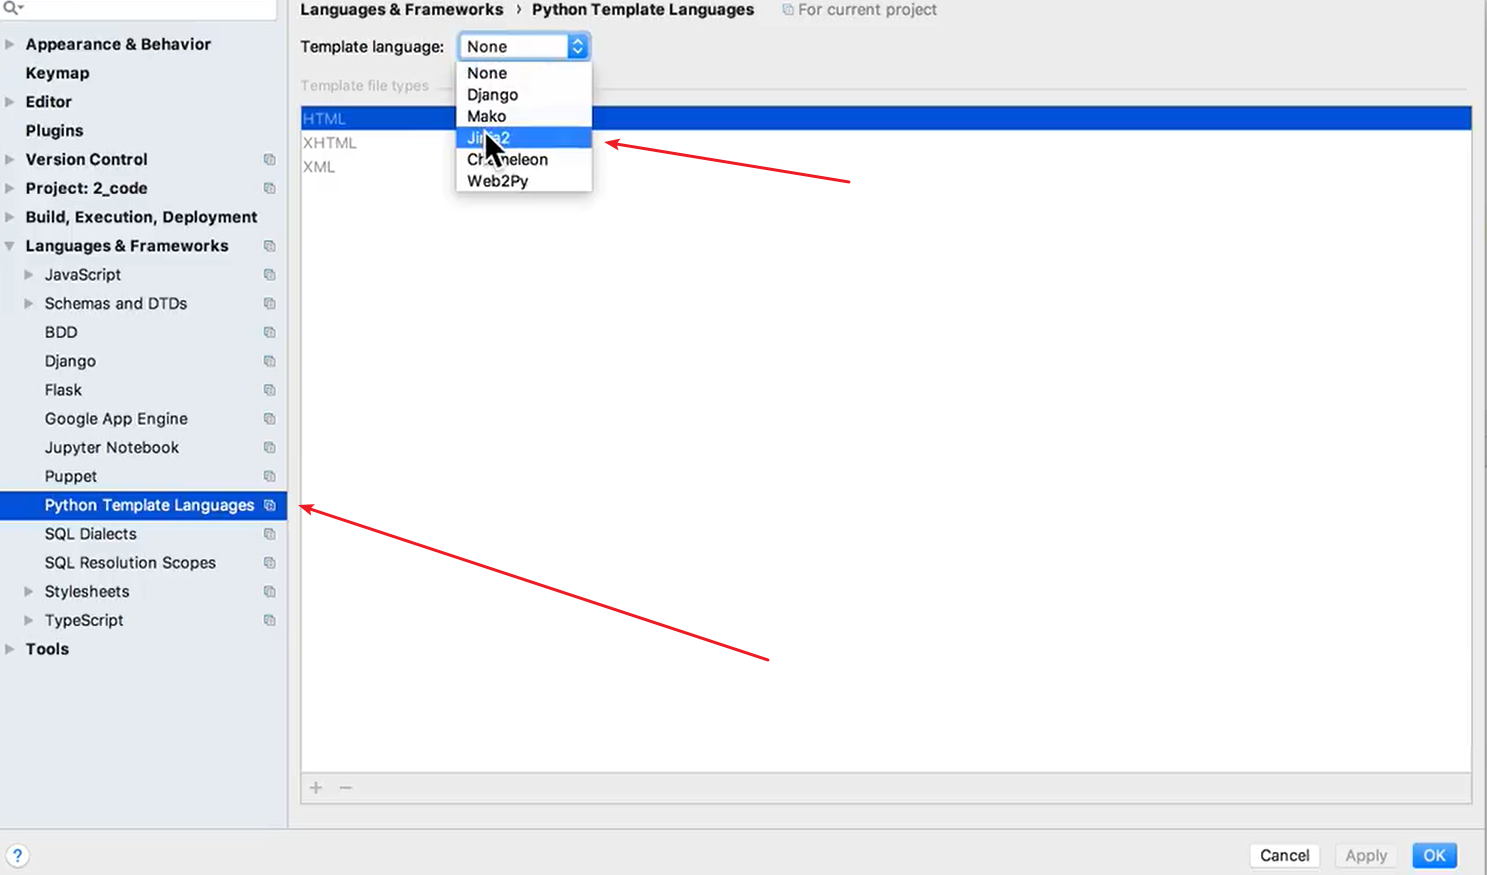
模板文件写在自动生成的templates目录下
如果是自己建的目录需要这样
from flask import Flask,render_template

app = Flask(__name__)

@app.route('/')
def hello_world():

    response = render_template('template.html')

    return response

if __name__ == '__main__':
    app.run(debug=True)
template.html文件
<!DOCTYPE html>
<html lang="en">
<head>
    <meta charset="UTF-8">
    <title>Title</title>
    <style>
        .box{
            width: 300px;
            height: 300px;
            background: red;
        }

    </style>
</head>
<body>

    <div class="box">

    </div>

</body>
</html>
六、模板语法,获取变量
- 解释: 在模板中获取视图函数的变量
- 格式:
- {{ 变量 }}
from flask import Flask,render_template

app = Flask(__name__)

@app.route('/')
def hello_world():

    #1.定义各种类型的变量
    number = 10
    str = "老王"
    tuple = (1,2,3,4,5)
    list = [6,7,8,9,10]
    dict = {
        "name":"班长",
        "age":29
    }

    #2.携带变量到模板中展示
    return render_template("variable.html",number=number,str=str,tuple=tuple,list=list,dict=dict)

if __name__ == '__main__':
    app.run(debug=True)
variable.html文件
<!DOCTYPE html>
<html lang="en">
<head>
    <meta charset="UTF-8">
    <title>Title</title>
</head>
<body>

    <h1>1.获取各种变量的值</h1>
    <h2>整数: {{number}}</h2>
    <h2>字符串: {{str}}</h2>
    <h2>元祖: {{tuple}},分开获取: {{tuple[0]}}, {{ tuple.1 }}</h2>
    <h2>列表: {{list}},分开获取: {{ list.0 }}, {{ list.1 }}</h2>
    {# 如果字典使用方括号,获取,需要写成字符串,如果不是字符串,那么则会被当成变量对待   #}
    <h2>字典: {{dict}}, 分开获取: {{ dict.name }}, {{ dict["age"] }}</h2>

</body>
</html>
七、模板语法,分支循环判断
-
模板语法的种类
-
分支格式:
{% if 条件 %} 语句1 {% else%} 语句2 {% endif %} -
循环语句格式:
{% for 变量 in 容器 %} {% endfor %} -
注释:
{# 这里是注释的内容 #}
-
from flask import Flask,render_template

app = Flask(__name__)

@app.route('/')
def hello_world():

    #1.定义各种类型的变量
    number = 10
    str = "老王"
    tuple = (1,2,3,4,5)
    list = [6,7,8,9,10]
    dict = {
        "name":"班长",
        "age":29
    }

    #2.携带变量到模板中展示
    return render_template("programer.html",number=number,str=str,tuple=tuple,list=list,dict=dict)

if __name__ == '__main__':
    app.run(debug=True)
对应的html
<!DOCTYPE html>
<html lang="en">
<head>
    <meta charset="UTF-8">
    <title>Title</title>
    <style>
        h1{
            color:red;
        }

    </style>
</head>
<body>

    <h1>1.遍历元祖中的偶数</h1>
    {% for item in tuple %}
        {% if item %2 == 0 %}
            <h3>{{ item }}</h3>
        {% endif %}
    {% endfor %}


    <h1>2.遍历字典</h1>
    {% for key in dict %}
        {# dict.key那么这个key会当成字典中的一个键,  dict[key],那么这个key当成一个变量 #}
        <h3>{{ key }} = {{ dict[key] }}</h3>
    {% endfor %}


</body>
</html>
八、系统字符串过滤器
- 解释: 过滤器,用来过滤想要的数据
- 格式: {{ 字符串 | 字符串过滤器 }}
- 常见的字符串过滤器有:
- title: 将每个单词的首字母都大写
- lower: 将每个单词都小写
- upper: 将每个单词都大写
- reverse: 反转
- ....
from flask import Flask,render_template

app = Flask(__name__)

@app.route('/')
def hello_world():

    return render_template("stringfilter.html")

if __name__ == '__main__':
    app.run(debug=True)
对应的html
<!DOCTYPE html>
<html lang="en">
<head>
    <meta charset="UTF-8">
    <title>Title</title>
</head>
<body>

    {#    使用格式:{{ 字符串 | 字符串过滤器 }}#}
    1.safe:禁用转义,让标签生效
    <p>{{ '<em>hello</em>' | safe }}</p>

    2.capitalize:把变量值的首字母转成大写,其余字母转小写
    <p>{{ 'hello PYTHON' | capitalize }}</p>

    3.lower:把值转成小写
    <p>{{ 'HELLO PYthON' | lower }}</p>

    4.upper:把值转成大写,中文没有大小写
    <p>{{ 'hello python 你好' | upper }}</p>

    5.title:把值中的每个单词的首字母都转成大写
    <p>{{ 'hello world python java' | title }}</p>

    6.reverse:字符串反转
    <p>{{ 'olleh' | reverse }}</p>
    <p>{{ '我爱你' | reverse }}</p>


    7.format:格式化输出
    <p>{{ '%s is %d' | format('age',17) }}</p>

    8.striptags:渲染之前把值中所有的HTML标签都删掉
    <p>{{ '<em>hello</em>' | striptags }}</p>

</body>
</html>
九、系统列表过滤器
- 解释: 过滤器,用来过滤想要的数据
- 格式: {{ 列表 | 列表过滤器 }}
- 常见的列表过滤器有:
- first: 获取列表第一个元素
- last: 最后一个元素
- sum: 列表和
- length: 列表长度
- ....
from flask import Flask,render_template

app = Flask(__name__)

@app.route('/')
def hello_world():

    return render_template("list_fliter.html")

if __name__ == '__main__':
    app.run(debug=True)
对应的html
<!DOCTYPE html>
<html lang="en">
<head>
    <meta charset="UTF-8">
    <title>Title</title>
</head>
<body>
    {#    * 使用格式:{{ 列表 | 列表过滤器 }}#}

    1.first:取第一个元素
    <p>{{ [1,2,3,4,5,6] | first }}</p>

    2. last:取最后一个元素
    <p>{{ [1,2,3,4,5,6] | last }}</p>

    3. length:获取列表长度
    <p>{{ [1,2,3,4,5,6] | length }}</p>

    4.sum:列表求和
    <p>{{ [1,2,3] | sum }}</p>

    5.sort:列表排序,默认升序
    <p>{{ [6,2,3,1,5,4] | sort }}</p>


    6.过滤器的链式调用
    {# 过滤器的链式调用 #}
    {{ "hello" | upper | reverse }}

</body>
</html>
十、自定义过滤器
-
解释: 当系统提供的过滤器满足不了需求的时候,需要自定义
-
自定义过滤器有两种格式:
-
1.先定义好函数,再将函数添加到系统默认的过滤器列表中
- def 函数名: pass
- app.add_template_filter(函数名,'过滤器名字')
-
2.定义函数的时候,直接使用系统过滤器进行装饰
@app.template_filter('过滤器名字') def 函数名(): pass -
案例:
-
1.获取列表偶数和
-
2.反转列表
-
from flask import Flask,render_template

app = Flask(__name__)

# 1.先定义好函数,再将函数添加到系统默认的过滤器列表中
def get_oushu(list):
    print(list)
    sum = 0
    for i in list:
        if i %2 == 0:
            sum += i

    return sum
#参数1: 关联的函数名称,  参数2: 在模板中使用的过滤器名字
app.add_template_filter(get_oushu,"oushu")


# 2.定义函数的时候,直接使用系统过滤器进行装饰
@app.template_filter("reverse")
def listreverse(list):
    list.reverse()
    return list


@app.route('/')
def hello_world():

    return render_template("custom_filter.html")

if __name__ == '__main__':
    app.run(debug=True)
html
<!DOCTYPE html>
<html lang="en">
<head>
    <meta charset="UTF-8">
    <title>Title</title>
</head>
<body>

    <h2>原列表: {{ [1,2,3,4,5,6] }}</h2>
    <h2>偶数列表: {{ [1,2,3,4,5,6] | oushu }}</h2>
    <h2>反转列表: {{ [1,2,3,4,5,6] | reverse }}</h2>
    <h2>降序列表: {{ [1,2,3,4,5,6,10,9,7] | sort | reverse }}</h2>

</body>
</html>
十一、代码复用之宏
-
解释: 相当于python中的函数,定义好一段功能,在需要的时候进行调用即可
-
定义格式:
{% macro 宏名(参数) %} {% endmacro %} -
使用格式:
// 使用当前文件定义好的宏
{{ 宏名(参数) }}

//使用其他文件定义好的宏
{% import '文件' as 别名%}
{{ 别名.宏名(参数) }}
from flask import Flask,render_template

app = Flask(__name__)

@app.route('/')
def hello_world():

    return render_template("file07macro.html")

if __name__ == '__main__':
    app.run(debug=True)
使用
<!DOCTYPE html>
<html lang="en">
<head>
    <meta charset="UTF-8">
    <title>Title</title>
</head>
<body>

    {# 定义宏 #}
    {% macro my_macro(name,password) %}
        用户名: <input type="text" value="{{ name }}"><br>
        密码: <input type="password" value="{{ password }}"><br>
    {% endmacro %}

    {# 调用当前文件宏 #}
    {{ my_macro("zhangsan","111111") }}


    {# 使用其他文件的宏 #}
    {% import 'othermacro.html' as other %}
    {{ other.my_input() }}
    {{ other.my_div() }}


</body>
</html>
othermacro.html
{% macro my_macro(name,password) %}
    用户名: <input type="text" value="{{ name }}"><br>
    密码: <input type="password" value="{{ password }}"><br>
{% endmacro %}


{% macro my_input() %}

    <h1>这是一个其他文件的宏</h1>

{% endmacro %}


{% macro my_div() %}

    <div style="color: red;">我是一个孤独的div</div>

{% endmacro %}
十二、代码复用之继承
-
解释: 一个子模板继承自父模板
-
作用: 共性抽取,代码复用
-
父模板
- 1.所有子类都具有的相同的内容的, 在父模板中直接写死
- 2.每个子类的模板中不一样的内容,使用block模板定义好
-
子模板
- 1.根据子类自己的需求,去重写父类中的block对应的内容
- 2.如果重写之后,还想保留父类的内容,那么使用{{super()}}
- 3.继承格式: {% extends '父文件名'%}, 写在页面的顶部
-
注意点:
-
定义block的格式
{% block 名称 %}

{% endblock %}
-
from flask import Flask,render_template

app = Flask(__name__)

@app.route('/')
def hello_world():

    # return render_template("file09zi.html")
    return render_template("file10zi.html")

if __name__ == '__main__':
    app.run(debug=True)
file11fu.html
<!DOCTYPE html>
<html lang="en">
<head>
    <meta charset="UTF-8">
    <title>Title</title>
</head>
<body>

    {# 头部部分 #}
    {% block titleBlock %}
        <h1>静夜思</h1>
    {% endblock %}

    {# 正文部分 #}
    {% block contentBlock %}

    {% endblock %}


    {# 底部部分 #}
    <div>
        <a href="#">点我有惊喜</a>
    </div>

</body>
</html>
file09zi.html
{% extends 'file11fu.html' %}

{# 重写正文部分 #}
{% block contentBlock %}
    <p>
        床前一锅汤,<br>
        撒了一裤裆, <br>
        抬头拿抹布, <br>
        低头擦裤裆 <br>
    </p>
{% endblock %}


{#<!DOCTYPE html>#}
{#<html lang="en">#}
{#<head>#}
{#    <meta charset="UTF-8">#}
{#    <title>Title</title>#}
{#</head>#}
{#<body>#}
{##}
{#    <h1>静夜思</h1>#}
{##}
{#    <p>#}
{#        床前一锅汤,<br>#}
{#        撒了一裤裆, <br>#}
{#        抬头拿抹布, <br>#}
{#        低头擦裤裆 <br>#}
{#    </p>#}
{##}
{#    <div>#}
{#        <a href="#">点我有惊喜</a>#}
{#    </div>#}
{##}
{##}
{#</body>#}
{#</html>#}
file10zi.html
{% extends 'file11fu.html' %}

{# 重写父类titleBlock内容 #}
{% block titleBlock %}
    {{ super() }}
    <h1>新静夜思</h1>
{% endblock %}

{# 重写父类中的contentBlock内容 #}
{% block contentBlock %}
    <p>
        床前明月光,<br>
        疑似地上霜, <br>
        举头望明月, <br>
        低头思故乡 <br>
    </p>
{% endblock %}

{#<!DOCTYPE html>#}
{#<html lang="en">#}
{#<head>#}
{#    <meta charset="UTF-8">#}
{#    <title>Title</title>#}
{#</head>#}
{#<body>#}
{##}
{#    <h1>静夜思</h1>#}
{##}
{#    <p>#}
{#        床前明月光,<br>#}
{#        疑似地上霜, <br>#}
{#        举头望明月, <br>#}
{#        低头思故乡 <br>#}
{#    </p>#}
{##}
{#    <div>#}
{#        <a href="#">点我有惊喜</a>#}
{#    </div>#}
{##}
{##}
{#</body>#}
{#</html>#}
十三、代码复用之包含
-
解释: 在一个文件中完全拥有另外一个文件,不够灵活,没法扩展
-
格式:
方式一: {% include '文件' %} 方式二: {% include '文件' ignore missing %} -
注意点: ignore missing 如果包含的文件不存在,也不会报错
十四、模板使用练习
- 题目: 给出5条数据,显示前四条
"""
给定如下5条数据,只显示4行数据,背景颜色依次为:黄,绿,红,紫
my_list = [
    {
        "id": 1,
        "value": "我爱工作"
    },
    {
        "id": 2,
        "value": "工作使人快乐"
    },
    {
        "id": 3,
        "value": "沉迷于工作无法自拔"
    },
    {
        "id": 4,
        "value": "日渐消瘦"
    },
    {
        "id": 5,
        "value": "以梦为马,越骑越傻"
    }
]
"""
from flask import Flask, render_template

app = Flask(__name__)

@app.route('/')
def hello_world():

    #1.定义5条数据
    my_list = [
        {
            "id": 1,
            "value": "我爱工作"
        },
        {
            "id": 2,
            "value": "工作使人快乐"
        },
        {
            "id": 3,
            "value": "沉迷于工作无法自拔"
        },
        {
            "id": 4,
            "value": "日渐消瘦"
        },
        {
            "id": 5,
            "value": "以梦为马,越骑越傻"
        }
    ]

    #2.在模板中显示4条
    return render_template("practice.html",list=my_list)

if __name__ == '__main__':
    app.run(debug=True)
practice.html
<!DOCTYPE html>
<html lang="en">
<head>
    <meta charset="UTF-8">
    <title>Title</title>
</head>
<body>

    <ul>
        {# 如果dict.id 不等于5才遍历 #}
        {% for dict in list if dict.id !=5 %}

            {# 方式一 #}
{#            {% if dict.id == 1 %}#}
{#                <li style="background: yellow;"> {{ dict.value }} </li>#}
{#            {% elif dict.id == 2 %}#}
{#                <li style="background: green;"> {{ dict.value }} </li>#}
{#            {% elif dict.id == 3 %}#}
{#                <li style="background: red;"> {{ dict.value }} </li>#}
{#            {% else %}#}
{#                <li style="background: purple;"> {{ dict.value }} </li>#}
{#            {% endif %}#}

            {# 遍历的时候可以获取到从0开始的索引 #}
{#            <h3>{{ loop.index0  }}</h3>#}

            {# 遍历的时候可以获取到从1开始的索引 #}
{#            <h3>{{ loop.index  }}</h3>#}


            {# 方式二 #}
            {% if loop.index == 1 %}
                <li style="background: yellow;"> {{ dict.value }} </li>
            {% elif loop.index == 2 %}
                <li style="background: green;"> {{ dict.value }} </li>
            {% elif loop.index == 3 %}
                <li style="background: red;"> {{ dict.value }} </li>
            {% else %}
                <li style="background: purple;"> {{ dict.value }} </li>
            {% endif %}


        {% endfor %}
    </ul>


</body>
</html>
十五、模板特有变量
- 解释: 不需要通过python程序传递就可以直接使用的变量
- 常见的特有变量如下:
- config: 就是flask中的app.config, 表示应用程序中的所有配置信息
- request: 表示请求上下文对象,封装的是请求相关的数据
- g: 局部的全局变量(了解)
- url_for(): 反解析,通过函数的名字,解析到视图函数的路径
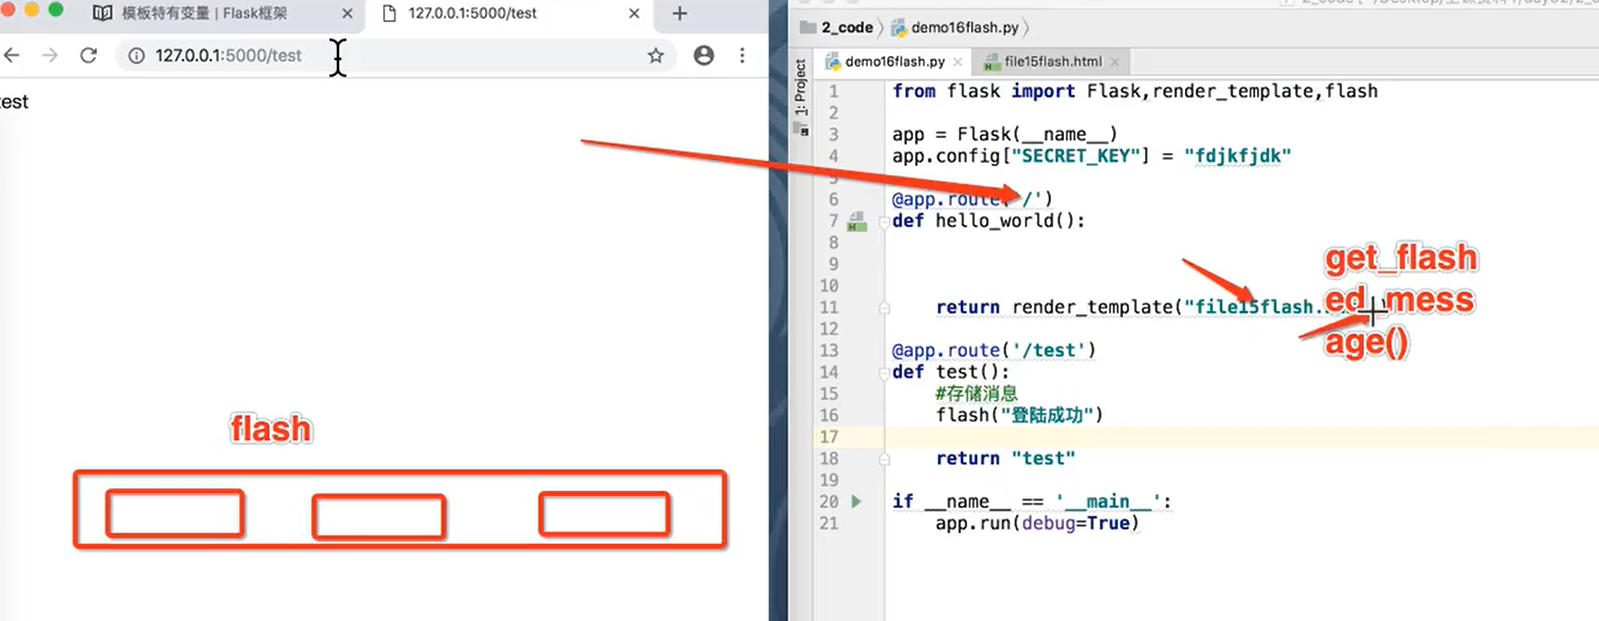
- get_flashed_messsages(): 用来消耗flash方法中存储的消息.
- 场景: 登陆出错,可以显示
- 注意点:
- 1.使用flash存储消息的时候需要设置SECRET_KEY
- 2.因为flash内部的消息存储,依赖于了session
from flask import Flask,render_template

app = Flask(__name__)
app.config["SECRET_KEY"] ="hahaha"
@app.route('/')
def hello_world():

    return render_template("special_variable.html")

@app.route('/test/<int:age>')
def test(age):
    return "test..."


if __name__ == '__main__':
    app.run(debug=True)
special_variable.html
<!DOCTYPE html>
<html lang="en">
<head>
    <meta charset="UTF-8">
    <title>Title</title>
</head>
<body>

    <h2>config变量: {{ config }}</h2>
    <h2>request: {{ request.method }}</h2>
    <h2>request: {{ request.url }}</h2>
    <h2>url_for(): {{ url_for("hello_world") }}</h2>
    <h2>url_for(): {{ url_for("test",age=100) }}</h2>

</body>
</html>
get_flashed_messsages()的使用
from flask import Flask,render_template,flash

app = Flask(__name__)
app.config["SECRET_KEY"] = "onjgtex"

@app.route('/')
def hello_world():

    return render_template("flash.html")

@app.route('/test')
def test():
    #存储消息
    flash("登陆成功")

    return "test"

if __name__ == '__main__':
    app.run(debug=True)
flash.html
用来消耗flash方法中存储的消息
<!DOCTYPE html>
<html lang="en">
<head>
    <meta charset="UTF-8">
    <title>Title</title>
</head>
<body>

    {{ get_flashed_messages() }}

</body>
</html>
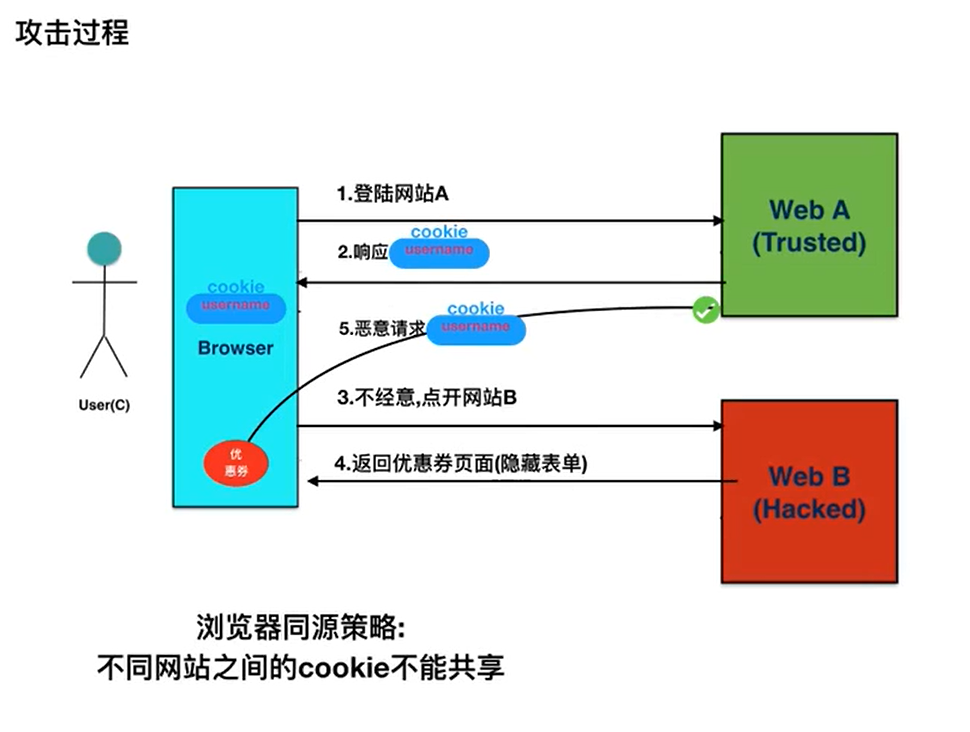
十六、csrf攻击流程
- 解释: 跨站点请求伪造
- 掌握: 需要理解讲义中的攻击流程图
- 代码演示: webA, webB
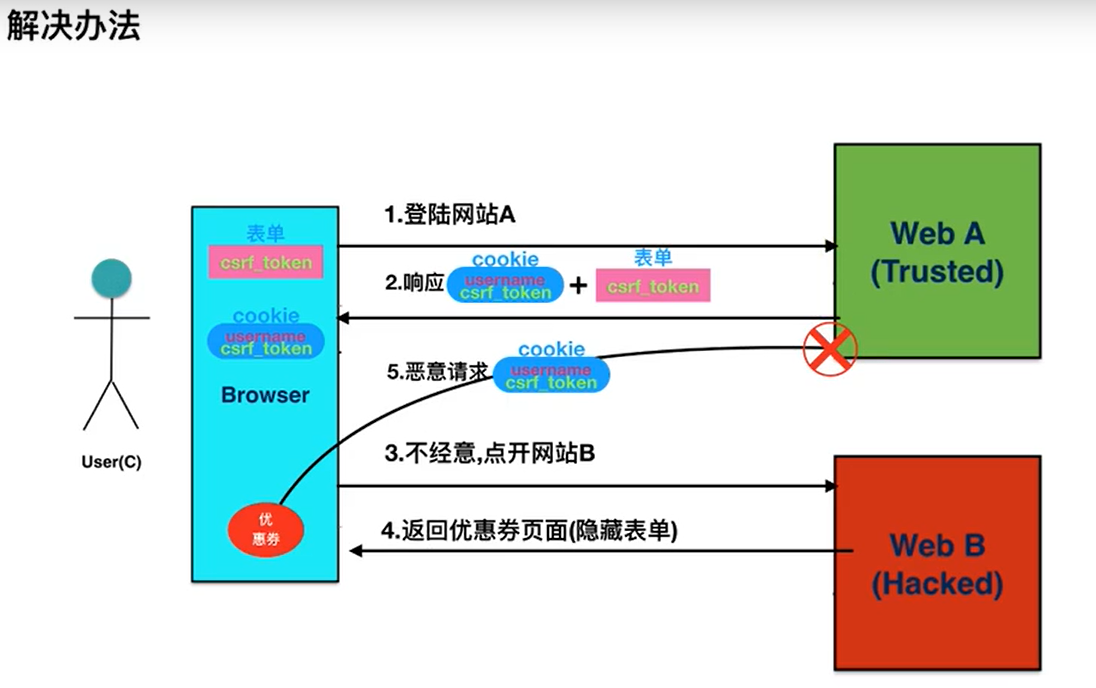
十七、csrf攻击手动解决
- 在cookie增加一个csrf_token
- 在表单中增加一个csrf_token
- 校验: 取出cookie和表单中的csrf_token比较如果二者一致那么是正常请求
- 具体过程,看keynote图解
十八、CSRFProtect解决csrf
- 使用流程:
- 1.安装扩展包
- pip install flask-wtf
- 2.导入包
- from flask_wtf.csrf import CSRFProtect
- 3.设置SECRET_KEY,便于csrf_token加密
- 4.创建CSRFProtect对象,保护app对象
- 5.需要在表单中设置csrf_token隐藏字段即可
- 例子: 注册案例
- 注意点: CSRFProtect一旦保护了app之后, 会对'POST', 'PUT', 'PATCH', 'DELETE'做校验.
- 1.安装扩展包
from flask import Flask, render_template, request
from flask_wtf.csrf import CSRFProtect


app = Flask(__name__)

# 1. 先设置密钥
app.config["SECRET_KEY"] = "weorinsaiudfhnb"
# 2. 保护app
CSRFProtect(app)


@app.route('/', methods=["GET", "POST"])
def index():
    if request.method == "POST":
        # 获取到参数
        username = request.form.get("username")
        password = request.form.get("password")
        repassword = request.form.get("repassword")

        # 校验参数
        if not all([username, password, repassword]):
            return "参数填写不全"

        # 判断两次的密码是否一致
        if password != repassword:
            return "两次密码输入不一致,请重新输入"

        return "注册成功"

    else:
        return render_template("register.html")


if __name__ == '__main__':
    app.run()
对应的register.html
<!DOCTYPE html>
<html lang="en">
<head>
    <meta charset="UTF-8">
    <title>Title</title>
</head>
<body>
    <form action="/" method="post">
    {# 3. 只要使用了CSRFProtect保护app,就可以直接使用csrf_token()作为value值       #}
        <input type="hidden" name="csrf_token" value="{{ csrf_token() }}">

        用户名:<input type="text" name="username"><br>
        密码:<input type="password" name="password"><br>
        确认密码:<input type="password" name="repassword"><br>
        <input type="submit" value="注册">
    </form>
</body>
</html>
作者:山丘!
-------------------------------------------
你闻讯而来,我大喜过望,我在这等你,你又在哪呢?喜欢的话加一个“关注”呗!
如果觉得这篇文章对你有小小的帮助的话,记得在右下角点个“推荐”哦,博主在此感谢!

 浙公网安备 33010602011771号