


springboot整合thymeleaf的简单操作
thymeleaf是一种视图技术 类似于jsp springboot用thymeleaf的比较多
首先 添加在maven中添加依赖:
<span th:text="${hello}">123</span> th:text 会把标签中的值覆盖掉 所以 最终会显示${hello}的内容 而不是 123
<input th:value="${hello}"> th:value 会把内容赋给文本框 th:value 只能用于input标签
2.字符串操作:
首先 添加在maven中添加依赖:
<!--添加thymeleaf依赖-->
        <dependency>
            <groupId>org.springframework.boot</groupId>
            <artifactId>spring-boot-starter-thymeleaf</artifactId>
            <version>2.2.5.RELEASE</version>
        </dependency>
其次 在springboot项目的templates文件夹下建立一个html文件 index.html作为测试的页面
再写一个测试类User:
package com.mc_74120.springbootthymeleaf.domain;

public class User {
    private String id;
    private String name;
    private int age;

    public User() {
    }

    public String getId() {
        return id;
    }

    public void setId(String id) {
        this.id = id;
    }

    public String getName() {
        return name;
    }

    public void setName(String name) {
        this.name = name;
    }

    public int getAge() {
        return age;
    }

    public void setAge(int age) {
        this.age = age;
    }

    public User(String id, String name, int age) {
        this.id = id;
        this.name = name;
        this.age = age;
    }
}
再创建控制器:
@Controller
public class PageController {
    @GetMapping("/show")
    public String show(Model model){
model.addAttribute("hello","hello");
return "index"; } }
这样就可以对thymeleaf进行测试了 1.字符串与变量输出
在index.html中写入:
<span th:text="嘟嘟噜"></span>
<span th:text="${hello}"></span>
<input th:value="${hello}">
结果如图:

<span th:text="${hello}">123</span> th:text 会把标签中的值覆盖掉 所以 最终会显示${hello}的内容 而不是 123
<input th:value="${hello}"> th:value 会把内容赋给文本框 th:value 只能用于input标签
2.字符串操作:
<span th:text="${#strings.isEmpty(hello)}"></span>   model中的hello的value是否为空
<br/>
<span th:text="${#strings.contains(hello,'h')}"></span>  是否包含'h'
<br/>
<span th:text="${#strings.length(hello)}"></span>     内容的长度
<br/>
结果如图所示

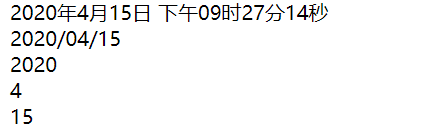
3.日期操作:
控制器添加:
model.addAttribute("date",new Date());
index.html添加:
<span th:text="${#dates.format(date)}"></span> 以系统默认格式 显示日期
<br/>
<span th:text="${#dates.format(date,'yyyy/MM/dd')}"></span> 以指定形式显示日期
<br/>
<span th:text="${#dates.year(date)}"></span> 显示日期中的年份
<br/>
<span th:text="${#dates.month(date)}"></span> 月份
<br/>
<span th:text="${#dates.day(date)}"></span> 第几日
<br/>
结果如图:
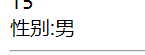
if条件判断:
model.addAttribute("sex","男");
<span th:if="${sex}=='男'">
    性别:男
</span>
    <span th:if="${sex}=='女'">
        性别:女
    </span>
因为 sex的值为"男" 所以应该显示 性别:男 这一栏
结果如图:
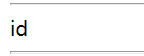
switch判断
<div th:switch="要判断的元素">
<span th:case="值1">id</span>
    <span th:case="值2">id2</span>
</div>
model.addAttribute("id","id");
<div th:switch="${id}">
<span th:case="id">id</span>
    <span th:case="id2">id2</span>
</div>
结果如图:
迭代遍历
List<User> users=new ArrayList<>();
users.add(new User("1","74120",10));
users.add(new User("2","74122",11));
users.add(new User("3","74123",12));
users.add(new User("4","74124",103));
model.addAttribute("userList",users);
<table border="1" width="50%">
    <tr>
        <th>ID</th>
        <th>Name</th>
        <th>Age</th>
    </tr>
    <tr th:each="u:${userList}">
        <th th:text="${u.id}"></th>
        <th th:text="${u.name}"></th>
        <th th:text="${u.age}"></th>
    </tr>
</table>

迭代map
Map<String,User> userMap=new HashMap<>();
userMap.put("user1",new User("1","74120",10) );
userMap.put("user2",new User("2","74122",11));
userMap.put("user3",new User("3","74123",12));
userMap.put("user4",new User("4","74124",103));
model.addAttribute("map",userMap);
<table border="1" width="50%">
    <tr>
        <th>Value</th>
    </tr>
    <tr th:each="m:${map}">
        <th th:text="${m}"></th>
    </tr>
</table>

<table border="1" width="50%">
    <tr>
        <th>key</th>
        <th>ID</th>
        <th>Name</th>
        <th>Age</th>
    </tr>
    <tr th:each="m:${map}">
        <th th:text="${m.key}"></th>
        <th th:text="${m.value.id}"></th>
        <th th:text="${m.value.name}"></th>
        <th th:text="${m.value.age}"></th>
    </tr>
</table>
取map中的元素的变量 应该用 m.value.xx 而m.key则是map对象的key名称
如图所示

1.Thymeleaf操作域对象:
写controller:
@GetMapping("/show")
public String show(Model model, HttpServletRequest request){
request.setAttribute("req","httpservletrequest");
 request.getSession().setAttribute("ses","httpsession");
    request.getServletContext().setAttribute("app","application");
    return  "index";
}
分别向request域中存入"req" "ses" "app"三个参数并跳转到index页面在index页面编写:取request域中的对象
<hr/>
HttpServletRequest<span th:text="${#httpServletRequest.getAttribute('req')}"></span>
<span th:text="${#request.getAttribute('req')}"></span>
<hr/>
取session域中对象
<span th:text="${session.ses}"></span>
<span th:text="${#httpSession.getAttribute('ses')}"></span>
<hr/>
取servletcontext中的对象
ServletContext <span th:text="${application.app}"></span>
<span th:text="${#servletContext.getAttribute('app')}"></span>
<hr/>
结果如图所示:

2.thymeleaf的URL传递参数:
第一种方法和普通的get方法相同,在路径后面加上?key=value%xx=xxx 如:
<a th:href="@{/show2?id=1&name=admin}">普通url传递参数方式1</a>
第二种方法的格式为{/ur(key1=value1,key2=value2)} 如:
<a th:href="@{/show2(id=1,name=74120)}">普通url传递参数方式2</a>
若要用restful风格传递参数 格式为{/url/{key1}/{key2}(key1=value1,key2=value2)}
restful风格传递的参数和普通参数一样 写在括号里
例如:
<a th:href="@{/show3/{id}/{name}(id=200,name=name)}">restful风格传递参数</a>


 浙公网安备 33010602011771号