2019-04-27 java NIO的知识
一、NIO介绍
1、在软件系统中,由于I/O的速度要比内存速度慢,因此,I/O读写在很多场合都会成为系统的瓶颈。提升I/O速度,对提升系统整体性能有着很大的好处。
在java标准的I/O中,提供了基于流的I/O实现,及InputStream和outputStream.这种基于流的实现以 字节为单位处理数据,并且非常容易建立各种过滤器。
NIO是NEW I/O的简称,与旧式的基于流的I/O方法相对,表示新的一套java i/o标准。Java1.4加入到JDK中,有以下特性:
- 为所有的原始类型提供(Buffer)缓存支持;
- 使用Java.nio.charset.Charset作为字符集编码解码解决方案;
- 增加通道(Channel)对象,作为新的原始I/O抽象;
- 支持锁和内存映射文件的文件访问接口;
- 提供了基于Selector的异步网络I/O。
与流式的I/O不同,NIO是基于块(Block)的,他以块为基本单位处理数据,在NIO中最为重要的两个组件是缓存Buffer和通道Channel。缓存是一块连续的内存块,是NIO读写数据的中转地。通道表示缓冲数据的源头或者目的地,他用于缓冲读取或者写入数据,是访问缓冲的接口,如下图展示子通道和缓冲的关系。

2、NIO的Buffer类族和Channel
在NIO的实现中,Buffer是一个抽象类。JDK为每一种Java原生类型都创建了一个Buffer,

除了ByteBuffer外,其他每一种Buffer都具有完全一样的操作,唯一的区别仅仅在于他们所对应的数据类型。因为ByteBuffer多用于绝大多数标准I/O操作的接口,因此他有一些特殊的方法。
在NIO中和Buffer配合使用的还有Channel,Channel是一个双向通道,即可读,也可写,有点类似Stream,但Stream是单向的,应用程序中不能直接对Channel进行读写操作,而必须通过Buffer来进行。比如,在读一个Channel的时候,需要先将数据读入到相应的Buffer,然后再Buffer中进行读取。
public static void niocopeFile(String resource, String destination) throws Exception{
        FileInputStream fis=new FileInputStream(resource);
        FileOutputStream fos=new FileOutputStream(destination);
        FileChannel readChannel = fis.getChannel();
        FileChannel writerChannel = fos.getChannel();
        ByteBuffer buffer = ByteBuffer.allocate(1024);
        int len;
        while(true){
            //为读入数据到buffer做准备
            buffer.clear();
            //讀入数据 ,,内容已存入buffer中
            len = readChannel.read(buffer);
            if(len==-1){
                //讀取完畢
                break;
            }
            //从 写状态 转为 读状态,flip()方法主要是在“读写切换时”调用
            buffer.flip();
            writerChannel.write(buffer);

        }
        readChannel.close();
        writerChannel.close();
        System.out.println("复制完");
    }
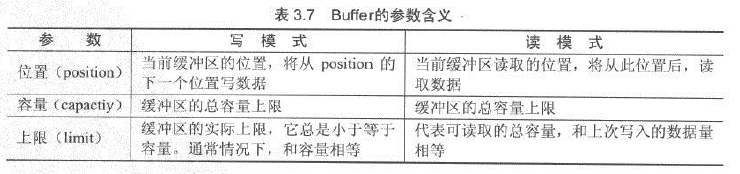
3、Buffer的基本原理
Buffer中有三个重要的参数:位置(position) 、容量(capactiy)和上限(limit),三者的含义如下:
为了更好理解Buffer的工作模式,实现以下实例:
public static void demo1(){
        ByteBuffer b=ByteBuffer.allocate(20);//15个字节大小的缓冲区
        System.out.println("position="+b.position()+" limit="+b.limit()+" capactiy= "+b.capacity());
        for(int i=0;i<10;i++){
            b.put((byte)i);                    //存入10个字节数据
        }
        System.out.println("position="+b.position()+" limit="+b.limit()+" capactiy= "+b.capacity());
        //重置position
        b.flip();
        System.out.println("position="+b.position()+" limit="+b.limit()+" capactiy= "+b.capacity());
        for (int i = 0; i < 5; i++) {
            System.out.print(b.get()+" ");
        }
        System.out.println();
        System.out.println("position="+b.position()+" limit="+b.limit()+" capactiy= "+b.capacity());
        b.flip();    //切到写
        System.out.println("position="+b.position()+" limit="+b.limit()+" capactiy= "+b.capacity());
    }
输出如下:
position=0 limit=20 capactiy= 20
position=10 limit=20 capactiy= 20
position=0 limit=10 capactiy= 20
0 1 2 3 4
position=5 limit=10 capactiy= 20
position=0 limit=5 capactiy= 20
Buffer的三个重置和清空方法:实际上就是对缓冲区的参数进行操作

//比如用在复制该buffer的有效数据到另一个数组里面
public final Buffer rewind() {
        position = 0;
        mark = -1;
        return this;
    }

public final Buffer clear() {
        position = 0;
        limit = capacity;
        mark = -1;
        return this;
    }

public final Buffer flip() {
        limit = position;
        position = 0;
        mark = -1;
        return this;
    }
标志缓冲区:mark()方法
public static void demo2(){
        ByteBuffer b=ByteBuffer.allocate(20);
        for (int i = 0; i < 15; i++) {
            b.put((byte)i);
        }
        b.flip();//准备读
        for (int i = 0; i < 15; i++) {
            //在位置10的地方做mark
            if(i==10){
                b.mark();
                System.out.print(" set mark ");
            }
            System.out.print(b.get()+" ");
        }
        //回到mark的位置,读取后续数据
        b.reset();
        System.out.println("\nreset to mark");
        while(b.hasRemaining()){
            System.out.print(b.get()+" ");
        }
    }
输出:
0 1 2 3 4 5 6 7 8 9  set mark 10 11 12 13 14
reset to mark
10 11 12 13 14
复制缓冲区 duplicate() 方法:可以为多方同时处理数据
/*
     * 复制缓冲区:
     * 1、主缓冲区、副本缓冲区,都是拿同一个地方的数据
     * 2、各自维护自己的position、limit、mark
     */
    public static void demo3(){
        ByteBuffer b=ByteBuffer.allocate(20);
        for (int i = 0; i < 15; i++) {
            b.put((byte)i);
        }
        ByteBuffer copyB = b.duplicate();
        System.out.println("执行b.duplicate()后,");
        System.out.println(b);
        System.out.println(copyB);
        copyB.flip();
        System.out.println("执行copyB.flip()后,");
        System.out.println(b);
        System.out.println(copyB);
        System.out.println("想副本缓冲区插入一个数据:(byte)100");
        copyB.put((byte)100);
        System.out.println("获取主缓冲区跟副本缓冲区第一个数据");
        System.out.println("b.get(0):"+b.get(0));
        System.out.println("copyB.get(0):"+copyB.get(0));
    }
缓冲区分片:slice()方法,
* 1、获取主缓冲去中的一个片段,
* 2、设置position、limit为范围,跟复制缓冲区一个概念,存储的数据本质是一样的。
* b.position(3);
* b.limit(10);
* b.slice();
只读缓冲区asReadOnlyBuffer() 方法
* 创建只读缓冲区,只能读取数据,写入数据会报错。
文件映射到内存 MappedByteBuffer
  /*
     * NIO提供一种将文件映射到内存的方法进行I/O操作,他可以比常规的基于流的I/O快很多,FileChannal.map()方法实现
     */
    public static void demo5() throws Exception{
        RandomAccessFile raf=new RandomAccessFile("d:\\student.txt","rw");
        FileChannel fc=raf.getChannel();
        //MappedByteBuffer 是ByteBuffer的子类
        //通过FileChannel将文件映射到内存中。
        MappedByteBuffer mbb = fc.map(FileChannel.MapMode.READ_WRITE, 0, raf.length());
        while(mbb.hasRemaining()){
            System.out.print(mbb.get()+" ");
        }
        //通过修改Buffer,通过映射,将实际数据写到对应 的磁盘中。
        mbb.put(0,(byte)98);
        raf.close();

    }
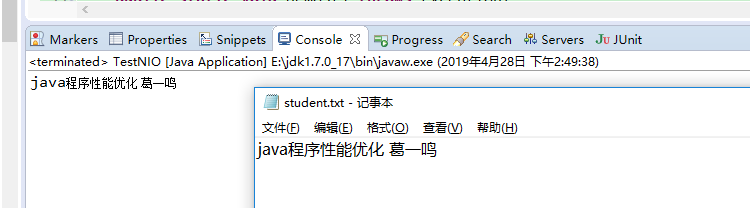
处理结构化数据:
/*
     * 处理结构化数据
     * 1、散射:将数据读入一组Buffer中
     * 2、聚集:将数据写入一组Buffer中
     * 简单来说就是将将数据处理成Buffer数组
     */
    public static void demo6() throws Exception{
        /*
         * 聚集
        */
        ByteBuffer b1=ByteBuffer.wrap("java程序性能优化".getBytes());
        ByteBuffer b2=ByteBuffer.wrap(" 葛一鸣".getBytes());
        int booklen=b1.limit();
        int autlen=b2.limit();
        FileOutputStream fos=new FileOutputStream("d:\\student.txt");
        ByteBuffer[] bs={b1,b2};
        FileChannel channel = fos.getChannel();
        channel.write(bs);
        fos.close();

        /*
         * 散射
         */
        ByteBuffer b3=ByteBuffer.allocate(booklen);
        ByteBuffer b4=ByteBuffer.allocate(autlen);
        ByteBuffer[] bs2=new ByteBuffer[]{b3,b4};
        FileInputStream fis=new FileInputStream("d:\\student.txt");
        FileChannel channel2 = fis.getChannel();
        channel2.read(bs2);
        String bookname=new String(bs2[0].array(),"utf-8");
        String atuname=new String(bs2[1].array(),"utf-8");
        System.out.println(bookname+atuname);
        fis.close();
    }
控制台输出跟文件内容展示:

 浙公网安备 33010602011771号