windows 安装 Elasticsearch
一.官网下载安装包
Elasticsearch高版本内置jdk,无需使用系统安装的java,本文以 8.3.3 版本为例,无需修改配置文件
1. 下载安装包
https://www.elastic.co/cn/downloads/elasticsearch

2.下载后解压
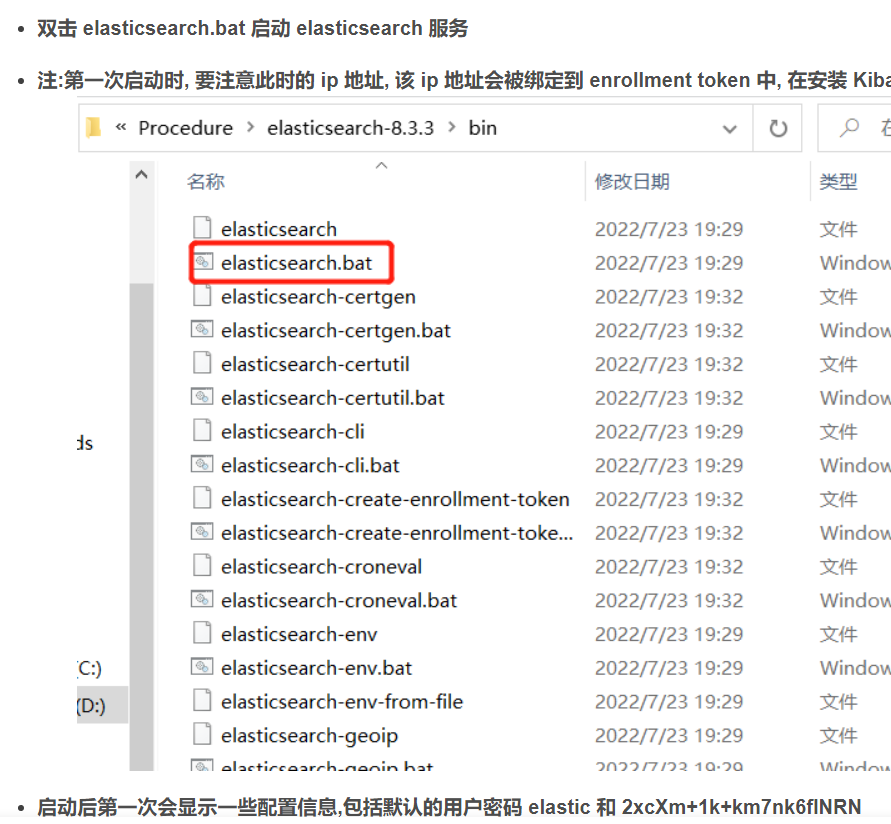
双击 elasticsearch.bat 启动 elasticsearch 服务
注:第一次启动时, 要注意此时的 ip 地址, 该 ip 地址会被绑定到 enrollment token 中, 在安装 Kibana 时有用
第一次启动会打印一下内容, 要好好记录下来
-> Elasticsearch security features have been automatically configured!
-> Authentication is enabled and cluster connections are encrypted.
-> Password for the elastic user (reset with `bin/elasticsearch-reset-password -u elastic`):
+FOyD9Ihzn*6SHmv9Son
-> HTTP CA certificate SHA-256 fingerprint:
61e0476f0849bb2293d6f83152dea0d94985568f6cadaae80f3eef2c621e5629
-> Configure Kibana to use this cluster:
* Run Kibana and click the configuration link in the terminal when Kibana starts.
* Copy the following enrollment token and paste it into Kibana in your browser (valid for the next 30 minutes):
eyJ2ZXIiOiI4LjMuMyIsImFkciI6WyIxOTIuMTY4LjEuNzo5MjAwIl0sImZnciI6IjYxZTA0NzZmMDg0OWJiMjI5M2Q2ZjgzMTUyZGVhMGQ5NDk4NTU2OGY2Y2FkYWFlODBmM2VlZjJjNjIxZTU2MjkiLCJrZXkiOiJwMWZhUDRNQjBWUGo5SW16NElOQzpoczZoU083LVJnbUh1QUZOc0FCUjVBIn0=
-> Configure other nodes to join this cluster:
* On this node:
- Create an enrollment token with `bin/elasticsearch-create-enrollment-token -s node`.
- Uncomment the transport.host setting at the end of config/elasticsearch.yml.
- Restart Elasticsearch.
* On other nodes:
- Start Elasticsearch with `bin/elasticsearch --enrollment-token <token>`, using the enrollment token that you generated.
3.验证安装结果
在浏览器中输入如下链接和用户名密码
https://localhost:9200/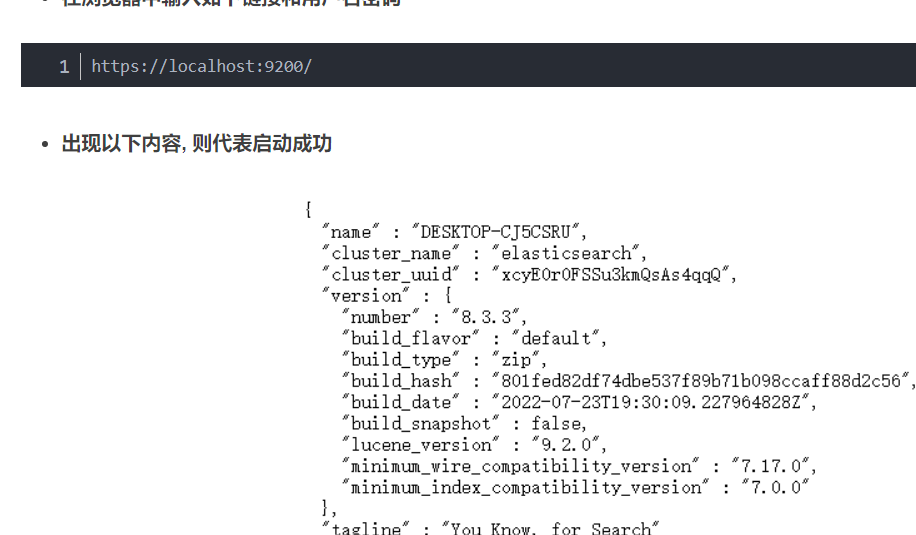
出现以下内容, 则代表启动成功
{
"name" : "DESKTOP-CJ5CSRU",
"cluster_name" : "elasticsearch",
"cluster_uuid" : "Jcp_3e7xRI6edD_yHgKpJA",
"version" : {
"number" : "8.3.3",
"build_flavor" : "default",
"build_type" : "zip",
"build_hash" : "801fed82df74dbe537f89b71b098ccaff88d2c56",
"build_date" : "2022-07-23T19:30:09.227964828Z",
"build_snapshot" : false,
"lucene_version" : "9.2.0",
"minimum_wire_compatibility_version" : "7.17.0",
"minimum_index_compatibility_version" : "7.0.0"
},
"tagline" : "You Know, for Search"
}
4.将 elasticsearch 以服务的方式安装
4.1 添加系统环境变量 Elasticsearch_Server
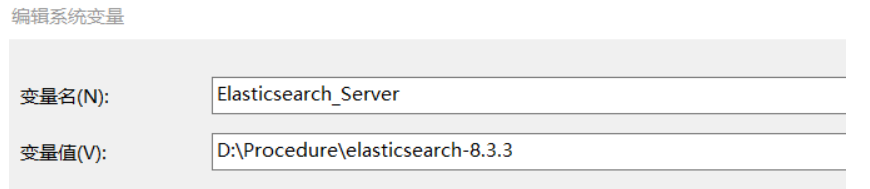
4.2 在系统环境变量 Path 中添加如下路径
%Elasticsearch_Server%\bin
4.3 安装 Elasticsearch 服务
cmd中执行
elasticsearch-service.bat install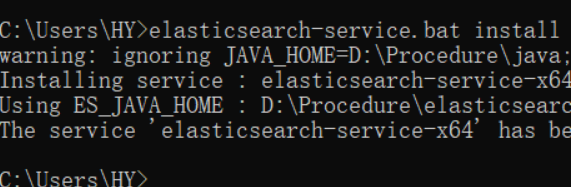
4.4 服务操作命令
启动Elasticsearch服务:
elasticsearch-service.bat start
停止Elasticsearch服务:
elasticsearch-service.bat stop
安装Elasticsearch服务:
elasticsearch-service.bat install
卸载Elasticsearch服务:
elasticsearch-service.bat remove
启动 Elasticsearch 属性gui:
elasticsearch-service.bat manager
1
二.安装 ElasticSearch-head 插件
1.安装 node.js 环境
官网下载 msi版本的 windows安装包:
https://nodejs.org/
1
我所下载的版本为 v14.0.0,下载过程中记得添加入环境变量, 安装成功后进行验证
2.安装 Grunt 工具
cmd中执行
npm install -g grunt-cli

3.安装 ElasticSearch-head 插件
下载压缩包 elasticsearch-head-master.zip:
https://github.com/mobz/elasticsearch-head
3. 下载后解压启动
在该文件夹内启动cmd, 执行安装命令:
npm install
执行启动命令:
npm run start
4.访问 elasticsearch-head
我们首先需要解决下跨域问题:
在 config/elasticsearch.yml 添加如下配置:
http.cors.enabled: true
http.cors.allow-origin: "*"
http.cors.allow-headers: "*"
重启 elasticsearch 和 elasticsearch-head
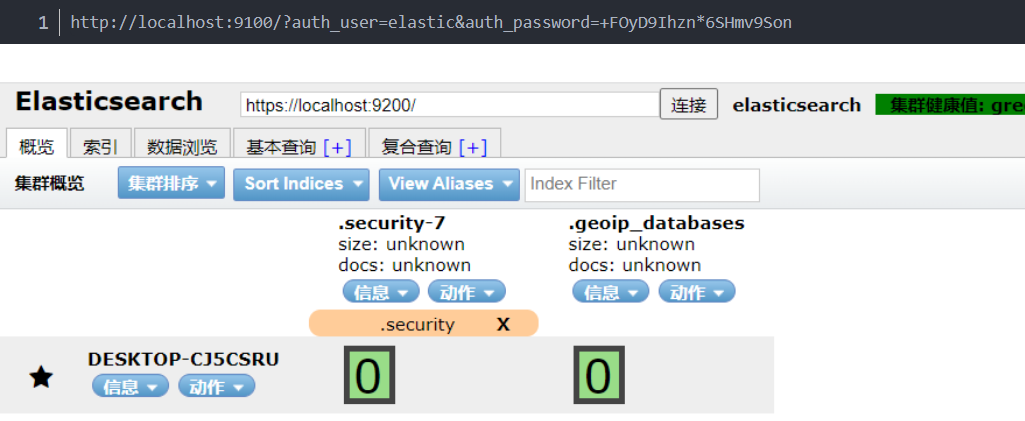
由于本次安装有默认的用户密码, 则我们请求
http://localhost:9100/?auth_user=elastic&auth_password=+FOyD9Ihzn*6SHmv9Son
三.安装 kibana
1.下载与Elasticsearch 相同版本的 kibana
https://www.elastic.co/cn/downloads/past-releases#kibana
1
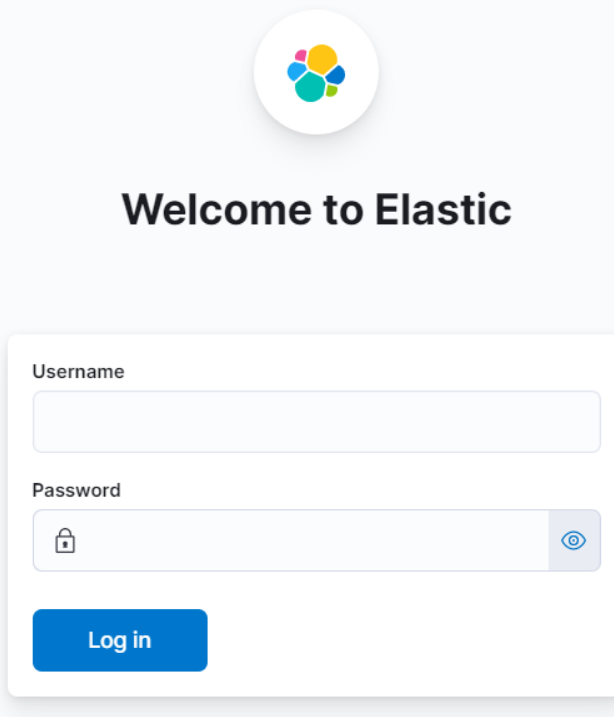
2.启动 Kibana服务
bin目录下双击执行 kibana.bat 文件

3.输入用户密码
4.中文版界面
修改 config\kibana.yml 文件
将 i18n.locale: “en”, 改为 i18n.locale: “zh-CN”

 浙公网安备 33010602011771号