ss搭建以及proxychains使用记录
环境
- centos
- pip2
安装
sudo pip install s**socks
配置
# 单用户
{
    "server":"0.0.0.0",
    "server_port":10010,
    "password":"yourpass",
    "timeout":300,
    "method":"aes-256-cfb",
    "mode":"tcp_and_udp"
}

多用户
{
 "server":"0.0.0.0",
 "local_address": "127.0.0.1",
 "local_port":1080,
  "port_password": {
        "port1":"pass1",
        "port2":"pass2",
        "port3":"pass3"
 },
 "timeout":300,
 "method":"aes-256-cfb",
 "fast_open": false
}
启动
ssserver -c /etc/s**socks.json -d start
停止
ssserver -c /etc/s**socks.json -d stop
环境
- win7
- s**socks-libqtss
启动
s**socks-libqtss.exe -c config.json -S
配置
{
    "server":"0.0.0.0",
    "server_port":10010,
    "local_address":"127.0.0.1",
    "local_port":1080,
    "password":"mark",
    "timeout":600,
    "method":"aes-256-cfb",
    "http_proxy": false,
    "auth": false
}
浏览器配置及测试
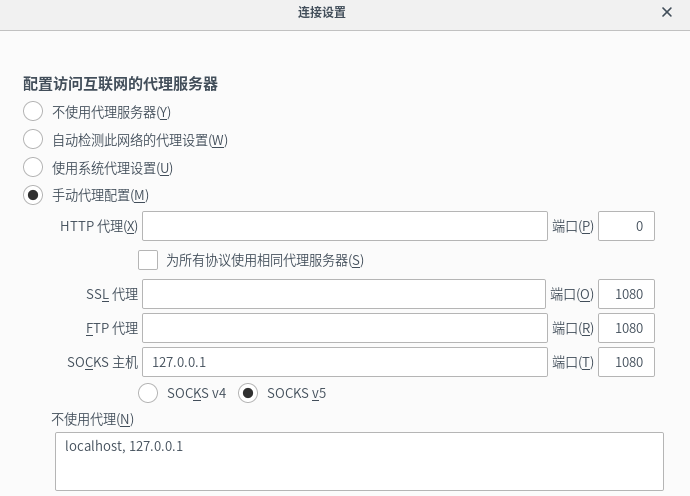
访问测试

proxychains使用记录
ProxyList下添加代理类型,执行命令前添加proxychains即可。
$ vim /etc/proxychains.conf
[ProxyList]
# add proxy here ...
# meanwile
# defaults set to "tor"
socks5 127.0.0.1 1080

 浙公网安备 33010602011771号