Spring(3)-AOP快速入手
经过前面Spring(1)-粗解动态代理 - marigo - 博客园 Spring(2)-粗解横切关注点 - marigo - 博客园两篇内容,我们可以引入AOP了。
AOP的简单理解
AOP 的全称(aspect oriented programming) ,面向切面编程。
我们在此之前接触的更多是OOP,也就是面向对象编程。OOP和AOP有什么异同,网上有很多详细地讲解,本文不做赘述,直接对什么是AOP进行说明。
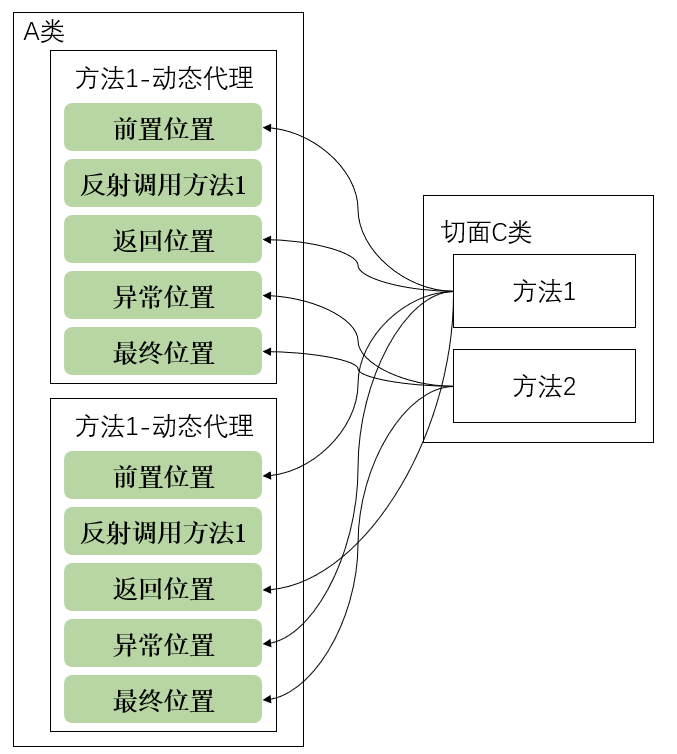
在前面Spring(2)-粗解横切关注点 - marigo - 博客园中,比如有一个 A类,其中有很多方法,在使用的时候不是OOP那种 A.方法1() 的方式,而且通过动态代理,使用proxy.方法1()的方式调用。又引出了横切关注点的概念,有四个位置:前置通知、返回通知、异常通知、最终通知,这四个位置也就是代表着四个可能需要切入的方法。我们还写了一个非常简单的切面类,其中有很多方法,这些方法会被切入到四个横切关注点的任意位置。
这就是AOP的比较直观地理解,接下来就是AOP的快速入门。
AOP的快速入门
切面类中,框架 aspectj 声明通知的方法:
1. 前置通知:@Before
2. 返回通知:@AfterReturning
3. 异常通知:@AfterThrowing
4. 后置通知(最终通知):@After
5. 环绕通知:@Around,可以将以上四个通知合并管理
实例
需求
同Spring(2)-粗解横切关注点 - marigo - 博客园的需求,大体要求就是打印输出:
前置通知
方法内部打印:result = 21.1
返回通知
最终通知
AOP代码实现
- 创建 SmartAnimalable 接口
public interface SmartAnimalable {
    float getSum(float i, float j);
    float getSub(float i, float j);
}
- 创建 SmartAnimalable 接口的实现类 SmartDog
- 使用Spring框架,我们后面就不再手动new对象了,加入注解@Component,也就是当Spring启动后,将SmartDog自动注入到容器中
@Component
public class SmartDog implements SmartAnimalable{
    @Override
    public float getSum(float i, float j) {
        float result = i + j;
        System.out.println("getSum() 方法内部打印 result= " + result);
        return result;
    }
    @Override
    public float getSub(float i, float j) {
        float result = i - j;
        System.out.println("getSub() 方法内部打印 result= " + result);
        return result;
    }
}
- 创建切面类 SmartAnimalAspect
- 如何让Spring知道这是个切面类呢,需要加两个注解@Aspect和@Component,前者表示这是一个切面类,后者是将这个切面类注入到容器中
- 以前置通知为例进行注释讲解,其他三个位置同理,不做展开
- 这里就将前面写过两遍的 MyProxyProvider 动态代理类进行了封装,写起来简单,而且功能更强大
@Aspect
@Component
public class SmartAnimalAspect {
    /**
     * 前置通知:希望在目标方法执行之前执行
     * @Before() 参数表示我们要把方法切入到哪里,格式是:访问修饰符 返回值 包名.类名.方法名(参数类型)
     * JoinPoint joinPoint:表示连接点对象,有很多有用的方法
     * joinPoint.getSignature():获取方法签名对象
     * joinPoint.getArgs():获取方法参数
     * 方法签名就是目标方法的方法名:com.example.aspectj.SmartDog.getSum
     */
    @Before(value = "execution(public float com.example.aspectj.SmartDog.getSum(float ,float))")
    public void showBeginLog(JoinPoint joinPoint) {
        System.out.println("前置通知");
        Signature signature = joinPoint.getSignature();
        // 1. 在调用目标方法之前打印“方法开始”日志
        System.out.println("日志--方法名:" + signature.getName() + "--方法开始--参数:" + Arrays.asList(joinPoint.getArgs()));
    }
}
- 配置bean.xml
- 自动扫描包
- 开启基于注解的AOP功能
<context:component-scan base-package="com.example.aspectj"/>
<aop:aspectj-autoproxy/>
- 测试
public class ATest {
    public static void main(String[] args) {
        ClassPathXmlApplicationContext ioc = new ClassPathXmlApplicationContext("beans07.xml");
        // 通过接口获取注入的对象-本质上就是代理对象
        SmartAnimalable bean = ioc.getBean(SmartAnimalable.class);
        bean.getSum(1, 2);
    }
}
至此,我们就完成了AOP的快速入门。
补充
- 切面类中的方法名不做要求,但是建议采用规范的方法名showBeginLog()、showSuccessEndLog()、showExceptionLog()、showFinallyEndLog()
- 切入表达式可以模糊配置:
@Before(value="execution(* com.example.aspectj.SmartDog.*(..))") - 所有包下的所有类的所有方法都执行方法:
@Before(value="execution(* *.*(..))") - 当 spring 容器开启了 aop:aspectj-autoproxy/ , 我们获取注入的对象, 需要以接口的类型来获取, 因为我们注入的对象.getClass() 已经是代理类型了
- 当 spring 容器开启了 aop:aspectj-autoproxy/ , 我们获取注入的对象, 也可以通过 id 来获取, 但是也要转成接口类型
public class ATest {
    public static void main(String[] args) {
        ClassPathXmlApplicationContext ioc = new ClassPathXmlApplicationContext("beans07.xml");
        // 通过接口获取注入的对象-本质上就是代理对象
//        SmartAnimalable bean = ioc.getBean(SmartAnimalable.class);
        SmartAnimalable bean2 = (SmartAnimalable) ioc.getBean("smartDog");
        bean2.getSum(1, 2);
    }
}

 浙公网安备 33010602011771号