netty源码学习
概述
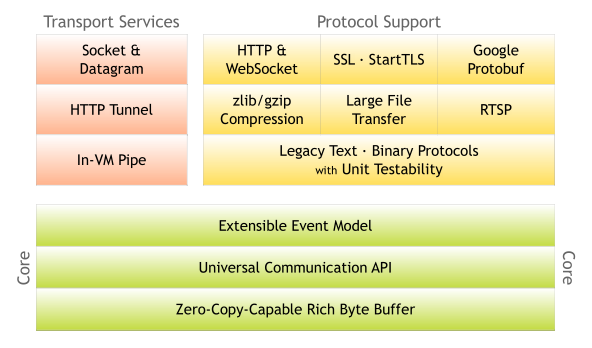
Netty is an asynchronous event-driven network application framework for rapid development of maintainable high performance protocol servers & clients.
系统架构图
启动过程
我们首先通过netty官方的demo来分析一下,TelnetServer。
public final class TelnetServer {

    static final boolean SSL = System.getProperty("ssl") != null;
    static final int PORT = Integer.parseInt(System.getProperty("port", SSL? "8992" : "8023"));

    public static void main(String[] args) throws Exception {
        // Configure SSL.
        final SslContext sslCtx;
        if (SSL) {
            SelfSignedCertificate ssc = new SelfSignedCertificate();
            sslCtx = SslContextBuilder.forServer(ssc.certificate(), ssc.privateKey()).build();
        } else {
            sslCtx = null;
        }

        EventLoopGroup bossGroup = new NioEventLoopGroup(1);
        EventLoopGroup workerGroup = new NioEventLoopGroup();
        try {
            ServerBootstrap b = new ServerBootstrap();
            b.group(bossGroup, workerGroup)
             .channel(NioServerSocketChannel.class)
             .handler(new LoggingHandler(LogLevel.INFO))
             .childHandler(new TelnetServerInitializer(sslCtx));

            b.bind(PORT).sync().channel().closeFuture().sync();
        } finally {
            bossGroup.shutdownGracefully();
            workerGroup.shutdownGracefully();
        }
    }
通过上面的代码,我们总结一下:
- 服务端在启动时,需要使用到两个EventLoopGroup,一个是作为监听服务端口,用于accept客户端的连接请求,并创建channel的线程池,线程数量一般设为1即可;另一个是负责channel的read & write等事件的worker线程池,如果没有指定初始值大小,默认为cpu核数*2,详见源码MultithreadEventLoopGroup
- 指定channel类为NioServerSocketChannel
- 通过childHandler方法指定业务处理的ChannelHandler
系统监听
TelnetServer中的bossGroup的线程数量设置为1,我有个疑问,线程数量如果大于1会怎么样?我们先看看netty相关的系统监听和服务注册的源码。服务的起点在b.bind(PORT).sync().channel().closeFuture().sync(),那么我们就线程b.bind(PORT)开始:
    public ChannelFuture bind(int inetPort) {
        return bind(new InetSocketAddress(inetPort));
    }

    public ChannelFuture bind(SocketAddress localAddress) {
        validate();
        if (localAddress == null) {
            throw new NullPointerException("localAddress");
        }
        return doBind(localAddress);
    }

    private ChannelFuture doBind(final SocketAddress localAddress) {
        final ChannelFuture regFuture = initAndRegister();
        ...
        if (regFuture.isDone()) {
            // At this point we know that the registration was complete and successful.
            ChannelPromise promise = channel.newPromise();
            doBind0(regFuture, channel, localAddress, promise);
            return promise;
        } else {
           ...
        }
    }
上面的三个方法的代码中,最重要的是initAndRegister()和doBind0两个方法,下面我们先来看一下initAndRegister方法:
    final ChannelFuture initAndRegister() {
        Channel channel = null;
        try {
            channel = channelFactory.newChannel();
            init(channel);
        }
        ...
        ChannelFuture regFuture = config().group().register(channel);
        ...
        return regFuture;
    }
其中,channelFactory.newChannel()会创建一个NioServerSocketChannel的实例,这个就和我们的demo中.channel(NioServerSocketChannel.class)就联系起来了。我们重点来看看init(channel)和config().group().register(channel),先来看看init方法,init方法在ServerBootstrap中:
    void init(Channel channel) throws Exception {
        final Map<ChannelOption<?>, Object> options = options0();
        synchronized (options) {
            setChannelOptions(channel, options, logger);
        }

        final Map<AttributeKey<?>, Object> attrs = attrs0();
        synchronized (attrs) {
            for (Entry<AttributeKey<?>, Object> e: attrs.entrySet()) {
                @SuppressWarnings("unchecked")
                AttributeKey<Object> key = (AttributeKey<Object>) e.getKey();
                channel.attr(key).set(e.getValue());
            }
        }

        ChannelPipeline p = channel.pipeline();
        System.out.println("hanlder names is :"+p.names());
        final EventLoopGroup currentChildGroup = childGroup;
        final ChannelHandler currentChildHandler = childHandler;
        final Entry<ChannelOption<?>, Object>[] currentChildOptions;
        final Entry<AttributeKey<?>, Object>[] currentChildAttrs;
        synchronized (childOptions) {
            currentChildOptions = childOptions.entrySet().toArray(newOptionArray(childOptions.size()));
        }
        synchronized (childAttrs) {
            currentChildAttrs = childAttrs.entrySet().toArray(newAttrArray(childAttrs.size()));
        }

        p.addLast(new ChannelInitializer<Channel>() {
            @Override
            public void initChannel(final Channel ch) throws Exception {
                final ChannelPipeline pipeline = ch.pipeline();
                ChannelHandler handler = config.handler();
                if (handler != null) {
                    pipeline.addLast(handler);
                }

                ch.eventLoop().execute(new Runnable() {
                    @Override
                    public void run() {
                        pipeline.addLast(new ServerBootstrapAcceptor(
                                ch, currentChildGroup, currentChildHandler, currentChildOptions, currentChildAttrs));
                    }
                });
            }
        });
        System.out.println("hanlder names is :"+p.names());
    }
上面的代码可以发现,init主要干了下面的几件事:
- 初始化option和AttributeKey参数;
- 获取到channel对应的pipeline,注意每个channel的一生中都会有且只有一个pipeline,这里我们只要知道这个pipeline的类型是:DefaultChannelPipeline,我们对于pipeline添加了两行system.out代码,第一行输出:hanlder names is :[DefaultChannelPipeline$TailContext#0],;
- p.addLast(new ChannelInitializer<Channel>()主要是为了加入新的连接处理器,后面的章节会专门来介绍pipeline,加入完新的链接处理器后,我们的输出变为了:hanlder names is :[ServerBootstrap$1#0, DefaultChannelPipeline$TailContext#0];
我们再来看看config().group().register(channel)相关的代码,其中config().group()获取到的group就是demo中的:bossGroup,看一下此group下实现的register源码:
    public ChannelFuture register(Channel channel) {
        return next().register(channel);
    }
其中的next()方法会从此group中获取到一个NioEventLoop,关于创建NioEventLoop的过程及分配线程的细节,大家有兴趣的可以自行研究一下NioEventLoopGroup。接下来,我们再来看看NioEventLoop的register方法:
    public ChannelFuture register(Channel channel) {
        return register(new DefaultChannelPromise(channel, this));
    }

    public ChannelFuture register(final ChannelPromise promise) {
        ObjectUtil.checkNotNull(promise, "promise");
        promise.channel().unsafe().register(this, promise);
        return promise;
    }
其中promise.channel().unsafe().register方法在AbstractUnsafe类里面:
        public final void register(EventLoop eventLoop, final ChannelPromise promise) {
            ...
            AbstractChannel.this.eventLoop = eventLoop;
            if (eventLoop.inEventLoop()) {
                register0(promise);
            } else {
                try {
                    eventLoop.execute(new Runnable() {
                        @Override
                        public void run() {
                            register0(promise);
                        }
                    });
                }
                ...
            }
        }
AbstractChannel.this.eventLoop = eventLoop 这行代码将此unsafe对象和NioEventLoopGroup分配的NioEventLoop绑定,其实就是将NioServerSocketChannel和它的eventLoop进行绑定,使得此NioServerSocketChannel相关的代码只能在eventLoop的专属线程里执行,这里也可以回答了我们开头的问题:“TelnetServer中的bossGroup的线程数量设置为1,我有个疑问,线程数量如果大于1会怎么样?”,答案是:线程数量只能设置为1,因为有且只有一个线程会服务于NioServerSocketChannel,设置多了是浪费。我们再来看看register0()相关的代码,注意register0()相关的代码执行已经是在eventLoop的专属线程里执行的了:
        private void register0(ChannelPromise promise) {
            try {
                ...
                doRegister();
                ...
                pipeline.invokeHandlerAddedIfNeeded();

                safeSetSuccess(promise);
                pipeline.fireChannelRegistered();
                if (isActive()) {
                    if (firstRegistration) {
                        pipeline.fireChannelActive();
                    } else if (config().isAutoRead()) {
                        beginRead();
                    }
                }
            }
            ...
        }
这里面比较重要的是doRegister()、isActive(),我们先来看看doRegister()方法:
    protected void doRegister() throws Exception {
        boolean selected = false;
        for (;;) {
            try {
                selectionKey = javaChannel().register(eventLoop().unwrappedSelector(), 0, this);
                return;
            }
            ...
        }
    }
javaChannel().register方法调用jdk底层的channel进行注册,具体逻辑就不深入下去,我们再来看看上面的isActive()方法:
    public boolean isActive() {
        return javaChannel().socket().isBound();
    }
判断端口是否绑定,因为我们现在还没绑定,所以这里会返回false。接下来,我们再来回头看之前提到的AbstractBootstrap的doBind0()方法:
    private static void doBind0(
            final ChannelFuture regFuture, final Channel channel,
            final SocketAddress localAddress, final ChannelPromise promise) {

        // This method is invoked before channelRegistered() is triggered.  Give user handlers a chance to set up
        // the pipeline in its channelRegistered() implementation.
        channel.eventLoop().execute(new Runnable() {
            @Override
            public void run() {
                if (regFuture.isSuccess()) {
                    channel.bind(localAddress, promise).addListener(ChannelFutureListener.CLOSE_ON_FAILURE);
                } else {
                    promise.setFailure(regFuture.cause());
                }
            }
        });
    }
上面代码中的channel.bind会调用到AbstractChannel的bind方法:
    public ChannelFuture bind(SocketAddress localAddress, ChannelPromise promise) {
        return pipeline.bind(localAddress, promise);
    }
继续来看DefaultChannelPipeline中的bind方法:
    public final ChannelFuture bind(SocketAddress localAddress, ChannelPromise promise) {
        return tail.bind(localAddress, promise);
    }
tail的类型是TailContext,我们来看看它里面的bind方法:
    public ChannelFuture bind(final SocketAddress localAddress, final ChannelPromise promise) {
        final AbstractChannelHandlerContext next = findContextOutbound();
        EventExecutor executor = next.executor();
        if (executor.inEventLoop()) {
            next.invokeBind(localAddress, promise);
        } else {
            safeExecute(executor, new Runnable() {
                @Override
                public void run() {
                    next.invokeBind(localAddress, promise);
                }
            }, promise, null);
        }
        return promise;
    }
上面的代码中的next类型为HeadContext,因为已经在eventLoop里面,所以会直接执行next.invokeBind(localAddress, promise),源码如下:
    private void invokeBind(SocketAddress localAddress, ChannelPromise promise) {
        if (invokeHandler()) {
            try {
                ((ChannelOutboundHandler) handler()).bind(this, localAddress, promise);
            } catch (Throwable t) {
                notifyOutboundHandlerException(t, promise);
            }
        } else {
            bind(localAddress, promise);
        }
    }
((ChannelOutboundHandler) handler()).bind方法,我们再来看看这个hanlder的bind方法:
        public void bind(
               ChannelHandlerContext ctx, SocketAddress localAddress, ChannelPromise promise)
               throws Exception {
           unsafe.bind(localAddress, promise);
       }
又调到了unsafe里面的方法,我们继续分析:
        public final void bind(final SocketAddress localAddress, final ChannelPromise promise) {
          ...
           boolean wasActive = isActive();
           try {
               doBind(localAddress);
           }
           ...
           if (!wasActive && isActive()) {
               invokeLater(new Runnable() {
                   @Override
                   public void run() {
                       pipeline.fireChannelActive();
                   }
               });
           }
           safeSetSuccess(promise);
       }
核心代码是doBind方法的调用,它在NioServerSocketChannel中,我们来继续分析:
    protected void doBind(SocketAddress localAddress) throws Exception {
       if (PlatformDependent.javaVersion() >= 7) {
           javaChannel().bind(localAddress, config.getBacklog());
       } else {
           javaChannel().socket().bind(localAddress, config.getBacklog());
       }
   }
doBind方法里面就开始调用jdk的相关绑定端口的底层代码,到此我们nioserver的启动流程就已经分析完毕,我们来总结一下:
- ServerBootstrap bossGroup的线程数设置为1是最好的,因为在netty中任何channel的eventloop只能有一个;
- ServerBootstap在启动过程中有两个比较重要的流程分析,分别是:initAndRegister()和doBind0两个方法,其中initAndRegister实现NioServerSocketChannel的创建、参数的初始化、eventloop的初始化和channel的绑定、业务的handler注册到pipeline中;doBind0主要是调用jdk底层进行端口监听;
- 下图是以时序图的方式做的一个流程总结;

启动过程中涉及到的设计模式总结:
- 工厂方法+反射:NioServerSocketChannel类对象的创建使用了工厂方法+反射的机制,使得netty在架构上可以支持Channel接口的实现类的扩展;
- Future模式:netty中的ChannelFuture和ChannelPromise都是Future模式的使用和扩展;
ChannelPipeline
在前面的server启动分析时,我们就遇到了ChannelPipeline,这个章节我们着重介绍一下ChannelPipeline。首先我们来看一下ChannelPipeline的类结构关系图: 如上图所示,ChannelPipeline的继承关系比较简单,我们实际使用的pipeline对象都是DefaultChannelPipeline类的对象。我们在来看一张pipeline和其它重要对象的关系图:
 由上面的图片上可以看出,以下几点:
- 在netty中,每一个channel都有且只有一个ChannelPipeline为之提供服务;
- DefaultChannelPipeline中有两个固定的ContextHandler存在,一个是head(HeadContext),一个是tail(TailContext);
- 我们需要添加的业务处理Context会添加到head和tail之间,并形成一个双向链表;
我们先提个问题,为什么要有双向链表,难道单向的链表不可以吗?我们先来看看DefaultChannelPipeline中的构造方法源码:
    protected DefaultChannelPipeline(Channel channel) {
        this.channel = ObjectUtil.checkNotNull(channel, "channel");
        succeededFuture = new SucceededChannelFuture(channel, null);
        voidPromise =  new VoidChannelPromise(channel, true);

        tail = new TailContext(this);
        head = new HeadContext(this);

        head.next = tail;
        tail.prev = head;
    }
DefaultChannelPipeline在初始化的时候,会创建两个context,一个为tail,一个为head,tail和head组成双向链表结构,后续业务添加的context/handler对,都会加入到这个双向链表结构里面。我们先来看一下TailContext的源码:
   final class TailContext extends AbstractChannelHandlerContext implements ChannelInboundHandler {

        TailContext(DefaultChannelPipeline pipeline) {
            super(pipeline, null, TAIL_NAME, true, false);
            setAddComplete();
        }
    }
上面的代码中,主要是调用了父类的构造方法:
    AbstractChannelHandlerContext(DefaultChannelPipeline pipeline, EventExecutor executor, String name,
                                  boolean inbound, boolean outbound) {
        this.name = ObjectUtil.checkNotNull(name, "name");
        this.pipeline = pipeline;
        this.executor = executor;
        this.inbound = inbound;
        this.outbound = outbound;
        // Its ordered if its driven by the EventLoop or the given Executor is an instanceof OrderedEventExecutor.
        ordered = executor == null || executor instanceof OrderedEventExecutor;
    }
注意,tail的outbound标志是false,inbound是true,从字面意义来理解,tail是用来处理inbound事件的,它不能处理outbound相关的事件。但真实的情况却并不完全是这样,head会是一个例外。head和tail它们既是HandlerContext的同时,又是HandlerContext关联的hanlder,来看一下代码:
    public ChannelHandler handler() {
        return this;
    }
我们再来看看HeadContext的源码:
    final class HeadContext extends AbstractChannelHandlerContext
            implements ChannelOutboundHandler, ChannelInboundHandler {

        private final Unsafe unsafe;

        HeadContext(DefaultChannelPipeline pipeline) {
            super(pipeline, null, HEAD_NAME, false, true);
            unsafe = pipeline.channel().unsafe();
            setAddComplete();
        }
    }
head的inbound标志是true,outbound的标志是false,按照之前的说法,head就只能处理outbound相关的事件的,但事实上不是这样的:我们可以发现一个head和tail实现细节的不同:head同时实现了ChannelOutboundHandler和ChannelInboundHandler接口,而tail只实现了ChannelInboundHandler接口。下面以一个inbound事件来进行分析一下:先来看DefaultPipeline中的fireChannelRegistered():
    public final ChannelPipeline fireChannelRegistered() {
        AbstractChannelHandlerContext.invokeChannelRegistered(head);
        return this;
    }
方法调用了AbstractChannelHandlerContext的静态方法,并将head作为参数:
    static void invokeChannelRegistered(final AbstractChannelHandlerContext next) {
        EventExecutor executor = next.executor();
        if (executor.inEventLoop()) {
            next.invokeChannelRegistered();
        } else {
            executor.execute(new Runnable() {
                @Override
                public void run() {
                    next.invokeChannelRegistered();
                }
            });
        }
    }
上面的代码将会在eventloop下调用head的invokeChannelRegistered,我们再来看看:
    private void invokeChannelRegistered() {
        if (invokeHandler()) {
            try {
                ((ChannelInboundHandler) handler()).channelRegistered(this);
            } catch (Throwable t) {
                notifyHandlerException(t);
            }
        } else {
            fireChannelRegistered();
        }
    }
上面的方法会调用到head的channelRegistered方法里面,我们暂时分析到这里,代码分析的结论与我们刚刚的分析判断是一致的:head既可以处理inbound事件,也可以处理outbound事件。
inbound & outbound事件
我们刚刚分析的ChannelRegistered,就是一个典型的inbound事件。下面我们来分析一下inbound和outbound事件。下图是来自于netty官网关于inbound和outbound事件顺序的图示。由图可知:
- inbound事件一般是来源于socket.read方法;
- outbound事件来源于上层业务的调用,一般会调用到socket.write方法;
- inbound和outbound事件的处理方向相反,但都会沿着各自的方向单向传播;
                                             I/O Request
                                        via Channel or
                                    ChannelHandlerContext
                                                    |
+---------------------------------------------------+---------------+
|                           ChannelPipeline         |               |
|                                                  \|/              |
|    +---------------------+            +-----------+----------+    |
|    | Inbound Handler  N  |            | Outbound Handler  1  |    |
|    +----------+----------+            +-----------+----------+    |
|              /|\                                  |               |
|               |                                  \|/              |
|    +----------+----------+            +-----------+----------+    |
|    | Inbound Handler N-1 |            | Outbound Handler  2  |    |
|    +----------+----------+            +-----------+----------+    |
|              /|\                                  .               |
|               .                                   .               |
| ChannelHandlerContext.fireIN_EVT() ChannelHandlerContext.OUT_EVT()|
|        [ method call]                       [method call]         |
|               .                                   .               |
|               .                                  \|/              |
|    +----------+----------+            +-----------+----------+    |
|    | Inbound Handler  2  |            | Outbound Handler M-1 |    |
|    +----------+----------+            +-----------+----------+    |
|              /|\                                  |               |
|               |                                  \|/              |
|    +----------+----------+            +-----------+----------+    |
|    | Inbound Handler  1  |            | Outbound Handler  M  |    |
|    +----------+----------+            +-----------+----------+    |
|              /|\                                  |               |
+---------------+-----------------------------------+---------------+
                |                                  \|/
+---------------+-----------------------------------+---------------+
|               |                                   |               |
|       [ Socket.read() ]                    [ Socket.write() ]     |
|                                                                   |
|  Netty Internal I/O Threads (Transport Implementation)            |
+-------------------------------------------------------------------+
inbound事件
我们来详细的分析一下inbound事件相关的源码。首先,我们来看看inbound事件有哪些:
    fireChannelRegistered;
    fireChannelUnregistered;
    fireChannelActive;
    fireChannelInactive;
    fireChannelRead(Object msg);
    fireChannelReadComplete;
    fireUserEventTriggered(Object event)
    fireChannelWritabilityChanged;
    fireExceptionCaught(Throwable cause);
inbound事件共用9个事件,它们都是以fire...开头。我们来简单看一下fireChannelRead相关的流程代码,流程的起点是在NioByteUnsafe的read方法:
        public final void read() {
            ...
            try {
                do {
                    byteBuf = allocHandle.allocate(allocator);
                    allocHandle.lastBytesRead(doReadBytes(byteBuf));
                    ...
                    allocHandle.incMessagesRead(1);
                    readPending = false;
                    pipeline.fireChannelRead(byteBuf);
                    byteBuf = null;
                } while (allocHandle.continueReading());

                allocHandle.readComplete();
                pipeline.fireChannelReadComplete();

                if (close) {
                    closeOnRead(pipeline);
                }
            }
            ...
        }
每次从底层的socket里面读取到内容,netty都会调用pipeline的fireChannelRead方法,此方法就是我们刚刚看到的inbound事件里面的方法:
    public final ChannelPipeline fireChannelRead(Object msg) {
        AbstractChannelHandlerContext.invokeChannelRead(head, msg);
        return this;
    }
上面的pipeline代码会调用到AbstractChannelHandlerContext的invokeChannelRead方法并将head和读取到的msg传递过去,我们再来看看invokeChannelRead:
    static void invokeChannelRead(final AbstractChannelHandlerContext next, Object msg) {
        final Object m = next.pipeline.touch(ObjectUtil.checkNotNull(msg, "msg"), next);
        EventExecutor executor = next.executor();
        if (executor.inEventLoop()) {
            next.invokeChannelRead(m);
        } else {
            executor.execute(new Runnable() {
                @Override
                public void run() {
                    next.invokeChannelRead(m);
                }
            });
        }
    }
上面的方法会先调用head的invokeChannelRead方法,进入head中进行处理:
    private void invokeChannelRead(Object msg) {
        if (invokeHandler()) {
            try {
                ((ChannelInboundHandler) handler()).channelRead(this, msg);
            } catch (Throwable t) {
                notifyHandlerException(t);
            }
        } else {
            fireChannelRead(msg);
        }
    }
流程进入到head的channelRead方法,我们来看看:
        public void channelRead(ChannelHandlerContext ctx, Object msg) throws Exception {
            ctx.fireChannelRead(msg);
        }
上面的代码中的ctx还是head本身,我们来看看head的fireChannelRead方法:
    public ChannelHandlerContext fireChannelRead(final Object msg) {
        invokeChannelRead(findContextInbound(), msg);
        return this;
    }
上面的方法中会通过我们看看已经看到过的invokeChannelRead方法,调用到head的下一个的处理inbound事件的Context中去,后面代码我们便不展开。我们总结一下inbound相关事件的处理:
- inbound事件一般是来源于socket的read方法;
- netty目前的inbound事件一共有9种;
- netty的inbound事件在pipeline中方法的起点是以fire...()开头的方法,inbound事件会从head节点开始向后传递并处理;
outbound事件
我们再来看看outbound的事件有哪些,outbound的事件比inbound事件会复杂一些,因为它的外部调用接口会比较多,但是抽象一下,就是下面这几种事件:
    bind;
    connect;
    disconnect;
    close;
    deregister;
    read;
    write;
    flush;
outbound的事件入口也在pipeline的公共方法里,例如write的流程调用:
    public final ChannelFuture writeAndFlush(Object msg) {
        return tail.writeAndFlush(msg);
    }
上面的方法会调用到tail的writeAndFlush方法里面。关于write流程的分析,后面会有专门的章节分析,在此不展开了。
异常事件
通过上面的分析,我们都了解了inbound和outbound事件相关处理细节,那么在处理inbound和outbound事件时,如果处理逻辑遇到了异常,ChannelPipeline是如何处理的?我们接下来便来分析一下ChannelPipeline里关于异常的处理。按下面三种情况,异常事件的处理情况是不同的:
- inbound事件;
- outbound事件,且需要ChannelPromise模式回调通知的方法;
- outbound事件,但不需要ChannelPromise模式回调通知的方法;
其中,第一和第三两种情况处理方式相同。我们先来看看inbound异常事件的处理。
inbound异常事件
我们选择channelActive来分析,首先来看DefaultPipeline中的fireChannelActive:
    public final ChannelPipeline fireChannelActive() {
        AbstractChannelHandlerContext.invokeChannelActive(head);
        return this;
    }
我们再接着往下看:
    static void invokeChannelActive(final AbstractChannelHandlerContext next) {
        EventExecutor executor = next.executor();
        if (executor.inEventLoop()) {
            next.invokeChannelActive();
        } else {
            executor.execute(new Runnable() {
                @Override
                public void run() {
                    next.invokeChannelActive();
                }
            });
        }
    }
上面的静态方法中,会直接进入到next.invokeChannelActive(),此时的ChannelHandlerContext为head:
    private void invokeChannelActive() {
        if (invokeHandler()) {
            try {
                ((ChannelInboundHandler) handler()).channelActive(this);
            } catch (Throwable t) {
                notifyHandlerException(t);
            }
        } else {
            fireChannelActive();
        }
    }
在上面的代码中,我们假设在try{}模块内抛出了异常,流程便走到了notifyHandlerException:
    private void notifyHandlerException(Throwable cause) {
        ...
        invokeExceptionCaught(cause);
    }
直接看重点的invokeExceptionCaught:
    private void invokeExceptionCaught(final Throwable cause) {
        if (invokeHandler()) {
            try {
                handler().exceptionCaught(this, cause);
            } catch (Throwable error) {
                ...
            }
        }
        ...
    }
上面的代码会调用到Context对应的handler的exceptionCaught方法,目前我们的context还是head:
        public void exceptionCaught(ChannelHandlerContext ctx, Throwable cause) throws Exception {
            ctx.fireExceptionCaught(cause);
        }
再接着看AbstractChannelHandlerContext的方法:
    public ChannelHandlerContext fireExceptionCaught(final Throwable cause) {
        invokeExceptionCaught(next, cause);
        return this;
    }
注意上面方法中的next,它是head的next节点,我们再来看看invokeExceptionCaught:
    static void invokeExceptionCaught(final AbstractChannelHandlerContext next, final Throwable cause) {
        ObjectUtil.checkNotNull(cause, "cause");
        EventExecutor executor = next.executor();
        if (executor.inEventLoop()) {
            next.invokeExceptionCaught(cause);
        }
        ...
    }
上面的代码会调用next(下一个Context)的invokeExceptionCaught方法,最终会调用到能处理异常的hanlder,然后终止,netty建议我们将异常处理的Context作为最后一个,也就是tail前面的一个。如果没有能处理此异常的hanlder,那么最后会走到tail中的处理方法。
inbound异常事件总结:
- 异常事件也是在ChanelPipeline上进行传递,传递顺序为由前向后;
- 一般会将tail前一个Context作为异常事件的处理节点,如没有,则会在tail中进行处理;
- outbound异常事件(不需要回调通知ChannelPromise),与inbound事件的处理逻辑完全一致;
outbound异常事件(ChannelPromise)
关于outbound异常事件(ChannelPromise)的处理流程并不是在链表上进行传递处理的,它因为需要通知到ChannelPromise,因此,它的代码最终会走到PromiseNotificationUtil方法中:
    public static void tryFailure(Promise<?> p, Throwable cause, InternalLogger logger) {
        if (!p.tryFailure(cause) && logger != null) {
            Throwable err = p.cause();
            if (err == null) {
                logger.warn("Failed to mark a promise as failure because it has succeeded already: {}", p, cause);
            } else {
                logger.warn(
                        "Failed to mark a promise as failure because it has failed already: {}, unnotified cause: {}",
                        p, ThrowableUtil.stackTraceToString(err), cause);
            }
        }
    }
上面的代码如果调用通知promise成功,则返回,否则打印日志。
outbound异常事件(ChannelPromise)总结:
- 处理流程简单,直接通知ChannePromise,并不会在ChannelPipeline上进行传递;
最后,我们总结一下inbound和outbound事件:
- inbound事件一般是来源于socket的read方法;
- netty目前的inbound事件一共有9种;
- netty的inbound事件在pipeline中方法的起点是以fire...()开头的方法,inbound事件会从head节点开始向后传递并处理;
- outbound事件一般从pipeline中的方法开始,然后会调用到tail中的方法,然后向前传递并处理,最终会经过head,调用到socket的操作;
- netty目前的outbound事件一共有8种;
- pipeline的双向链表数据结构是为了支持inbound和outbound两种事件的传递;
ChannelPipeline小结
- ChannelPipeline的底层数据结构是一个双向链表结构,双向链表从数据结构上即支持了inbound的outbound两种事件的流转;
- 每个channel都会创建唯一的ChannelPipeline为之服务;
- inbound事件的起点是head、outbound事件的起点是tail;
- ChannelPipeline可以支持Context&Handler动态的添加和删除;
- 异常事件的处理分为inbound异常事件处理、outbound异常事件处理且需要通知ChannelPromise和outbound异常事件但无需通知ChannelPromise三种情况。其中第一种和第三种,都需要在ChannelPipeline上从前到后进行传递;第二种直接回调通知ChannelPromise即可;
涉及到的设计模式总结:
- 管道模型(pipeline):在netty中,所有inbound和outbound事件的传递都离不开pipeline,它的pipeline模型的底层是一个双向链表的数据结构,每个链表的节点代表一个对应事件的handler,当事件传递到某个节点时,先判断是否应该处理,最后向下一个节点传递,可以支持handler的热插拔;
write流程
因为write的流程相对比较复杂,在此我们单独拿一个章节来进行分析。首先,我们来拿netty4中的telnet的demo来说明netty4的write流程:
-
涉及到的类:TelnetClient、AbstractChannel、DefaultChannelPipeline、TailContext、AbstractChannelHandlerContext、SingleThreadEventExecutor、NioEventLoop、AbstractEventExecutor、AbstractChannelHandlerContext.WriteAndFlushTask、
-
流程顺序是:TelnetClient -> AbstractChannel -> DefaultChannelPipeline -> TailContext(AbstractChannelHandlerContext) -> NioEventLoop (SingleThreadEventExecutor) ->NioEventLoop(run方法) -> AbstractEventExecutor(safeExecute方法) -> WriteAndFlushTask(run方法) -> AbstractChannelHandlerContext(hanlder为StringEncoder) -> StringEncoder(write方法) -> HeadContext(invokeWrite方法) -> NioSocketChannelUnsafe(write)
流程的起点在TelnetClient,我们来看一下源码:
lastWriteFuture = ch.writeAndFlush(line + "\r\n");
其中的ch为NioSocketChannel,telnetclient直接调用了NioSocketChannel的父类AbstractChannel(不是直接的父类)中的writeAndFlush方法,代码如下:
    public ChannelFuture writeAndFlush(Object msg) {
        return pipeline.writeAndFlush(msg);
    }
上面的方法比较简单,直接调用了DefaultChannelPipeline的writeAndFlush方法,也就是outbound事件开始在pipeline中传递:
    public final ChannelFuture writeAndFlush(Object msg) {
        return tail.writeAndFlush(msg);
    }
上面的方法调用了TailContext的writeAndFlush方法,其实是TailContext的父类AbstractChannelHandlerContext中的方法:
    public ChannelFuture writeAndFlush(Object msg) {
        return writeAndFlush(msg, newPromise());
    }

    public ChannelFuture writeAndFlush(Object msg, ChannelPromise promise) {
        if (msg == null) {
            throw new NullPointerException("msg");
        }

        if (isNotValidPromise(promise, true)) {
            ReferenceCountUtil.release(msg);
            // cancelled
            return promise;
        }

        write(msg, true, promise);

        return promise;
    }

    private void write(Object msg, boolean flush, ChannelPromise promise) {
        AbstractChannelHandlerContext next = findContextOutbound();
        final Object m = pipeline.touch(msg, next);
        EventExecutor executor = next.executor();
        if (executor.inEventLoop()) {
            if (flush) {
                next.invokeWriteAndFlush(m, promise);
            } else {
                next.invokeWrite(m, promise);
            }
        } else {
            AbstractWriteTask task;
            if (flush) {
                task = WriteAndFlushTask.newInstance(next, m, promise);
            }  else {
                task = WriteTask.newInstance(next, m, promise);
            }
            safeExecute(executor, task, promise, m);
        }
    }
上面的最后一个方法中,会被调用两次。第一次调用时,第一次的next的ChannelHandlerContext对应的context为handler对应为io.netty.handler.codec.string.StringEncoder的context,context和handler的对应关系为一对一。首先因为executor.inEventLoop() = false,也就是当前线程和channel的专属负责读写的线程不是同一个线程,所以会先走到else中的逻辑里面,先创建一个WriteAndFlushTask类型的task,然后调用safeExecute方法:
    private static void safeExecute(EventExecutor executor, Runnable runnable, ChannelPromise promise, Object msg) {
        try {
            executor.execute(runnable);
        } catch (Throwable cause) {
            try {
                promise.setFailure(cause);
            } finally {
                if (msg != null) {
                    ReferenceCountUtil.release(msg);
                }
            }
        }
    }
safeExecute会调用NioEventLoop(SingleThreadEventExecutor)里的execute方法:
    public void execute(Runnable task) {
        if (task == null) {
            throw new NullPointerException("task");
        }

        boolean inEventLoop = inEventLoop();
        addTask(task);
        if (!inEventLoop) {
            startThread();
            if (isShutdown() && removeTask(task)) {
                reject();
            }
        }

        if (!addTaskWakesUp && wakesUpForTask(task)) {
            wakeup(inEventLoop);
        }
    }
上面的代码重点在于addTask方法,我们来看一下细节:
    protected void addTask(Runnable task) {
        if (task == null) {
            throw new NullPointerException("task");
        }
        if (!offerTask(task)) {
            reject(task);
        }
    }

    final boolean offerTask(Runnable task) {
        if (isShutdown()) {
            reject();
        }
        return taskQueue.offer(task);
    }
上面的代码显示了,之前生成的task会最终存进类型为: 的taskQueue中LinkedBlockingQueue中,到此为止,业务线程已经将write的操作任务通过队列移交给了NioEventLoop的线程,那么我们再来看看NioEventLoop是如何处理上面的task任务的:
    protected void run() {
        for (;;) {
            try {
                ...
                if (ioRatio == 100) {
                    ...
                } else {
                    final long ioStartTime = System.nanoTime();
                    try {
                        processSelectedKeys();
                    } finally {
                        // Ensure we always run tasks.
                        final long ioTime = System.nanoTime() - ioStartTime;
                        runAllTasks(ioTime * (100 - ioRatio) / ioRatio);
                    }
                }
            }
            ...
        }
    }
上面代码中最核心的处理之前task的地方是通过runAllTasks方法,我们再来看看runAllTasks方法:
    protected boolean runAllTasks(long timeoutNanos) {
        fetchFromScheduledTaskQueue();
        Runnable task = pollTask();
        ...
        for (;;) {
            safeExecute(task);
            ...
            task = pollTask();
            if (task == null) {
                lastExecutionTime = ScheduledFutureTask.nanoTime();
                break;
            }

        }

        afterRunningAllTasks();
        this.lastExecutionTime = lastExecutionTime;
        return true;
    }

    protected static void safeExecute(Runnable task) {
        try {
            task.run();
        } catch (Throwable t) {
            logger.warn("A task raised an exception. Task: {}", task, t);
        }
    }
上段代码通过调用父类AbstractEventExecutor的safeExecute()方法,最终调用到了在之前生成的WriteAndFlushTask的run方法,我们来看一下在WriteAndFlushTask中的代码流程:
        public final void run() {
            try {
                // Check for null as it may be set to null if the channel is closed already
                if (ESTIMATE_TASK_SIZE_ON_SUBMIT) {
                    ctx.pipeline.decrementPendingOutboundBytes(size);
                }
                write(ctx, msg, promise);
            } finally {
                // Set to null so the GC can collect them directly
                ctx = null;
                msg = null;
                promise = null;
                handle.recycle(this);
            }
        }

        protected void write(AbstractChannelHandlerContext ctx, Object msg, ChannelPromise promise) {

            ctx.invokeWrite(msg, promise);
        }

        public void write(AbstractChannelHandlerContext ctx, Object msg, ChannelPromise promise) {
            super.write(ctx, msg, promise);
            ctx.invokeFlush();
        }
上面的代码在WriteAndFlushTask及它的父类中,最终会执行这行代码:ctx.invokeWrite(msg, promise),又调用回了AbstractChannelHandlerContext(hanlder为StringEncoder),我们来分析一下:
    private void invokeWrite(Object msg, ChannelPromise promise) {
        if (invokeHandler()) {
            invokeWrite0(msg, promise);
        } else {
            System.out.println("not invoke write.");
            write(msg, promise);
        }
    }

    private void invokeWrite0(Object msg, ChannelPromise promise) {
        try {
            ((ChannelOutboundHandler) handler()).write(this, msg, promise);
        } catch (Throwable t) {
            notifyOutboundHandlerException(t, promise);
        }
    }
在上面的代码中最终会执行到((ChannelOutboundHandler) handler()).write(this, msg, promise),也就是StringEncoder的write方法:
    public void write(ChannelHandlerContext ctx, Object msg, ChannelPromise promise) throws Exception {
        CodecOutputList out = null;
        try {
            if (acceptOutboundMessage(msg)) {
                out = CodecOutputList.newInstance();
                @SuppressWarnings("unchecked")
                I cast = (I) msg;
                try {
                    encode(ctx, cast, out);
                }
            }
            ...
        } finally {
            if (out != null) {
                final int sizeMinusOne = out.size() - 1;
                if (sizeMinusOne == 0) {
                    ctx.write(out.get(0), promise);
                }
                ...
            }
        }
    }
上面的代码主要是对string进行编码,然后再调用ctx的write方法,此刻的ctx为StringEncoder对应的context,我们再来分析一下context的write方法:
    public ChannelFuture write(final Object msg, final ChannelPromise promise) {
        if (msg == null) {
            throw new NullPointerException("msg");
        }

        try {
            if (isNotValidPromise(promise, true)) {
                ReferenceCountUtil.release(msg);
                // cancelled
                return promise;
            }
        } catch (RuntimeException e) {
            ReferenceCountUtil.release(msg);
            throw e;
        }
        write(msg, false, promise);

        return promise;
    }

    private void write(Object msg, boolean flush, ChannelPromise promise) {
        AbstractChannelHandlerContext next = findContextOutbound();
        final Object m = pipeline.touch(msg, next);
        EventExecutor executor = next.executor();
        if (executor.inEventLoop()) {

            if (flush) {
                next.invokeWriteAndFlush(m, promise);
            } else {
                next.invokeWrite(m, promise);
            }
        } else {
            AbstractWriteTask task;
            if (flush) {
                task = WriteAndFlushTask.newInstance(next, m, promise);
            }  else {
                task = WriteTask.newInstance(next, m, promise);
            }
            safeExecute(executor, task, promise, m);
        }
    }
我们又回到了之前分析过的write方法,只不过这次的next的类型为HeadContext,已经是write的最后一个context了,代码最终会执行到next.invokeWrite(m, promise),我们来继续分析:
    private void invokeWrite(Object msg, ChannelPromise promise) {
        if (invokeHandler()) {
            invokeWrite0(msg, promise);
        } else {
            write(msg, promise);
        }
    }

    private void invokeWrite0(Object msg, ChannelPromise promise) {
        try {
            ((ChannelOutboundHandler) handler()).write(this, msg, promise);
        } catch (Throwable t) {
            notifyOutboundHandlerException(t, promise);
        }
    }
上面的两个方法最终会执行((ChannelOutboundHandler) handler()).write(this, msg, promise),因为现在的context是HeadContext,那么我们来看看HeadContext的Handler()会是什么?
    public ChannelHandler handler() {
        return this;
    }

    public void write(ChannelHandlerContext ctx, Object msg, ChannelPromise promise) throws Exception {
        unsafe.write(msg, promise);
    }
原来HeadContext的Handler()就是它自己,代码会调用到unsafe的write方法,unsafe的类型为:NioSocketChannelUnsafe,我们再来看看进入到unsafe中的代码:
        public final void write(Object msg, ChannelPromise promise) {
            assertEventLoop();
            ChannelOutboundBuffer outboundBuffer = this.outboundBuffer;
            ...
            outboundBuffer.addMessage(msg, size, promise);
        }
上面的代码将msg信息存入到outboundBuffer中,我们之前在研究WriteAndFlushTask的run方法时,最后还有一个flush操作,当将msg信息存入到outbondBuffer后,unsafe中的flush方法会被调用,我们来看一下:
        public final void flush() {
            assertEventLoop();
            ChannelOutboundBuffer outboundBuffer = this.outboundBuffer;
            if (outboundBuffer == null) {
                return;
            }

            outboundBuffer.addFlush();
            flush0();
        }

        protected void flush0() {
            if (inFlush0) {
                // Avoid re-entrance
                return;
            }

            final ChannelOutboundBuffer outboundBuffer = this.outboundBuffer;
            ...
            try {
                doWrite(outboundBuffer);
            } catch (Throwable t) {
                ...
            } finally {
                inFlush0 = false;
            }
        }
上面的方法,最终会调用此unsafe的doWrite方法:
    protected void doWrite(ChannelOutboundBuffer in) throws Exception {
        SocketChannel ch = javaChannel();
        int writeSpinCount = config().getWriteSpinCount();
        do {
            if (in.isEmpty()) {
                // All written so clear OP_WRITE
                clearOpWrite();
                // Directly return here so incompleteWrite(...) is not called.
                return;
            }

            // Ensure the pending writes are made of ByteBufs only.
            int maxBytesPerGatheringWrite = ((NioSocketChannelConfig) config).getMaxBytesPerGatheringWrite();
            ByteBuffer[] nioBuffers = in.nioBuffers(1024, maxBytesPerGatheringWrite);
            int nioBufferCnt = in.nioBufferCount();

            // Always us nioBuffers() to workaround data-corruption.
            // See https://github.com/netty/netty/issues/2761
            switch (nioBufferCnt) {
                case 0:
                    // We have something else beside ByteBuffers to write so fallback to normal writes.
                    writeSpinCount -= doWrite0(in);
                    break;
                case 1: {
                    // Only one ByteBuf so use non-gathering write
                    // Zero length buffers are not added to nioBuffers by ChannelOutboundBuffer, so there is no need
                    // to check if the total size of all the buffers is non-zero.
                    ByteBuffer buffer = nioBuffers[0];
                    int attemptedBytes = buffer.remaining();
                    final int localWrittenBytes = ch.write(buffer);
                    if (localWrittenBytes <= 0) {
                        incompleteWrite(true);
                        return;
                    }
                    adjustMaxBytesPerGatheringWrite(attemptedBytes, localWrittenBytes, maxBytesPerGatheringWrite);
                    in.removeBytes(localWrittenBytes);
                    --writeSpinCount;
                    break;
                }
                default: {
                    // Zero length buffers are not added to nioBuffers by ChannelOutboundBuffer, so there is no need
                    // to check if the total size of all the buffers is non-zero.
                    // We limit the max amount to int above so cast is safe
                    long attemptedBytes = in.nioBufferSize();
                    final long localWrittenBytes = ch.write(nioBuffers, 0, nioBufferCnt);
                    if (localWrittenBytes <= 0) {
                        incompleteWrite(true);
                        return;
                    }
                    // Casting to int is safe because we limit the total amount of data in the nioBuffers to int above.
                    adjustMaxBytesPerGatheringWrite((int) attemptedBytes, (int) localWrittenBytes,
                            maxBytesPerGatheringWrite);
                    in.removeBytes(localWrittenBytes);
                    --writeSpinCount;
                    break;
                }
            }
        } while (writeSpinCount > 0);

        incompleteWrite(writeSpinCount < 0);
    }
最终代码将由unsafe的doWrite方法来调用jdk的nio相关操作。
write流程小结:
通过分析netty4的源码及流程,我们总结如下:
- netty4中的最终write的线程是channel的worker线程,与read线程为同一个线程;
- 每个channel在它的生命周期内,有且只有一个worker线程为它服务;
- write操作的流程正如我们上面总结的顺序:TelnetClient -> AbstractChannel -> DefaultChannelPipeline -> TailContext(AbstractChannelHandlerContext) -> NioEventLoop (SingleThreadEventExecutor) ->NioEventLoop(run方法) -> AbstractEventExecutor(safeExecute方法) -> WriteAndFlushTask(run方法) -> AbstractChannelHandlerContext(hanlder为StringEncoder) -> StringEncoder(write方法) -> HeadContext(invokeWrite方法) -> NioSocketChannelUnsafe(write);
- 下面的时序图详细的总结了netty4里面的write流程

小结
netty小结
在本文中,我们先后分析了:netty服务启动流程、netty的信息流转通道channelPipeline机制、并详细的分析了netty4的write流程。我们现在给本次分享做一个小结:
- netty极其简化了nio的编程复杂度;
- bossGroup的线程数设置为1是最好,在netty的eventloop架构下,一个channel只能被同一个thread服务;
- 一个channel会有唯一的一个ChannelPipeline,ChannelPipeline的核心是一个双向链表结构。inbound事件从head开始,outbound事件从tail开始,其它的业务context都在head和tail之间,按照顺序处理;
- netty的inbound和outbound事件最终都会在channel的唯一的eventloop架构下按顺序执行;

 浙公网安备 33010602011771号