Redis10-哨兵
- Redis的主从复制模式下,一旦主节点由于故障不能提供服务,需要人工将从节点晋升为主节点,同时还要通知应用方更新主节点地址,对于很多应用场景这种故障处理的方式是无法接受的。从Redis 2.8开始正式提供了Redis Sentinel(哨兵)架构来解决这个问题。
1、Sentinel基本概念
- 由于对Redis的许多概念都有不同的名词解释,所以在介绍RedisSentinel之前,先对几个名词进行说明,这样便于在后面的介绍,如表9-1所示。
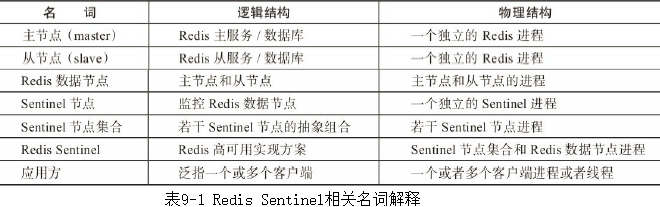
- Sentinel是Redis的高可用实现方案,在实际的生产环境中,对提高整个系统的高可用性是非常有帮助的
1.1、主从复制的问题
- Redis的主从复制模式可以将主节点的数据变更同步给从节点,这样从节点就可以起到两个作用:
- 第一,作为主节点的一个备份,一旦主节点出了故障不可达的情况,从节点可以作为后备“顶”上来,并且保证数据尽量不丢失(主从复制是最终一致性)。
- 第二,从节点可以扩展主节点的读能力,一旦主节点不能支撑住大并发量的读操作,从节点可以在一定程度上帮助主节点分担读压力。
- 但是主从复制也带来了以下问题:
- 一旦主节点出现故障,需要手动将一个从节点晋升为主节点,同时需要修改应用方的主节点地址,还需要命令其他从节点去复制新的主节点,整个过程都需要人工干预。
- 主节点的写能力受到单机的限制。
- 主节点的存储能力受到单机的限制。
- 其中第一个问题就是Redis的高可用问题,第二、三个问题属于Redis的分布式问题。
1.2、主从复制不便于高可用
- Redis主从复制模式下,一旦主节点出现了故障不可达,需要人工干预进行故障转移,无论对于Redis的应用方还是运维方都带来了很大的不便。
- 对于应用方来说无法及时感知到主节点的变化,必然会造成一定的写数据丢失和读数据错误,甚至可能造成应用方服务不可用。
- 对于Redis的运维方来说,整个故障转移的过程是需要人工来介入的,故障转移实时性和准确性上都无法得到保障。
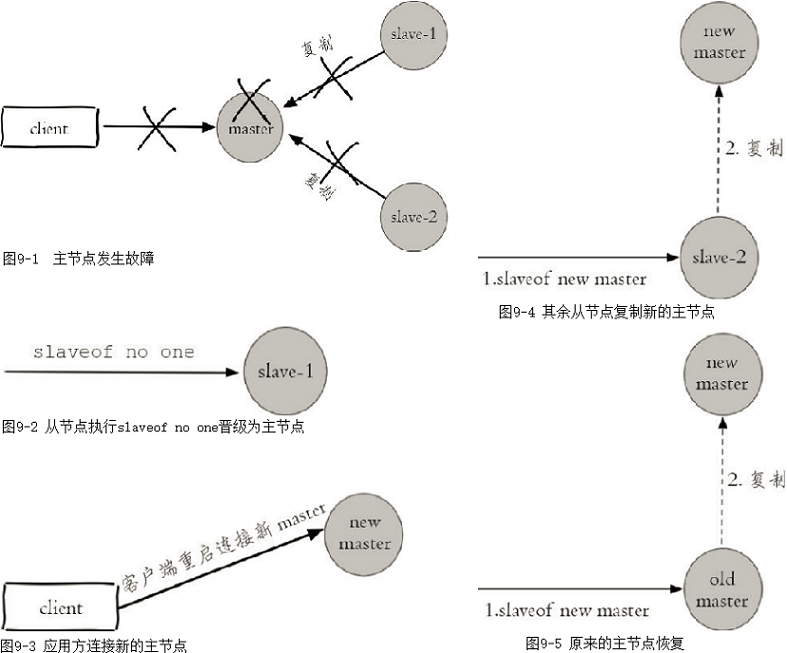
- 图9-1到图9-5展示了一个1主2从的Redis主从复制模式下的主节点出现故障后,是如何进行故障转移的,过程如下所示。
- (1)如图9-1所示,主节点发生故障后,客户端(client)连接主节点失败,两个从节点与主节点连接失败造成复制中断。
- (2)如图9-2所示,如果主节点无法正常启动,需要选出一个从节点(slave-1),对其执行slaveof no one命令使其成为新的主节点。
- (3)如图9-3所示,原来的从节点(slave-1)成为新的主节点后,更新应用方的主节点信息,重新启动应用方。
- (4)如图9-4所示,客户端命令另一个从节点(slave-2)去复制新的主节点(new-master)
- (5)如图9-5所示,待原来的主节点恢复后,让它去复制新的主节点。
- 上述处理过程就可以认为整个服务或者架构的设计不是高可用的,因为整个故障转移的过程需要人工介入。考虑到这点,有些公司把上述流程自动化了,但是仍然存在如下问题:
- 第一,判断节点不可达的机制是否健全和标准。
- 第二,如果有多个从节点,怎样保证只有一个被晋升为主节点。
- 第三,通知客户端新的主节点机制是否足够健壮。
- Redis Sentinel正是用于解决这些问题。
1.3、Redis Sentinel的高可用性
- 当主节点出现故障时,Redis Sentinel能自动完成故障发现和故障转移,并通知应用方,从而实现真正的高可用。
- 注意,Redis2.6版本提供Redis Sentinel v1版本,但是功能性和健壮性都有一些问题,如果想使用Redis Sentinel的话,建议使用2.8以上版本,也就是v2版本的Redis Sentinel。
- Redis Sentinel是一个分布式架构,其中包含若干个Sentinel节点和Redis数据节点。每个Sentinel节点会对数据节点和其余Sentinel节点进行监控,当它发现节点不可达时,会对节点做下线标识。如果被标识的是主节点,它还会和其他Sentinel节点进行“协商”,当大多数Sentinel节点都认为主节点不可达时,它们会选举出一个Sentinel节点来完成自动故障转移的工作,同时会将这个变化实时通知给Redis应用方。整个过程完全是自动的,不需要人工来介入,所以这套方案很有效地解决了Redis的高可用问题。
- 注意,这里的分布式是指:Redis数据节点、Sentinel节点集合、客户端分布在多个物理节点的架构。
- 如图9-6所示,Redis Sentinel与Redis主从复制模式只是多了若干Sentinel节点,所以Redis Sentinel并没有针对Redis节点做了特殊处理,这里是很多开发和运维人员容易混淆的。
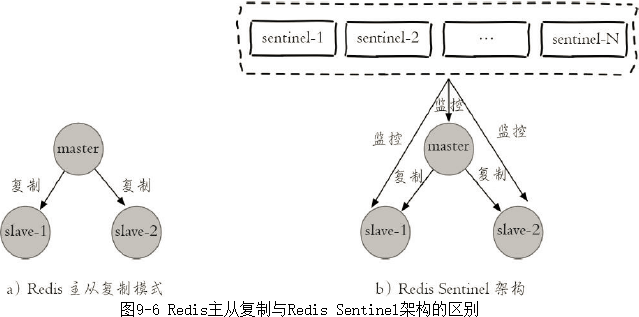
- 从逻辑架构上看,Sentinel节点集合会定期对所有节点进行监控,特别是对主节点的故障实现自动转移。
- 下面以1个主节点、2个从节点、3个Sentinel节点组成的Redis Sentinel为例子进行说明,拓扑结构如图9-7所示。
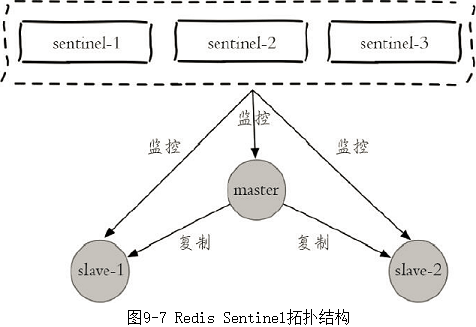
- 整个故障转移的处理逻辑有下面4个步骤:
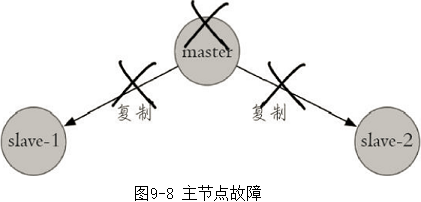
- (1)如图9-8所示,主节点出现故障,此时两个从节点与主节点失去连接,主从复制失败。
-
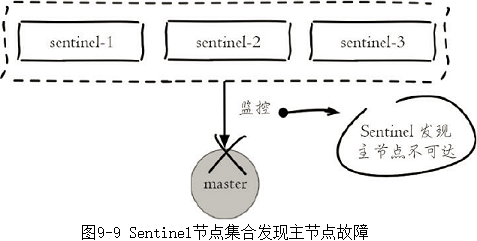
- (2)如图9-9所示,每个Sentinel节点通过定期监控发现主节点出现了故障。
-
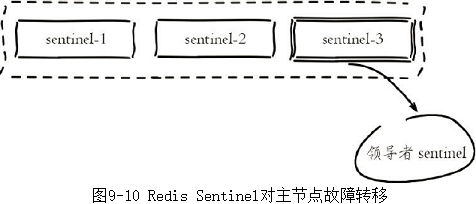
- (3)如图9-10所示,多个Sentinel节点对主节点的故障达成一致,选举出sentinel-3节点作为领导者负责故障转移。
-
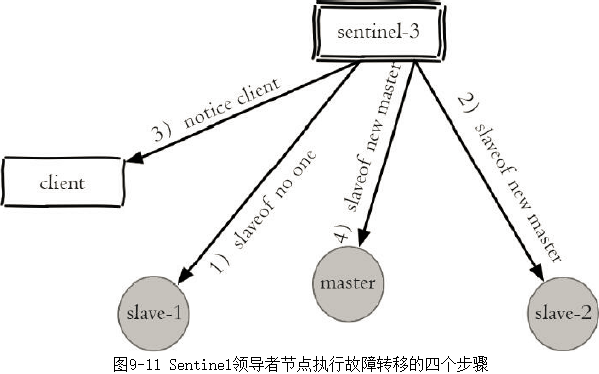
- (4)如图9-11所示,Sentinel领导者节点执行了故障转移,整个过程和上节介绍的是完全一致的,只不过是自动化完成的。
- (5)故障转移后整个Redis Sentinel的拓扑结构图9-12所示。
-
- (1)如图9-8所示,主节点出现故障,此时两个从节点与主节点失去连接,主从复制失败。
- 通过上面介绍的Redis Sentinel逻辑架构以及故障转移的处理,可以看出Redis Sentinel具有以下几个功能:
- 监控:Sentinel节点会定期检测Redis数据节点、其余Sentinel节点是否可达。
- 通知:Sentinel节点会将故障转移的结果通知给应用方。
- 主节点故障转移:实现从节点晋升为主节点并维护后续正确的主从关系。
- 配置提供者:在Redis Sentinel结构中,客户端在初始化的时候连接的是Sentinel节点集合,从中获取主节点信息。
- 同时看到,Redis Sentinel包含了若个Sentinel节点,这样做也带来了两个好处:
- 对于节点的故障判断是由多个Sentinel节点共同完成,这样可以有效地防止误判。
- Sentinel节点集合是由若干个Sentinel节点组成的,这样即使个别Sentinel节点不可用,整个Sentinel节点集依然是健壮的。

- Sentinel节点本身就是独立的Redis节点,只不过它们有一些特殊,它们不存储数据,只支持部分命令。
2、安装和部署
- 注意,这里使用的是redis 6.0.16。
2.1、部署拓扑结构
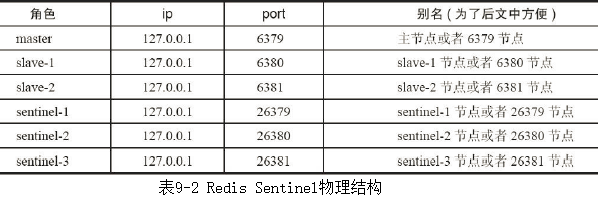
- 下面将以3个Sentinel节点、1个主节点、2个从节点组成一个RedisSentinel进行说明,拓扑结构如图9-13所示。
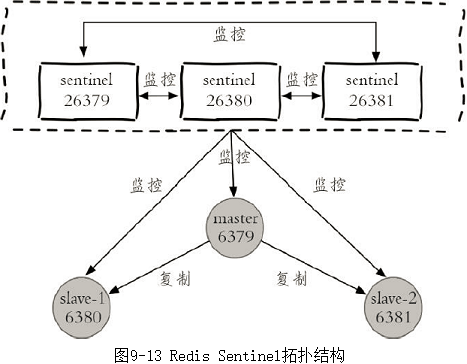
- 具体的物理部署如表9-2所示。
2.2、部署Redis数据节点
2.2.1、启动主节点
1、配置文件
]# vim /apps/redis/redis_6379.conf
bind 127.0.0.1
port 6379
daemonize yes
requirepass hengha123
logfile "/apps/redis/logs/6379.log"
dir /apps/redis/data_6379/
dbfilename dump.rdb
- 创建目录
# mkdir -p /apps/redis/{logs,data_6379}
2、启动主节点
]# /apps/redis/bin/redis-server /apps/redis/redis_6379.conf
2.2.2、启动两个从节点
1、配置文件
- 两个从节点的配置和主节点的几乎一样,不同的是:
- 都有各自的端口。
- replicaof和masterauth参数。
]# vim /apps/redis/redis_6380.conf
bind 127.0.0.1
port 6380
daemonize yes
requirepass hengha123
logfile "/apps/redis/logs/6380.log"
dir /apps/redis/data_6380/
dbfilename dump.rdb
replicaof 127.0.0.1 6379
masterauth hengha123

]# vim /apps/redis/redis_6381.conf
bind 127.0.0.1
port 6381
daemonize yes
requirepass hengha123
logfile "/apps/redis/logs/6381.log"
dir /apps/redis/data_6381/
dbfilename dump.rdb
replicaof 127.0.0.1 6379
masterauth hengha123
2、启动两个从节点
]# /apps/redis/bin/redis-server /apps/redis/redis_6380.conf
]# /apps/redis/bin/redis-server /apps/redis/redis_6381.conf
2.2.3、确认主从关系
//在主节点可以看到它有两个从节点,分别是127.0.0.1:6380和127.0.0.1:6381
]# /apps/redis/bin/redis-cli -h 127.0.0.1 -p 6379 -a hengha123 info replication
# Replication
role:master
connected_slaves:2
slave0:ip=127.0.0.1,port=6380,state=online,offset=252,lag=1
slave1:ip=127.0.0.1,port=6381,state=online,offset=252,lag=1
...

//在从节点可以看到它的主节点是127.0.0.1:6379
]# /apps/redis/bin/redis-cli -h 127.0.0.1 -p 6380 -a hengha123 info replication
# Replication
role:slave
master_host:127.0.0.1
master_port:6379
master_link_status:up
...
2.3、部署Sentinel节点
- 3个Sentinel节点的部署方法是完全一致的(端口不同),下面以sentinel-1节点的部署为例子进行说明。
1、Sentinel配置文件
]# vim /apps/redis/sentinel_26379.conf
port 26379
daemonize yes
logfile "/apps/redis/logs/26379.log"
dir /apps/redis/data_26379/
sentinel monitor mymaster 127.0.0.1 6379 2
sentinel auth-pass mymaster hengha123
sentinel down-after-milliseconds mymaster 30000
sentinel parallel-syncs mymaster 1
sentinel failover-timeout mymaster 180000
- Sentinel节点的默认端口是26379。
- sentinel monitor mymaster 127.0.0.1 6379 2配置代表sentinel-1节点需要监控127.0.0.1:6379这个主节点,2代表判断主节点失败至少需要2个Sentinel节点同意,mymaster是主节点的别名。
2、启动Sentinel节点
]# /apps/redis/bin/redis-sentinel /apps/redis/sentinel_26379.conf --sentinel
3、确认
- Sentinel节点本质上是一个特殊的Redis节点,所以也可以通过info命令来查询它的相关信息,从下面info的Sentinel片段来看,Sentinel节点找到了主节点127.0.0.1:6379,发现了它的两个从节点,同时发现Redis Sentinel一共有3个Sentinel节点。
]# /apps/redis/bin/redis-cli -h 127.0.0.1 -p 26379 info sentinel
# Sentinel
sentinel_masters:1
sentinel_tilt:0
sentinel_running_scripts:0
sentinel_scripts_queue_length:0
sentinel_simulate_failure_flags:0
master0:name=mymaster,status=ok,address=127.0.0.1:6379,slaves=2,sentinels=3
- 至此Redis Sentinel已经搭建起来了,整体上还是比较容易的,但是有2点需要强调一下:
- (1)在生产环境中,建议Redis Sentinel的所有节点应该分布在不同的物理机上。
- (2)Redis Sentinel中的数据节点和普通的Redis数据节点在配置上没有任何区别,只不过是添加了一些Sentinel节点对它们进行监控。
2.4、配置优化
- Redis安装目录下有一个sentinel.conf,是默认的Sentinel节点配置文件,下面就以它作为例子进行说明。
- redis 6.0.16的sentinel.conf文件


# Example sentinel.conf

# *** IMPORTANT ***
#
# By default Sentinel will not be reachable from interfaces different than
# localhost, either use the 'bind' directive to bind to a list of network
# interfaces, or disable protected mode with "protected-mode no" by
# adding it to this configuration file.
#
# Before doing that MAKE SURE the instance is protected from the outside
# world via firewalling or other means.
#
# For example you may use one of the following:
#
# bind 127.0.0.1 192.168.1.1
#
# protected-mode no

# port <sentinel-port>
# The port that this sentinel instance will run on
port 26379

# By default Redis Sentinel does not run as a daemon. Use 'yes' if you need it.
# Note that Redis will write a pid file in /var/run/redis-sentinel.pid when
# daemonized.
daemonize no

# When running daemonized, Redis Sentinel writes a pid file in
# /var/run/redis-sentinel.pid by default. You can specify a custom pid file
# location here.
pidfile /var/run/redis-sentinel.pid

# Specify the log file name. Also the empty string can be used to force
# Sentinel to log on the standard output. Note that if you use standard
# output for logging but daemonize, logs will be sent to /dev/null
logfile ""

# sentinel announce-ip <ip>
# sentinel announce-port <port>
#
# The above two configuration directives are useful in environments where,
# because of NAT, Sentinel is reachable from outside via a non-local address.
#
# When announce-ip is provided, the Sentinel will claim the specified IP address
# in HELLO messages used to gossip its presence, instead of auto-detecting the
# local address as it usually does.
#
# Similarly when announce-port is provided and is valid and non-zero, Sentinel
# will announce the specified TCP port.
#
# The two options don't need to be used together, if only announce-ip is
# provided, the Sentinel will announce the specified IP and the server port
# as specified by the "port" option. If only announce-port is provided, the
# Sentinel will announce the auto-detected local IP and the specified port.
#
# Example:
#
# sentinel announce-ip 1.2.3.4

# dir <working-directory>
# Every long running process should have a well-defined working directory.
# For Redis Sentinel to chdir to /tmp at startup is the simplest thing
# for the process to don't interfere with administrative tasks such as
# unmounting filesystems.
dir /tmp

# sentinel monitor <master-name> <ip> <redis-port> <quorum>
#
# Tells Sentinel to monitor this master, and to consider it in O_DOWN
# (Objectively Down) state only if at least <quorum> sentinels agree.
#
# Note that whatever is the ODOWN quorum, a Sentinel will require to
# be elected by the majority of the known Sentinels in order to
# start a failover, so no failover can be performed in minority.
#
# Replicas are auto-discovered, so you don't need to specify replicas in
# any way. Sentinel itself will rewrite this configuration file adding
# the replicas using additional configuration options.
# Also note that the configuration file is rewritten when a
# replica is promoted to master.
#
# Note: master name should not include special characters or spaces.
# The valid charset is A-z 0-9 and the three characters ".-_".
sentinel monitor mymaster 127.0.0.1 6379 2

# sentinel auth-pass <master-name> <password>
#
# Set the password to use to authenticate with the master and replicas.
# Useful if there is a password set in the Redis instances to monitor.
#
# Note that the master password is also used for replicas, so it is not
# possible to set a different password in masters and replicas instances
# if you want to be able to monitor these instances with Sentinel.
#
# However you can have Redis instances without the authentication enabled
# mixed with Redis instances requiring the authentication (as long as the
# password set is the same for all the instances requiring the password) as
# the AUTH command will have no effect in Redis instances with authentication
# switched off.
#
# Example:
#
# sentinel auth-pass mymaster MySUPER--secret-0123passw0rd

# sentinel auth-user <master-name> <username>
#
# This is useful in order to authenticate to instances having ACL capabilities,
# that is, running Redis 6.0 or greater. When just auth-pass is provided the
# Sentinel instance will authenticate to Redis using the old "AUTH <pass>"
# method. When also an username is provided, it will use "AUTH <user> <pass>".
# In the Redis servers side, the ACL to provide just minimal access to
# Sentinel instances, should be configured along the following lines:
#
#     user sentinel-user >somepassword +client +subscribe +publish \
#                        +ping +info +multi +slaveof +config +client +exec on

# sentinel down-after-milliseconds <master-name> <milliseconds>
#
# Number of milliseconds the master (or any attached replica or sentinel) should
# be unreachable (as in, not acceptable reply to PING, continuously, for the
# specified period) in order to consider it in S_DOWN state (Subjectively
# Down).
#
# Default is 30 seconds.
sentinel down-after-milliseconds mymaster 30000

# requirepass <password>
#
# You can configure Sentinel itself to require a password, however when doing
# so Sentinel will try to authenticate with the same password to all the
# other Sentinels. So you need to configure all your Sentinels in a given
# group with the same "requirepass" password. Check the following documentation
# for more info: https://redis.io/topics/sentinel

# sentinel parallel-syncs <master-name> <numreplicas>
#
# How many replicas we can reconfigure to point to the new replica simultaneously
# during the failover. Use a low number if you use the replicas to serve query
# to avoid that all the replicas will be unreachable at about the same
# time while performing the synchronization with the master.
sentinel parallel-syncs mymaster 1

# sentinel failover-timeout <master-name> <milliseconds>
#
# Specifies the failover timeout in milliseconds. It is used in many ways:
#
# - The time needed to re-start a failover after a previous failover was
#   already tried against the same master by a given Sentinel, is two
#   times the failover timeout.
#
# - The time needed for a replica replicating to a wrong master according
#   to a Sentinel current configuration, to be forced to replicate
#   with the right master, is exactly the failover timeout (counting since
#   the moment a Sentinel detected the misconfiguration).
#
# - The time needed to cancel a failover that is already in progress but
#   did not produced any configuration change (SLAVEOF NO ONE yet not
#   acknowledged by the promoted replica).
#
# - The maximum time a failover in progress waits for all the replicas to be
#   reconfigured as replicas of the new master. However even after this time
#   the replicas will be reconfigured by the Sentinels anyway, but not with
#   the exact parallel-syncs progression as specified.
#
# Default is 3 minutes.
sentinel failover-timeout mymaster 180000

# SCRIPTS EXECUTION
#
# sentinel notification-script and sentinel reconfig-script are used in order
# to configure scripts that are called to notify the system administrator
# or to reconfigure clients after a failover. The scripts are executed
# with the following rules for error handling:
#
# If script exits with "1" the execution is retried later (up to a maximum
# number of times currently set to 10).
#
# If script exits with "2" (or an higher value) the script execution is
# not retried.
#
# If script terminates because it receives a signal the behavior is the same
# as exit code 1.
#
# A script has a maximum running time of 60 seconds. After this limit is
# reached the script is terminated with a SIGKILL and the execution retried.

# NOTIFICATION SCRIPT
#
# sentinel notification-script <master-name> <script-path>
#
# Call the specified notification script for any sentinel event that is
# generated in the WARNING level (for instance -sdown, -odown, and so forth).
# This script should notify the system administrator via email, SMS, or any
# other messaging system, that there is something wrong with the monitored
# Redis systems.
#
# The script is called with just two arguments: the first is the event type
# and the second the event description.
#
# The script must exist and be executable in order for sentinel to start if
# this option is provided.
#
# Example:
#
# sentinel notification-script mymaster /var/redis/notify.sh

# CLIENTS RECONFIGURATION SCRIPT
#
# sentinel client-reconfig-script <master-name> <script-path>
#
# When the master changed because of a failover a script can be called in
# order to perform application-specific tasks to notify the clients that the
# configuration has changed and the master is at a different address.
#
# The following arguments are passed to the script:
#
# <master-name> <role> <state> <from-ip> <from-port> <to-ip> <to-port>
#
# <state> is currently always "failover"
# <role> is either "leader" or "observer"
#
# The arguments from-ip, from-port, to-ip, to-port are used to communicate
# the old address of the master and the new address of the elected replica
# (now a master).
#
# This script should be resistant to multiple invocations.
#
# Example:
#
# sentinel client-reconfig-script mymaster /var/redis/reconfig.sh

# SECURITY
#
# By default SENTINEL SET will not be able to change the notification-script
# and client-reconfig-script at runtime. This avoids a trivial security issue
# where clients can set the script to anything and trigger a failover in order
# to get the program executed.

sentinel deny-scripts-reconfig yes

# REDIS COMMANDS RENAMING
#
# Sometimes the Redis server has certain commands, that are needed for Sentinel
# to work correctly, renamed to unguessable strings. This is often the case
# of CONFIG and SLAVEOF in the context of providers that provide Redis as
# a service, and don't want the customers to reconfigure the instances outside
# of the administration console.
#
# In such case it is possible to tell Sentinel to use different command names
# instead of the normal ones. For example if the master "mymaster", and the
# associated replicas, have "CONFIG" all renamed to "GUESSME", I could use:
#
# SENTINEL rename-command mymaster CONFIG GUESSME
#
# After such configuration is set, every time Sentinel would use CONFIG it will
# use GUESSME instead. Note that there is no actual need to respect the command
# case, so writing "config guessme" is the same in the example above.
#
# SENTINEL SET can also be used in order to perform this configuration at runtime.
#
# In order to set a command back to its original name (undo the renaming), it
# is possible to just rename a command to itself:
#
# SENTINEL rename-command mymaster CONFIG CONFIG
1、sentinel monitor
- Sentinel节点要监控主节点。
sentinel monitor <master-name> <ip> <redis-port> <quorum>
- 本配置说明Sentinel节点要监控的是一个名字叫做<master-name>,ip地址和端口为<ip> <port>的主节点。<quorum>代表要判定主节点最终不可达所需要的票数。
- <quorum>参数用于故障发现和判定,例如将quorum配置为2,代表至少有2个Sentinel节点认为主节点不可达,那么这个不可达的判定才是客观的。对于<quorum>设置的越小,那么达到下线的条件越宽松,反之越严格。一般建议将其设置为Sentinel节点的一半加1。
- 同时<quorum>还与Sentinel节点的领导者选举有关,至少要有max(quorum,num(sentinels)/2+1)个Sentinel节点参与选举,才能选出领导者Sentinel,从而完成故障转移。例如有5个Sentinel节点,quorum=4,那么至少要有max(quorum,num(sentinels)/2+1)=4个在线Sentinel节点才可以进行领导者选举。
- 实际上Sentinel节点会监控所有节点,但是在Sentinel节点的配置中没有看到有关从节点和其余Sentinel节点的配置,那是因为Sentinel节点会从主节点中获取有关从节点以及其余Sentinel节点的相关信息。
- 当所有节点启动后,配置文件中的内容发生了变化,体现在三个方面:
- Sentinel节点自动发现从节点、其余Sentinel节点。
- 去掉了默认配置,例如parallel-syncs、failover-timeout参数。
- 添加了配置纪元相关参数。
//启动前的配置文件
port 26379
daemonize yes
logfile "/apps/redis/logs/26379.log"
dir /apps/redis/data_26379/
sentinel monitor mymaster 127.0.0.1 6379 2
sentinel auth-pass mymaster hengha123
sentinel down-after-milliseconds mymaster 30000
sentinel parallel-syncs mymaster 1
sentinel failover-timeout mymaster 180000

//启动前的配置文件
port 26379
daemonize yes
logfile "/apps/redis/logs/26379.log"
dir "/apps/redis/data_26379"
sentinel monitor mymaster 127.0.0.1 6379 2
sentinel auth-pass mymaster hengha123
sentinel down-after-milliseconds mymaster 30000
sentinel parallel-syncs mymaster 1
sentinel failover-timeout mymaster 180000
sentinel config-epoch mymaster 0
sentinel leader-epoch mymaster 0
# Generated by CONFIG REWRITE
protected-mode no
user default on nopass ~* +@all
#发现两个slave节点
sentinel known-replica mymaster 127.0.0.1 6381
sentinel known-replica mymaster 127.0.0.1 6380
#发现两个sentinel节点
sentinel known-sentinel mymaster 127.0.0.1 26380 0e8bbd3500e0c401a6702f1a8f68e9b74374e8a6
sentinel known-sentinel mymaster 127.0.0.1 26381 21f0e63aea4dd304628bde0ef3b56010261fc5b5
sentinel current-epoch 0
2、sentinel down-after-milliseconds
- 定期发送ping命令。
sentinel down-after-milliseconds <master-name> <milliseconds>
- 每个Sentinel节点都要通过定期发送ping命令来判断Redis数据节点和其余Sentinel节点是否可达,如果超过了down-after-milliseconds配置的时间且没有有效的回复,则判定节点不可达,<milliseconds>(单位为毫秒)就是超时时间。这个配置是对节点失败判定的重要依据。
- 优化说明:down-after-milliseconds越大,代表Sentinel节点对于节点不可达的条件越宽松,反之越严格。
- 条件宽松有可能带来的问题是节点确实不可达了,那么应用方需要等待故障转移的时间越长,也就意味着应用方故障时间可能越长。
- 条件严格虽然可以及时发现故障完成故障转移,但是也存在一定的误判率。
- 注意,down-after-milliseconds虽然以<master-name>为参数,但实际上对Sentinel节点、主节点、从节点的失败判定同时有效。
3、sentinel parallel-syncs
- 限制向新的主节点发起复制操作的从节点个数。
sentinel parallel-syncs <master-name> <numreplicas>
- 当Sentinel节点集合对主节点故障判定达成一致时,Sentinel领导者节点会做故障转移操作,选出新的主节点,原来的从节点会向新的主节点发起复制操作。
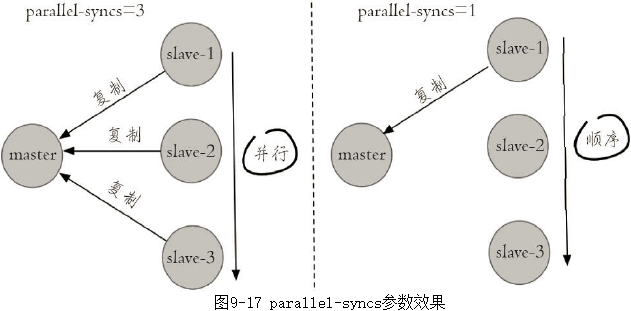
- parallel-syncs就是用来限制在一次故障转移之后,每次向新的主节点发起复制操作的从节点个数。如果这个参数配置的比较大,那么多个从节点会向新的主节点同时发起复制操作,尽管复制操作通常不会阻塞主节点,但是同时向主节点发起复制,必然会对主节点所在的机器造成一定的网络和磁盘IO开销。
- 图9-17展示parallel-syncs=3和parallel-syncs=1的效果,parallelsyncs=3会同时发起复制,parallel-syncs=1时从节点会轮流发起复制。
4、sentinel failover-timeout
- 故障转移超时时间
sentinel failover-timeout <master-name> <milliseconds>
- failover-timeout通常被解释成故障转移超时时间,但实际上它作用于故障转移的各个阶段:
- a)选出合适从节点。
- b)晋升选出的从节点为主节点。
- c)命令其余从节点复制新的主节点。
- d)等待原主节点恢复后命令它去复制新的主节点。
- failover-timeout的作用具体体现在四个方面:
- (1)如果Redis Sentinel对一个主节点故障转移失败,那么下次再对该主节点做故障转移的起始时间是failover-timeout的2倍。
- (2)在b)阶段时,如果Sentinel节点向a)阶段选出来的从节点执行slaveof no one一直失败(例如该从节点此时出现故障),当此过程超failover-timeout时,则故障转移失败。
- (3)在b)阶段如果执行成功,Sentinel节点还会执行info命令来确认a)阶段选出来的节点确实晋升为主节点,如果此过程执行时间超过failover-timeout时,则故障转移失败。
- (4)如果c)阶段执行时间超过了failover-timeout(不包含复制时间),则故障转移失败。注意即使超过了这个时间,Sentinel节点也会最终配置从节点去同步最新的主节点。
5、sentinel auth-pass
- 如果Sentinel要监控的主节点配置了密码,那么就需要通过sentinel auth-pass添加主节点的密码,防止Sentinel节点无法监控主节点。
sentinel auth-pass <master-name> <password>
6、sentinel notification-script
- sentinel notification-script的作用是在故障转移期间,当一些警告级别的Sentinel事件发生(指重要事件,例如-sdown:客观下线、-odown:主观下线)时,会触发对应路径的脚本,并向脚本发送相应的事件参数。
sentinel notification-script <master-name> <script-path>
- 例如在/apps/redis/scripts/下配置了notification.sh,该脚本会接收每个Sentinel节点传过来的事件参数,可以利用这些参数作为邮件或者短信报警依据:
#!/bin/sh
#获取所有参数
msg=$*
#报警脚本或者接口,将msg作为参数
exit 0
- 如果需要该功能,就可以在Sentinel节点添加如下配置:
sentinel notification-script mymaster /apps/redis/scripts/notification.sh
7、sentinel client-reconfig-script
- sentinel client-reconfig-script的作用是在故障转移结束后,会触发对应路径的脚本,并向脚本发送故障转移结果的相关参数。
sentinel client-reconfig-script <master-name> <script-path>
- 和notification-script类似,可以在/apps/redis/scripts/下配置了client-reconfig.sh,该脚本会接收每个Sentinel节点传过来的故障转移结果参数,并触发类似短信和邮件报警:
#!/bin/sh
#获取所有参数
msg=$*
#报警脚本或者接口,将msg作为参数
exit 0
- 如果需要该功能,就可以在Sentinel节点添加如下配置:
sentinel client-reconfig-script mymaster /apps/redis/scripts/client-reconfig.sh
- 当故障转移结束,每个Sentinel节点会将故障转移的结果发送给对应的脚本,具体参数如下:
<master-name> <role> <state> <from-ip> <from-port> <to-ip> <to-port>
    <master-name>:主节点名。
    <role>:Sentinel节点的角色,分别是leader和observer,leader代表当前Sentinel节点是领导者,是它进行的故障转移;observer是其余Sentinel节点。
    <from-ip>:原主节点的ip地址。
    <from-port>:原主节点的端口。
    <to-ip>:新主节点的ip地址。
    <to-port>:新主节点的端口。
- 例如以下内容分别是三个Sentinel节点发送给脚本的,其中一个是leader,另外两个是observer:
mymaster leader start 127.0.0.1 6379 127.0.0.1 6380
mymaster observer start 127.0.0.1 6379 127.0.0.1 6380
mymaster observer start 127.0.0.1 6379 127.0.0.1 6380
- 有关sentinel notification-script和sentinel client-reconfig-script有几点需要注意:
- <script-path>必须有可执行权限。
- <script-path>开头必须包含shell脚本头(例如#!/bin/sh),否则事件发生时Redis将无法执行脚本产生如下错误:
- -script-error /apps/sentinel/notification.sh 0 2
- Redis规定脚本的最大执行时间不能超过60秒,超过后脚本将被杀掉。
- 如果shell脚本以exit 1结束,那么脚本稍后重试执行。如果以exit 2或者更高的值结束,那么脚本不会重试。正常返回值是exit 0。
- 如果需要运维的Redis Sentinel比较多,建议不要使用这种脚本的形式来进行通知,这样会增加部署的成本。
2.5、监控多个主节点
- Redis Sentinel可以同时监控多个主节点,具体拓扑图类似于图9-18。

- 配置方法也比较简单,只需要指定多个masterName来区分不同的主节点即可,例如下面的配置监控master-1和master-2两个主节点:
sentinel monitor master-1 10.10.xx.1 6379 2
sentinel down-after-milliseconds master-1 60000
sentinel failover-timeout master-1 180000
sentinel parallel-syncs master-1 1

sentinel monitor master-2 10.16.xx.2 6380 2
sentinel down-after-milliseconds master-2 10000
sentinel failover-timeout master-2 180000
sentinel parallel-syncs master-2 1
2.6、部署技巧
1、Sentinel节点不应该部署在一台物理“机器”上。
- 这里特意强调物理机是因为一台物理机做成了若干虚拟机或者现今比较流行的容器,它们虽然有不同的IP地址,但实际上它们都是同一台物理机。同一台物理机意味着如果这台机器有什么硬件故障,所有的虚拟机都会受到影响,为了实现Sentinel节点集合真正的高可用,请勿将Sentinel节点部署在同一台物理机器上。
2、部署至少三个且奇数个的Sentinel节点
- 3个以上是通过增加Sentinel节点的个数提高对于故障判定的准确性,因为领导者选举需要至少一半加1个节点,奇数个节点可以在满足该条件的基础上节省一个节点。
3、只有一套Sentinel,还是每个主节点配置一套Sentinel?
- Sentinel节点集合可以只监控一个主节点,也可以监控多个主节点。
- 那么在实际生产环境中更偏向于哪一种部署方式呢,下面分别分析两种方案的优缺点。
- 方案一:一套Sentinel监视多个主节点。很明显这种方案在一定程度上降低了维护成本,因为只需要维护固定个数的Sentinel节点,集中对多个Redis数据节点进行管理就可以了。但是这同时也是它的缺点,如果这套Sentinel节点集合出现异常,可能会对多个Redis数据节点造成影响。还有如果监控的Redis数据节点较多,会造成Sentinel节点产生过多的网络连接,也会有一定的影响。
- 方案二:多套Sentinel,每套Sentinel都只监视一个主节点。显然这种方案的优点和缺点和上面是相反的,每个Redis主节点都有自己的Sentinel节点集合,会造成资源浪费。但是优点也很明显,每套Redis Sentinel都是彼此隔离的。
- 运维提示
- 如果Sentinel节点集合监控的是同一个业务的多个主节点集合,那么使用方案一、否则一般建议采用方案二。
3、API
- Sentinel节点是一个特殊的Redis节点,它有自己专属的API。
- 为了方便演示,以图9-21进行说明:Sentinel节点集合监控着两组主从模式的Redis数据节点。

1、sentinel masters
- 展示所有被监控的主节点状态以及相关的统计信息。
127.0.0.1:26379> sentinel masters
1)  1) "name"
    2) "mymaster-1"
    3) "ip"
    4) "127.0.0.1"
    5) "port"
    6) "6379"
...
2)  1) "name"
    2) "mymaster-2"
    3) "ip"
    4) "127.0.0.1"
    5) "port"
    6) "6382"
...
2、sentinel master <master_name>
- 展示指定<master_name>的主节点状态以及相关的统计信息。
127.0.0.1:26379> sentinel master mymaster-1
 1) "name"
 2) "mymaster-1"
 3) "ip"
 4) "127.0.0.1"
 5) "port"
 6) "6379"
3、sentinel slaves <master_name>
- 展示指定<master_name>的从节点状态以及相关的统计信息。
127.0.0.1:26379> sentinel slaves mymaster-1
1)  1) "name"
    2) "127.0.0.1:6381"
    3) "ip"
    4) "127.0.0.1"
    5) "port"
    6) "6381"
...
2)  1) "name"
    2) "127.0.0.1:6380"
    3) "ip"
    4) "127.0.0.1"
    5) "port"
    6) "6380"

...
4、sentinel sentinels <master_name>
- 展示指定<master_name>的Sentinel节点集合(不包含当前Sentinel节点)。
127.0.0.1:26379> sentinel sentinels mymaster-1
1)  1) "name"
    2) "0e8bbd3500e0c401a6702f1a8f68e9b74374e8a6"
    3) "ip"
    4) "127.0.0.1"
    5) "port"
    6) "26380"
...
2)  1) "name"
    2) "21f0e63aea4dd304628bde0ef3b56010261fc5b5"
    3) "ip"
    4) "127.0.0.1"
    5) "port"
    6) "26381"
...
5、sentinel get-master-addr-by-name <master_name>
- 返回指定<master_name>主节点的IP地址和端口。
127.0.0.1:26379> sentinel get-master-addr-by-name mymaster-1
1) "127.0.0.1"
2) "6379"
6、sentinel reset <pattern>
- 当前Sentinel节点对符合<pattern>(通配符风格)主节点的配置进行重置,包含清除主节点的相关状态(例如故障转移),重新发现从节点和Sentinel节点。
127.0.0.1:26379> sentinel reset mymaster-1
(integer) 1
7、sentinel failover <master_name>
- 对指定<master_name>主节点进行强制故障转移(没有和其他Sentinel节点“协商”),当故障转移完成后,其他Sentinel节点按照故障转移的结果更新自身配置,这个命令在Redis Sentinel的日常运维中非常有用
]# /apps/redis/bin/redis-cli -h 127.0.0.1 -p 26379 info sentinel
# Sentinel
sentinel_masters:1
sentinel_tilt:0
sentinel_running_scripts:0
sentinel_scripts_queue_length:0
sentinel_simulate_failure_flags:0
master0:name=mymaster-1,status=ok,address=127.0.0.1:6379,slaves=2,sentinels=3

//强制进行故障转移
127.0.0.1:26379> sentinel failover mymaster-1
OK

]# /apps/redis/bin/redis-cli -h 127.0.0.1 -p 26379 info sentinel
# Sentinel
sentinel_masters:1
sentinel_tilt:0
sentinel_running_scripts:0
sentinel_scripts_queue_length:0
sentinel_simulate_failure_flags:0
master0:name=mymaster-1,status=ok,address=127.0.0.1:6381,slaves=2,sentinels=3
8、sentinel ckquorum <master_name>
- 检测当前可达的Sentinel节点总数是否达到<quorum>的个数。
- 例如,quorum=3,而当前可达的Sentinel节点个数为2个,那么将无法进行故障转移,Redis Sentinel的高可用特性也将失去。
127.0.0.1:26379> sentinel ckquorum mymaster-1
OK 3 usable Sentinels. Quorum and failover authorization can be reached
9、sentinel flushconfig
- 将Sentinel节点的配置强制刷到磁盘上,这个命令Sentinel节点自身用得比较多,对于开发和运维人员只有当外部原因(例如磁盘损坏)造成配置文件损坏或者丢失时,这个命令是很有用的。
127.0.0.1:26379> sentinel flushconfig
OK
10、sentinel remove <master_name>
- 取消当前Sentinel节点对于指定<master name>主节点的监控。
127.0.0.1:26379> info sentinel
# Sentinel
sentinel_masters:2
sentinel_tilt:0
sentinel_running_scripts:0
sentinel_scripts_queue_length:0
master0:name=mymaster-2,status=ok,address=127.0.0.1:6382,slaves=2,sentinels=3
master1:name=mymaster-1,status=ok,address=127.0.0.1:6379,slaves=2,sentinels=3

//sentinel-1节点取消对mymaster-1节点的监控,但是要注意这个命令仅仅对当前Sentinel节点有效。
127.0.0.1:26379> sentinel remove mymaster-1
OK

//再执行info sentinel命令,发现sentinel-1已经失去对mymaster-1的监控:
127.0.0.1:26379> info sentinel
# Sentinel
sentinel_masters:1
sentinel_tilt:0
sentinel_running_scripts:0
sentinel_scripts_queue_length:0
master0:name=mymaster-2,status=ok,address=127.0.0.1:6383,slaves=2,sentinels=3
11、sentinel monitor <master_name> <ip> <port> <quorum>
- 这个命令和配置文件中的含义是完全一样的,只不过是通过命令的形式来完成Sentinel节点对主节点的监控。
//sentinel-1节点重新监控mymaster-1节点:
127.0.0.1:26379> sentinel monitor mymaster-1 127.0.0.1 6379 2
OK
12、sentinel set <master_name> <param> <value>
- 动态修改Sentinel节点配置选项。
- 有几点需要注意一下:
- (1)sentinel set命令只对当前Sentinel节点有效。
- (2)sentinel set命令如果执行成功会立即刷新配置文件,这点和Redis普通数据节点设置配置需要执行config rewrite刷新到配置文件不同。
- (3)建议所有Sentinel节点的配置尽可能一致,这样在故障发现和转移时比较容易达成一致。
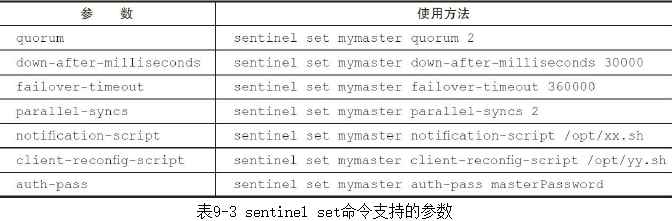
- (4)表9-3中为sentinel set支持的参数,具体可以参考源码中的sentinel.c的sentinelSetCommand函数。
- (5)Sentinel对外不支持config命令。
13、sentinel is-master-down-by-addr
- Sentinel节点之间用来交换对主节点是否下线的判断,根据参数的不同,还可以作为Sentinel领导者选举的通信方式。
sentinel is-master-down-by-addr <ip> <port> <current_epoch> <runid>
    ip:主节点IP。
    port:主节点端口。
    current_epoch:当前配置纪元。
    runid:此参数有两种类型,不同类型决定了此API作用的不同。
        当runid等于“*”时,作用是Sentinel节点直接交换对主节点下线的判定。
        当runid等于当前Sentinel节点的runid时,作用是当前Sentinel节点希望目标Sentinel节点同意自己成为领导者的请求。
4、Sentinel客户端的使用
- 通过前面的学习,相信读者对Redis Sentinel有了一定的了解,应用方该如何正确地连接Redis Sentinel。有人会说这有什么难的,已经知道了主节点的ip地址和端口,用对应编程语言的客户端连接主节点不就可以了吗?但试想一下,如果这样使用客户端,和主从复制的Redis又有什么区别呢,如果主节点挂掉了,虽然Redis Sentinel可以完成故障转移,但是客户端无法获取这个变化,那么使用Redis Sentinel的意义就不大了,所以各个语言的客户端需要对Redis Sentinel进行显式的支持。
1、Redis Sentinel的客户端
- Sentinel节点集合具备了监控、通知、自动故障转移、配置提供者若干功能,也就是说实际上最了解主节点信息的就是Sentinel节点集合,而各个主节点可以通过<master-name>进行标识的,所以,无论是哪种编程语言的客户端,如果需要正确地连接Redis Sentinel,必须有Sentinel节点集合和masterName两个参数。
2、Redis Sentinel客户端基本实现原理
- 实现一个Redis Sentinel客户端的基本步骤如下:
- (1)遍历Sentinel节点集合获取一个可用的Sentinel节点,因为Sentinel节点之间共享数据,所以可以从任意一个Sentinel节点获取主节点的信息。
- (2)通过sentinel get-master-addr-by-name master-name这个API来获取对应主节点的相关信息。
- (3)验证当前获取的“主节点”是真正的主节点(role或者info replication),这样做的目的是为了防止故障转移期间主节点的变化。
- (4)保持和Sentinel节点集合的“联系”,时刻获取关于主节点的相关“信息”,如图9-25所示。
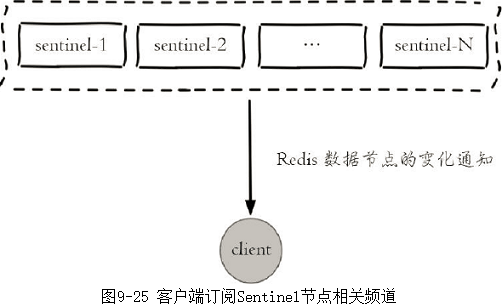
- Redis Sentinel客户端只有在初始化和切换主节点时需要和Sentinel节点集合进行交互来获取主节点信息,所以在设计客户端时需要将Sentinel节点集合考虑成配置(相关节点信息和变化)发现服务。
3、Java操作Redis Sentinel
public JedisSentinelPool(String masterName, Set<String> sentinels, final GenericObjectPoolConfig poolConfig,
final int connectionTimeout, final int soTimeout, final String password, final int database, final String clientName)
- masterName:主节点名。
- sentinels:Sentinel节点集合。
- poolConfig:common-pool连接池配置。
- connectTimeout:连接超时。
- soTimeout:读写超时。
- password:主节点密码。
- database:当前数据库索引。
- clientName:客户端名。
5、实现原理
- 介绍Redis Sentinel的基本实现原理,具体包含以下几个方面:
- Redis Sentinel的三个定时任务
- 主观下线和客观下线
- Sentinel领导者选举
- 故障转移
5.1、三个定时监控任务
- 一套合理的监控机制是Sentinel节点判定节点不可达的重要保证,Redis Sentinel通过三个定时监控任务完成对各个节点发现和监控:
1、每隔10秒,每个Sentinel节点会向主节点和从节点发送info命令获取最新的拓扑结构。
- 这个定时任务的作用具体可以表现在三个方面:
- 通过向主节点执行info命令,获取从节点的信息,这也是为什么Sentinel节点不需要显式配置监控从节点。
- 当有新的从节点加入时都可以立刻感知出来。
- 节点不可达或者故障转移后,可以通过info命令实时更新节点拓扑信息。
2、每隔2秒,Sentinel节点向Redis数据节点的"__sentinel__:hello"频道上发送/订阅消息
- 每隔2秒,每个Sentinel节点会向Redis数据节点的"__sentinel__:hello"频道上发送该Sentinel节点对于主节点的判断以及当前Sentinel节点的信息,同时每个Sentinel节点也会订阅该频道,来了解其他Sentinel节点以及它们对主节点的判断,所以这个定时任务可以完成以下两个工作:
- 发现新的Sentinel节点:通过订阅主节点的"__sentinel__:hello"了解其他的Sentinel节点信息,如果是新加入的Sentinel节点,将该Sentinel节点信息保存起来,并与该Sentinel节点创建连接。
- Sentinel节点之间交换主节点的状态,作为后面客观下线以及领导者选举的依据。
- Sentinel节点publish的消息格式如下:
- <Sentinel节点IP> <Sentinel节点端口> <Sentinel节点runId> <Sentinel节点配置版本> <主节点名字> <主节点Ip> <主节点端口> <主节点配置版本>
3、每隔1秒,Sentinel节点发送一条ping命令
- 每隔1秒,每个Sentinel节点会向主节点、从节点、其余Sentinel节点发送一条ping命令做一次心跳检测,来确认这些节点当前是否可达。通过该定时任务,Sentinel节点对主节点、从节点、其余Sentinel节点都建立起连接,实现了对每个节点的监控,这个定时任务是节点失败判定的重要依据。
5.2、主观下线和客观下线
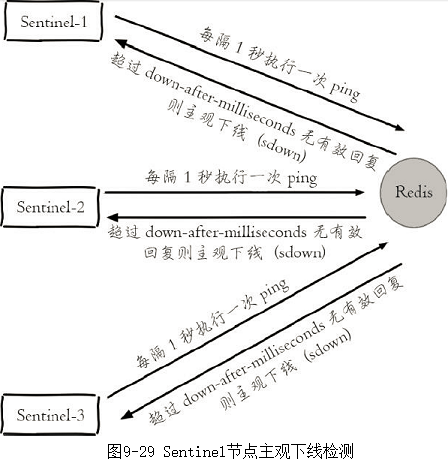
1、主观下线
- Sentinel节点会每隔1秒对主节点、从节点、其他Sentinel节点发送ping命令做心跳检测,当这些节点超过down-after-milliseconds没有进行有效回复,该Sentinel节点就会对该节点做失败判定,这个行为叫做主观下线。
- 从字面意思也可以很容易看出主观下线是当前Sentinel节点的一家之言,存在误判的可能,如图9-29所示。
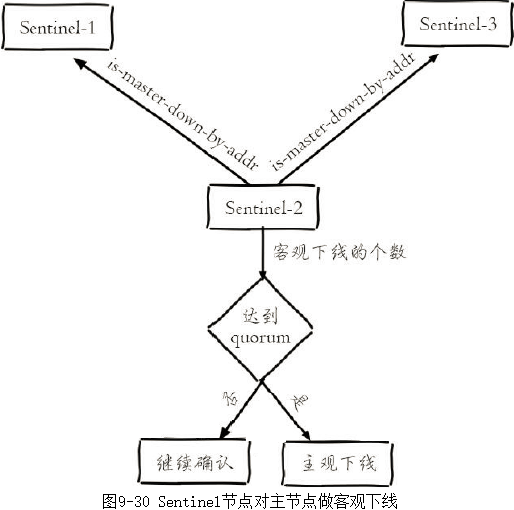
2、客观下线
- 当Sentinel主观下线的节点是主节点时,该Sentinel节点会通过sentinel ismaster-down-by-addr命令向其他Sentinel节点询问对主节点的判断,当超过<quorum>个数,Sentinel节点认为主节点确实有问题,这时该Sentinel节点会做出客观下线的决定,这样客观下线的含义是比较明显了,也就是大部分Sentinel节点都对主节点的下线做了同意的判定,那么这个判定就是客观的,如图9-30所示。
- 注意,从节点、Sentinel节点在主观下线后,没有后续的故障转移操作。
- sentinel is-master-down-by-addr命令使用方法如下:
sentinel is-master-down-by-addr <ip> <port> <current_epoch> <runid>
    ip:主节点IP。
    port:主节点端口。
    current_epoch:当前配置纪元。
    runid:此参数有两种类型,不同类型决定了此API作用的不同。
        当runid等于“*”时,作用是Sentinel节点直接交换对主节点下线的判定。
        当runid等于当前Sentinel节点的runid时,作用是当前Sentinel节点希望目标Sentinel节点同意自己成为领导者的请求。
示例:
- 例如sentinel-1节点对主节点做主观下线后,会向其余Sentinel节点(假设sentinel-2和sentinel-3节点)发送该命令:
sentinel is-master-down-by-addr 127.0.0.1 6379 0 *
- 返回结果包含三个参数,如下所示:
- down_state:目标Sentinel节点对于主节点的下线判断,1是下线,0是在线。
- leader_runid:当leader_runid等于“*”时,代表返回结果是用来做主节点是否不可达,当leader_runid等于具体的runid,代表目标节点同意runid成为领导者。
- leader_epoch:领导者纪元。
5.3、选举Sentinel领导者
- 假如Sentinel节点对于主节点已经做了客观下线,那么是不是就可以立即进行故障转移了?当然不是,实际上故障转移的工作只需要一个Sentinel节点来完成即可,所以Sentinel节点之间会做一个领导者选举的工作,选出一个Sentinel节点作为领导者进行故障转移的工作。
- Redis使用了Raft算法实现领导者选举,因为Raft算法相对比较抽象和复杂,以及篇幅所限,所以这里给出一个Redis Sentinel进行领导者选举的大致思路:
- (1)每个在线的Sentinel节点都有资格成为领导者,当它确认主节点客观下线时候,会向其他Sentinel节点发送sentinel is-master-down-by-addr命令,要求将自己设置为领导者。(选举的过程非常快,基本上谁先完成客观下线,谁就是领导者)
- (2)收到命令的Sentinel节点,如果没有同意过其他Sentinel节点的sentinel is-master-down-by-addr命令,将同意该请求,否则拒绝。(每个Sentinel节点只有一票)
- (3)如果该Sentinel节点发现自己的票数已经大于等于max(quorum,num(sentinels)/2+1),那么它将成为领导者。
- (4)如果此过程没有选举出领导者,将进入下一次选举。
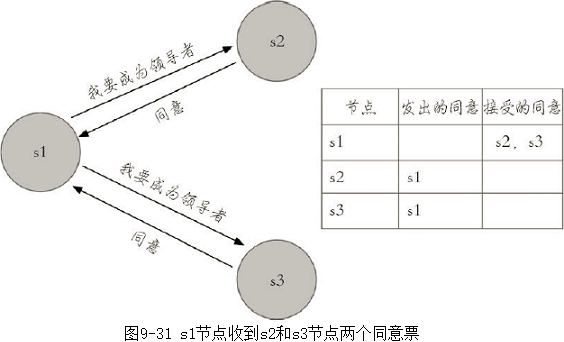
- 图9-31展示了一次领导者选举的大致过程:
- (1)s1(sentinel-1)最先完成了客观下线,它会向s2(sentinel-2)和s3(sentinel-3)发送sentinel is-master-down-by-addr命令,s2和s3同意选其为领导者。
- (2)s1此时已经拿到2张投票,满足了大于等于max(quorum,num(sentinels)/2+1)=2的条件,所以此时s1成为领导者。
5.4、故障转移
- 领导者选举出的领导者Sentinel节点负责故障转移,具体步骤如下:
- (1)在从节点列表中选出一个节点作为新的主节点,选择方法如下:
- a)过滤:“不健康”(主观下线、断线)、5秒内没有回复过Sentinel节点ping响应、与主节点失联超过down-after-milliseconds*10秒。
- b)选择slave-priority(从节点优先级)最高的从节点列表,如果存在则返回,不存在则继续。
- c)选择复制偏移量最大的从节点(复制的最完整),如果存在则返回,不存在则继续。
- d)选择runid最小的从节点。
- (2)Sentinel领导者节点会对第一步选出来的从节点执行slaveof no one命令让其成为主节点。
- (3)Sentinel领导者节点会向剩余的从节点发送命令,让它们成为新主节点的从节点,复制规则和parallel-syncs参数有关。
- (4)Sentinel节点集合会将原来的主节点更新为从节点,并保持着对其关注,当其恢复后命令它去复制新的主节点。
- (1)在从节点列表中选出一个节点作为新的主节点,选择方法如下:
6、开发与运维中的问题
- 首先分析Redis Sentinel故障转移的日志,读懂日志是运维中的重要方法,接下来将介绍Redis Sentinel中节点的常见运维方法,最后介绍如何借助Redis Sentinel实现读写分离。
6.1、故障转移日志分析
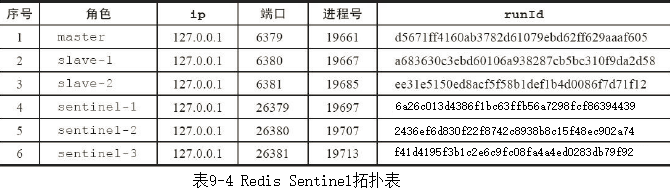
1、Redis Sentinel拓扑结构
- 本次故障转移的分析直接使用图9-13的拓扑和配置进行说明,为了方便分析故障转移的过程,表9-4列出了每个节点的角色、ip、端口、进程号、runId。
2、开始故障转移测试
- 模拟故障的方法有很多,比较典型的方法有以下几种:
- 方法一,强制杀掉对应节点的进程号,这样可以模拟出宕机的效果。
- 方法二,使用Redis的debug sleep命令,让节点进入睡眠状态,这样可以模拟阻塞的效果。
- 方法三,使用Redis的shutdown命令,模拟正常的停掉Redis。
- 使用方法一进行测试,因为从实际经验来看,数百上千台机器偶尔宕机一两台是会不定期出现的。
3、观察效果
- 6380节点晋升为主节点,6381节点成为6380节点的从节点。
4、故障转移分析
- 相信故障转移的效果和预想的一样,这里重点分析相应节点的日志。
- 09:55:51,kill -9掉6379节点
1、6379节点日志
- 两个复制请求,分别来自端口为6380和6381的从节点:
62643:M 23 Aug 2022 09:53:03.068 * Replica 127.0.0.1:6380 asks for synchronization
...
62643:M 23 Aug 2022 09:53:03.169 * Synchronization with replica 127.0.0.1:6380 succeeded

62643:M 23 Aug 2022 09:55:27.587 * Replica 127.0.0.1:6381 asks for synchronization
...
62643:M 23 Aug 2022 09:55:27.601 * Synchronization with replica 127.0.0.1:6381 succeeded
- 09:55:51做了kill -9操作,由于模拟的是宕机效果,所以6379节点在09:55:51之后没有看到任何日志(这点和shutdown操作不太相同)。
2、6380节点日志
- 6380节点在09:55:51之后发现它与6379节点已经失联。
62649:S 23 Aug 2022 09:55:51.456 # Connection with master lost.
62649:S 23 Aug 2022 09:55:51.456 * Caching the disconnected master state.
62649:S 23 Aug 2022 09:55:51.958 * Connecting to MASTER 127.0.0.1:6379
62649:S 23 Aug 2022 09:55:51.958 * MASTER <-> REPLICA sync started
62649:S 23 Aug 2022 09:55:51.958 # Error condition on socket for SYNC: Connection refused
...
- 09:56:21时它接到Sentinel节点的命令:清理原来缓存的主节点状态,Sentinel节点将6380节点晋升为主节点,并重写配置
62649:M 23 Aug 2022 09:56:21.867 * Discarding previously cached master state.
62649:M 23 Aug 2022 09:56:21.867 * MASTER MODE enabled (user request from 'id=463 addr=127.0.0.1:46759 fd=9 name=sentinel-6a26c013-cmd age=114 idle=0 flags=x db=0 sub=0 psub=0 multi=4 qbuf=321 qbuf-free=32447 argv-mem=4 obl=45 oll=0 omem=0 tot-mem=61468 events=r cmd=exec user=default')
62649:M 23 Aug 2022 09:56:21.878 # CONFIG REWRITE executed with success.
- 6381节点发来了复制请求
62649:M 23 Aug 2022 09:56:23.882 * Replica 127.0.0.1:6381 asks for synchronization
62649:M 23 Aug 2022 09:56:23.883 * Partial resynchronization request from 127.0.0.1:6381 accepted. Sending 688 bytes of backlog starting from offset 13186.
3、6381节点日志
- 6381节点同样与6379节点失联
62655:S 23 Aug 2022 09:55:51.456 # Connection with master lost.
62655:S 23 Aug 2022 09:55:51.456 * Caching the disconnected master state.
62655:S 23 Aug 2022 09:55:52.252 * Connecting to MASTER 127.0.0.1:6379
62655:S 23 Aug 2022 09:55:52.252 * MASTER <-> REPLICA sync started
62655:S 23 Aug 2022 09:55:52.252 # Error condition on socket for SYNC: Connection refused
...
- 09:56:22时它接到Sentinel节点的命令,清理原来缓存的主节点状态,让它去复制新的主节点(6380节点)
62655:S 23 Aug 2022 09:56:22.788 # Error condition on socket for SYNC: Connection refused
62655:S 23 Aug 2022 09:56:22.835 * REPLICAOF 127.0.0.1:6380 enabled (user request from 'id=11 addr=127.0.0.1:42488 fd=9 name=sentinel-6a26c013-cmd age=55 idle=0 flags=x db=0 sub=0 psub=0 multi=4 qbuf=329 qbuf-free=32439 argv-mem=4 obl=45 oll=0 omem=0 tot-mem=61468 events=r cmd=exec user=default')
62655:S 23 Aug 2022 09:56:22.849 # CONFIG REWRITE executed with success.
- 向新的主节点(6380节点)发起复制操作
62655:S 23 Aug 2022 09:56:23.881 * Connecting to MASTER 127.0.0.1:6380
62655:S 23 Aug 2022 09:56:23.881 * MASTER <-> REPLICA sync started
62655:S 23 Aug 2022 09:56:23.881 * Non blocking connect for SYNC fired the event.
62655:S 23 Aug 2022 09:56:23.882 * Master replied to PING, replication can continue...
62655:S 23 Aug 2022 09:56:23.882 * Trying a partial resynchronization.
62655:S 23 Aug 2022 09:56:23.883 * Successful partial resynchronization with master.
4、sentinel-1节点日志
- (1)达到了客观下线的条件
//对6379节点作了主观下线(+sdown),注意这个时间正好是kill-9后的30秒,和down-after-milliseconds的配置是一致的。
62778:X 23 Aug 2022 09:56:21.566 # +sdown master mymaster 127.0.0.1 6379
//达到了客观下线的条件
62778:X 23 Aug 2022 09:56:21.663 # +odown master mymaster 127.0.0.1 6379 #quorum 2/2
//Sentinel节点更新自己的配置纪元(new-epoch)
62778:X 23 Aug 2022 09:56:21.663 # +new-epoch 1
- (2)sentinel-1节点被选为领导者
62778:X 23 Aug 2022 09:56:21.663 # +try-failover master mymaster 127.0.0.1 6379
62778:X 23 Aug 2022 09:56:21.669 # +vote-for-leader 6a26c013d4386f1bc63ffb56a7298fcf86394439 1
62778:X 23 Aug 2022 09:56:21.678 # f41d4195f3b1c2e6c9fc08fa4a4ed0283db79f92 voted for 6a26c013d4386f1bc63ffb56a7298fcf86394439 1
62778:X 23 Aug 2022 09:56:21.678 # 2436ef6d830f22f8742c8938b8c15f48ec902a74 voted for 6a26c013d4386f1bc63ffb56a7298fcf86394439 1
62778:X 23 Aug 2022 09:56:21.724 # +elected-leader master mymaster 127.0.0.1 6379
- (3)故障转移
//寻找合适的从节点作为新的主节点
62778:X 23 Aug 2022 09:56:21.725 # +failover-state-select-slave master mymaster 127.0.0.1 6379
//选出了合适的从节点(6380节点)
62778:X 23 Aug 2022 09:56:21.803 # +selected-slave slave 127.0.0.1:6380 127.0.0.1 6380 @ mymaster 127.0.0.1 6379
//命令6380节点执行slaveof no one,使其成为主节点
62778:X 23 Aug 2022 09:56:21.803 * +failover-state-send-slaveof-noone slave 127.0.0.1:6380 127.0.0.1 6380 @ mymaster 127.0.0.1 6379
//等待6380节点晋升为主节点
62778:X 23 Aug 2022 09:56:21.866 * +failover-state-wait-promotion slave 127.0.0.1:6380 127.0.0.1 6380 @ mymaster 127.0.0.1 6379
//确认6380节点已经晋升为主节点
62778:X 23 Aug 2022 09:56:22.763 # +promoted-slave slave 127.0.0.1:6380 127.0.0.1 6380 @ mymaster 127.0.0.1 6379
//故障转移进入重新配置从节点阶段
62778:X 23 Aug 2022 09:56:22.763 # +failover-state-reconf-slaves master mymaster 127.0.0.1 6379
//命令6381节点复制新的主节点
62778:X 23 Aug 2022 09:56:22.834 * +slave-reconf-sent slave 127.0.0.1:6381 127.0.0.1 6381 @ mymaster 127.0.0.1 6379
//6381节点正在重新配置成为6380节点的从节点,但是同步过程尚未完成
62778:X 23 Aug 2022 09:56:23.804 * +slave-reconf-inprog slave 127.0.0.1:6381 127.0.0.1 6381 @ mymaster 127.0.0.1 6379
62778:X 23 Aug 2022 09:56:23.882 # -odown master mymaster 127.0.0.1 6379
//6381节点完成对6380节点的同步
62778:X 23 Aug 2022 09:56:24.835 * +slave-reconf-done slave 127.0.0.1:6381 127.0.0.1 6381 @ mymaster 127.0.0.1 6379
//故障转移顺利完成
62778:X 23 Aug 2022 09:56:24.897 # +failover-end master mymaster 127.0.0.1 6379
//故障转移成功后,发布主节点的切换消息
62778:X 23 Aug 2022 09:56:24.898 # +switch-master mymaster 127.0.0.1 6379 127.0.0.1 6380
- 表9-6记录了Redis Sentinel在故障转移一些重要的事件消息对应的频道。
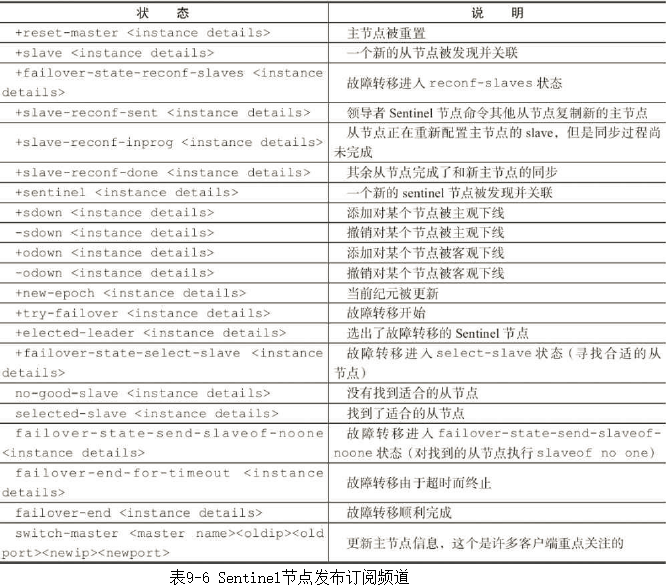
- <instance details>格式如下:
- <instance-type> <name> <ip> <port> @ <master-name> <master-ip> <master-port>
5、sentinel-2节点日志
- (1)主观下线
//对6379节点作了主观下线(+sdown)。
62785:X 23 Aug 2022 09:56:21.600 # +sdown master mymaster 127.0.0.1 6379
//Sentinel节点更新自己的配置纪元(new-epoch)
62785:X 23 Aug 2022 09:56:21.673 # +new-epoch 1
- (2)客观下线
//投票给sentinel-1节点
62785:X 23 Aug 2022 09:56:21.678 # +vote-for-leader 6a26c013d4386f1bc63ffb56a7298fcf86394439 1
//达到了客观下线的条件
62785:X 23 Aug 2022 09:56:21.688 # +odown master mymaster 127.0.0.1 6379 #quorum 3/2
- (3)更新状态:从sentinel-1节点(领导者)得知:故障转移后6380节点变为主节点,并发现了两个从节点6381和6379,并在30秒后对(09:56:52.894)6379节点做了主观下线
62785:X 23 Aug 2022 09:56:21.688 # Next failover delay: I will not start a failover before Tue Aug 23 10:02:22 2022
62785:X 23 Aug 2022 09:56:22.844 # +config-update-from sentinel 6a26c013d4386f1bc63ffb56a7298fcf86394439 127.0.0.1 26379 @ mymaster 127.0.0.1 6379
62785:X 23 Aug 2022 09:56:22.844 # +switch-master mymaster 127.0.0.1 6379 127.0.0.1 6380
62785:X 23 Aug 2022 09:56:22.844 * +slave slave 127.0.0.1:6381 127.0.0.1 6381 @ mymaster 127.0.0.1 6380
62785:X 23 Aug 2022 09:56:22.844 * +slave slave 127.0.0.1:6379 127.0.0.1 6379 @ mymaster 127.0.0.1 6380
62785:X 23 Aug 2022 09:56:52.894 # +sdown slave 127.0.0.1:6379 127.0.0.1 6379 @ mymaster 127.0.0.1 6380
6、sentinel-3节点日志
- 整个过程和sentinel-2节点是一样的,这里就不占用篇幅分析了。
62801:X 23 Aug 2022 09:56:21.534 # +sdown master mymaster 127.0.0.1 6379
62801:X 23 Aug 2022 09:56:21.674 # +new-epoch 1
62801:X 23 Aug 2022 09:56:21.677 # +vote-for-leader 6a26c013d4386f1bc63ffb56a7298fcf86394439 1
//达到了客观下线的条件
62801:X 23 Aug 2022 09:56:22.662 # +odown master mymaster 127.0.0.1 6379 #quorum 3/2
- 表9-5展示了3个Sentinel节点完成客观下线的时间点,从时间点可以看到sentinel-1节点最先完成客观下线。

5、原主节点后续处理
- 10:00:18,重新启动原来的6379节点
1、6379节点
- 启动后接到Sentinel节点的命令,让它去复制6380节点
62655:S 23 Aug 2022 10:00:38.723 * The server is now ready to accept connections on port 6379
62655:S 23 Aug 2022 10:00:38.835 * SLAVE OF 127.0.0.1:6380 enabled (user request from 'id=2 addr=127.0.0.1:51187 fd=6 name=sentinel-94dde2f5-cmd age=10 idle=0 flags=x db=0 sub=0 psub=0 multi=3 qbuf=0 qbuf-free=32768 obl=36 oll=0 omem=0 events=rw cmd=exec')
62655:S 23 Aug 2022 10:00:38.849 # CONFIG REWRITE executed with success.
...
2、6380节点
- 接到6379节点的复制请求,做复制的相应处理
62649:M 23 Aug 2022 10:00:38.813 * Replica 127.0.0.1:6379 asks for synchronization
62649:M 23 Aug 2022 10:00:38.813 * Full resync requested by replica 127.0.0.1:6379
...
62649:M 23 Aug 2022 10:00:38.911 * Synchronization with replica 127.0.0.1:6379 succeeded
3、sentinel-1节点日志
- 撤销对6379节点主观下线的决定
62778:X 23 Aug 2022 10:00:19.837 # -sdown slave 127.0.0.1:6379 127.0.0.1 6379 @ mymaster 127.0.0.1 6380
4、sentinel-2节点日志
- 撤销对6379节点主观下线的决定
62785:X 23 Aug 2022 10:00:19.243 # -sdown slave 127.0.0.1:6379 127.0.0.1 6379 @ mymaster 127.0.0.1 6380
5、sentinel-3节点日志
- 撤销对6379节点主观下线的决定
62801:X 23 Aug 2022 10:00:19.214 # -sdown slave 127.0.0.1:6379 127.0.0.1 6379 @ mymaster 127.0.0.1 6380
6、注意点
- 部署各个节点的机器时间尽量要同步,否则日志的时序性会混乱,例如可以给机器添加NTP服务来同步时间。
6.2、节点运维
6.2.1、节点下线
- 节点下线有两种:临时下线和永久下线。
- 临时下线:暂时将节点关掉,之后还会重新启动,继续提供服务。
- 永久下线:将节点关掉后不再使用,需要做一些清理工作,如删除配置文件、持久化文件、日志文件。
- 通常来看,无论是主节点、从节点还是Sentinel节点,下线原因无外乎以下几种:
- 节点所在的机器出现了不稳定或者即将过保被回收。
- 节点所在的机器性能比较差或者内存比较小,无法支撑应用方的需求。
- 节点自身出现服务不正常情况,需要快速处理。
1、主节点
- 如果需要对主节点进行下线,比较合理的做法是选出一个“合适”(例如性能更高的机器)的从节点,使用sentinel failover功能将从节点晋升主节点,可以在任意一个可用的Sentinel节点上执行如下操作。
sentinel failover <master_name>
- 运维提示
- Redis Sentinel存在多个从节点时,如果想将指定从节点晋升为主节点,可以将其他从节点的slave-priority配置为0,但是需要注意failover后,将slave-priority调回原值。
2、从节点和Sentinel节点
- 如果需要对从节点或者Sentinel节点进行下线,只需要确定好是临时还是永久下线后执行相应操作即可。
- 如果使用了读写分离,下线从节点需要保证应用方可以感知从节点的下线变化,从而把读取请求路由到其他节点。
- 需要注意的是,Sentinel节点依然会对这些下线节点进行定期监控,这是由Redis Sentinel的设计思路所决定的。
6.2.2、节点上线
1、添加从节点
- 添加从节点的场景大致有如下几种:
- 使用了读写分离,但现有的从节点无法支撑应用方的流量。
- 主节点没有可用的从节点,无法支持故障转移。
- 添加一个更强悍的从节点利用手动failover替换主节点。
- 添加方法:添加slaveof {masterIp} {masterPort}的配置,使用redis-server启动即可,它将被Sentinel节点自动发现。
2、添加Sentinel节点
- 添加Sentinel节点的场景可以分为以下几种:
- 当前Sentinel节点数量不够,无法达到Redis Sentinel健壮性要求或者无法达到票数。
- 原Sentinel节点所在机器需要下线。
- 添加方法:添加sentinel monitor主节点的配置,使用redis-sentinel启动即可,它将被其余Sentinel节点自动发现。
3、添加主节点
- 因为Redis Sentinel中只能有一个主节点,所以不需要添加主节点,如果需要替换主节点,可以使用Sentinel failover手动故障转移。
6.2.3、节点配置
- 配置Sentinel节点时要注意的地方有:
- Sentinel节点配置尽可能一致,这样在判断节点故障时会更加准确。
- Sentinel节点支持的命令非常有限,例如config命令是不支持的,而Sentinel节点也需要dir、loglevel之类的配置,所以尽量在一开始规划好,不过所幸Sentinel节点不存储数据,如果需要修改配置,重新启动即可。
- 运维提示
- Sentinel节点只支持如下命令:ping、sentinel、subscribe、unsubscribe、psubscribe、punsubscribe、publish、info、role、client、shutdown。
- 在实际运维中,故障的发生通常比较突然并且瞬息万变,影响的范围也很难预估,所以建议运维人员将上述场景提前做好预案,当事故发生时,可以用脚本或者可视化工具快速处理故障。
6.3、高可用读写分离
1、从节点的作用
- 从节点一般可以起到两个作用:
- 第一,当主节点出现故障时,作为主节点的后备“顶”上来实现故障转移,Redis Sentinel已经实现了该功能的自动化,实现了真正的高可用。
- 第二,扩展主节点的读能力,尤其是在读多写少的场景非常适用,通常的模型如图9-36所示。
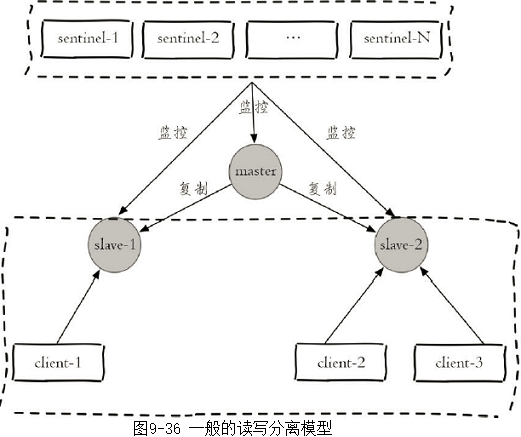
- 但上述模型中,从节点不是高可用的,如果slave-1节点出现故障,首先客户端client-1将与其失联,其次Sentinel节点只会对该节点做主观下线,因为Redis Sentinel的故障转移是针对主节点的。所以很多时候,Redis Sentinel中的从节点仅仅是作为主节点一个热备,不让它参与客户端的读操作,就是为了保证整体高可用性,但实际上这种使用方法还是有一些浪费,尤其是在有很多从节点或者确实需要读写分离的场景,所以如何实现从节点的高可用是非常有必要的。
2、Redis Sentinel读写分离设计思路
- Redis Sentinel在对各个节点的监控中,如果有对应事件的发生,都会发出相应的事件消息(见表9-6),其中和从节点变动的事件有以下几个:
- +switch-master:切换主节点(原来的从节点晋升为主节点),说明减少了某个从节点。
- +convert-to-slave:切换从节点(原来的主节点降级为从节点),说明添加了某个从节点。
- +sdown:主观下线,说明可能某个从节点可能不可用(因为对从节点不会做客观下线),所以在实现客户端时可以采用自身策略来实现类似主观下线的功能。
- +reboot:重新启动了某个节点,如果它的角色是slave,那么说明添加了某个从节点。
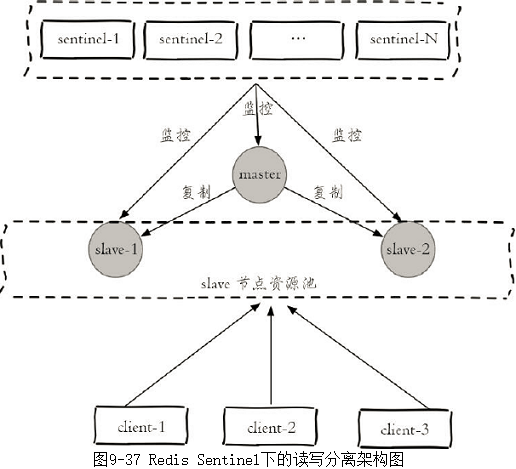
- 所以在设计Redis Sentinel的从节点高可用时,只要能够实时掌握所有从节点的状态,把所有从节点看做一个资源池(如图9-37所示),无论是上线还是下线从节点,客户端都能及时感知到(将其从资源池中添加或者删除),这样从节点的高可用目标就达到了。
7、本章重点回顾
- Redis Sentinel是Redis的高可用实现方案:故障发现、故障自动转移、配置中心、客户端通知。
- Redis Sentinel从Redis2.8版本开始才正式生产可用,之前版本生产不可用。
- 尽可能在不同物理机上部署Redis Sentinel所有节点。
- Redis Sentinel中的Sentinel节点个数应该为大于等于3且最好为奇数。
- Redis Sentinel中的数据节点与普通数据节点没有区别。
- 客户端初始化时连接的是Sentinel节点集合,不再是具体的Redis节点,但Sentinel只是配置中心不是代理。
- Redis Sentinel通过三个定时任务实现了Sentinel节点对于主节点、从节点、其余Sentinel节点的监控。
- Redis Sentinel在对节点做失败判定时分为主观下线和客观下线。
- 看懂Redis Sentinel故障转移日志对于Redis Sentnel以及问题排查非常有帮助。
- Redis Sentinel实现读写分离高可用可以依赖Sentinel节点的消息通知,获取Redis数据节点的状态变化。
# #

 浙公网安备 33010602011771号