


ASP.NET Core Razor Pages 教程七 添加Email
添加 Email
在上一节中,您向Bakery网站添加了一个表单,以便从客户处收集信息。 现在,您将处理该表单的内容以生成电子邮件。
在添加电子邮件代码之前,请通过添加以下内容来关闭 OrderSuccess.cshtml 页面:
<div class="message order-success">
    <h2>Thank you for your order!</h2>
    <p>We are processing your order and have sent a confirmation email. Thank you for your business and enjoy!</p>
</div>
Email in .NET
在 .NET 中发送电子邮件非常简单。 基本电子邮件所需的代码不多。 您需要做的就是在 Order.cshtml.cs 的顶部添加一个 using 指令:
using System.Net.Mail;
然后将以下突出显示的代码添加到同一个文件中的 OnPostAsync 方法中:
public async Task<IActionResult> OnPostAsync()
{
    Product = await db.Products.FindAsync(Id);
    if(ModelState.IsValid){

        var body = $@"<p>Thank you, we have received your order for {OrderQuantity} unit(s) of {Product.Name}!</p>
        <p>Your address is: <br/>{OrderShipping.Replace("\n", "<br/>")}</p>
        Your total is ${Product.Price * OrderQuantity}.<br/>
        We will contact you if we have questions about your order.  Thanks!<br/>";

        using(var smtp = new SmtpClient())
        {
            smtp.DeliveryMethod = SmtpDeliveryMethod.SpecifiedPickupDirectory;
            smtp.PickupDirectoryLocation = @"c:\mailpickup";
            var message = new MailMessage();
            message.To.Add(OrderEmail);
            message.Subject = "Fourth Coffee - New Order";
            message.Body = body;
            message.IsBodyHtml = true;
            message.From = new MailAddress("sales@fourthcoffee.com");
            await smtp.SendMailAsync(message);
        }

        return RedirectToPage("OrderSuccess");
    }
    return Page();
}
This code uses the SpecifiedPickupDirectory option for the delivery method, ensuring that the resulting email is created in a local folder. That way, it's easy to test that everything worked by simply looking in the specified folder. Feel free to alter the location to somewhere that suits your environment.
此代码使用 SpecifiedPickupDirectory 选项进行传递方法,确保在本地文件夹中创建生成的电子邮件。 这样,只需查看指定的文件夹就可以轻松测试一切是否正常。 您可以随意将位置更改为适合您环境的地方。
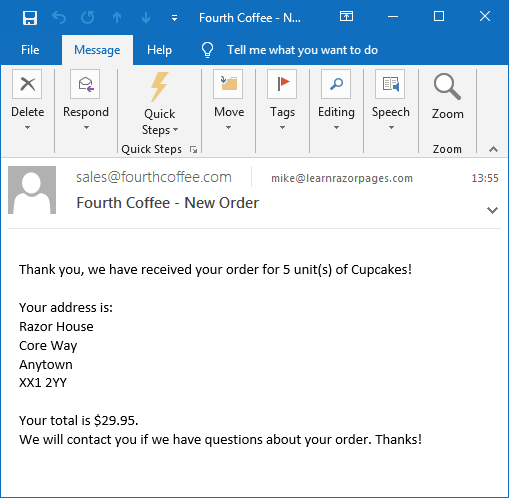
Now run the application and select a product. Then enter valid values into the form and process the order. You should find an eml file in the specified folder, containing the generated message:
现在运行应用程序并选择一个产品。 然后在表单中输入有效值并处理订单。 您应该在指定的文件夹中找到一个包含生成的消息的 eml 文件:
电子邮件选项
此版本实际上并未在任何地方发送电子邮件。 但是,您可以通过 Gmail 或 Outlook/Hotmail/Live 或任何其他允许您连接到其邮件服务器的服务提供商来测试发送电子邮件。 以下是 Gmail 和 Microsoft 的电子邮件服务的标准配置设置,它们几乎相同:
| Gmail | Outlook/Live | |
|---|---|---|
| Host | smtp.gmail.com | smtp-mail.outlook.com |
| Port | 587 | 587 |
| EnableSsl | true | true |
| User Name | Your email address | Your email address |
| Password | Your account password | Your account password |
如果您没有使用本文介绍的任何一种服务,那么您应该检查提供者的文档以获得正确的值。您也可以将电子邮件发送到端口 465,但是您的站点必须在 HTTPS 下运行才能正常工作,在这样做时不应该将 EnableSsl 设置为 true。
下一个代码块显示如何修改上面的例子以使用 Gmail:
using(var smtp = new SmtpClient())
{
    var credential = new NetworkCredential
    {
        UserName = "example@gmail.com",  // replace with valid value
        Password = "password"  // replace with valid value
    };
    smtp.Credentials = credential;
    smtp.Host = "smtp.gmail.com";
    smtp.Port = 587;
    smtp.EnableSsl = true;
    message.To.Add(OrderEmail);
    message.Subject = "Fourth Coffee - New Order";
    message.Body = body;
    message.IsBodyHtml = true;
    message.From = new MailAddress("example@gmail.com");
    await smtp.SendMailAsync(message);
}
请注意,Gmail 等电子邮件服务提供商通常不允许您从与您正在使用的帐户关联的地址以外的地址发送电子邮件。
摘要
现在您已达到这一点,ASP.NET Web Pages Bakery 模板中的端口已完成。 Razor Pages 版本可以 在Github 上找到,但事情并不止于此。 计划进一步的部分将涵盖更多的 Razor Pages 功能。 完成后,下一节将查看脚手架 CRUD 页面,以便您可以向数据库添加更多产品,并修改现有产品。


 浙公网安备 33010602011771号