
Jenkins环境变量与构建工具、触发pipeline执行、多分支构建
Jenkins内置变量
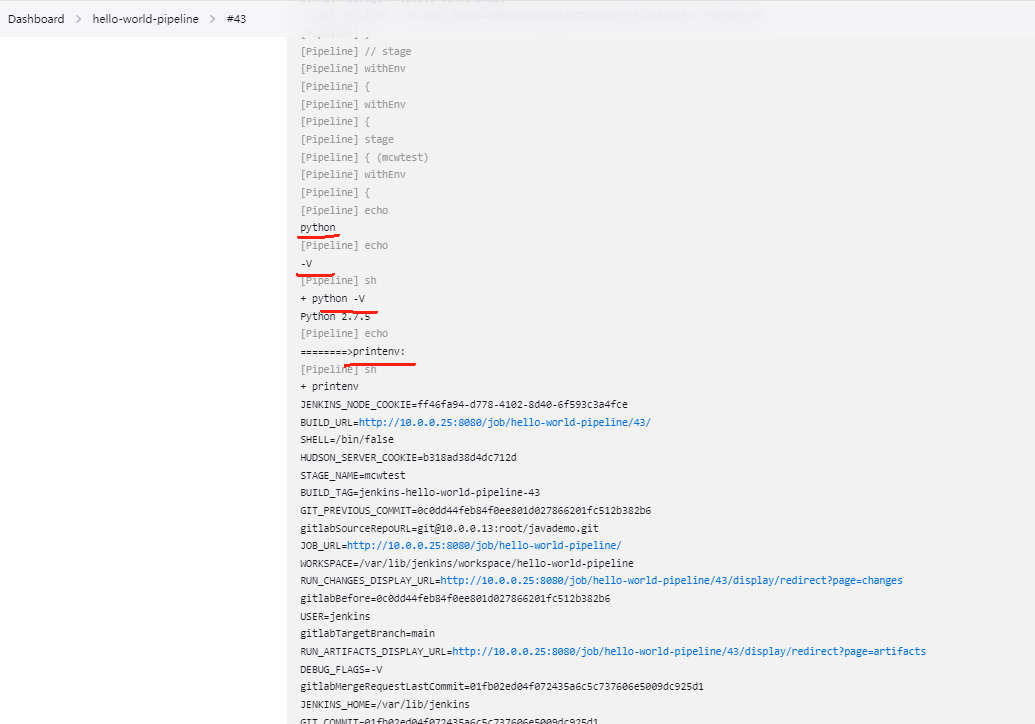
pipeline {
    agent any
    stages {
        stage ('mcwtest') {
            steps {
                echo "Running ${env.BUILD_NUMBER} on ${env.JENKINS_URL}" // 方法一
                echo "Running $env.BUILD_NUMBER on $env.JENKINS_URL" // 方法二
                echo "Running ${BUILD_NUMBER} on ${JENKINS_URL}" // 方法三
                echo "========>printenv:"
                sh "printenv"
            }
        }
    }
}
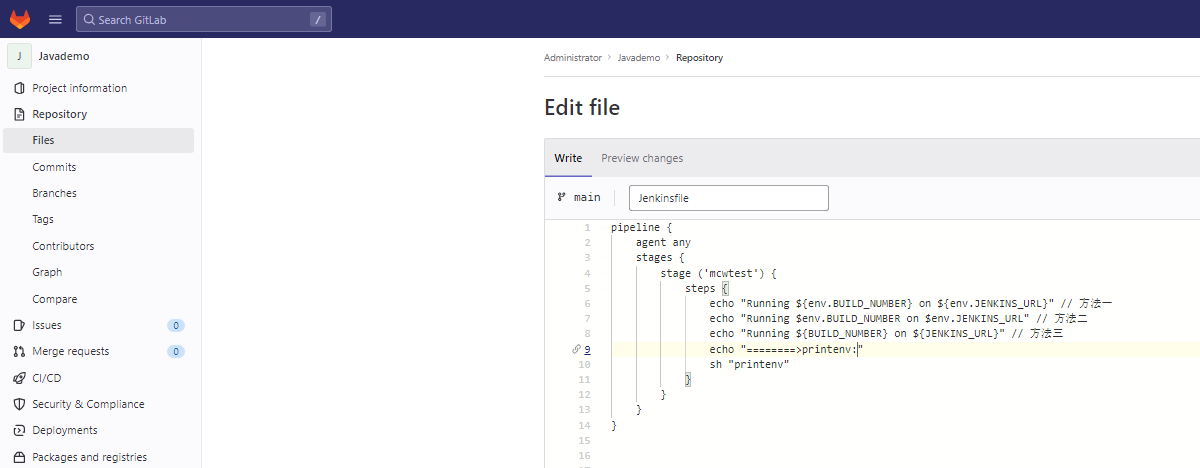
可以看到三种方式都获取到了内置变量

我们看下打印的所有内置变量
Started by GitLab push by Administrator
Obtained Jenkinsfile from git http://10.0.0.13/root/javademo.git
[Pipeline] Start of Pipeline
[Pipeline] node
Running on Jenkins in /var/lib/jenkins/workspace/hello-world-pipeline
[Pipeline] {
[Pipeline] stage
[Pipeline] { (Declarative: Checkout SCM)
[Pipeline] checkout
The recommended git tool is: NONE
using credential 104b2169-f64c-4c0d-a1d0-22e43914f73e
 > git rev-parse --resolve-git-dir /var/lib/jenkins/workspace/hello-world-pipeline/.git # timeout=10
Fetching changes from the remote Git repository
 > git config remote.origin.url http://10.0.0.13/root/javademo.git # timeout=10
Fetching upstream changes from http://10.0.0.13/root/javademo.git
 > git --version # timeout=10
 > git --version # 'git version 1.8.3.1'
using GIT_ASKPASS to set credentials
 > git fetch --tags --progress http://10.0.0.13/root/javademo.git +refs/heads/*:refs/remotes/origin/* # timeout=10
skipping resolution of commit remotes/origin/main, since it originates from another repository
 > git rev-parse refs/remotes/origin/main^{commit} # timeout=10
Checking out Revision eacde33e2e2ca4b80ed81d6f2fef9736f46cbdf0 (refs/remotes/origin/main)
 > git config core.sparsecheckout # timeout=10
 > git checkout -f eacde33e2e2ca4b80ed81d6f2fef9736f46cbdf0 # timeout=10
Commit message: "Update Jenkinsfile"
 > git rev-list --no-walk 277bb380ff8b4ab792f3234ad8c432ff9306ddaa # timeout=10
[Pipeline] }
[Pipeline] // stage
[Pipeline] withEnv
[Pipeline] {
[Pipeline] stage
[Pipeline] { (mcwtest)
[Pipeline] echo
Running 41 on http://10.0.0.25:8080/
[Pipeline] echo
Running 41 on http://10.0.0.25:8080/
[Pipeline] echo
Running 41 on http://10.0.0.25:8080/
[Pipeline] echo
========>printenv:
[Pipeline] sh
+ printenv
JENKINS_NODE_COOKIE=a34f85be-8e93-4dec-b86d-aaf97f8c3e4f
BUILD_URL=http://10.0.0.25:8080/job/hello-world-pipeline/41/
SHELL=/bin/false
HUDSON_SERVER_COOKIE=b318ad38d4dc712d
STAGE_NAME=mcwtest
BUILD_TAG=jenkins-hello-world-pipeline-41
GIT_PREVIOUS_COMMIT=277bb380ff8b4ab792f3234ad8c432ff9306ddaa
gitlabSourceRepoURL=git@10.0.0.13:root/javademo.git
JOB_URL=http://10.0.0.25:8080/job/hello-world-pipeline/
WORKSPACE=/var/lib/jenkins/workspace/hello-world-pipeline
RUN_CHANGES_DISPLAY_URL=http://10.0.0.25:8080/job/hello-world-pipeline/41/display/redirect?page=changes
gitlabBefore=277bb380ff8b4ab792f3234ad8c432ff9306ddaa
USER=jenkins
gitlabTargetBranch=main
RUN_ARTIFACTS_DISPLAY_URL=http://10.0.0.25:8080/job/hello-world-pipeline/41/display/redirect?page=artifacts
gitlabMergeRequestLastCommit=eacde33e2e2ca4b80ed81d6f2fef9736f46cbdf0
JENKINS_HOME=/var/lib/jenkins
GIT_COMMIT=eacde33e2e2ca4b80ed81d6f2fef9736f46cbdf0
PATH=/usr/local/sbin:/usr/local/bin:/usr/sbin:/usr/bin
RUN_DISPLAY_URL=http://10.0.0.25:8080/job/hello-world-pipeline/41/display/redirect
_=/usr/bin/printenv
PWD=/var/lib/jenkins/workspace/hello-world-pipeline
gitlabSourceNamespace=Administrator
HUDSON_URL=http://10.0.0.25:8080/
LANG=en_US.UTF-8
gitlabSourceRepoHttpUrl=http://10.0.0.13/root/javademo.git
gitlabAfter=eacde33e2e2ca4b80ed81d6f2fef9736f46cbdf0
JOB_NAME=hello-world-pipeline
gitlabUserName=Administrator
gitlabSourceRepoName=Javademo
BUILD_DISPLAY_NAME=#41
gitlabActionType=PUSH
JENKINS_URL=http://10.0.0.25:8080/
BUILD_ID=41
NOTIFY_SOCKET=/run/systemd/notify
GIT_PREVIOUS_SUCCESSFUL_COMMIT=277bb380ff8b4ab792f3234ad8c432ff9306ddaa
JOB_BASE_NAME=hello-world-pipeline
RUN_TESTS_DISPLAY_URL=http://10.0.0.25:8080/job/hello-world-pipeline/41/display/redirect?page=tests
gitlabUserUsername=root
SHLVL=2
HOME=/var/lib/jenkins
gitlabSourceBranch=main
gitlabSourceRepoHomepage=http://10.0.0.13/root/javademo
GIT_BRANCH=origin/main
CI=true
WORKSPACE_TMP=/var/lib/jenkins/workspace/hello-world-pipeline@tmp
EXECUTOR_NUMBER=1
JENKINS_SERVER_COOKIE=durable-ac58e08ad80c9815284465d058cecee77a7bcc018cc857b2be762f1e77af8f73
NODE_LABELS=built-in
GIT_URL=http://10.0.0.13/root/javademo.git
LOGNAME=jenkins
HUDSON_HOME=/var/lib/jenkins
NODE_NAME=built-in
JOB_DISPLAY_URL=http://10.0.0.25:8080/job/hello-world-pipeline/display/redirect
BUILD_NUMBER=41
HUDSON_COOKIE=5e1354a6-51ee-4ec5-a9d4-6afeca268b6c
gitlabBranch=main
gitlabSourceRepoSshUrl=git@10.0.0.13:root/javademo.git
[Pipeline] }
[Pipeline] // stage
[Pipeline] }
[Pipeline] // withEnv
[Pipeline] }
[Pipeline] // node
[Pipeline] End of Pipeline
Finished: SUCCESS
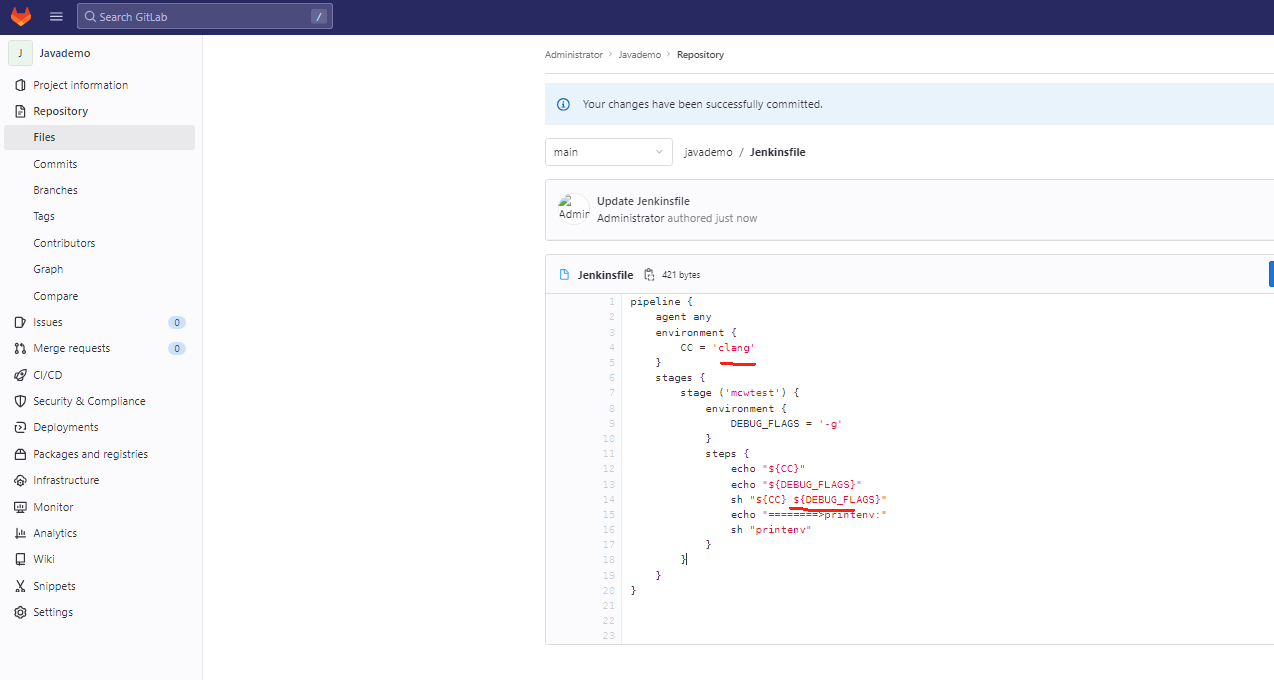
自定义pipeline环境变量
日常
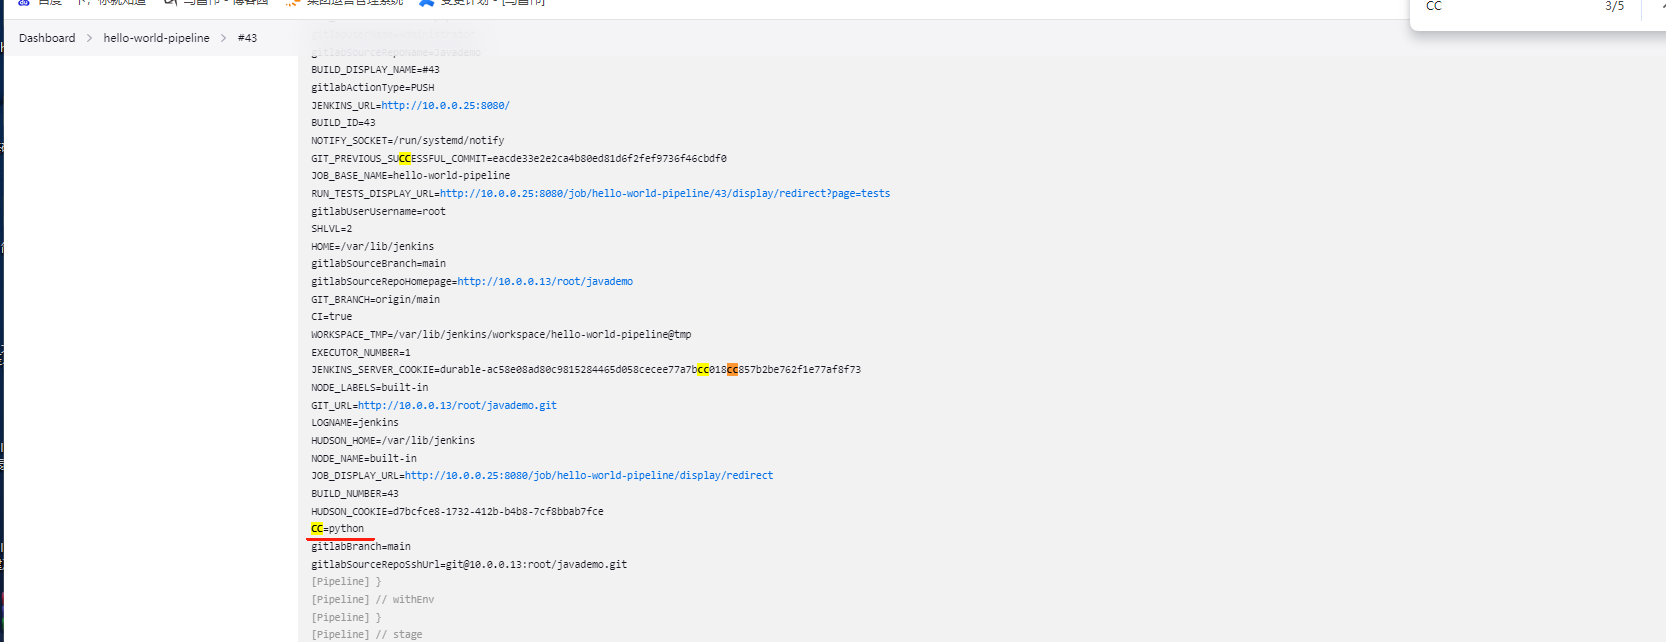
pipeline {
    agent any
    environment {
        CC = 'python'
    }
    stages {
        stage ('mcwtest') {
            environment {
                DEBUG_FLAGS = '-V'
            }
            steps {
                echo "${CC}"
                echo "${DEBUG_FLAGS}"
                sh "${CC} ${DEBUG_FLAGS}"
                echo "========>printenv:"
                sh "printenv"
            }
        }
    }
}
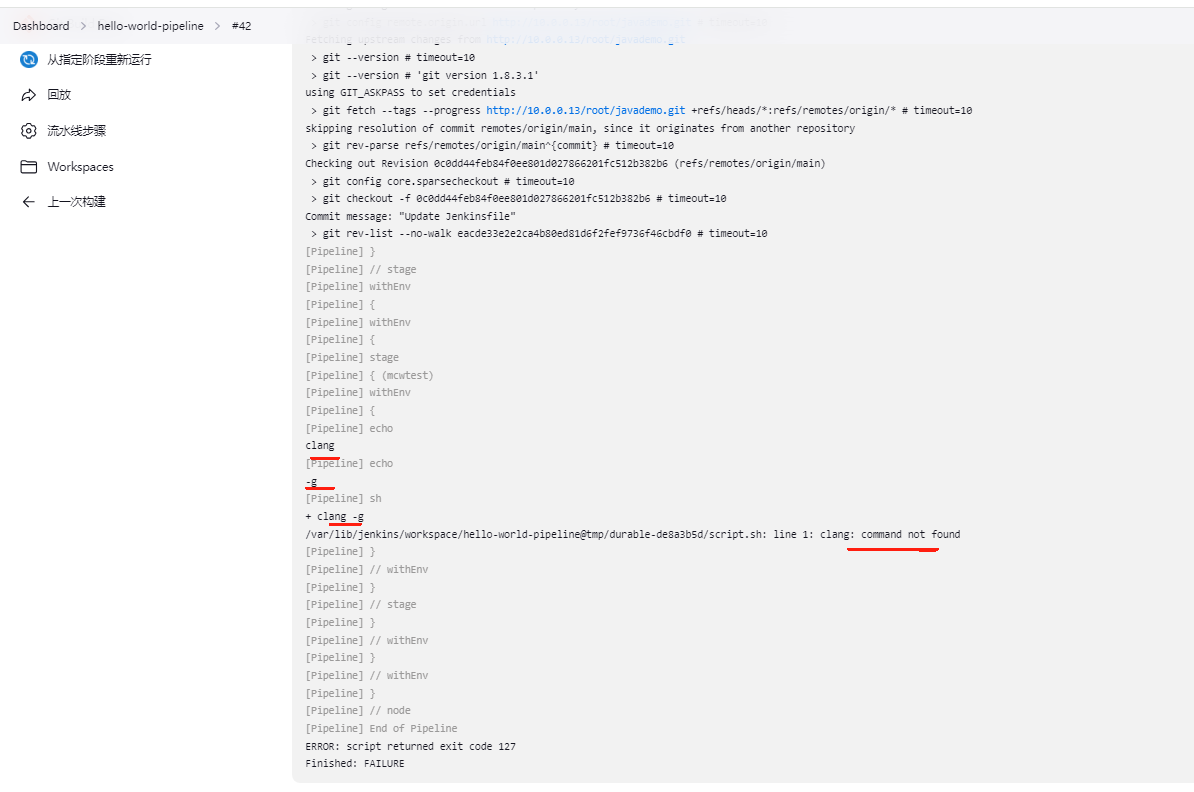
没有clang命令,所以执行失败,pipeline失败了,后面的打印环境变量也没执行
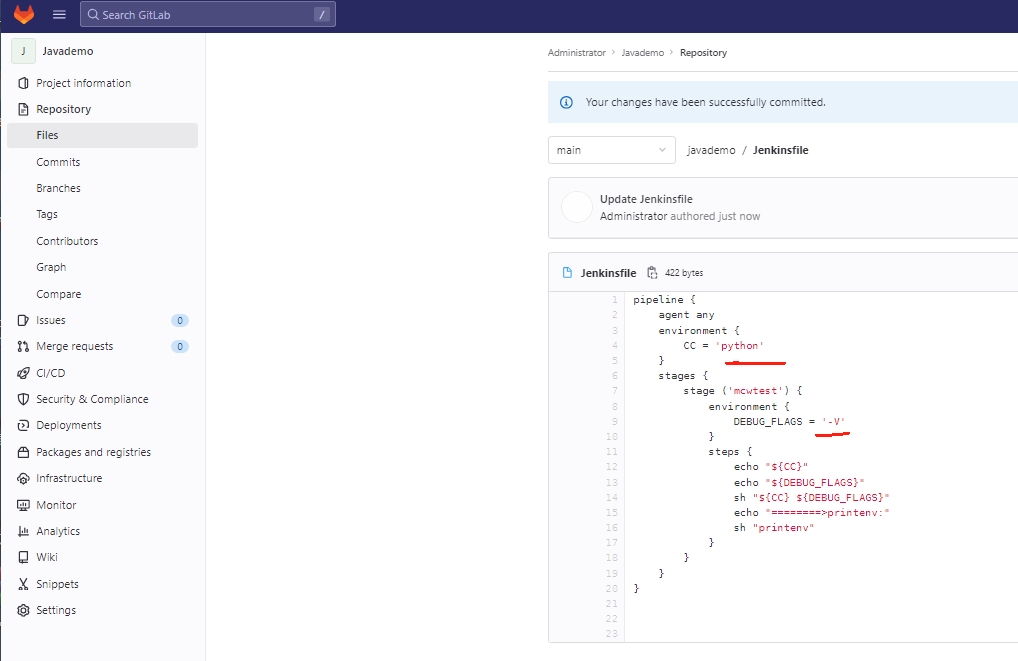
比如修改为python -V
都往下执行了
查看自定义的环境变量

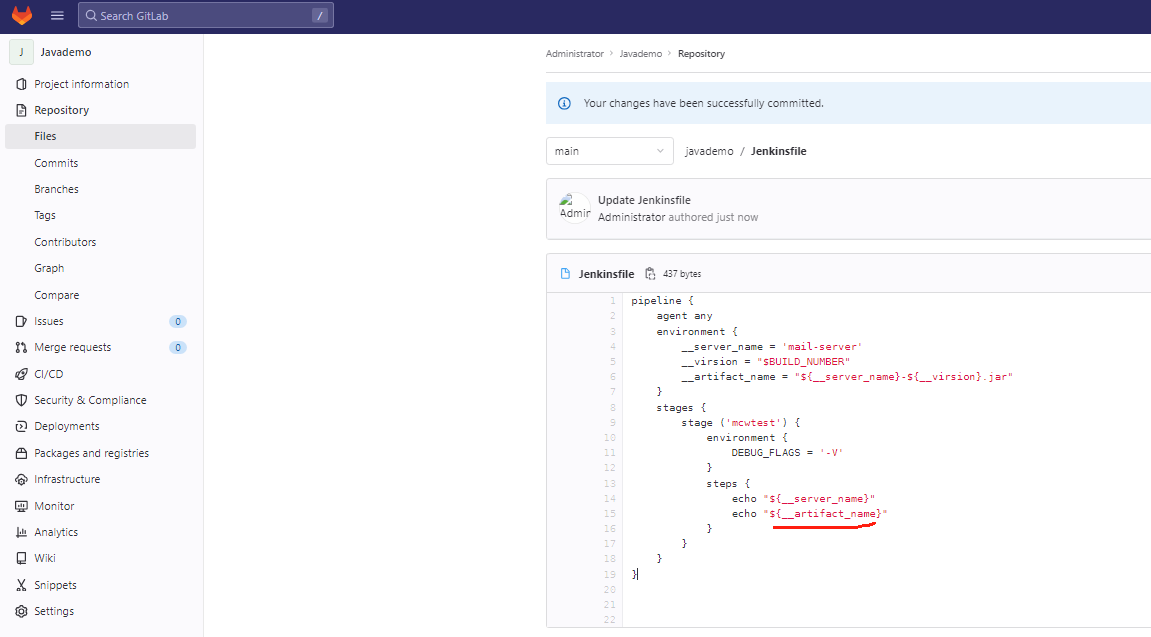
一个环境变量引用另一个环境变量
pipeline {
    agent any
    environment {
        __server_name = 'mail-server'
        __virsion = "$BUILD_NUMBER"
        __artifact_name = "${__server_name}-${__virsion}.jar"
    }
    stages {
        stage ('mcwtest') {
            environment {
                DEBUG_FLAGS = '-V'
            }
            steps {
                echo "${__server_name}"
                echo "${__artifact_name}"
            }
        }
    }
}

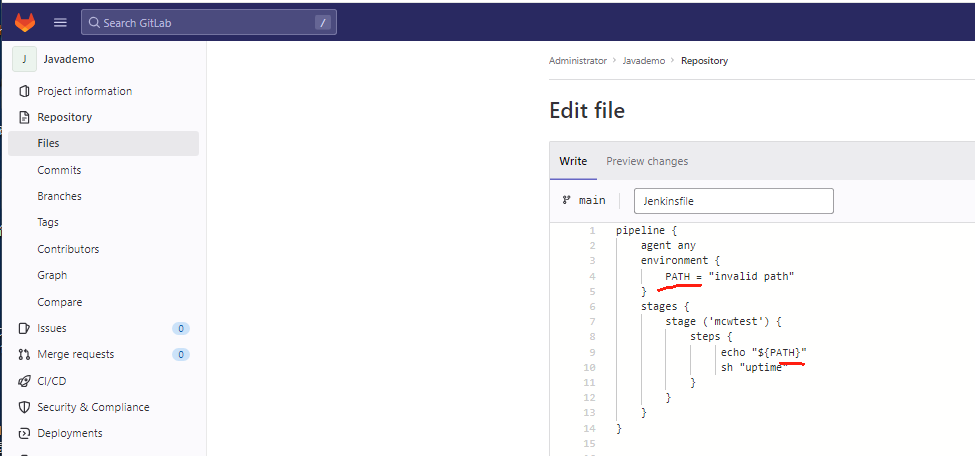
environment中定义的变量与env中变量重名时
为避免命名冲突,可以在变量前加__下划线
正常情况下,是有这个内置变量的
我们自定义将它覆盖
报错
加下划线不覆盖Jenkins内置变量
还是报错,是我们缺少步骤了
添加上步骤

自定义的覆盖内置变量
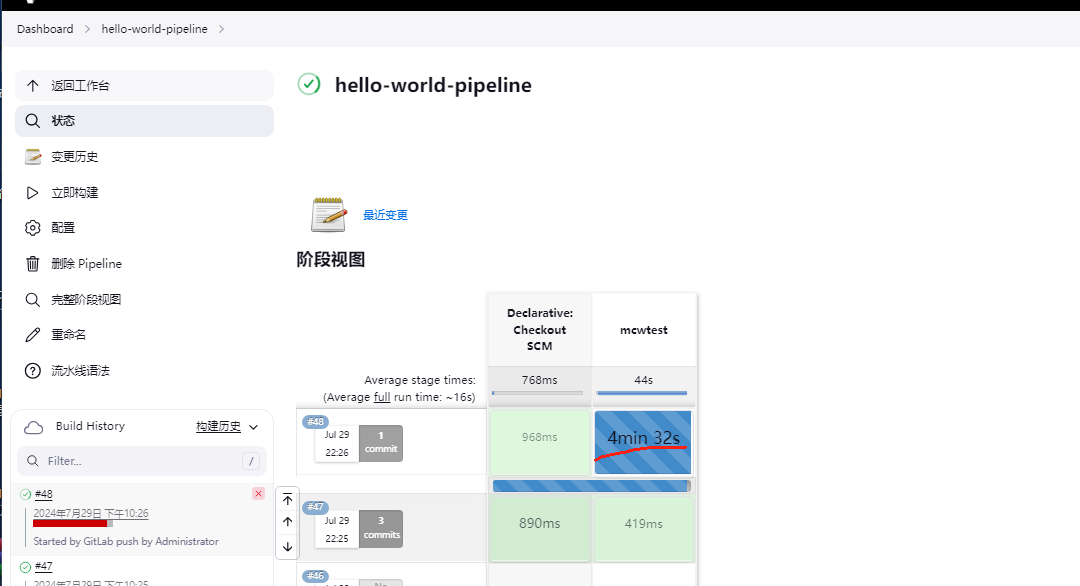
下面再执行shell命令,直接卡住了
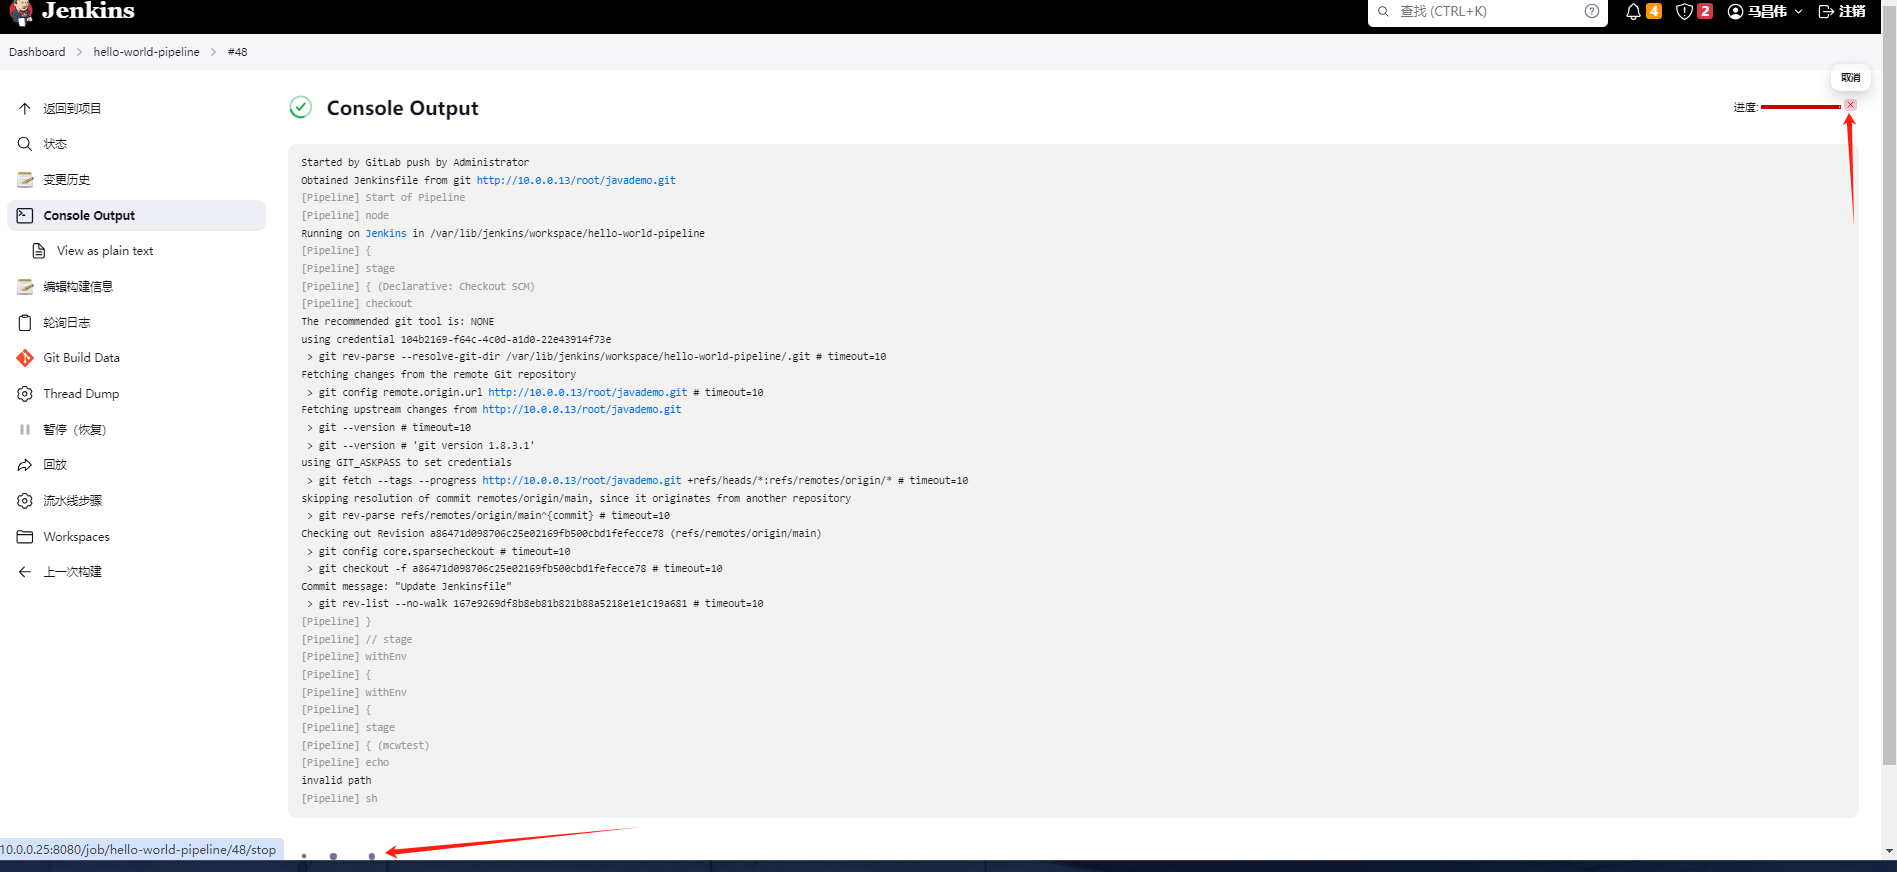
卡了四分多钟
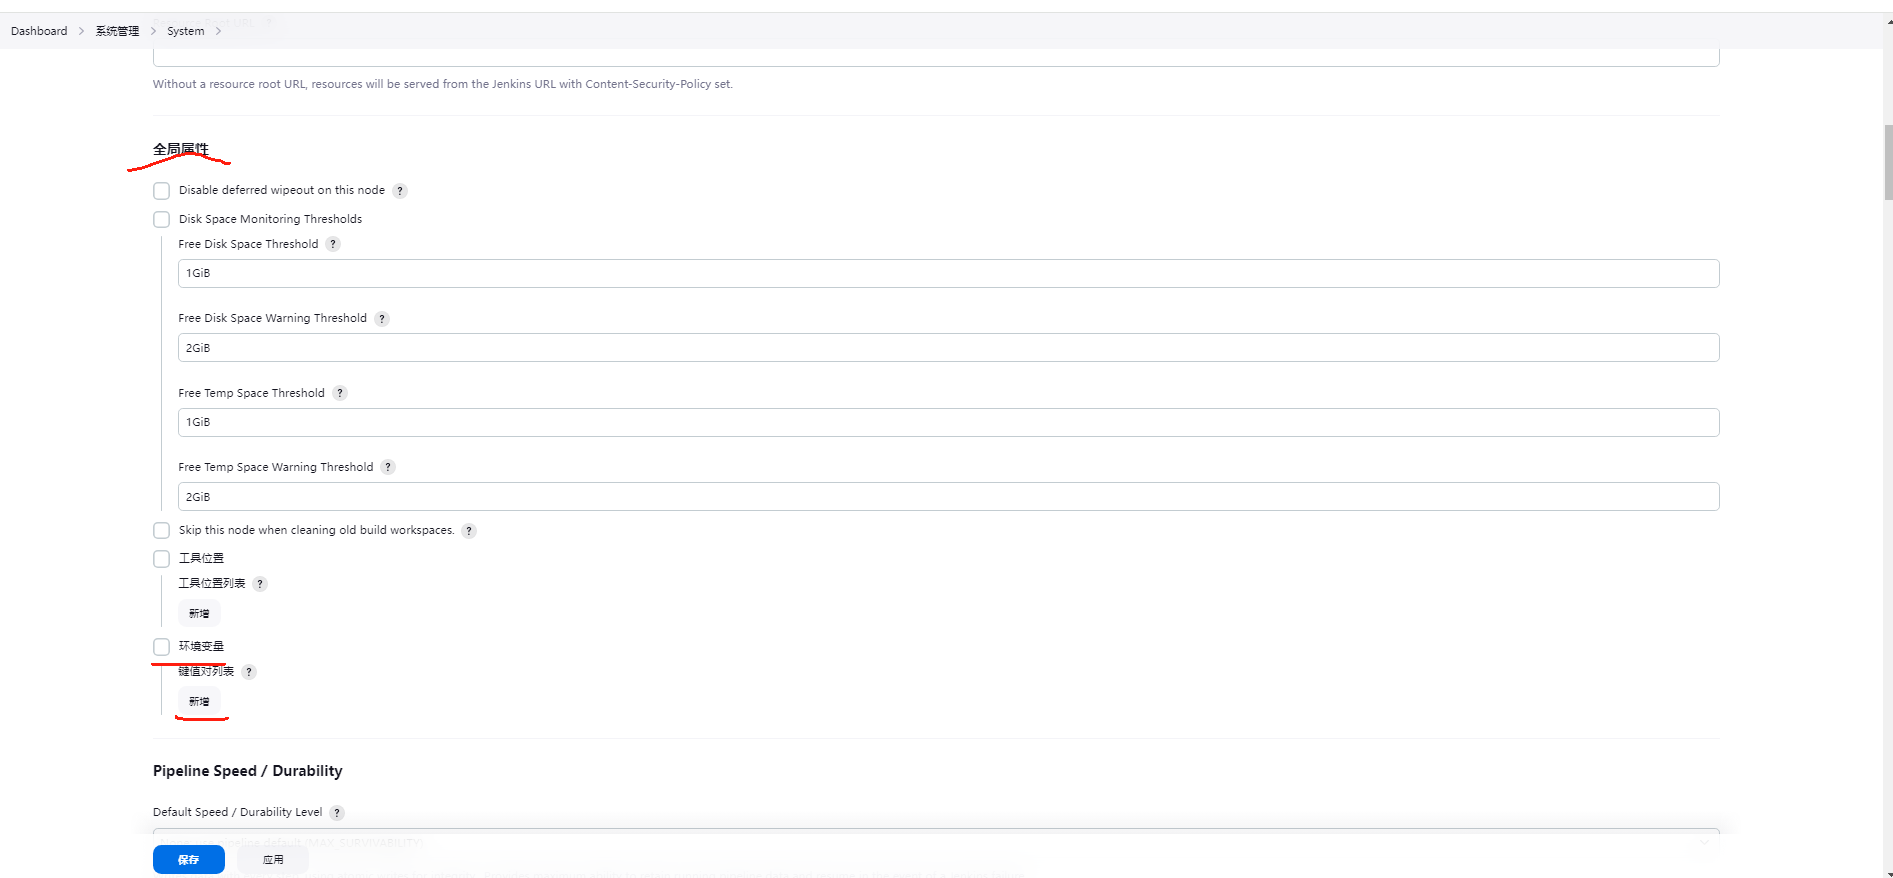
自定义全局环境变量
系统设置里,添加全局环境变量
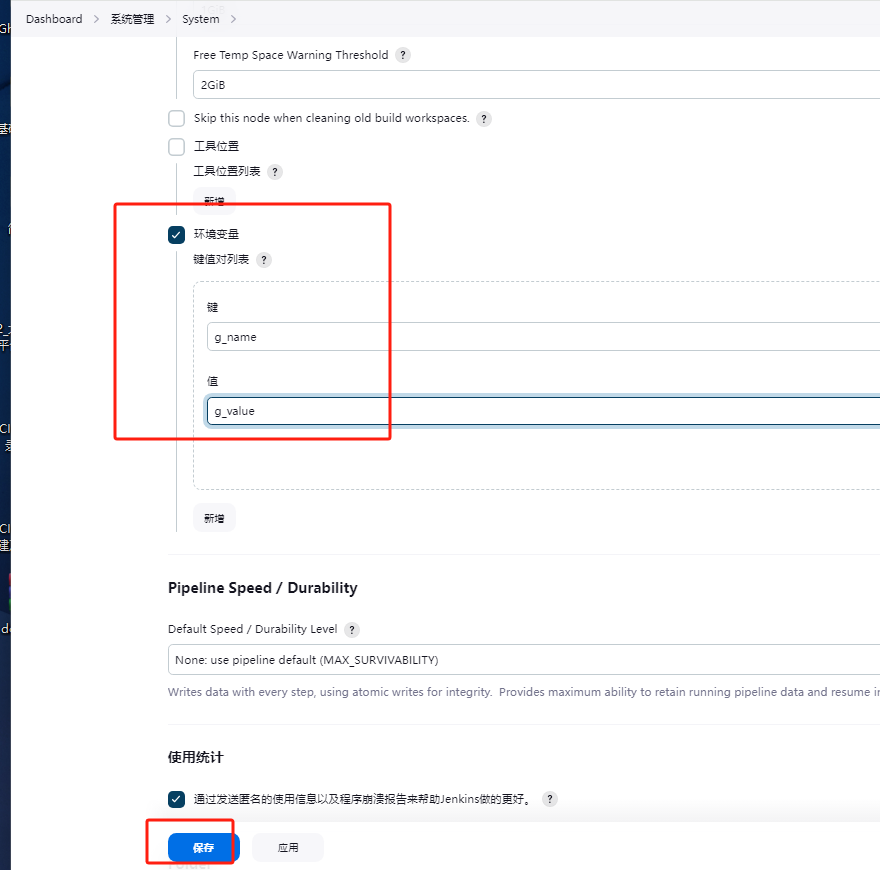
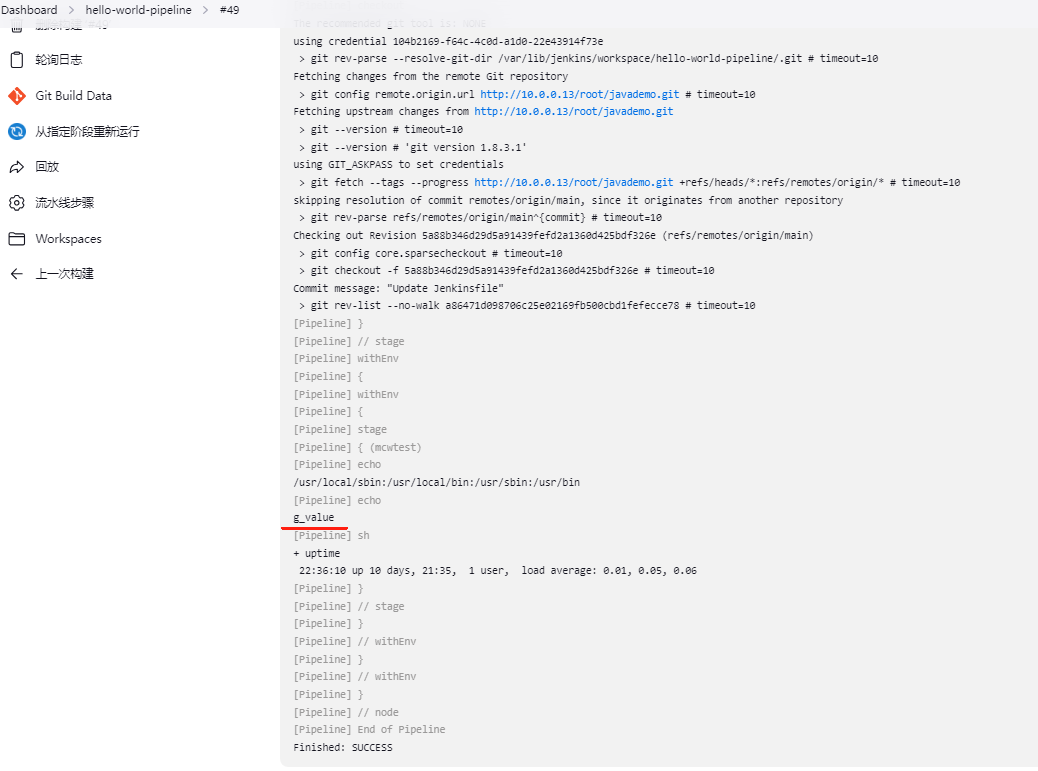
打印定义的全局环境变量

成功获取到它的值
构建工具
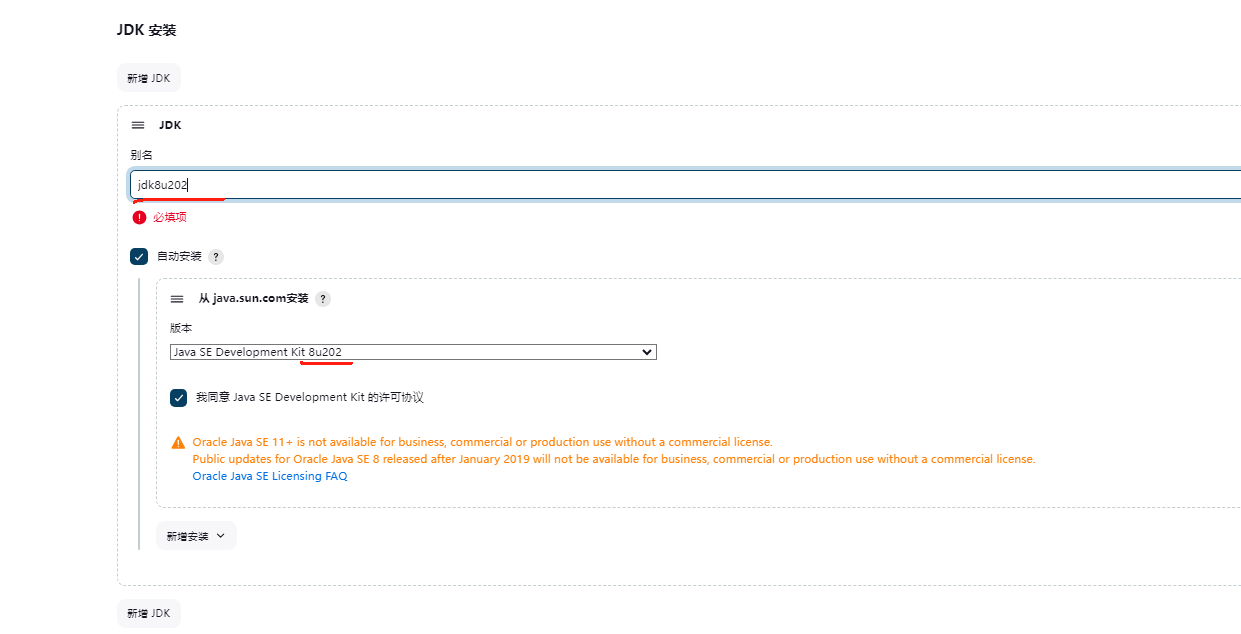
jdk环境安装
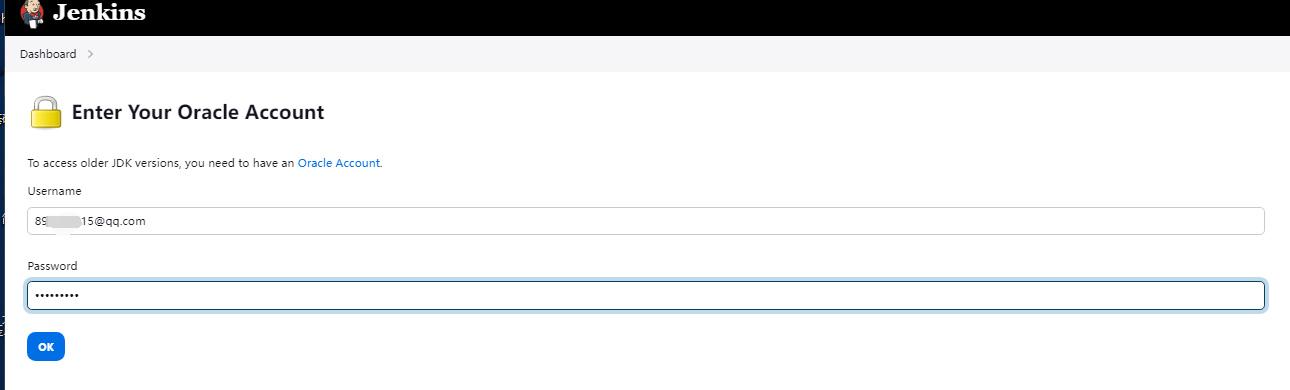
全局工具安装,需要输入Oracle账号密码


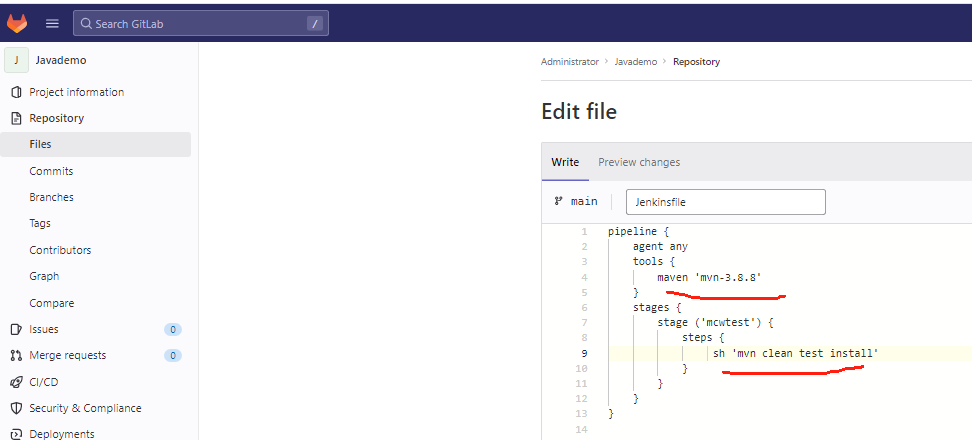
maven

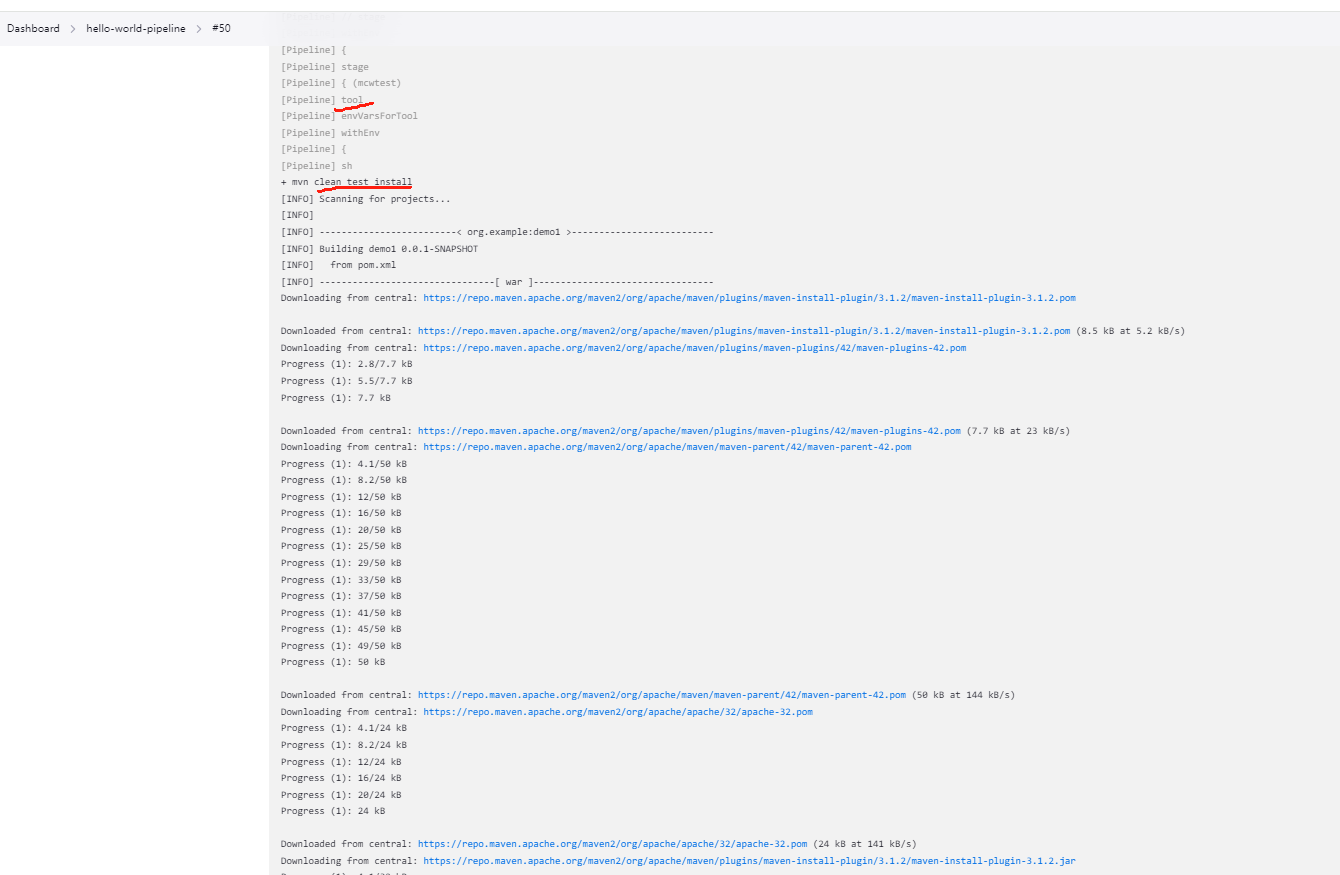
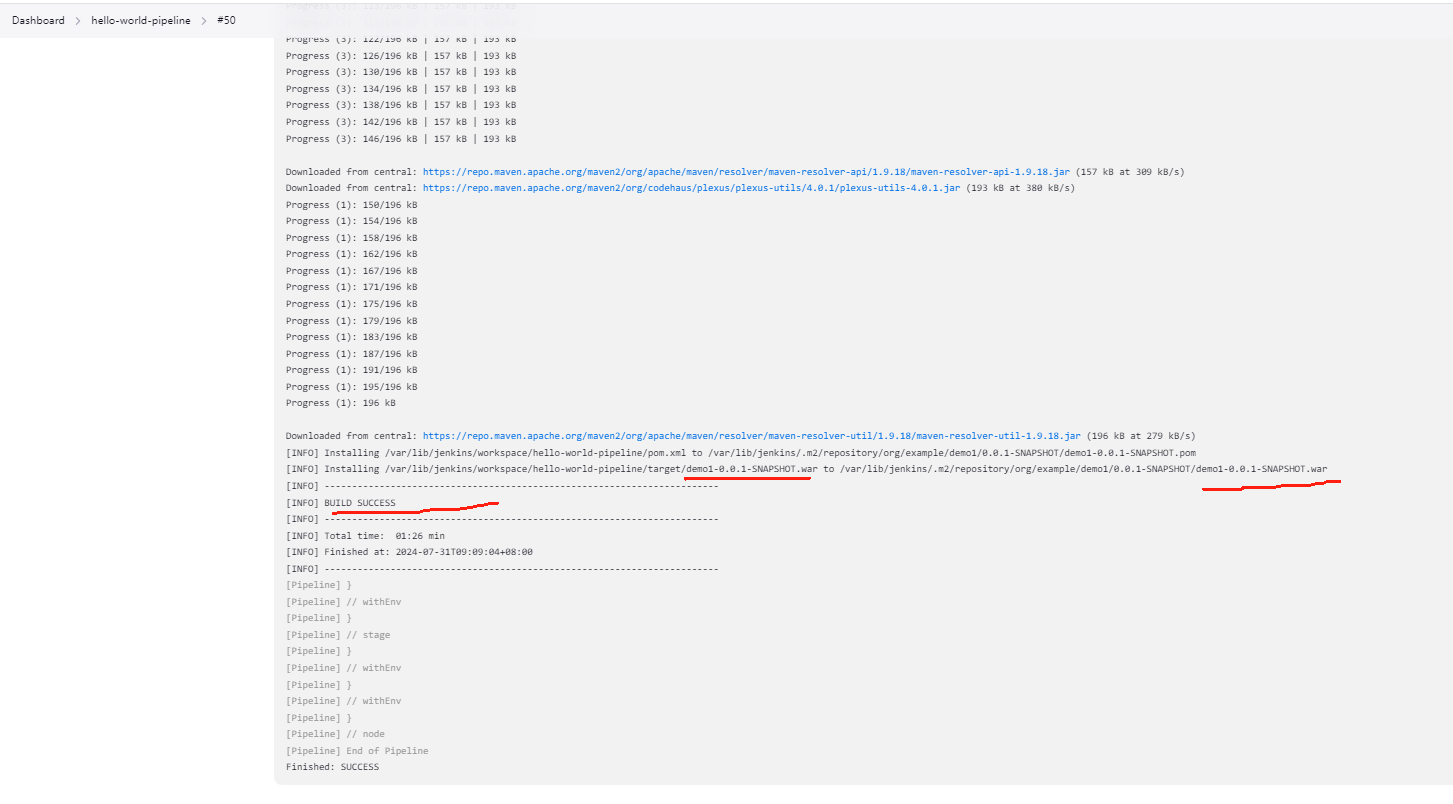
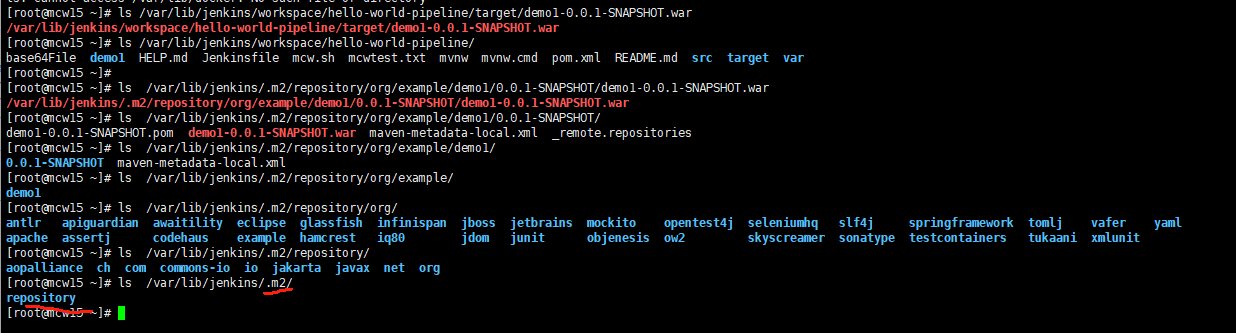
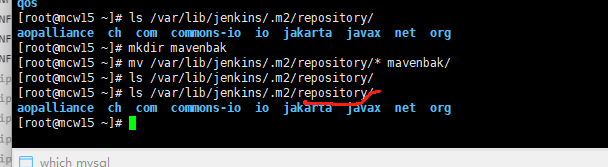
配置的maven,默认有个本地仓库,在里面存了一份
/var/lib/jenkins/.m2/repository/org/example/demo1/0.0.1-SNAPSHOT/demo1-0.0.1-SNAPSHOT.war
如下,安装了工具之后,可以在Jenkins家目录下的tool找到这个工具名字的目录,作为工具的安装目录
[root@mcw15 ~]# ls  /var/lib/jenkins/.m2/
repository
[root@mcw15 ~]# ls  /var/lib/jenkins/
%C                                                                          jenkins.model.JenkinsLocationConfiguration.xml
caches                                                                      jenkins.mvn.GlobalMavenConfig.xml
com.cloudbees.hudson.plugins.folder.config.AbstractFolderConfiguration.xml  jenkins.plugins.nodejs.tools.NodeJSInstallation.xml
com.dabsquared.gitlabjenkins.connection.GitLabConnectionConfig.xml          jenkins.security.ResourceDomainConfiguration.xml
com.dabsquared.gitlabjenkins.GitLabPushTrigger.xml                          jenkins.tasks.filters.EnvVarsFilterGlobalConfiguration.xml
config.xml                                                                  jenkins.telemetry.Correlator.xml
credentials.xml                                                             jobs
de.jamba.hudson.plugin.wsclean.CommonConfig.xml                             logs
fingerprints                                                                net.uaznia.lukanus.hudson.plugins.gitparameter.GitParameterDefinition.xml
github-plugin-configuration.xml                                             nodeMonitors.xml
hudson.model.UpdateCenter.xml                                               nodes
hudson.plugins.build_timeout.global.GlobalTimeOutConfiguration.xml          org.jenkinsci.plugins.gitclient.JGitApacheTool.xml
hudson.plugins.build_timeout.operations.BuildStepOperation.xml              org.jenkinsci.plugins.gitclient.JGitTool.xml
hudson.plugins.emailext.ExtendedEmailPublisher.xml                          org.jenkinsci.plugins.github_branch_source.GitHubConfiguration.xml
hudson.plugins.git.GitSCM.xml                                               org.jenkinsci.plugins.workflow.flow.FlowExecutionList.xml
hudson.plugins.git.GitTool.xml                                              org.jenkinsci.plugins.workflow.flow.GlobalDefaultFlowDurabilityLevel.xml
hudson.plugins.gradle.Gradle.xml                                            org.jenkinsci.plugins.workflow.libs.GlobalLibraries.xml
hudson.plugins.gradle.injection.InjectionConfig.xml                         org.jenkins.plugins.lockableresources.LockableResourcesManager.xml
hudson.plugins.timestamper.TimestamperConfig.xml                            plugins
hudson.tasks.Ant.xml                                                        queue.xml
hudson.tasks.Mailer.xml                                                     queue.xml.bak
hudson.tasks.Maven.xml                                                      scriptApproval.xml
hudson.tasks.Shell.xml                                                      scripts
hudson.tools.JDKInstaller.xml                                               secret.key
hudson.triggers.SCMTrigger.xml                                              secret.key.not-so-secret
identity.key.enc                                                            secrets
io.jenkins.plugins.junit.storage.JunitTestResultStorageConfiguration.xml    tools
jenkins.fingerprints.GlobalFingerprintConfiguration.xml                     updates
jenkins.install.InstallUtil.lastExecVersion                                 userContent
jenkins.install.UpgradeWizard.state                                         users
jenkins.model.ArtifactManagerConfiguration.xml                              workflow-libs
jenkins.model.GlobalBuildDiscarderConfiguration.xml                         workspace
[root@mcw15 ~]# ls  /var/lib/jenkins/tools/
hudson.tasks.Maven_MavenInstallation
[root@mcw15 ~]# ls  /var/lib/jenkins/tools/hudson.tasks.Maven_MavenInstallation/
mvn-3.8.8
[root@mcw15 ~]# ls  /var/lib/jenkins/tools/hudson.tasks.Maven_MavenInstallation/mvn-3.8.8/
bin  boot  conf  lib  LICENSE  NOTICE  README.txt
[root@mcw15 ~]# ls  /var/lib/jenkins/tools/hudson.tasks.Maven_MavenInstallation/mvn-3.8.8/bin/
m2.conf  mvn  mvn.cmd  mvnDebug  mvnDebug.cmd  mvnyjp
[root@mcw15 ~]# ls  /var/lib/jenkins/tools/hudson.tasks.Maven_MavenInstallation/mvn-3.8.8/conf/
logging  settings.xml  toolchains.xml
[root@mcw15 ~]# ls  /var/lib/jenkins/tools/hudson.tasks.Maven_MavenInstallation/mvn-3.8.8/conf/settings.xml
/var/lib/jenkins/tools/hudson.tasks.Maven_MavenInstallation/mvn-3.8.8/conf/settings.xml
[root@mcw15 ~]# less /var/lib/jenkins/tools/hudson.tasks.Maven_MavenInstallation/mvn-3.8.8/conf/settings.xml
[root@mcw15 ~]#
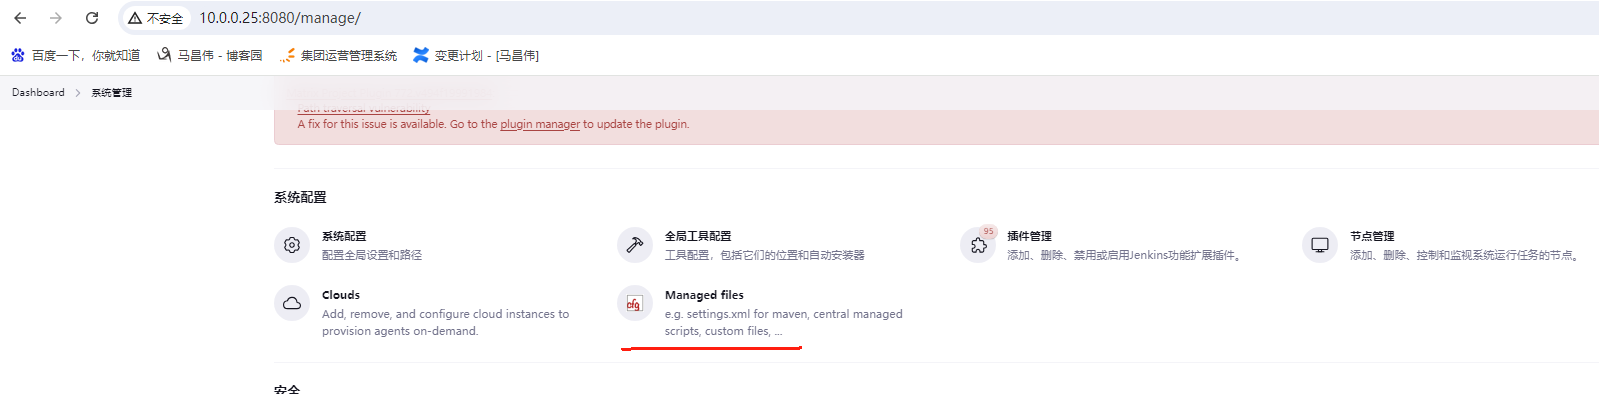
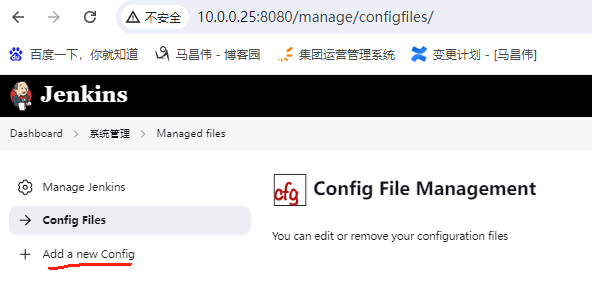
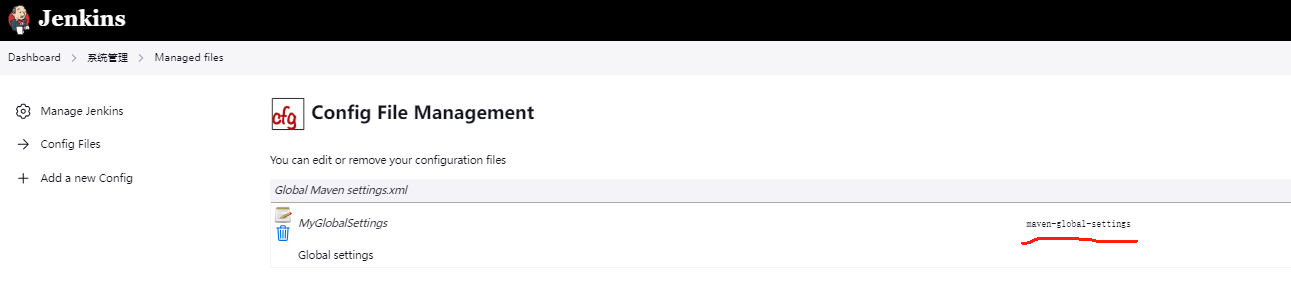
使用managed files设置maven
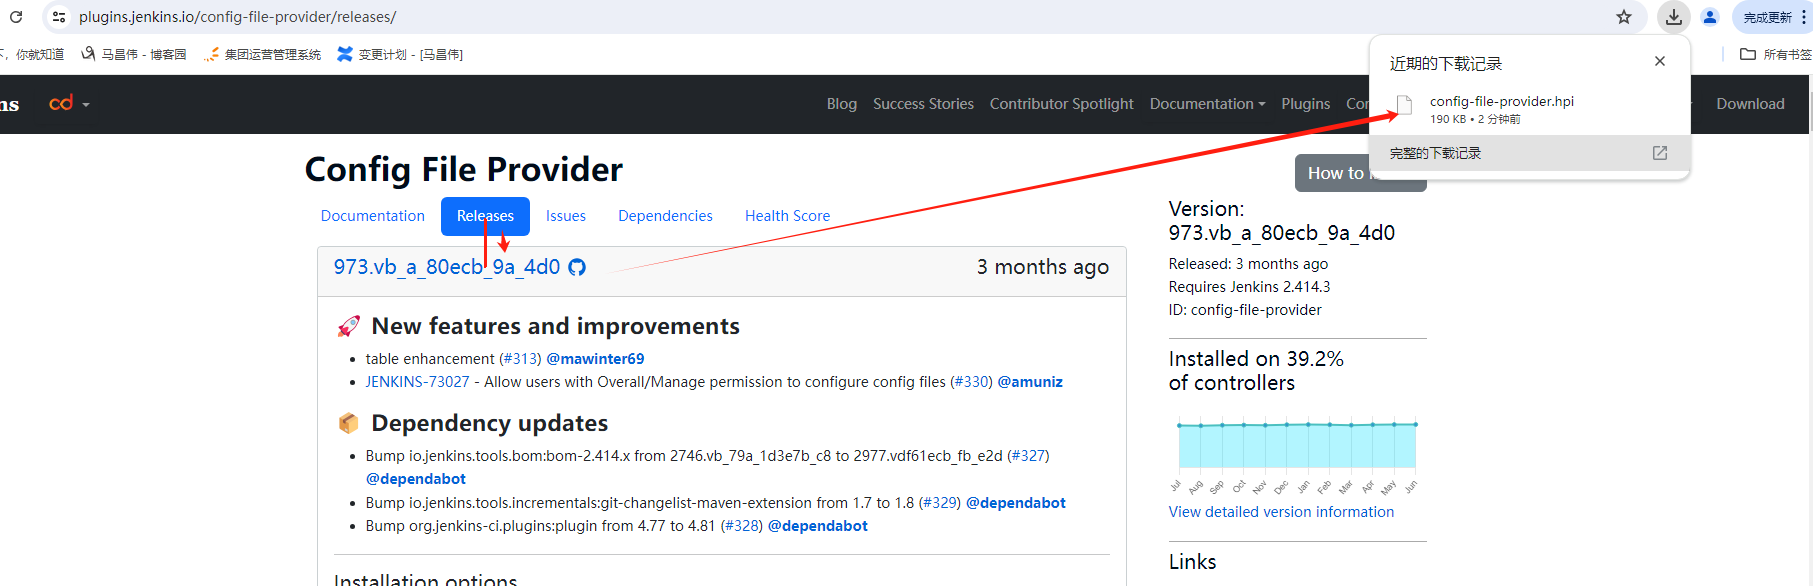
安装config file provider插件:https://plugins.jenkins.io/config-file-provider
下载
不过我们这里已经安装过插件了

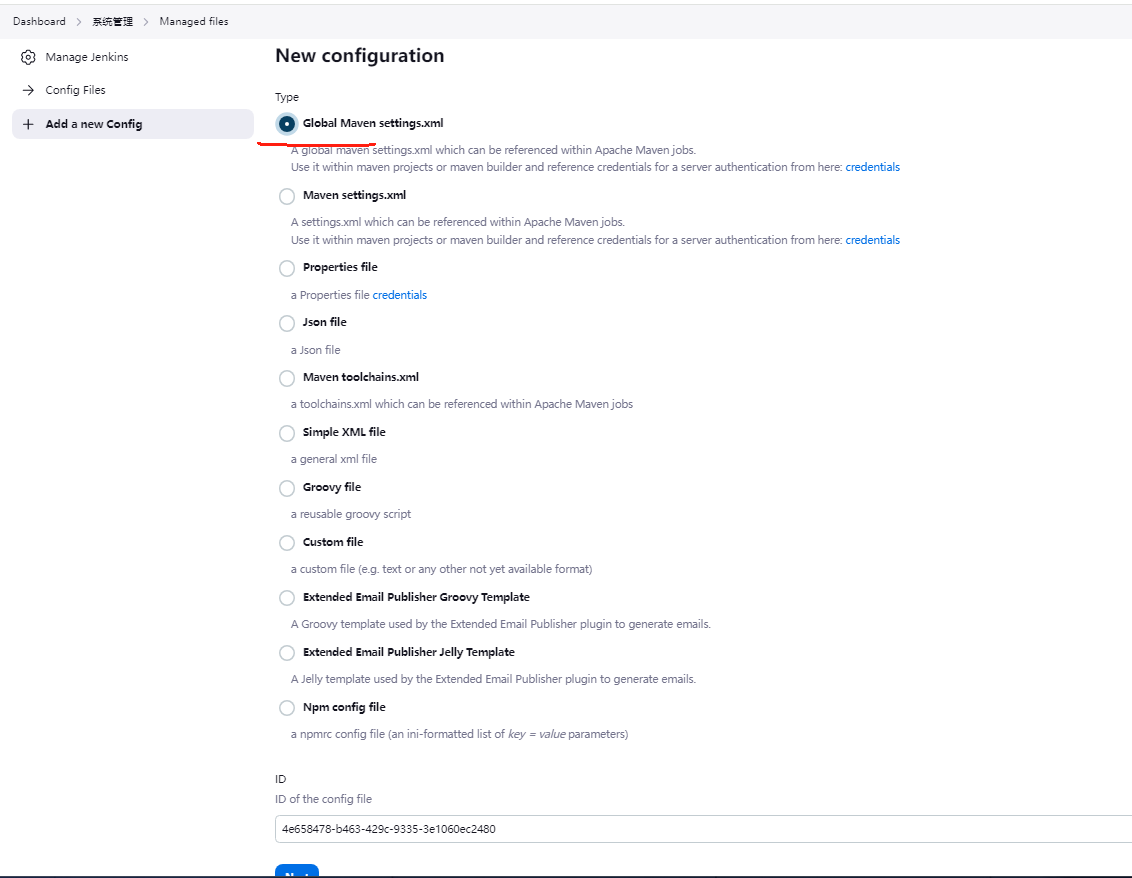
点击下一步之后,这里也可以修改下id值
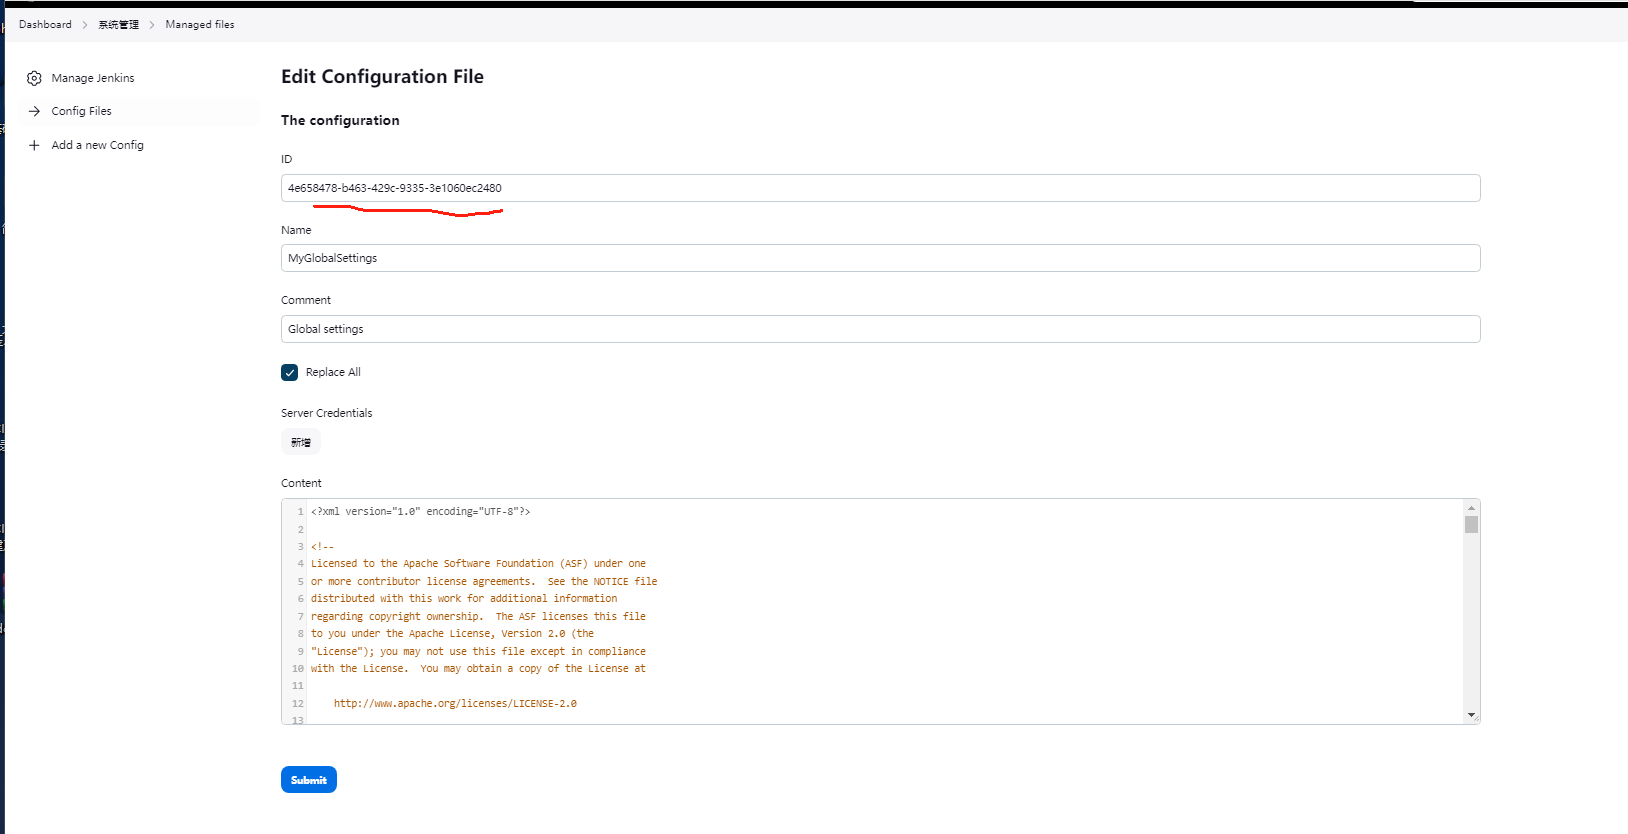
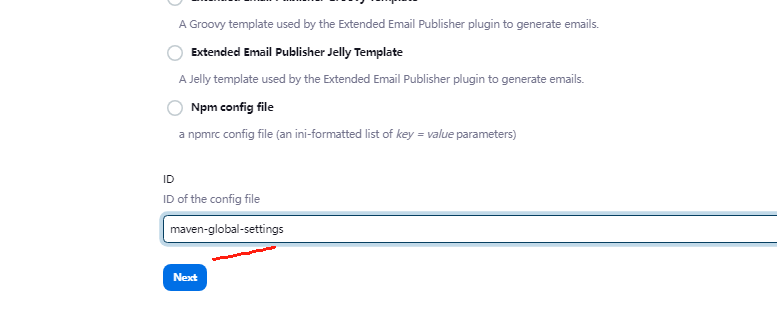
下一步之后,无法修改id了,重新新增,然后这里改下id
我这里直接修改下,而不是替换。新增国内仓库,参考:https://blog.csdn.net/qq_36577291/article/details/135299574
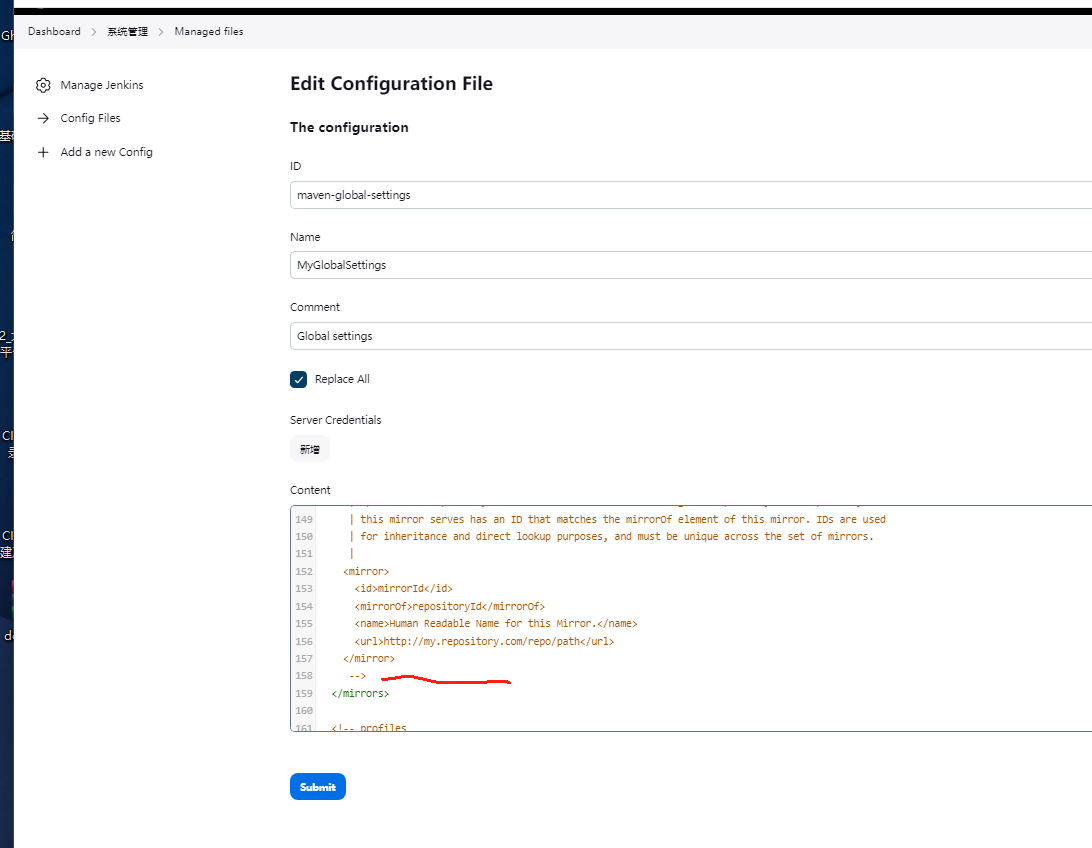
将下面的加入到上面配置
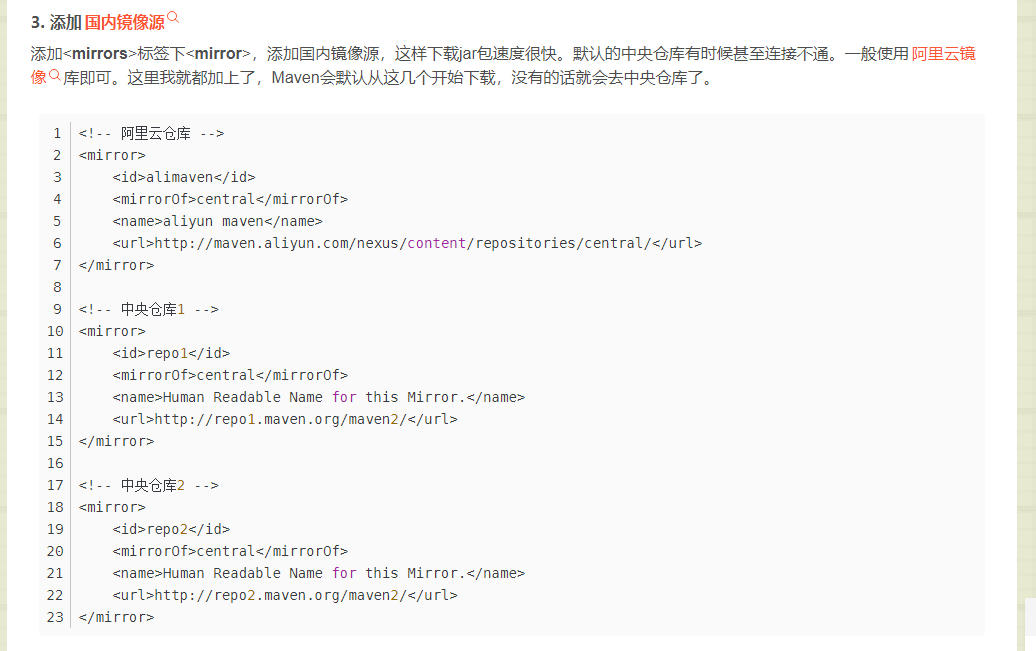
<!-- 阿里云仓库 -->
<mirror>
    <id>alimaven</id>
    <mirrorOf>central</mirrorOf>
    <name>aliyun maven</name>
    <url>http://maven.aliyun.com/nexus/content/repositories/central/</url>
</mirror>

<!-- 中央仓库1 -->
<mirror>
    <id>repo1</id>
    <mirrorOf>central</mirrorOf>
    <name>Human Readable Name for this Mirror.</name>
    <url>http://repo1.maven.org/maven2/</url>
</mirror>

<!-- 中央仓库2 -->
<mirror>
    <id>repo2</id>
    <mirrorOf>central</mirrorOf>
    <name>Human Readable Name for this Mirror.</name>
    <url>http://repo2.maven.org/maven2/</url>
</mirror>

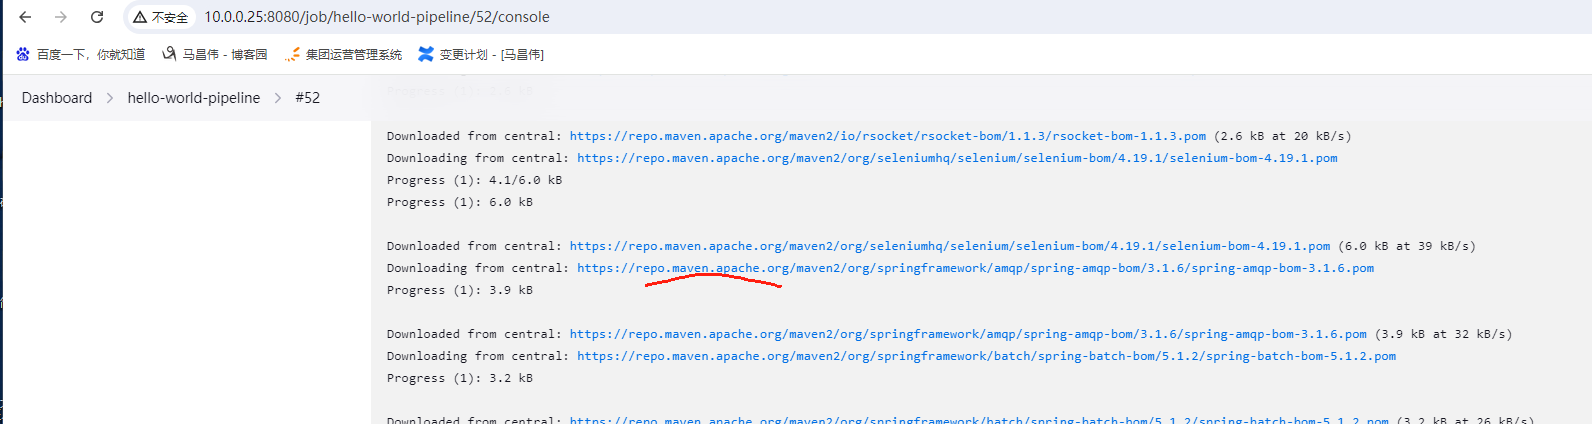
之前执行,是去官网下载的

现在重新执行一下试试,加个空格触发
好像因为本地有缓存,就没下载了,移走然后重新触发试试
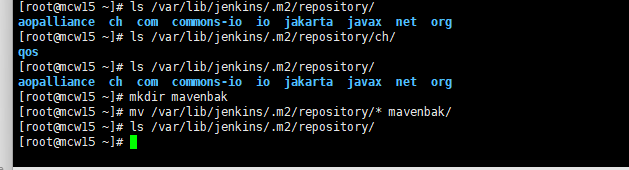
可以看的,还是去国外下载的
完成

查看,这些数据又有了
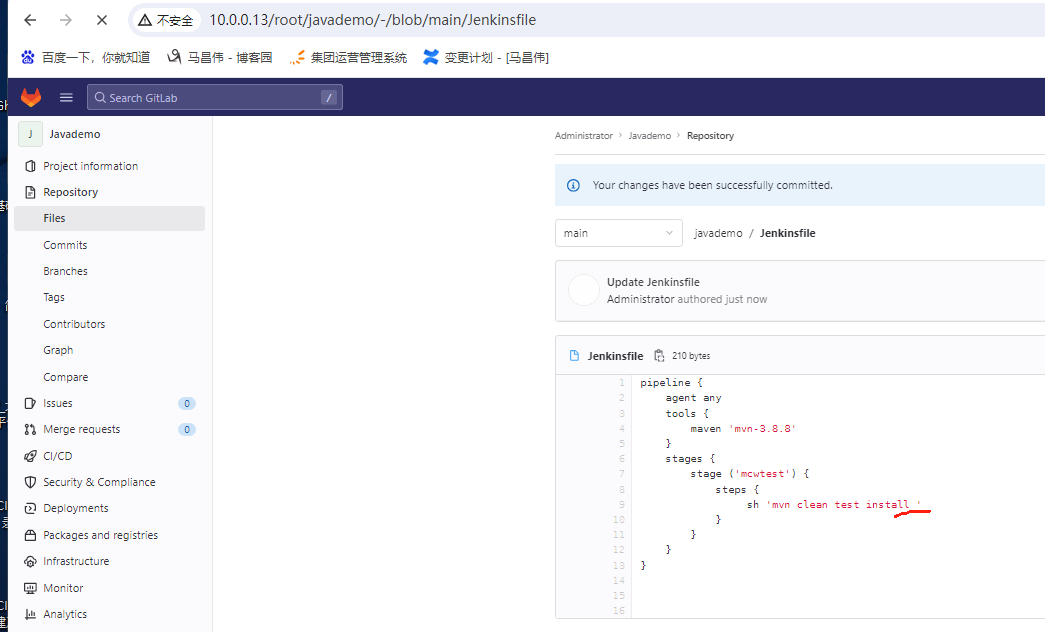
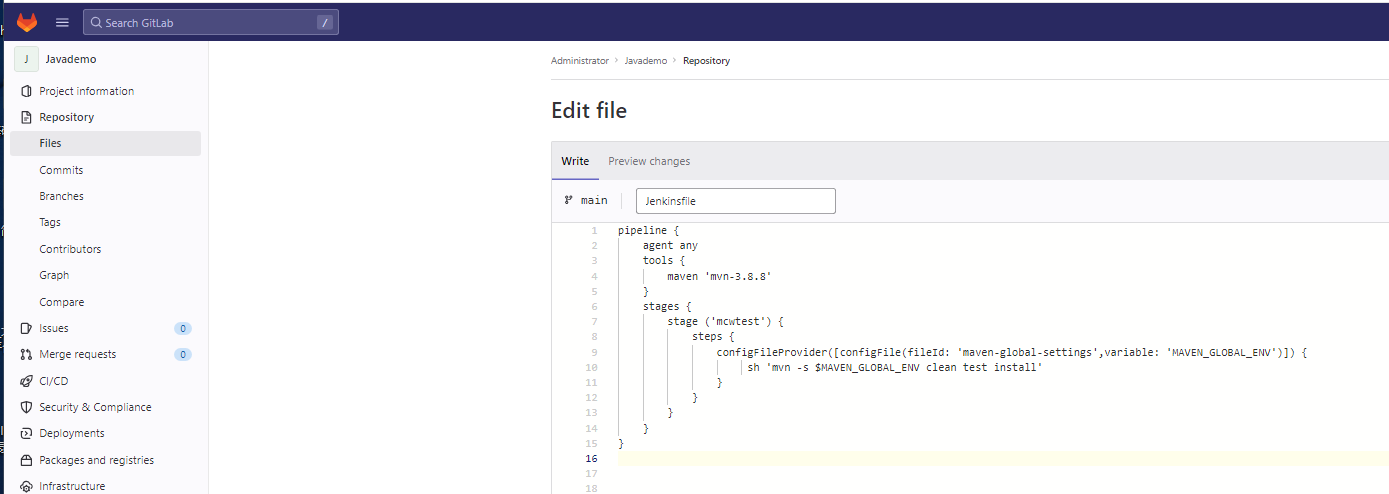
这里我们在Jenkinsfile里面指定使用 maven的配置
原本是这样的
pipeline {
    agent any
    tools {
        maven 'mvn-3.8.8'
    }
    stages {
        stage ('mcwtest') {
            steps {
                 sh 'mvn clean test install  '
            }
        }
    }
}
改成如下试试
pipeline {
    agent any
    tools {
        maven 'mvn-3.8.8'
    }
    stages {
        stage ('mcwtest') {
            steps {
                configFileProvider([configFile(fileId: 'maven-global-settings',variable: 'MAVEN_GLOBAL_ENV')]) {
                     sh 'mvn -s $MAVEN_GLOBAL_ENV clean test install'
                }
            }
        }
    }
}
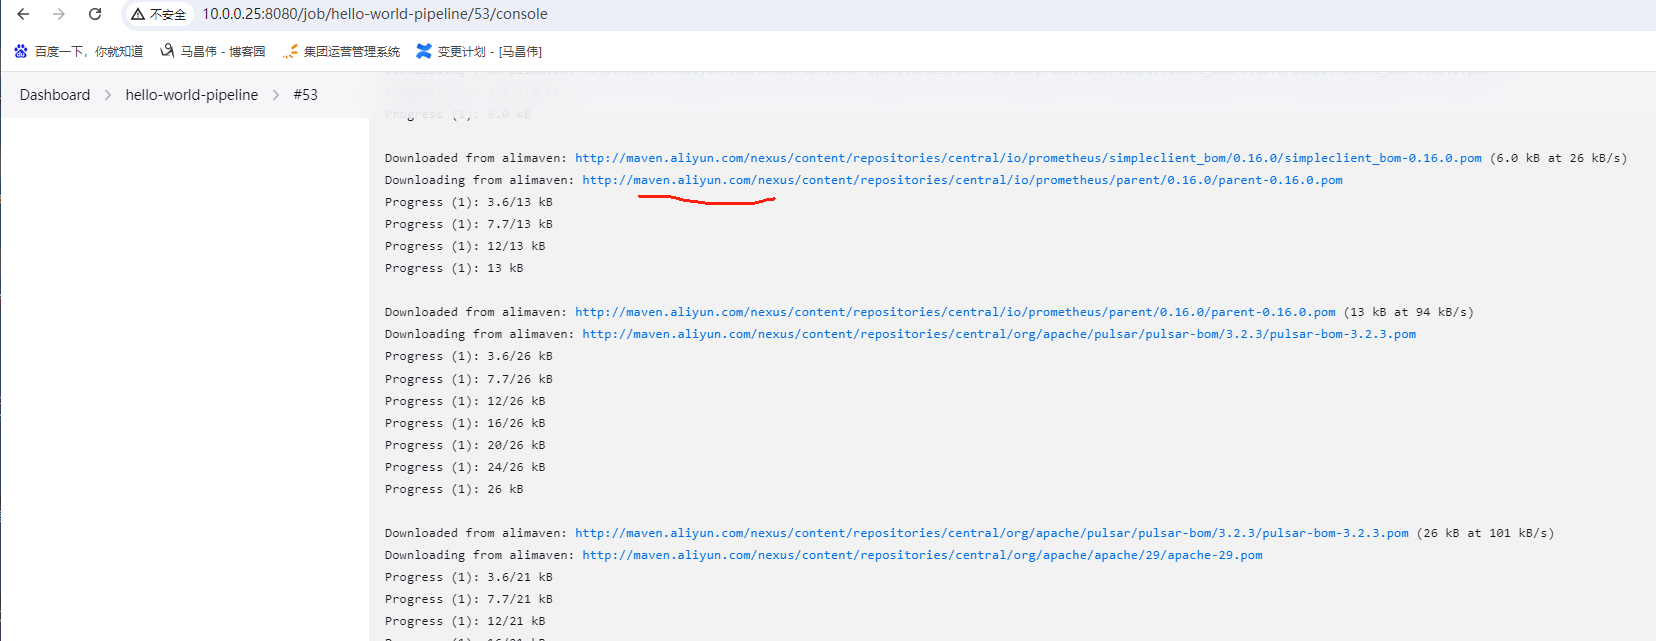
再次触发构建后查看,已经在使用我们添加的全局maven配置里设置的阿里云仓库了。
go语言环境搭建
go插件:https://plugins.jenkins.io/golang

添加后重启
root@mcw15 plugins]# ls|grep go
golang.hpi
[root@mcw15 plugins]# systemctl restart jenkins
pipeline {
    agent any
    environment {
        GOPATH = "${env.WORKSPACE}/"
    }
    tools {
        go 'go1.22.0'
    }
    stages {
        stage ('mcwtest') {
            steps {
                sh "go build"
            }
        }
    }
}
网络不通,安装失败
python环境搭建
Pythonenv pipeline插件: https://plugins.jenkins.io/pyenv-pipeline

[root@mcw15 plugins]# ls|grep py
pyenv-pipeline.hpi
[root@mcw15 plugins]# systemctl restart jenkins
                withPythonEnv('/usr/bin/python') {
                    sh 'python --version '
                }
利用环境变量支持更多的构建工具
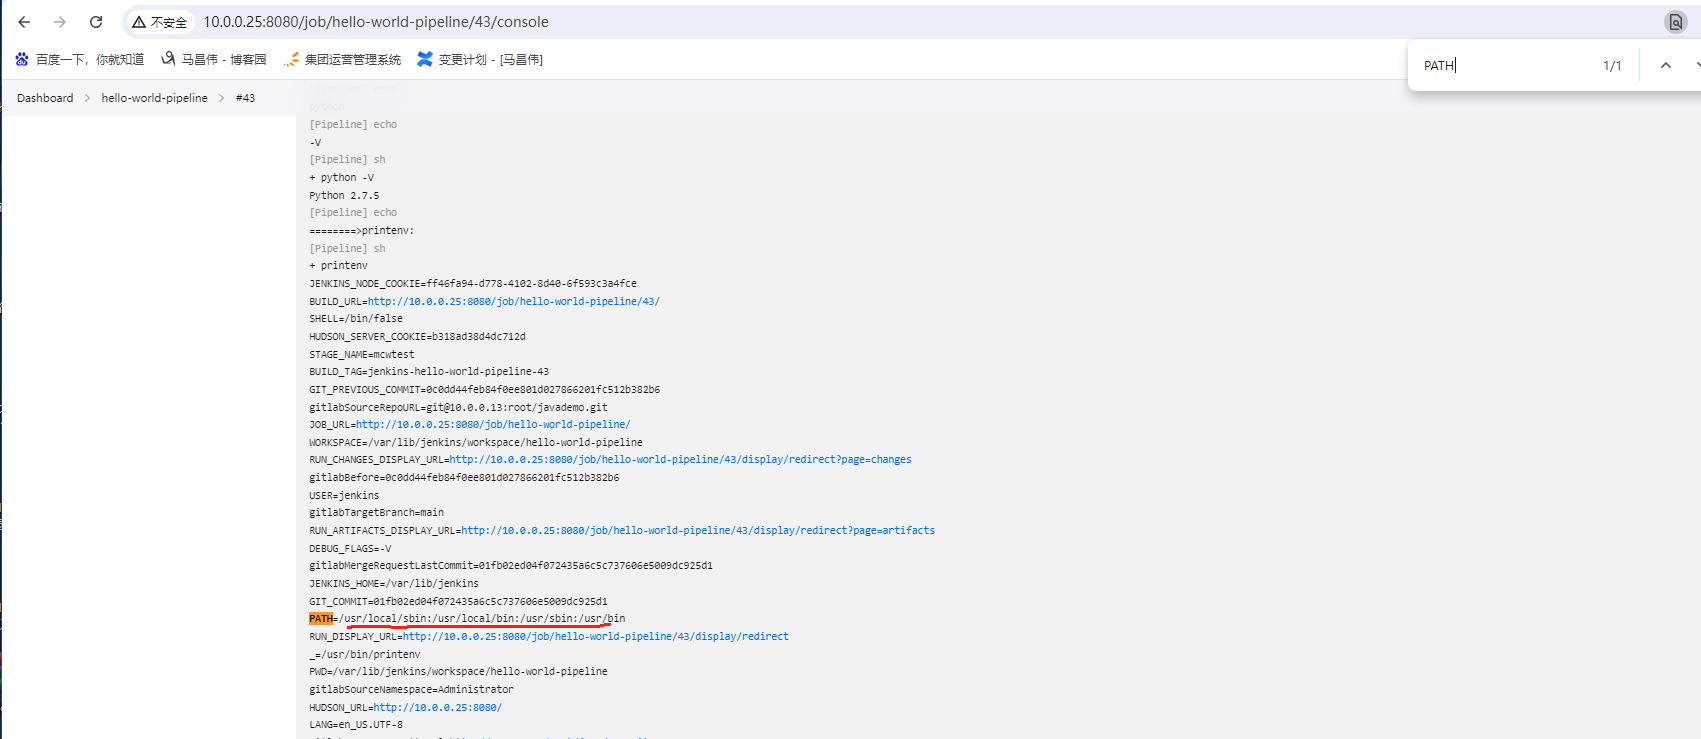
pipeline {
    agent any
    environment {
        PATH = "/usr/lib/customtool/bin:$PATH"
    }
    stages {
        stage ('mcwtest') {
            steps {
                sh "customtool build"
            }
        }
    }
}
pipeline {
    agent any
    environment {
        CUSTOM_TOOL_HOME = "/usr/lib/customtool/bin"
    }
    stages {
        stage ('mcwtest') {
            steps {
                sh "${CUSTOM_TOOL_HOM}/customtool build"
            }
        }
    }
}
利用tools作用域实现多版本编译
pipeline {
    agent any
    stages {
        stage ('build with jdk-10.0.2') {
            tools {
                jdk "jdk-10.0.2"
            }
            steps {
                sh "pringenv"
            }
        }
        stage ('build with jdk-9.0.4') {
            tools {
                jdk "jdk-9.0.4"
            }
            steps {
                sh "pringenv"
            }
        }
    }
}
触发pipeline执行
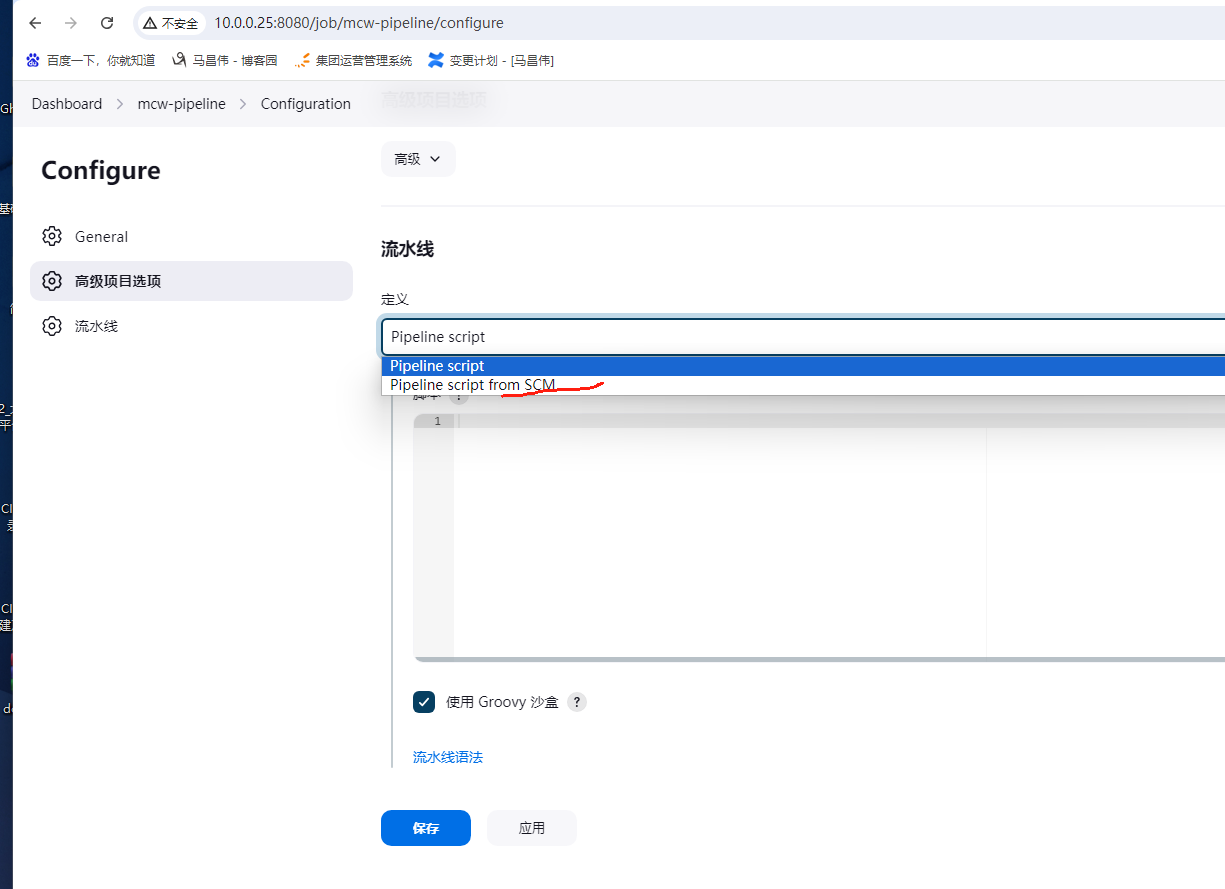
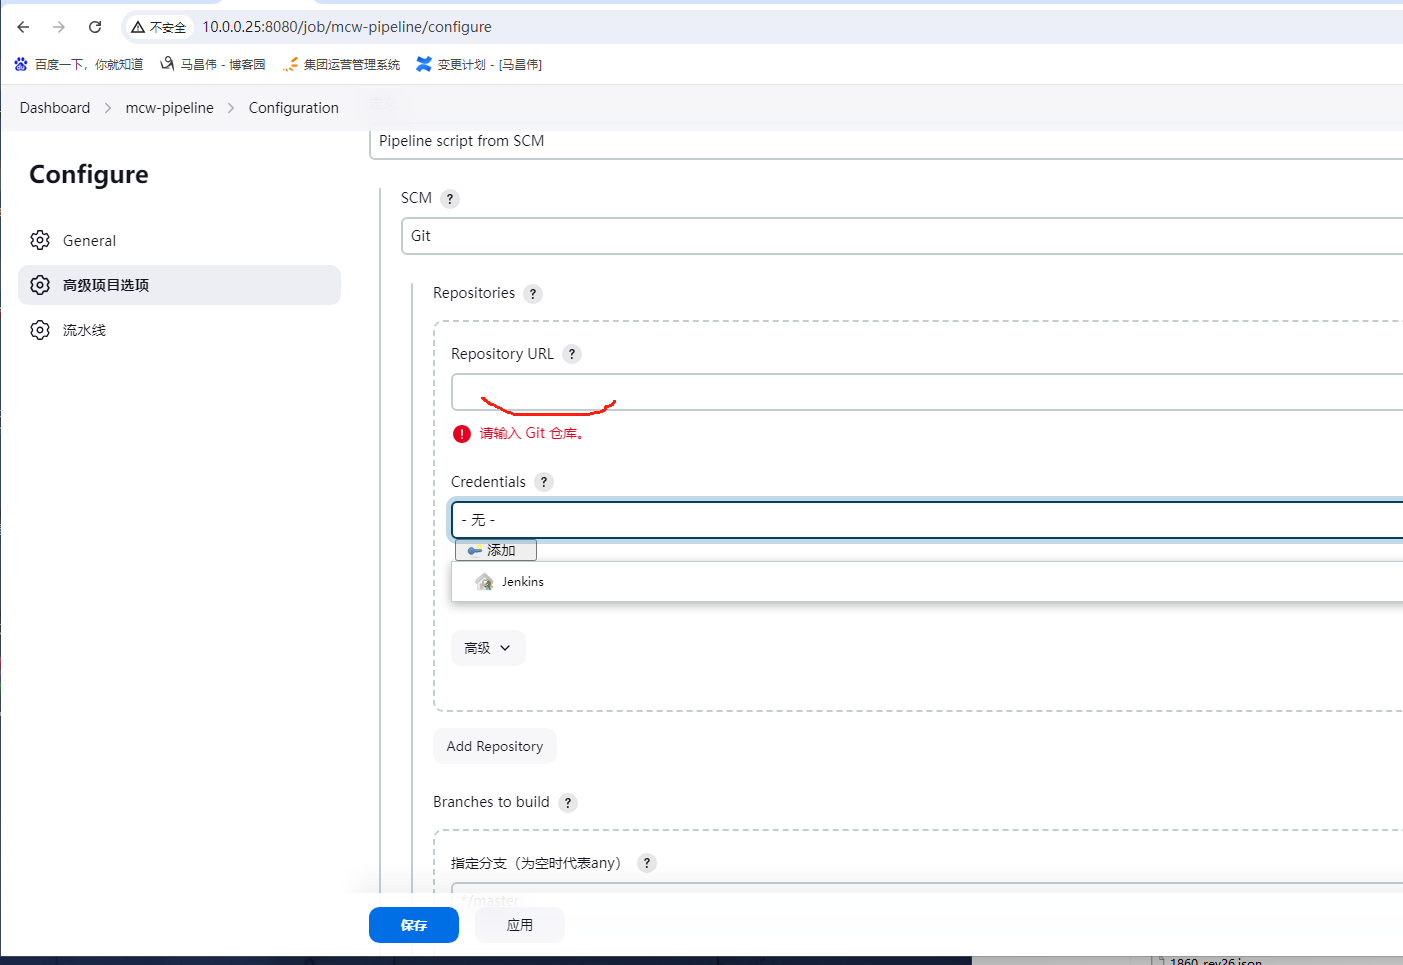
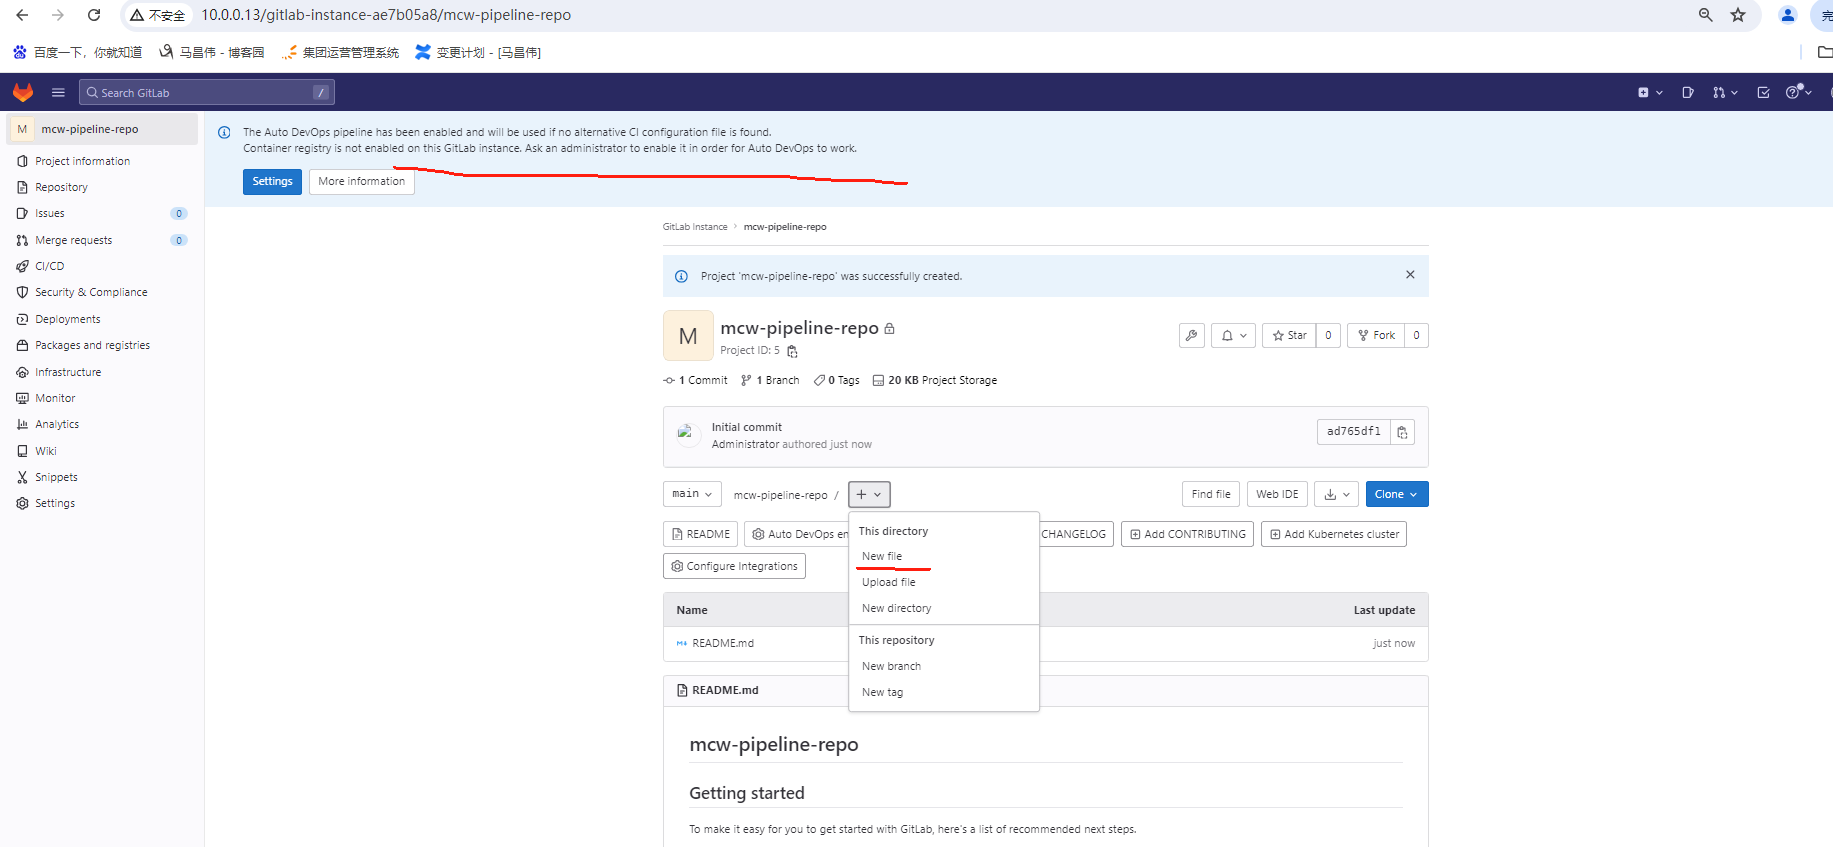
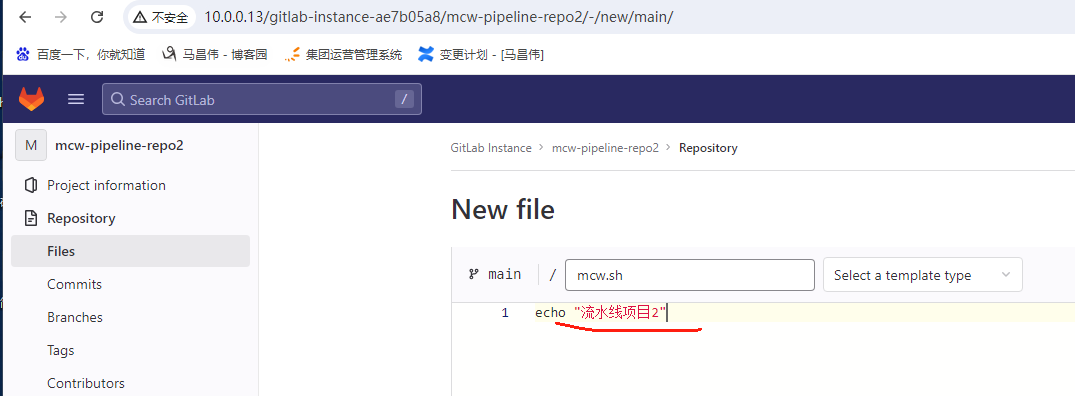
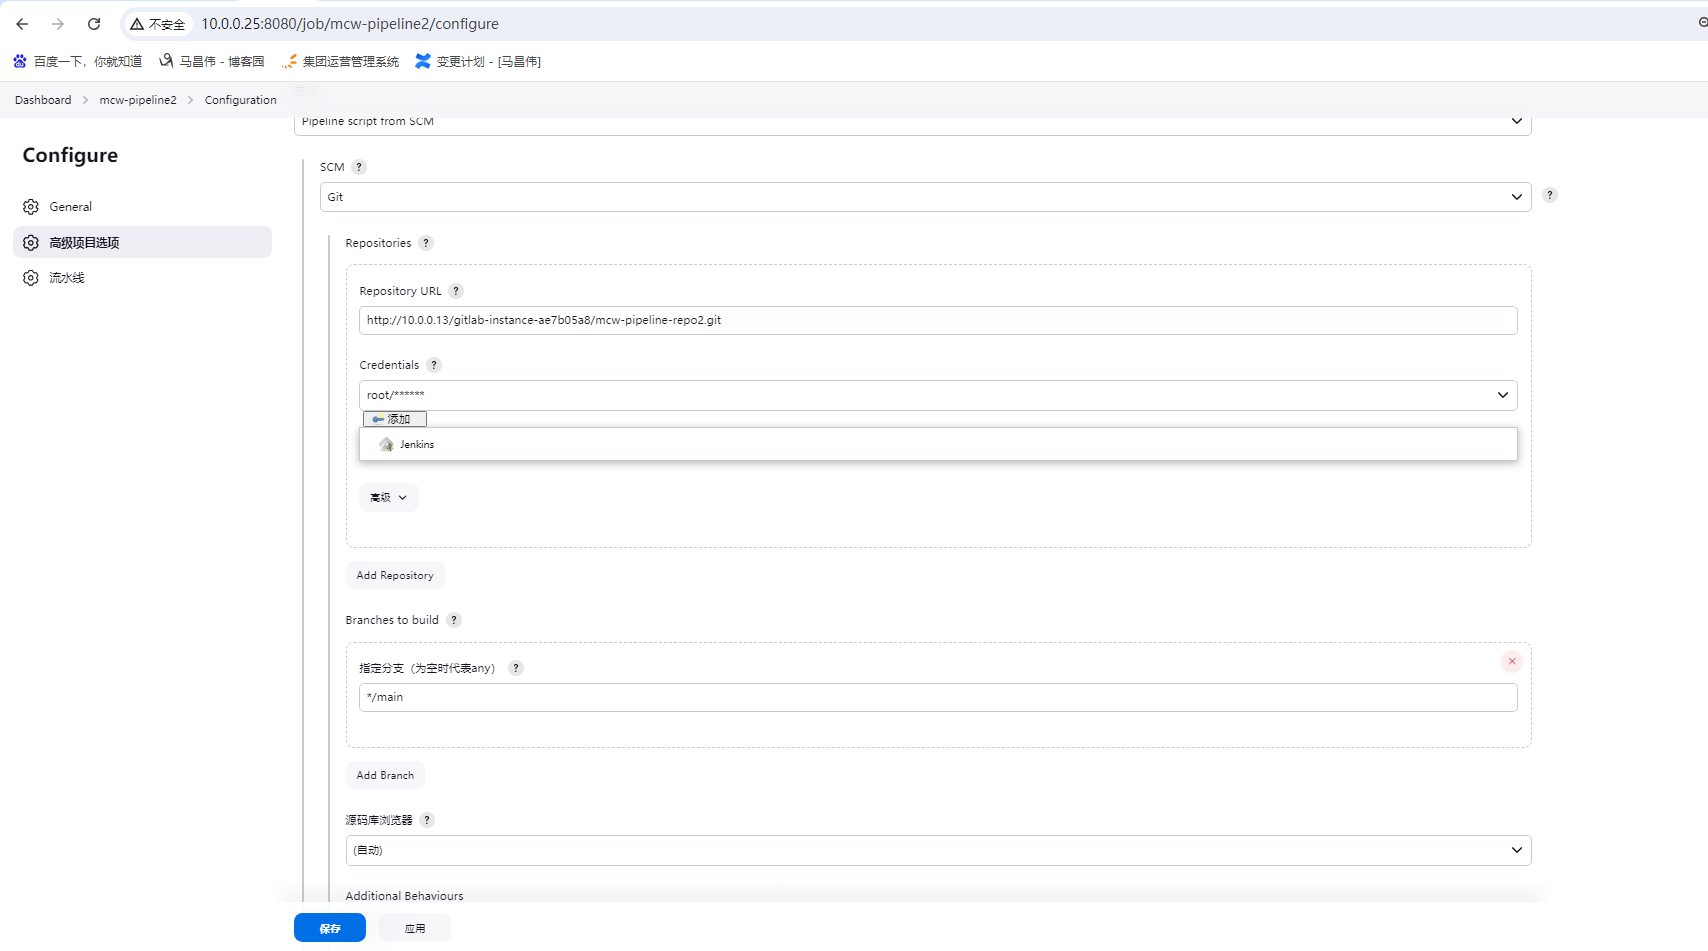
@@新建pipeline项目,准备环境
其它地方没有做设置,触发器也没有做设置
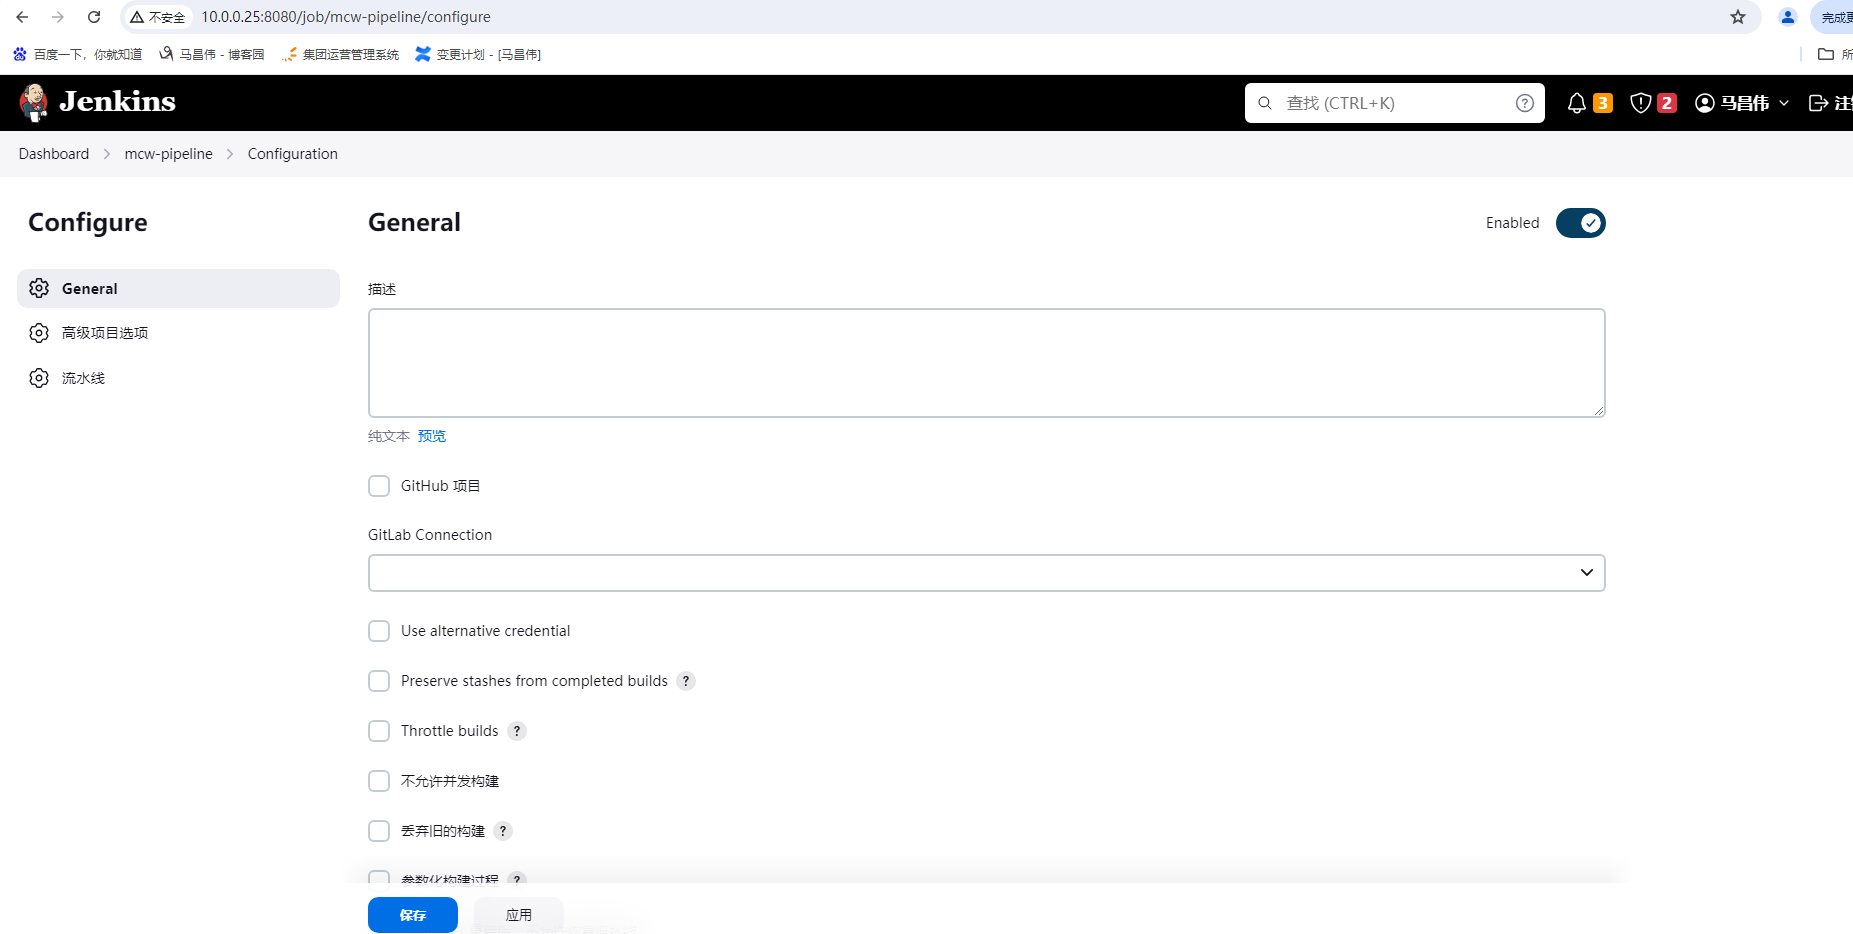

选择下面的scm
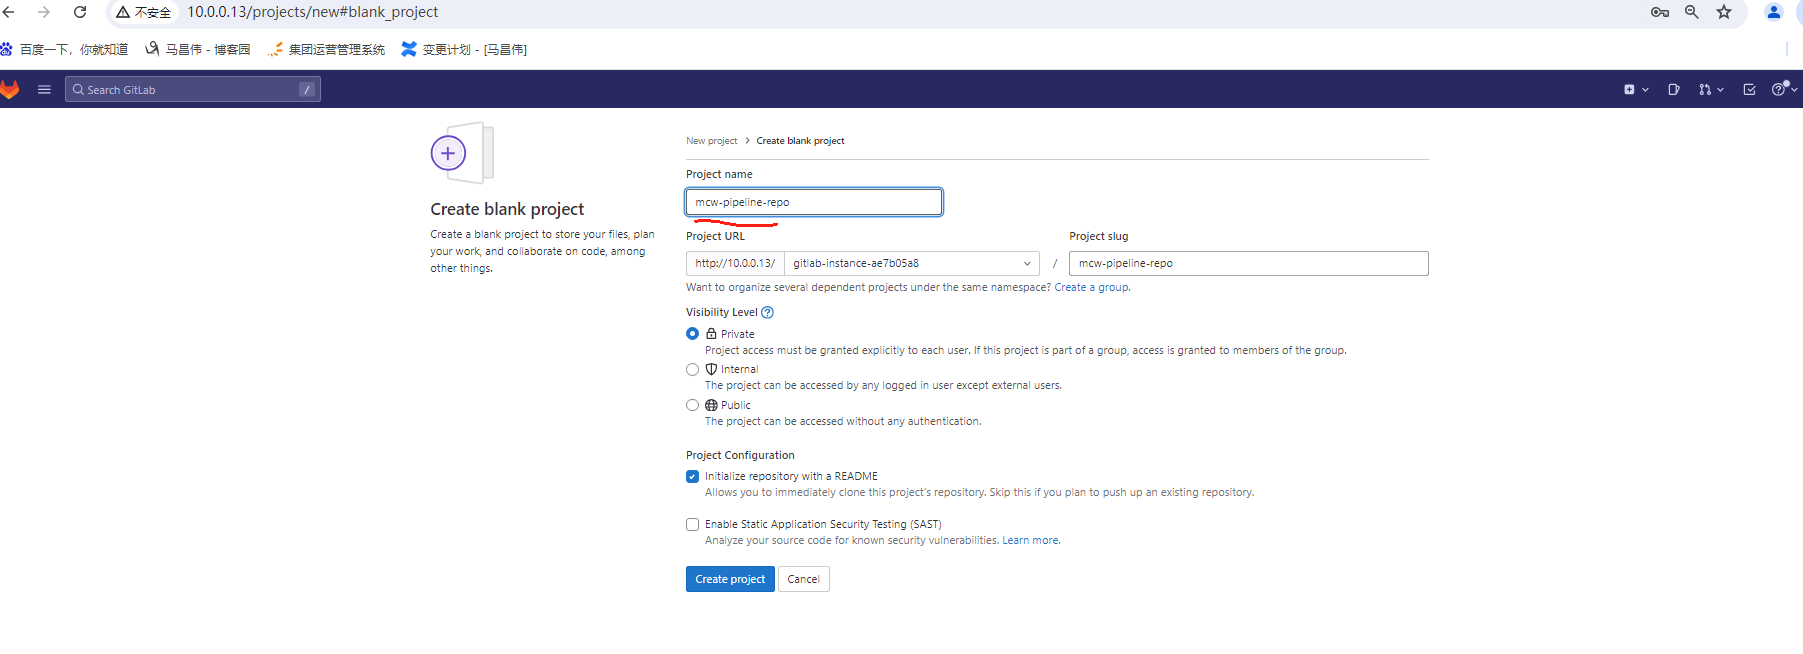
因为需要仓库地址,所有创建个代码仓库
新建代码仓库


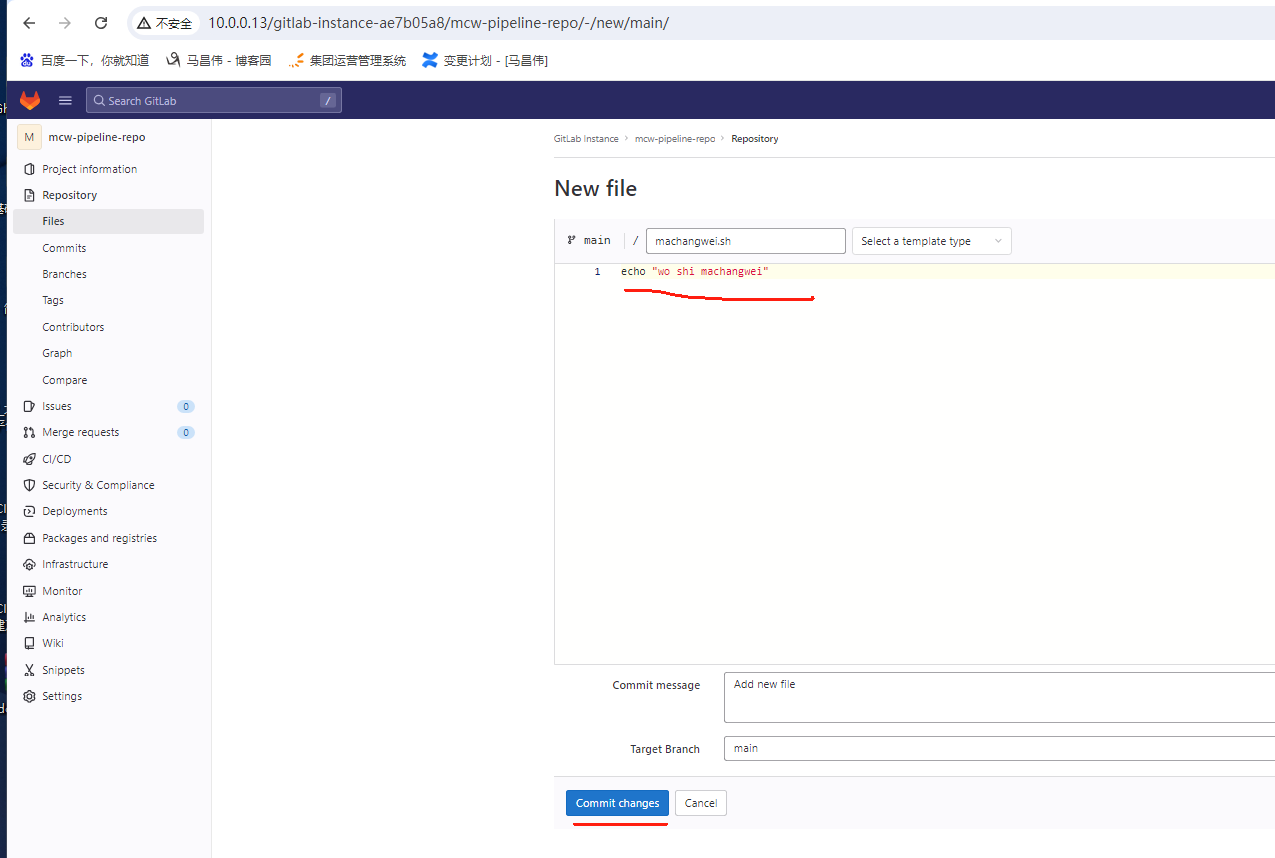
新建一个文件
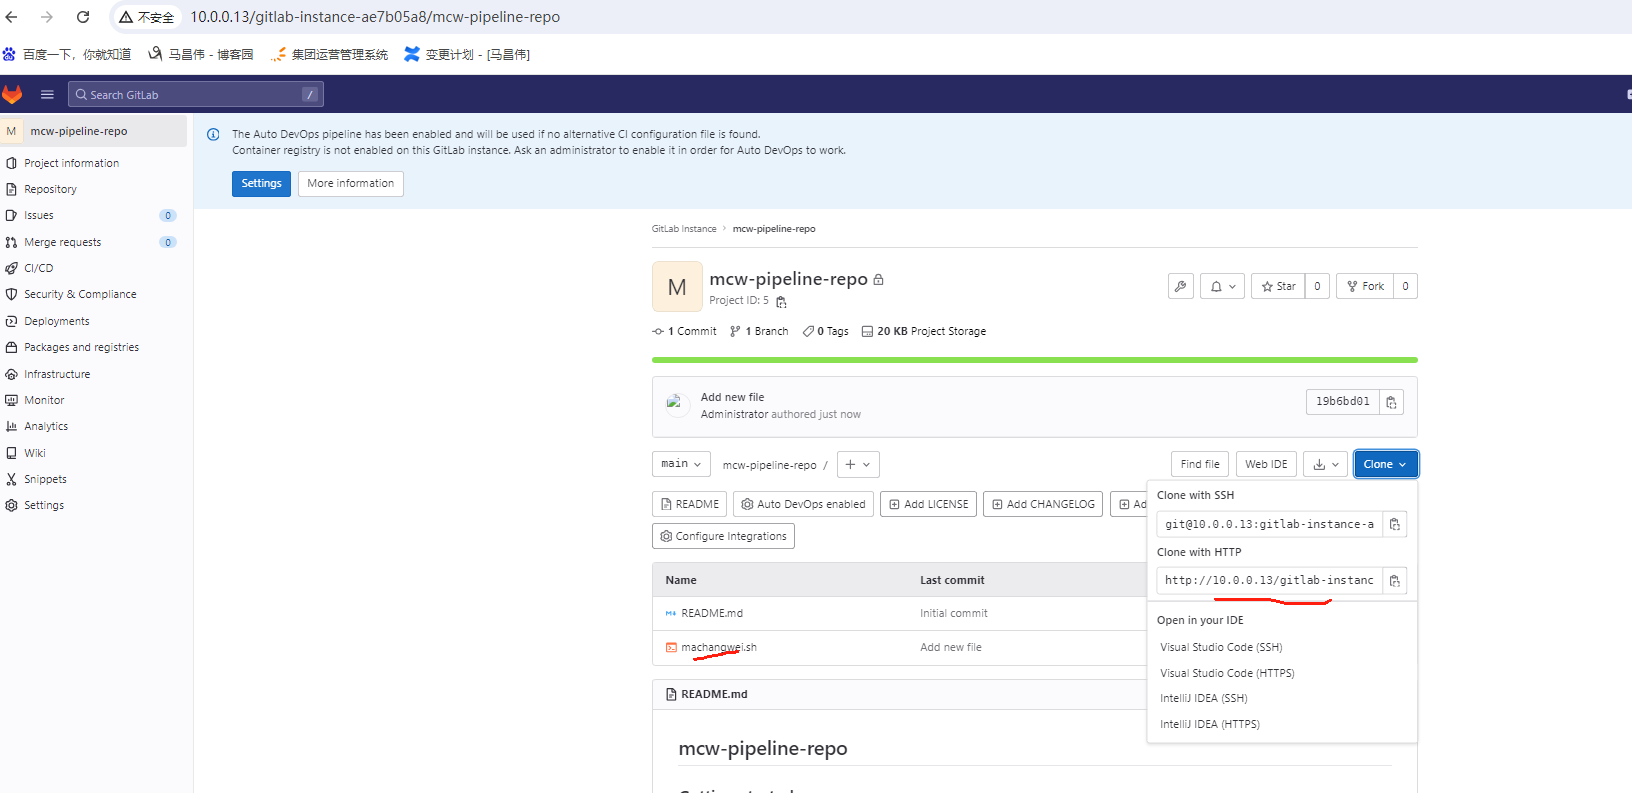
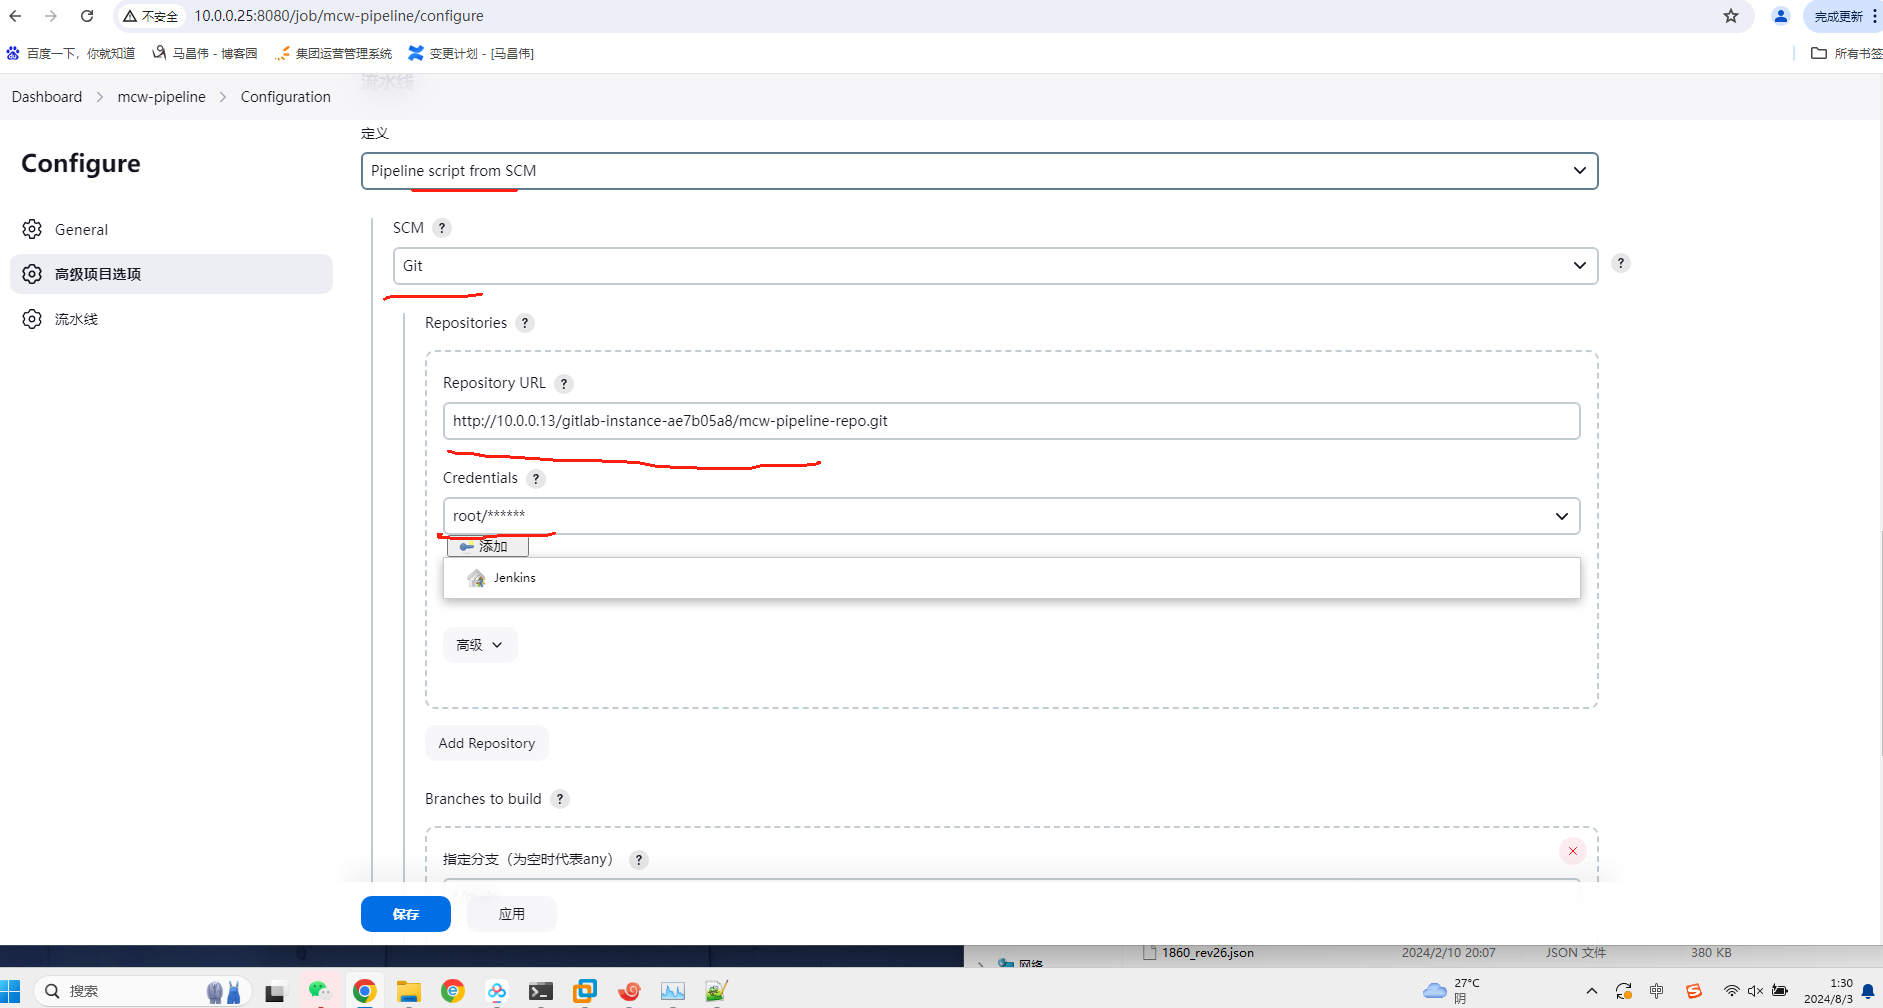
复制仓库地址,在Jenkins流水线项目中配置仓库地址
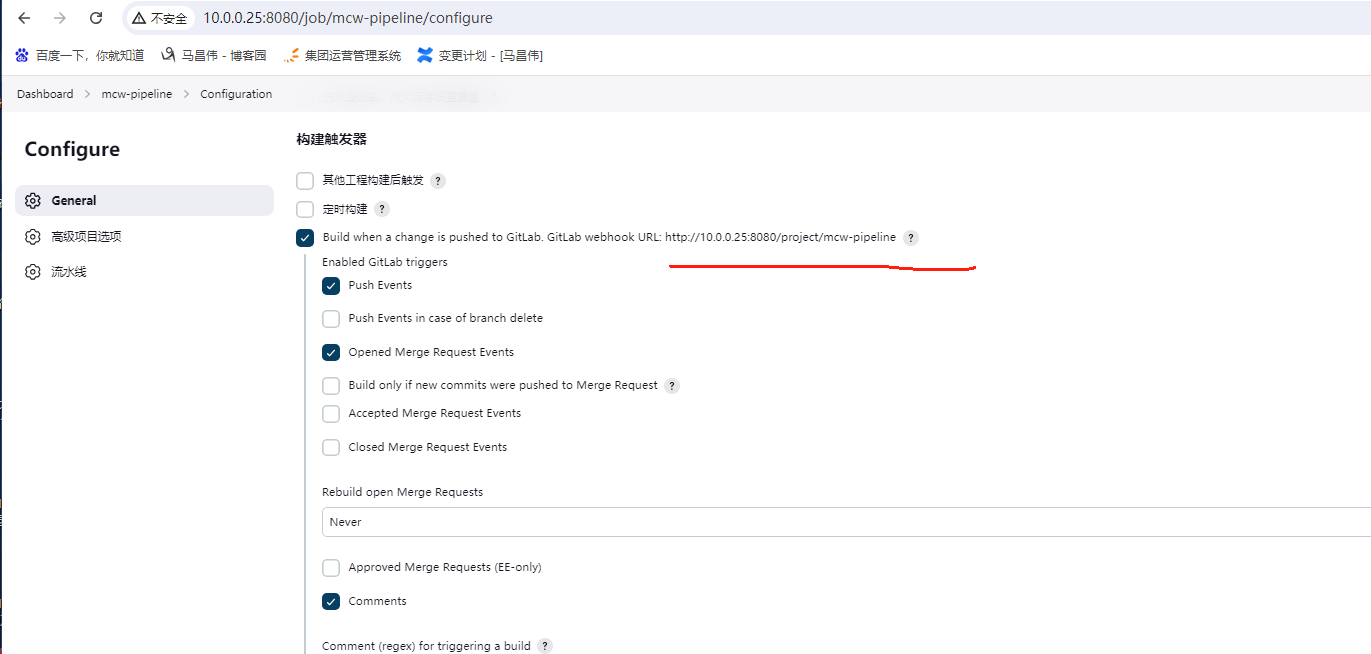
Jenkins中,其它地方没有设置,这里才开始设置
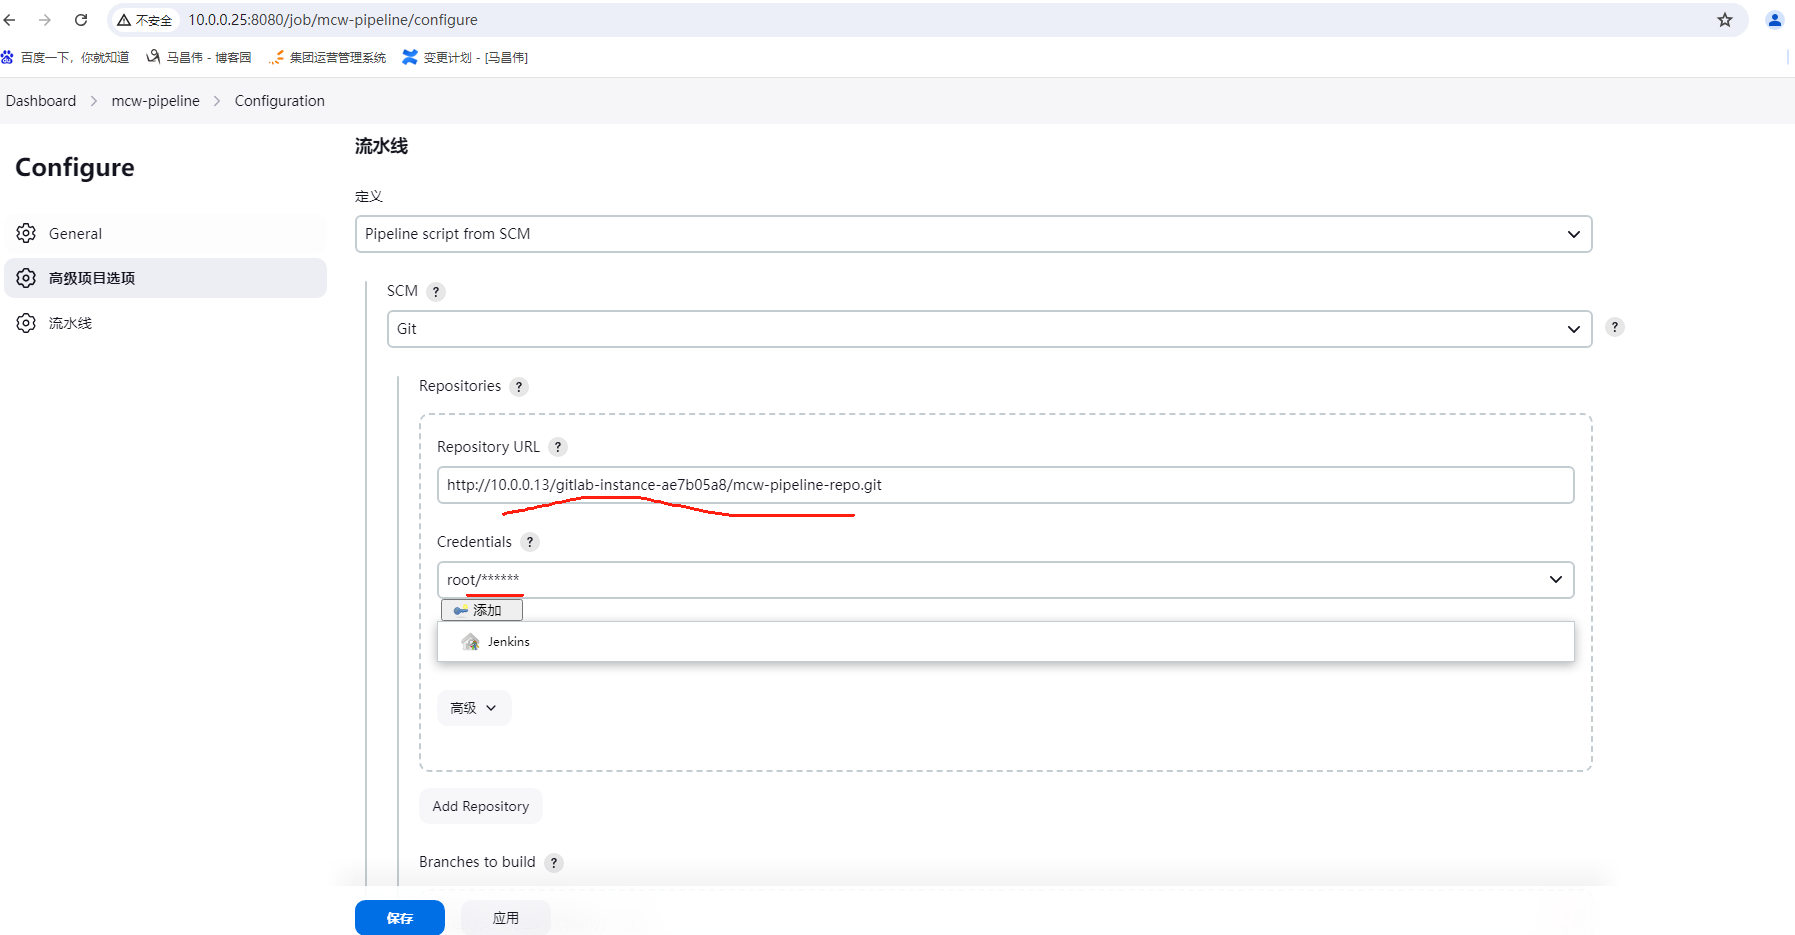
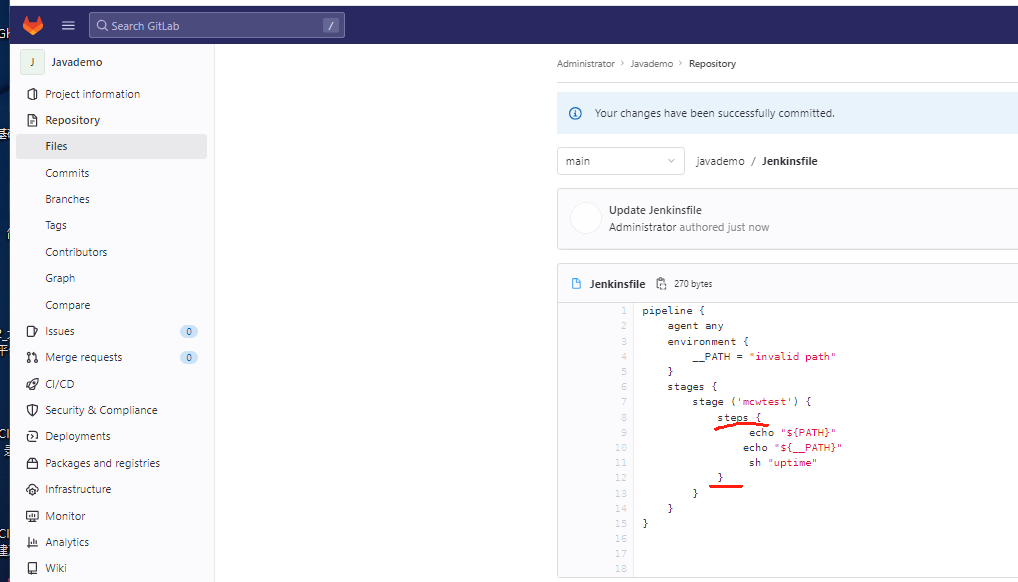
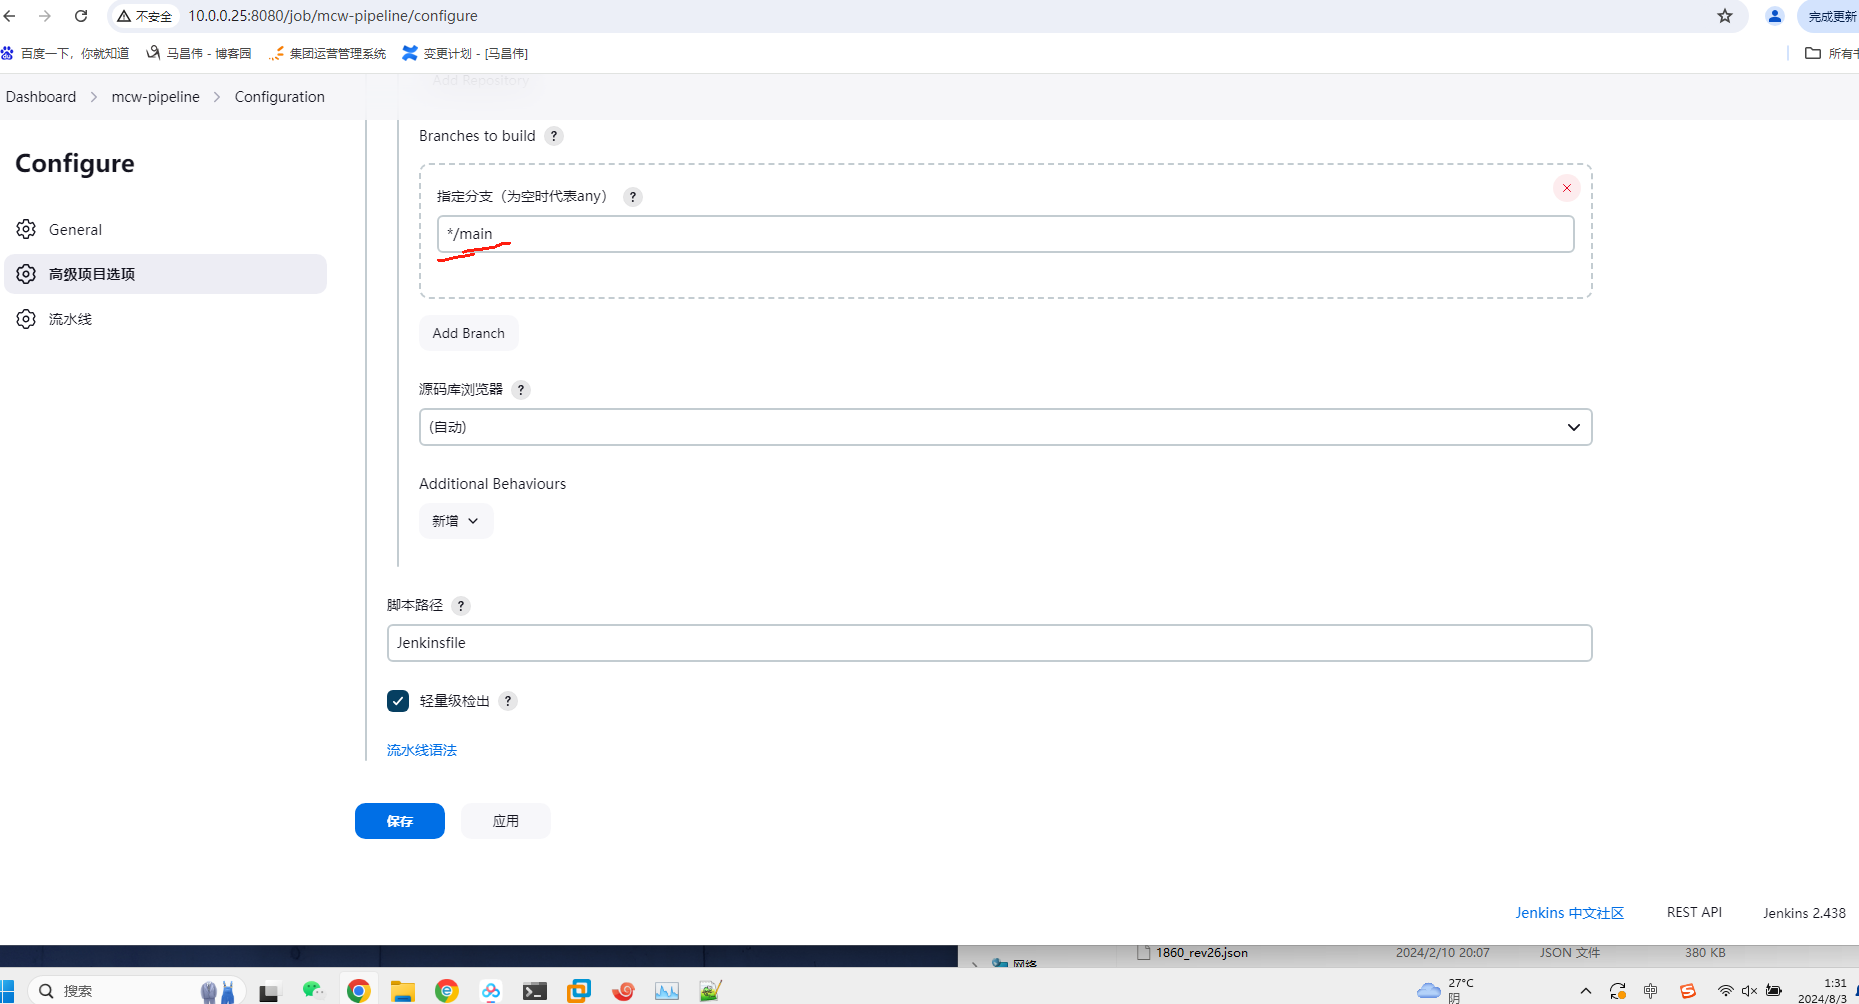
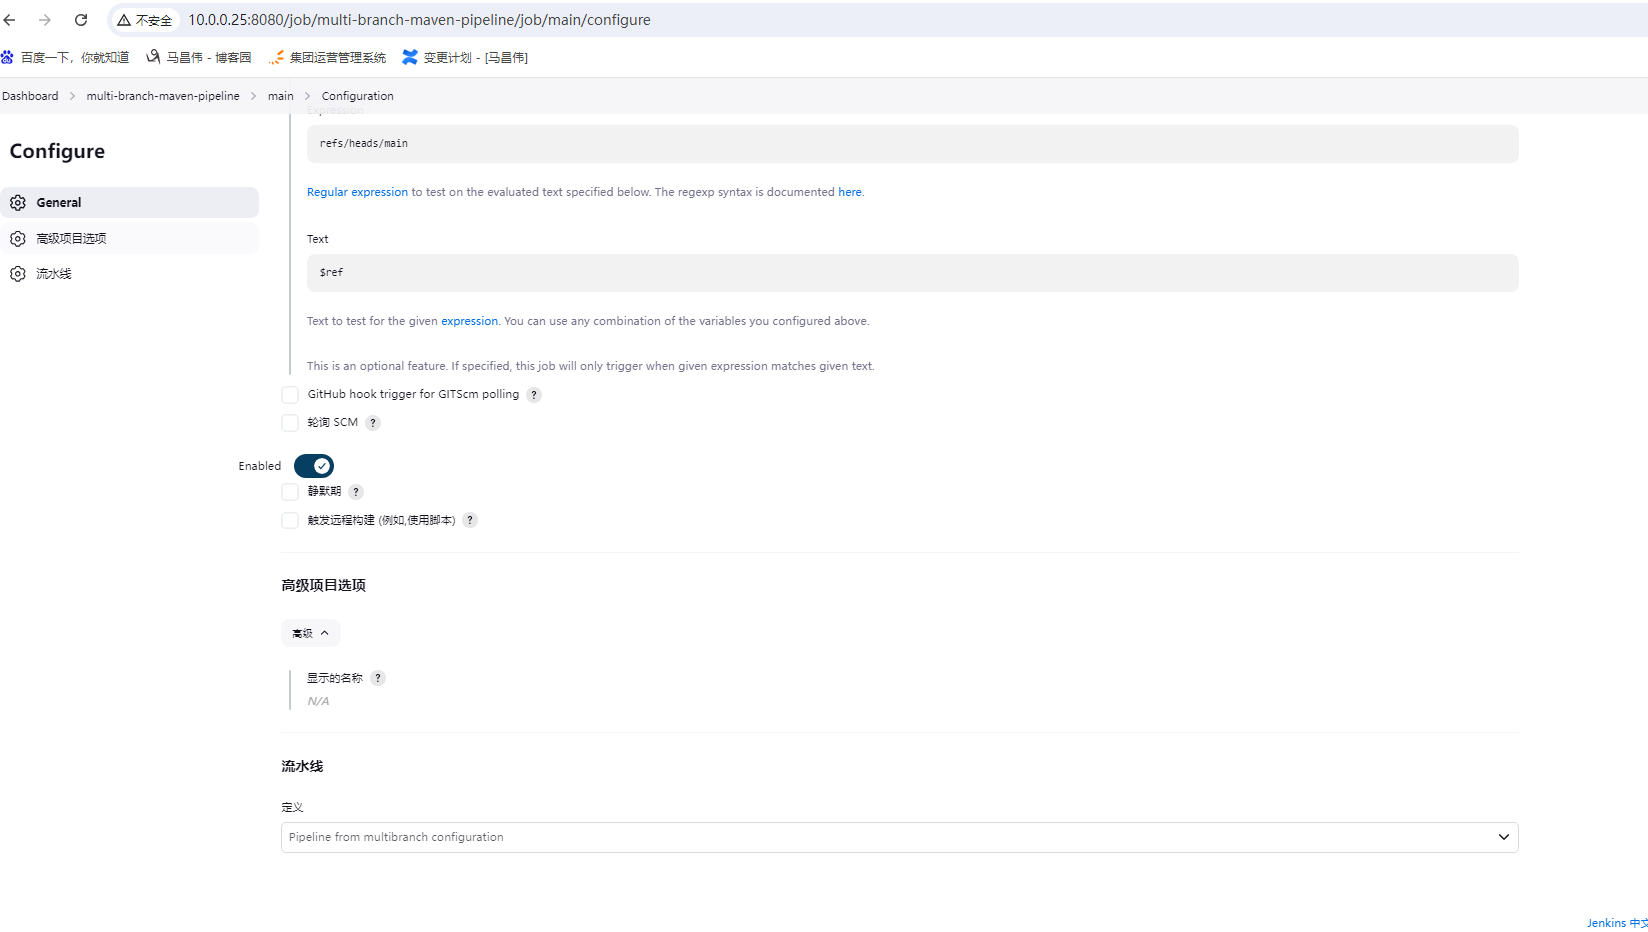
下面是默认的配置,我们这里主分支是main,而不是master,所以改正
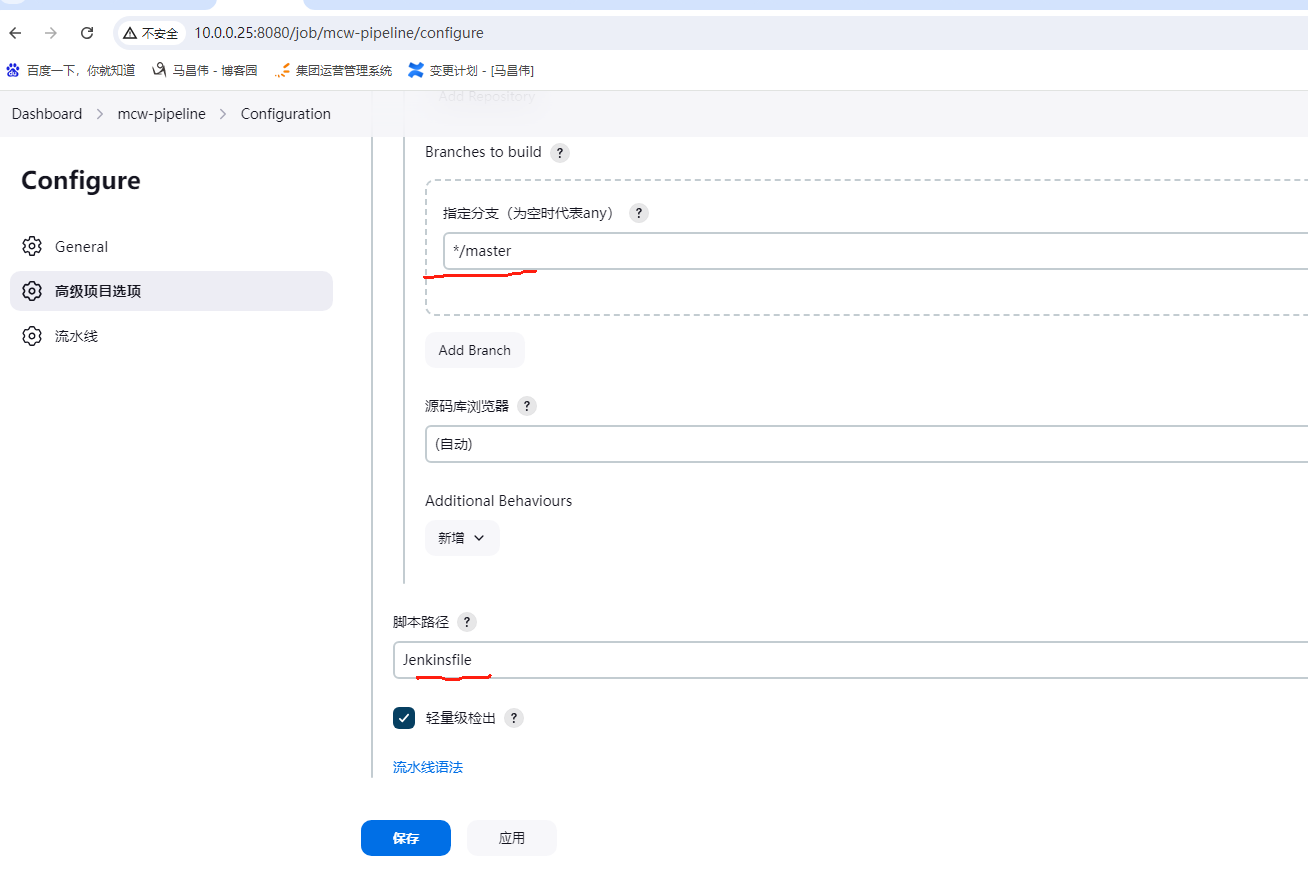

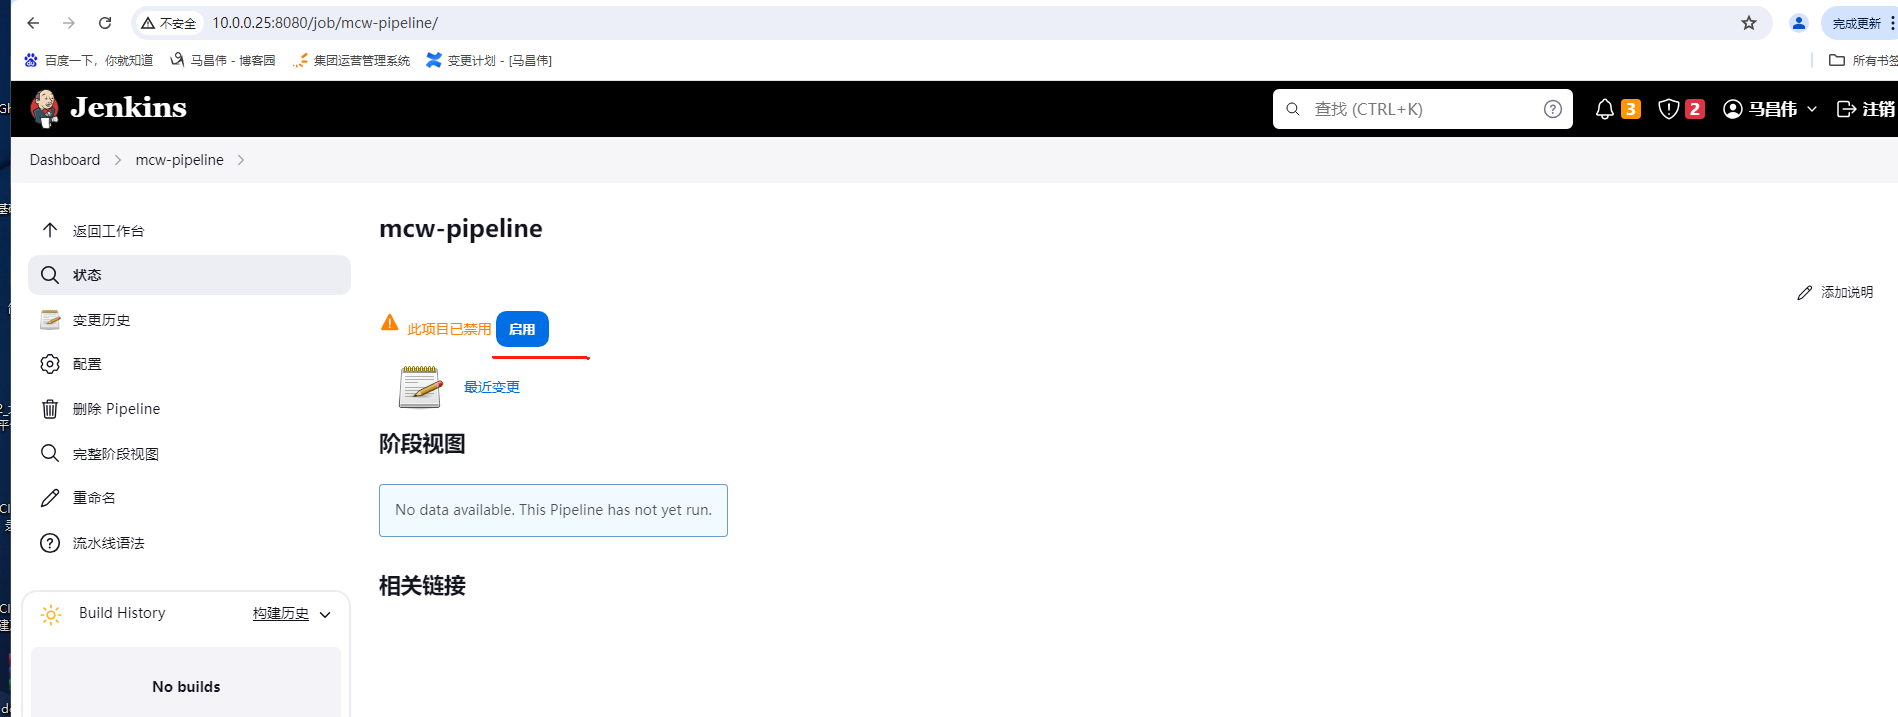
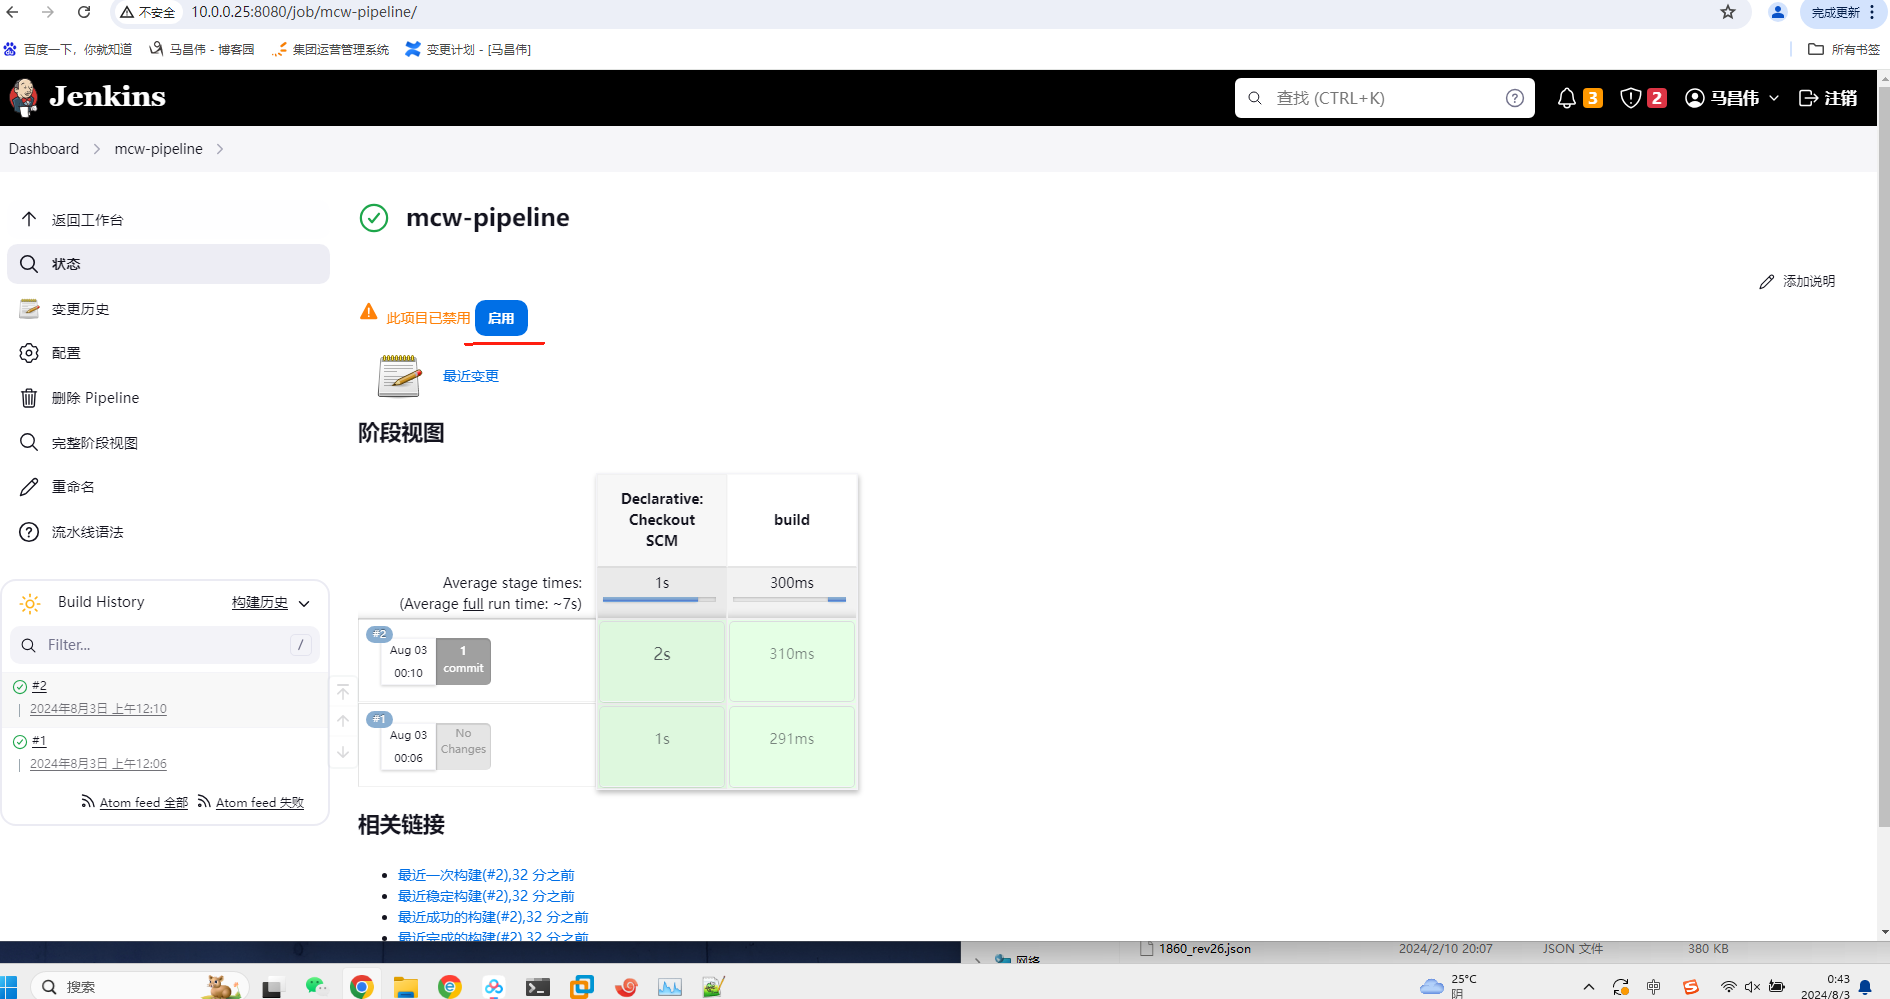
启用项目
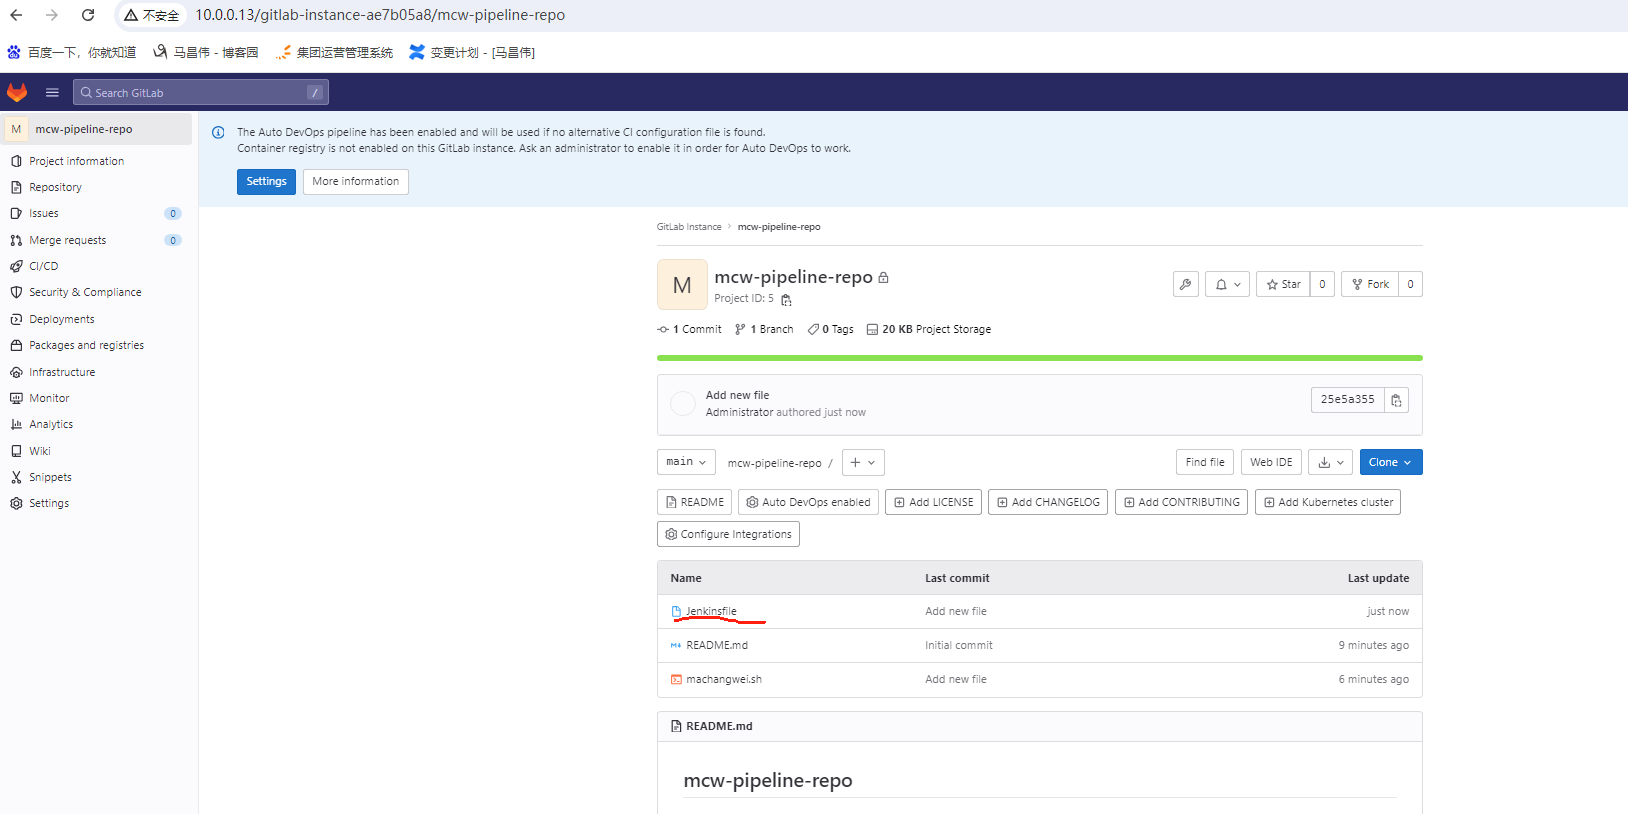
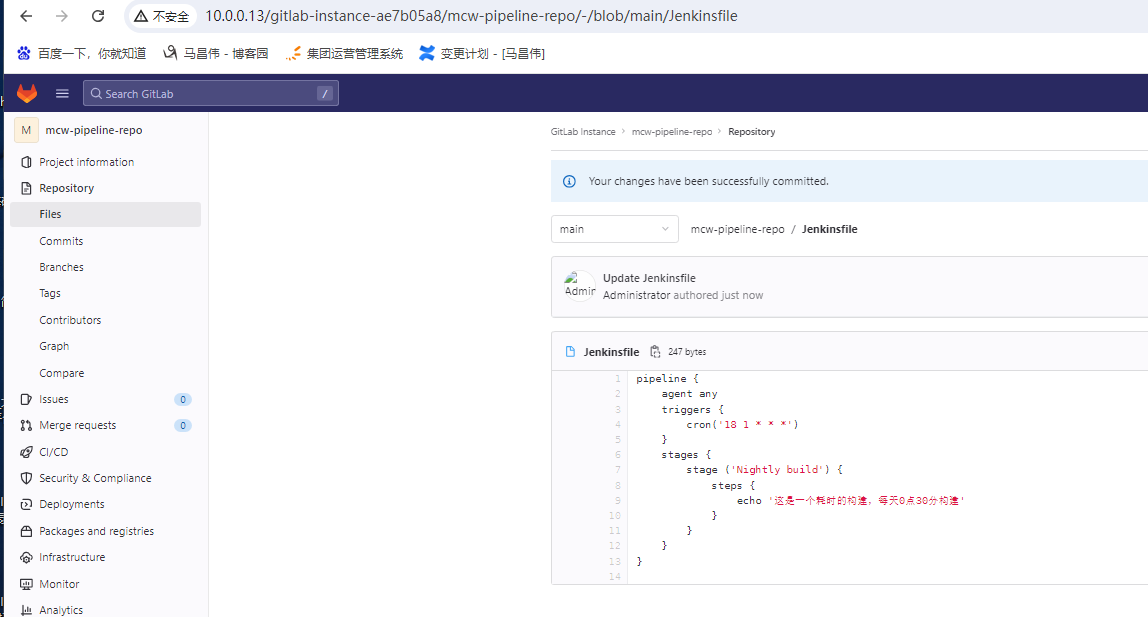
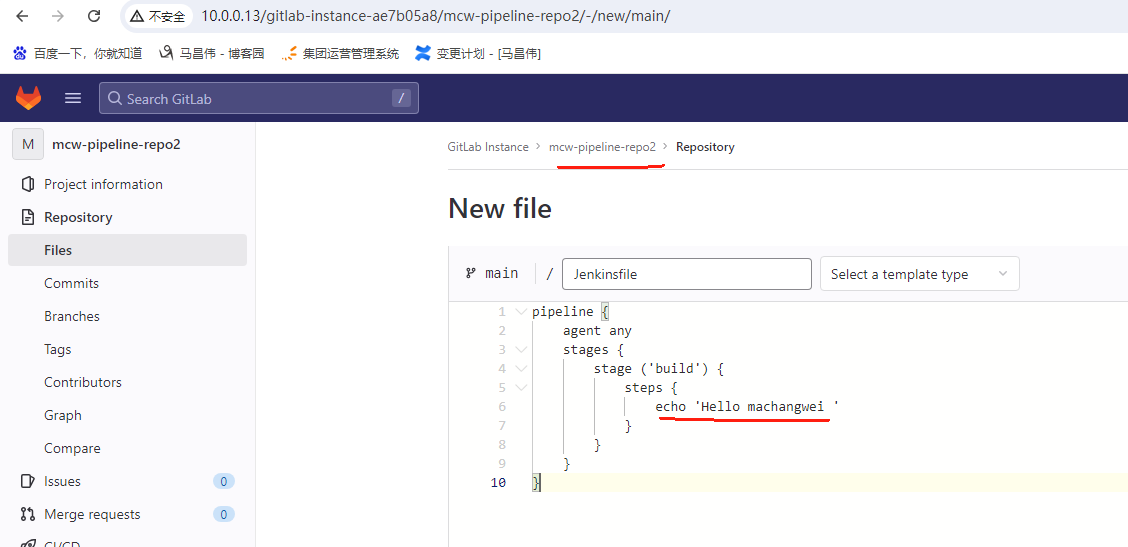
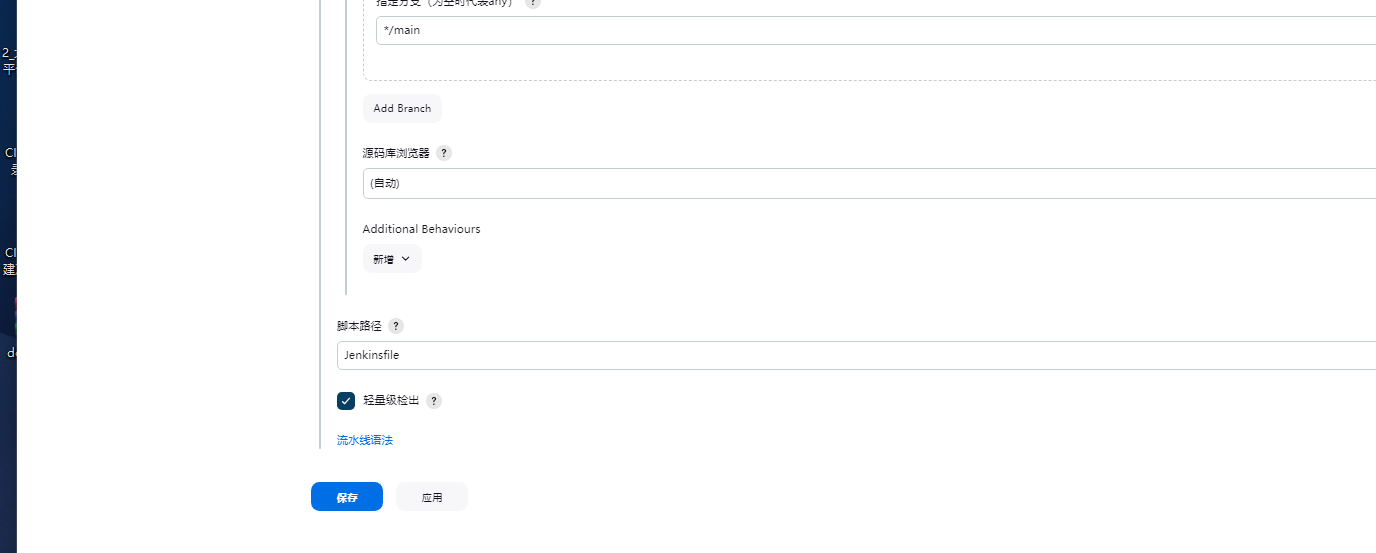
代码仓库中创建Jenkinsfile
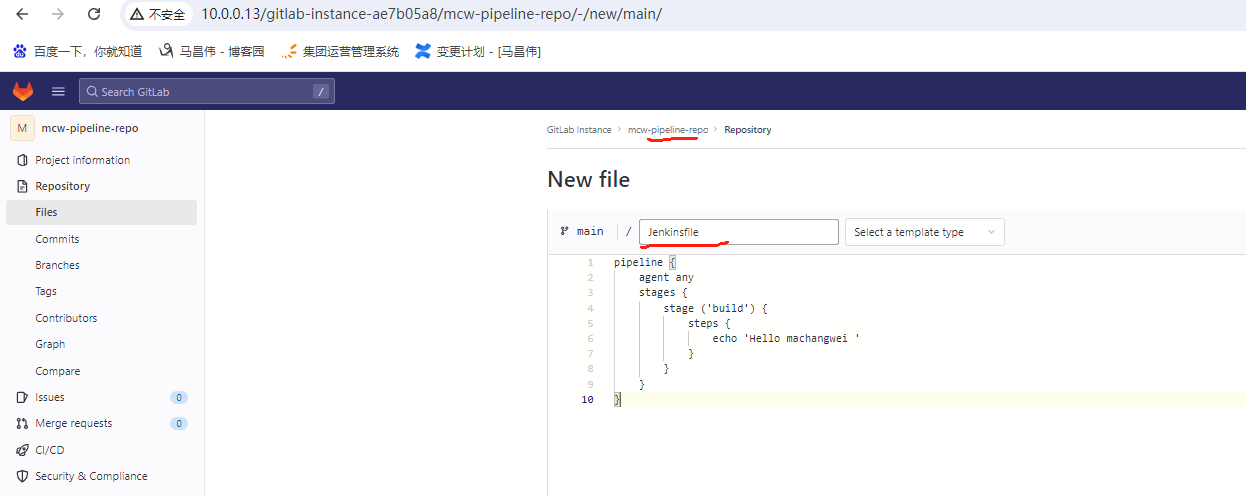
创建完成
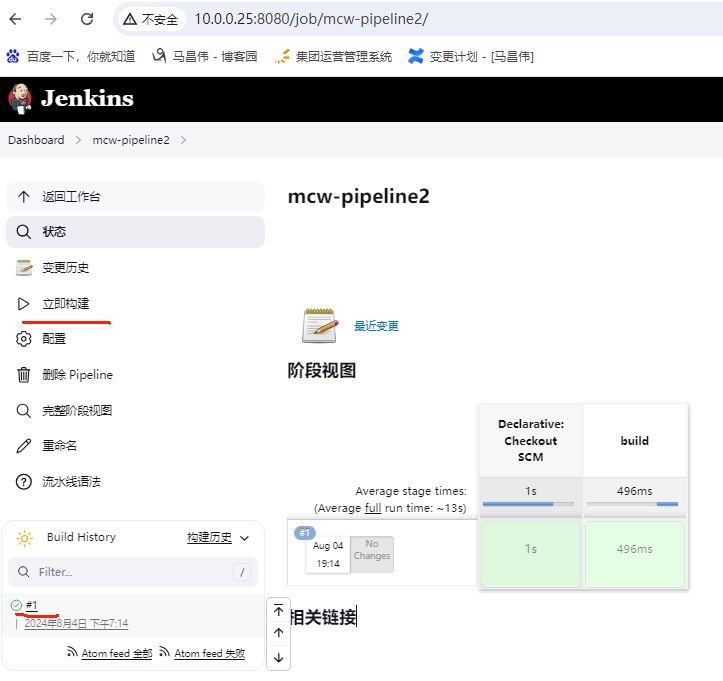
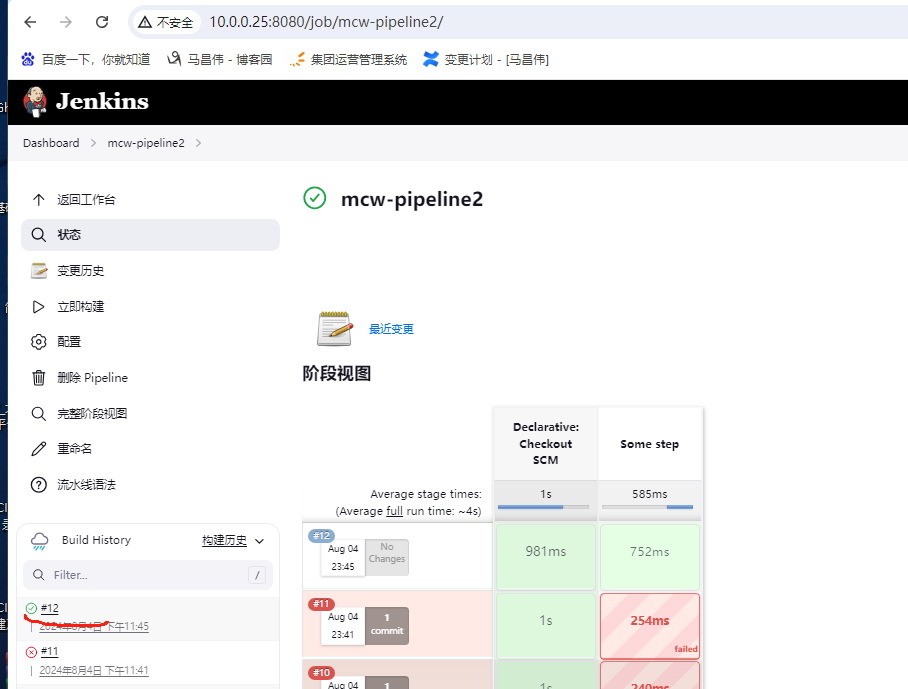
Jenkins项目还没构建运行过,手动触发构建执行试试
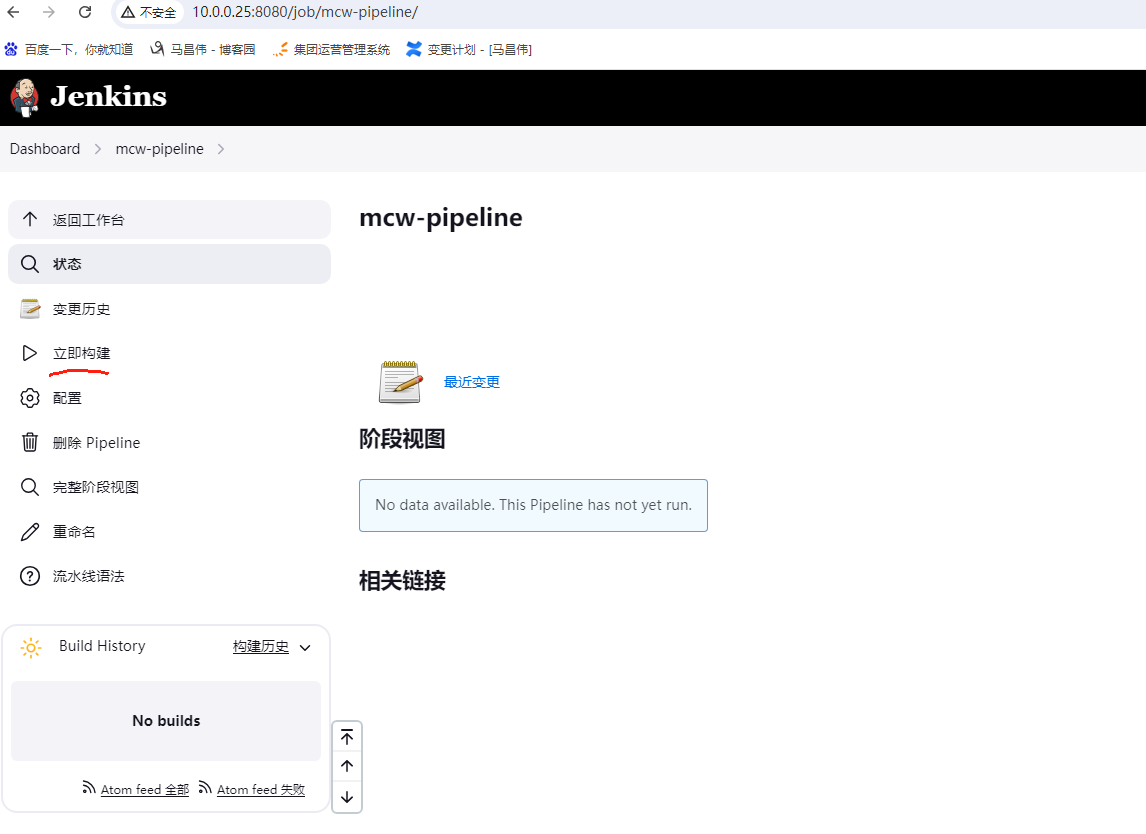
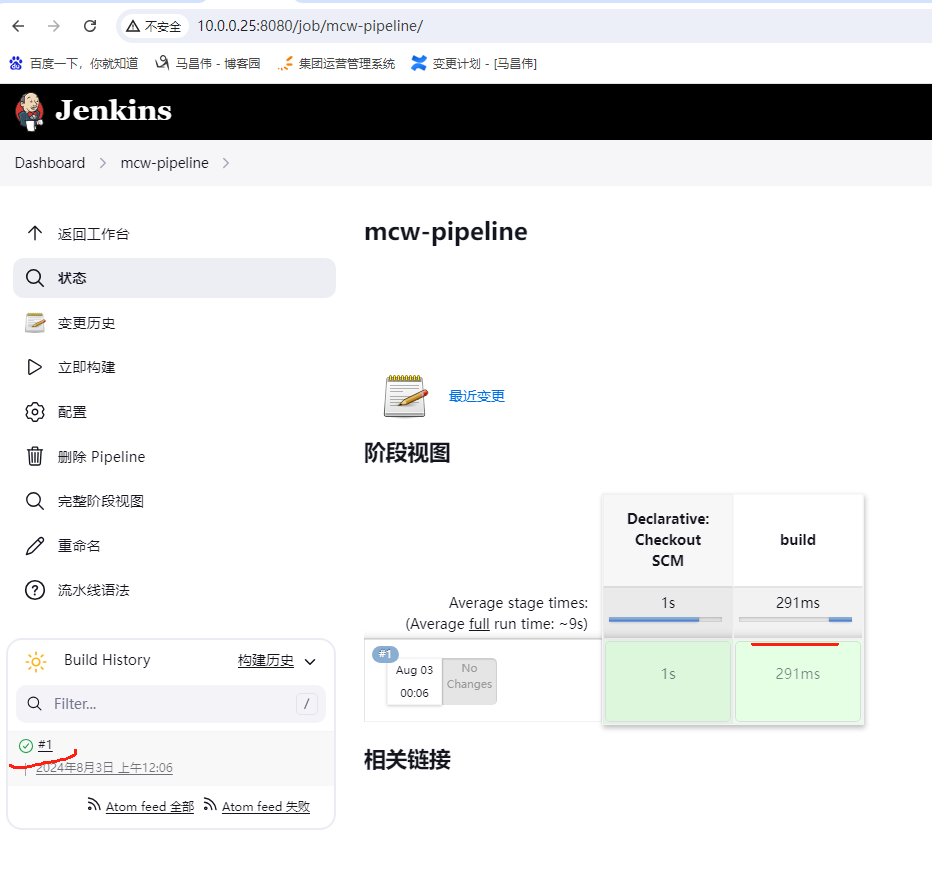
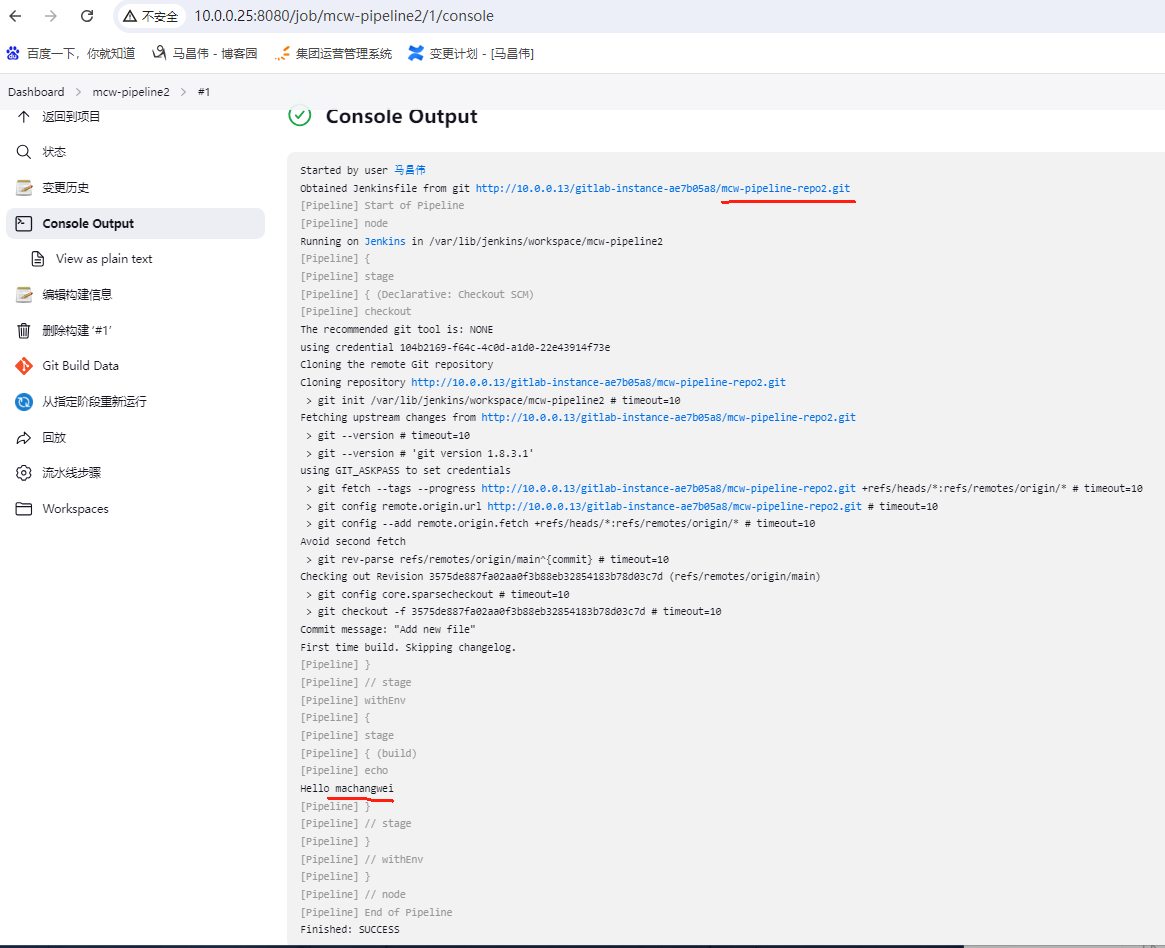
第一次手动构建成功
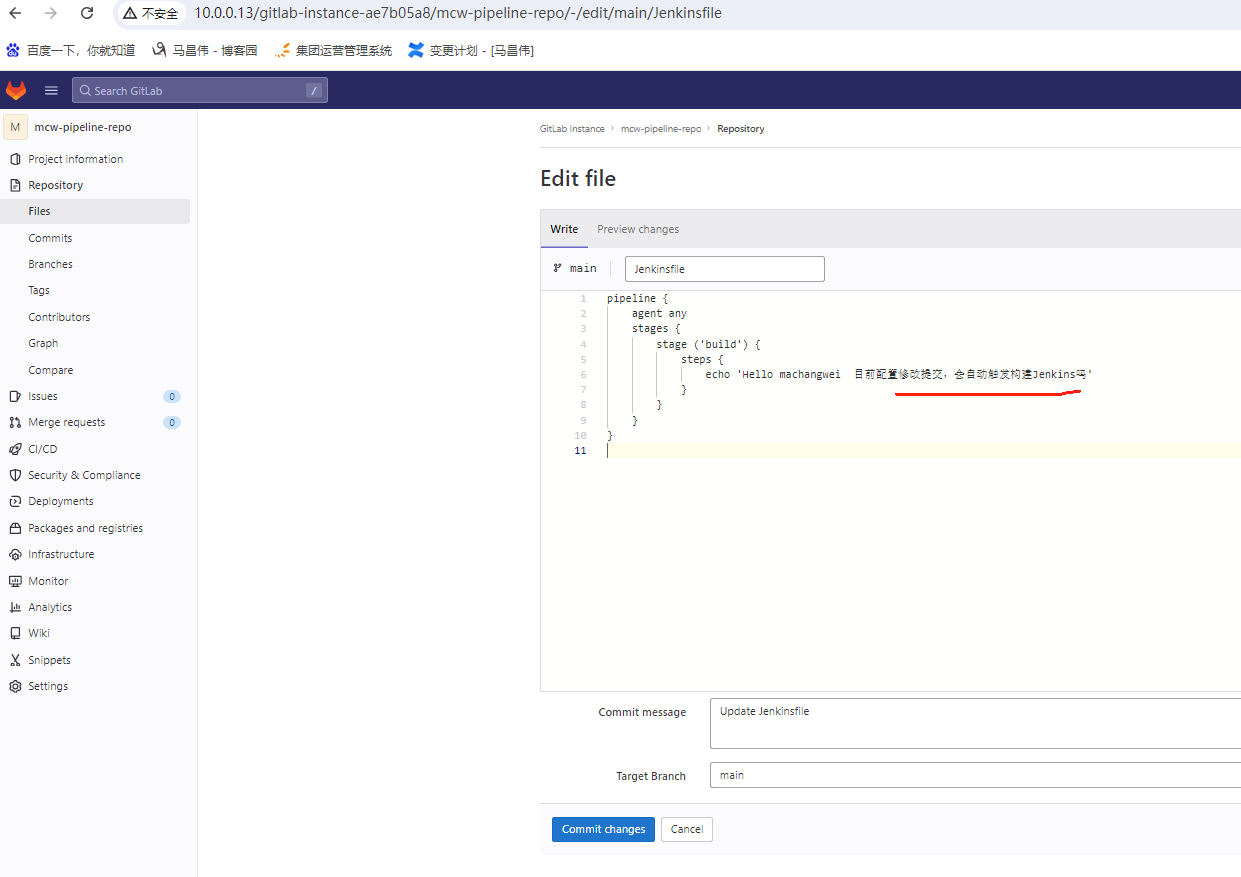
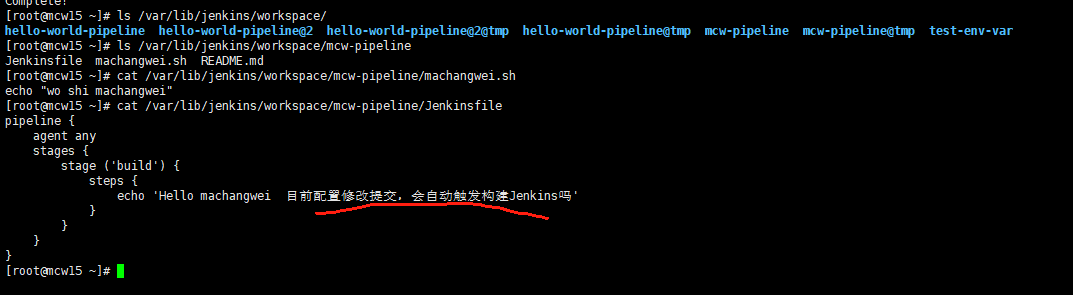
修改提交代码,查看目前配置会自动构建Jenkins任务么,
pipeline {
    agent any
    stages {
        stage ('build') {
            steps {
                echo 'Hello machangwei  目前配置修改提交,会自动触发构建Jenkins吗'
            }
        }
    }
}
并没有发现自动触发构建任务,我们手动触发一下

手动点击立即构建

可以看到我们的修改提交,但是目前是没有设置触发器的,包括Jenkins流水线项目页面的设置,都没有做配置。所以这里不会触发自动构建。接下来我们要在Jenkinsfile中添加配置,然后触发流水线项目的的自动化构建
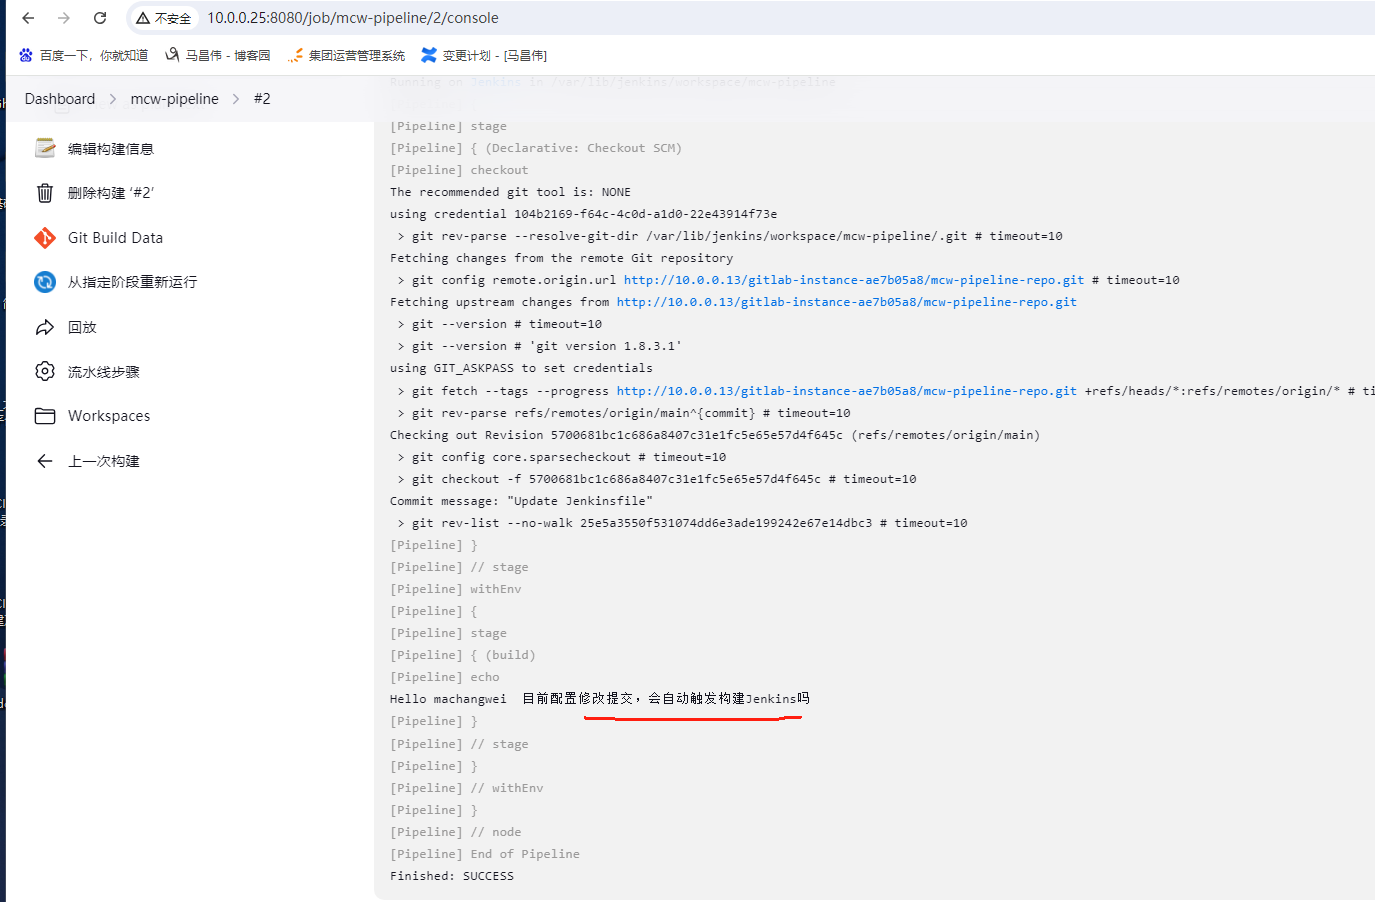
查看该项目代码已经被拉取到Jenkins工作目录中
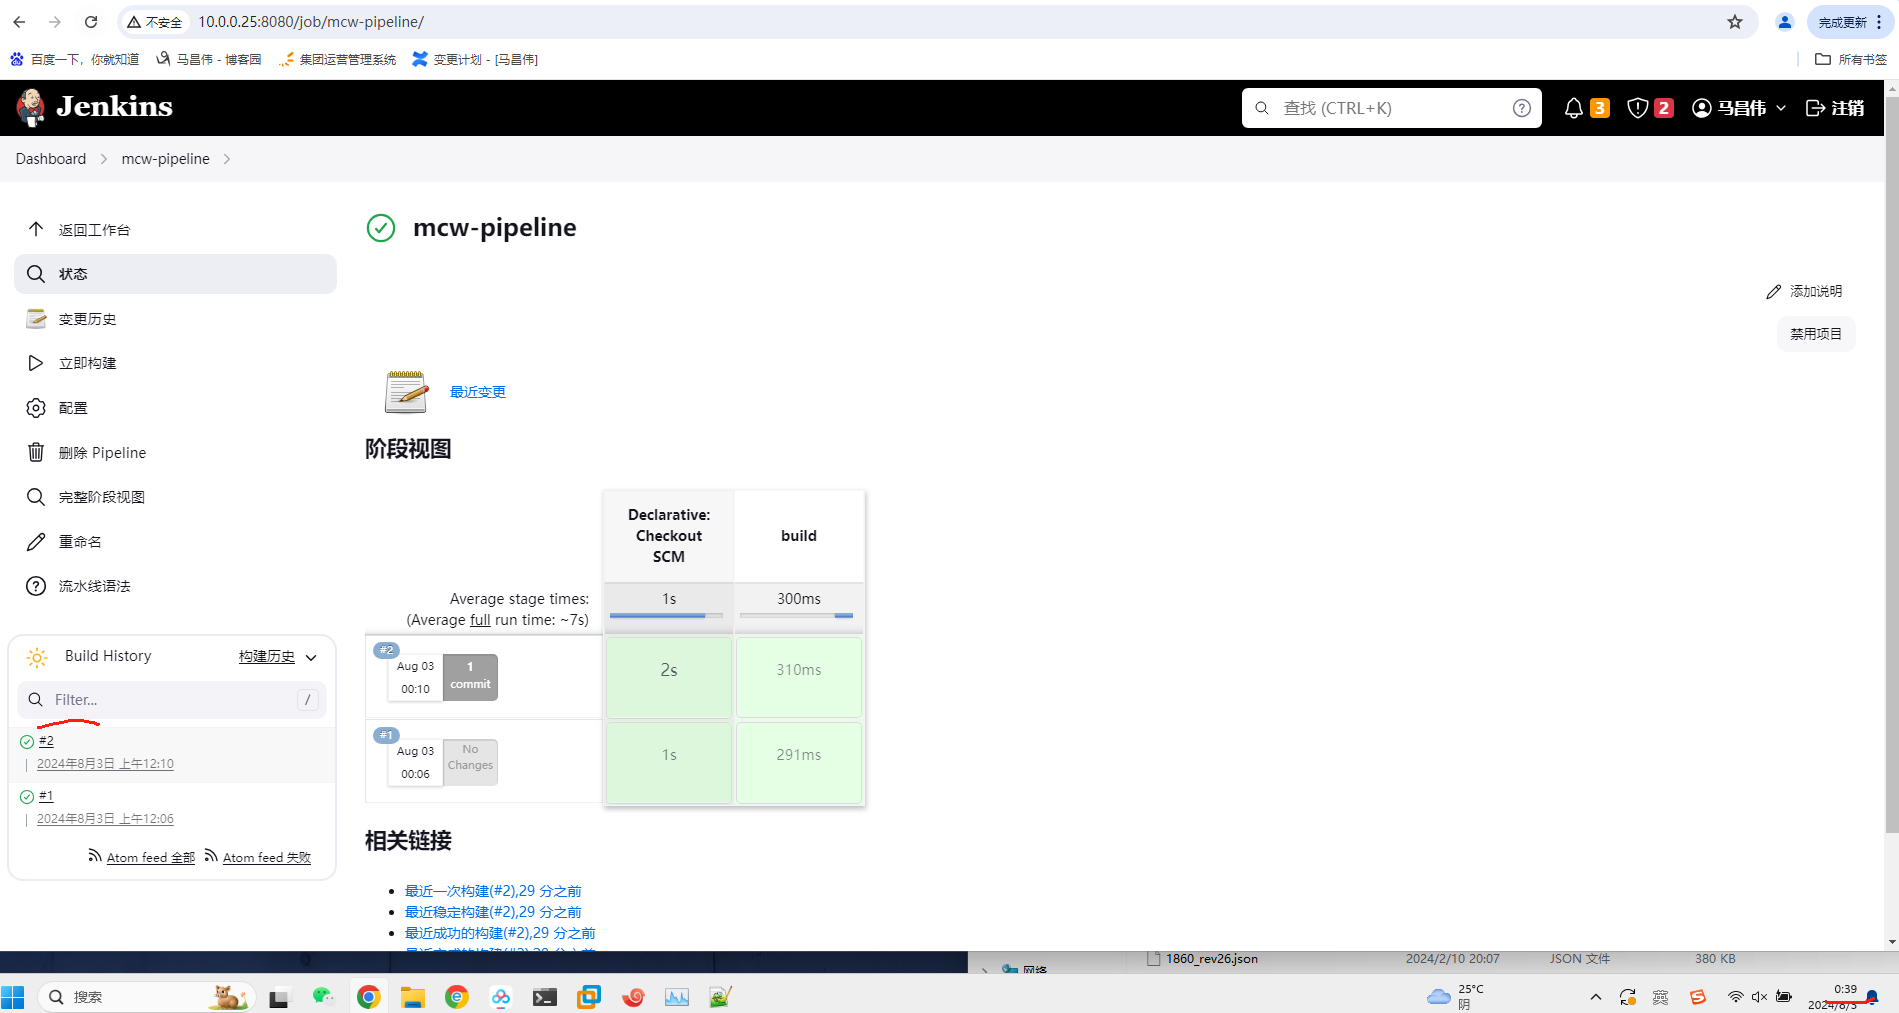
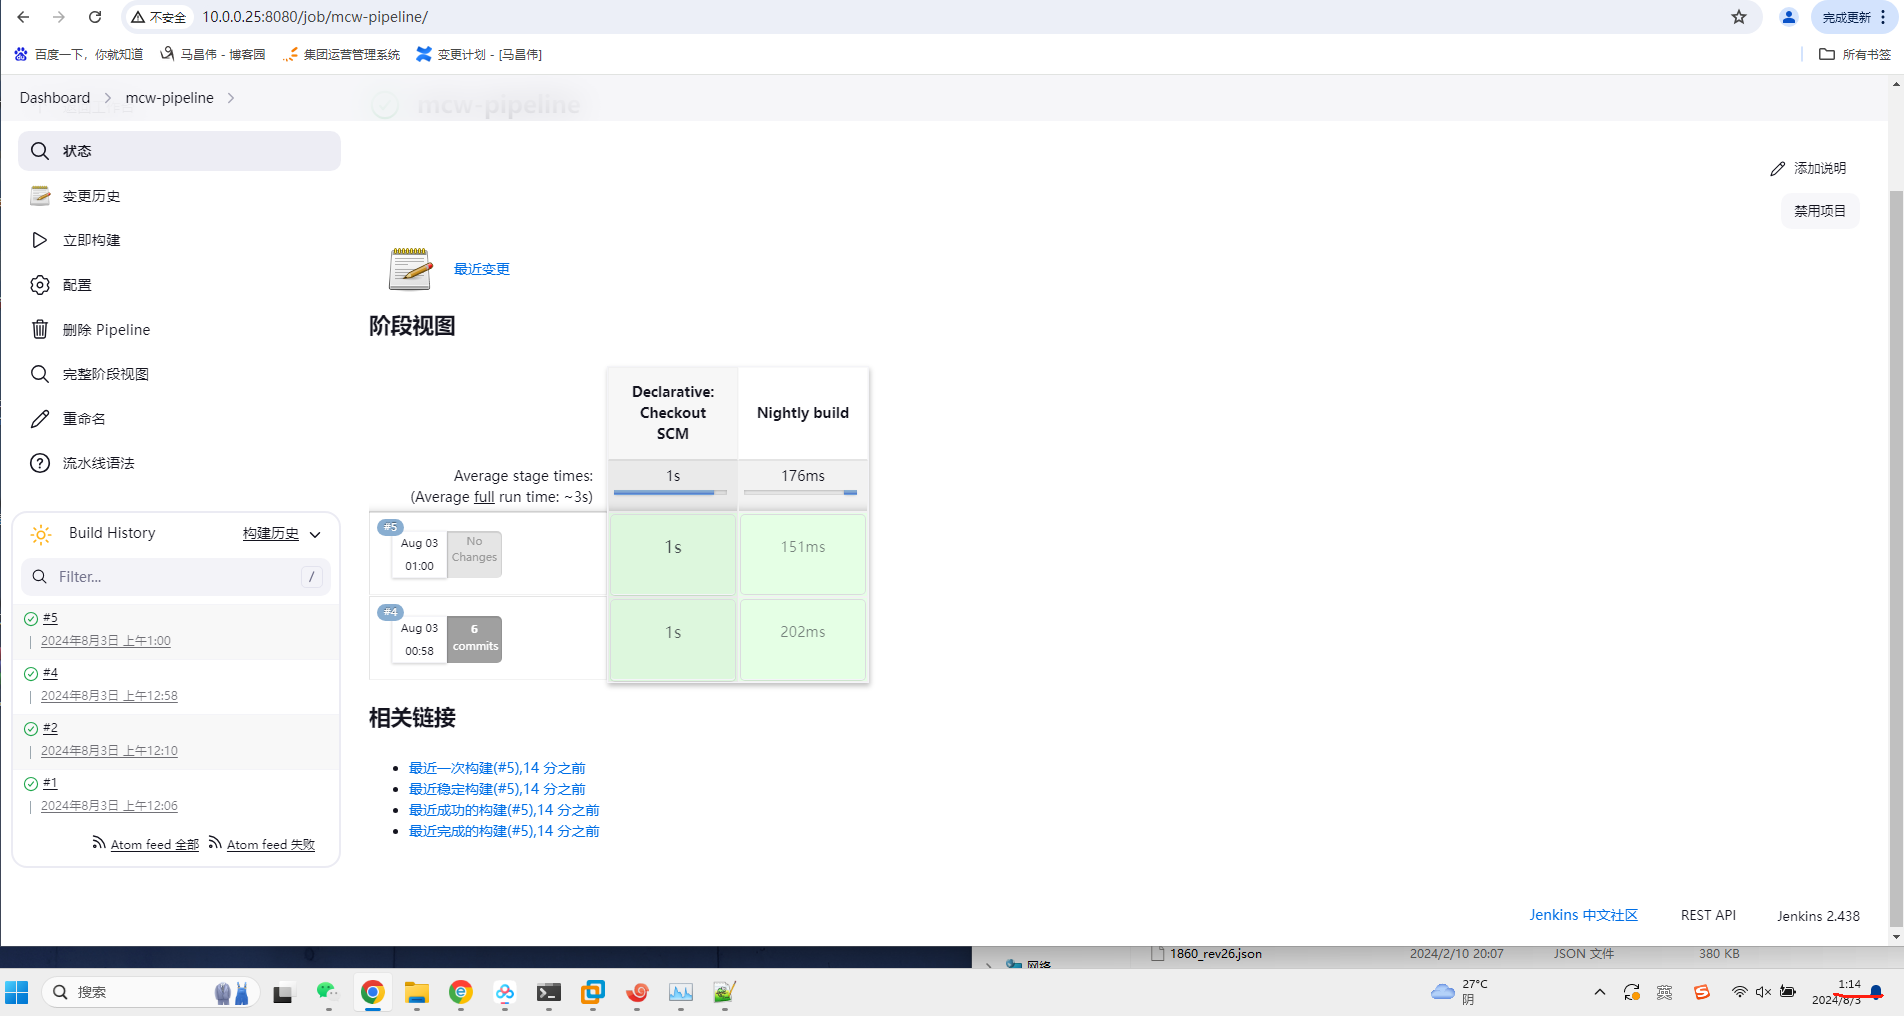
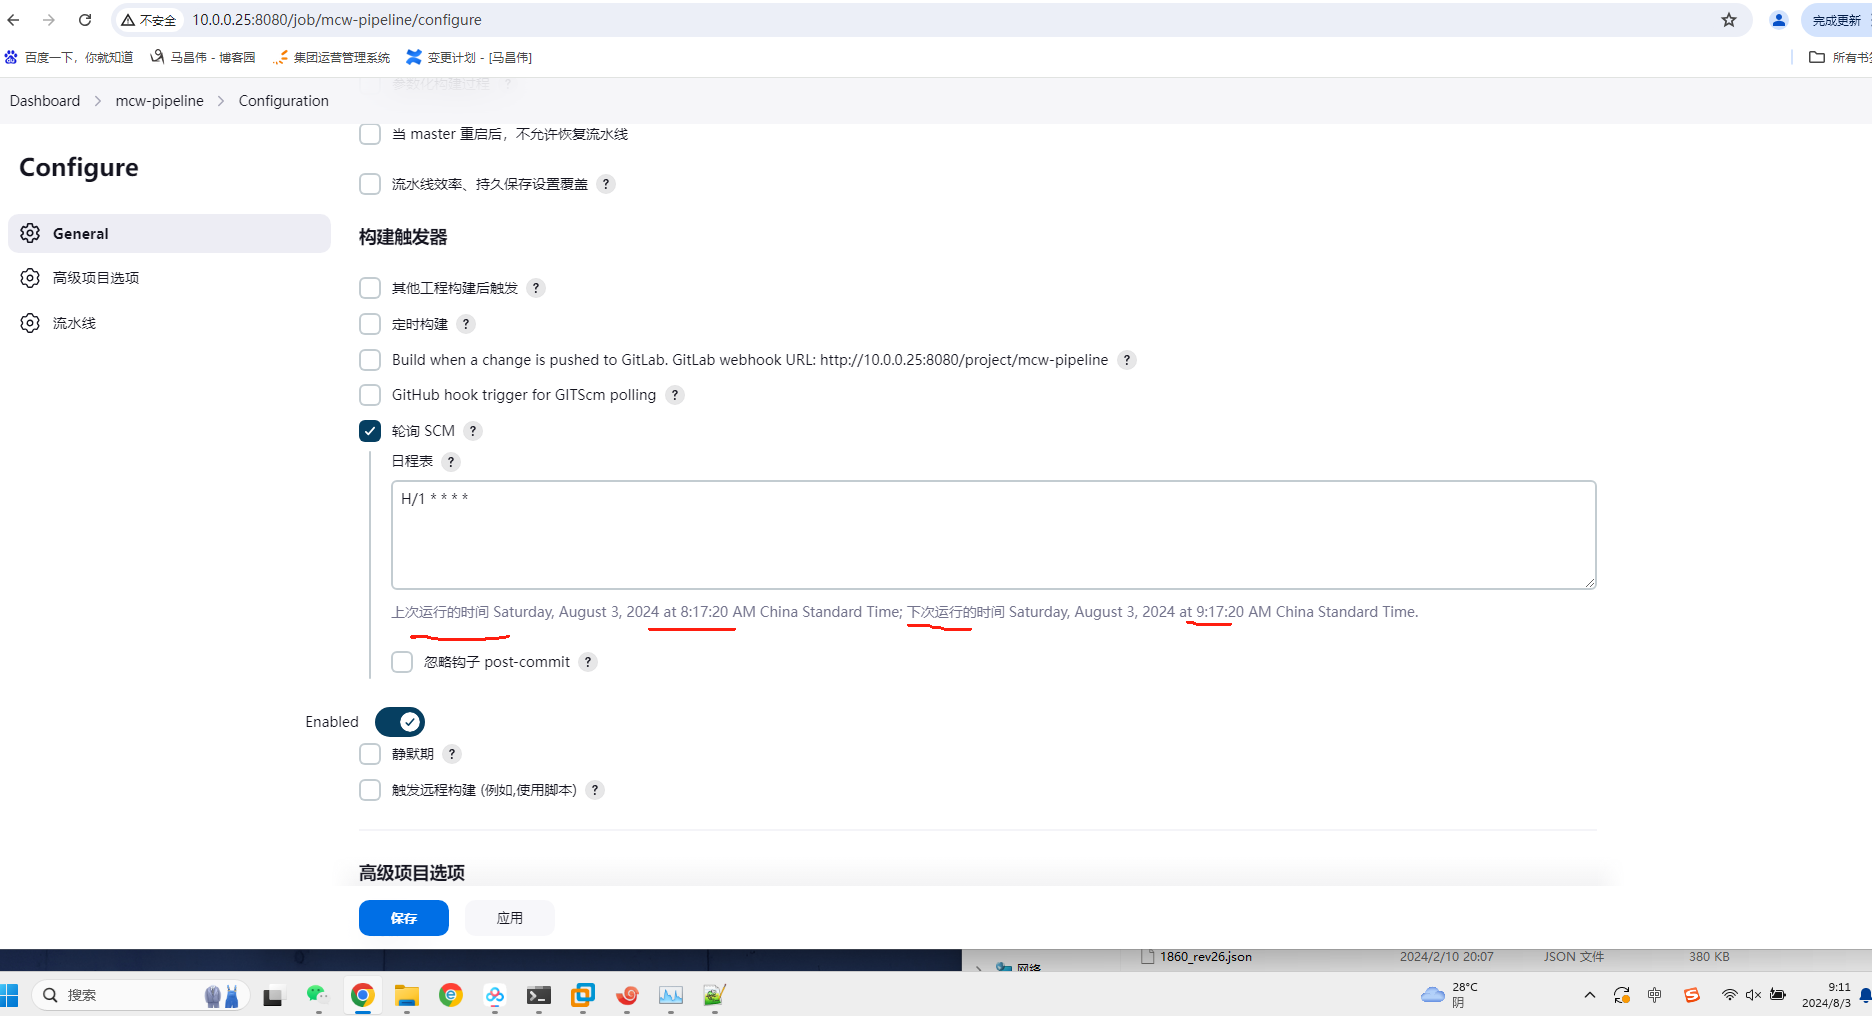
@@时间触发
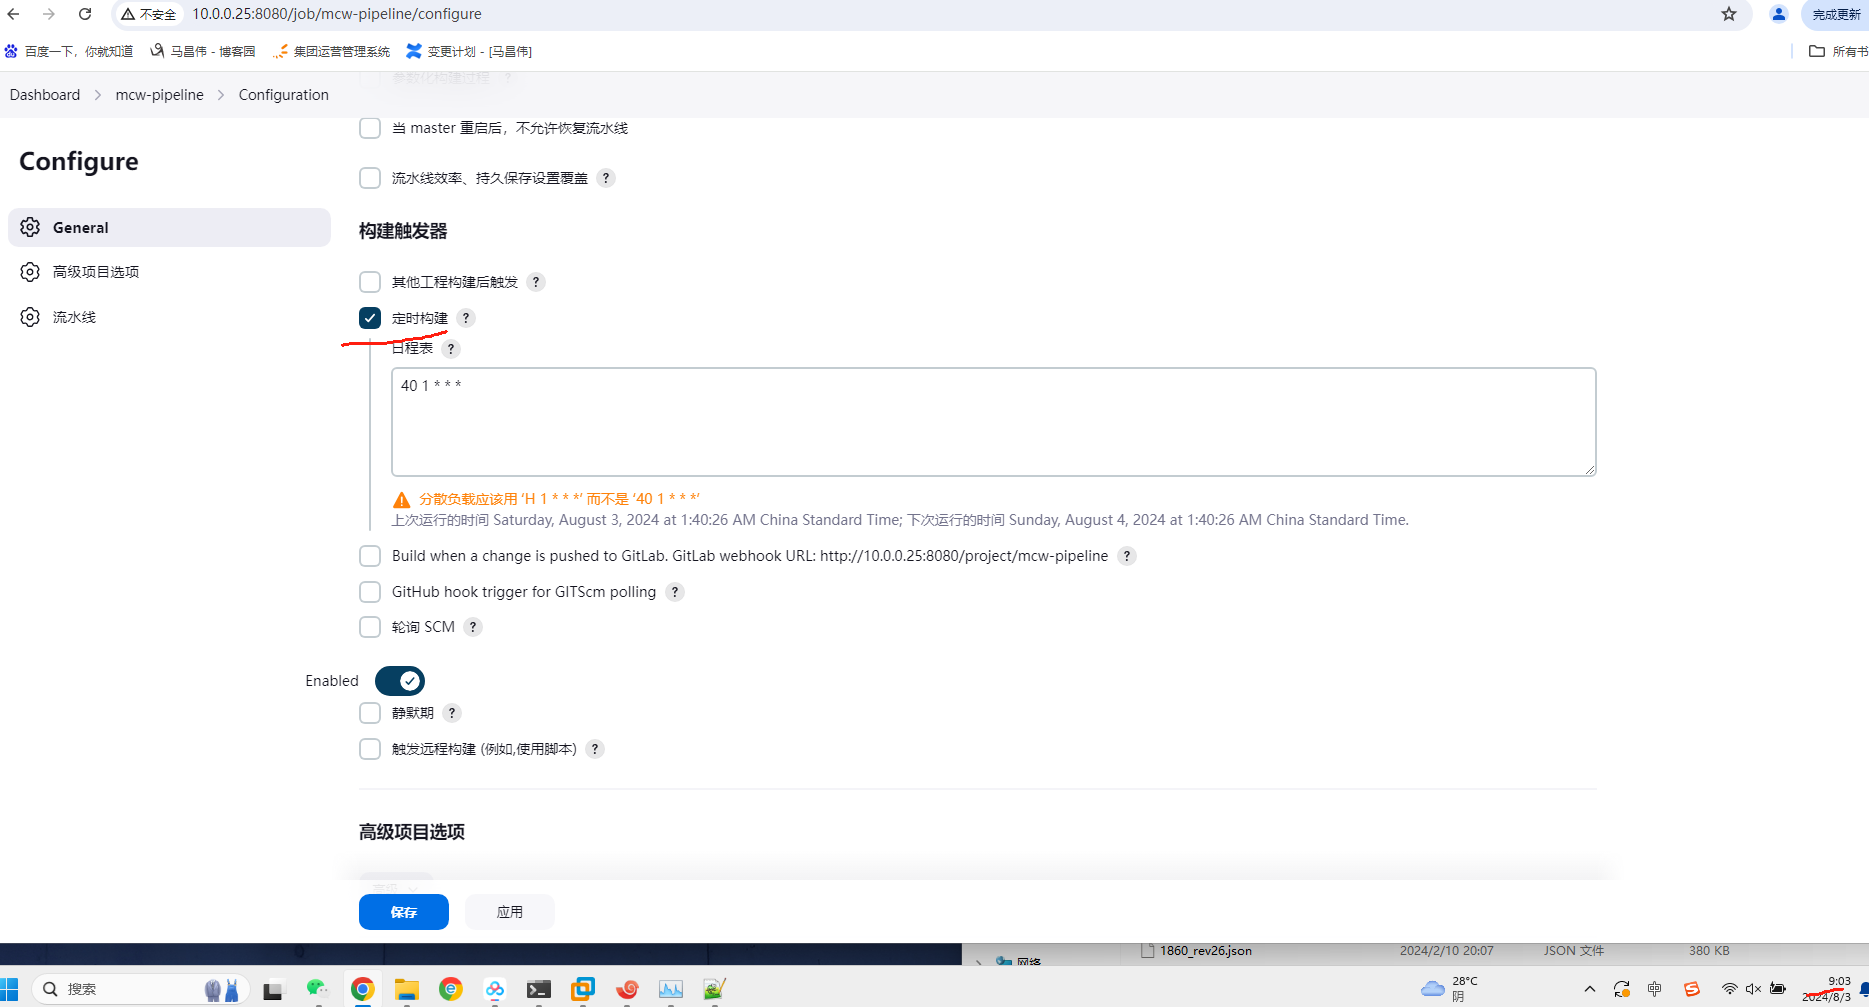
定时执行
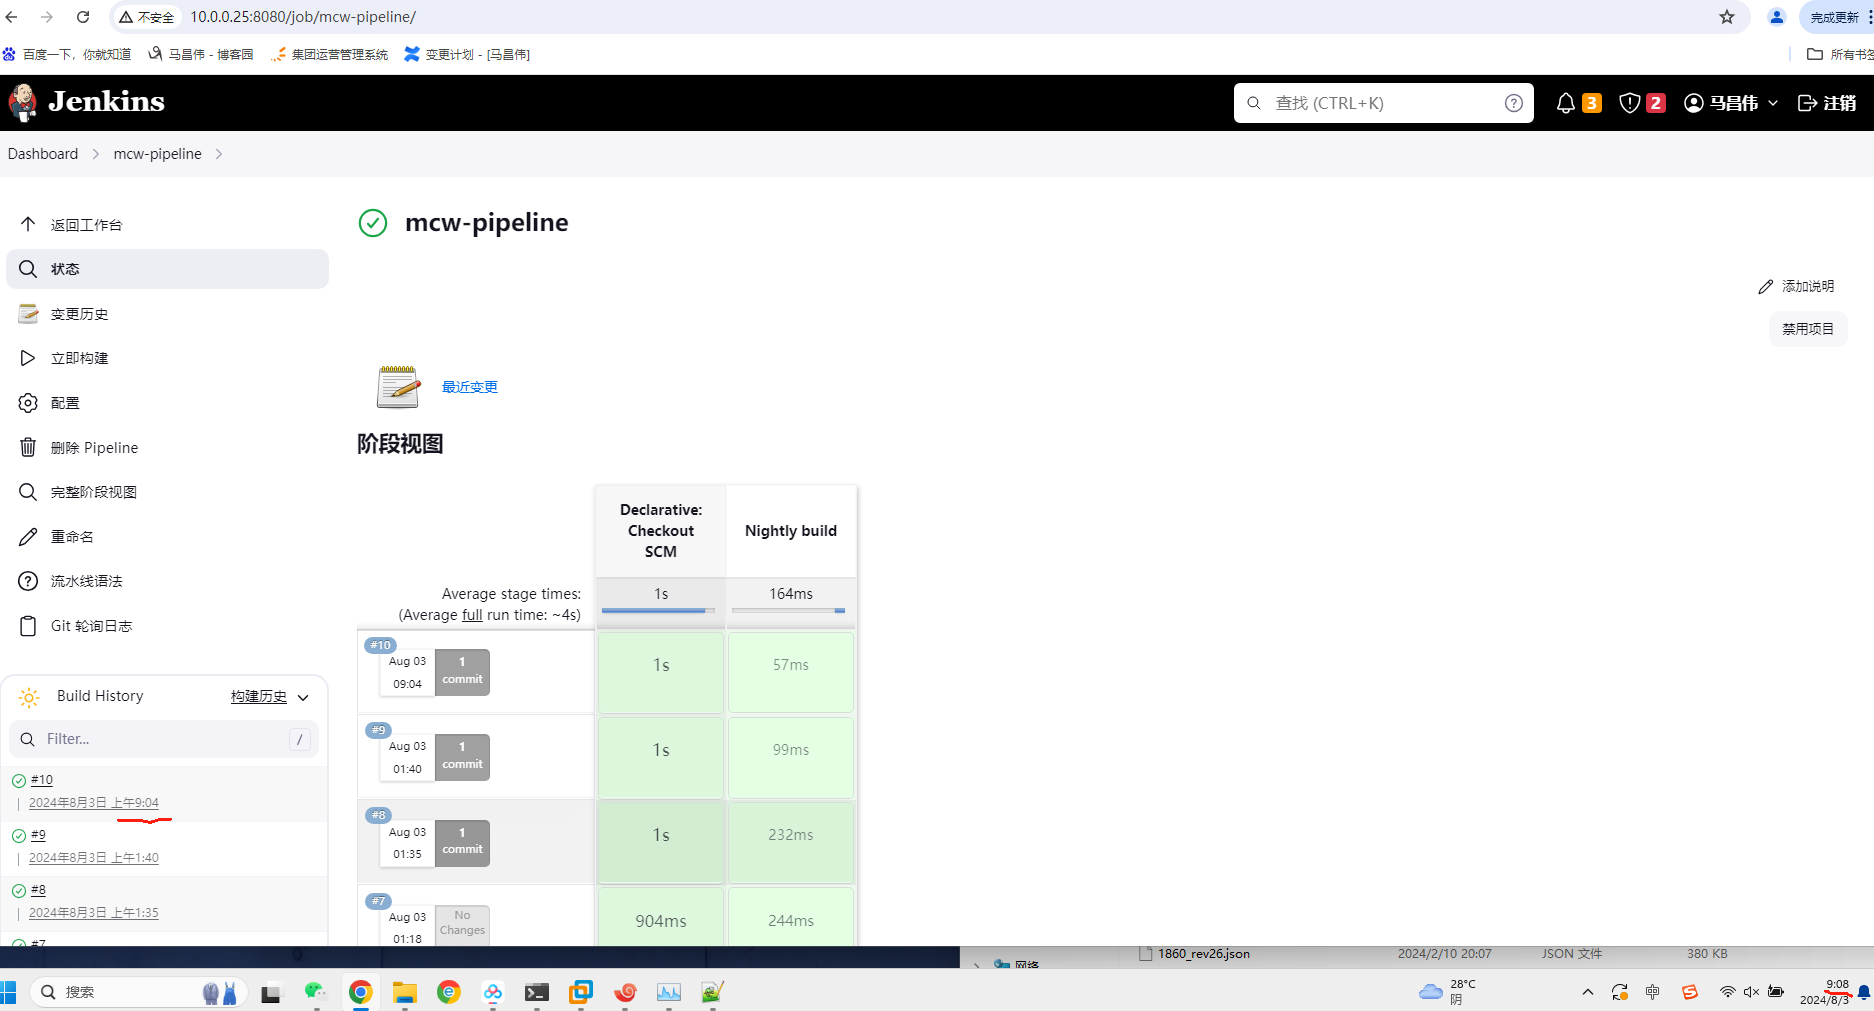
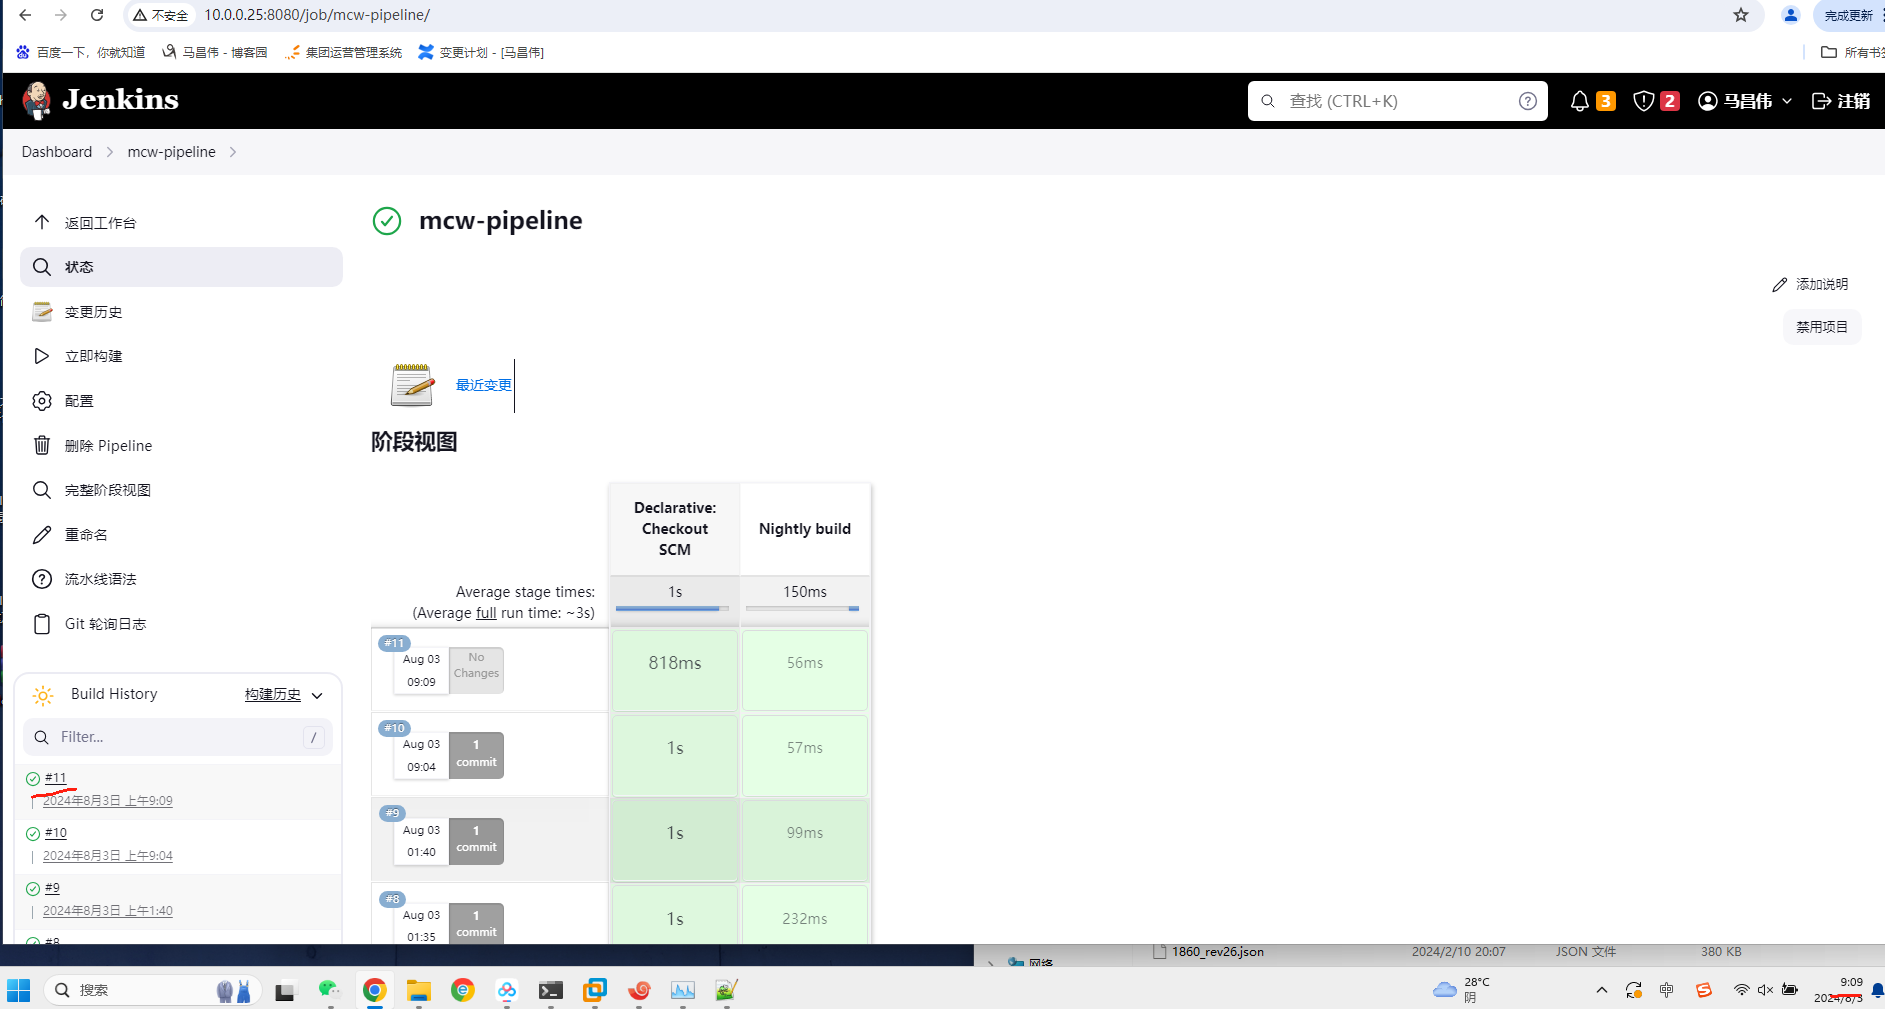
注意:修改了定时时间之后,要手动点击Jenkins项目的立即构建一次,这样把修改了定时时间同步到Jenkins项目配置里,我们也能从Jenkins项目配置里看到这个同步的计划时间,并且不是我们手动打进去的时间。
其它方式的触发,可能写好Jenkinsfile之后,也是需要这样操作,同步Jenkinsfile的触发器配置到Jenkins项目配置中
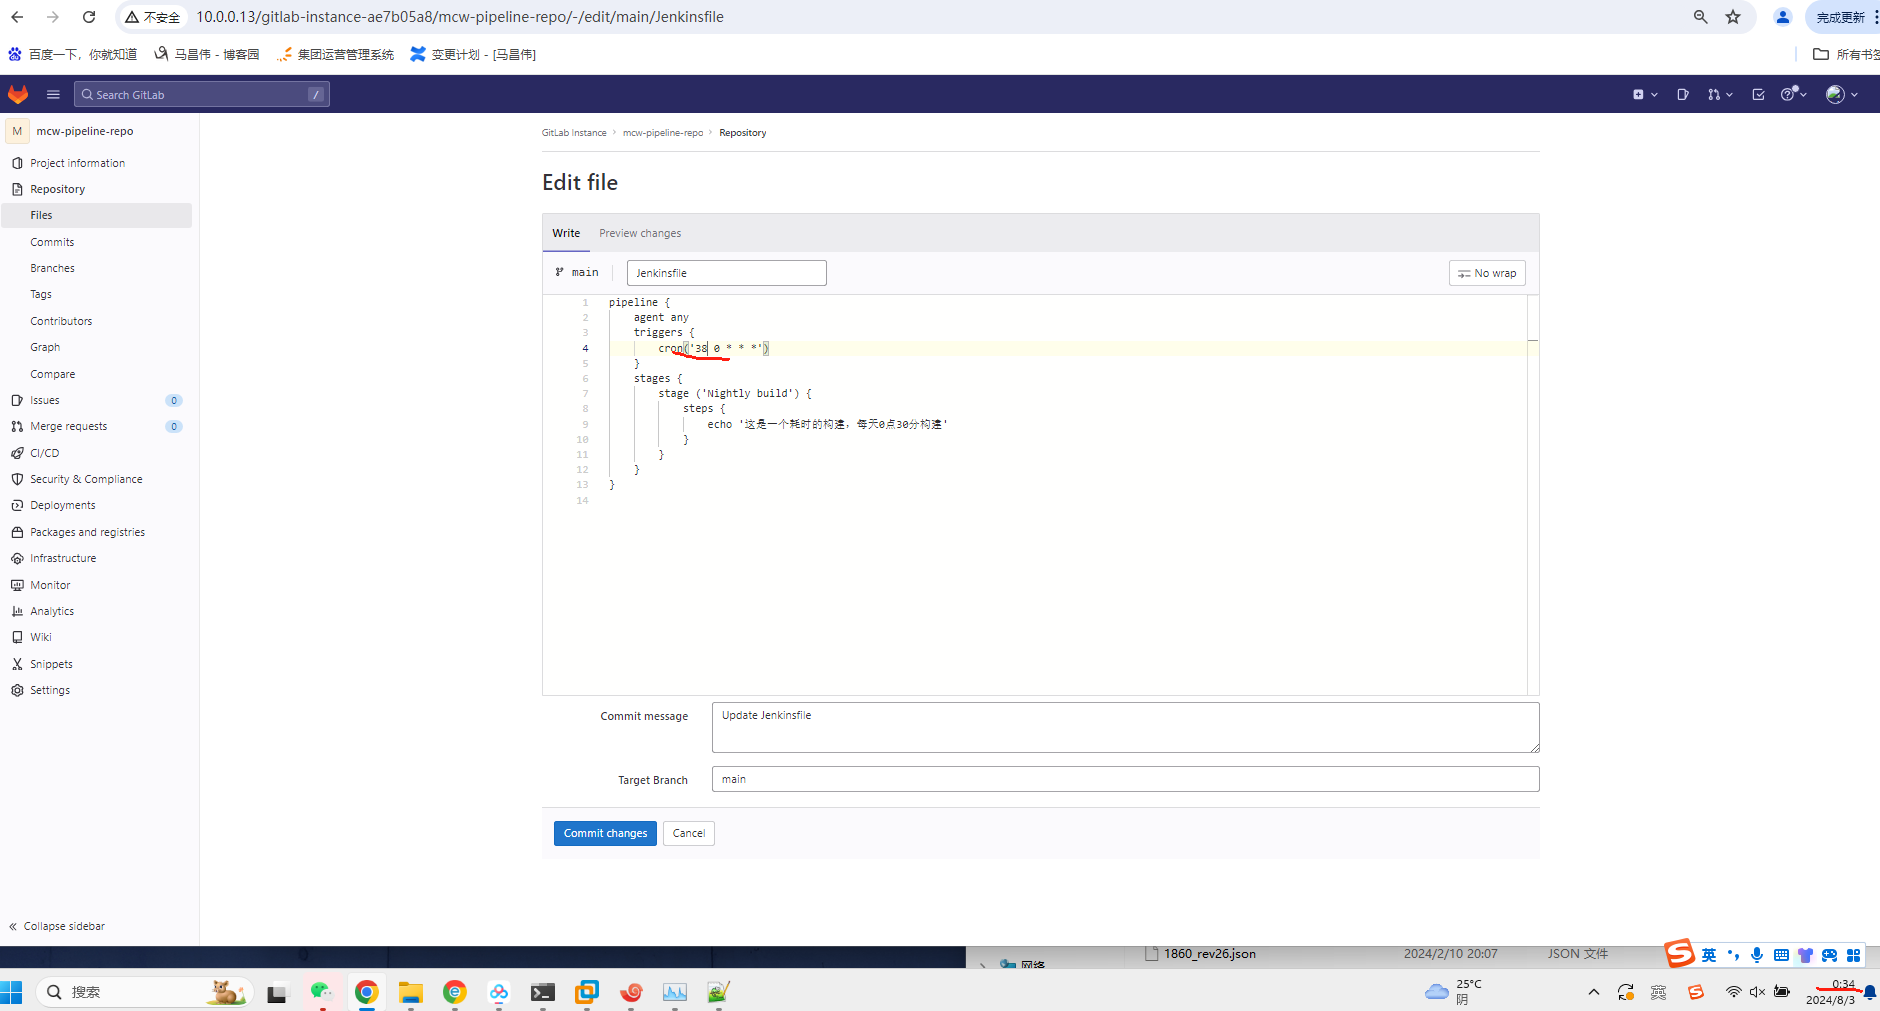
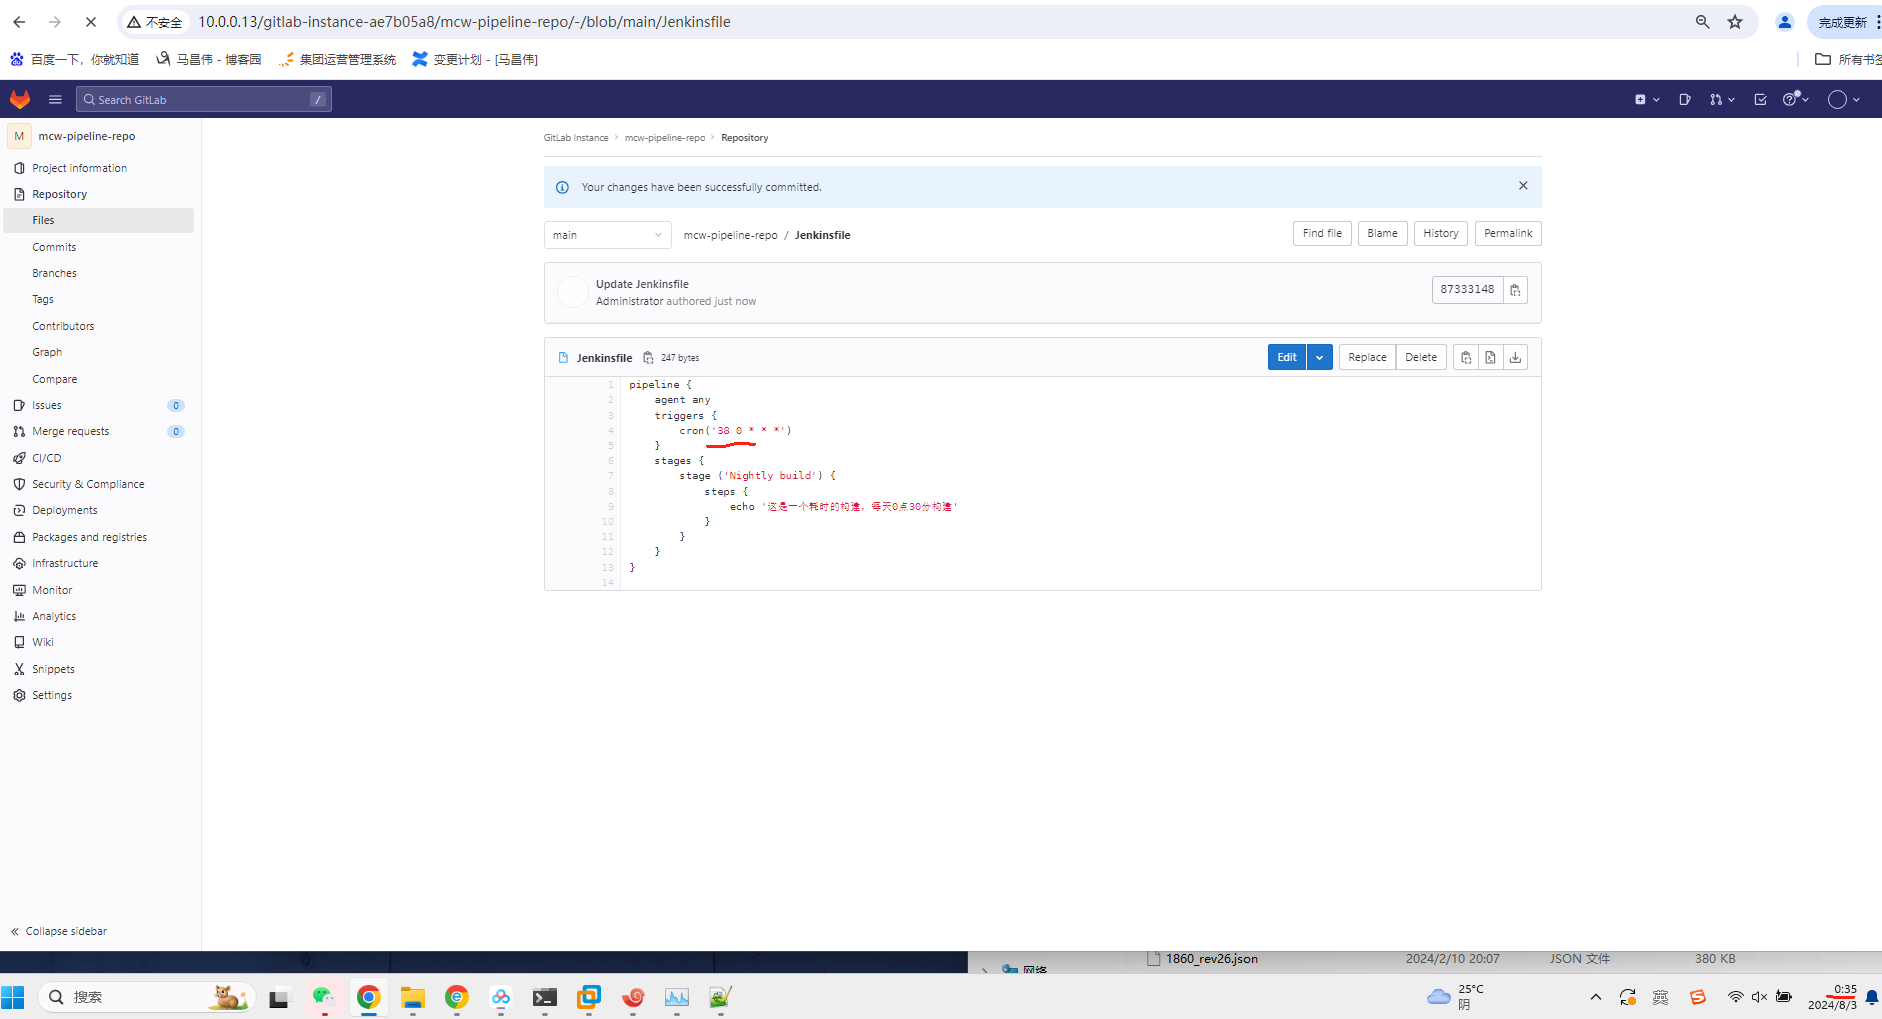
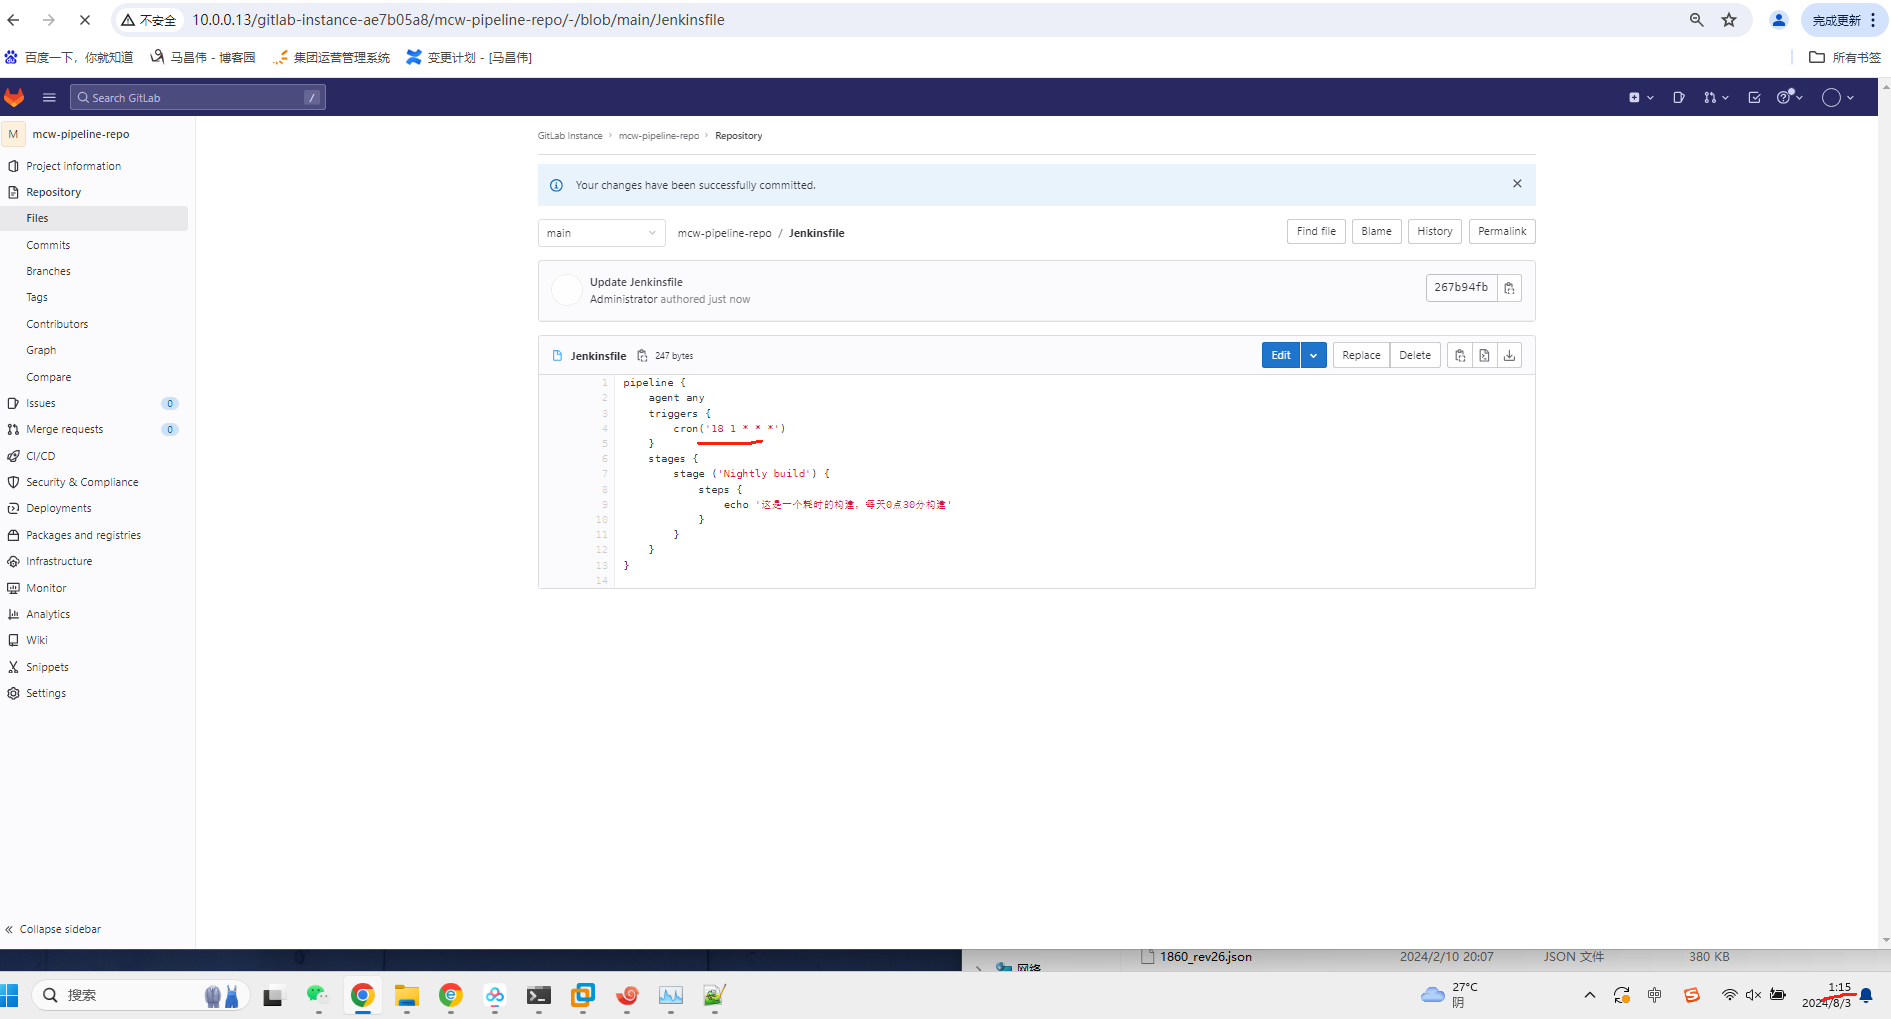
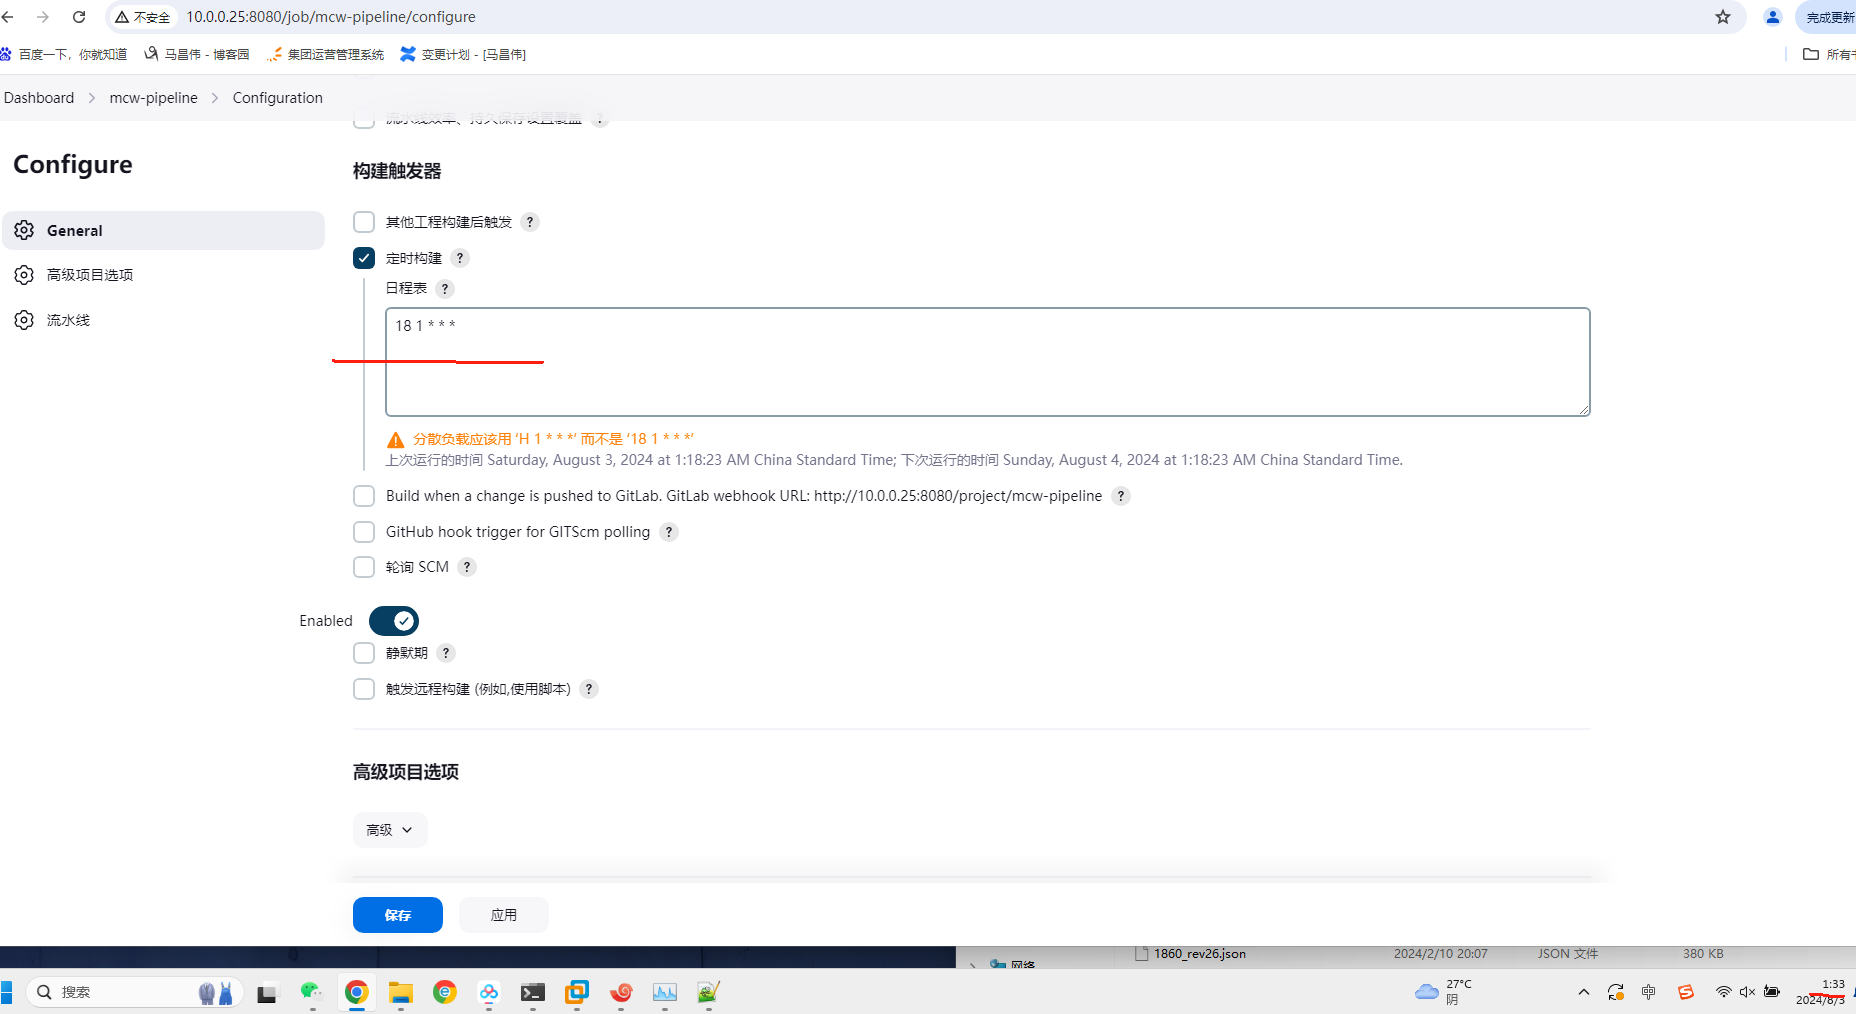
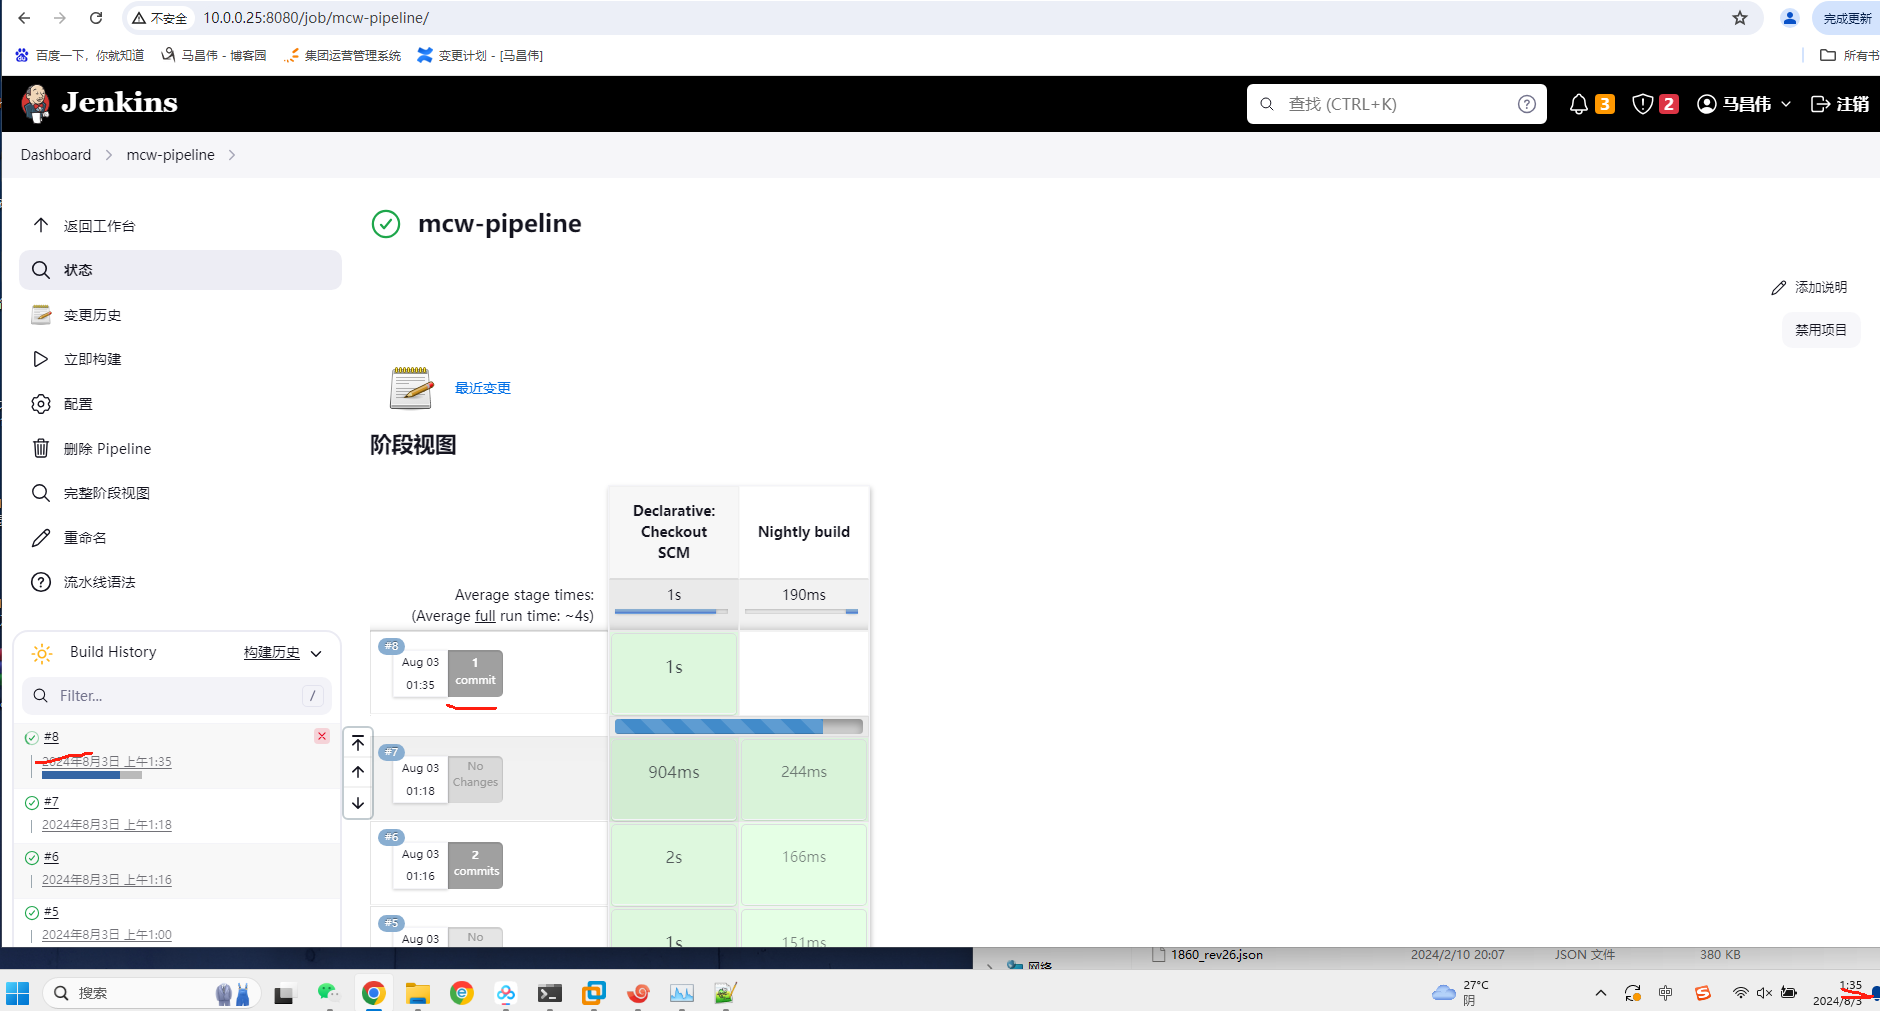
pipeline {
    agent any
    triggers {
        cron('18 1 * * *')
    }
    stages {
        stage ('Nightly build') {
            steps {
                echo '这是一个耗时的构建,每天0点30分构建'
            }
        }
    }
}
pipeline语句里面设置触发器,0点38分钟的时候定时自动触发构建任务
35分的时候我已经提交代码
此时还没有构建任务,等38分的时候,看是否会定时触发构建任务
39分了,还是没有触发
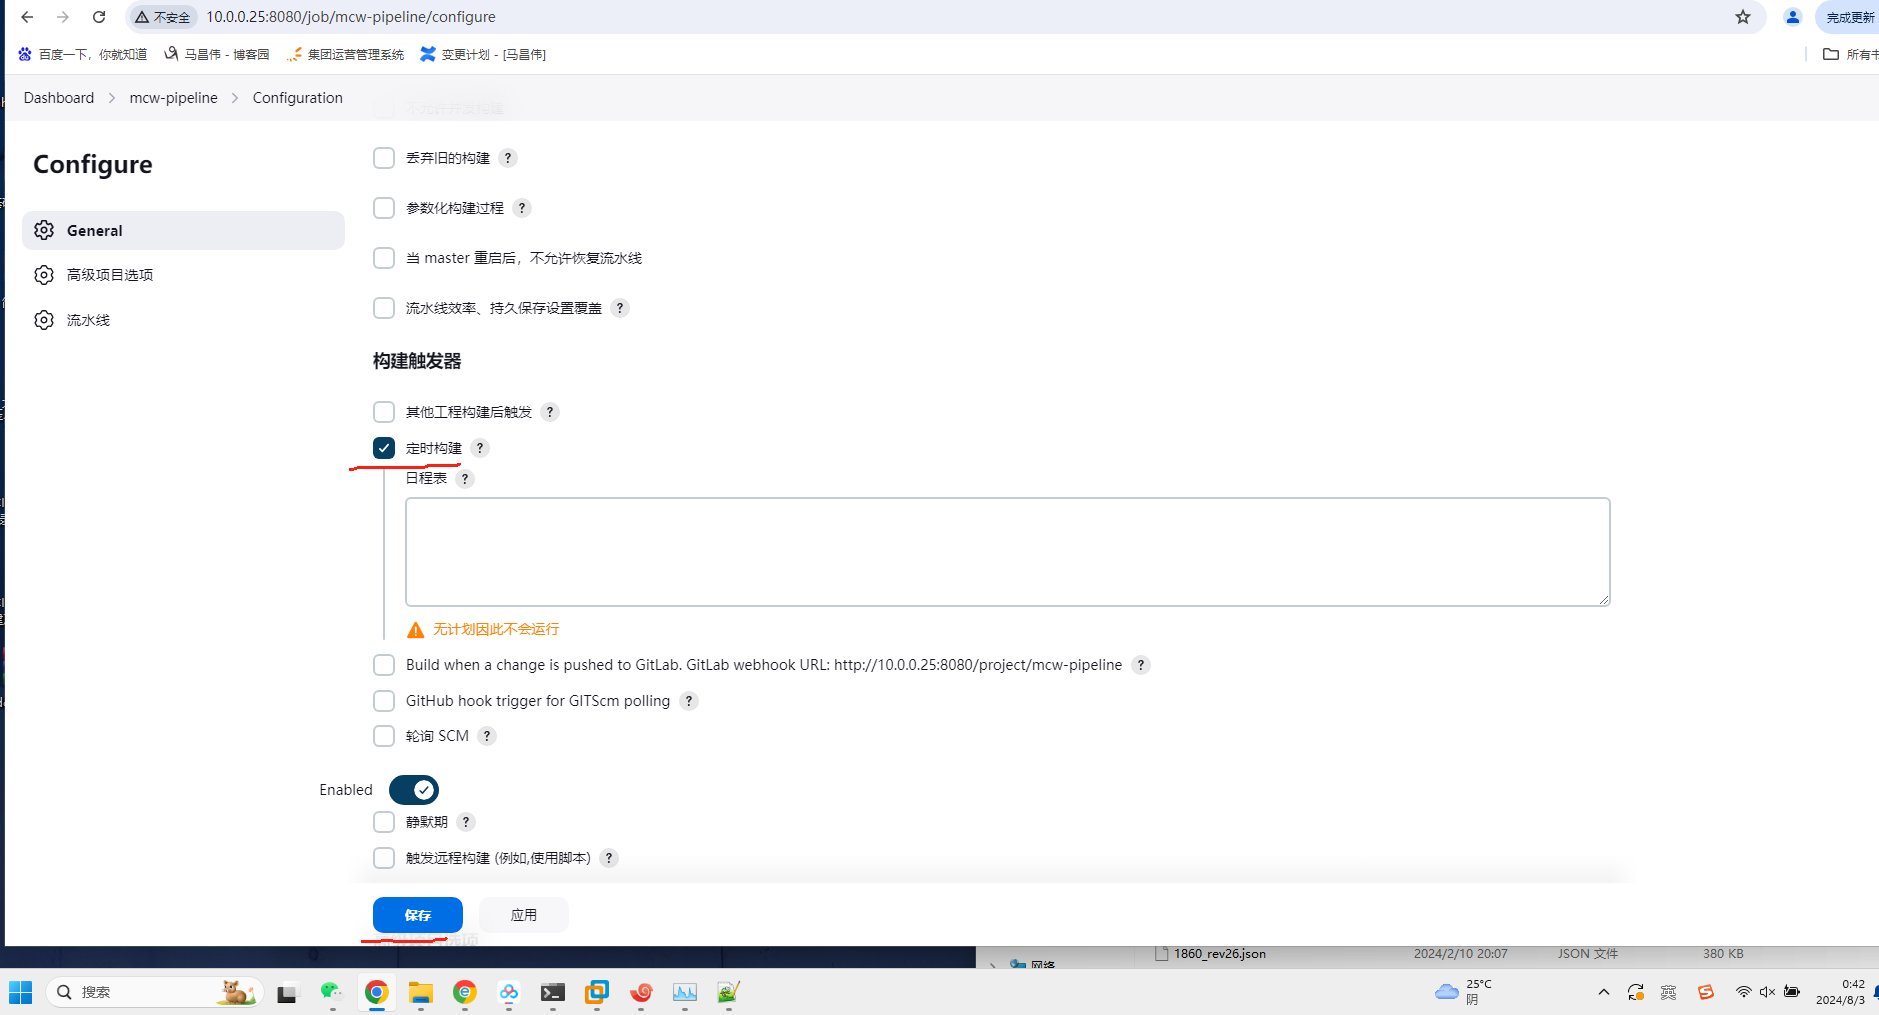
是否要勾选上,但是可以不写计划呢
将时间改为46

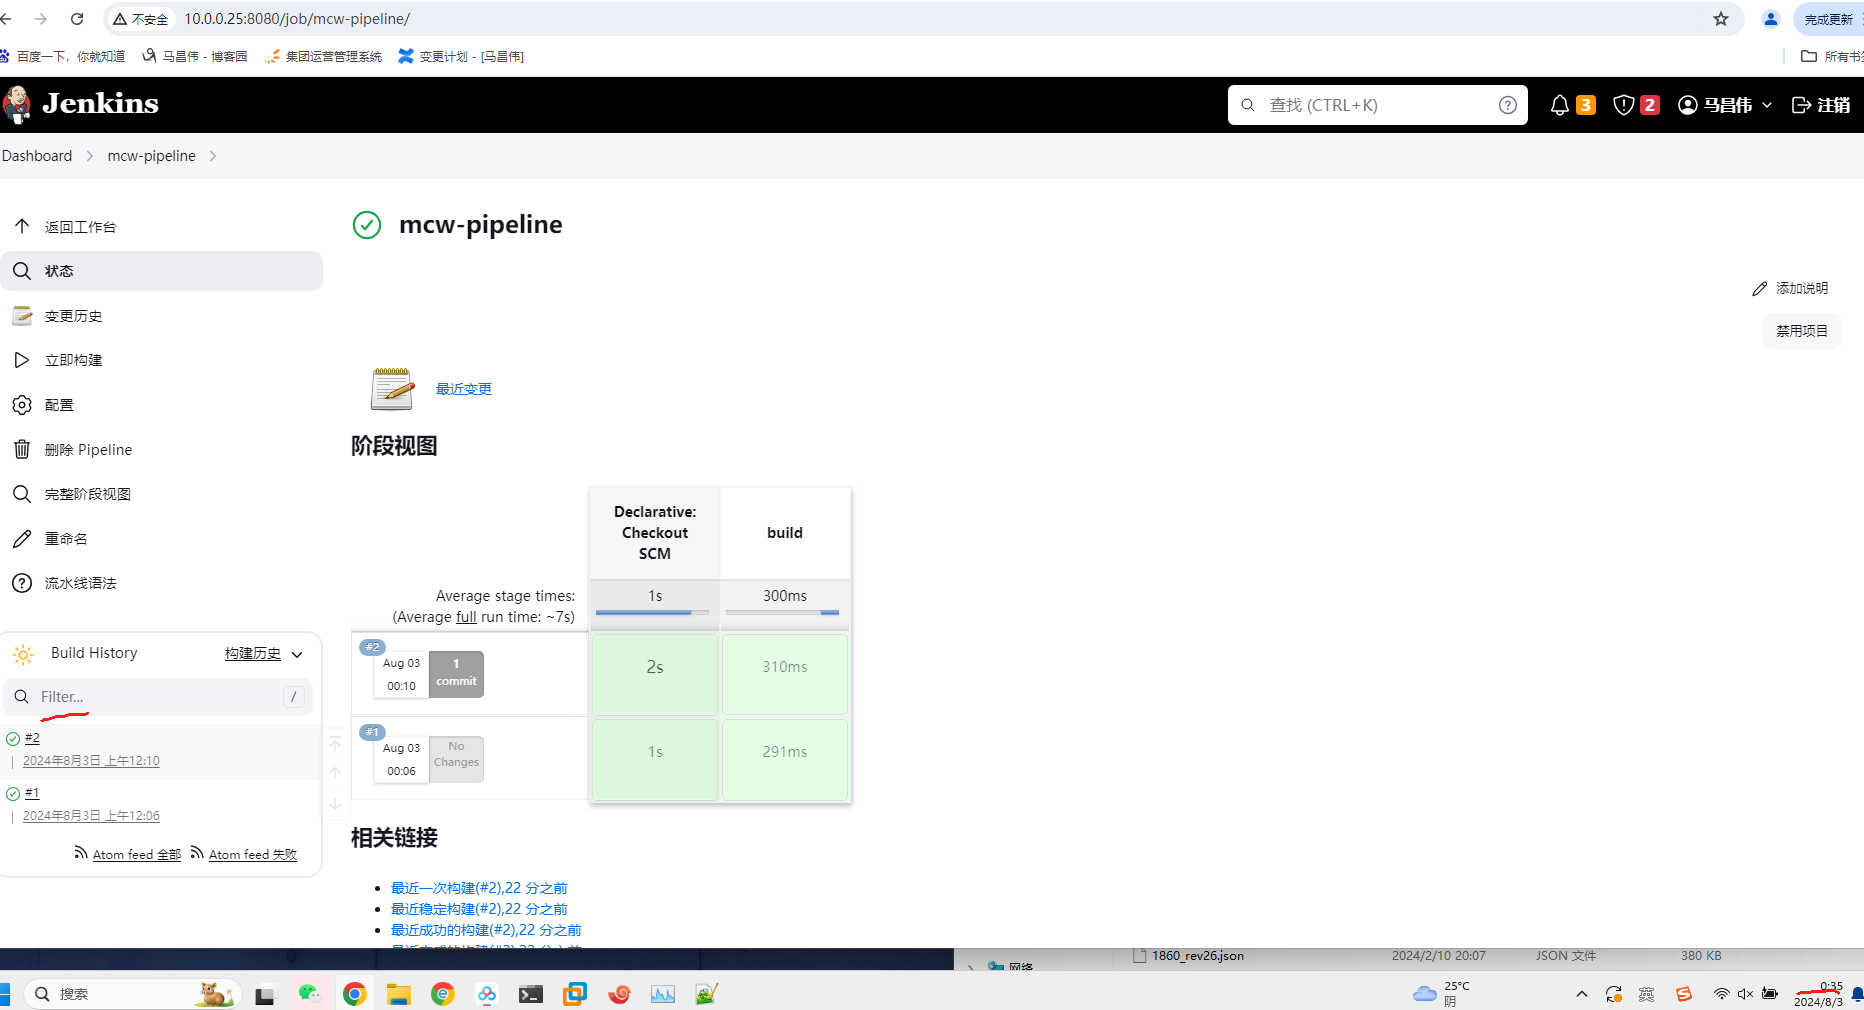
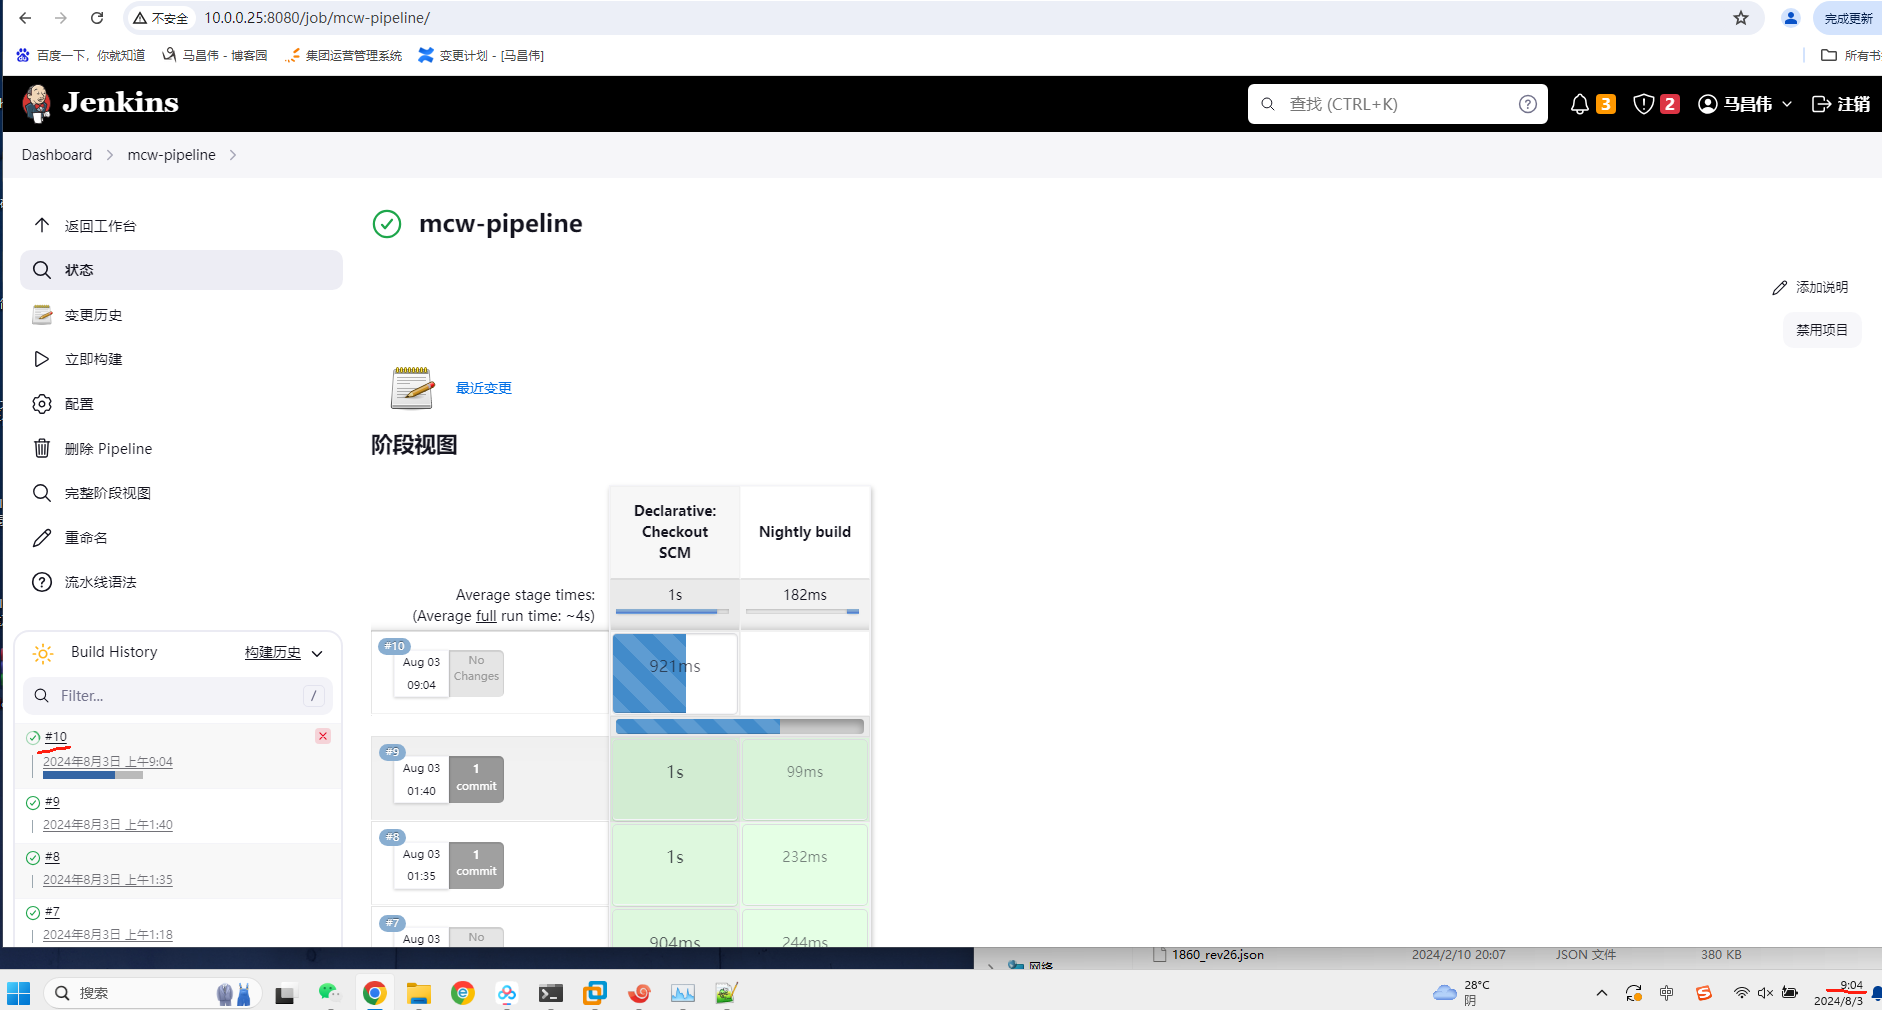
还是没有触发构建
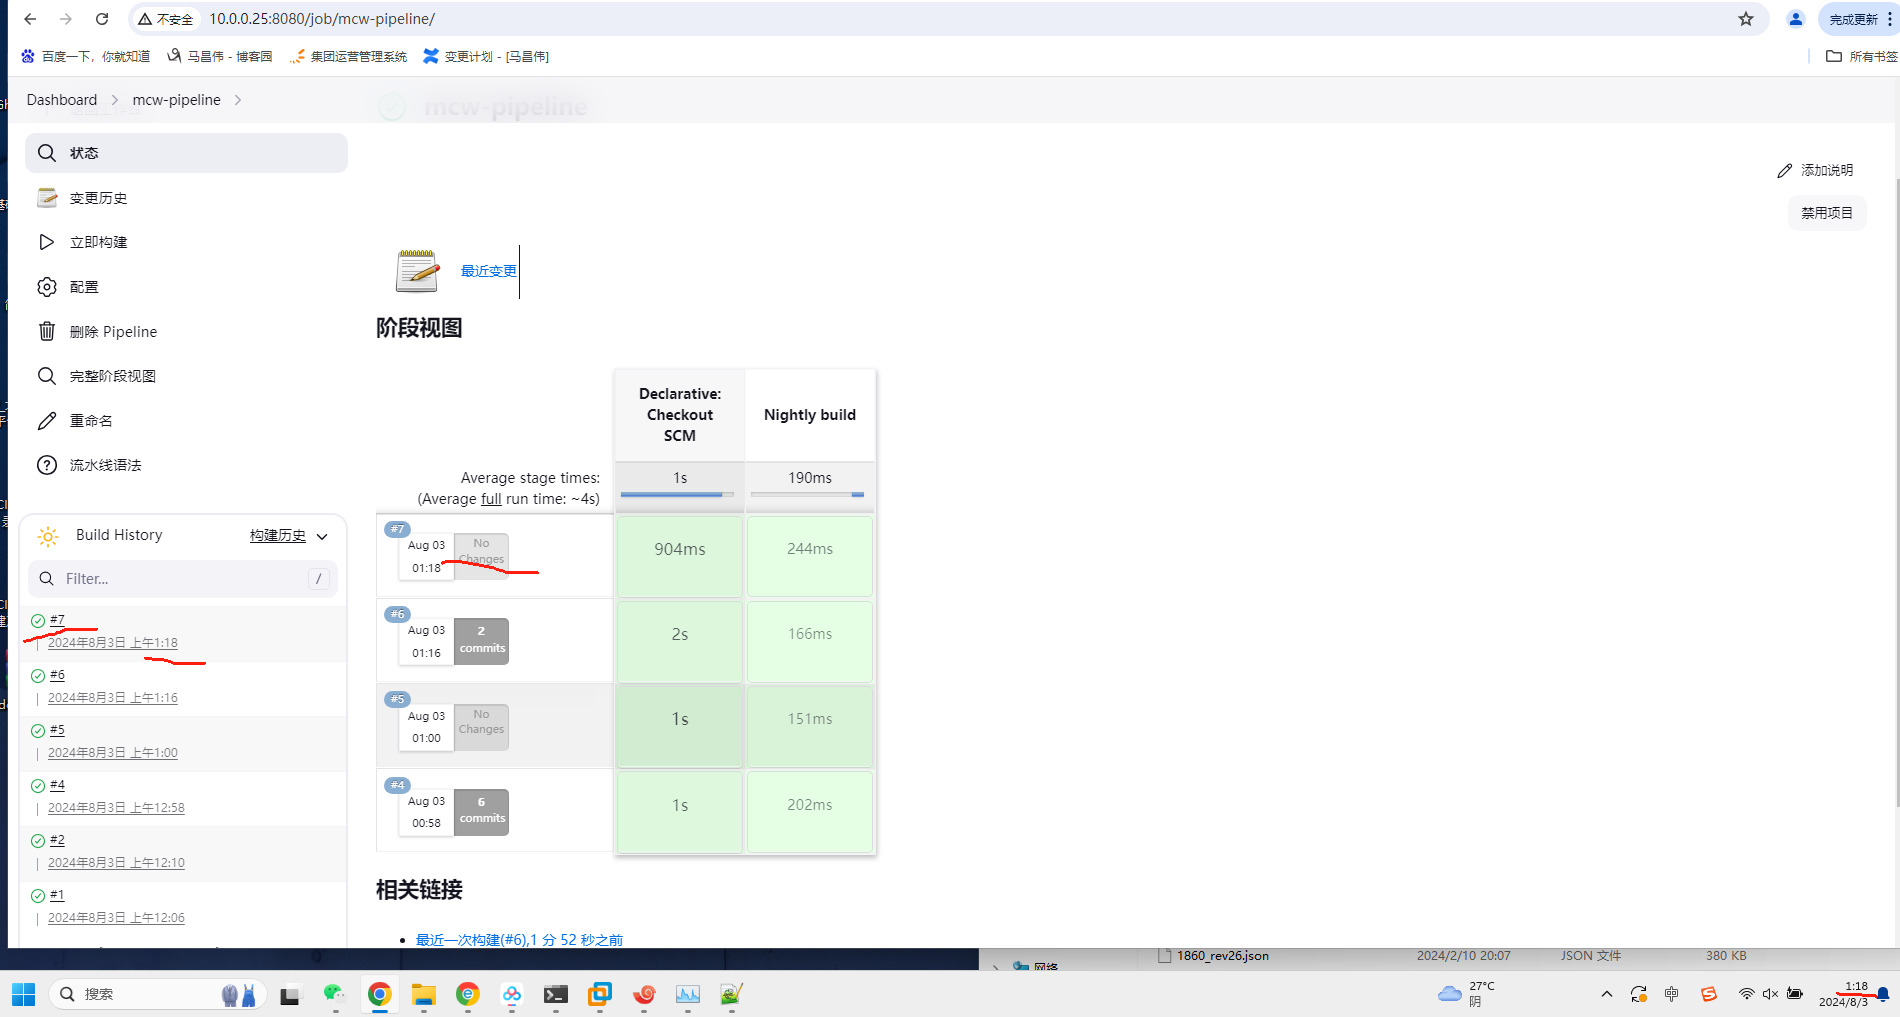
好像现在可以了。之前修改pipeline语句之后,手动触发4,然后它自动触发执行了5。应该是我们设置好之后,得先手动点立即构建一次,然后等它自己定时触发

下面我们再次测试一下定时触发。修改为1点14触发,等14分看它是否触发

14分之后查看,还是没有触发
下面再做次测试
我们先改为18分自动触发
自动触发之前,先手动点击立即构建,然后静等18分看是否自动触发

亲眼看到,18分的时候,的确自动触发构建了。因此得出结论,每次修改完Jenkinsfile之后(不清楚是否跟修改时间还是其它内容的直接原因,需要验证),需要手动在Jenkins上点击立即构建,然后这个定时触发的,到了时间才会触发构建任务。如果修改完之后没有在自动触发之前,点击立即构建一次,那么它到了自动触发的时间,却不会触发执行构建任务。定时触发的这里,可以看到是No changes。而在此自动定时触发之前我们已经因为提交一次Jenkinsfile,并且点击立即构建,然后显示的是commit,而这个提交,修改的是Jenkinsfile或者是其他文件,跟定时自动触发是否存在什么关联,以后验证。验证是否,只有Jenkinsfile被重新提交,或者是只有计划时间重新提交,才会需要手动点击一次立即构建,才能让定时自动构建生效,验证这个疑问。
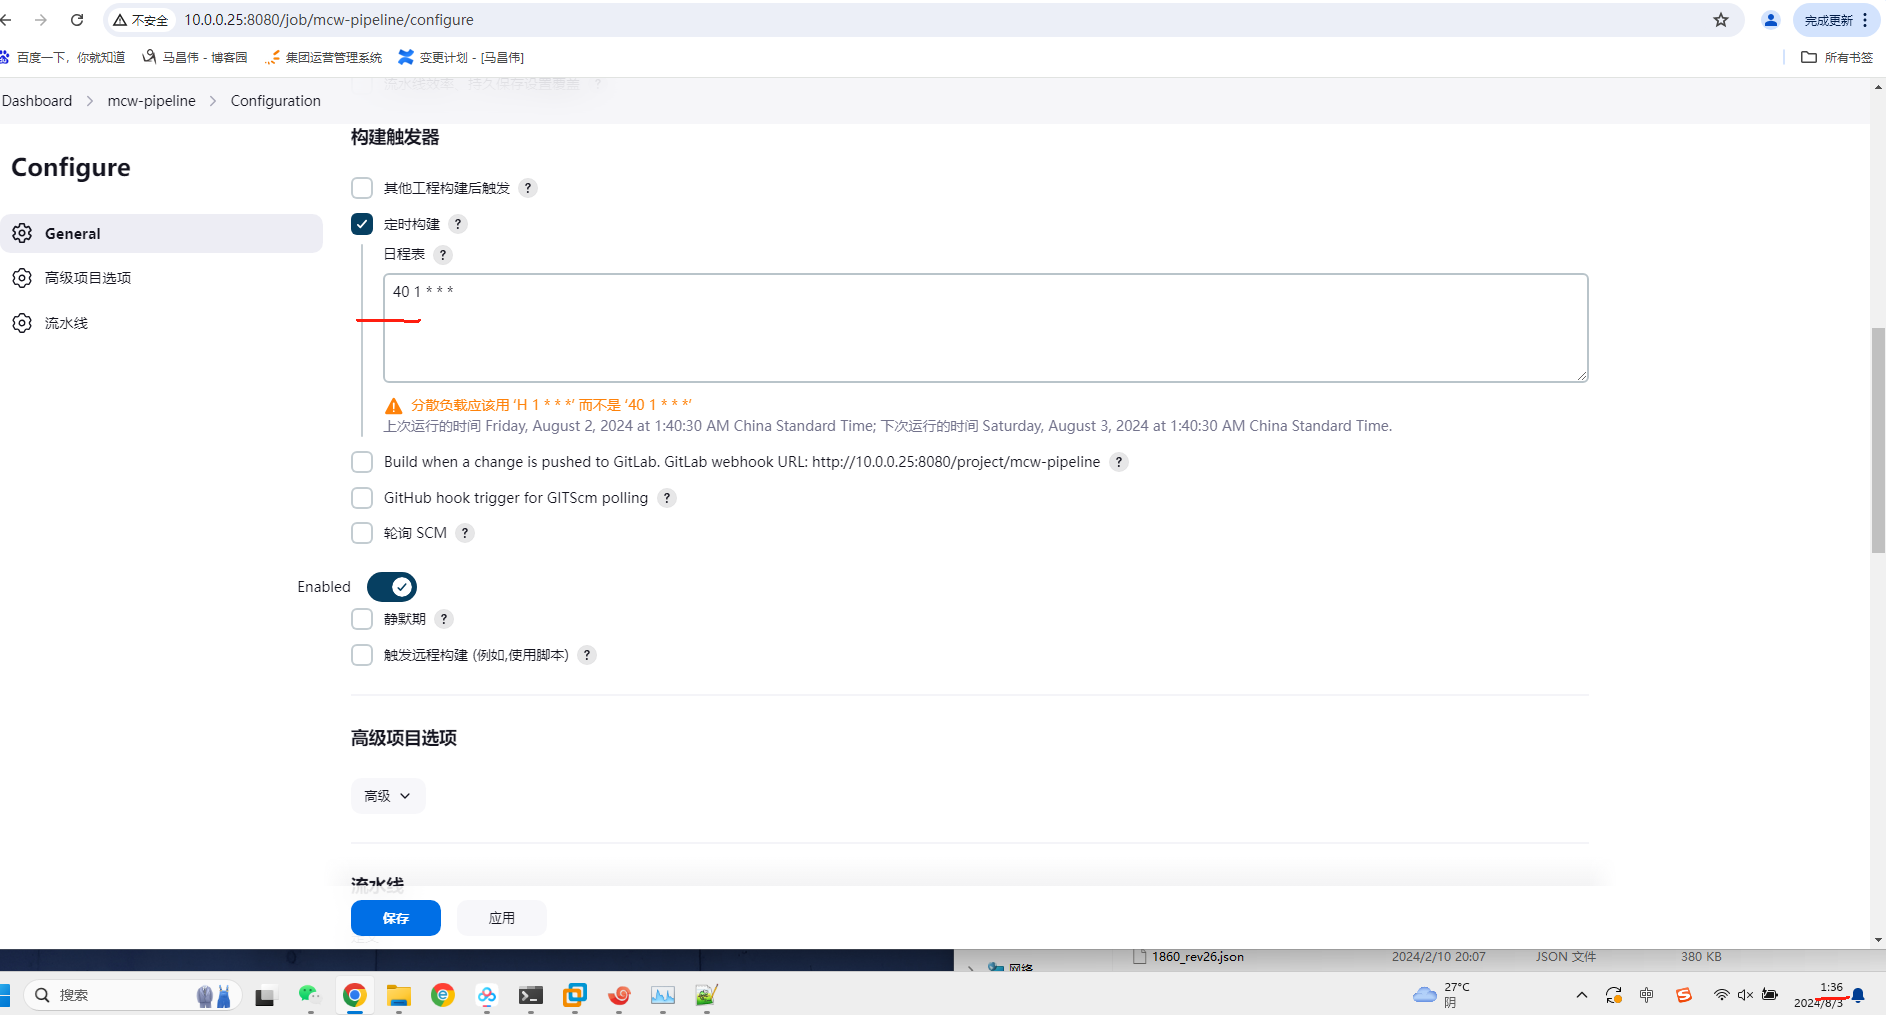
下面看定时执行的设置
Jenkins设置:

这里是自动生成的,可能是修改了Jenkinsfile之后,然后手动点击立即构建,就会自动把Jenkinsfile上这个定时时间同步到这个web页面上的配置上

手动改的,只是下面标红的地方
pipeline {
    agent any
    triggers {
        cron('18 1 * * *')
    }
    stages {
        stage ('Nightly build') {
            steps {
                echo '这是一个耗时的构建,每天0点30分构建'
            }
        }
    }
}
我们再次查看一下验证下。是否修改定时时间,就会替换掉那个定时配置
修改Jenkinsfile时间之前
修改为40分

修改完之后,查看,配置没有变
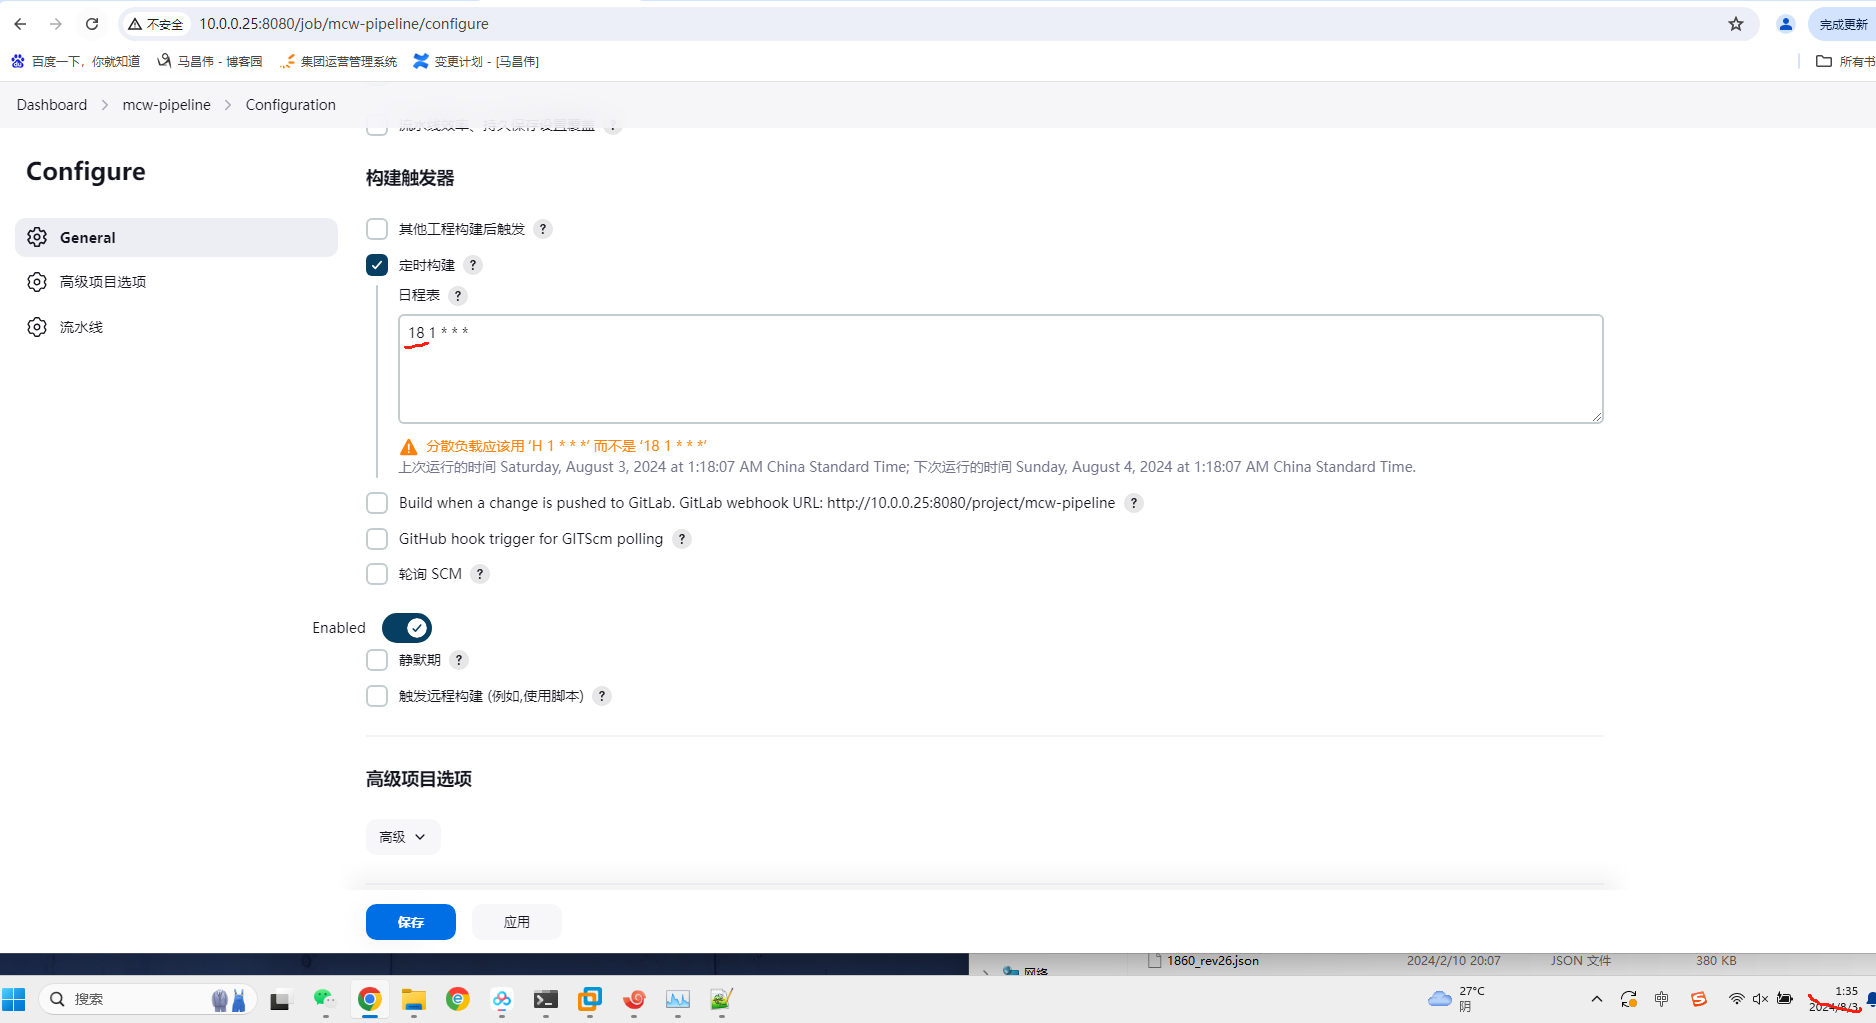
手动点击立即构建
再次查看配置,也就是手动点击立即构建一次,就是替换新的定时时间。目前还没到这个时间,但是已经将定时时间同步上去了。如果没有这个手动点击立即构建,那么还是旧的定时时间,肯定到40分就无法自动构建
在定时时间到达之前,我修改非定时时间相关的数据,这里加个40分,然后提交。看40是否还是会定时触发
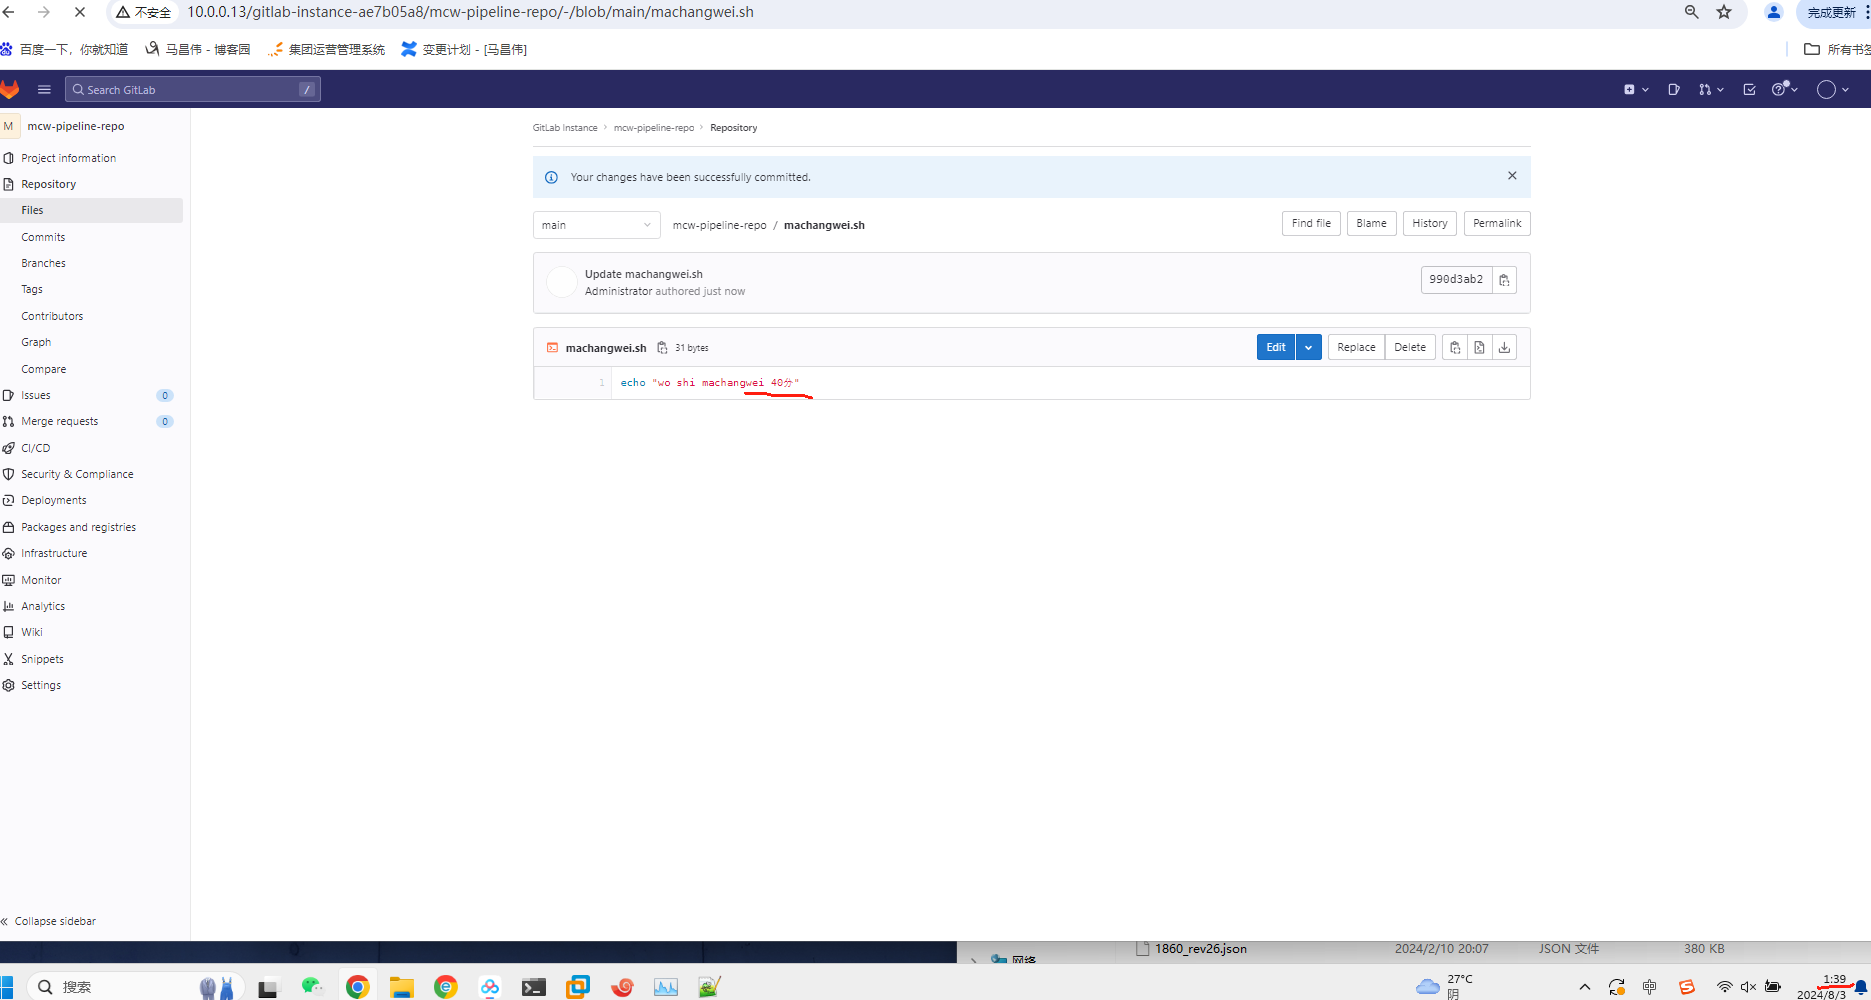
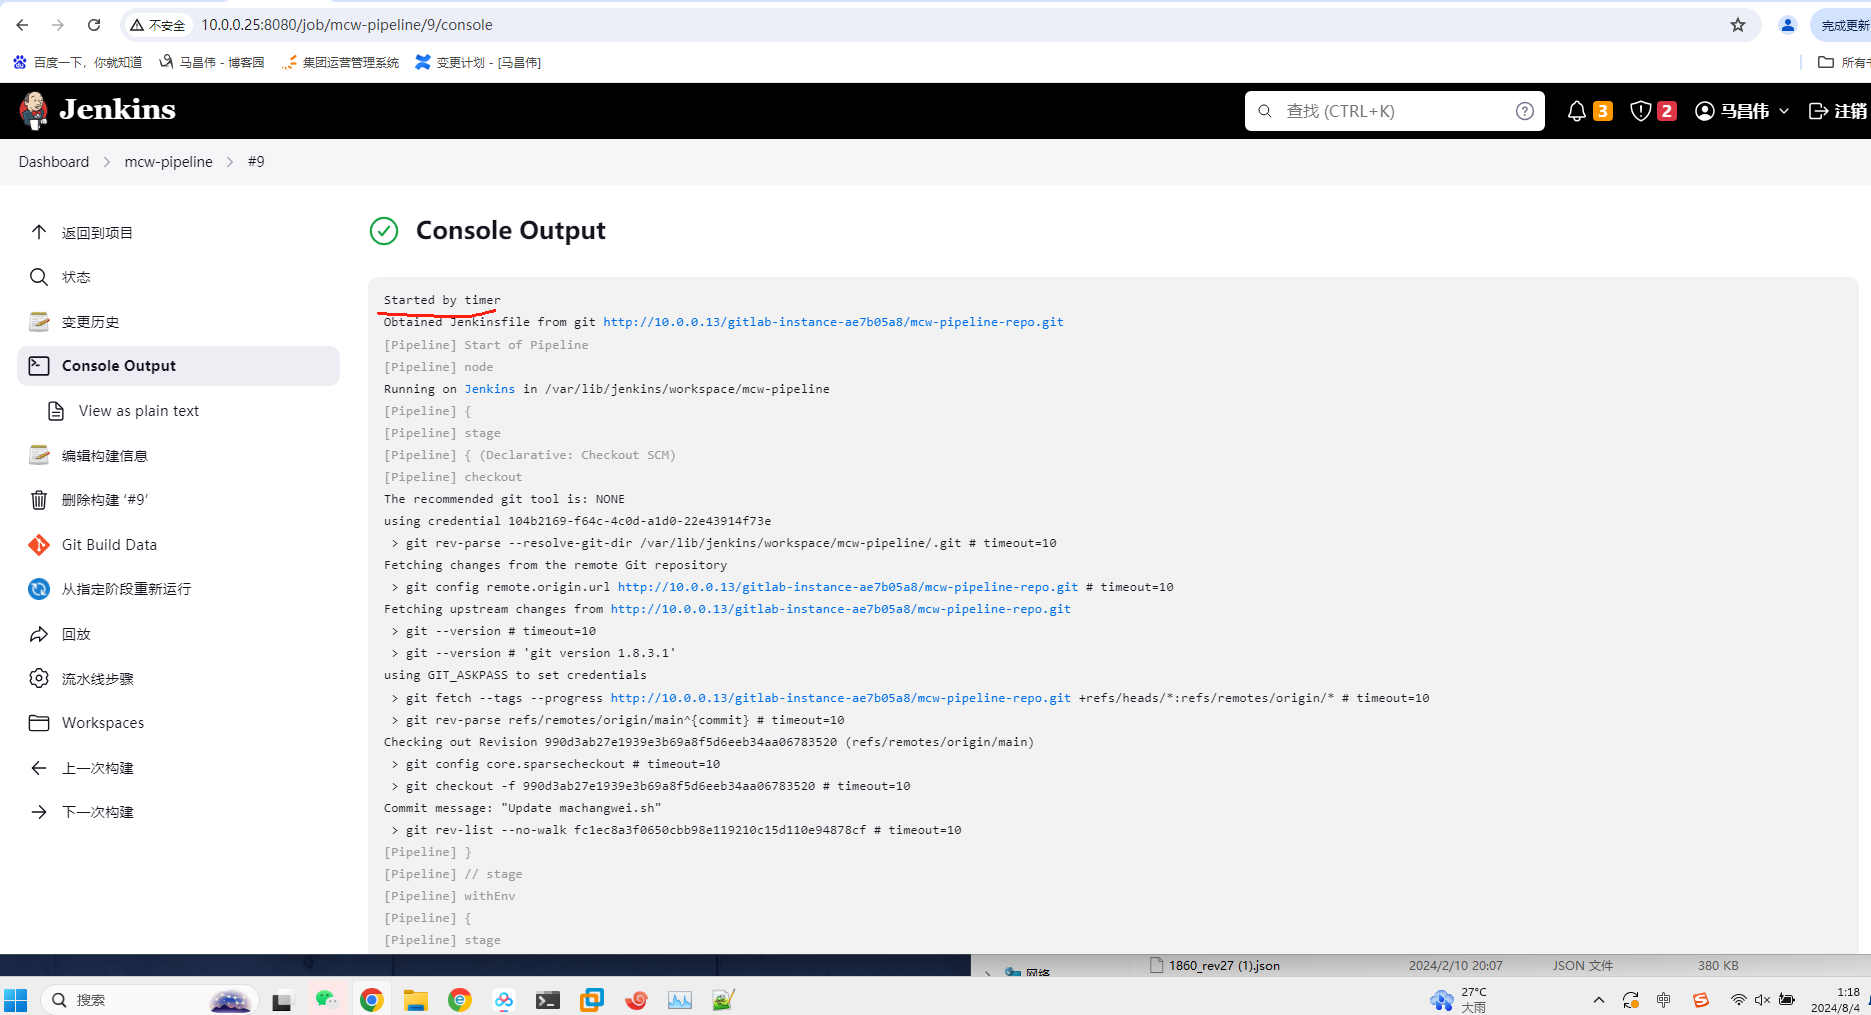
我们上一次手动点击立即构建,构建数字是8,并且是1点35。1点39的时候提交了一次非定时时间方面的数据,也就是还是保持定时时间是个即将到来的时候,到了这个定时时间40分的时候,还是如预期般的定时执行了。上面还显示一次提交

查看日志输出,提示开始于timer,时间
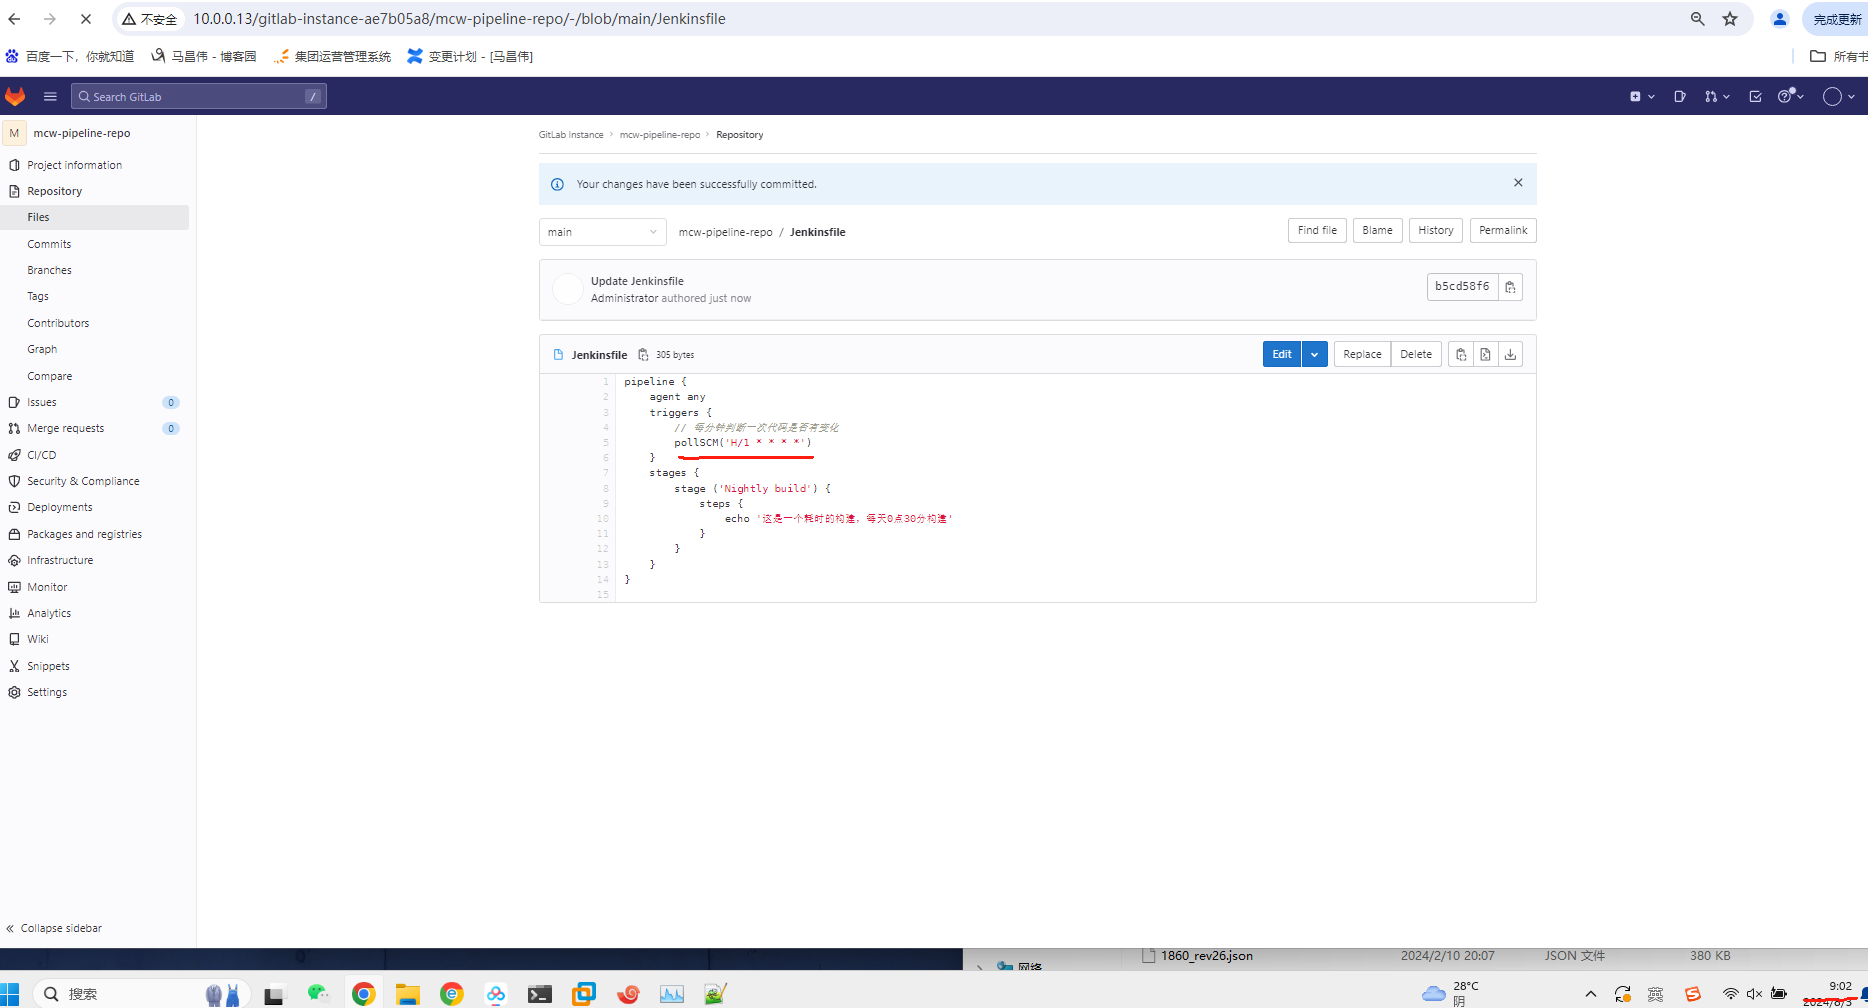
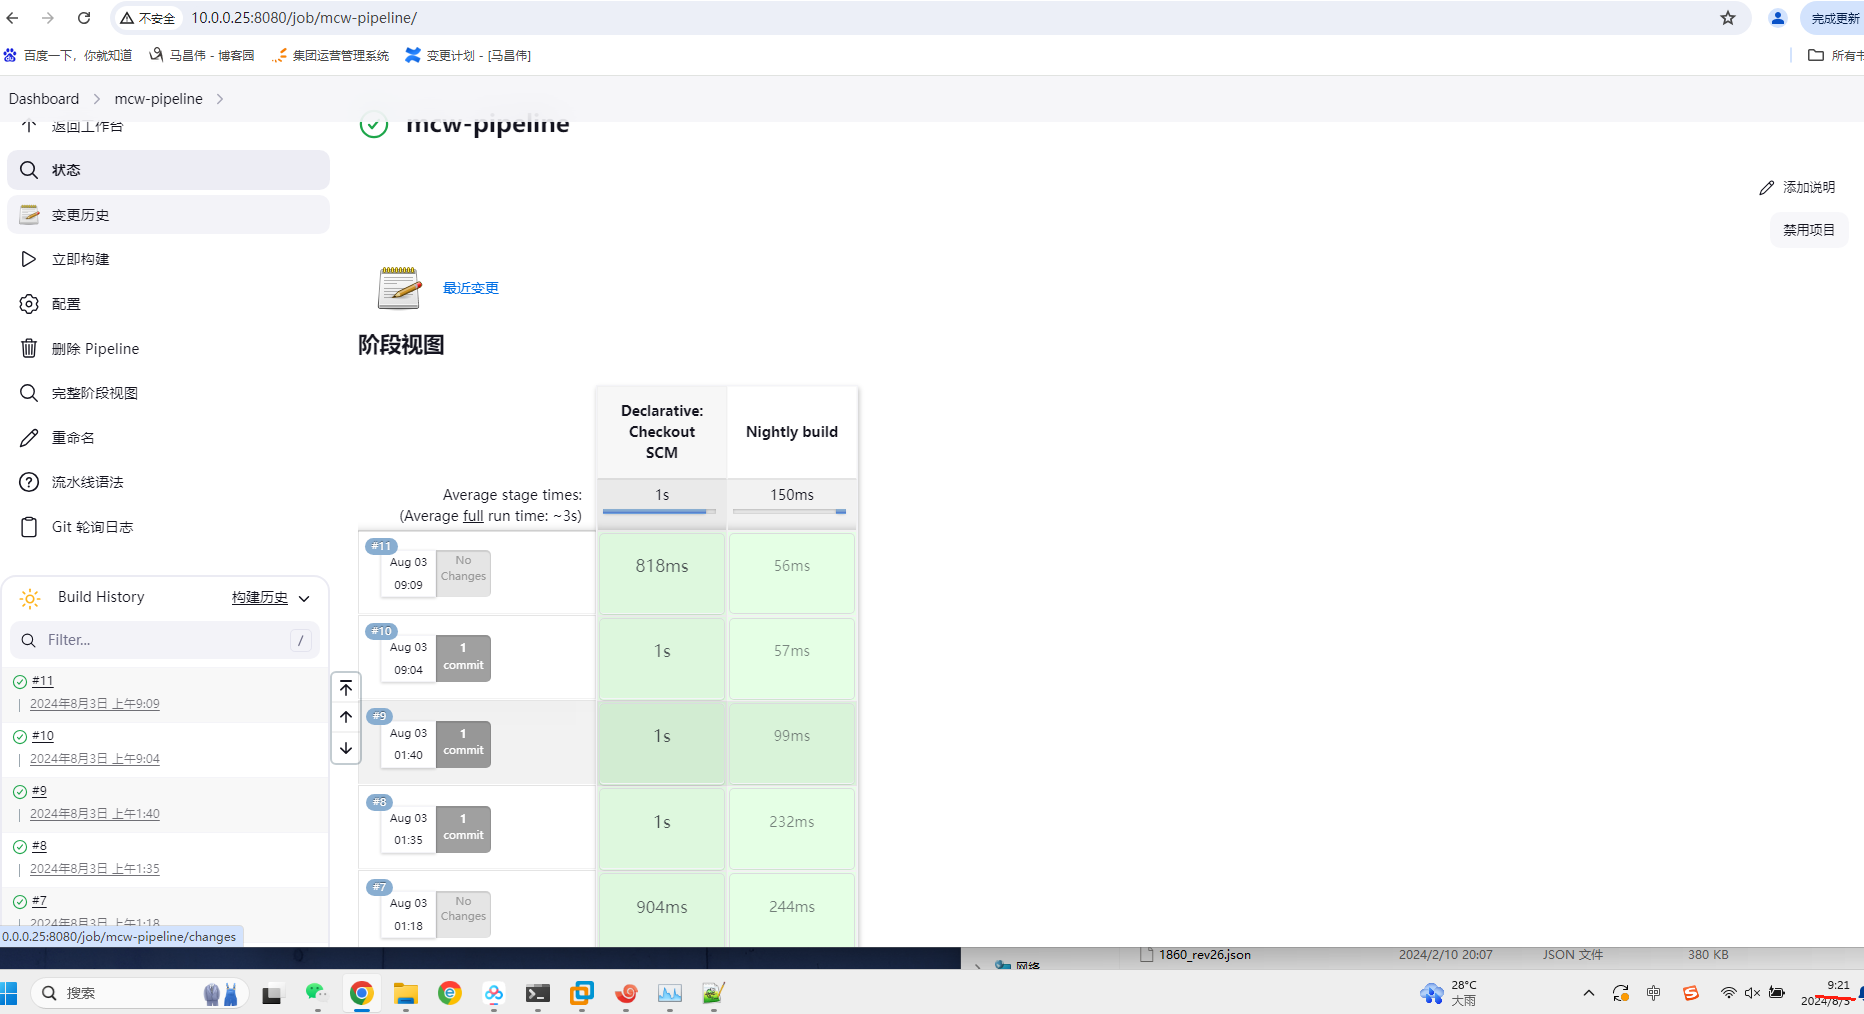
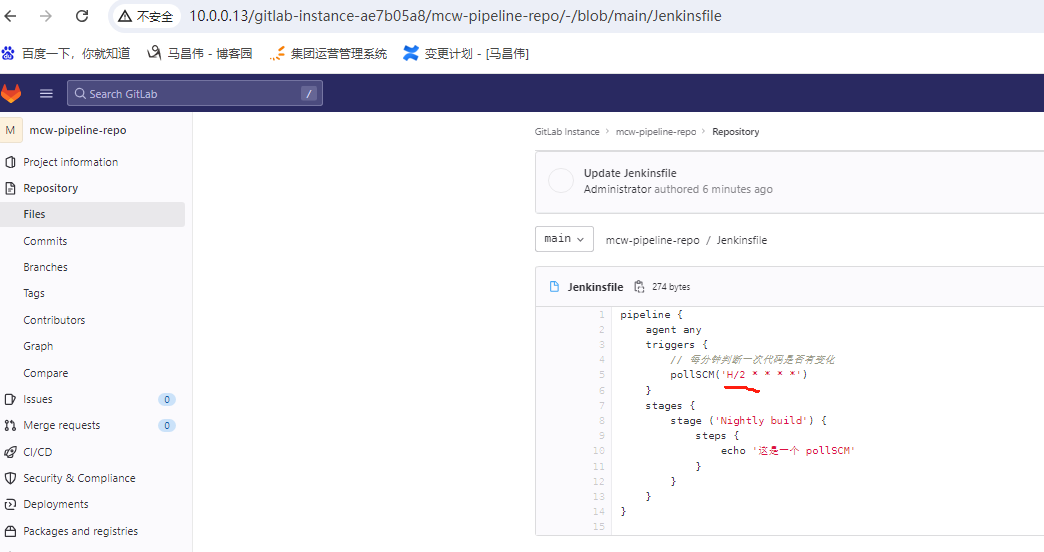
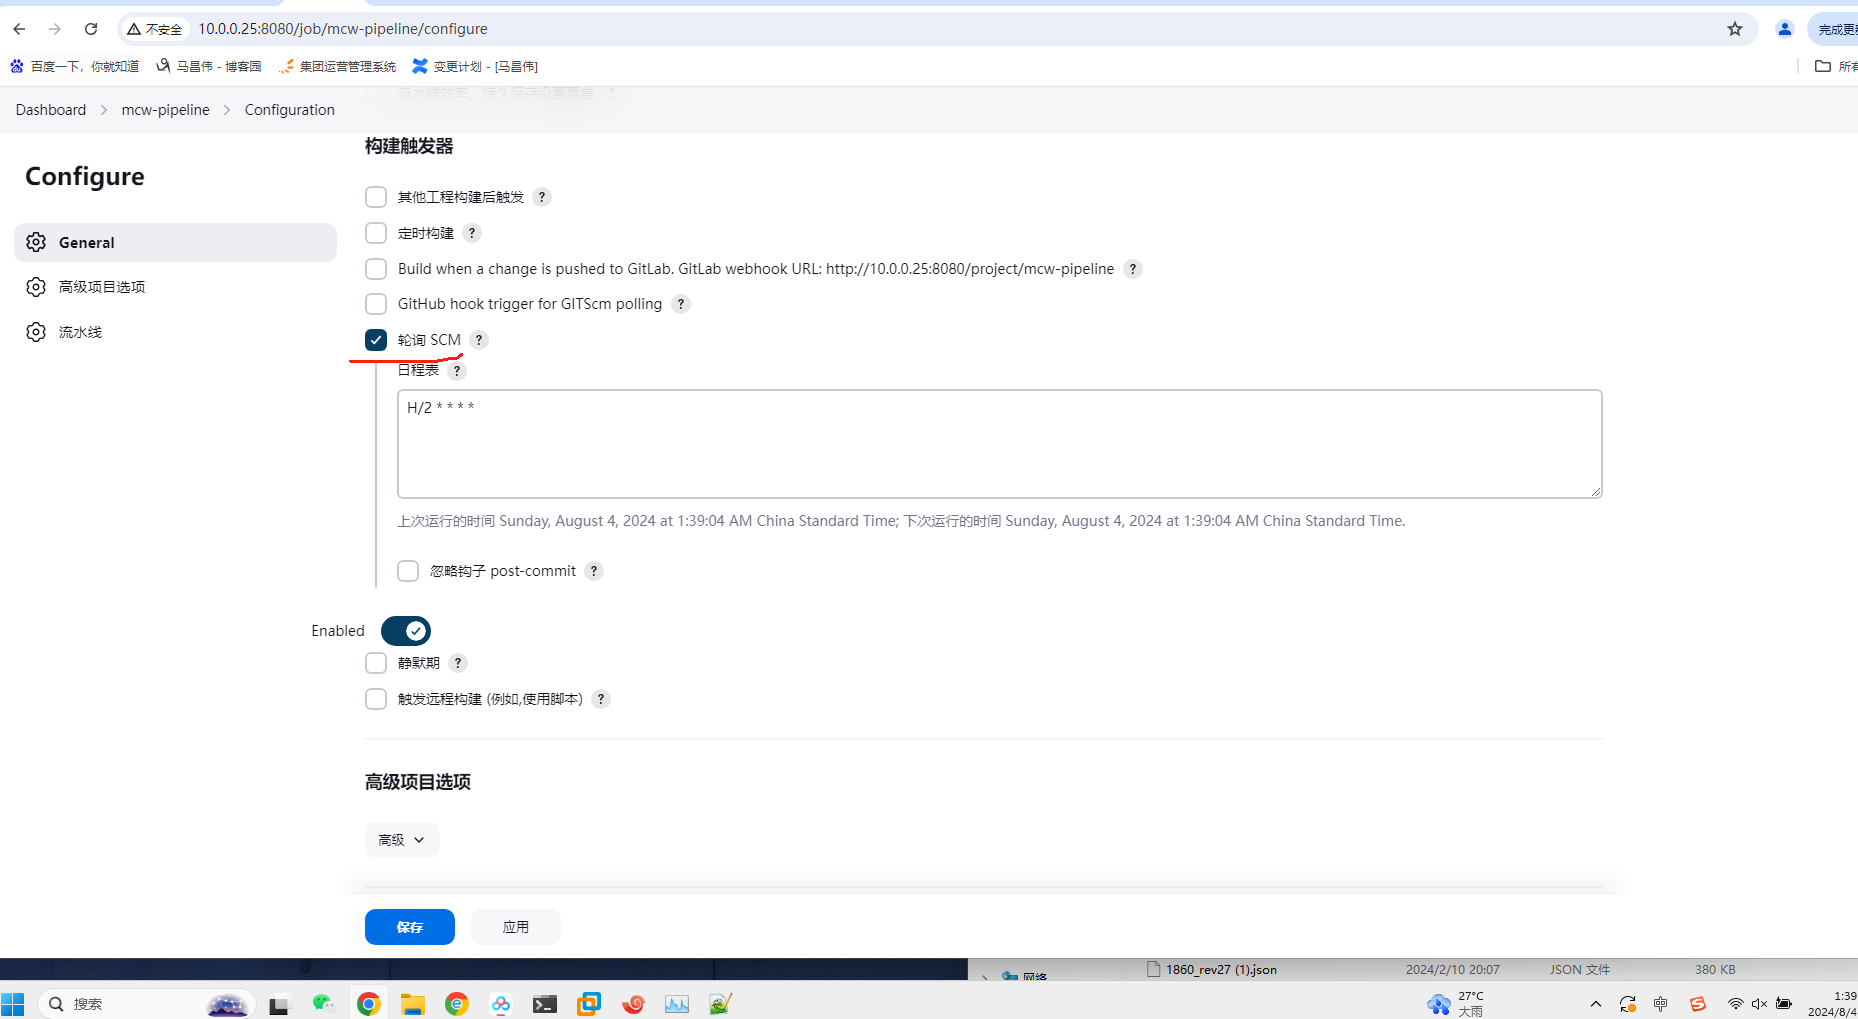
轮询代码仓库:pollSCM
正确代码:下面那个是错误的,没有自动触发的那种
pipeline {
    agent any
    triggers {
        // 每分钟判断一次代码是否有变化
        pollSCM('H/2 * * * *')
    }
    stages {
        stage ('Nightly build') {
            steps {
                echo '这是一个 pollSCM'
            }
        }
    }
}
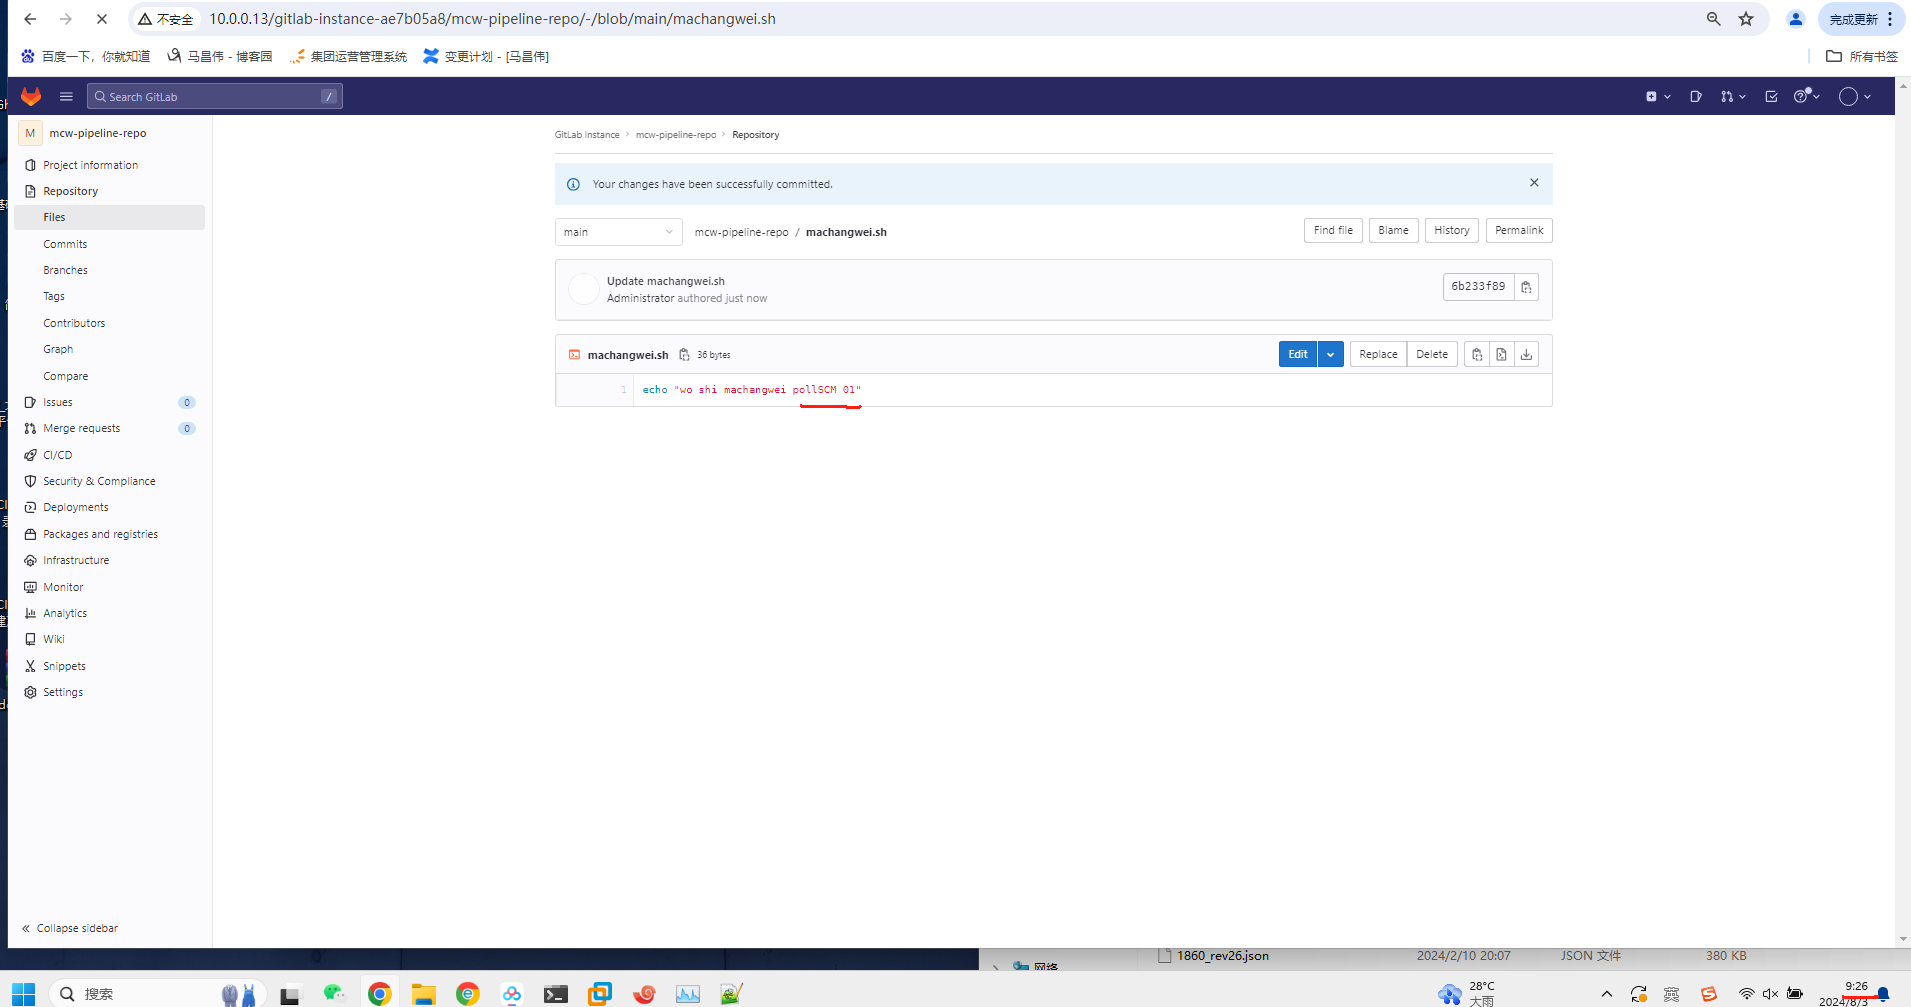
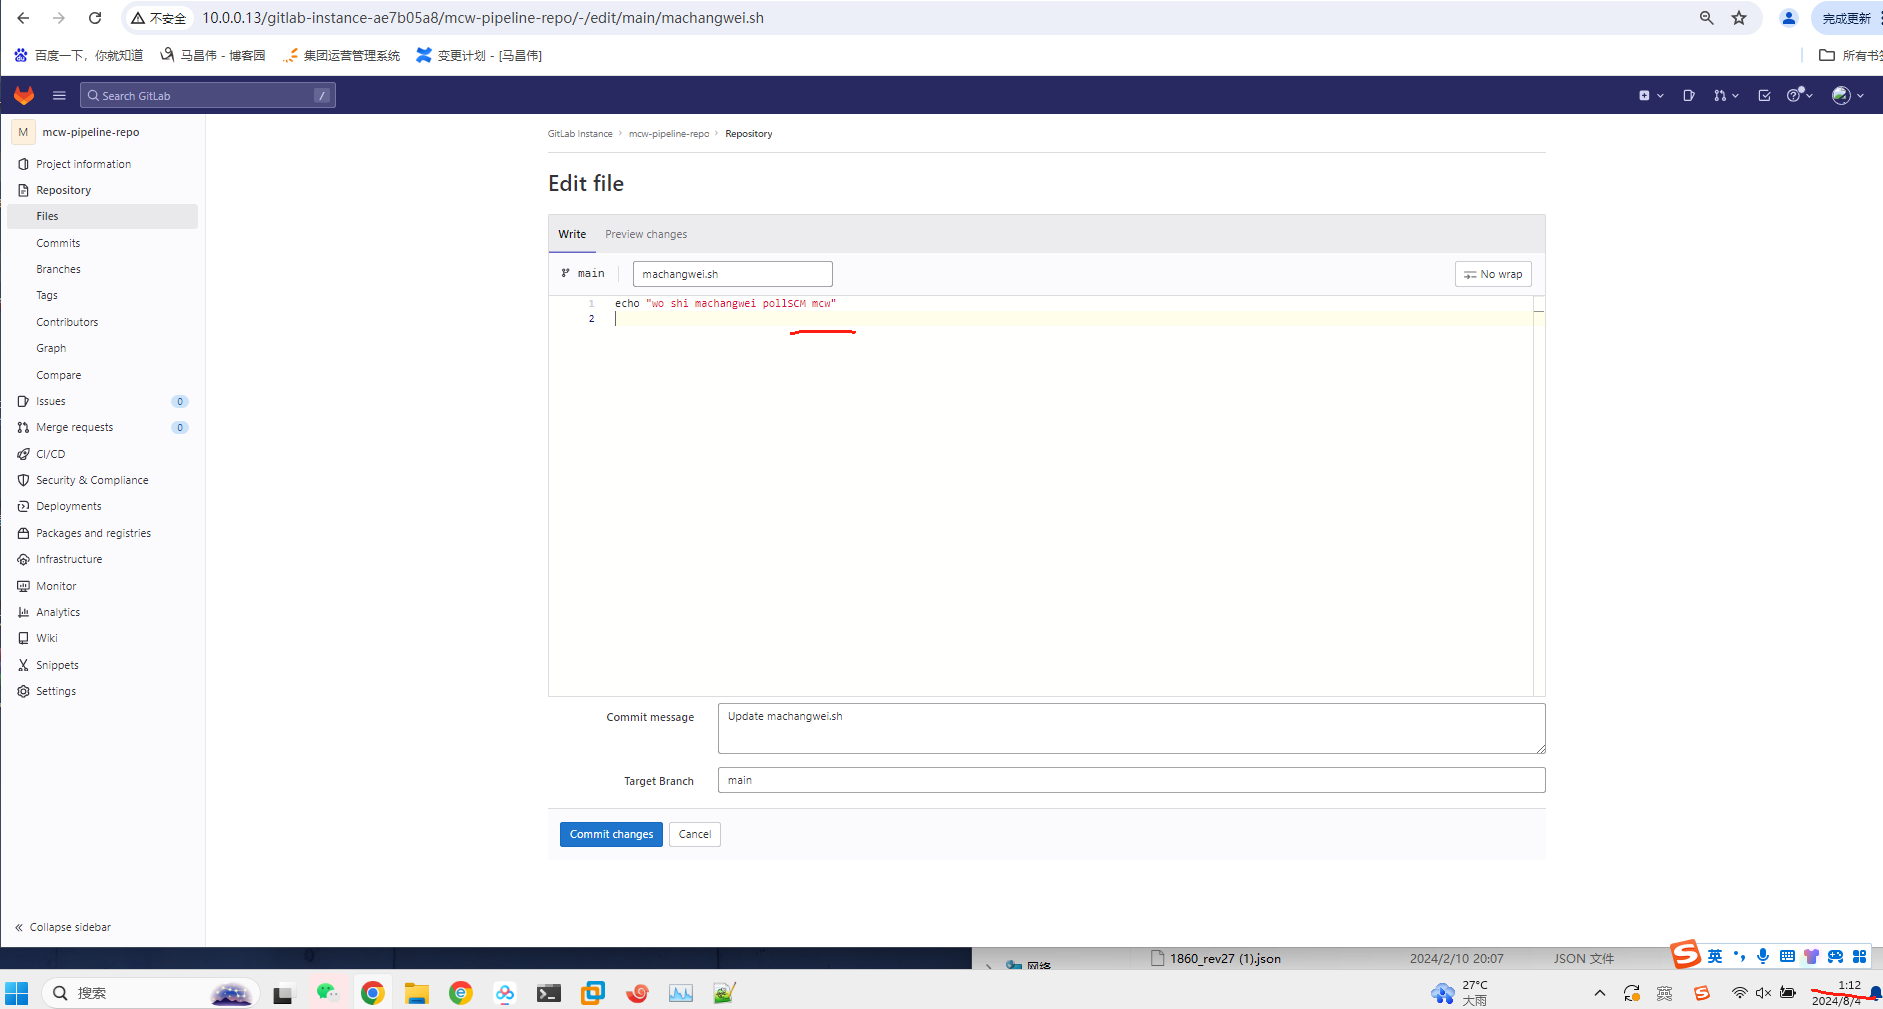
修改代码
pipeline {
    agent any
    triggers {
        // 每分钟判断一次代码是否有变化
        pollSCM('H/1 * * * *')
    }
    stages {
        stage ('Nightly build') {
            steps {
                echo '这是一个耗时的构建,每天0点30分构建'
            }
        }
    }
}
目前项目配置是定时执行,我们手动点击立即构建,更新项目配置为轮询代码仓库
点击立即构建
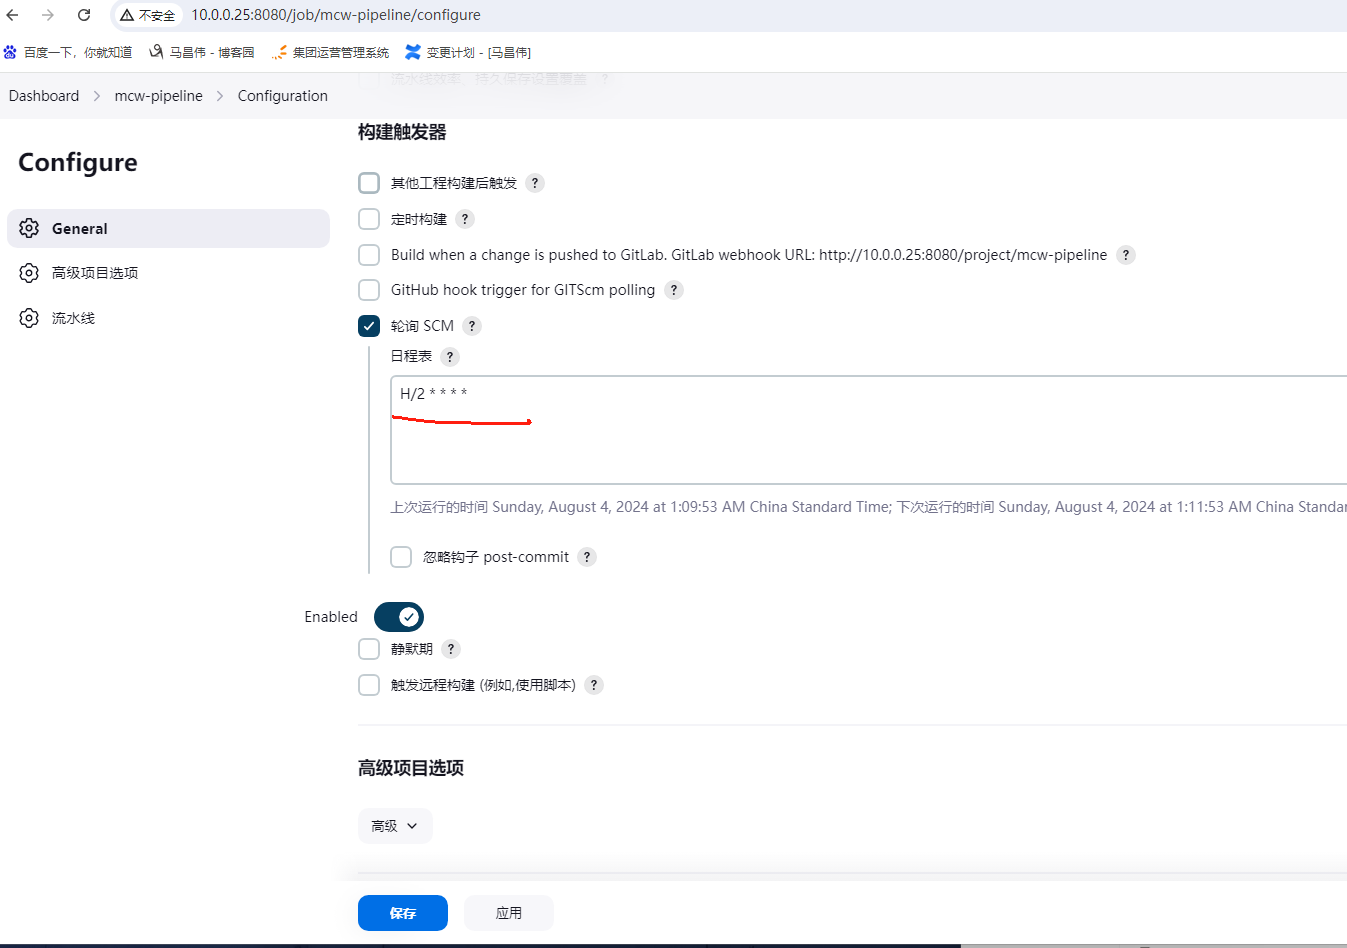
Jenkins项目触发器配置已经和Jenkinsfile里配置的同步
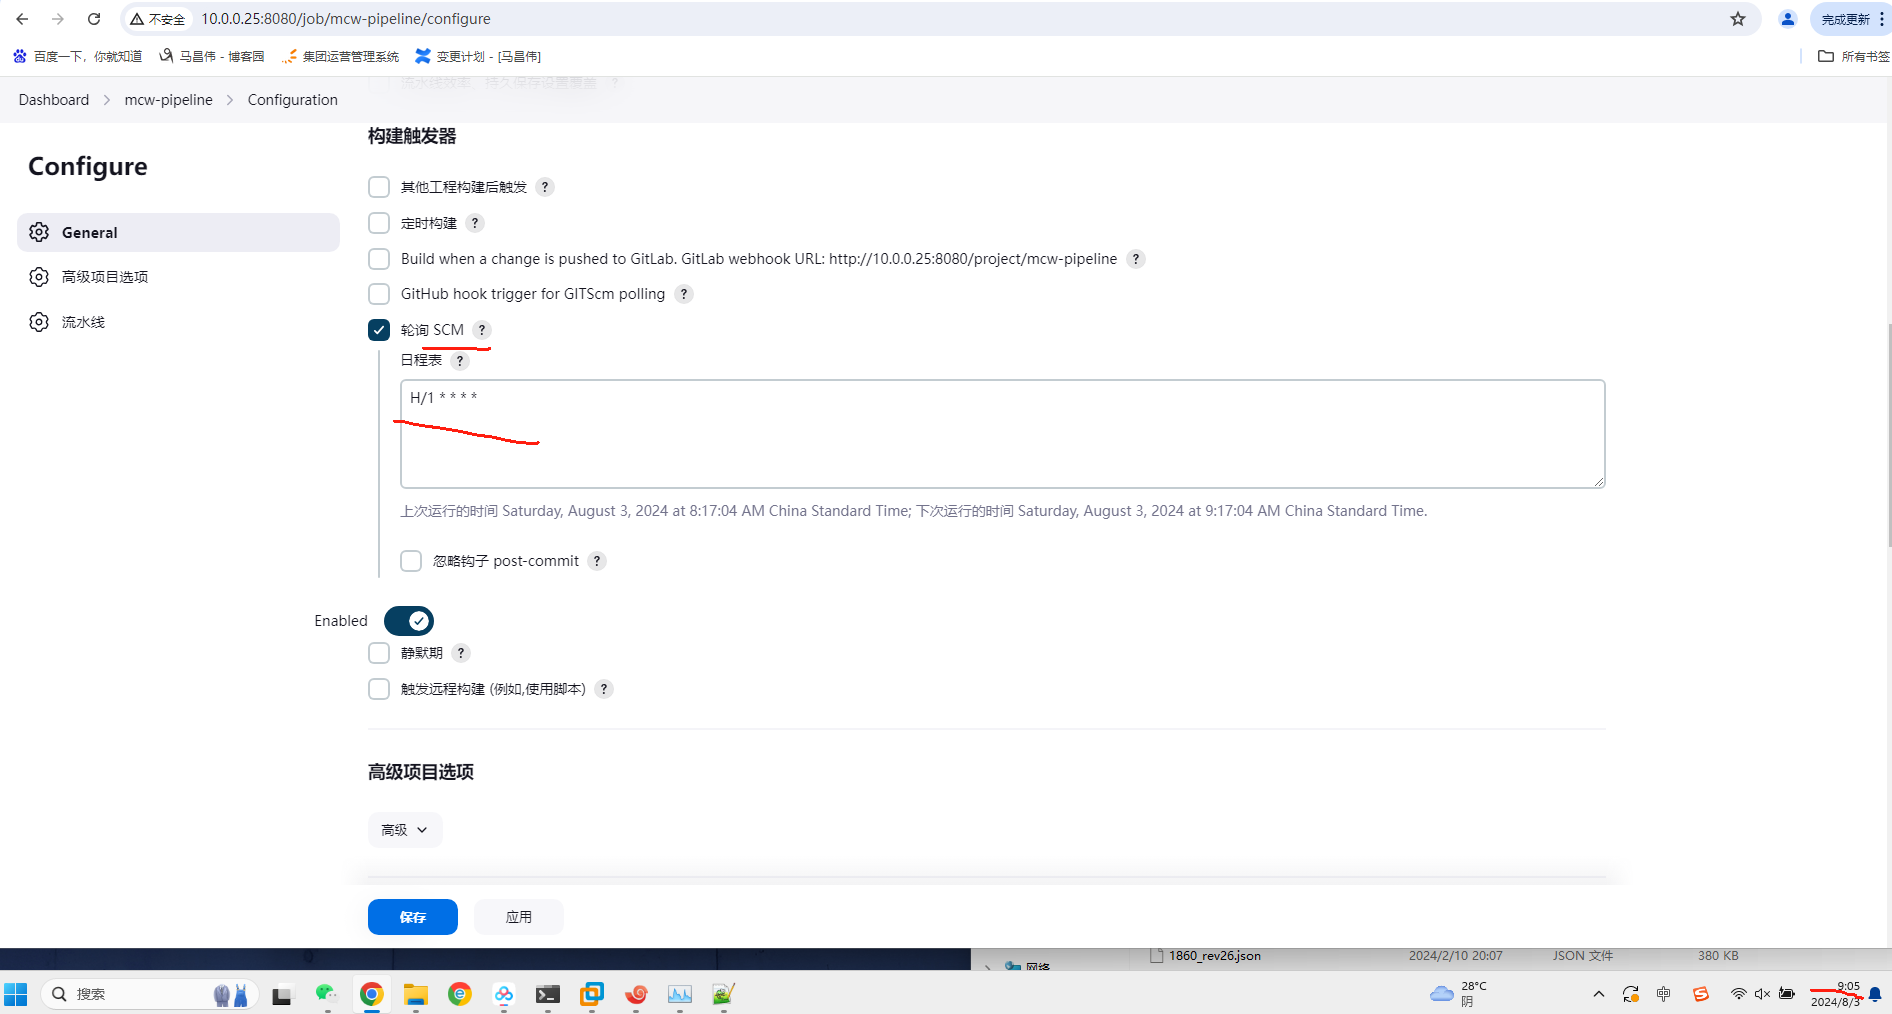
好几分钟之后,还是没有发生自动触发构建,应该是每分钟触发一次才符合预期
重新手动点击立即构建一次试试
看这里时间,好像不对呀。是一个小时后,根据这个提示时间,还有6分钟,那等6分钟看看,是否触发第12次构建
查看并没有触发第12次构建
上面我们进入误区了,Jenkins每一分钟检查一次代码更新,发现代码更新了才会自动触发构建,所以我们要改动一下代码
目前构建数字是11

代码修改提交
还是没自动触发

上面没有触发,应该是因为时间写错了,每分钟检查一次,我上面的写法有问题。后面我修改了,改为两分钟检查一次变动。然后手动点击构建,将Jenkinsfile配置同步到Jenkins项目配置里面。然后再次修改代码,两分钟之后就可以看到Jenkins项目自动触发了
如下,改为每两分钟检查一次了
同步后配置如下
修改提交
13提交,15自动触发了
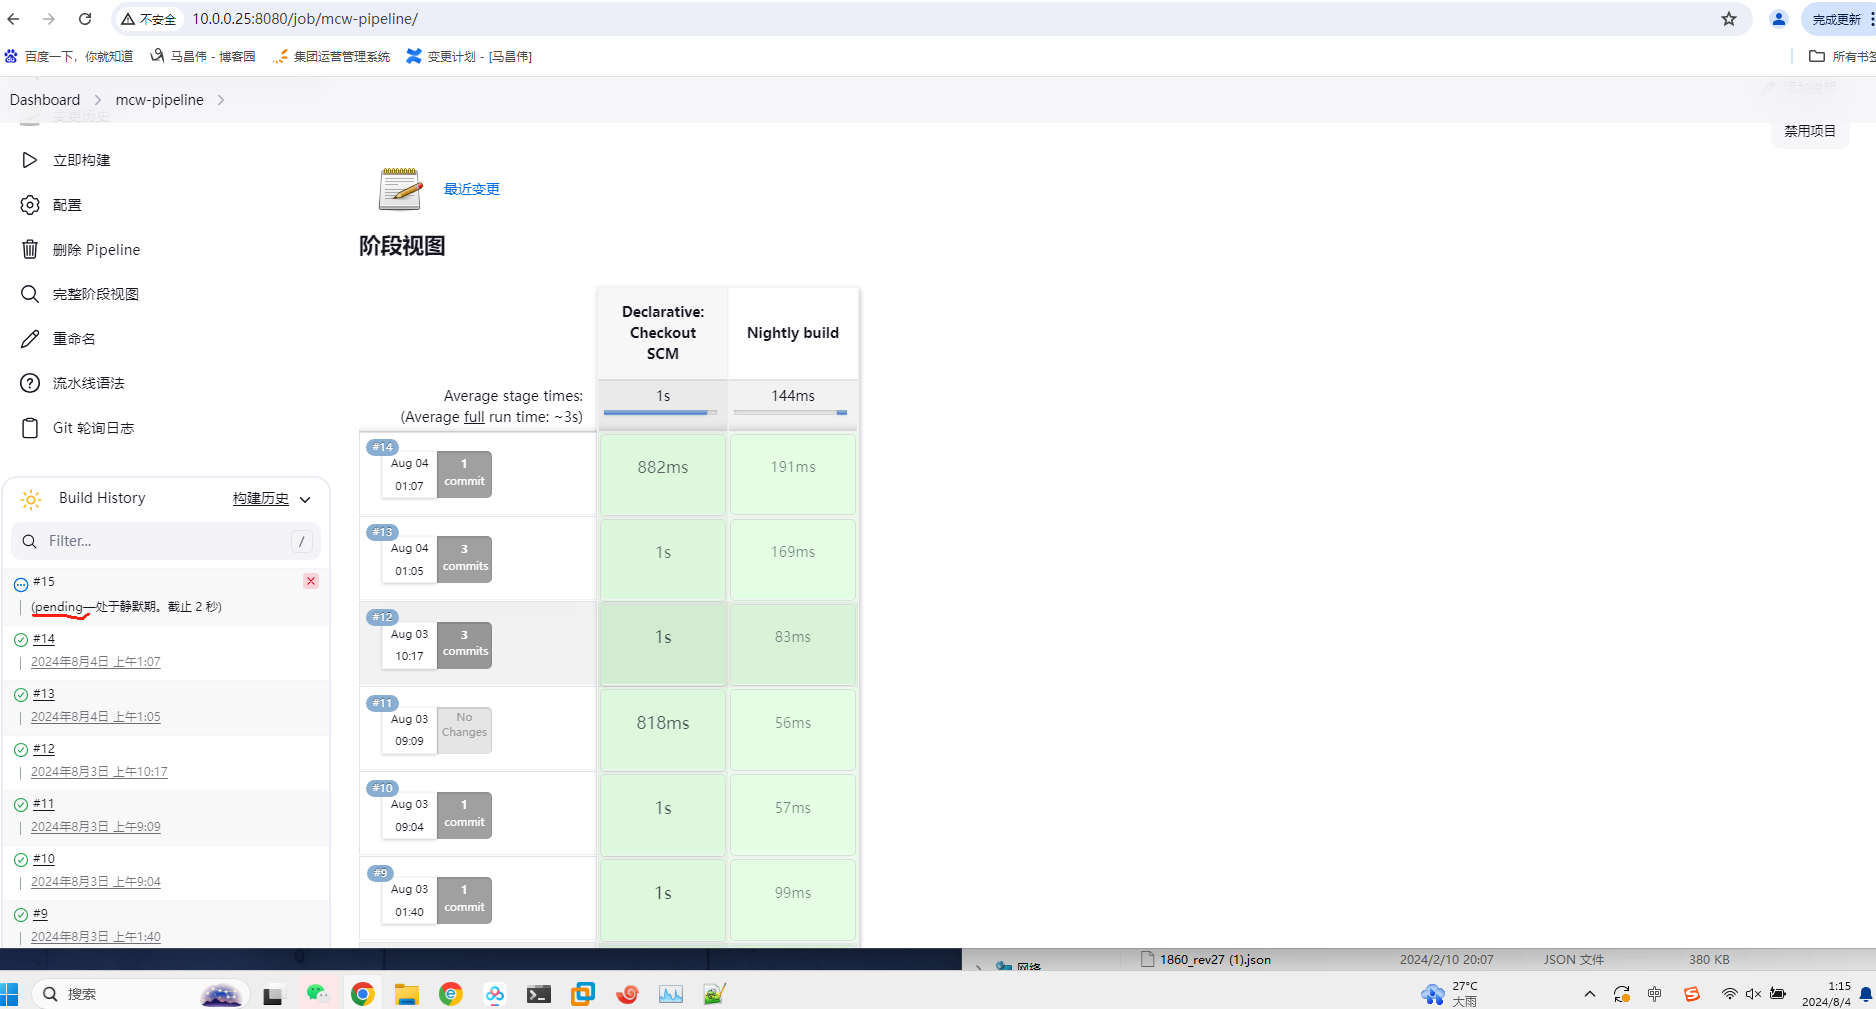
查看日志输出,可以看到开始于scm改变

pipeline {
    agent any
    triggers {
        // 每分钟判断一次代码是否有变化
        pollSCM('H/2 * * * *')
    }
    stages {
        stage ('Nightly build') {
            steps {
                echo '这是一个 pollSCM'
            }
        }
    }
}
@@事件触发
由上游任务触发:upstream
    triggers {
        upstream(upstreamProjects: 'job1,job2',threshold: hudson.model.Result.SUCCESS)
    }
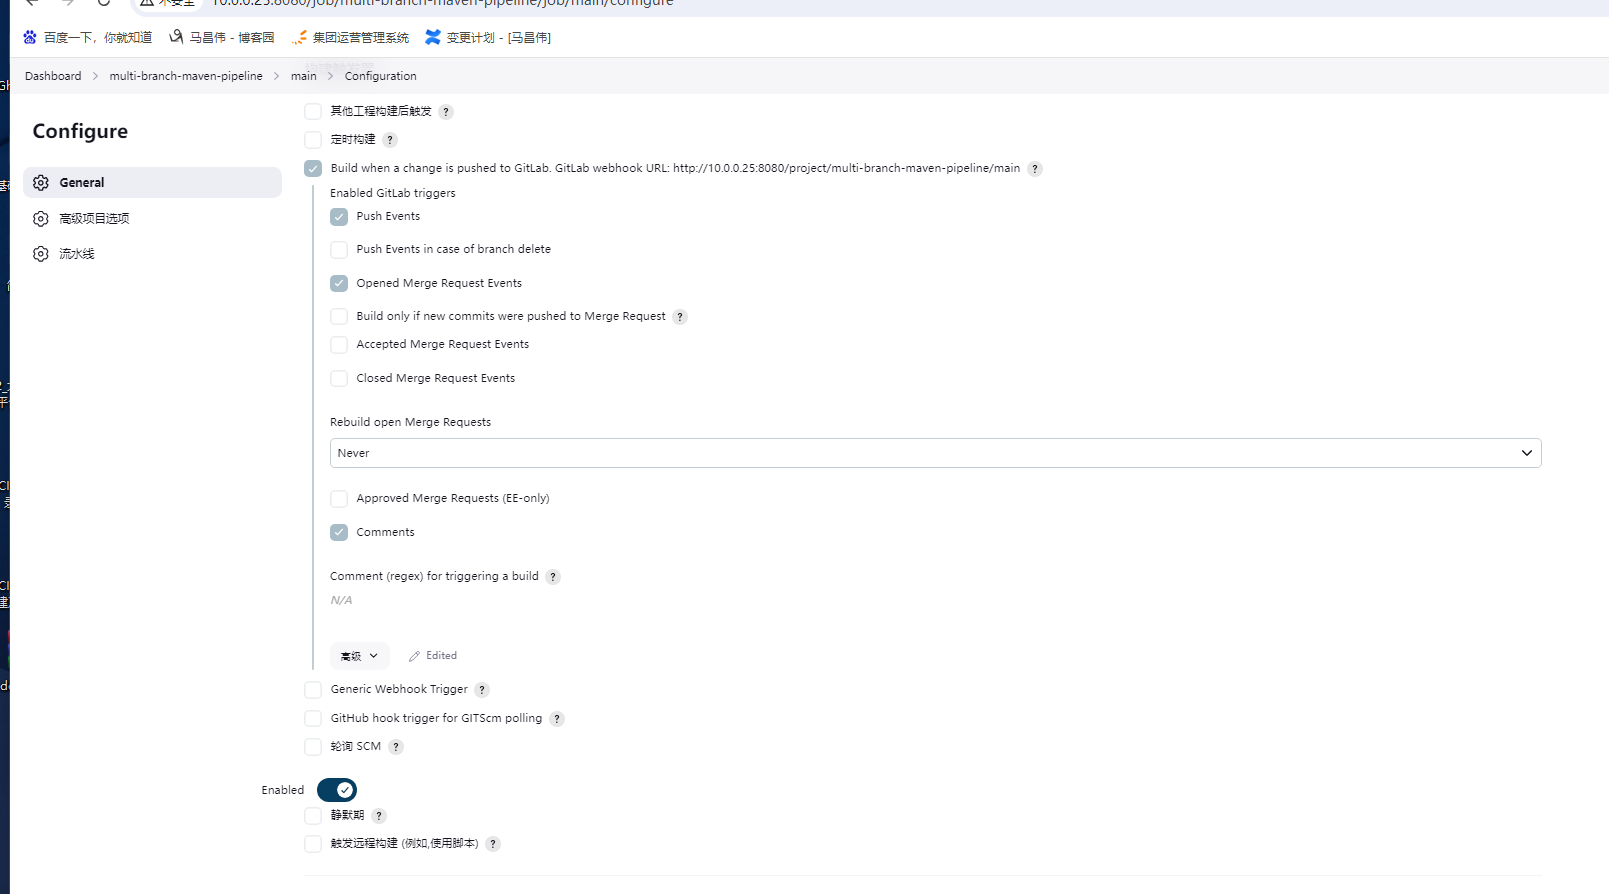
gitlab通知触发
跟我们第一次操作的那个一样。不过书中多了个使用token,我们是关闭了认证
https://www.cnblogs.com/machangwei-8/p/18213869#_label3_1
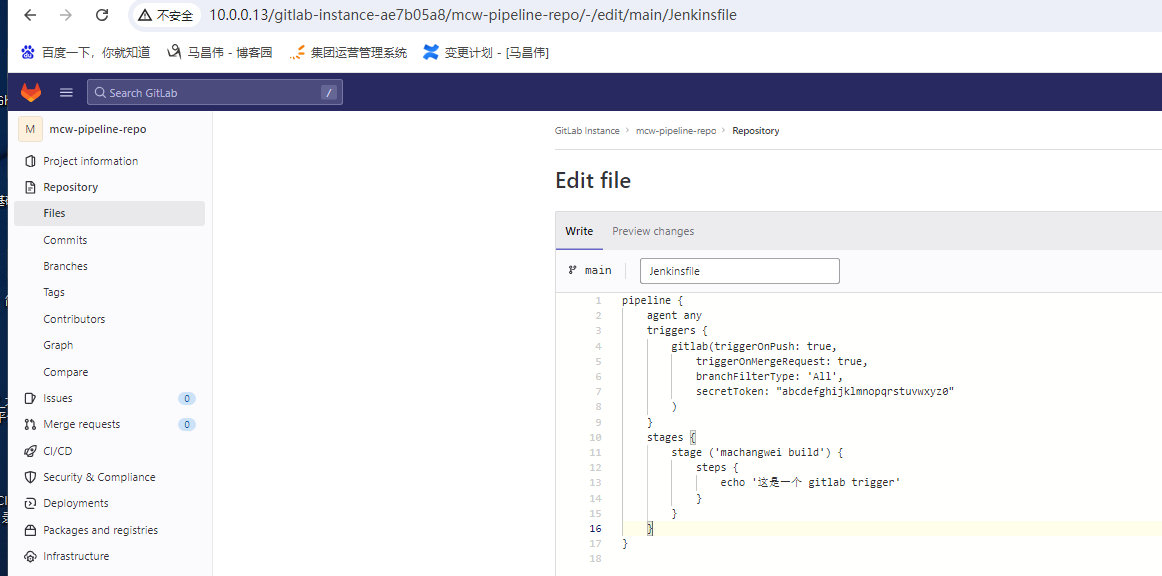
在pipeline中实现gitlab trigger
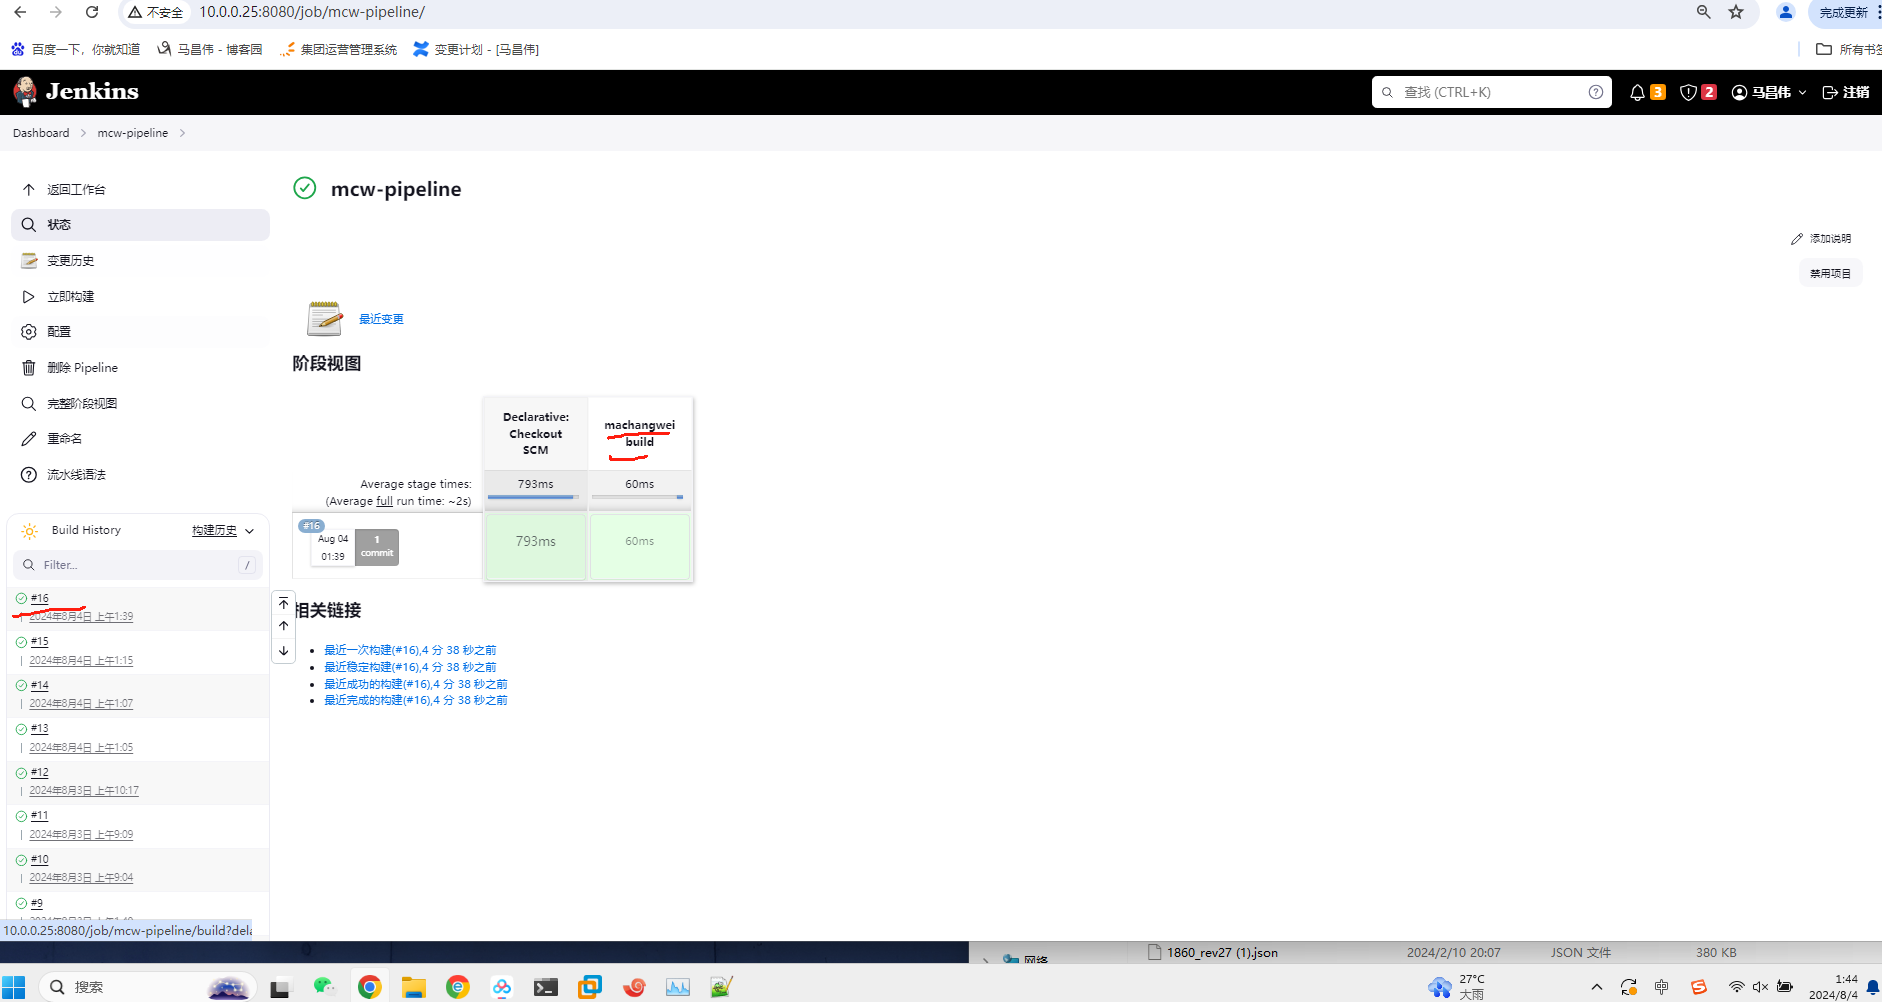
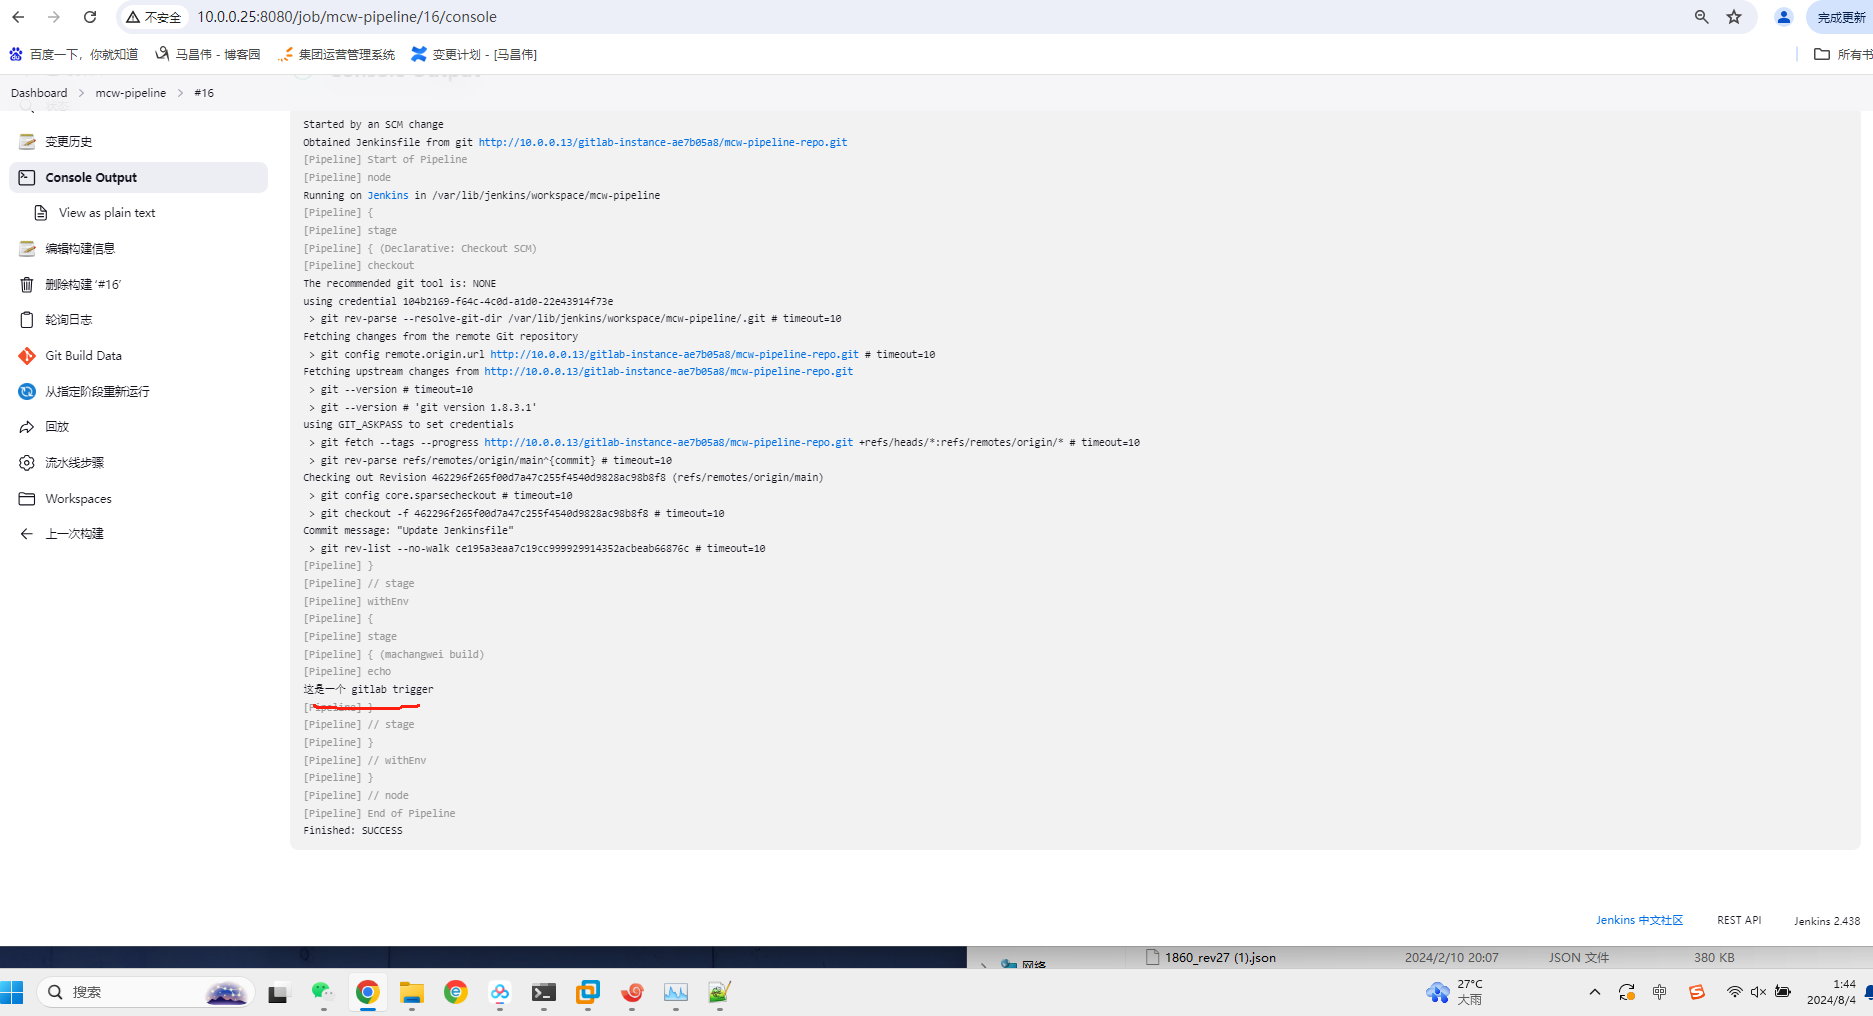
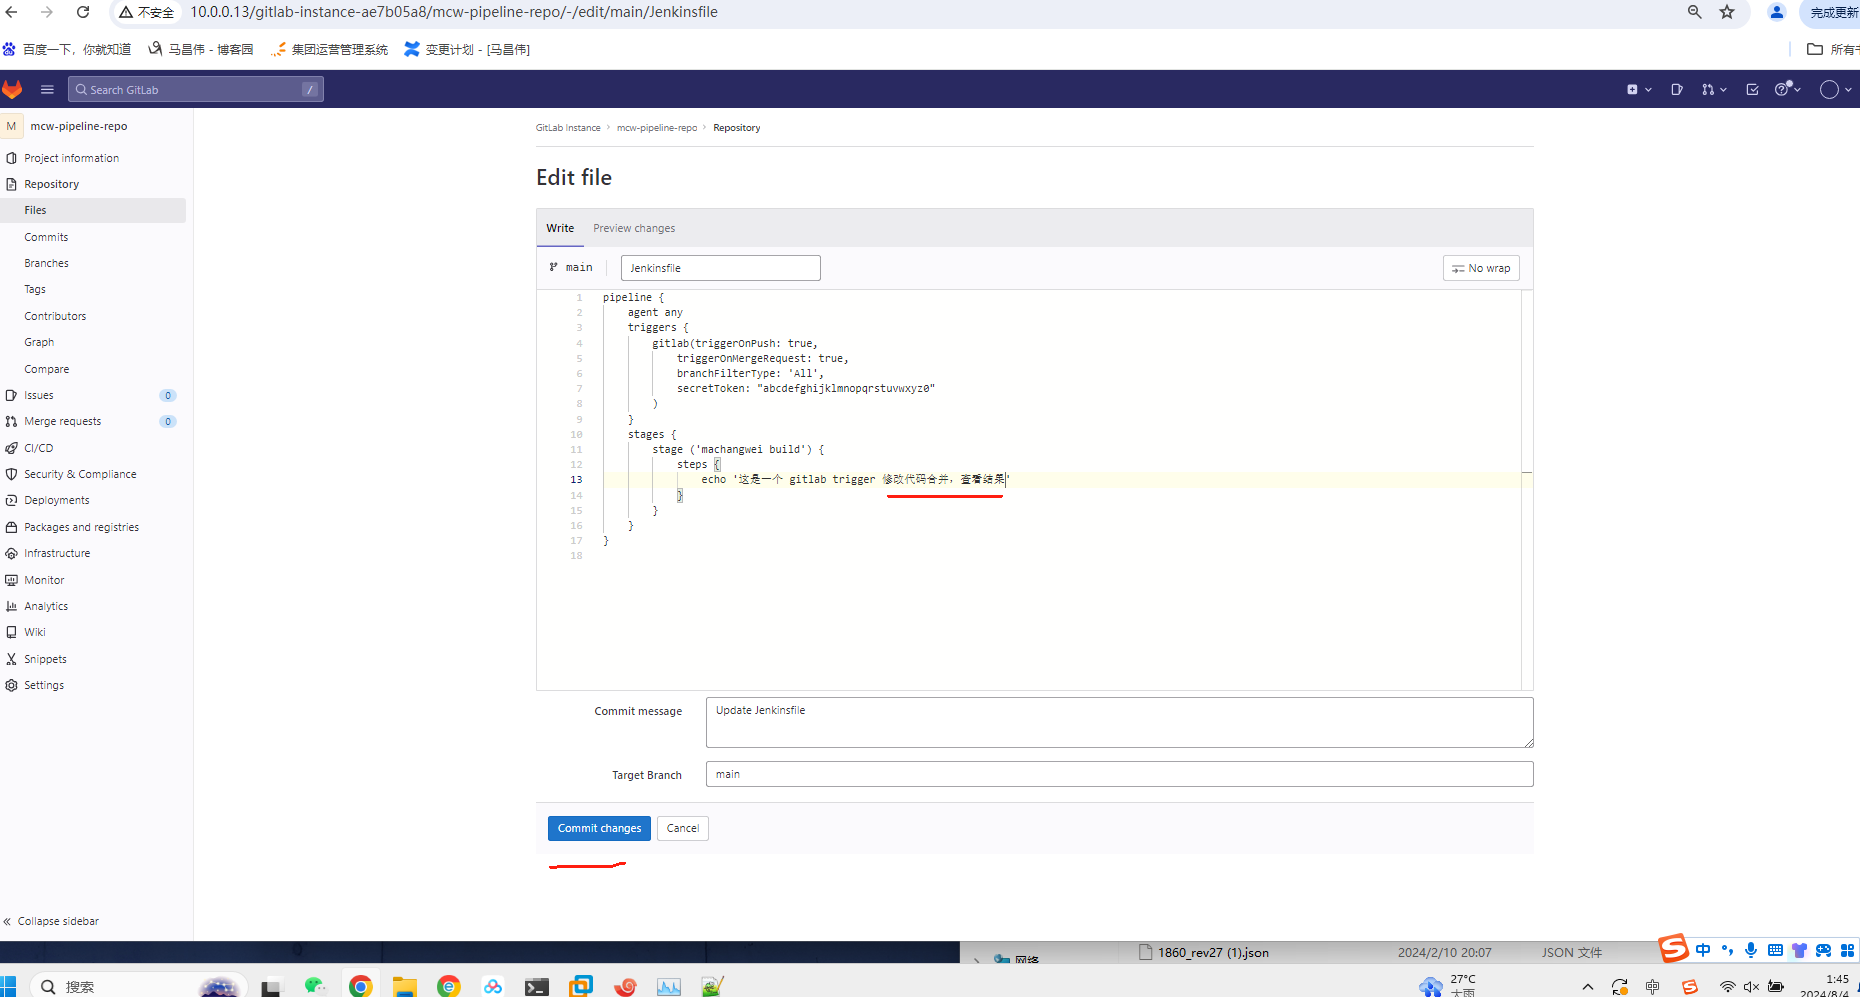
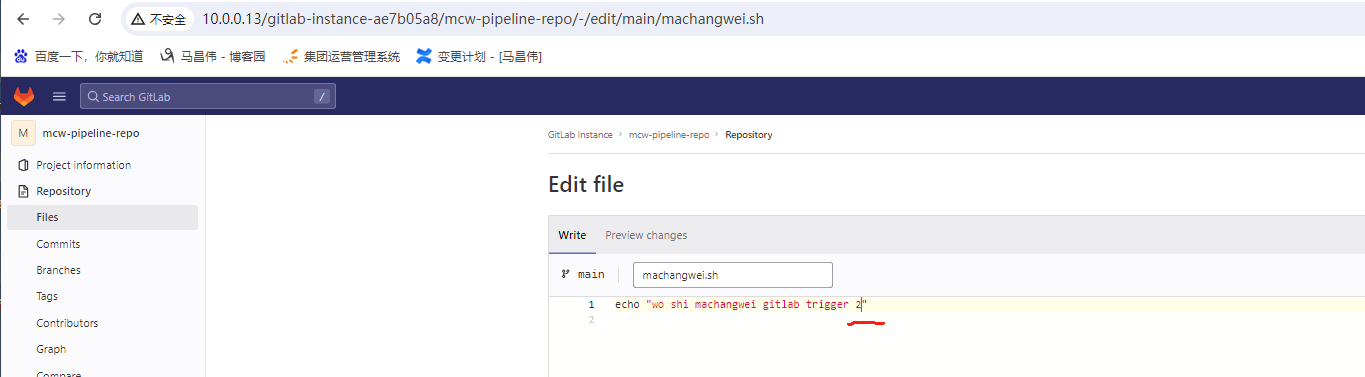
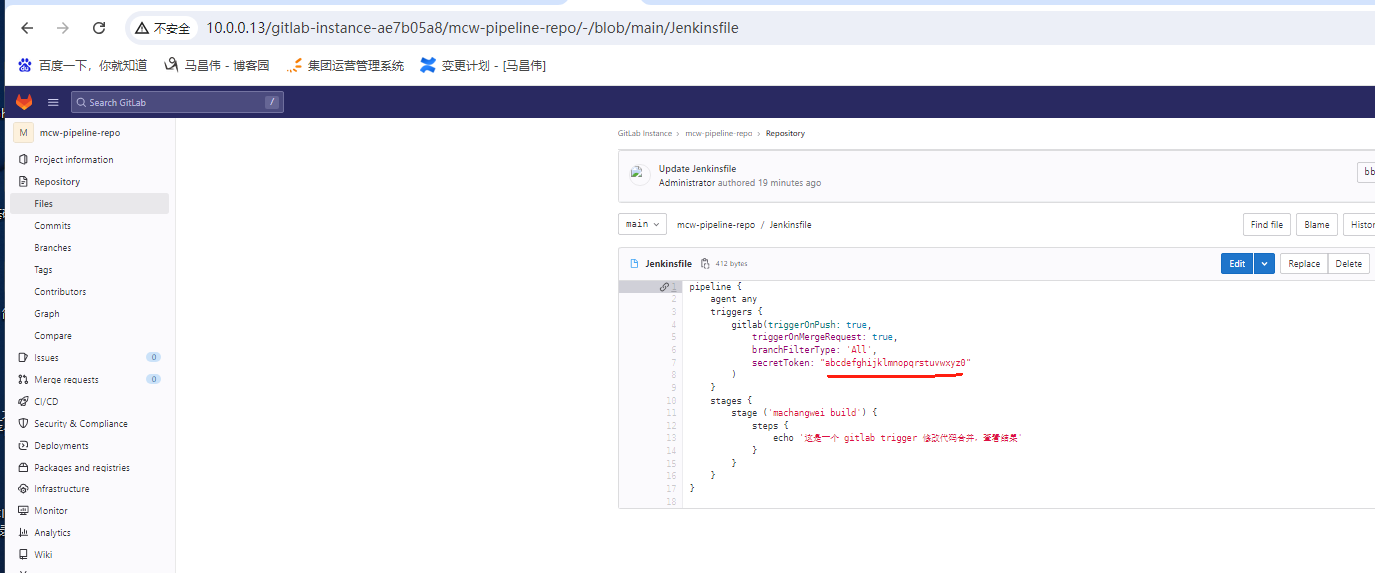
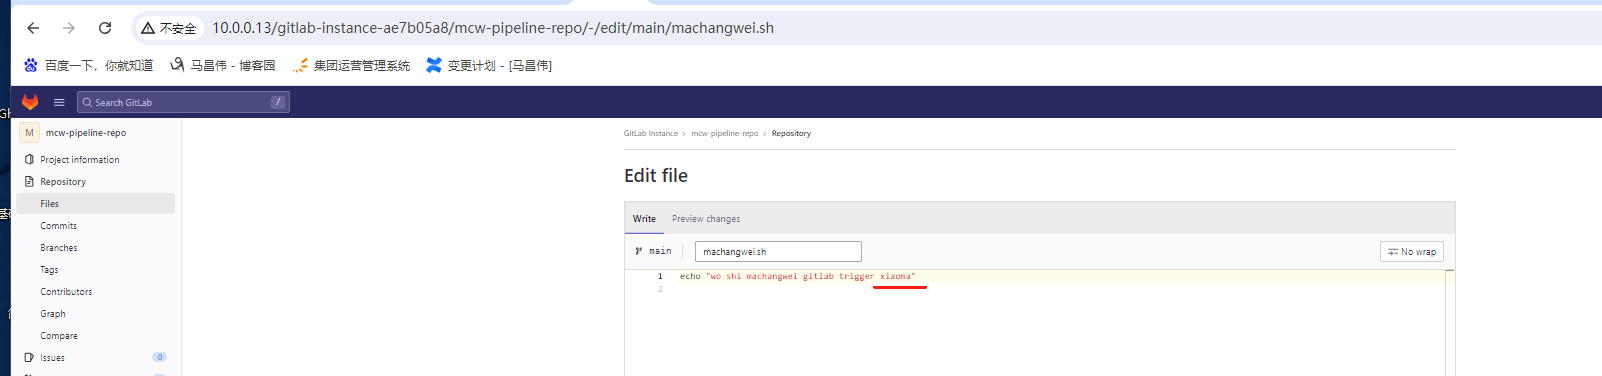
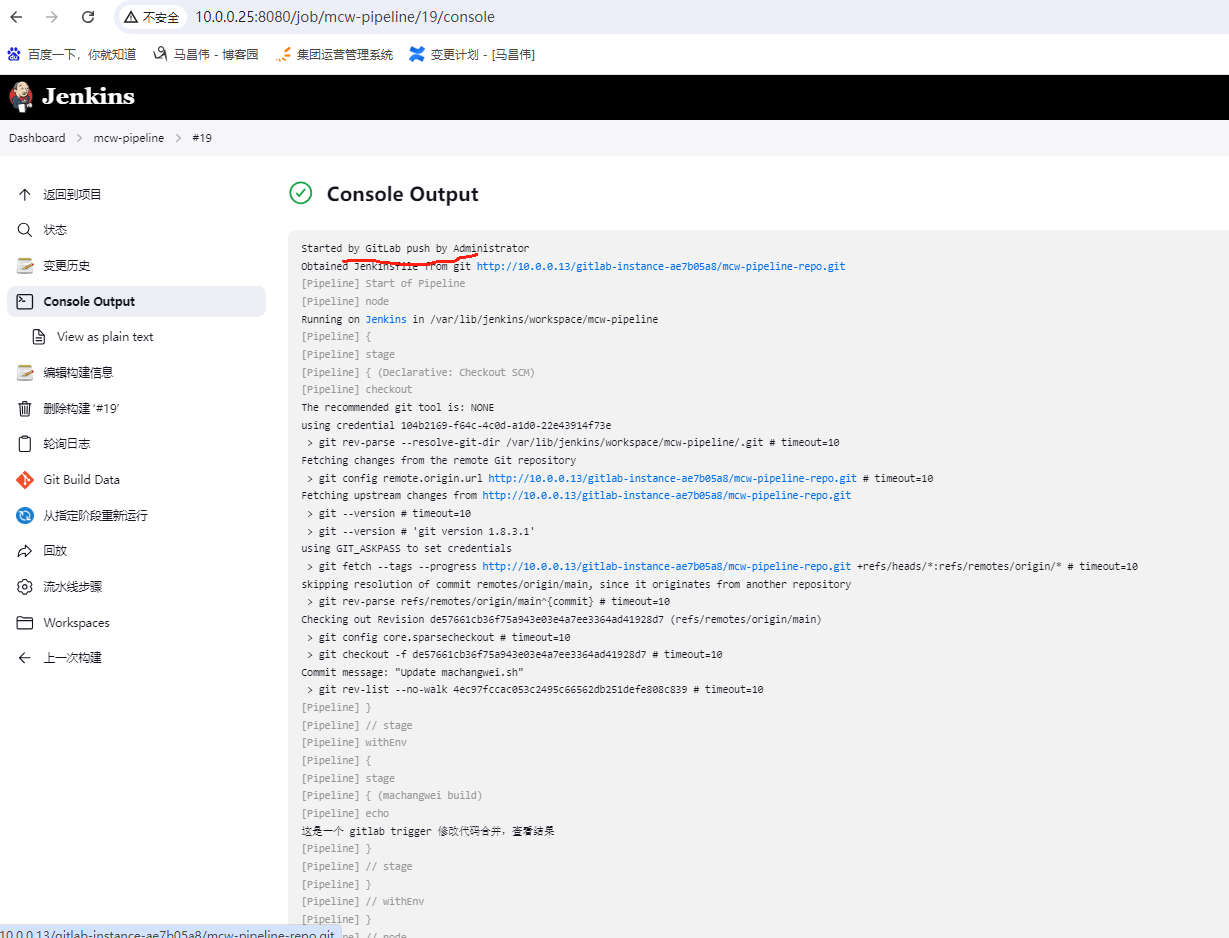
pipeline {
    agent any
    triggers {
        gitlab(triggerOnPush: true,
            triggerOnMergeRequest: true,
            branchFilterType: 'All',
            secretToken: "abcdefghijklmnopqrstuvwxyz0"
        )
    }
    stages {
        stage ('machangwei build') {
            steps {
                echo '这是一个 gitlab trigger 修改代码合并,查看结果'
            }
        }
    }
}
修改
提交之后,还没手动构建,目前配置如下,是scm
过了一会,它自动刷新同步了。不用手动点立即构建,同步Jenkinsfile配置上去

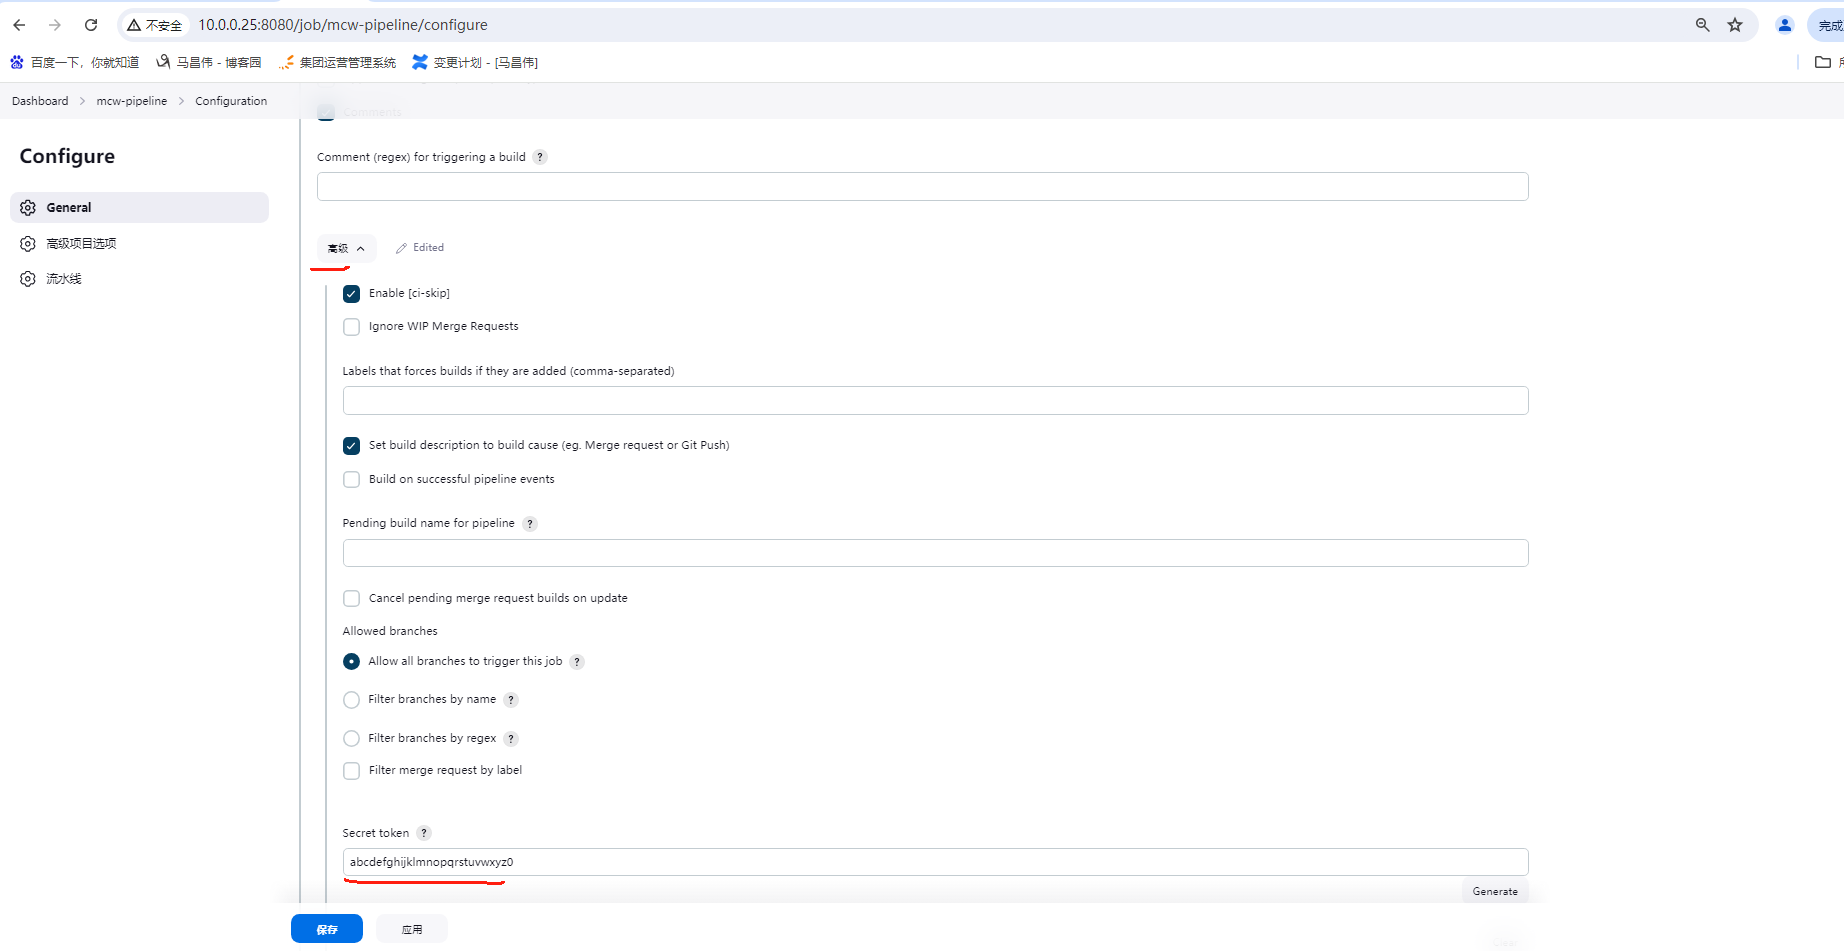
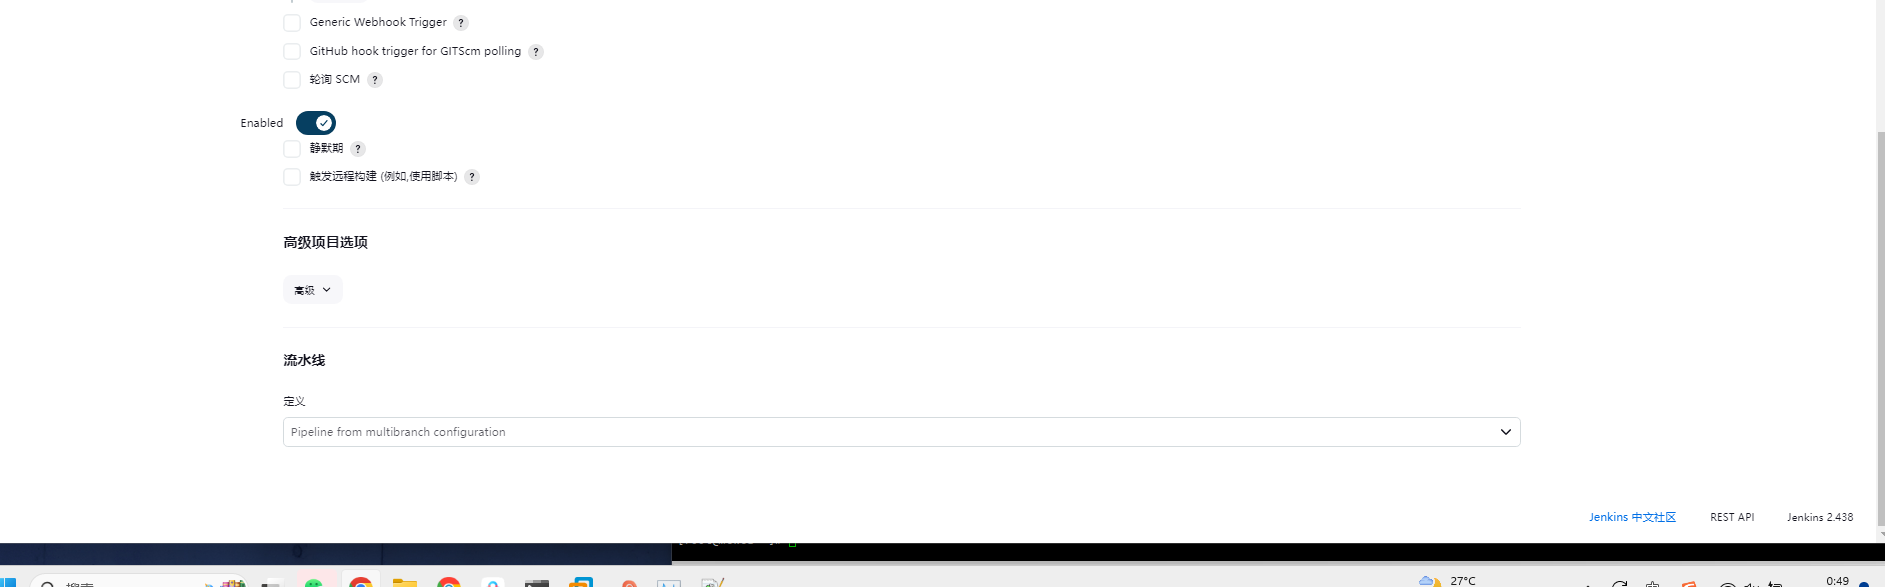
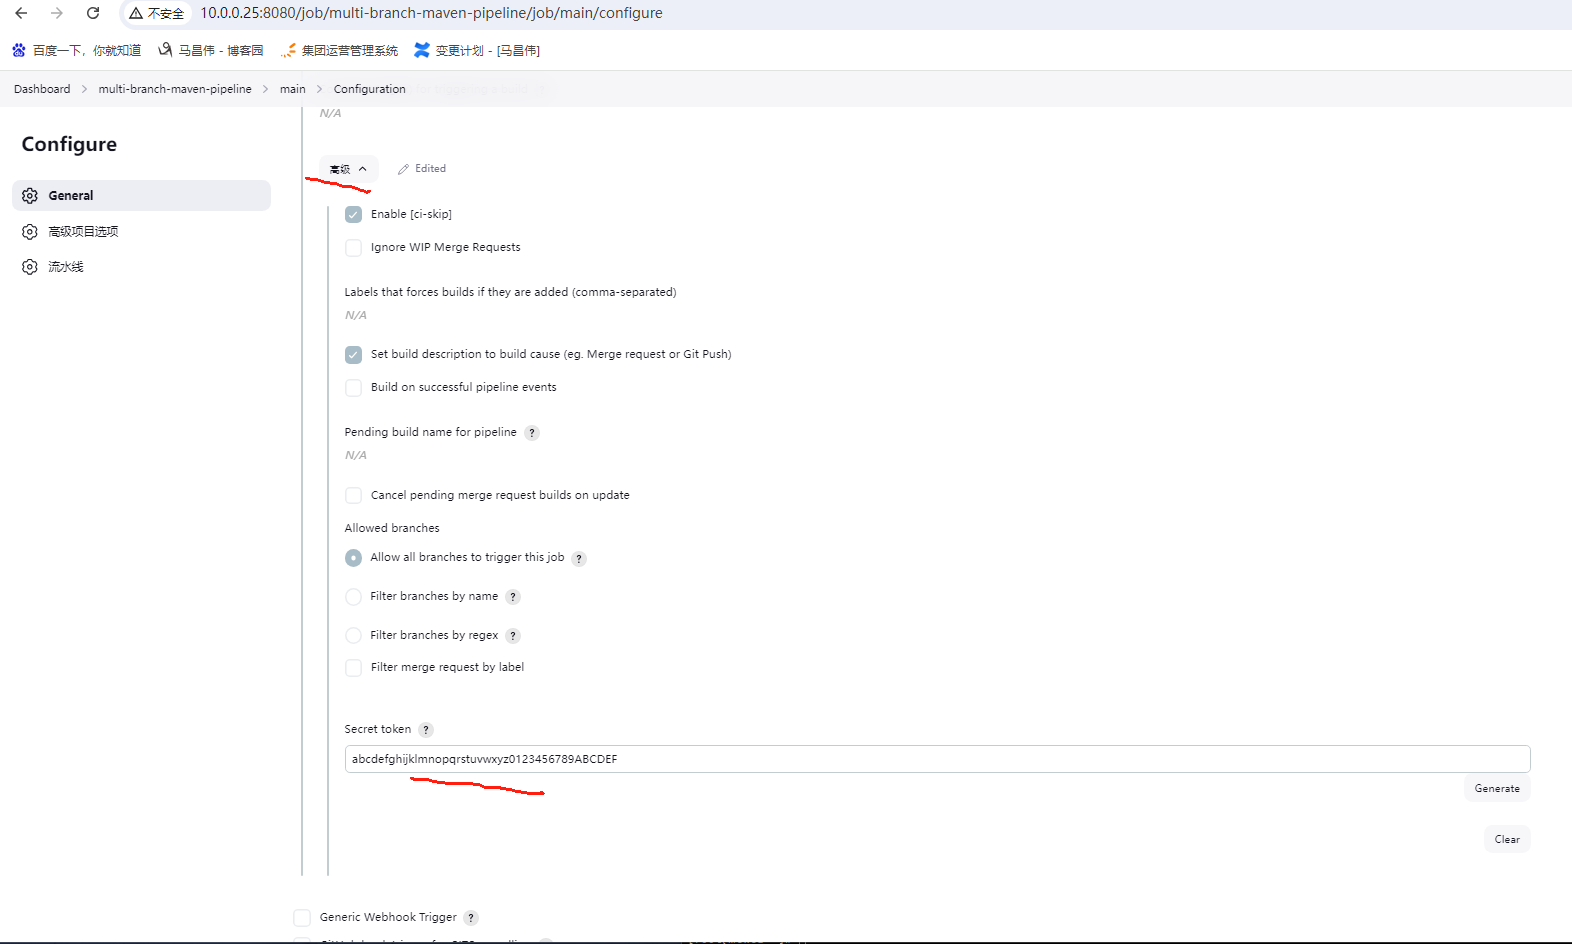
点击高级,打开隐藏部分,可以看到Jenkinsfile里面配置的secretToken也是同步上去了
此时也是立马构建运行了一次
准备修改提交一下,看看情况
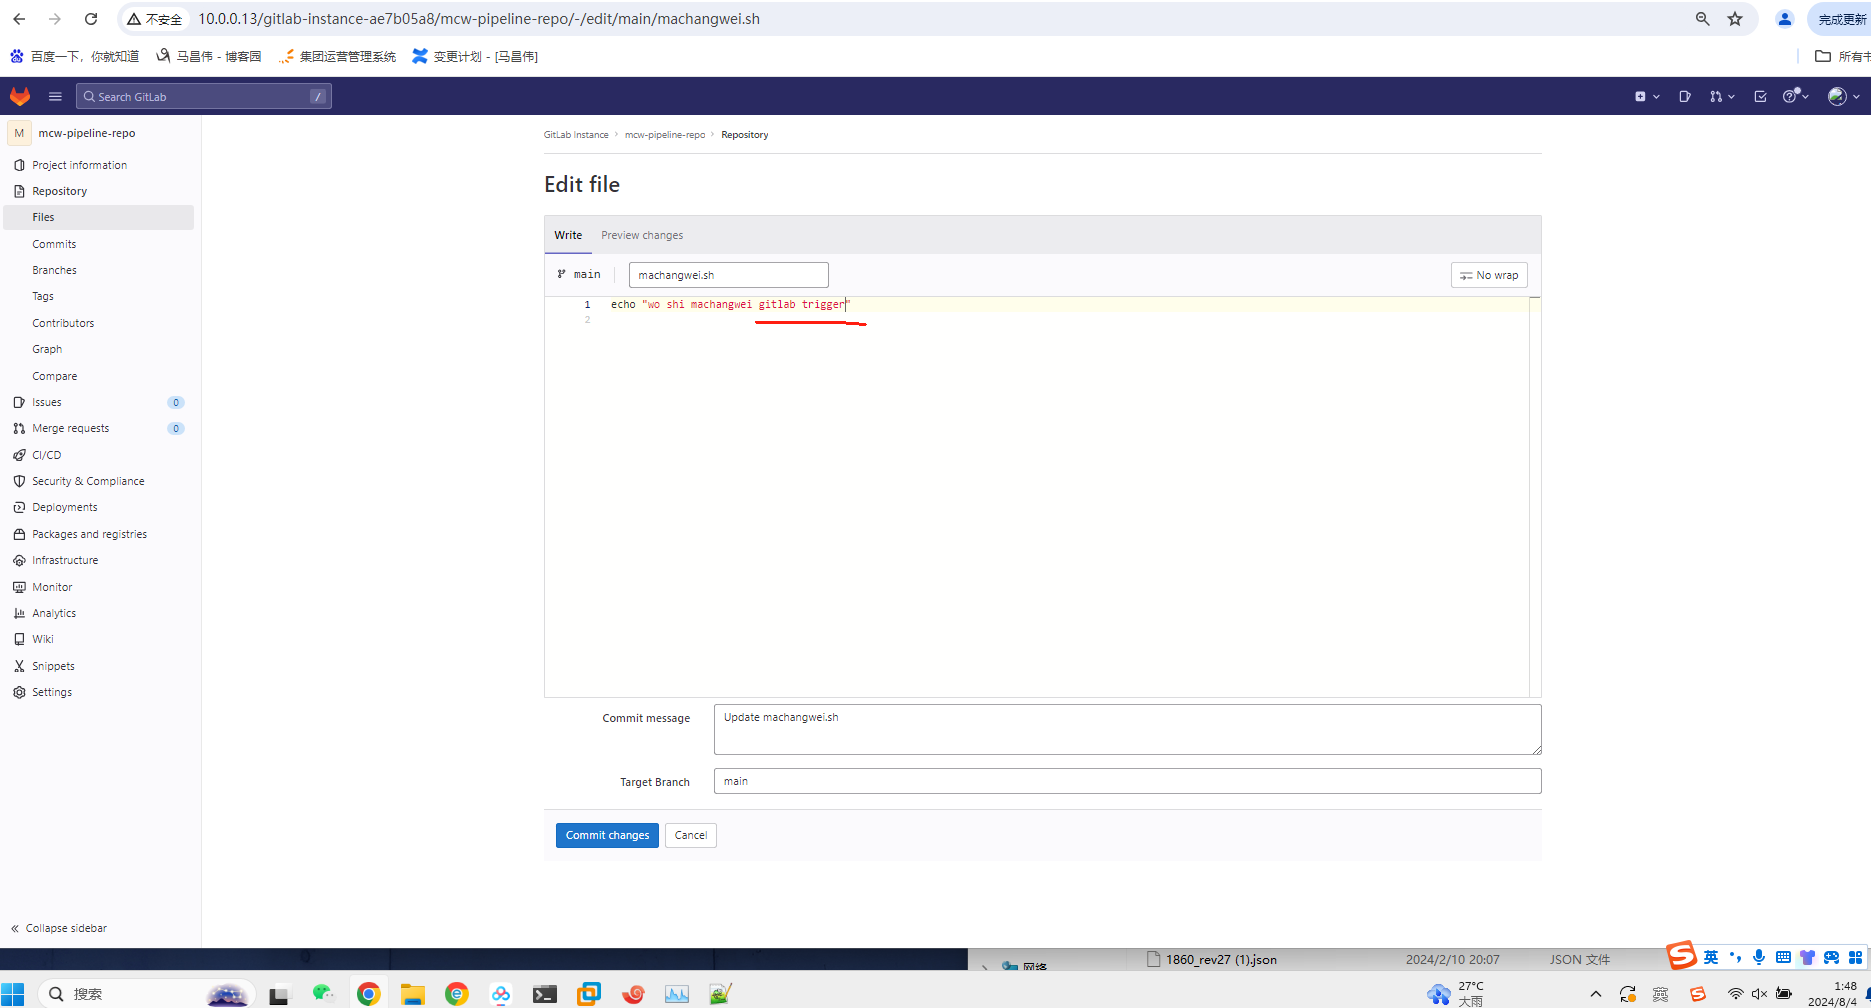
刚刚提交的没触发构建,重新提交下试试,这次修改其它文件
还是之前的最后构建数字,没有新的构建

我先手点立即构建一下

手点的立即构建任务,提示的是被用户开启的

修改代码并提交
还是没有触发。构建数字17,可能是上一个配置的生效触发的,而现在这个配置是没有触发的
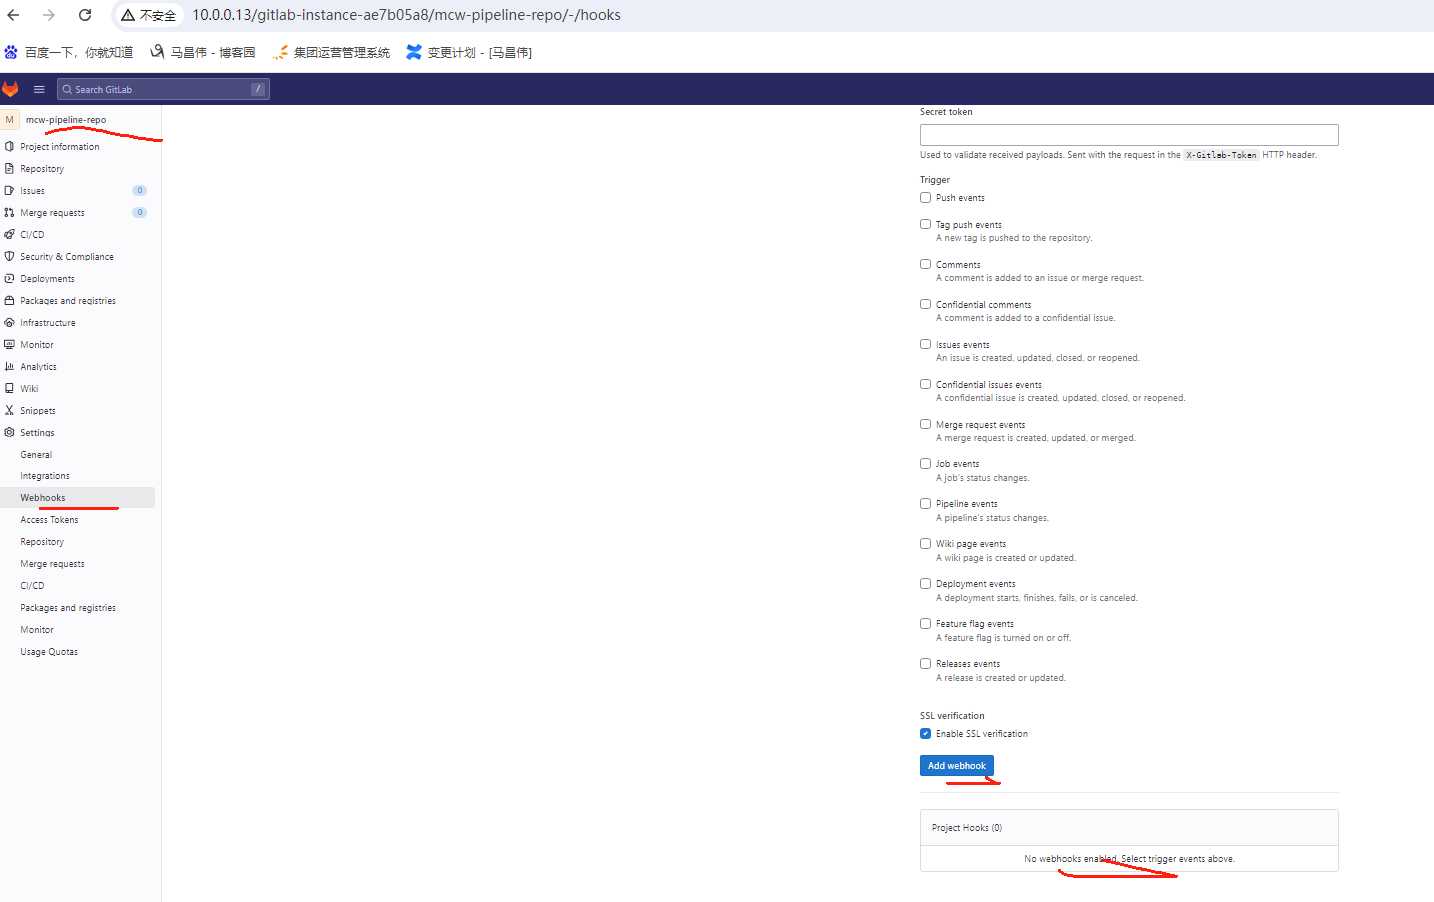
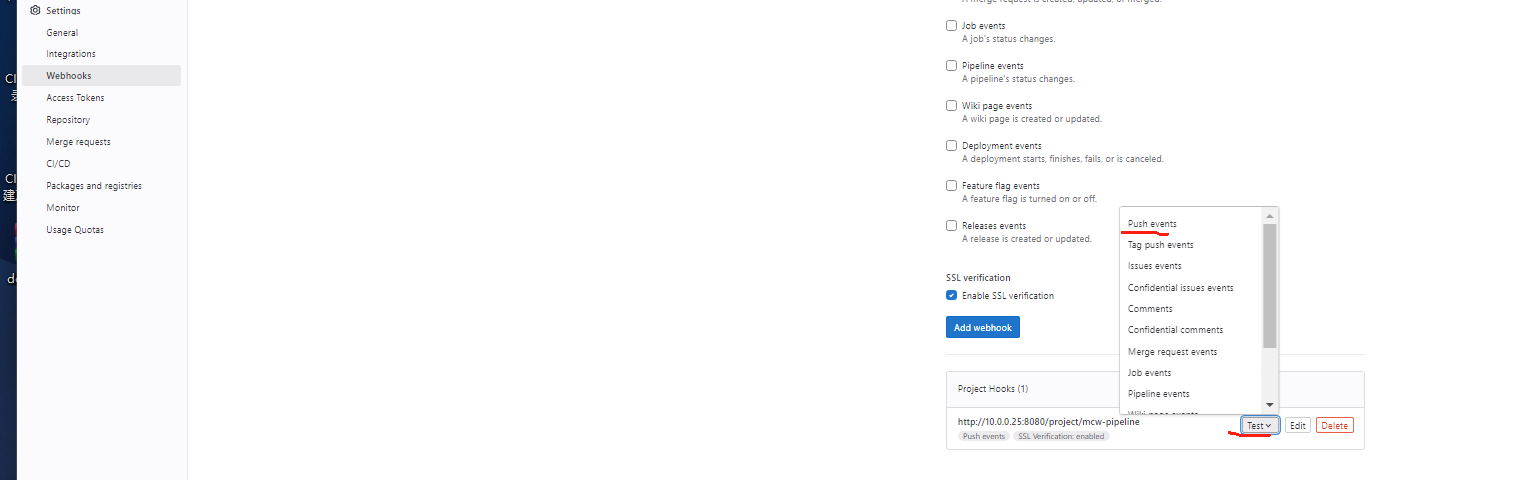
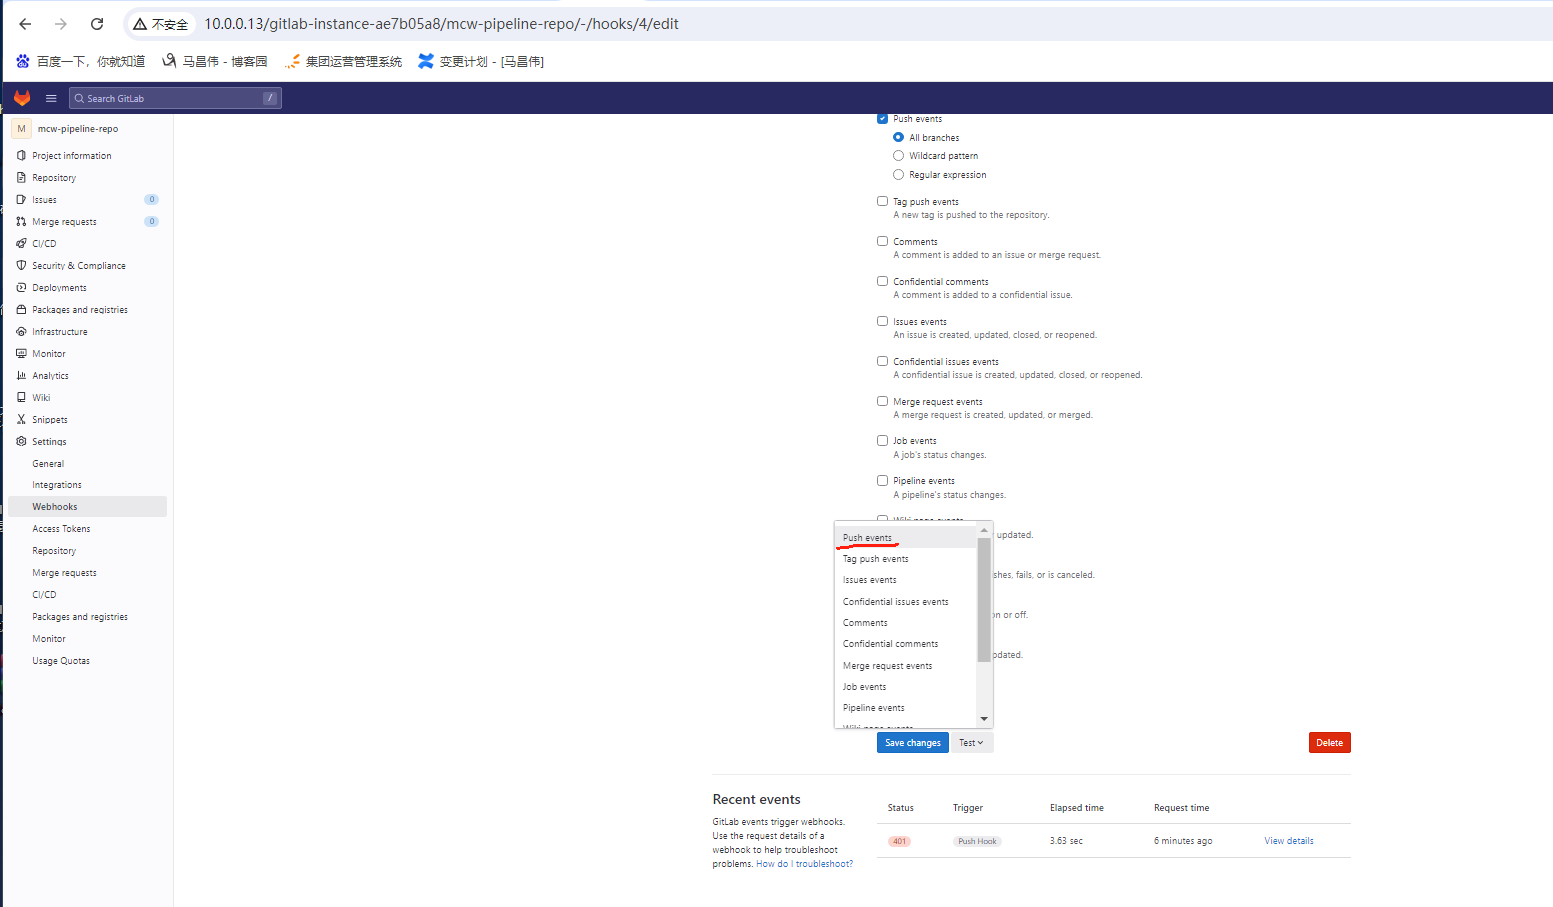
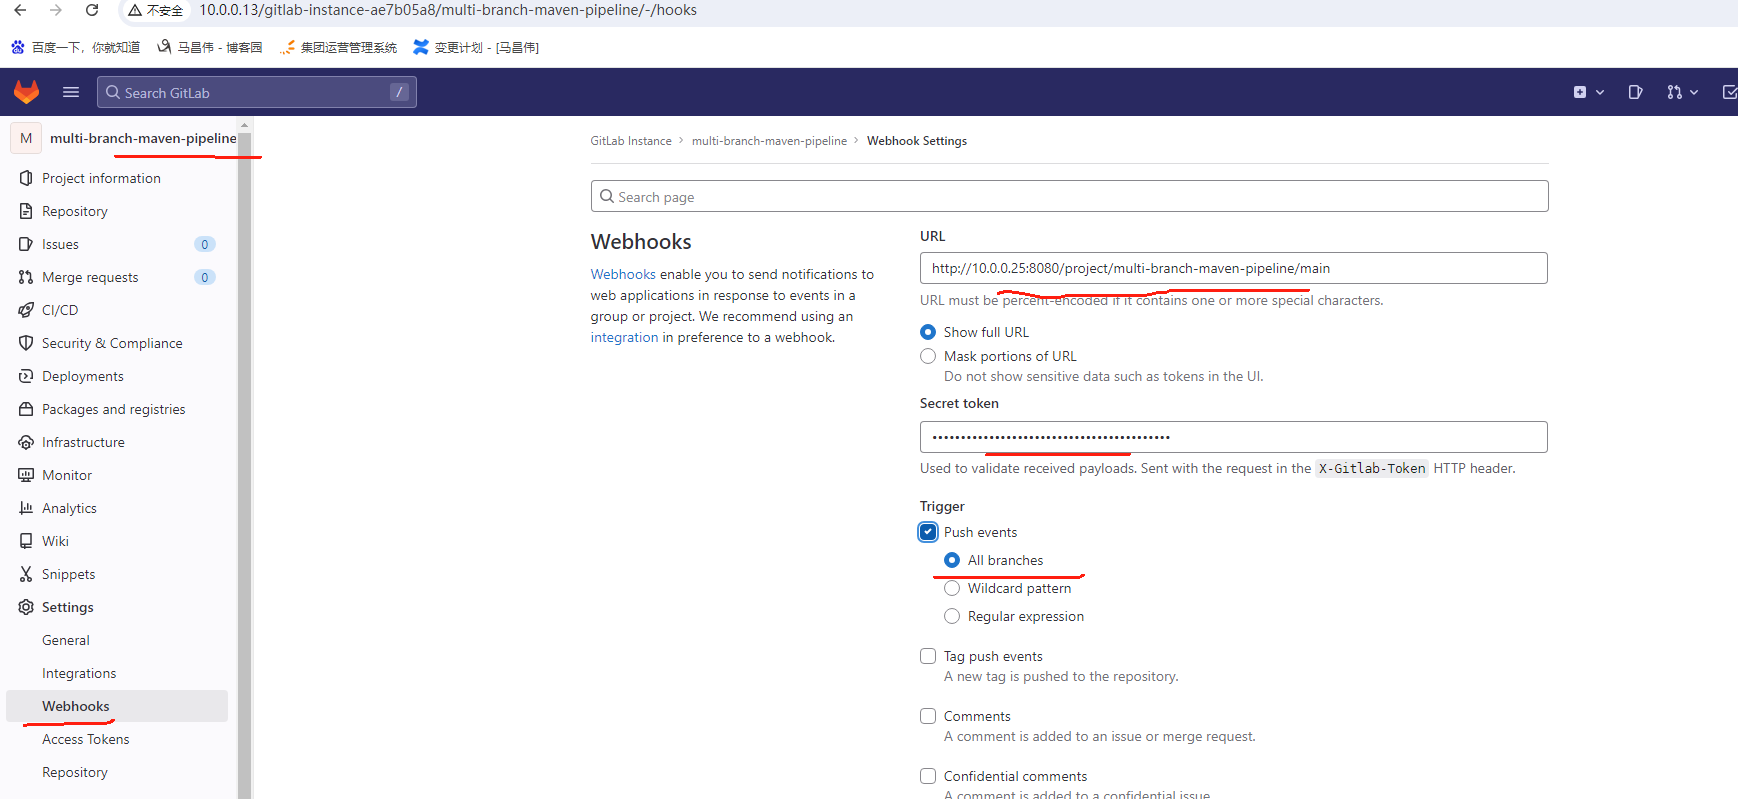
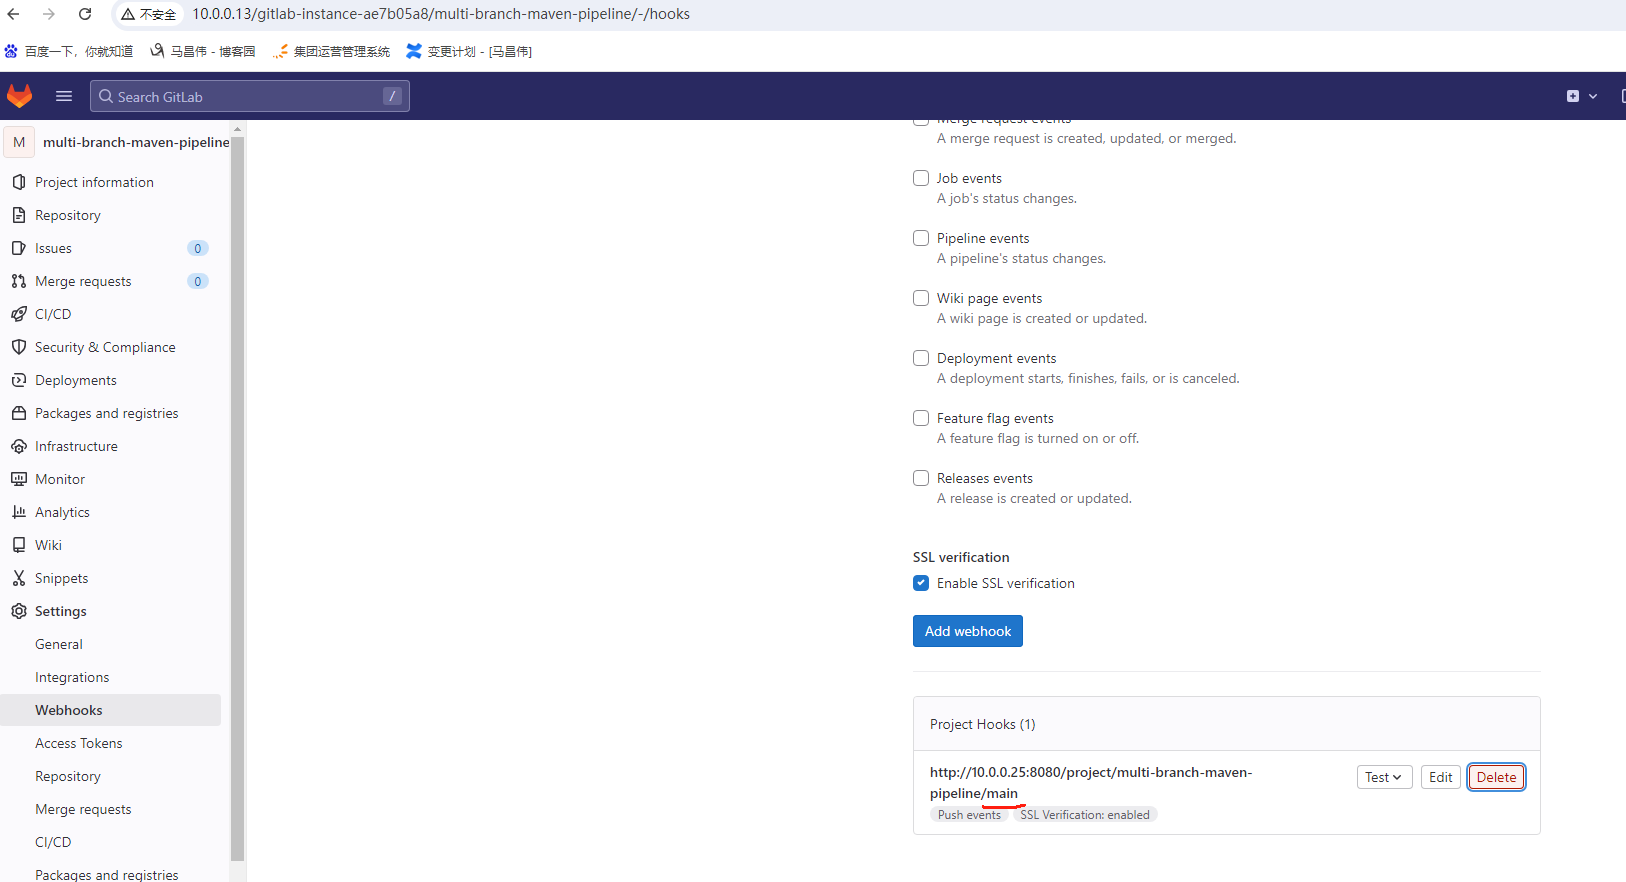
查看这里,没有webhook,我们这里先加一个吧
好像各个项目这个链接都差不多,就是接个项目名称


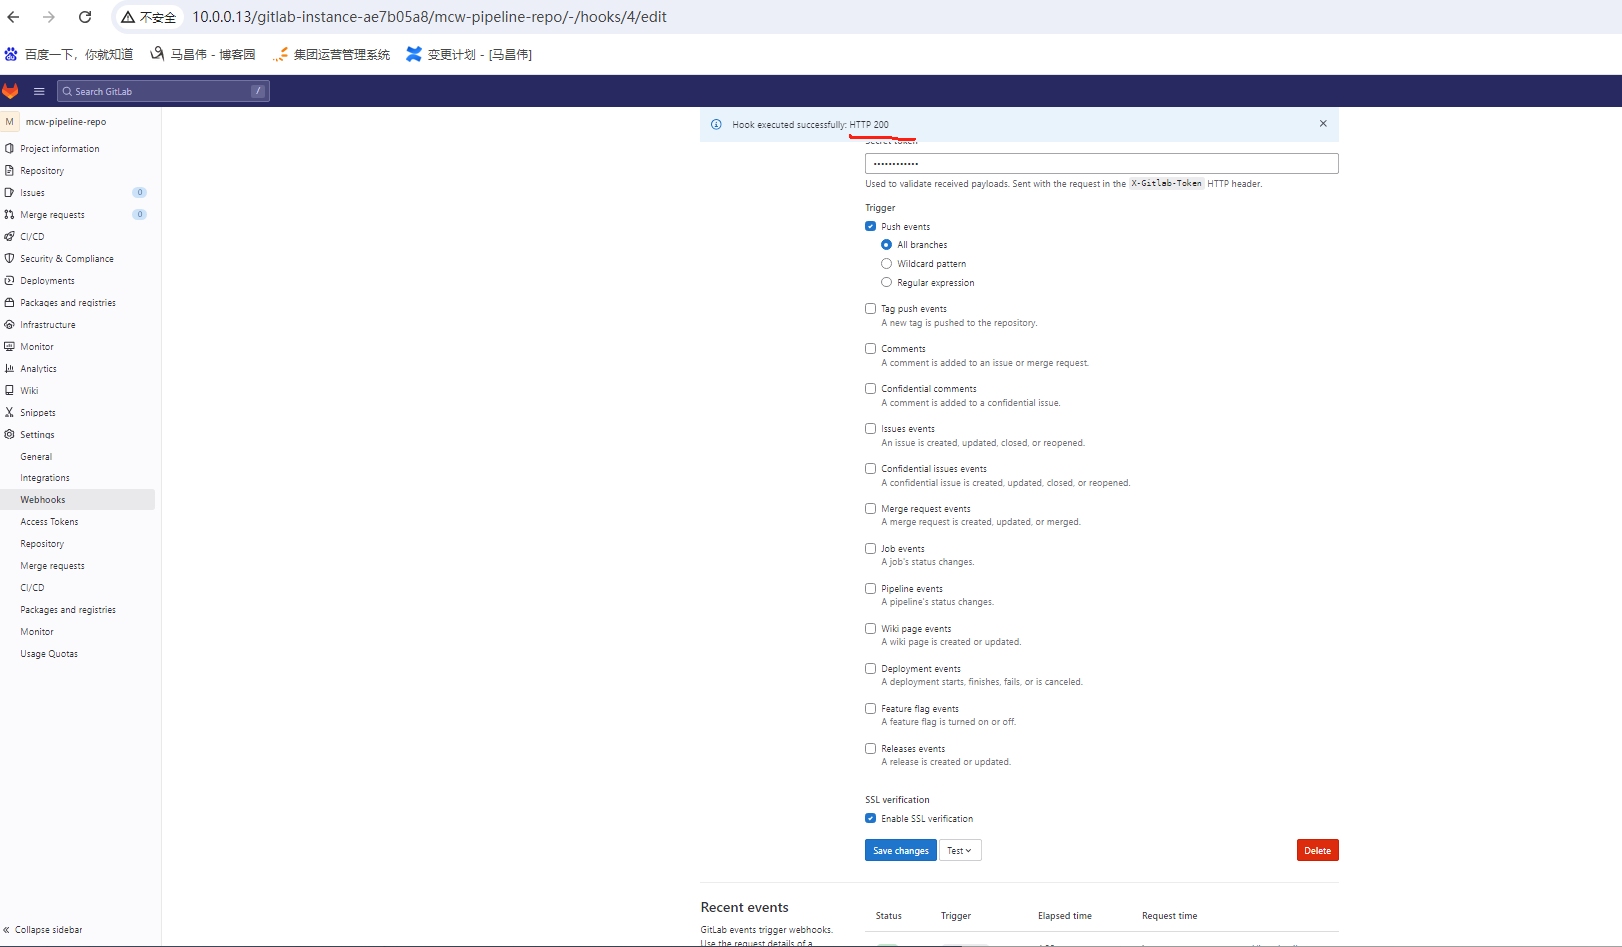
Hook executed successfully but returned HTTP 401 <html> <head> <meta http-equiv="Content-Type" content="text/html;charset=ISO-8859-1"/> <title>Error 401 Invalid token</title> </head> <body><h2>HTTP ERROR 401 Invalid token</h2> <table> <tr><th>URI:</th><td>/project/mcw-pipeline</td></tr> <tr><th>STATUS:</th><td>401</td></tr> <tr><th>MESSAGE:</th><td>Invalid token</td></tr> <tr><th>SERVLET:</th><td>Stapler</td></tr> </table> <hr/><a href="https://eclipse.org/jetty">Powered by Jetty:// 10.0.18</a><hr/> </body> </html>
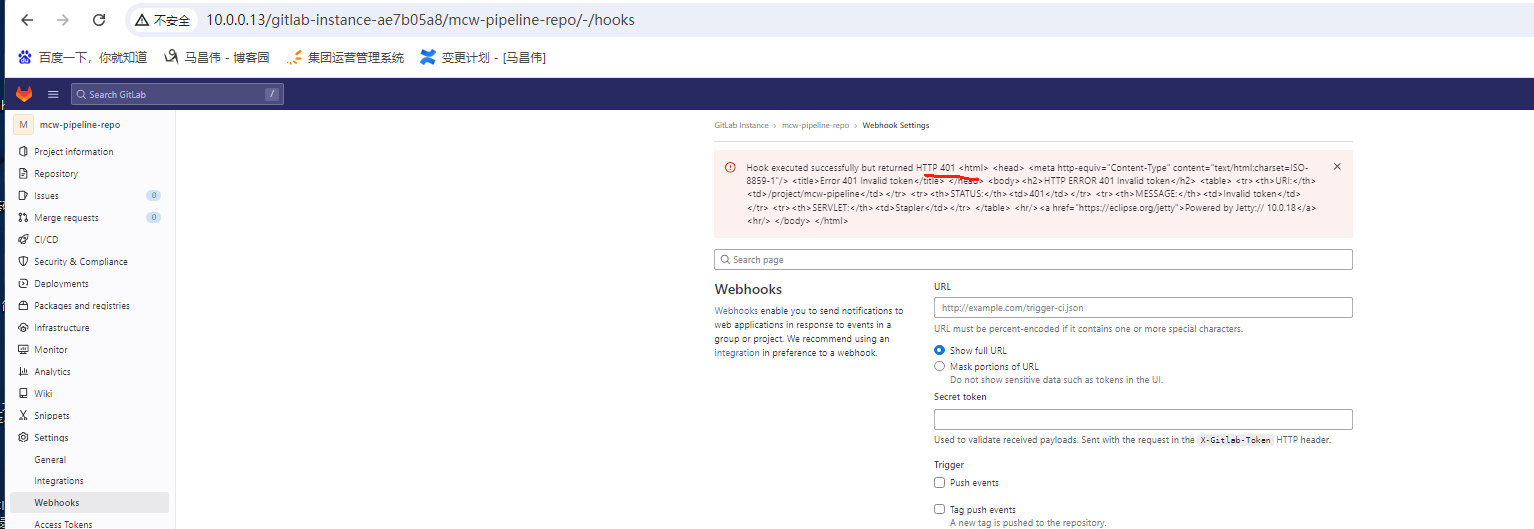
这是缺少token
我们将这个填上去


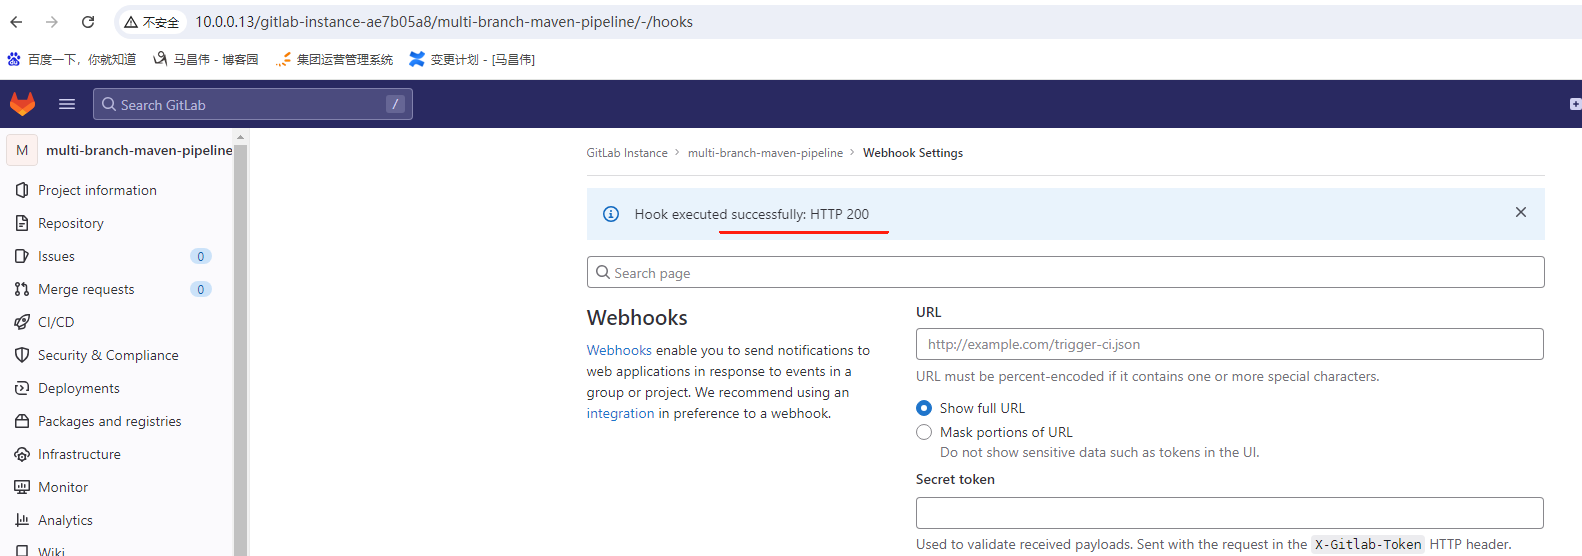
再次测试
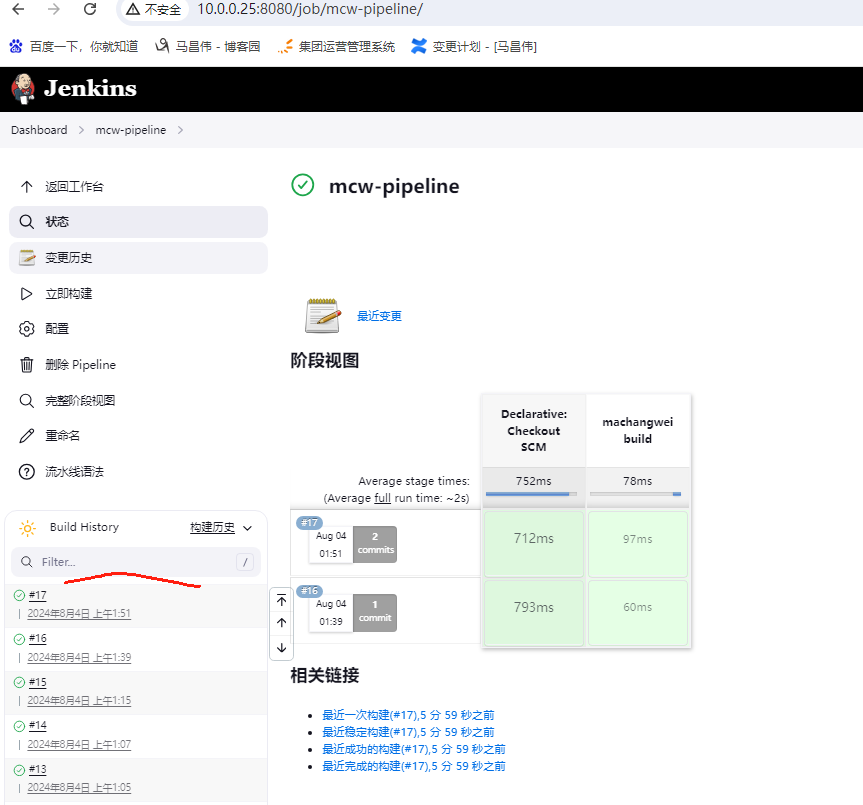
成功
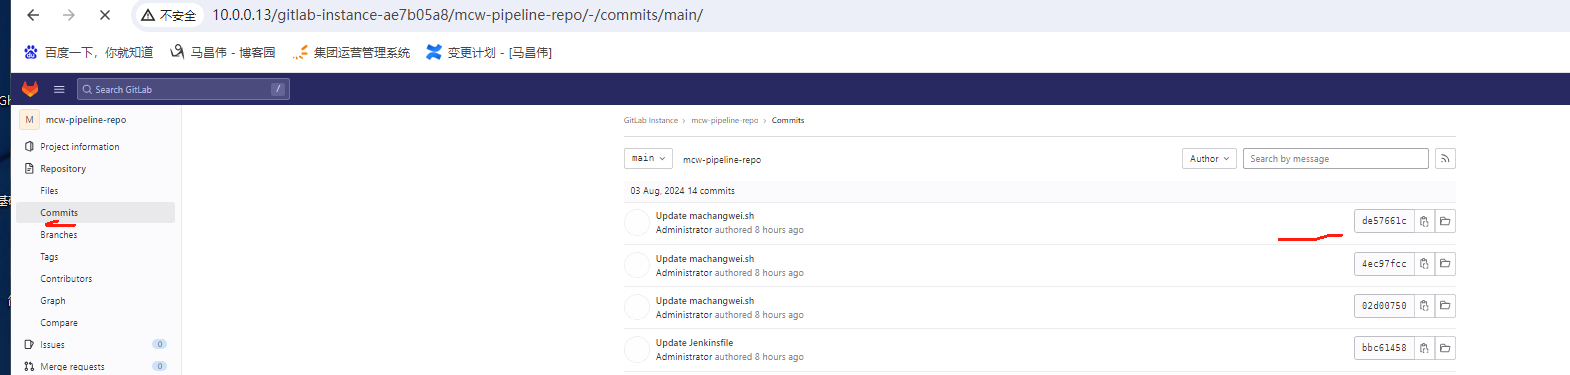
可以看到已经触发了一次了
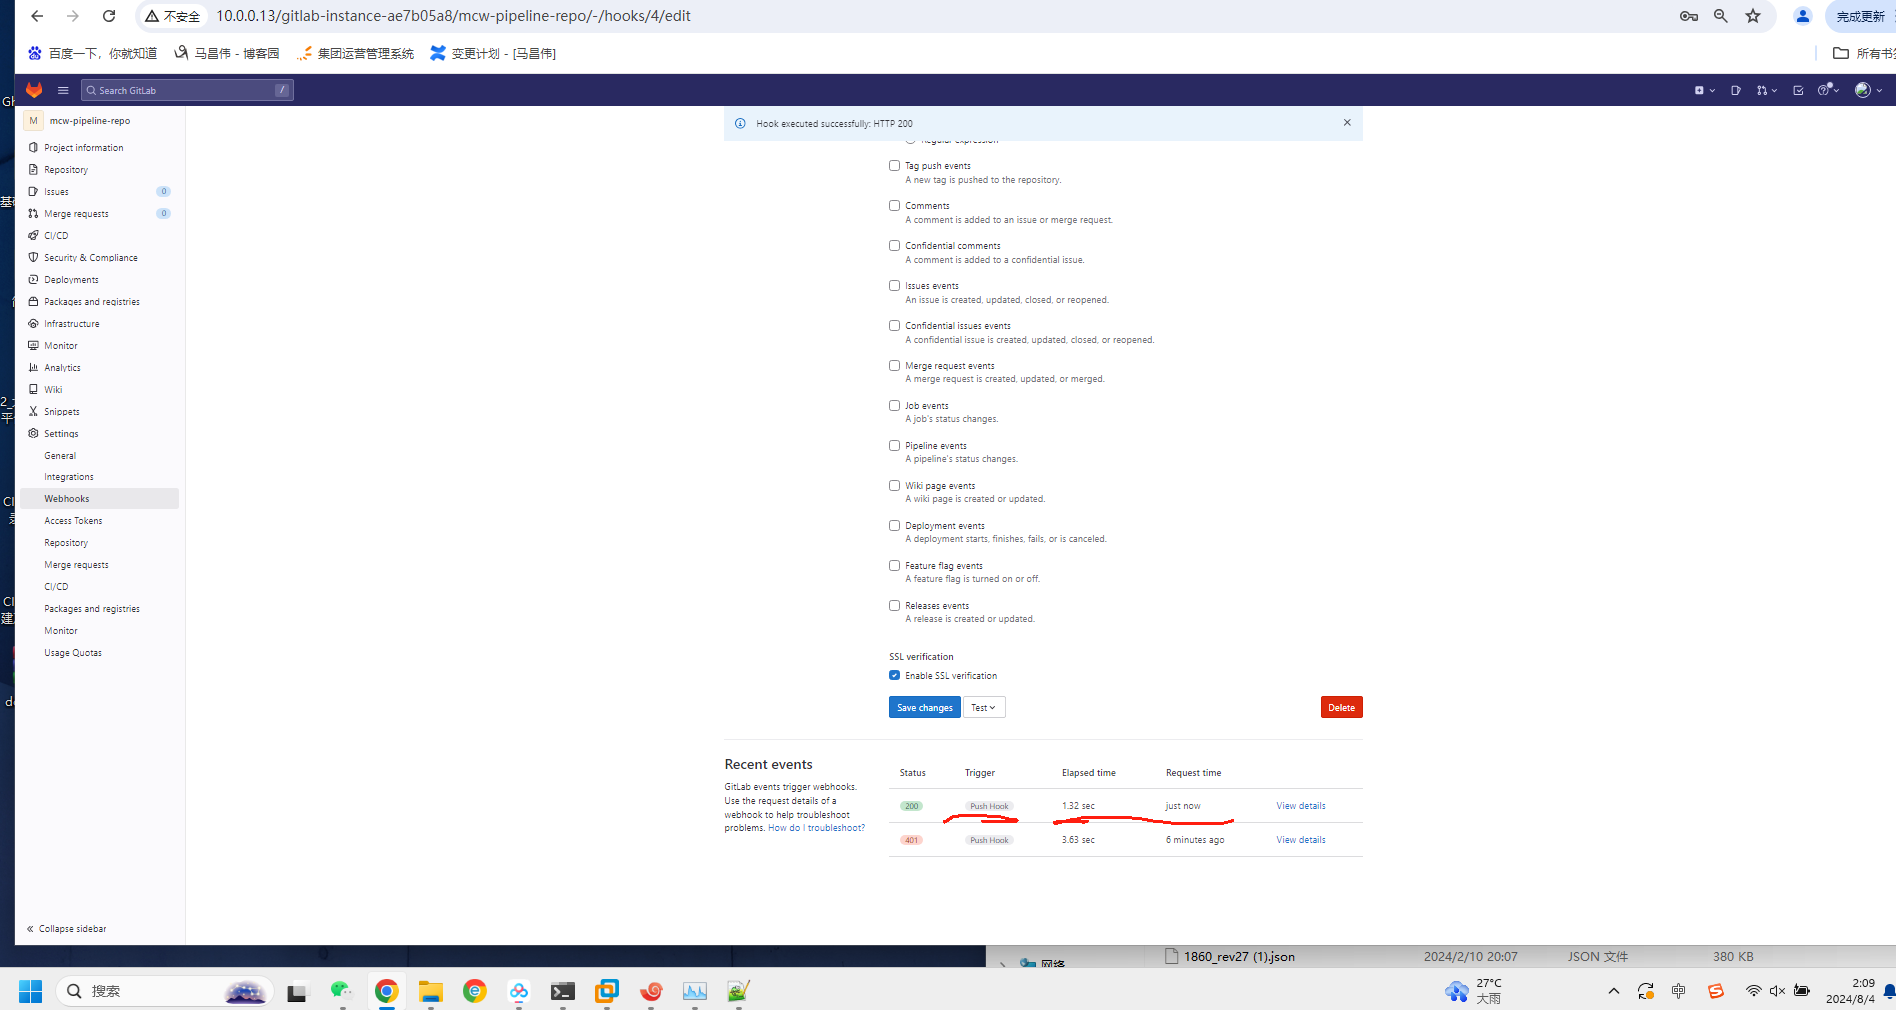
查看详情

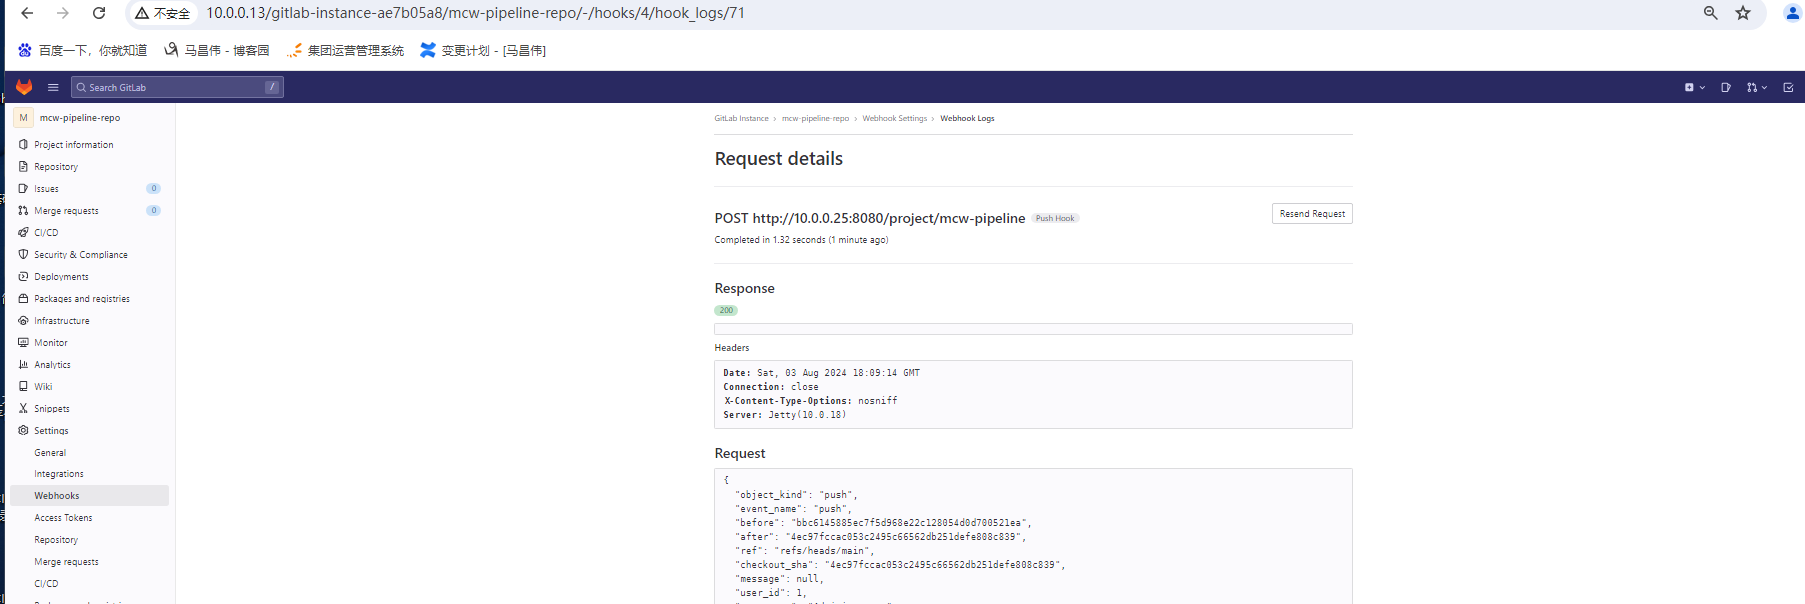
{
  "object_kind": "push",
  "event_name": "push",
  "before": "bbc6145885ec7f5d968e22c128054d0d700521ea",
  "after": "4ec97fccac053c2495c66562db251defe808c839",
  "ref": "refs/heads/main",
  "checkout_sha": "4ec97fccac053c2495c66562db251defe808c839",
  "message": null,
  "user_id": 1,
  "user_name": "Administrator",
  "user_username": "root",
  "user_email": null,
  "user_avatar": "https://www.gravatar.com/avatar/e64c7d89f26bd1972efa854d13d7dd61?s=80&d=identicon",
  "project_id": 5,
  "project": {
    "id": 5,
    "name": "mcw-pipeline-repo",
    "description": null,
    "web_url": "http://10.0.0.13/gitlab-instance-ae7b05a8/mcw-pipeline-repo",
    "avatar_url": null,
    "git_ssh_url": "git@10.0.0.13:gitlab-instance-ae7b05a8/mcw-pipeline-repo.git",
    "git_http_url": "http://10.0.0.13/gitlab-instance-ae7b05a8/mcw-pipeline-repo.git",
    "namespace": "GitLab Instance",
    "visibility_level": 0,
    "path_with_namespace": "gitlab-instance-ae7b05a8/mcw-pipeline-repo",
    "default_branch": "main",
    "ci_config_path": null,
    "homepage": "http://10.0.0.13/gitlab-instance-ae7b05a8/mcw-pipeline-repo",
    "url": "git@10.0.0.13:gitlab-instance-ae7b05a8/mcw-pipeline-repo.git",
    "ssh_url": "git@10.0.0.13:gitlab-instance-ae7b05a8/mcw-pipeline-repo.git",
    "http_url": "http://10.0.0.13/gitlab-instance-ae7b05a8/mcw-pipeline-repo.git"
  },
  "commits": [
    {
      "id": "4ec97fccac053c2495c66562db251defe808c839",
      "message": "Update machangwei.sh",
      "title": "Update machangwei.sh",
      "timestamp": "2024-08-03T17:54:01+00:00",
      "url": "http://10.0.0.13/gitlab-instance-ae7b05a8/mcw-pipeline-repo/-/commit/4ec97fccac053c2495c66562db251defe808c839",
      "author": {
        "name": "Administrator",
        "email": "[REDACTED]"
      },
      "added": [

      ],
      "modified": [
        "machangwei.sh"
      ],
      "removed": [

      ]
    },
    {
      "id": "02d00750b5e6c7e7745add0c7a6d0e5d097412ca",
      "message": "Update machangwei.sh",
      "title": "Update machangwei.sh",
      "timestamp": "2024-08-03T17:49:23+00:00",
      "url": "http://10.0.0.13/gitlab-instance-ae7b05a8/mcw-pipeline-repo/-/commit/02d00750b5e6c7e7745add0c7a6d0e5d097412ca",
      "author": {
        "name": "Administrator",
        "email": "[REDACTED]"
      },
      "added": [

      ],
      "modified": [
        "machangwei.sh"
      ],
      "removed": [

      ]
    },
    {
      "id": "bbc6145885ec7f5d968e22c128054d0d700521ea",
      "message": "Update Jenkinsfile",
      "title": "Update Jenkinsfile",
      "timestamp": "2024-08-03T17:45:45+00:00",
      "url": "http://10.0.0.13/gitlab-instance-ae7b05a8/mcw-pipeline-repo/-/commit/bbc6145885ec7f5d968e22c128054d0d700521ea",
      "author": {
        "name": "Administrator",
        "email": "[REDACTED]"
      },
      "added": [

      ],
      "modified": [
        "Jenkinsfile"
      ],
      "removed": [

      ]
    }
  ],
  "total_commits_count": 3,
  "push_options": {
  },
  "repository": {
    "name": "mcw-pipeline-repo",
    "url": "git@10.0.0.13:gitlab-instance-ae7b05a8/mcw-pipeline-repo.git",
    "description": null,
    "homepage": "http://10.0.0.13/gitlab-instance-ae7b05a8/mcw-pipeline-repo",
    "git_http_url": "http://10.0.0.13/gitlab-instance-ae7b05a8/mcw-pipeline-repo.git",
    "git_ssh_url": "git@10.0.0.13:gitlab-instance-ae7b05a8/mcw-pipeline-repo.git",
    "visibility_level": 0
  }
}
Content-Type: application/json
User-Agent: GitLab/15.7.9
X-Gitlab-Event: Push Hook
X-Gitlab-Instance: http://10.0.0.13
X-Gitlab-Token: [REDACTED]
X-Gitlab-Event-UUID: 580d53e1-4951-44c5-8128-3a5ecdb80395
查看Jenkins项目,可以看到是gitlab推送的
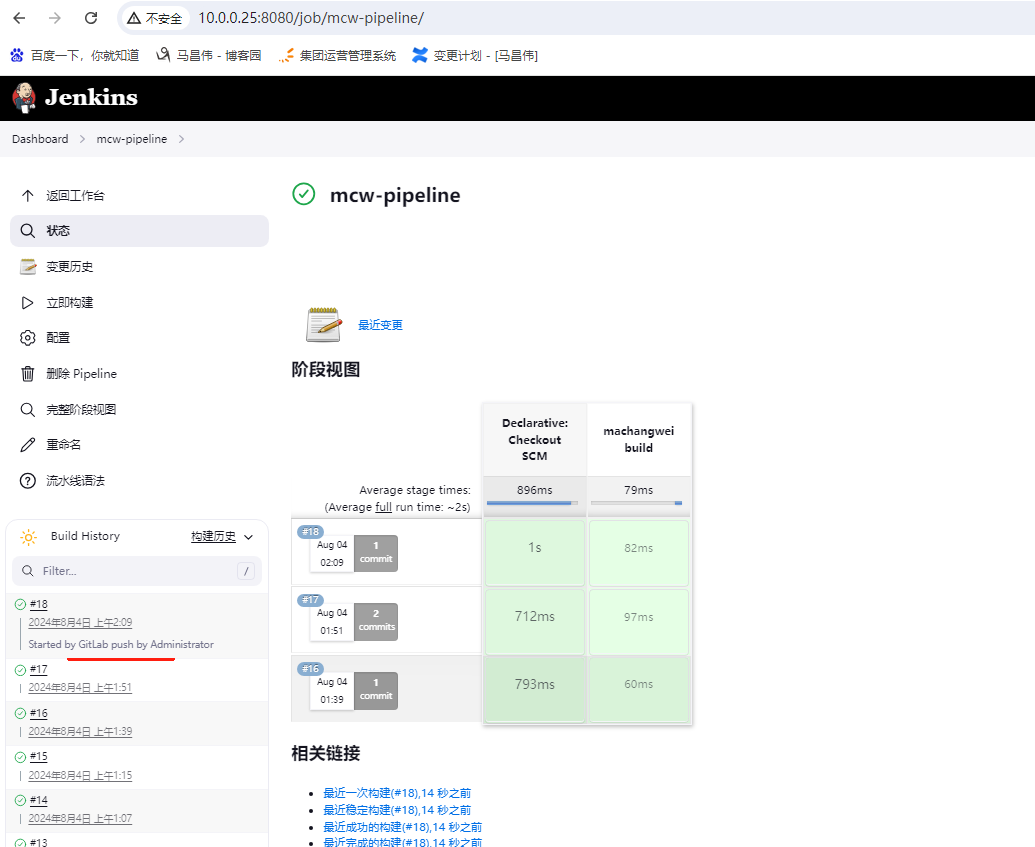
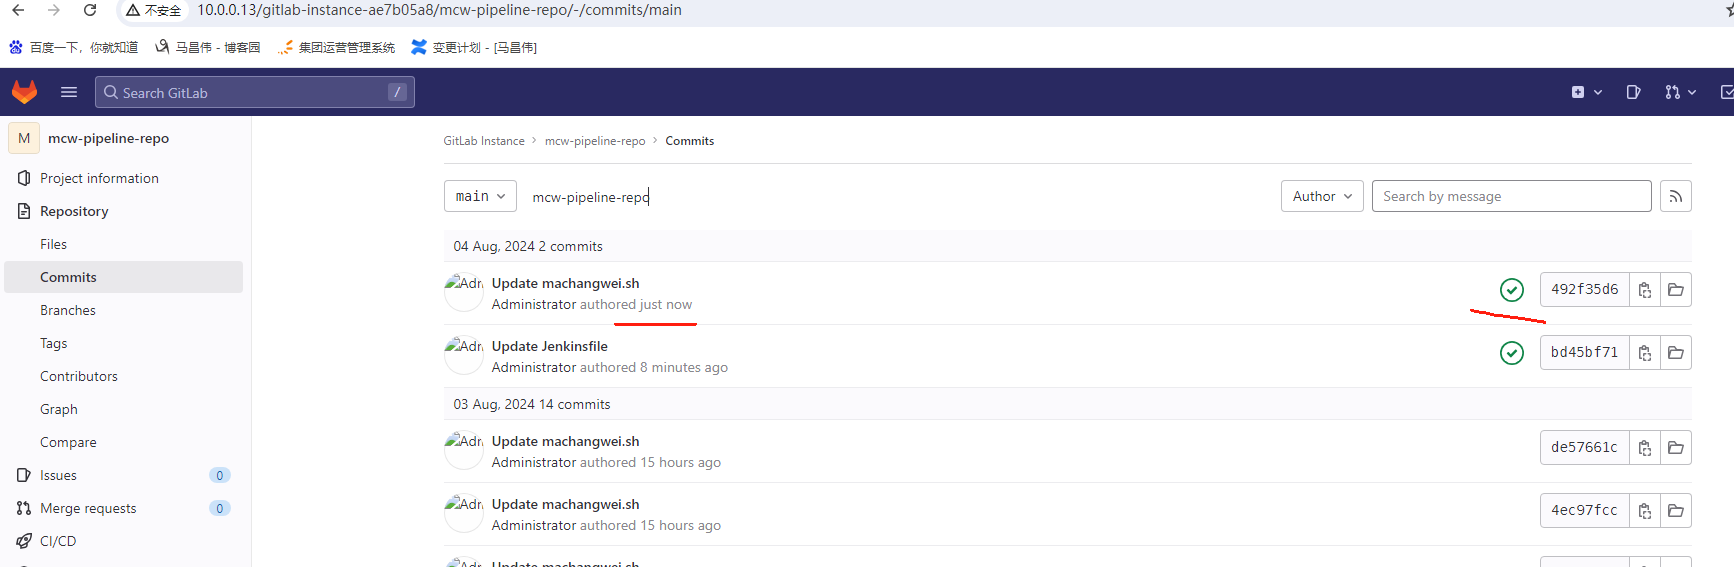
修改代码提交
可以看到自动触发构建了

这里可以看到,开始于gitlab push
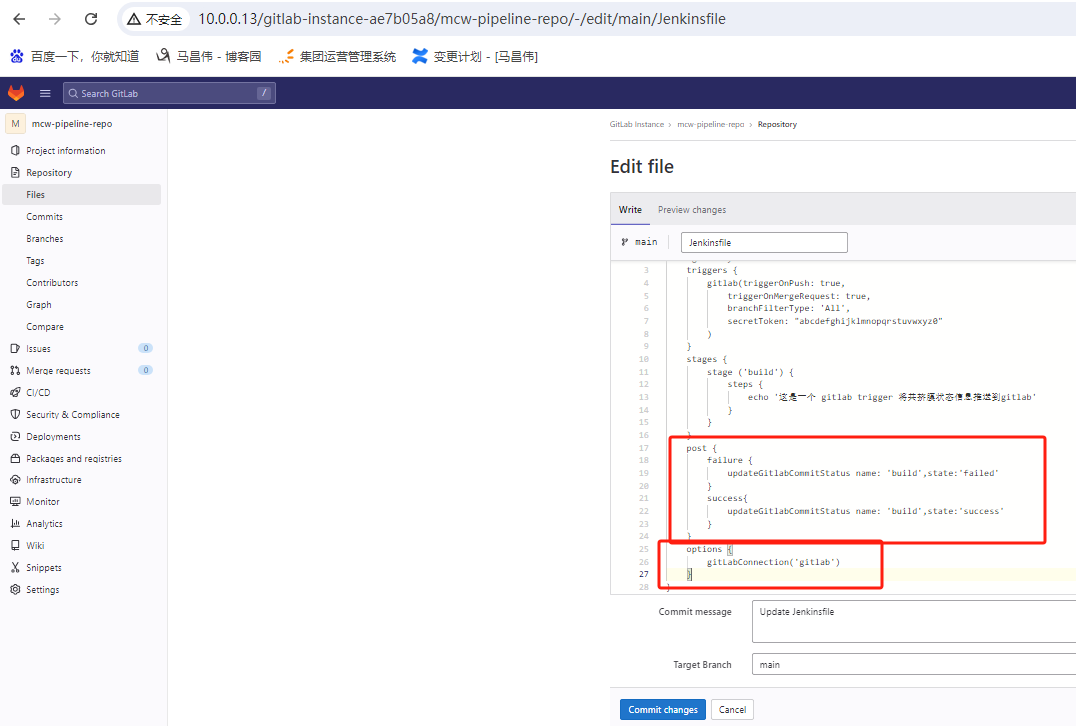
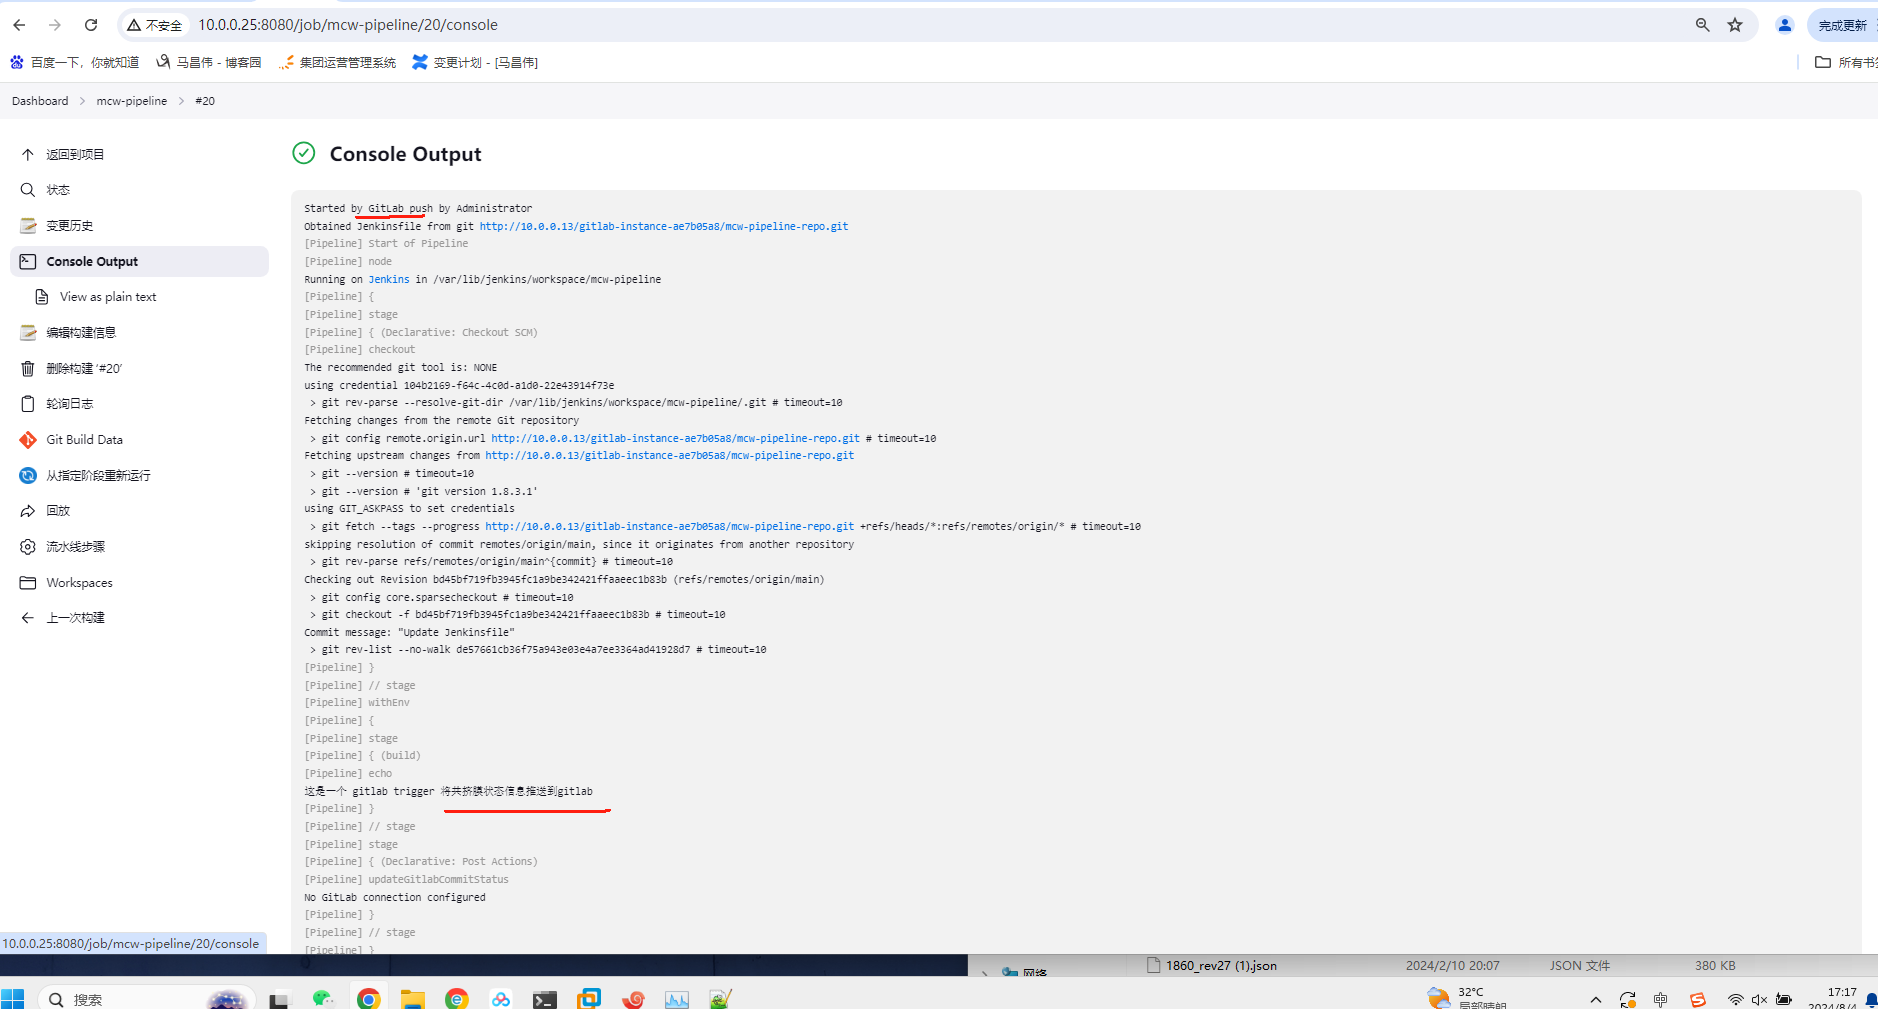
将构建状态信息推送到gitlab
pipeline {
    agent any
    triggers {
        gitlab(triggerOnPush: true,
            triggerOnMergeRequest: true,
            branchFilterType: 'All',
            secretToken: "abcdefghijklmnopqrstuvwxyz0"
        )
    }
    stages {
        stage ('build') {
            steps {
                echo '这是一个 gitlab trigger 将共挤膜状态信息推送到gitlab'
            }
        }
    }
    post {
        failure {
            updateGitlabCommitStatus name: 'build',state:'failed'
        }
        success{
            updateGitlabCommitStatus name: 'build',state:'success'
        }
    }
    options {
        gitLabConnection('gitlab')
    }
}
一开始是没有的Jenkins发布情况的

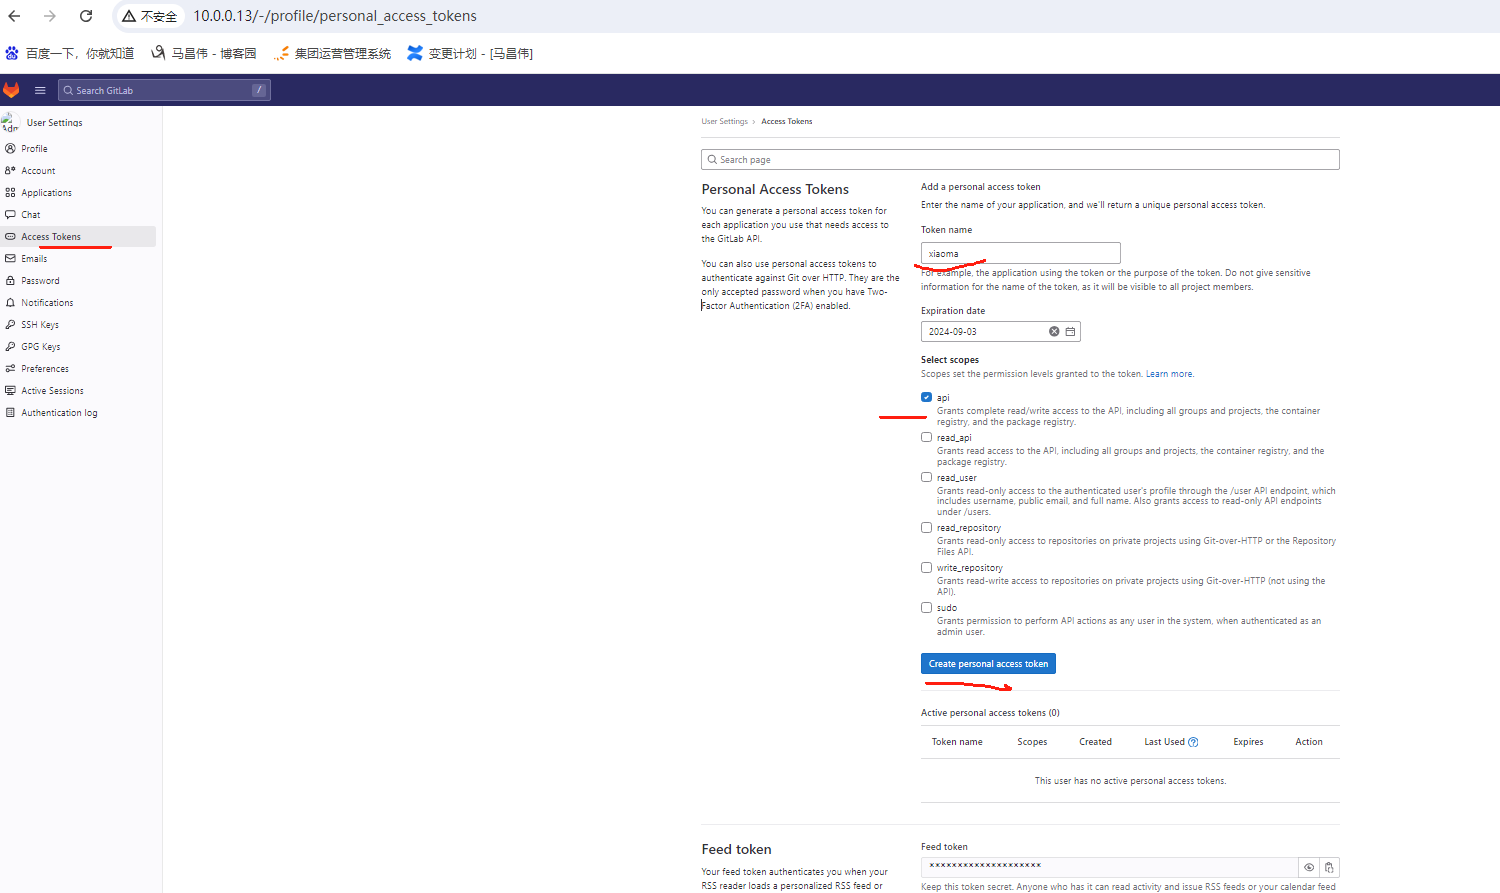
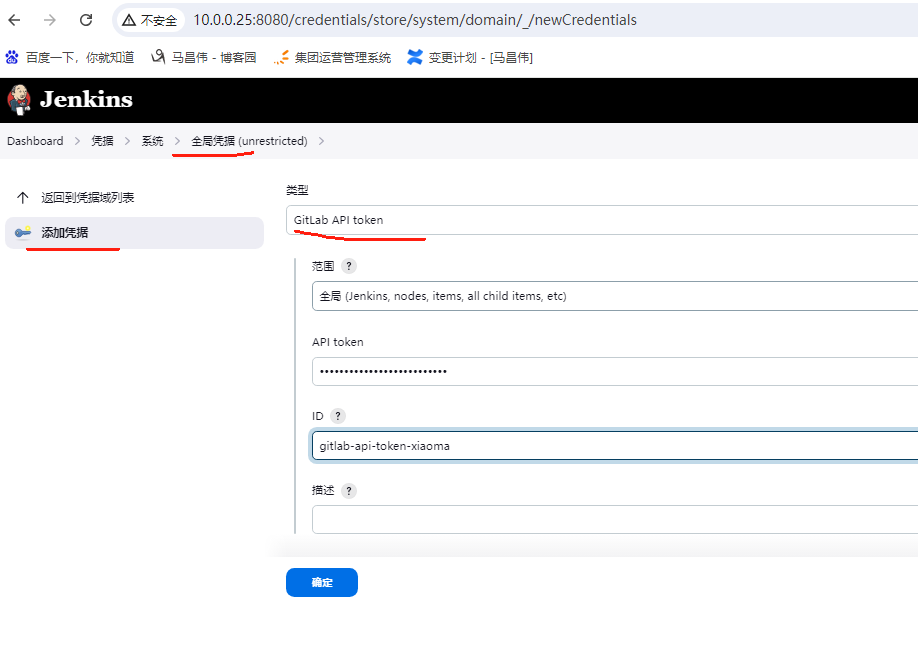
Jenkins系统设置里,添加一个gitlab设置。因为需要api token,所以先添加一个凭证
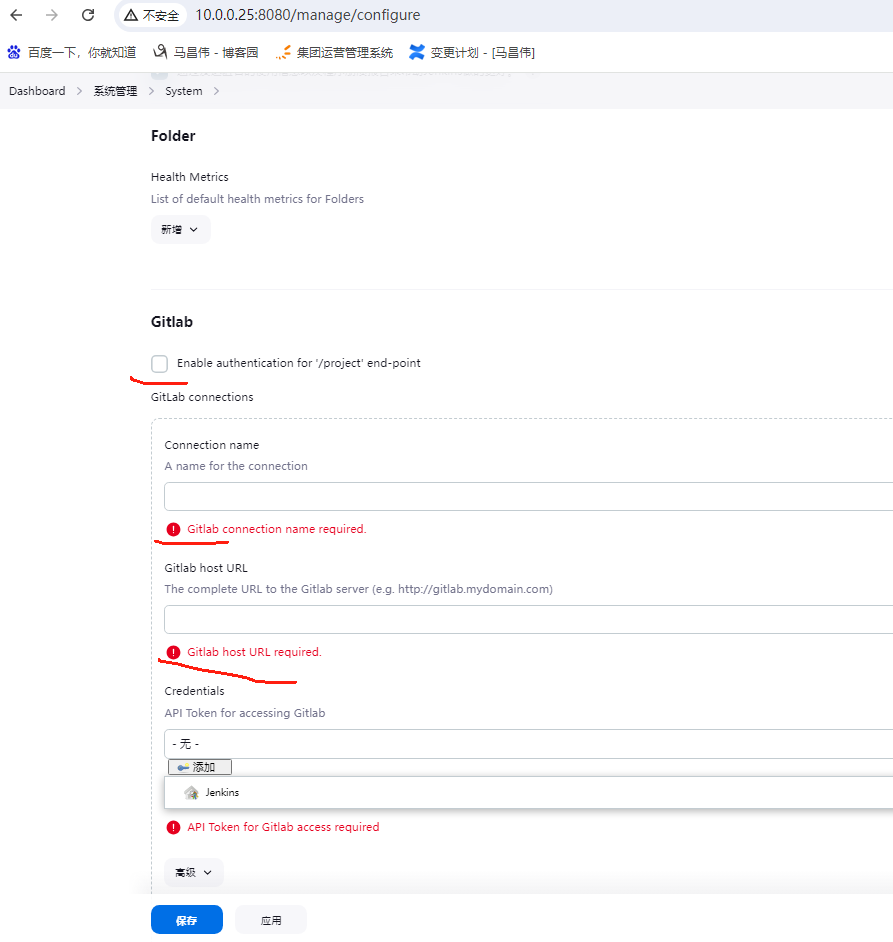


全局系统配置里面,添加这个gitlab设置,并测试连通性
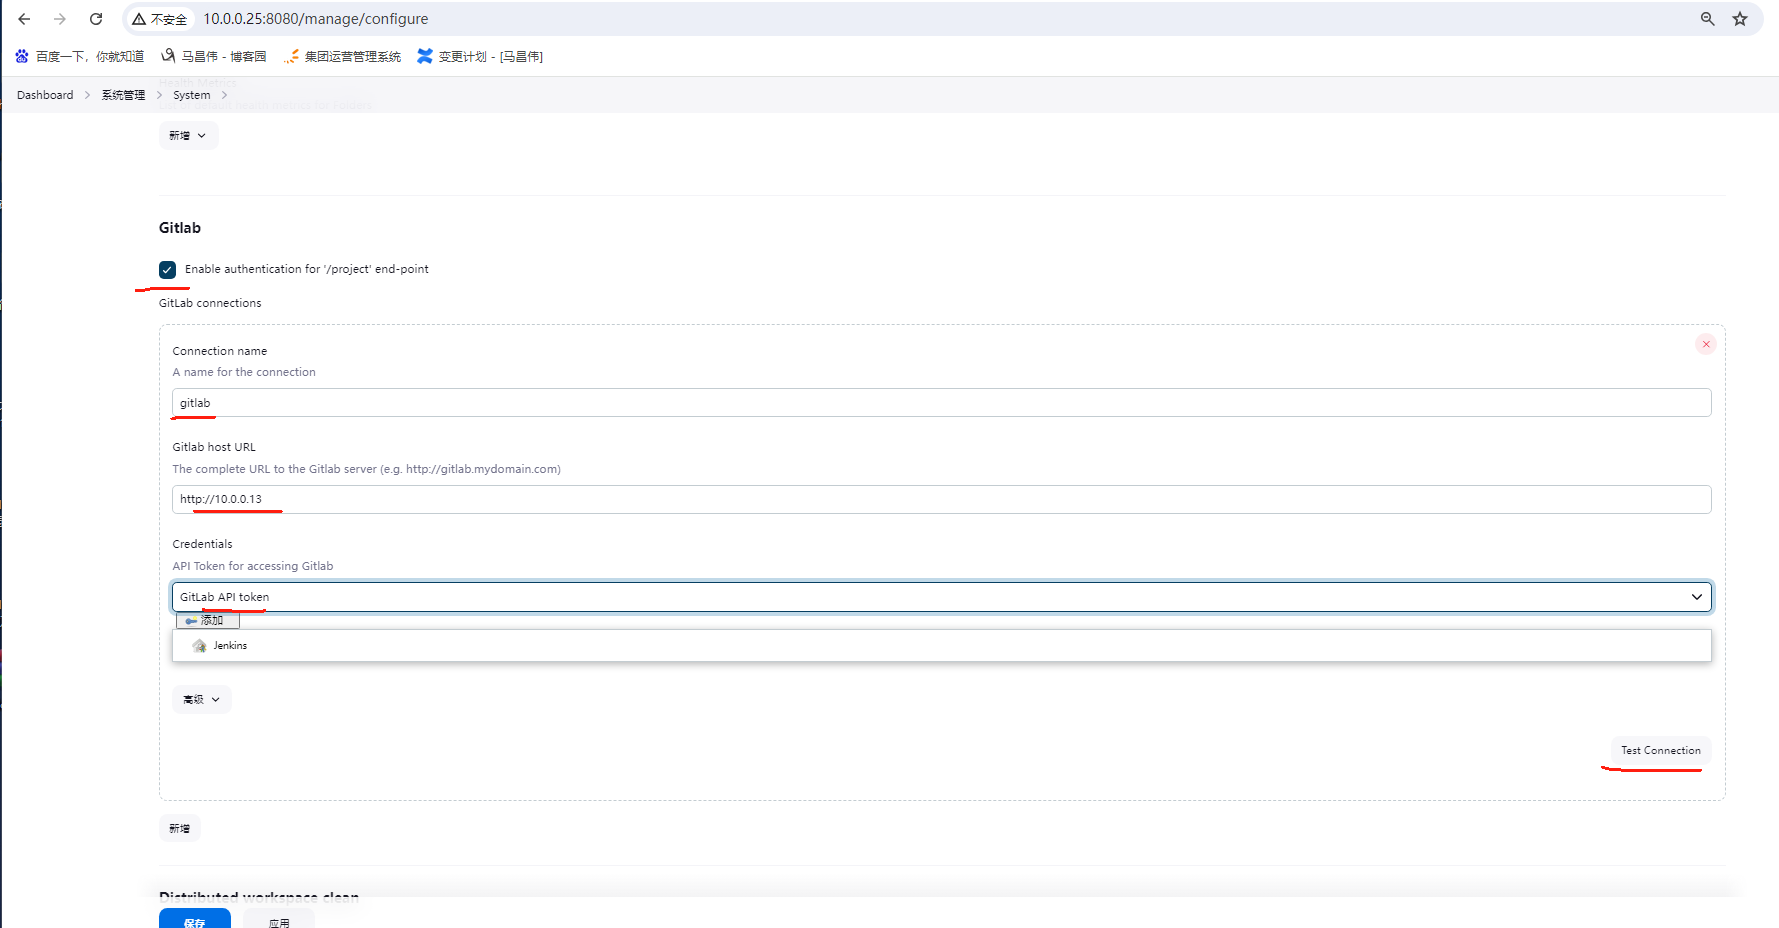
测试成功,点击保存

添加post,option指定我们系统配置里添加的gitlab连接
提交代码之后,自动触发构建Jenkins任务了
但是这次自动触发的构建,没有看到构建状态,在这个提交这里

我们需要先手动触发一次构建,pipeline才会生效
21是手动触发
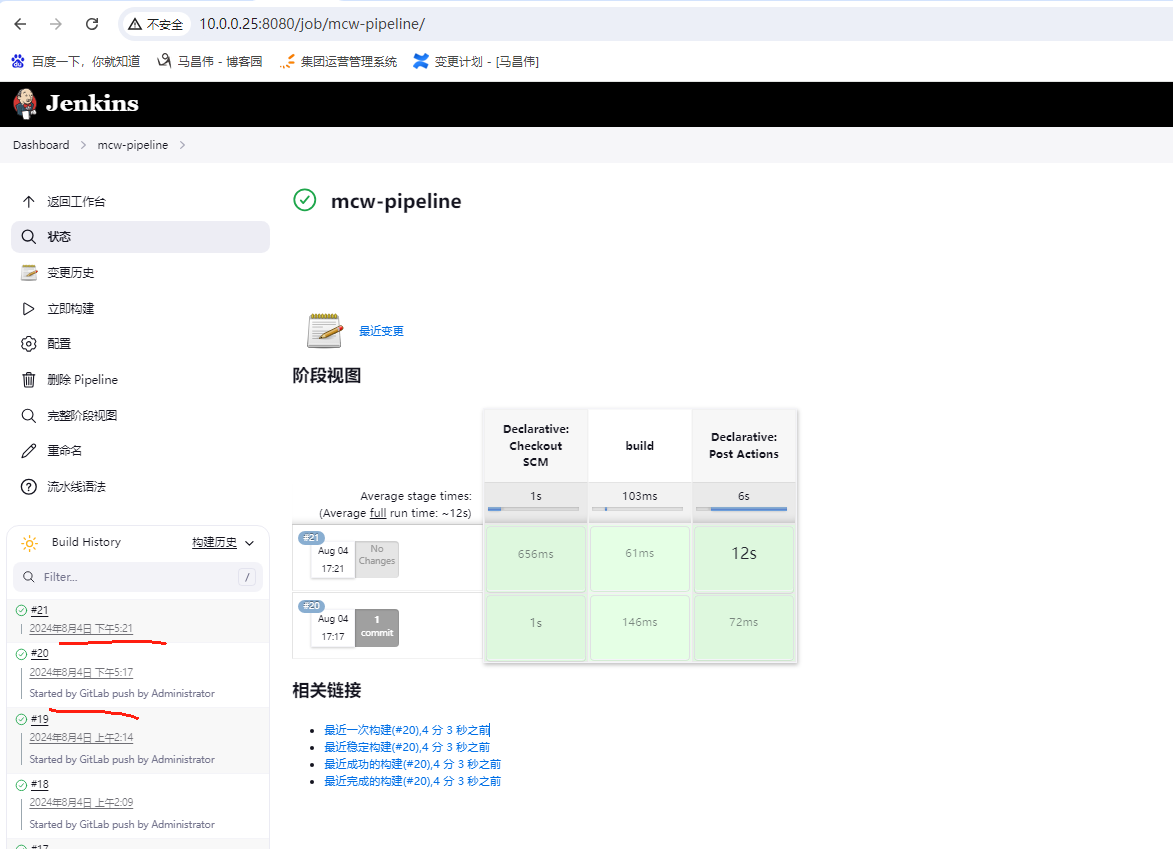
再次刷新代码历史提交列表,可以看到上次push的,已经是有状态了

改下并提交代码,让它自动触发构建
22就是刚刚自动触发的构建
查看这次构建,是有成功状态的
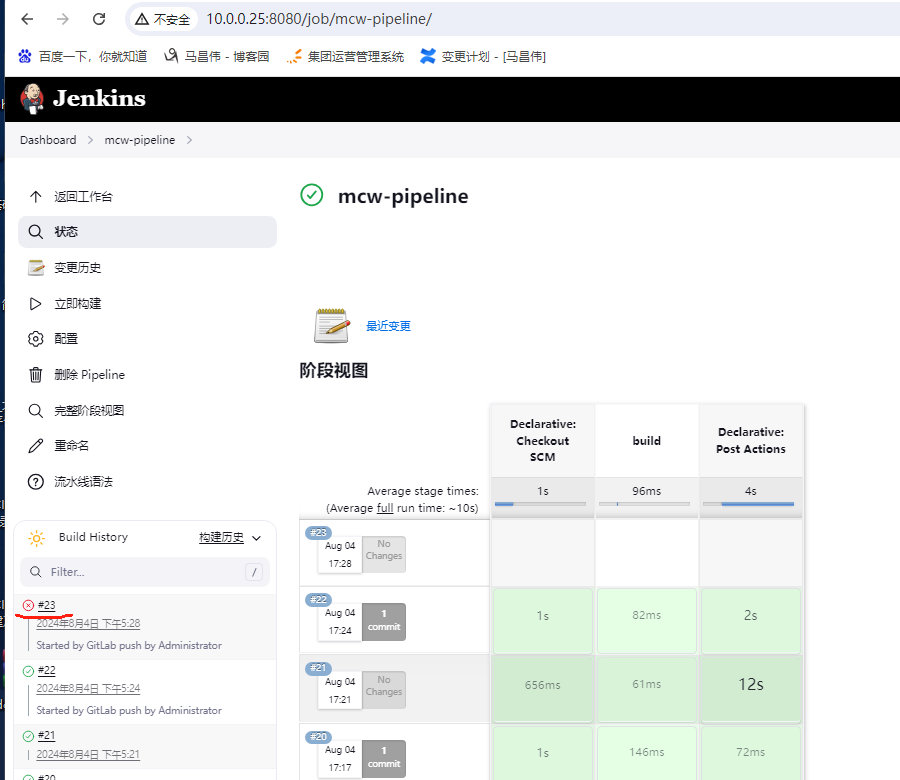
修改Jenkinsfile,到这里的时候任务失败,看代码提交列表的状态显示
23,已经失败

发现没有显示失败状态呀
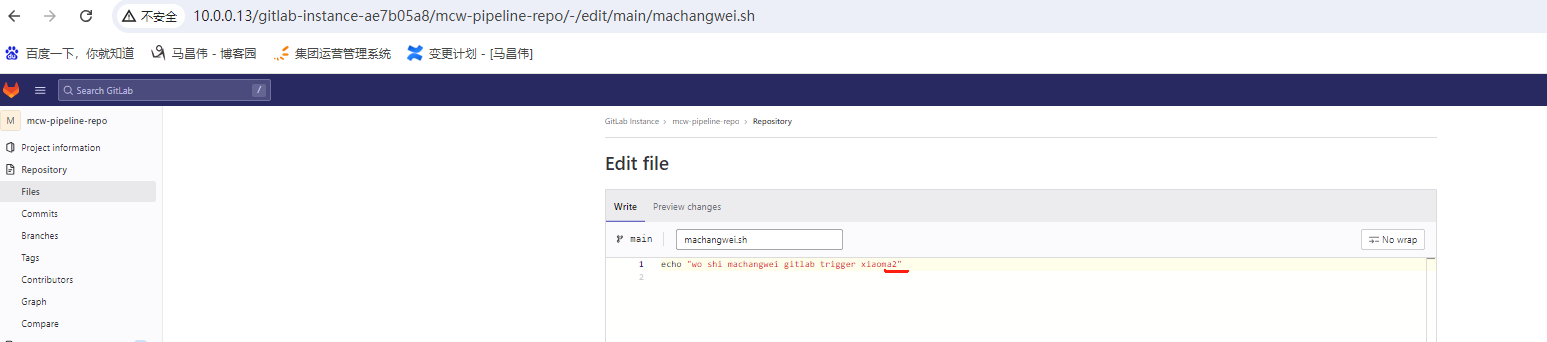
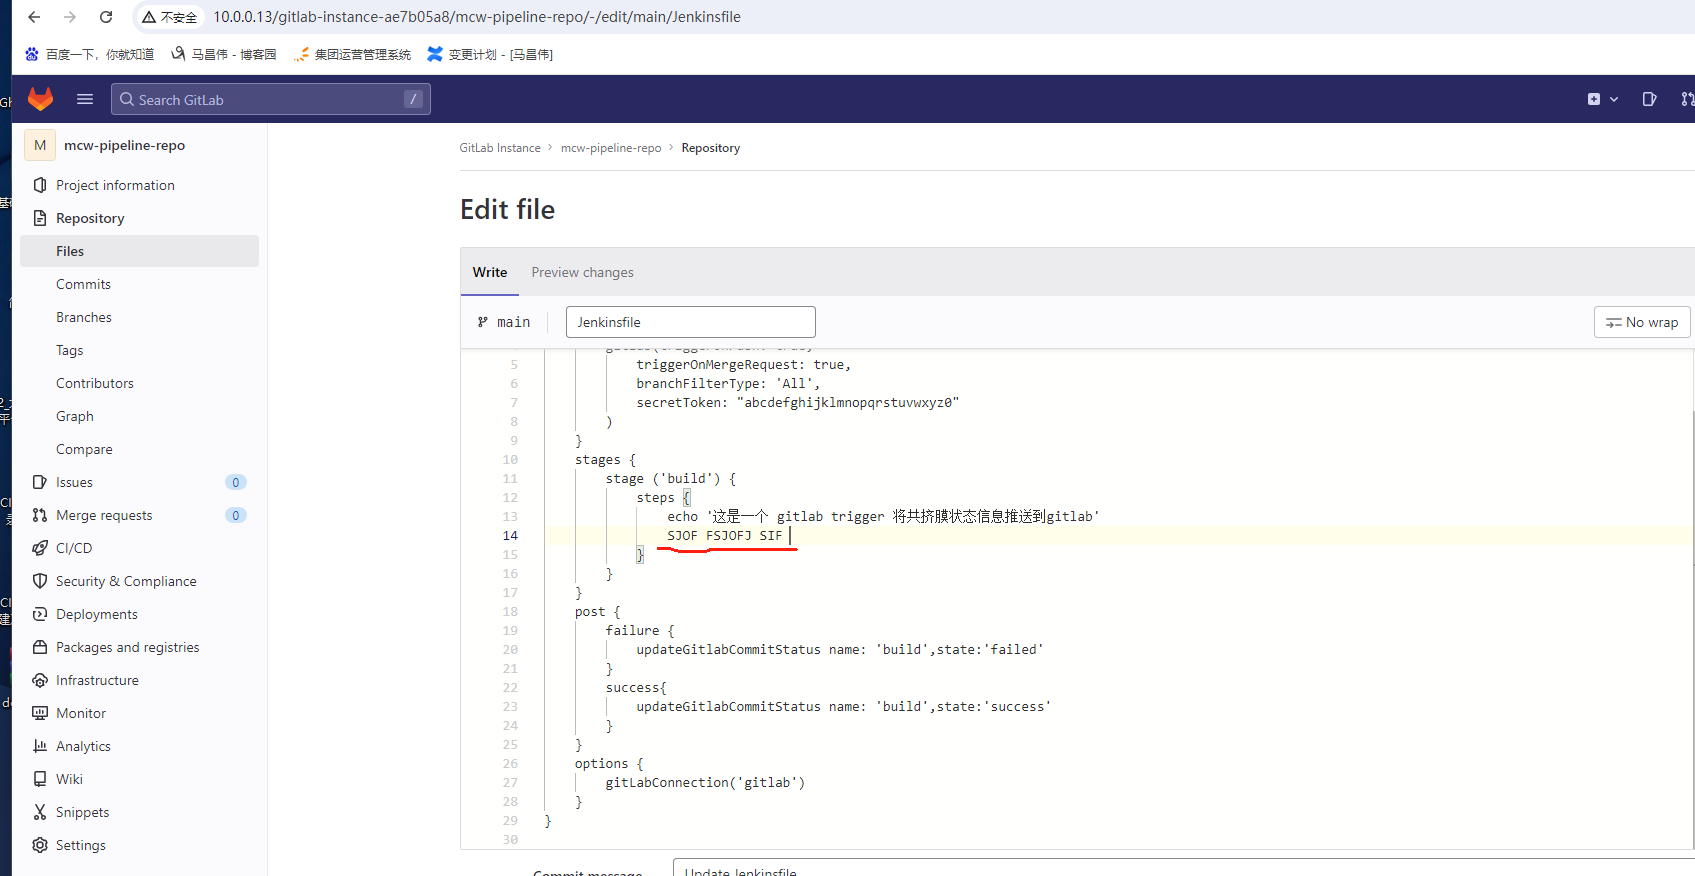
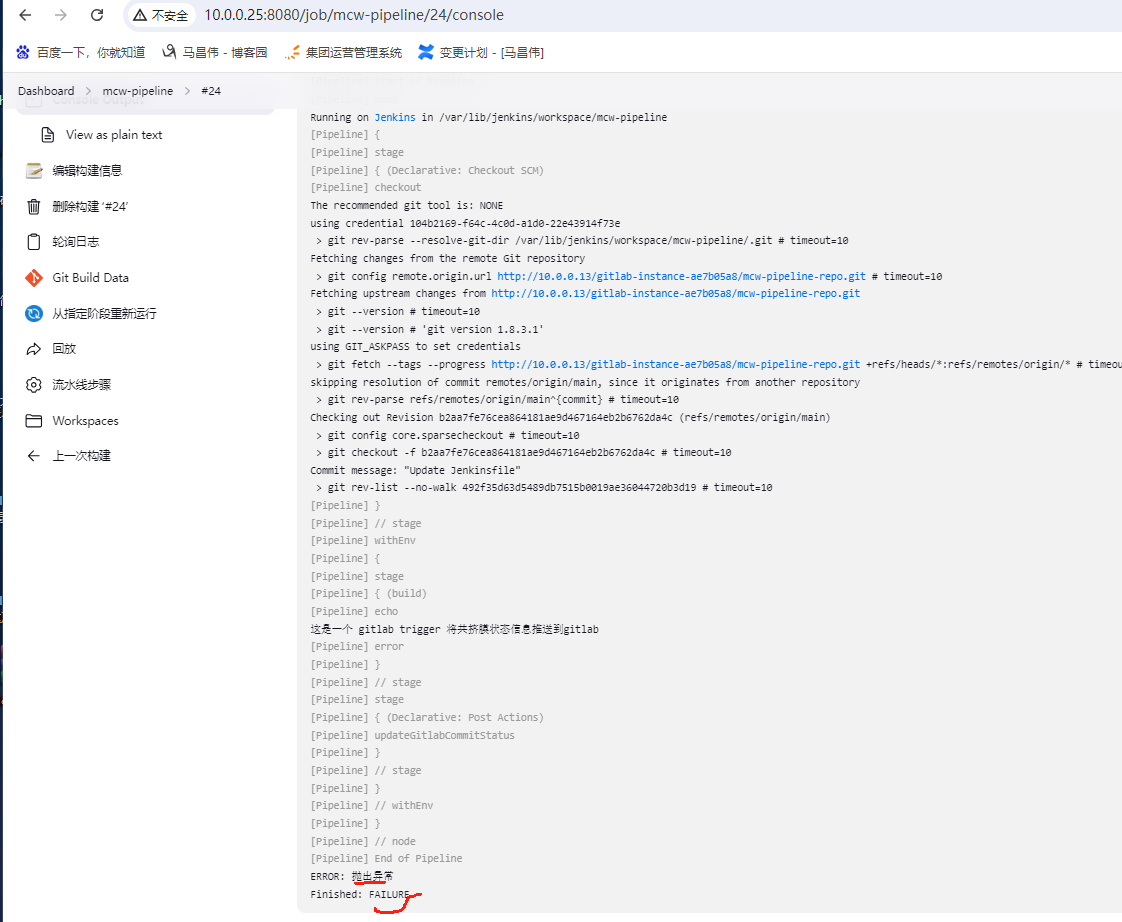
将之前乱写的改为抛出异常

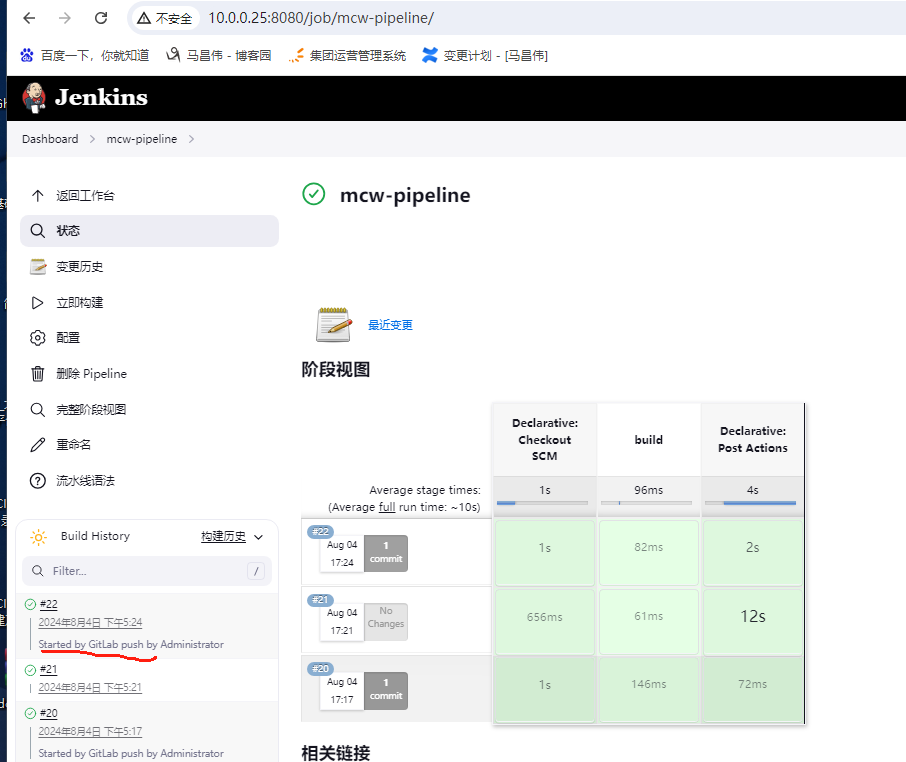
通过下面我们可以看到,23的时候虽然是失败,但是都 没有走到build这一步,24是走到build这一步,这一步失败了,然后执行后面的post操作。而post,看上面就是基于build去执行的。并且这里的post是执行成功的
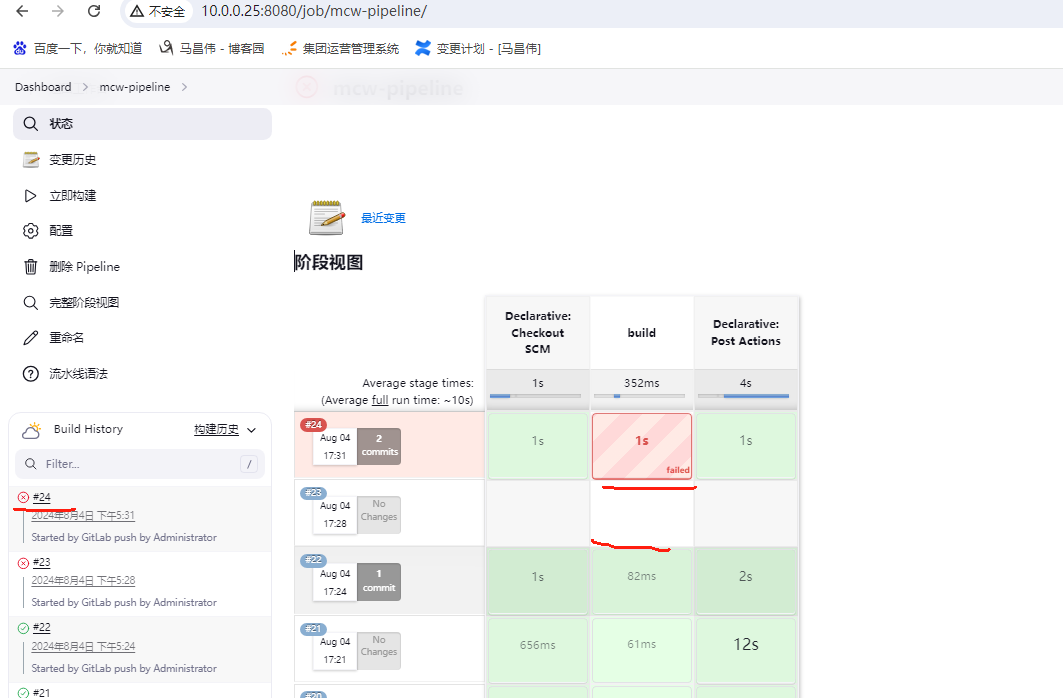
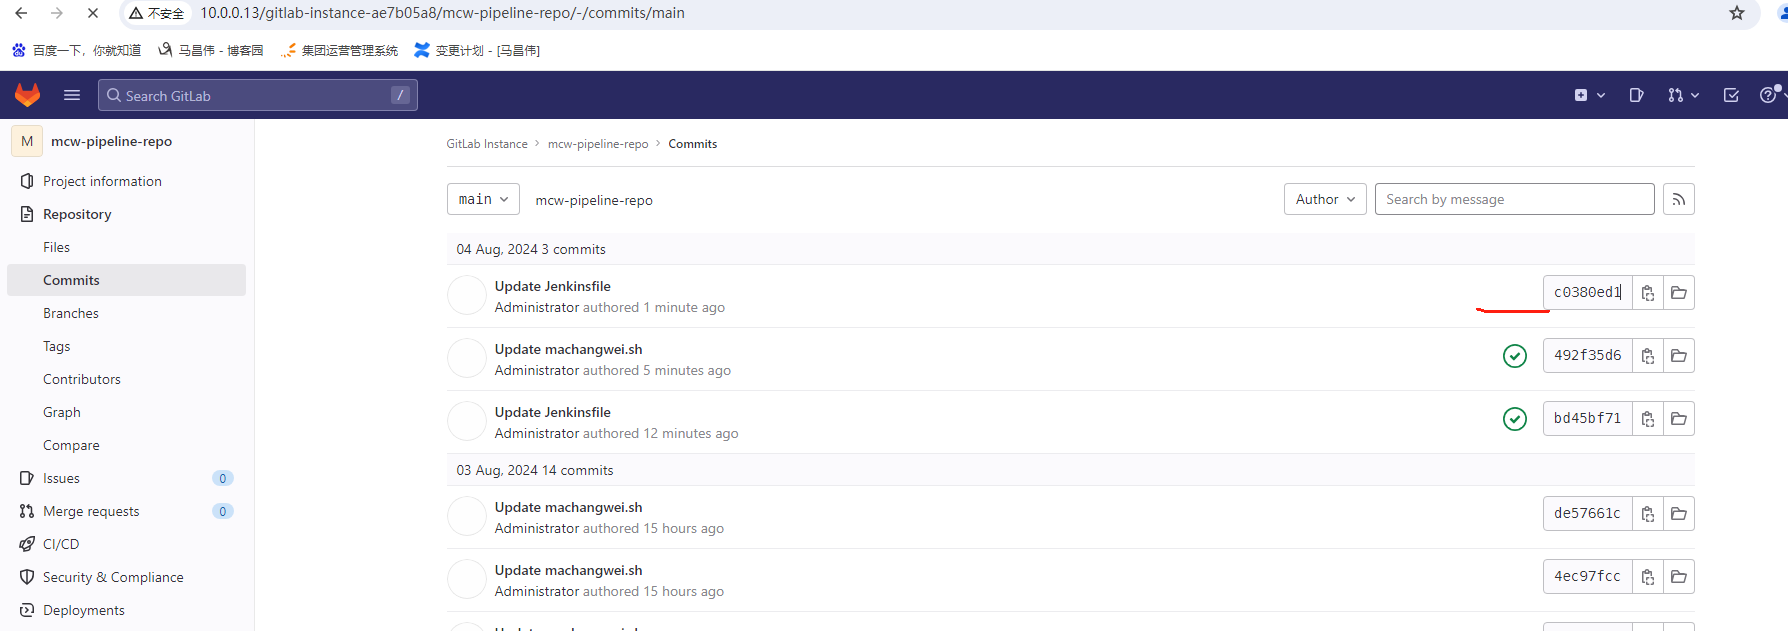
这一次再查看代码提交列表,可以看到有构建失败的状态显示

使用Generic Webhook Trigger插件实现触发
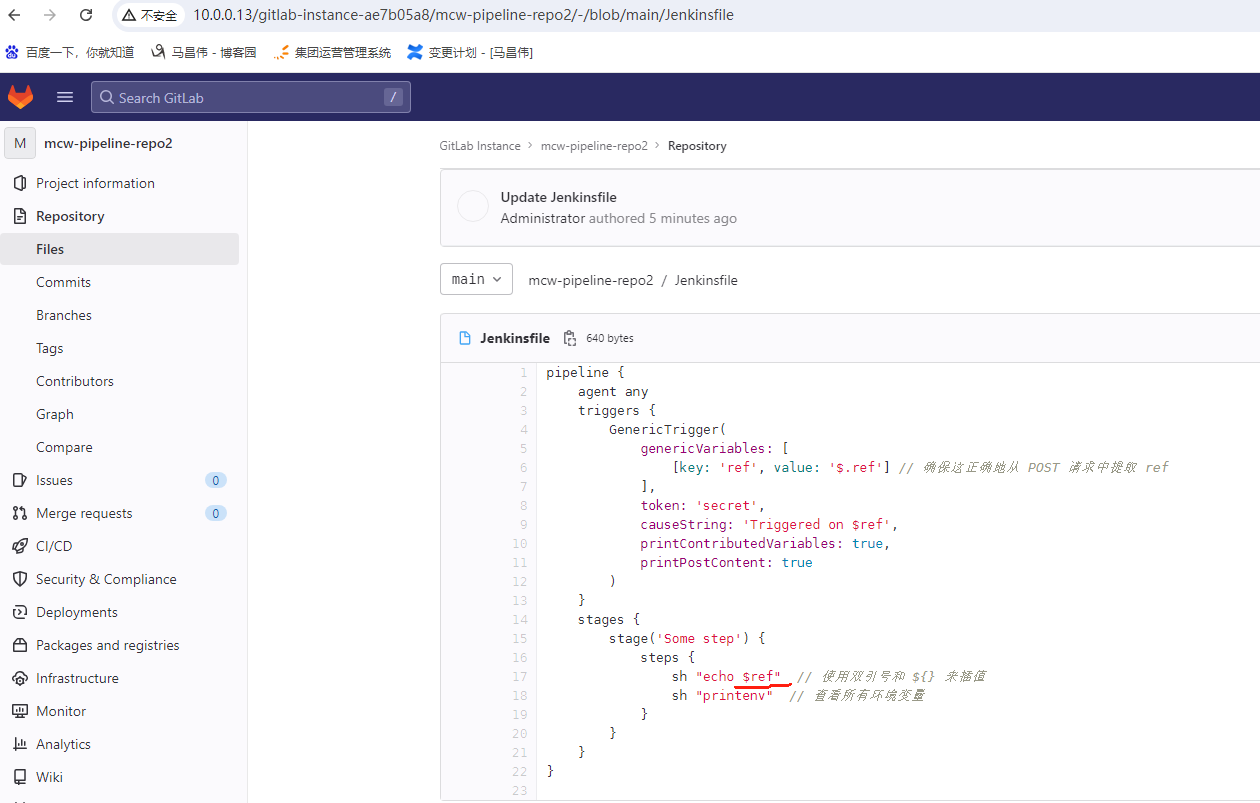
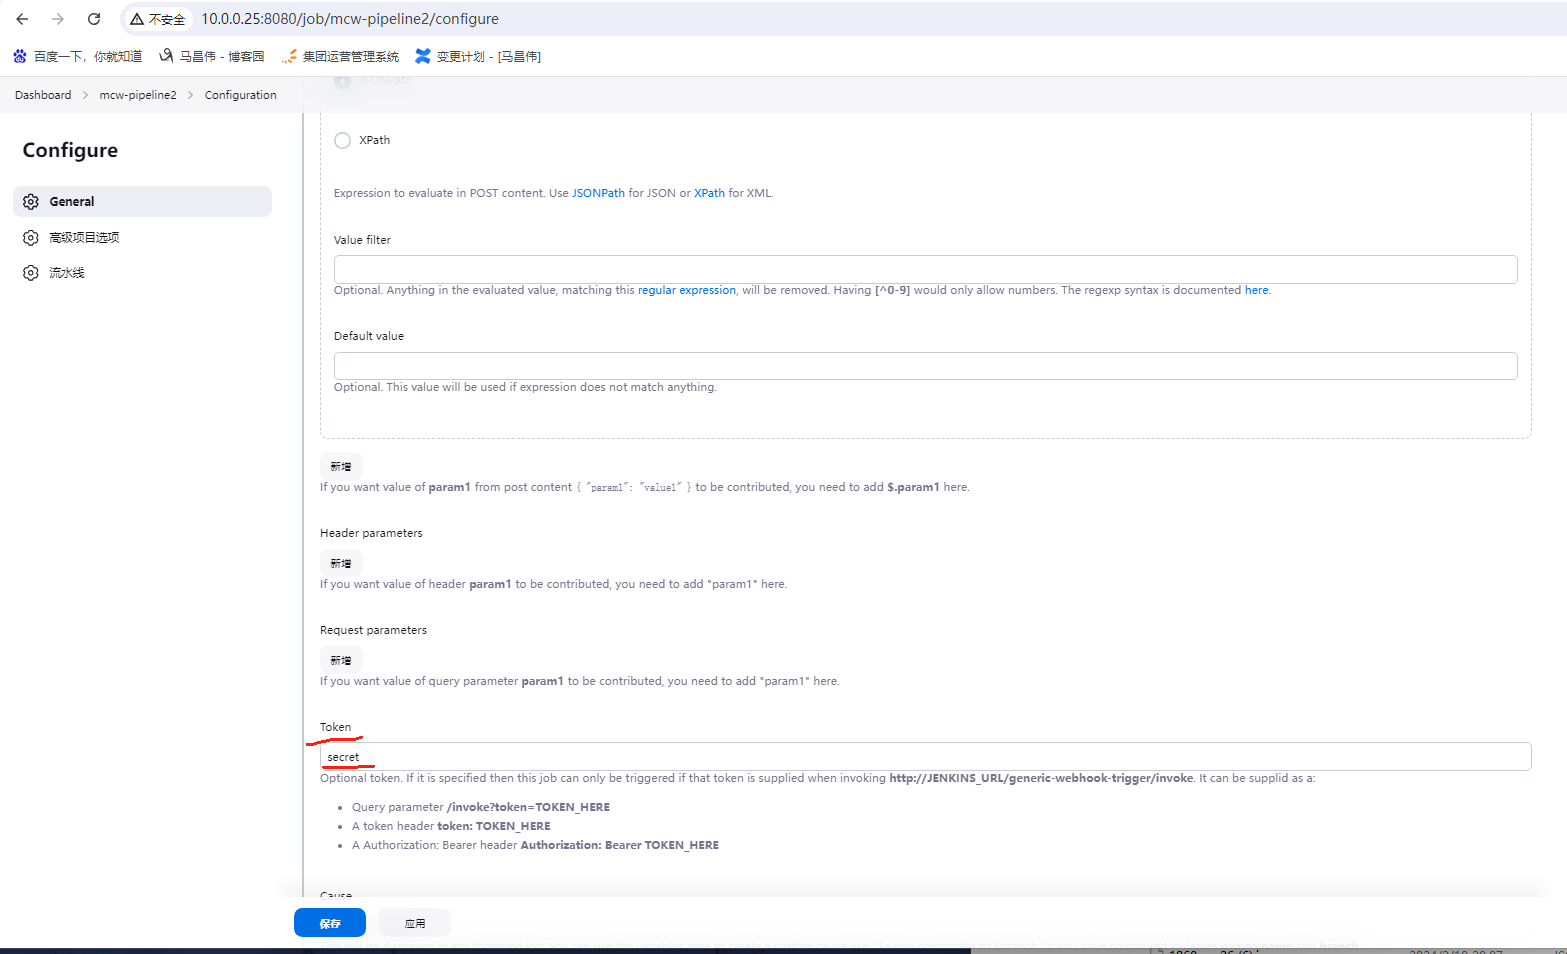
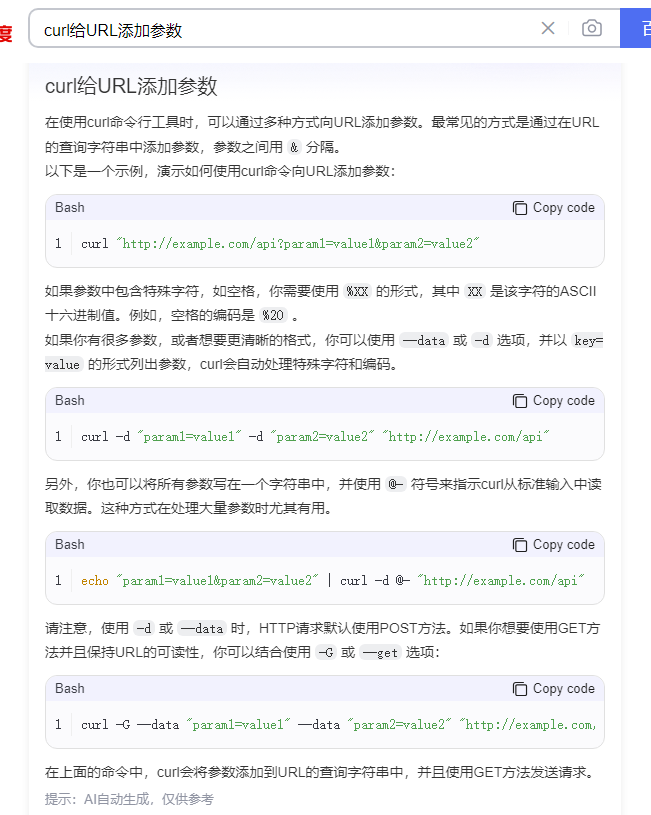
curl -X POST -H "Content-Type: application/json" -d '{ "ref": "refs/heads/main" }' -vs http://10.0.0.25:8080/generic-webhook-trigger/invoke?token=secret
pipeline {
    agent any
    triggers {
        GenericTrigger(
            genericVariables: [
                [key: 'ref', value: '$.ref'] // 确保这正确地从 POST 请求中提取 ref
            ],
            token: 'secret',
            causeString: 'Triggered on $ref',
            printContributedVariables: true,
            printPostContent: true
        )
    }
    stages {
        stage('Some step') {
            steps {
                sh "echo $ref"  // 使用双引号和 ${} 来插值
                sh "printenv"  // 查看所有环境变量
            }
        }
    }
}
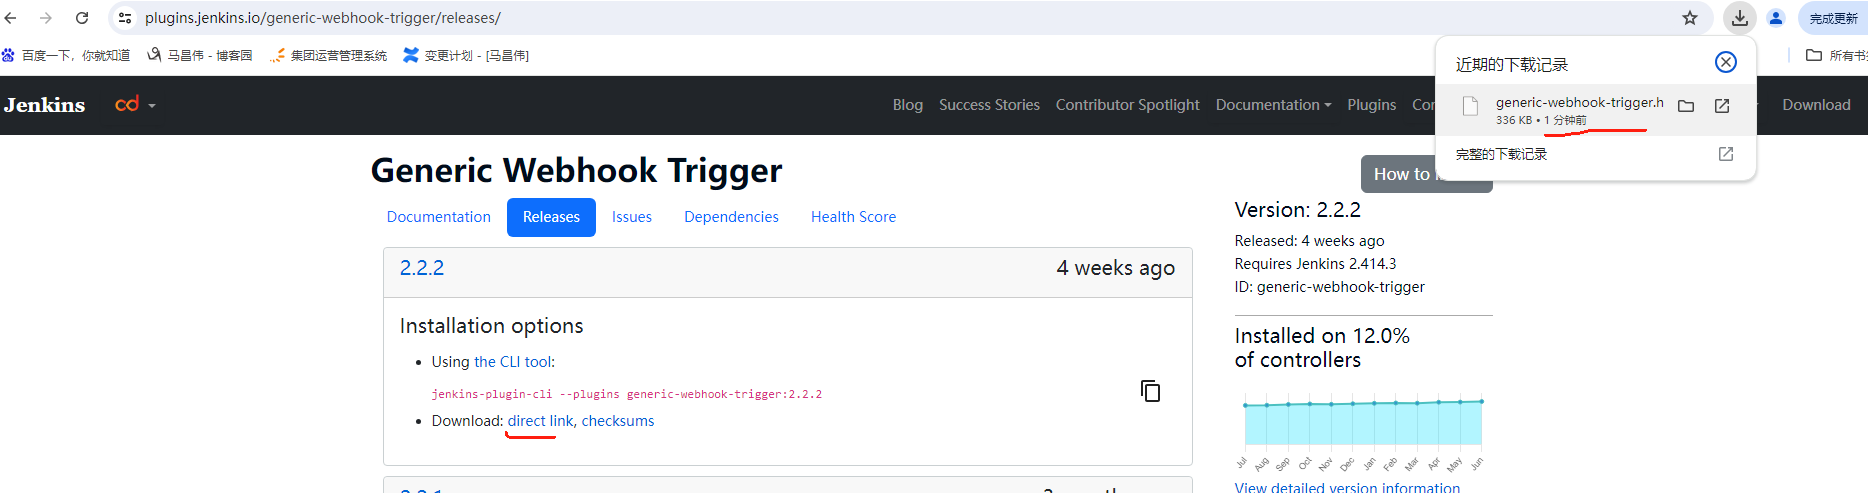
Generic Webhook Trigger插件: https://plugins.jenkins.io/generic-webhook-trigger


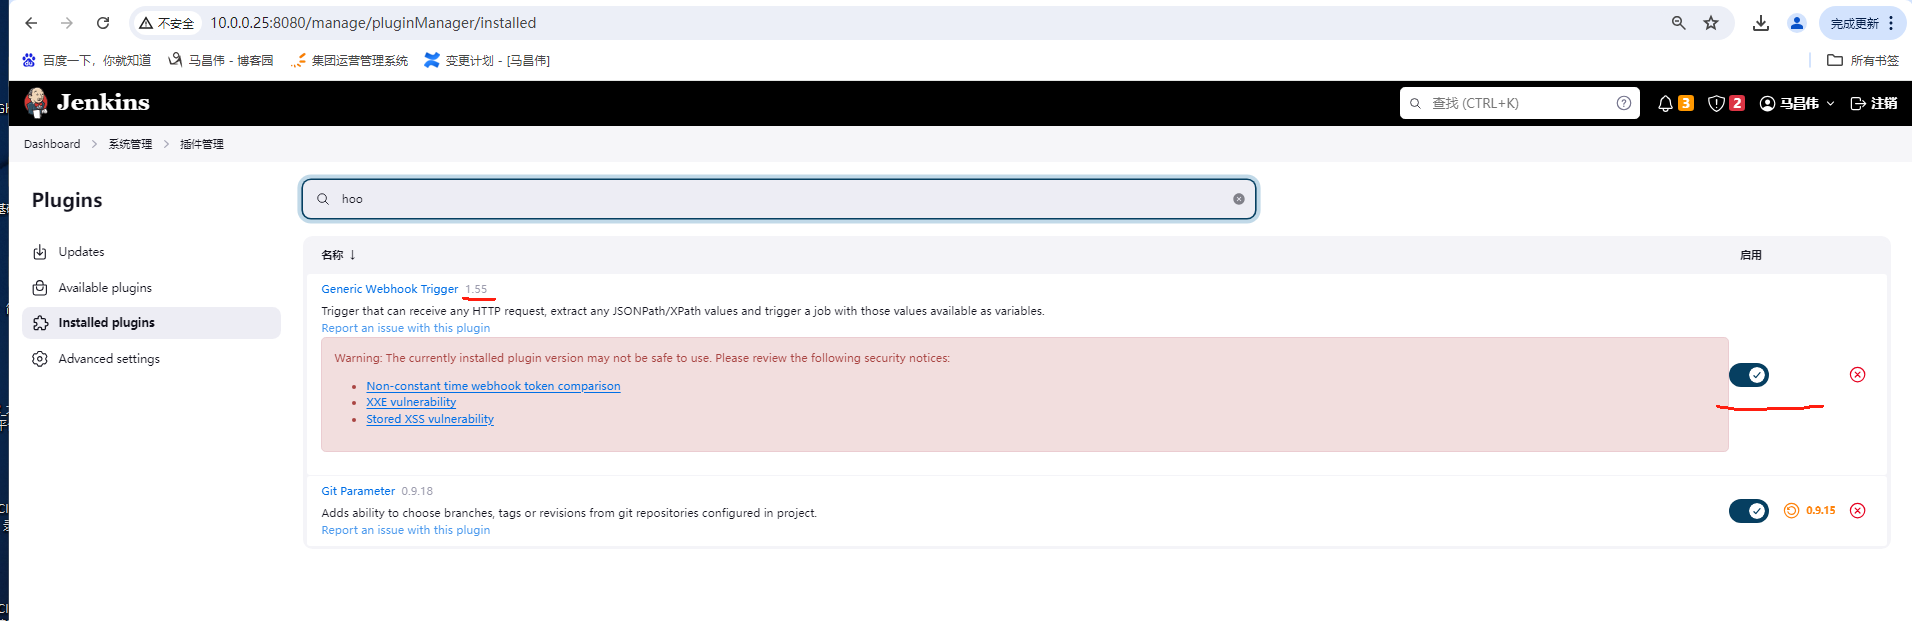
虽然安装了插件,但是没有启用,应该有版本兼容问题

Failed to load: Generic Webhook Trigger Plugin (generic-webhook-trigger 2.2.2)
 - Plugin is missing: gson-api (2.10.1-15.v0d99f670e0a_7)
 - Plugin is missing: json-path-api (2.9.0-33.v2527142f2e1d)
 - Update required: Credentials Plugin (credentials 1087.1089.v2f1b_9a_b_040e4) to be updated to 1319.v7eb_51b_3a_c97b_ or higher
 - Update required: Structs Plugin (structs 324.va_f5d6774f3a_d) to be updated to 337.v1b_04ea_4df7c8 or higher
 - Update required: Plain Credentials Plugin (plain-credentials 143.v1b_df8b_d3b_e48) to be updated to 179.vc5cb_98f6db_38 or higher
重新换了个低版本的插件,就成功启用了,不过这里还有告警信息,应该不影响使用
创建一个新的代码仓库,并在里面新增一个文件
新增Jenkins流水线项目,其它不用配置,只需要配置下面

代码仓库中,新增Jenkinsfile文件
手动触发构建一次
拉取代码仓库2的代码,成功运行pipeline
修改代码仓库2如下
手动触发一次构建,手动触发会将Jenkinsfile的配置同步到Jenkins项目配置中,但是这次会报错,因为没有ref这个变量,因为手动触发的时候,是没有传递这个变量,而我们后面用curl命令触发,会传递这个变量。
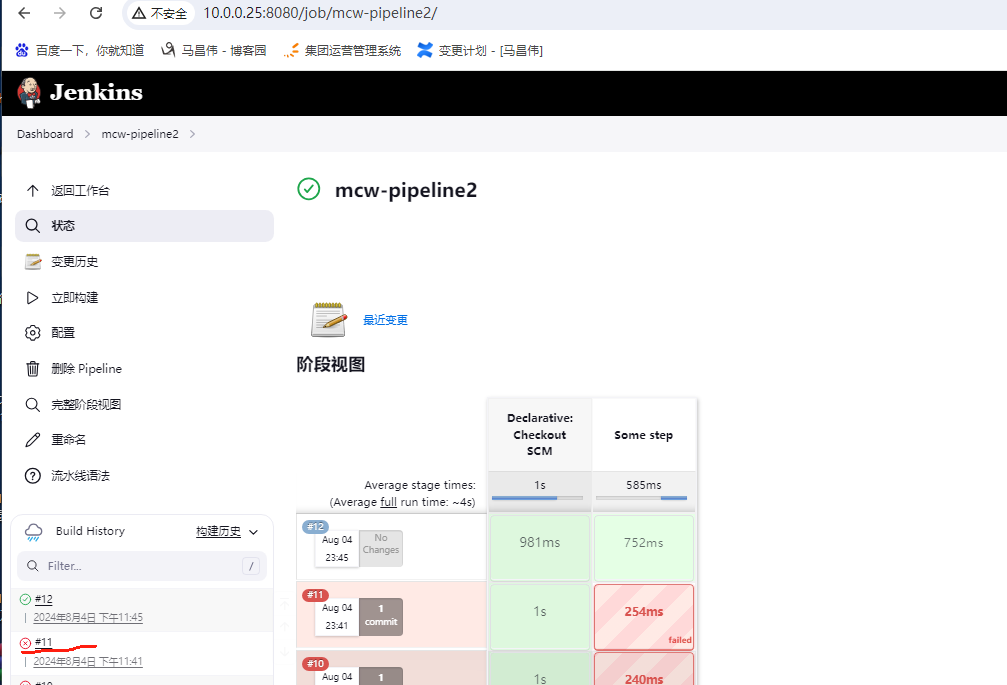
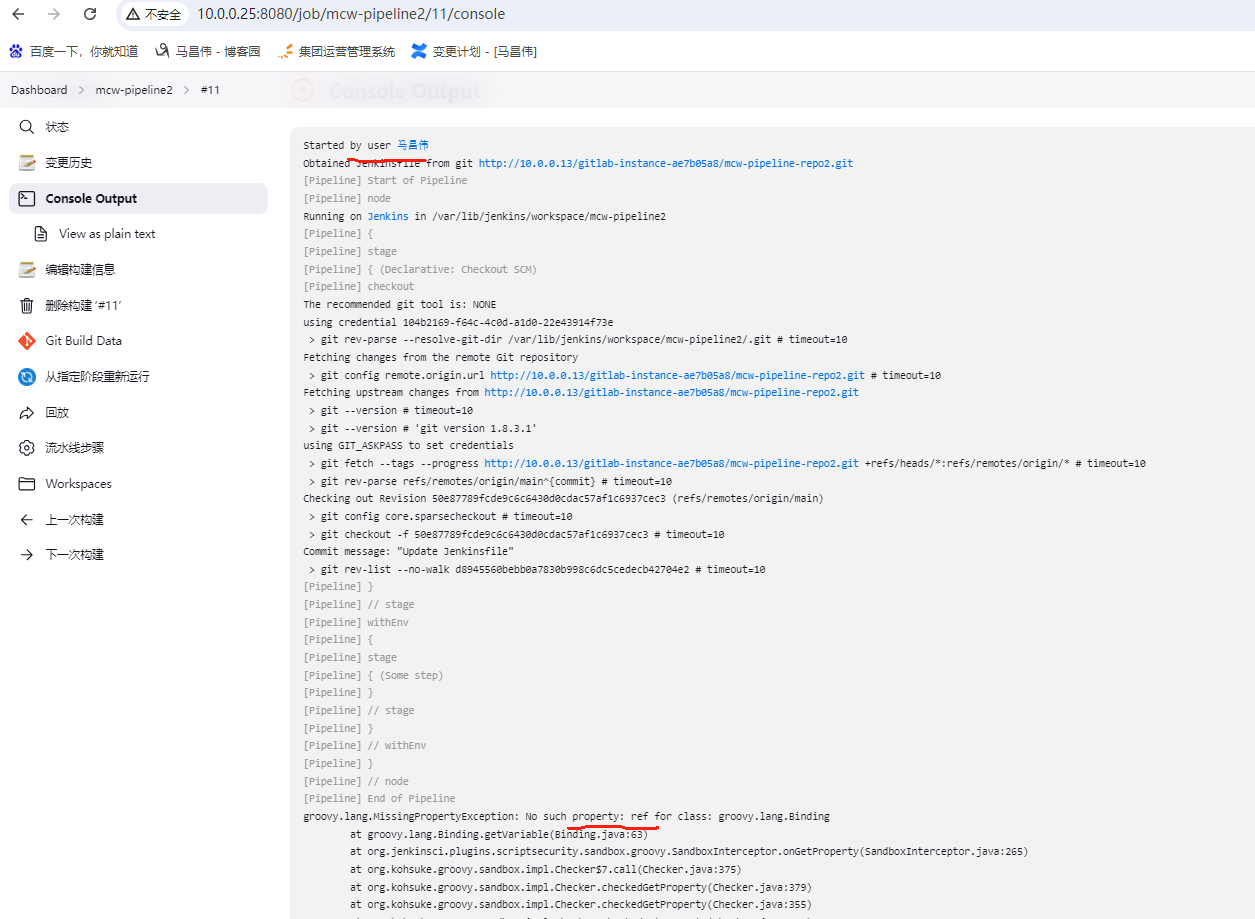
11是手动触发构建失败
手动触发报错内容
但是配置已经同步到Jenkins项目配置中了
其它配置没有变,但是触发器这里变化了,这个gitlab不知道从哪里设置过来的

触发器设置的一个变量


curl命令触发构建,
[root@mcw12 webapps]# curl -X POST -H "Content-Type: application/json" -d '{ "ref": "refs/heads/main" }' -vs http://10.0.0.25:8080/generic-webhook-trigger/invoke?token=secret
* About to connect() to 10.0.0.25 port 8080 (#0)
*   Trying 10.0.0.25...
* Connected to 10.0.0.25 (10.0.0.25) port 8080 (#0)
> POST /generic-webhook-trigger/invoke?token=secret HTTP/1.1
> User-Agent: curl/7.29.0
> Host: 10.0.0.25:8080
> Accept: */*
> Content-Type: application/json
> Content-Length: 28
>
* upload completely sent off: 28 out of 28 bytes
< HTTP/1.1 200 OK
< Date: Sun, 04 Aug 2024 15:45:35 GMT
< X-Content-Type-Options: nosniff
< Content-Type: application/json;charset=utf-8
< Content-Length: 207
< Server: Jetty(10.0.18)
<
* Connection #0 to host 10.0.0.25 left intact
{"status":"ok","data":{"triggerResults":{"mcw-pipeline2":{"regexpFilterExpression":"","triggered":true,"resolvedVariables":{"ref":"refs/heads/main"},"regexpFilterText":"","id":174,"url":"queue/item/174/"}}}}[root@mcw12 webapps]#
构建运行成功,ref是这里传递的分支变量
12就是这次curl命令触发构建的
查看日志,触发构建是开启于这个

里面有这个变量,是curl传递的。之前手动触发构建失败,就是没有传递这个变量,所以echo这边变量,没有在环境变量中找到
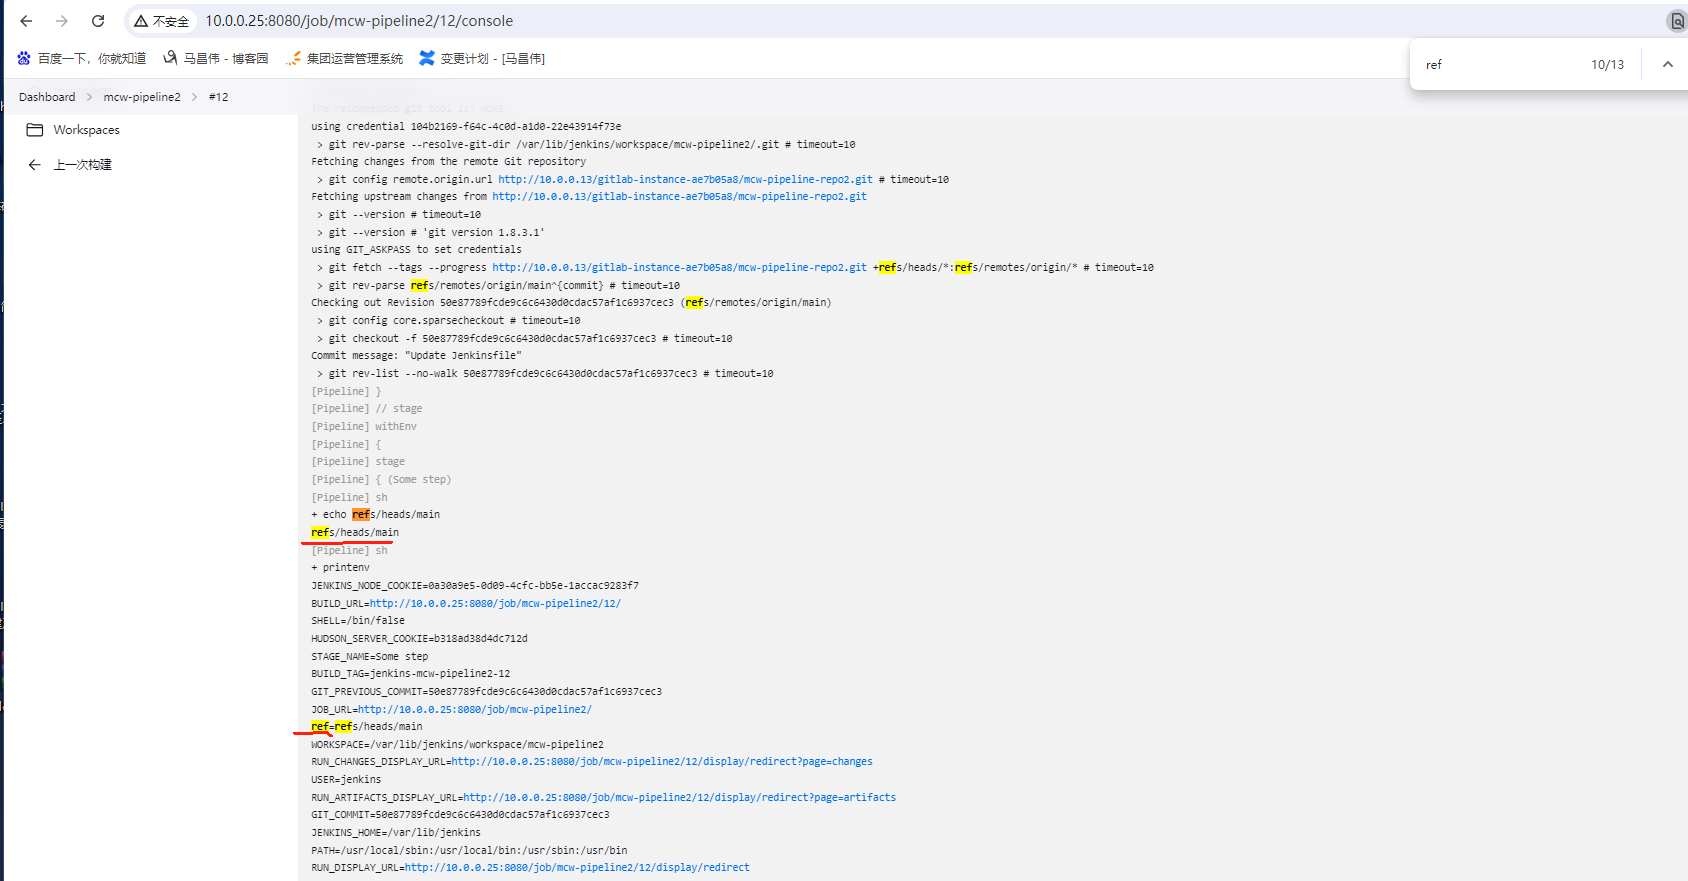
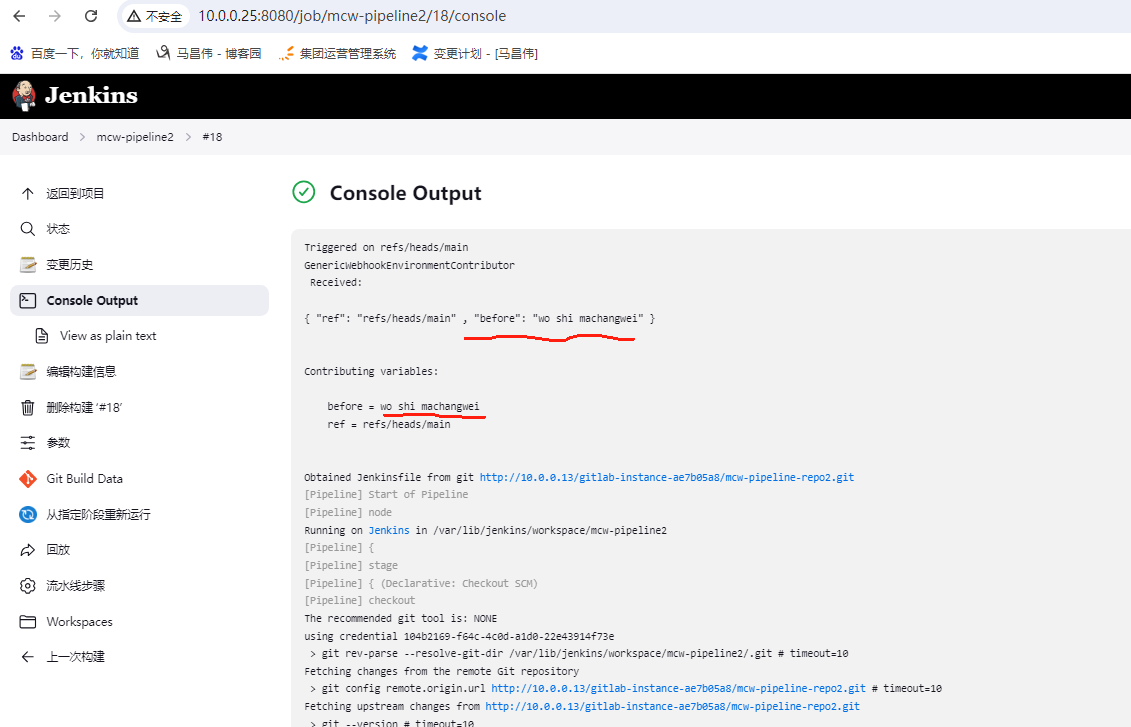
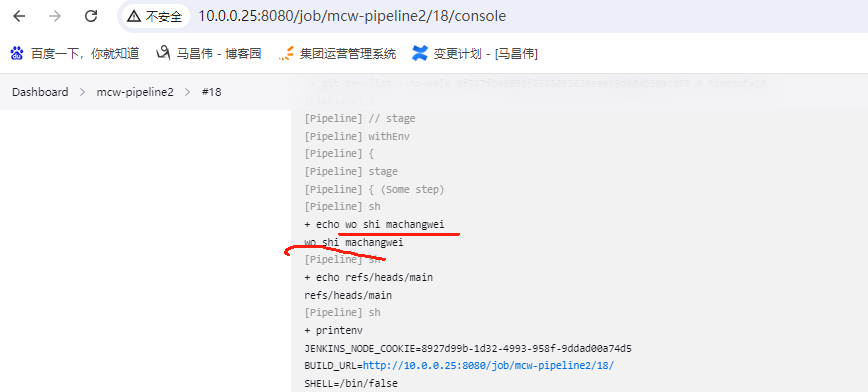
Triggered on refs/heads/main
GenericWebhookEnvironmentContributor
 Received:

{ "ref": "refs/heads/main" }


Contributing variables:

    ref = refs/heads/main


Obtained Jenkinsfile from git http://10.0.0.13/gitlab-instance-ae7b05a8/mcw-pipeline-repo2.git
[Pipeline] Start of Pipeline
[Pipeline] node
Running on Jenkins in /var/lib/jenkins/workspace/mcw-pipeline2
[Pipeline] {
[Pipeline] stage
[Pipeline] { (Declarative: Checkout SCM)
[Pipeline] checkout
The recommended git tool is: NONE
using credential 104b2169-f64c-4c0d-a1d0-22e43914f73e
 > git rev-parse --resolve-git-dir /var/lib/jenkins/workspace/mcw-pipeline2/.git # timeout=10
Fetching changes from the remote Git repository
 > git config remote.origin.url http://10.0.0.13/gitlab-instance-ae7b05a8/mcw-pipeline-repo2.git # timeout=10
Fetching upstream changes from http://10.0.0.13/gitlab-instance-ae7b05a8/mcw-pipeline-repo2.git
 > git --version # timeout=10
 > git --version # 'git version 1.8.3.1'
using GIT_ASKPASS to set credentials
 > git fetch --tags --progress http://10.0.0.13/gitlab-instance-ae7b05a8/mcw-pipeline-repo2.git +refs/heads/*:refs/remotes/origin/* # timeout=10
 > git rev-parse refs/remotes/origin/main^{commit} # timeout=10
Checking out Revision 50e87789fcde9c6c6430d0cdac57af1c6937cec3 (refs/remotes/origin/main)
 > git config core.sparsecheckout # timeout=10
 > git checkout -f 50e87789fcde9c6c6430d0cdac57af1c6937cec3 # timeout=10
Commit message: "Update Jenkinsfile"
 > git rev-list --no-walk 50e87789fcde9c6c6430d0cdac57af1c6937cec3 # timeout=10
[Pipeline] }
[Pipeline] // stage
[Pipeline] withEnv
[Pipeline] {
[Pipeline] stage
[Pipeline] { (Some step)
[Pipeline] sh
+ echo refs/heads/main
refs/heads/main
[Pipeline] sh
+ printenv
JENKINS_NODE_COOKIE=0a30a9e5-0d09-4cfc-bb5e-1accac9283f7
BUILD_URL=http://10.0.0.25:8080/job/mcw-pipeline2/12/
SHELL=/bin/false
HUDSON_SERVER_COOKIE=b318ad38d4dc712d
STAGE_NAME=Some step
BUILD_TAG=jenkins-mcw-pipeline2-12
GIT_PREVIOUS_COMMIT=50e87789fcde9c6c6430d0cdac57af1c6937cec3
JOB_URL=http://10.0.0.25:8080/job/mcw-pipeline2/
ref=refs/heads/main
WORKSPACE=/var/lib/jenkins/workspace/mcw-pipeline2
RUN_CHANGES_DISPLAY_URL=http://10.0.0.25:8080/job/mcw-pipeline2/12/display/redirect?page=changes
USER=jenkins
RUN_ARTIFACTS_DISPLAY_URL=http://10.0.0.25:8080/job/mcw-pipeline2/12/display/redirect?page=artifacts
GIT_COMMIT=50e87789fcde9c6c6430d0cdac57af1c6937cec3
JENKINS_HOME=/var/lib/jenkins
PATH=/usr/local/sbin:/usr/local/bin:/usr/sbin:/usr/bin
RUN_DISPLAY_URL=http://10.0.0.25:8080/job/mcw-pipeline2/12/display/redirect
_=/usr/bin/printenv
PWD=/var/lib/jenkins/workspace/mcw-pipeline2
HUDSON_URL=http://10.0.0.25:8080/
LANG=en_US.UTF-8
JOB_NAME=mcw-pipeline2
BUILD_DISPLAY_NAME=#12
BUILD_ID=12
JENKINS_URL=http://10.0.0.25:8080/
NOTIFY_SOCKET=/run/systemd/notify
GIT_PREVIOUS_SUCCESSFUL_COMMIT=9c89a6cfc2d2f23234b045f12c1a2b294fe7a13a
JOB_BASE_NAME=mcw-pipeline2
RUN_TESTS_DISPLAY_URL=http://10.0.0.25:8080/job/mcw-pipeline2/12/display/redirect?page=tests
HOME=/var/lib/jenkins
SHLVL=2
GIT_BRANCH=origin/main
CI=true
WORKSPACE_TMP=/var/lib/jenkins/workspace/mcw-pipeline2@tmp
EXECUTOR_NUMBER=0
JENKINS_SERVER_COOKIE=durable-1d2ffcc629092a4c7a95b480ffb97610f956bd9242dad91735f86c4e6525984b
NODE_LABELS=built-in
GIT_URL=http://10.0.0.13/gitlab-instance-ae7b05a8/mcw-pipeline-repo2.git
LOGNAME=jenkins
HUDSON_HOME=/var/lib/jenkins
NODE_NAME=built-in
BUILD_NUMBER=12
JOB_DISPLAY_URL=http://10.0.0.25:8080/job/mcw-pipeline2/display/redirect
HUDSON_COOKIE=56ef6bf0-8d5a-4228-bed4-fe1ff875dc6e
g_name=g_value
[Pipeline] }
[Pipeline] // stage
[Pipeline] }
[Pipeline] // withEnv
[Pipeline] }
[Pipeline] // node
[Pipeline] End of Pipeline
Finished: SUCCESS
从Webhook请求中提取参数值
1、genericVariables :提取post body中的参数
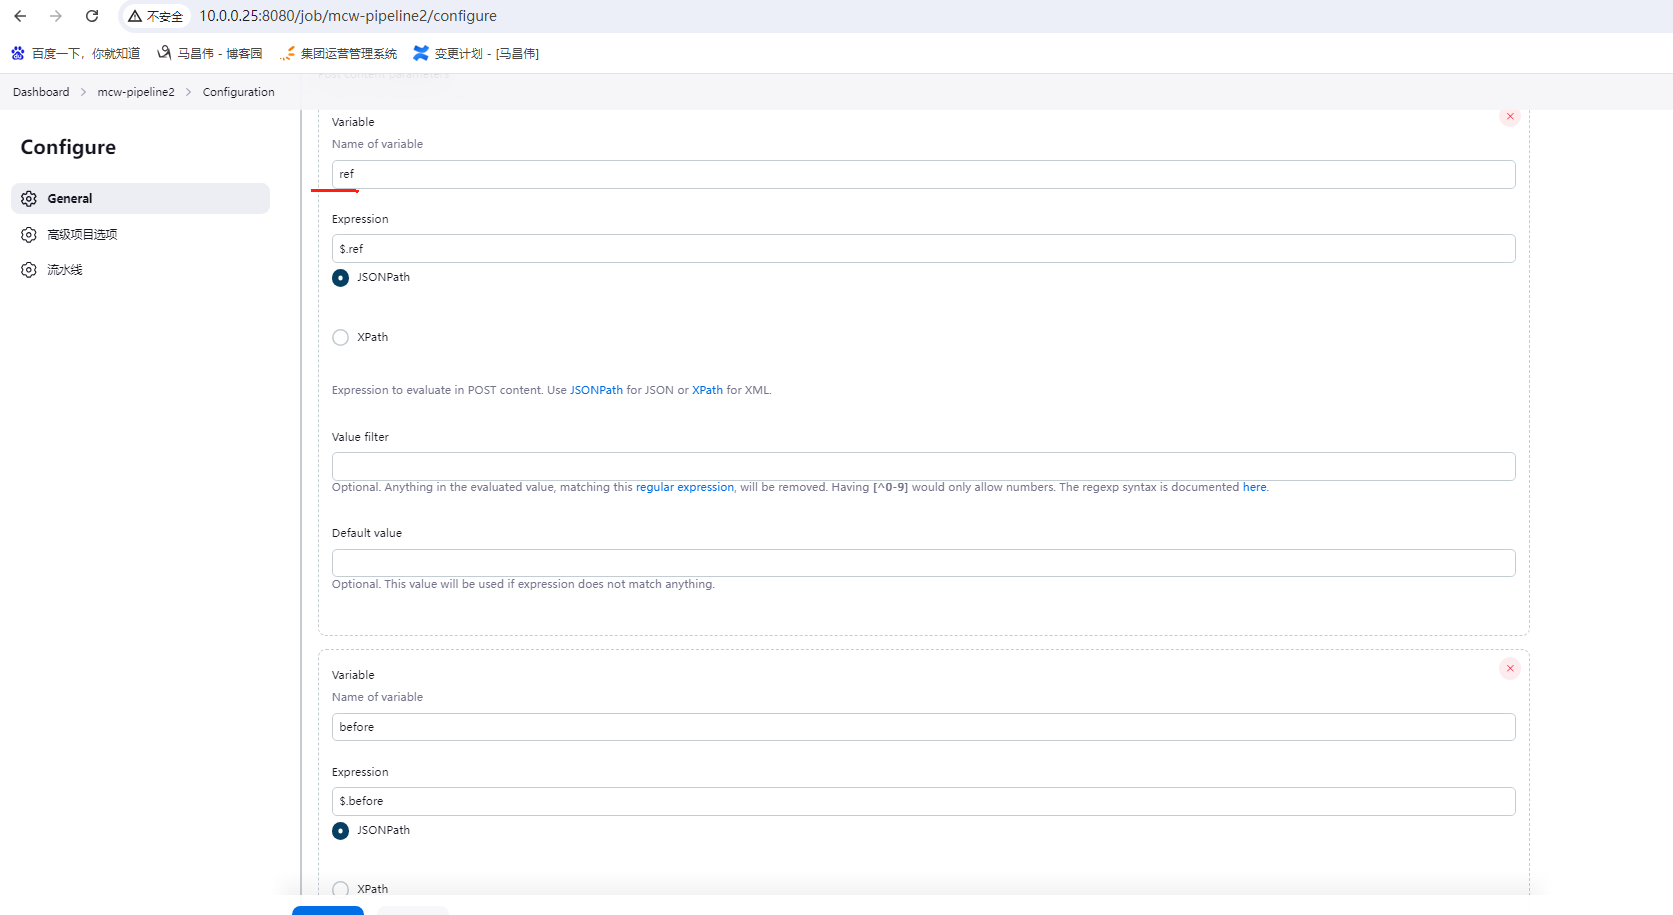
新增一个变量
pipeline {
    agent any
    triggers {
        GenericTrigger(
            genericVariables: [
                [key: 'ref', value: '$.ref'], // 确保这正确地从 POST 请求中提取 ref
                [key: 'before',
                value: '$.before',
                expressionType: 'JSONPath',
                regexpFilter: '',
                defaultValue: ''
                ]
            ],
            token: 'secret',
            causeString: 'Triggered on $ref',
            printContributedVariables: true,
            printPostContent: true
        )
    }
    stages {
        stage('Some step') {
            steps {
                sh "echo $before"
                sh "echo $ref"
                sh "printenv"
            }
        }
    }
}
curl -X POST -H "Content-Type: application/json" -d '{ "ref": "refs/heads/main" }' -vs http://10.0.0.25:8080/generic-webhook-trigger/invoke?token=secret

手动点立即构建,触发构建一次。失败不要紧,就是要同步Jenkinsfile配置

同步成功,可以看到这第二个变量了

命令再次触发一次
[root@mcw12 webapps]# curl -X POST -H "Content-Type: application/json" -d '{ "ref": "refs/heads/main" }' -vs http://10.0.0.25:8080/generic-webhook-trigger/invoke?token=secret
* About to connect() to 10.0.0.25 port 8080 (#0)
*   Trying 10.0.0.25...
* Connected to 10.0.0.25 (10.0.0.25) port 8080 (#0)
> POST /generic-webhook-trigger/invoke?token=secret HTTP/1.1
> User-Agent: curl/7.29.0
> Host: 10.0.0.25:8080
> Accept: */*
> Content-Type: application/json
> Content-Length: 28
>
* upload completely sent off: 28 out of 28 bytes
< HTTP/1.1 200 OK
< Date: Sun, 04 Aug 2024 17:12:40 GMT
< X-Content-Type-Options: nosniff
< Content-Type: application/json;charset=utf-8
< Content-Length: 219
< Server: Jetty(10.0.18)
<
* Connection #0 to host 10.0.0.25 left intact
{"status":"ok","data":{"triggerResults":{"mcw-pipeline2":{"regexpFilterExpression":"","triggered":true,"resolvedVariables":{"before":"","ref":"refs/heads/main"},"regexpFilterText":"","id":181,"url":"queue/item/181/"}}}}[root@mcw12 webapps]#
[root@mcw12 webapps]#
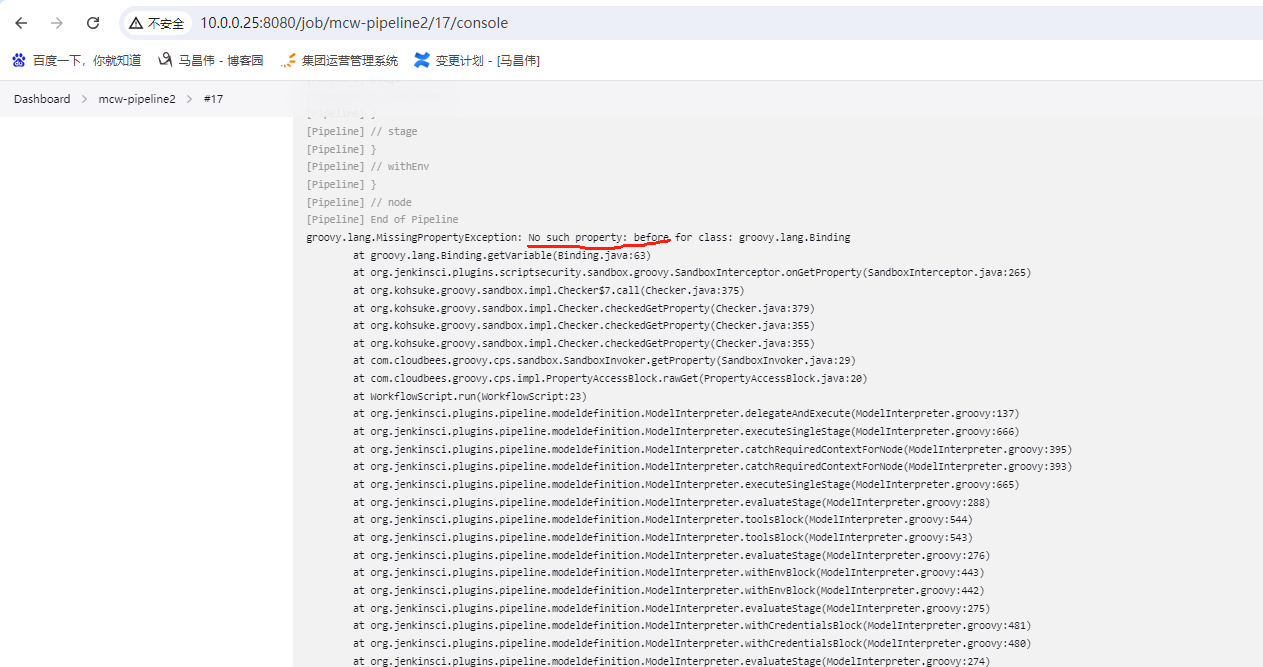
curl请求触发的,也是失败了
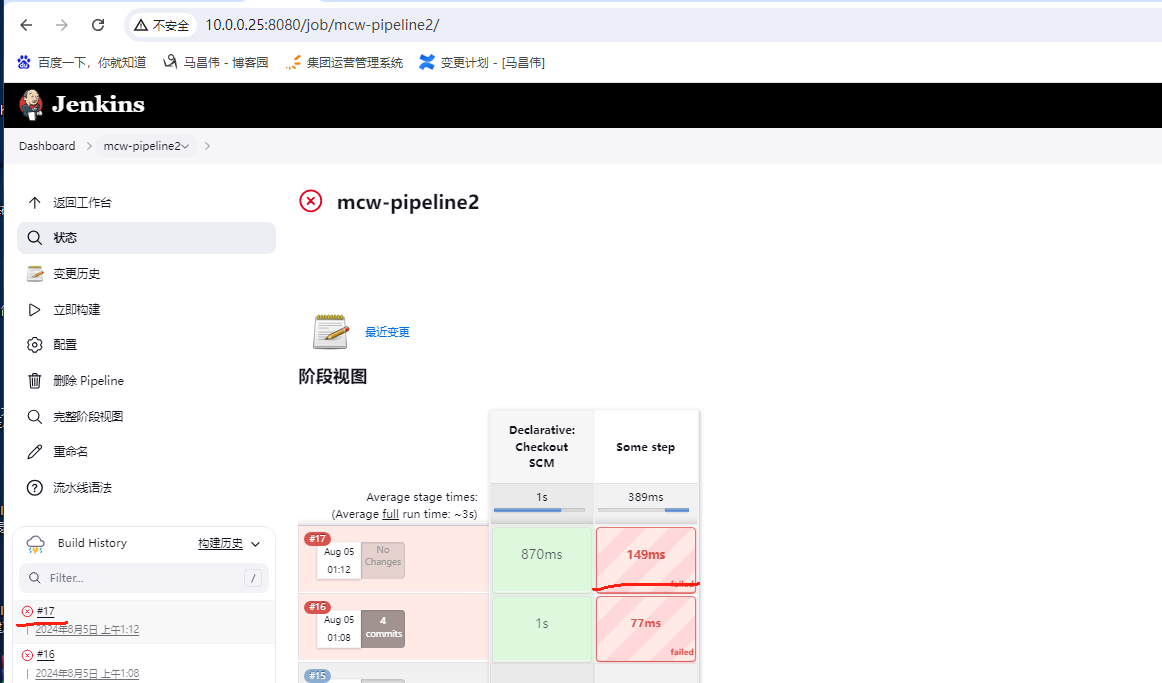
查看没有这个属性,也就是我们设置的默认值为'',就是没有设置,所以我们curl请求中必须要传递这个值
添加上变量

[root@mcw12 webapps]#
[root@mcw12 webapps]# curl -X POST -H "Content-Type: application/json" -d '{ "ref": "refs/heads/main" , "before": "wo shi machangwei" }' -vs http://10.0.0.25:8080/generic-webhook-trigger/invoke?token=secret
* About to connect() to 10.0.0.25 port 8080 (#0)
*   Trying 10.0.0.25...
* Connected to 10.0.0.25 (10.0.0.25) port 8080 (#0)
> POST /generic-webhook-trigger/invoke?token=secret HTTP/1.1
> User-Agent: curl/7.29.0
> Host: 10.0.0.25:8080
> Accept: */*
> Content-Type: application/json
> Content-Length: 60
>
* upload completely sent off: 60 out of 60 bytes
< HTTP/1.1 200 OK
< Date: Sun, 04 Aug 2024 17:16:25 GMT
< X-Content-Type-Options: nosniff
< Content-Type: application/json;charset=utf-8
< Content-Length: 236
< Server: Jetty(10.0.18)
<
* Connection #0 to host 10.0.0.25 left intact
{"status":"ok","data":{"triggerResults":{"mcw-pipeline2":{"regexpFilterExpression":"","triggered":true,"resolvedVariables":{"before":"wo shi machangwei","ref":"refs/heads/main"},"regexpFilterText":"","id":183,"url":"queue/item/183/"}}}}[root@mcw12 webapps]#
再次查看curl请求触发的,已经成功运行
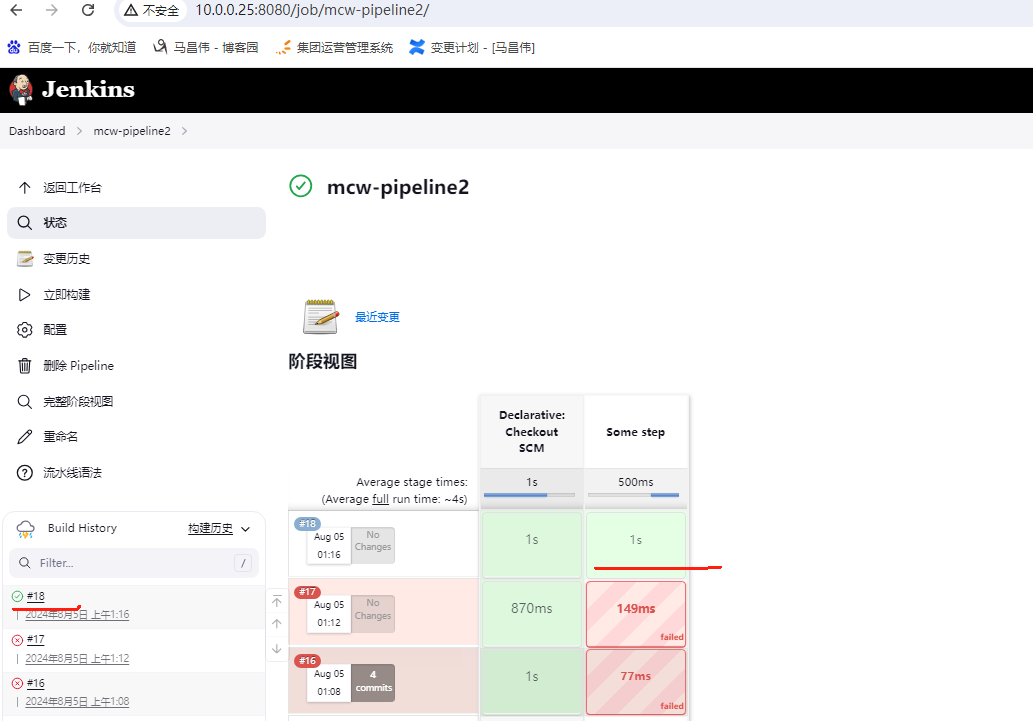
查看日志,已经新增。从请求body中获取数据,并在pipeline中使用
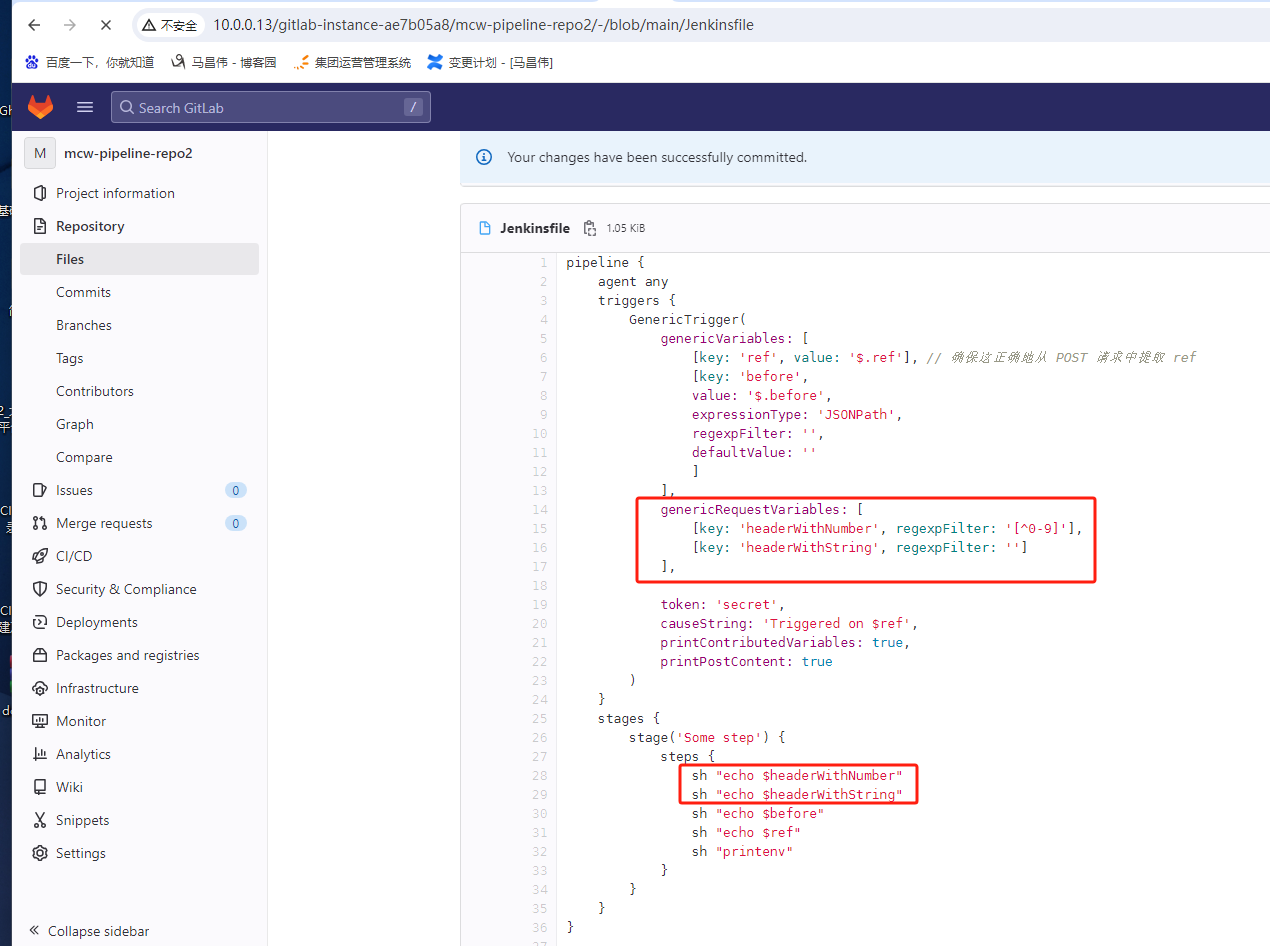
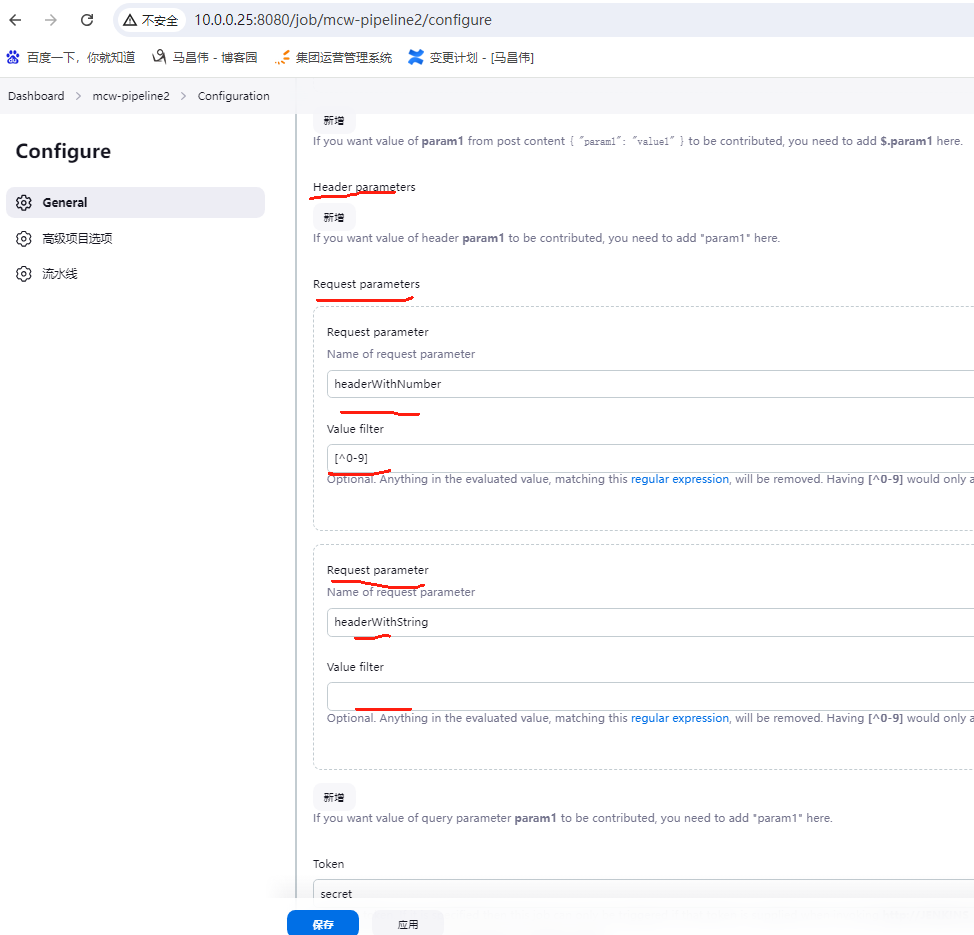
2、genericRequestVariables: 从URL参数中获取值。
下面的有问题,先略过
pipeline {
    agent any
    triggers {
        GenericTrigger(
            genericVariables: [
                [key: 'ref', value: '$.ref'], // 确保这正确地从 POST 请求中提取 ref
                [key: 'before',
                value: '$.before',
                expressionType: 'JSONPath',
                regexpFilter: '',
                defaultValue: ''
                ]
            ],
            genericRequestVariables: [
                [key: 'headerWithNumber', regexpFilter: '[^0-9]'],
                [key: 'headerWithString', regexpFilter: '']
            ],

            token: 'secret',
            causeString: 'Triggered on $ref',
            printContributedVariables: true,
            printPostContent: true
        )
    }
    stages {
        stage('Some step') {
            steps {
                sh "echo $headerWithNumber"
                sh "echo $headerWithString"
                sh "echo $before"
                sh "echo $ref"
                sh "printenv"
            }
        }
    }
}
新增
手动构建一次,同步Jenkinsfile配置, 新增请求参数
直接请求
[root@mcw12 webapps]# curl -X POST -H "Content-Type: application/json" -d '{ "ref": "refs/heads/main" , "before": "wo shi machangwei" }' -vs http://10.0.0.25:8080/generic-webhook-trigger/invoke?token=secret
* About to connect() to 10.0.0.25 port 8080 (#0)
*   Trying 10.0.0.25...
* Connected to 10.0.0.25 (10.0.0.25) port 8080 (#0)
> POST /generic-webhook-trigger/invoke?token=secret HTTP/1.1
> User-Agent: curl/7.29.0
> Host: 10.0.0.25:8080
> Accept: */*
> Content-Type: application/json
> Content-Length: 60
>
* upload completely sent off: 60 out of 60 bytes
< HTTP/1.1 200 OK
< Date: Sun, 04 Aug 2024 17:30:54 GMT
< X-Content-Type-Options: nosniff
< Content-Type: application/json;charset=utf-8
< Content-Length: 236
< Server: Jetty(10.0.18)
<
* Connection #0 to host 10.0.0.25 left intact
{"status":"ok","data":{"triggerResults":{"mcw-pipeline2":{"regexpFilterExpression":"","triggered":true,"resolvedVariables":{"before":"wo shi machangwei","ref":"refs/heads/main"},"regexpFilterText":"","id":187,"url":"queue/item/187/"}}}}[root@mcw12 webapps]#
[root@mcw12 webapps]#
失败
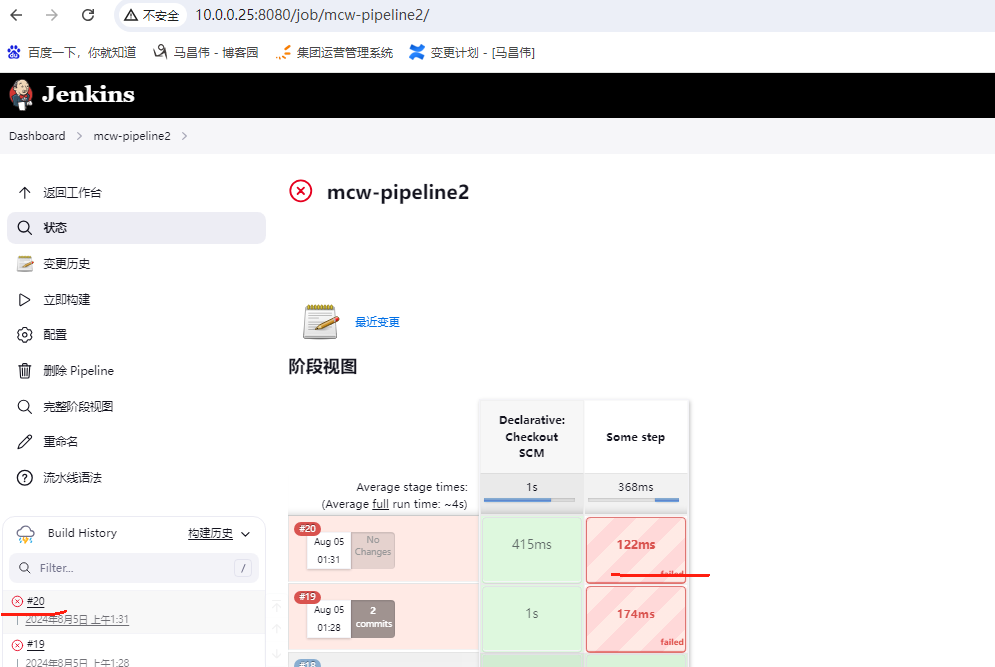
报错没有这个变量,因为没有传参,所以环境变量里面没有,所以打印失败,找不到
将两个请求参数补充上
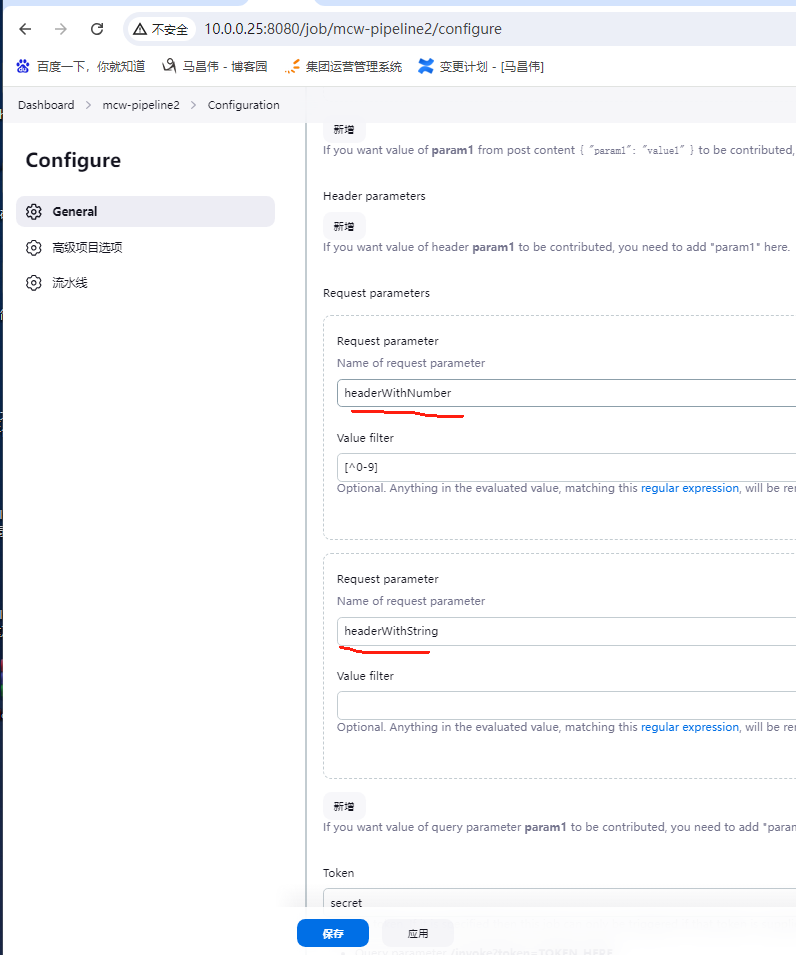
新增请求参数。记得是分号隔开

[root@mcw12 webapps]# curl -X POST -H "Content-Type: application/json" -d '{ "ref": "refs/heads/main" , "before": "wo shi machangwei" }' -vs http://10.0.0.25:8080/generic-webhook-trigger/invoke?token=secret;headerWithNumber=1314;headerWithString=machangwei
* About to connect() to 10.0.0.25 port 8080 (#0)
* Trying 10.0.0.25...
* Connected to 10.0.0.25 (10.0.0.25) port 8080 (#0)
> POST /generic-webhook-trigger/invoke?token=secret HTTP/1.1
> User-Agent: curl/7.29.0
> Host: 10.0.0.25:8080
> Accept: */*
> Content-Type: application/json
> Content-Length: 60
>
* upload completely sent off: 60 out of 60 bytes
< HTTP/1.1 200 OK
< Date: Sun, 04 Aug 2024 17:38:55 GMT
< X-Content-Type-Options: nosniff
< Content-Type: application/json;charset=utf-8
< Content-Length: 236
< Server: Jetty(10.0.18)
<
* Connection #0 to host 10.0.0.25 left intact
{"status":"ok","data":{"triggerResults":{"mcw-pipeline2":{"regexpFilterExpression":"","triggered":true,"resolvedVariables":{"before":"wo shi machangwei","ref":"refs/heads/main"},"regexpFilterText":"","id":193,"url":"queue/item/193/"}}}}[root@mcw12 webapps]#
还是构建失败
-H添加参数,还是不行

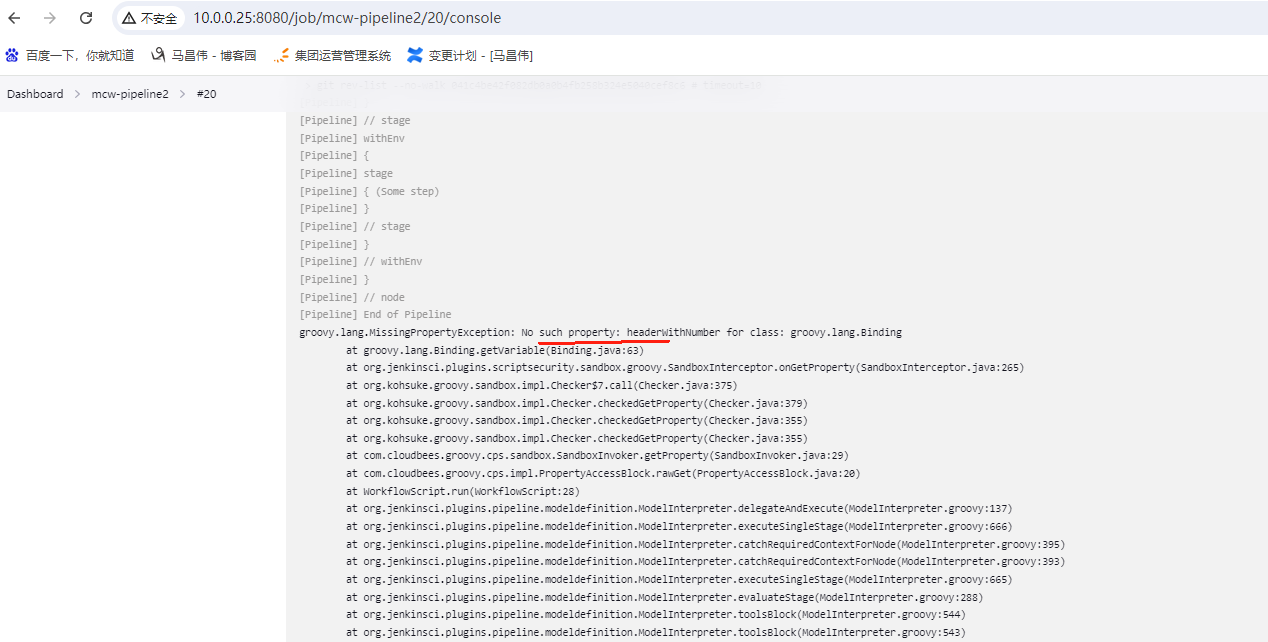
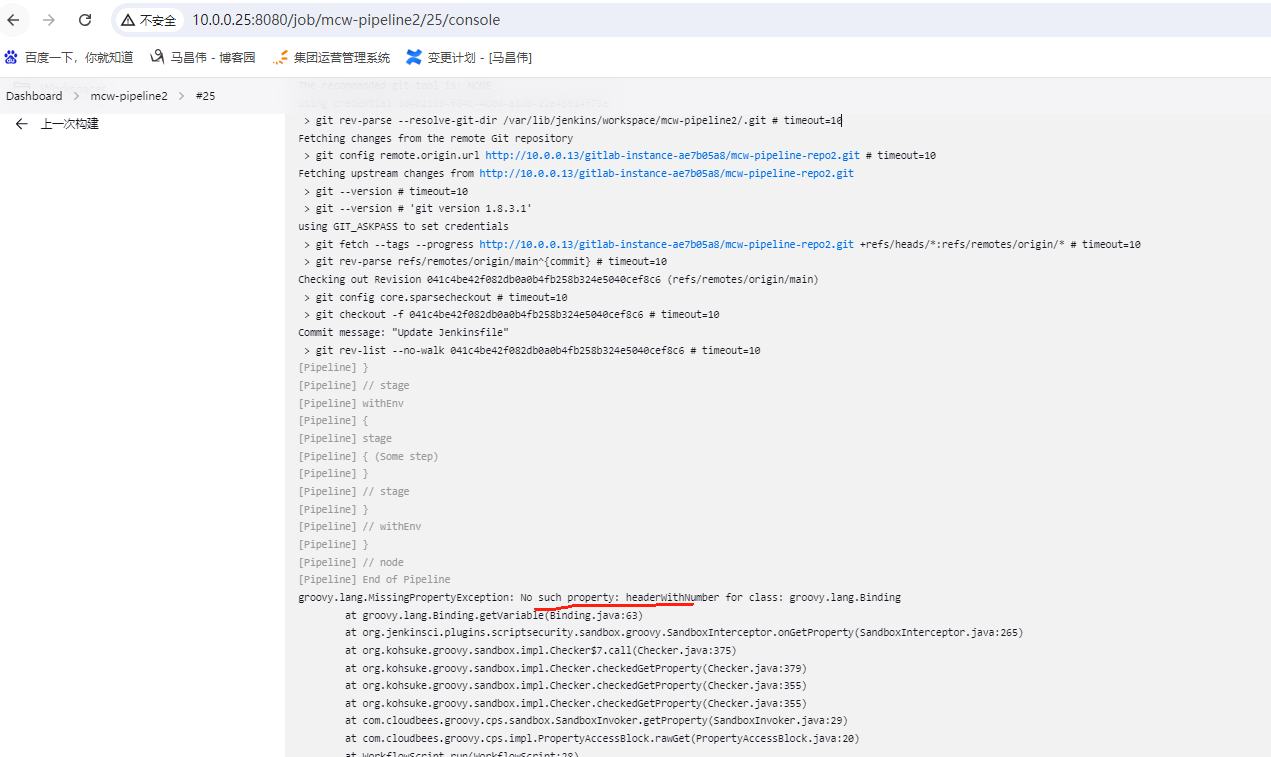
3、genericHeaderVariables: 从HTTP header中提取值用于pipeline中做变量
没试出来。
genericHeaderVariables: [
                [key: 'headerWithNumber', regexpFilter: '[^0-9]'],
                [key: 'headerWithString', regexpFilter: '']
            ],
触发具体某个Jenkins项目
根据请求参数值判断是否触发Jenkins项目执行
控制打印内容
控制响应
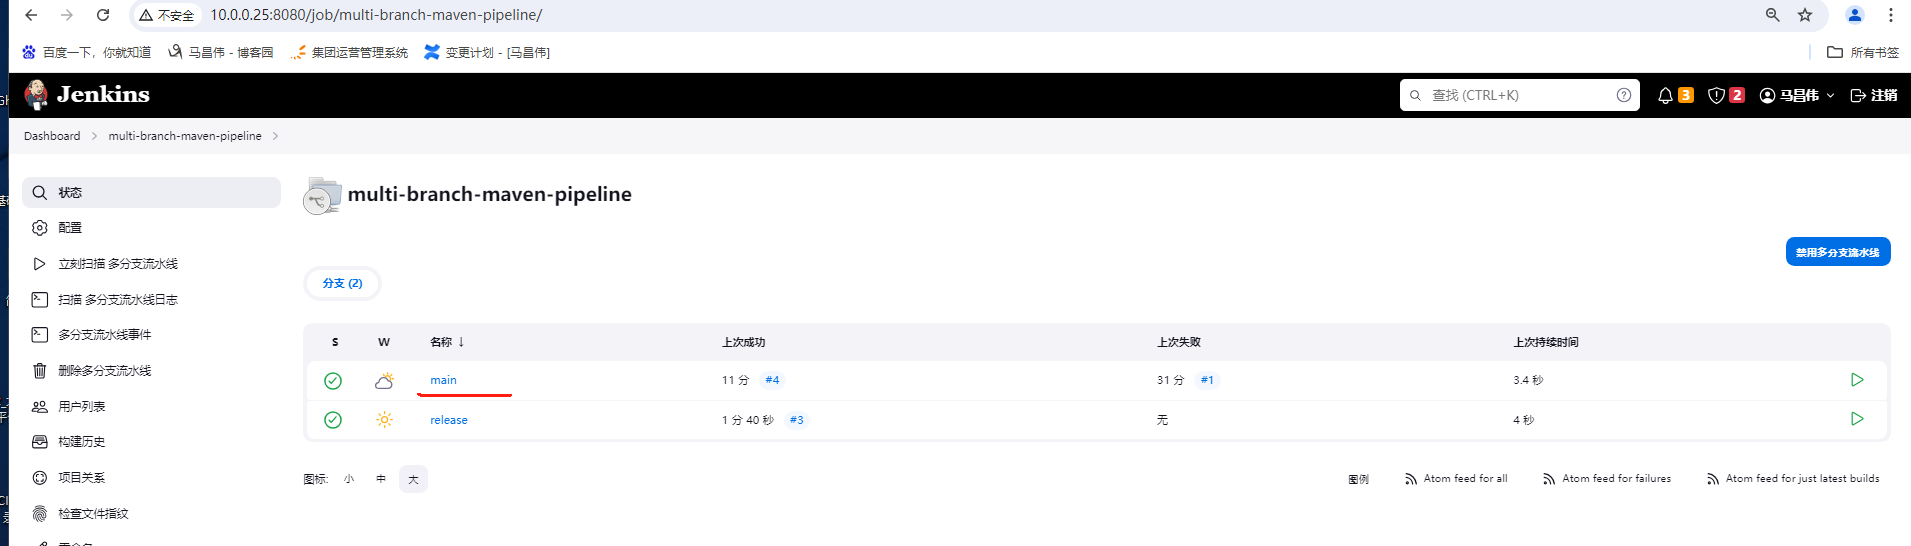
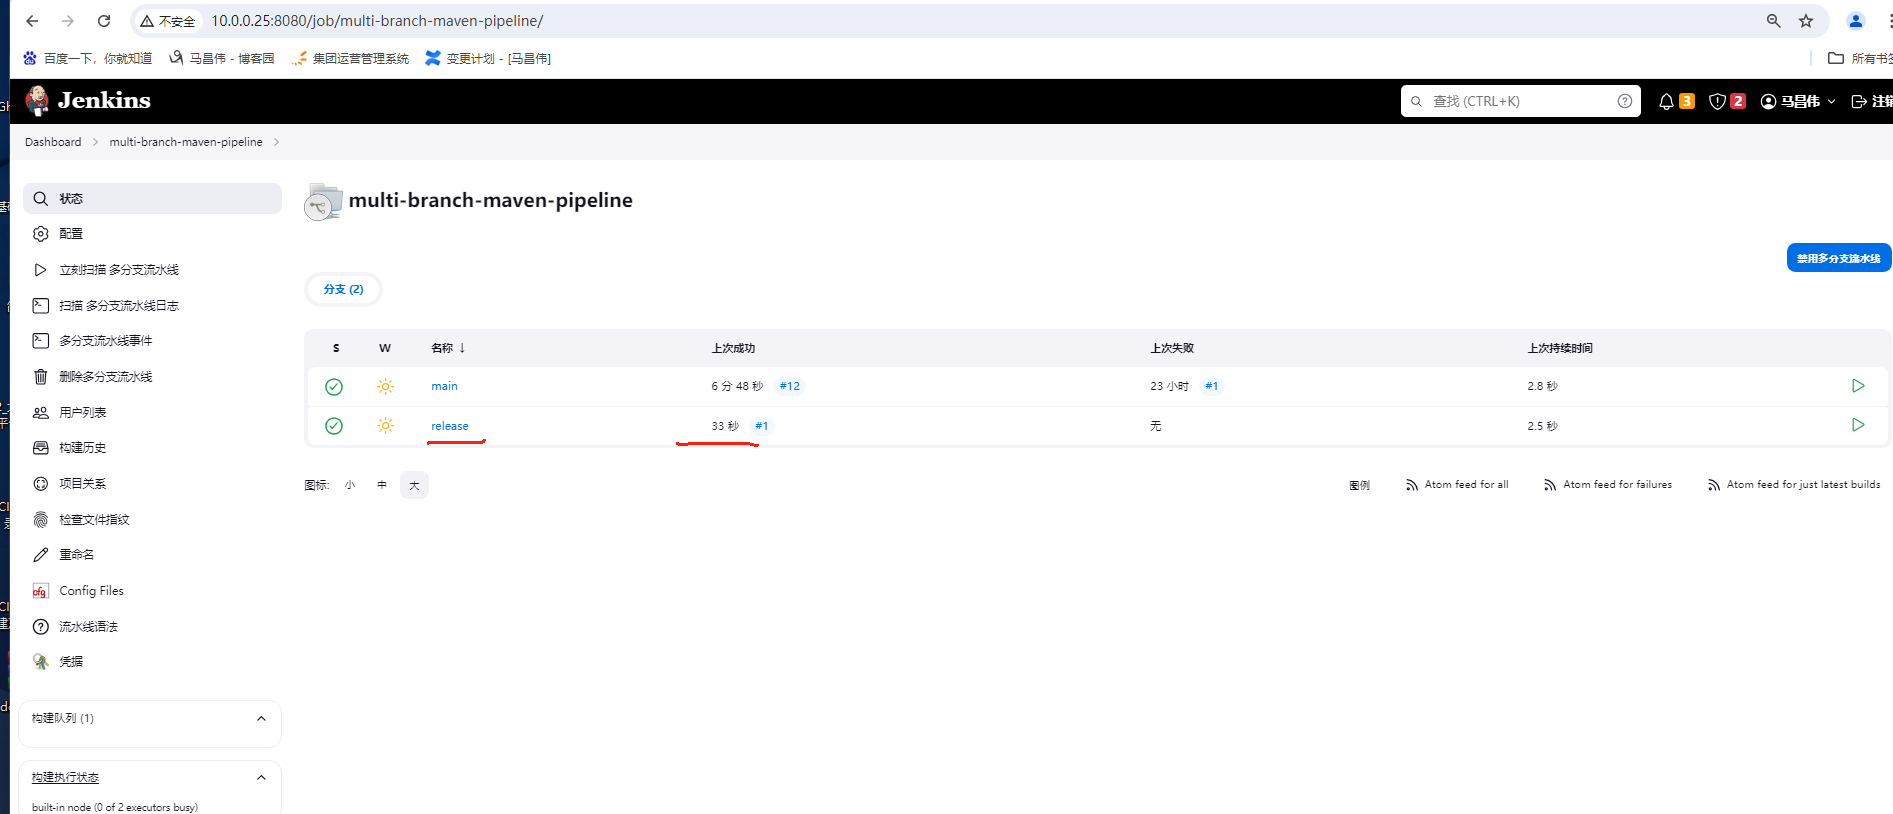
多分支构建
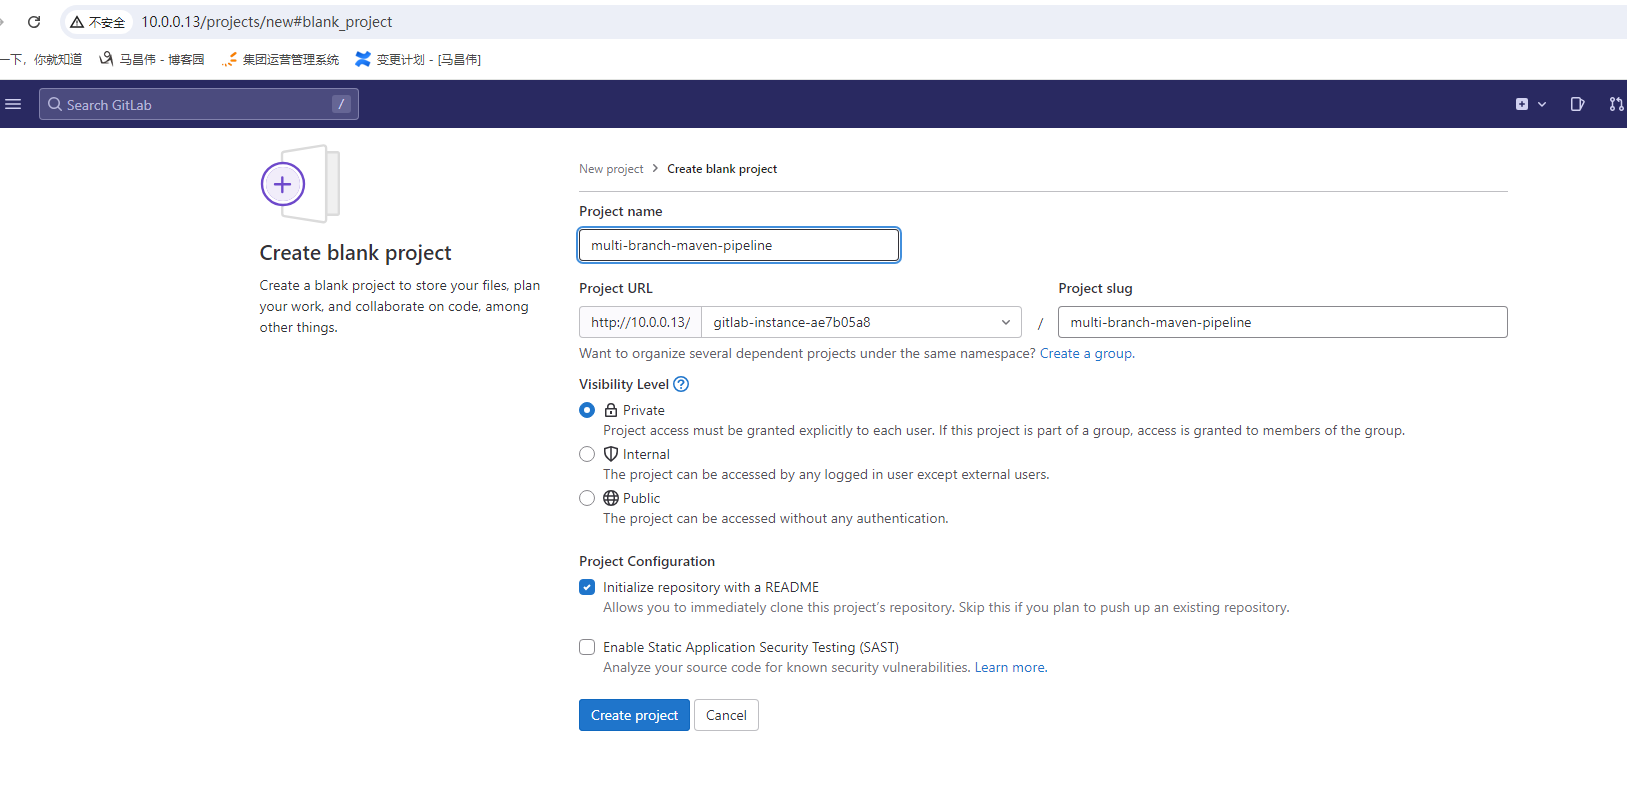
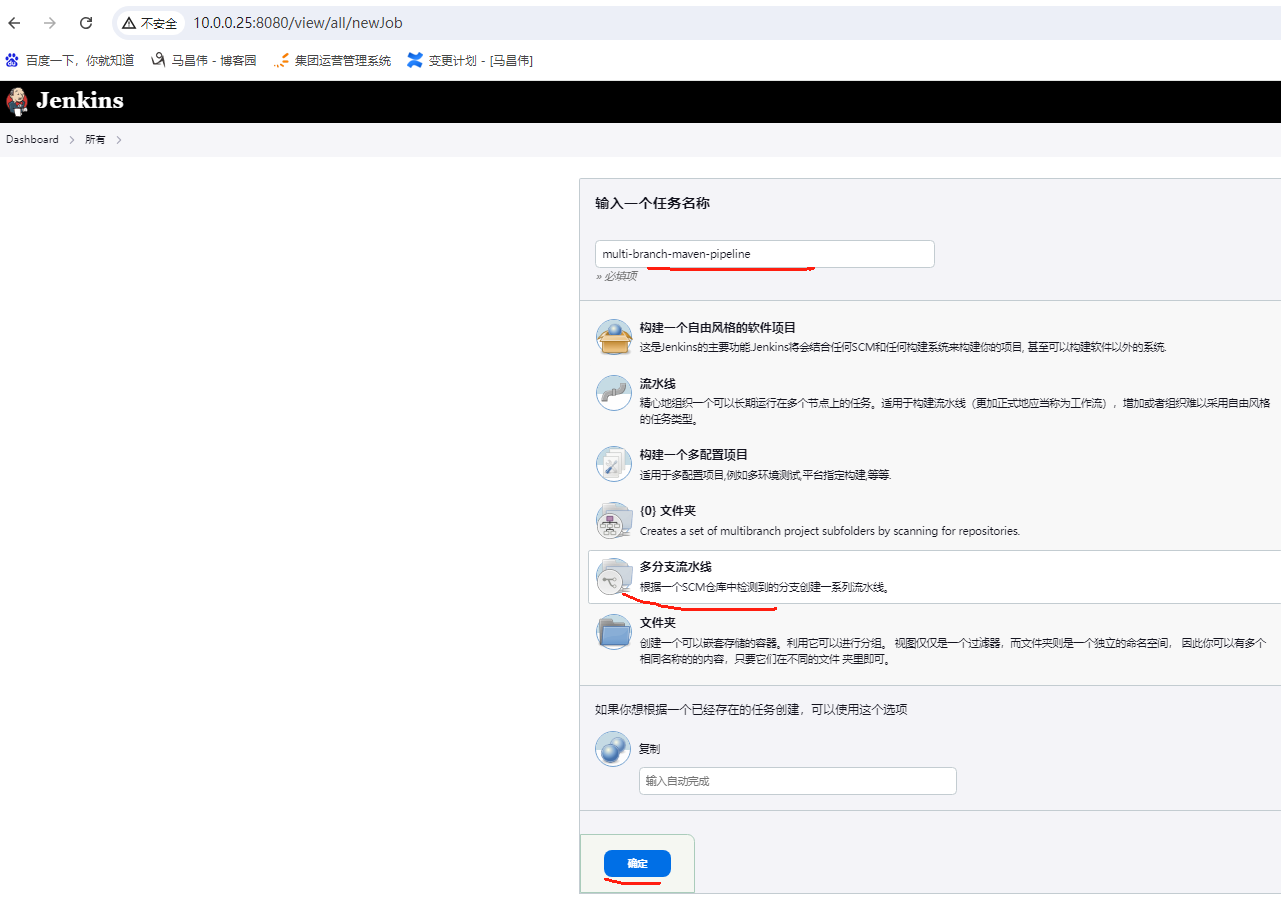
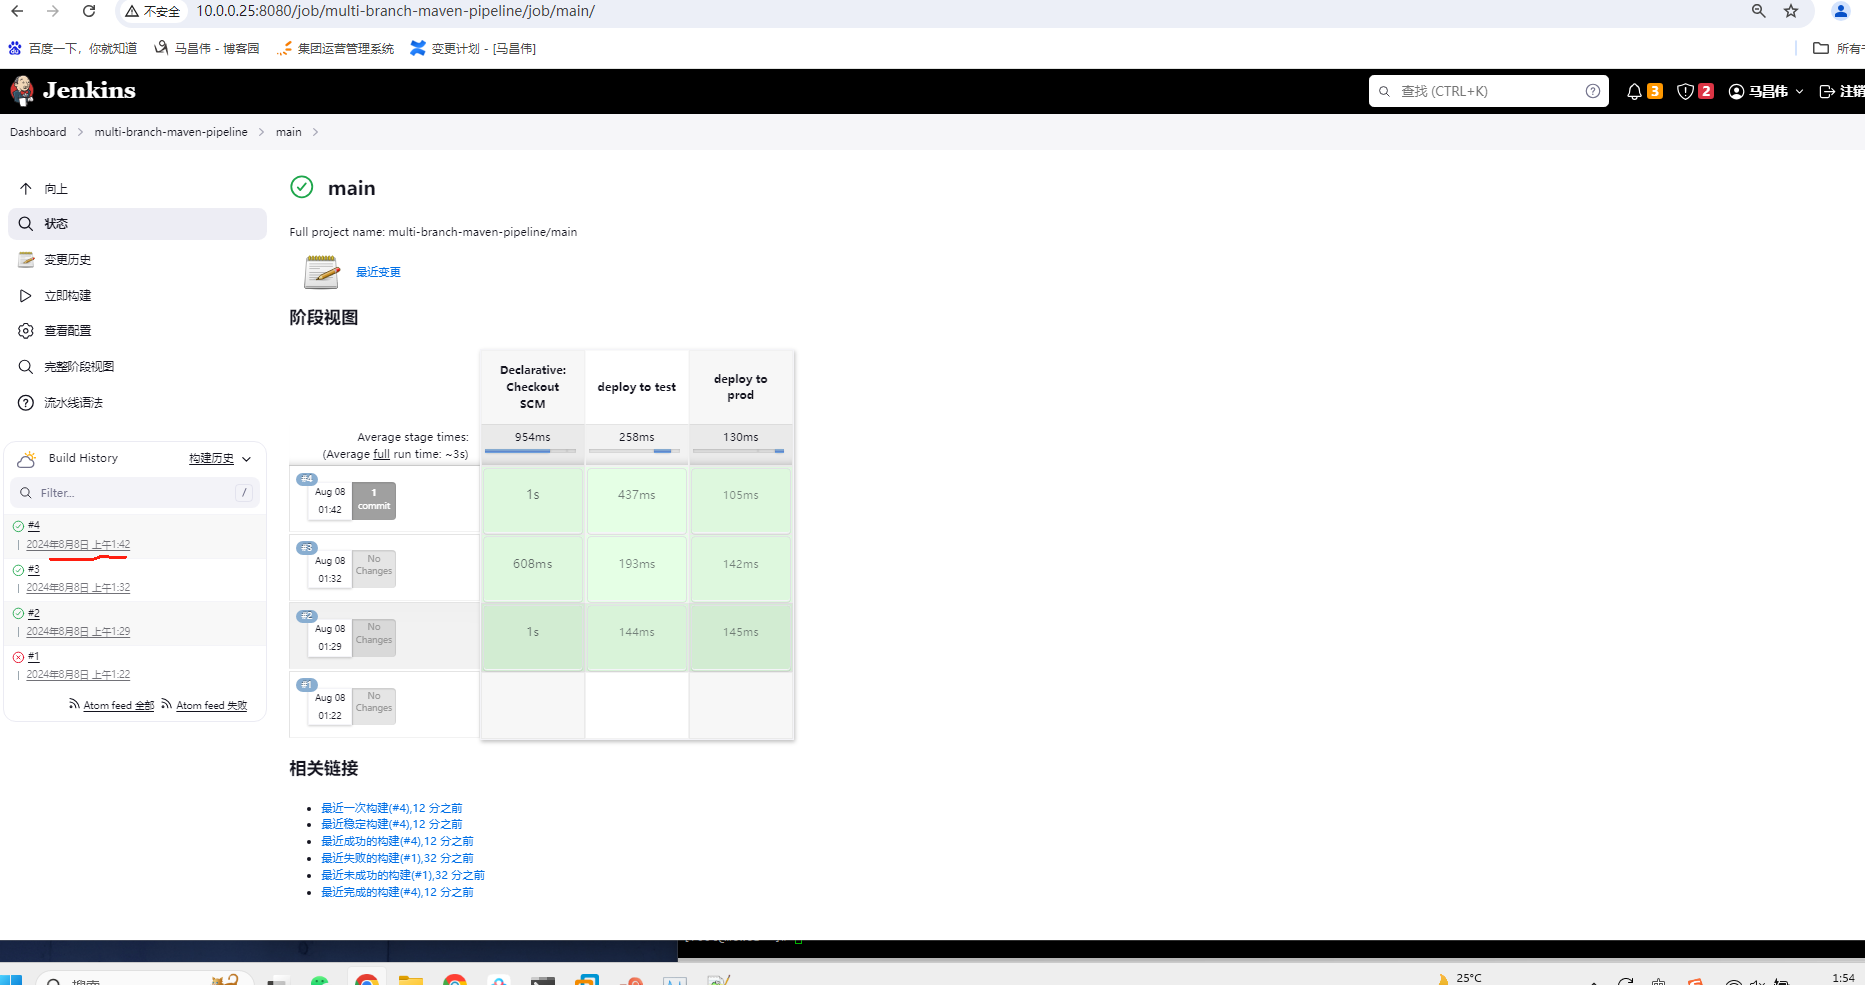
创建多分支pipeline
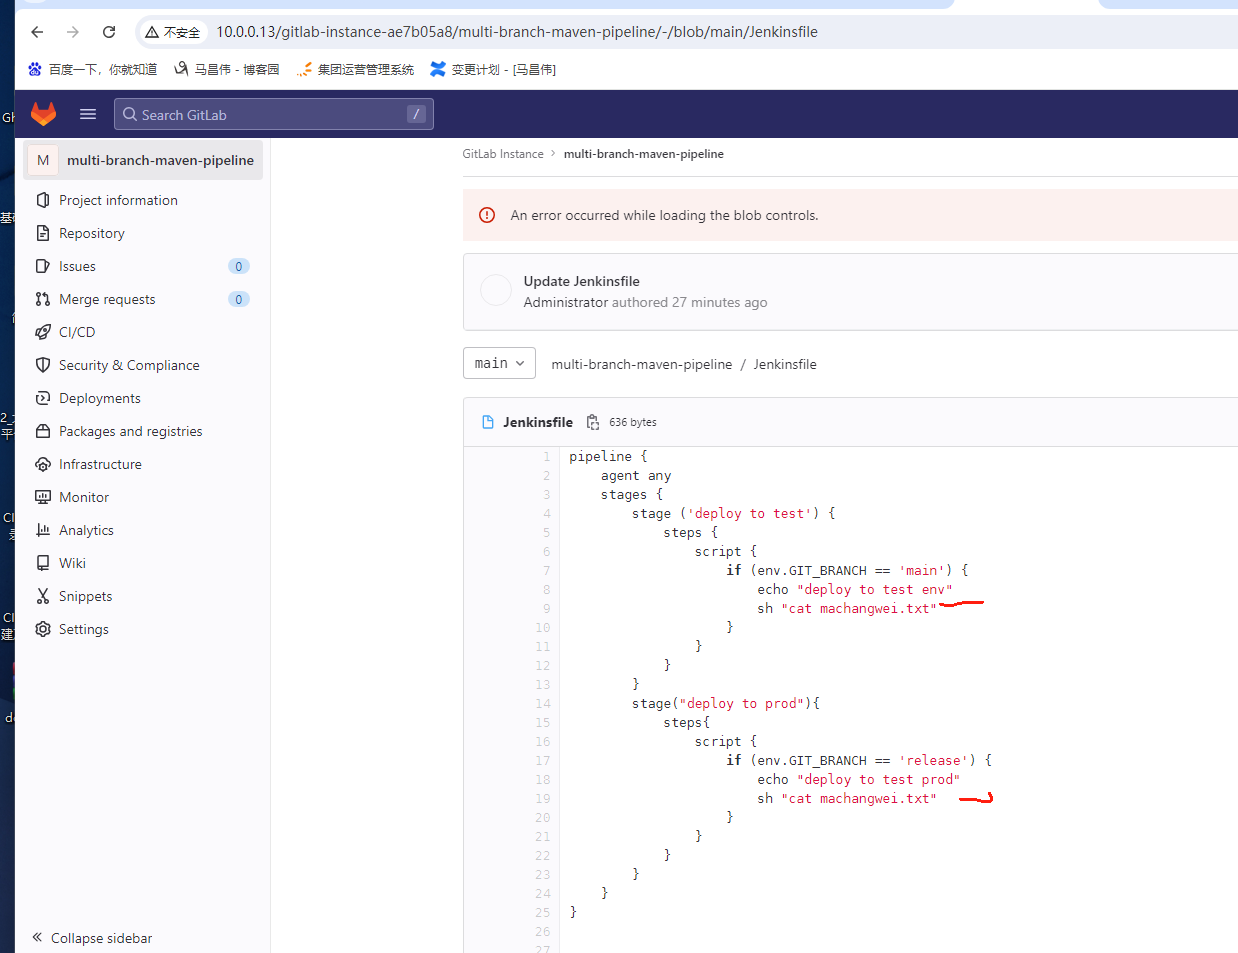
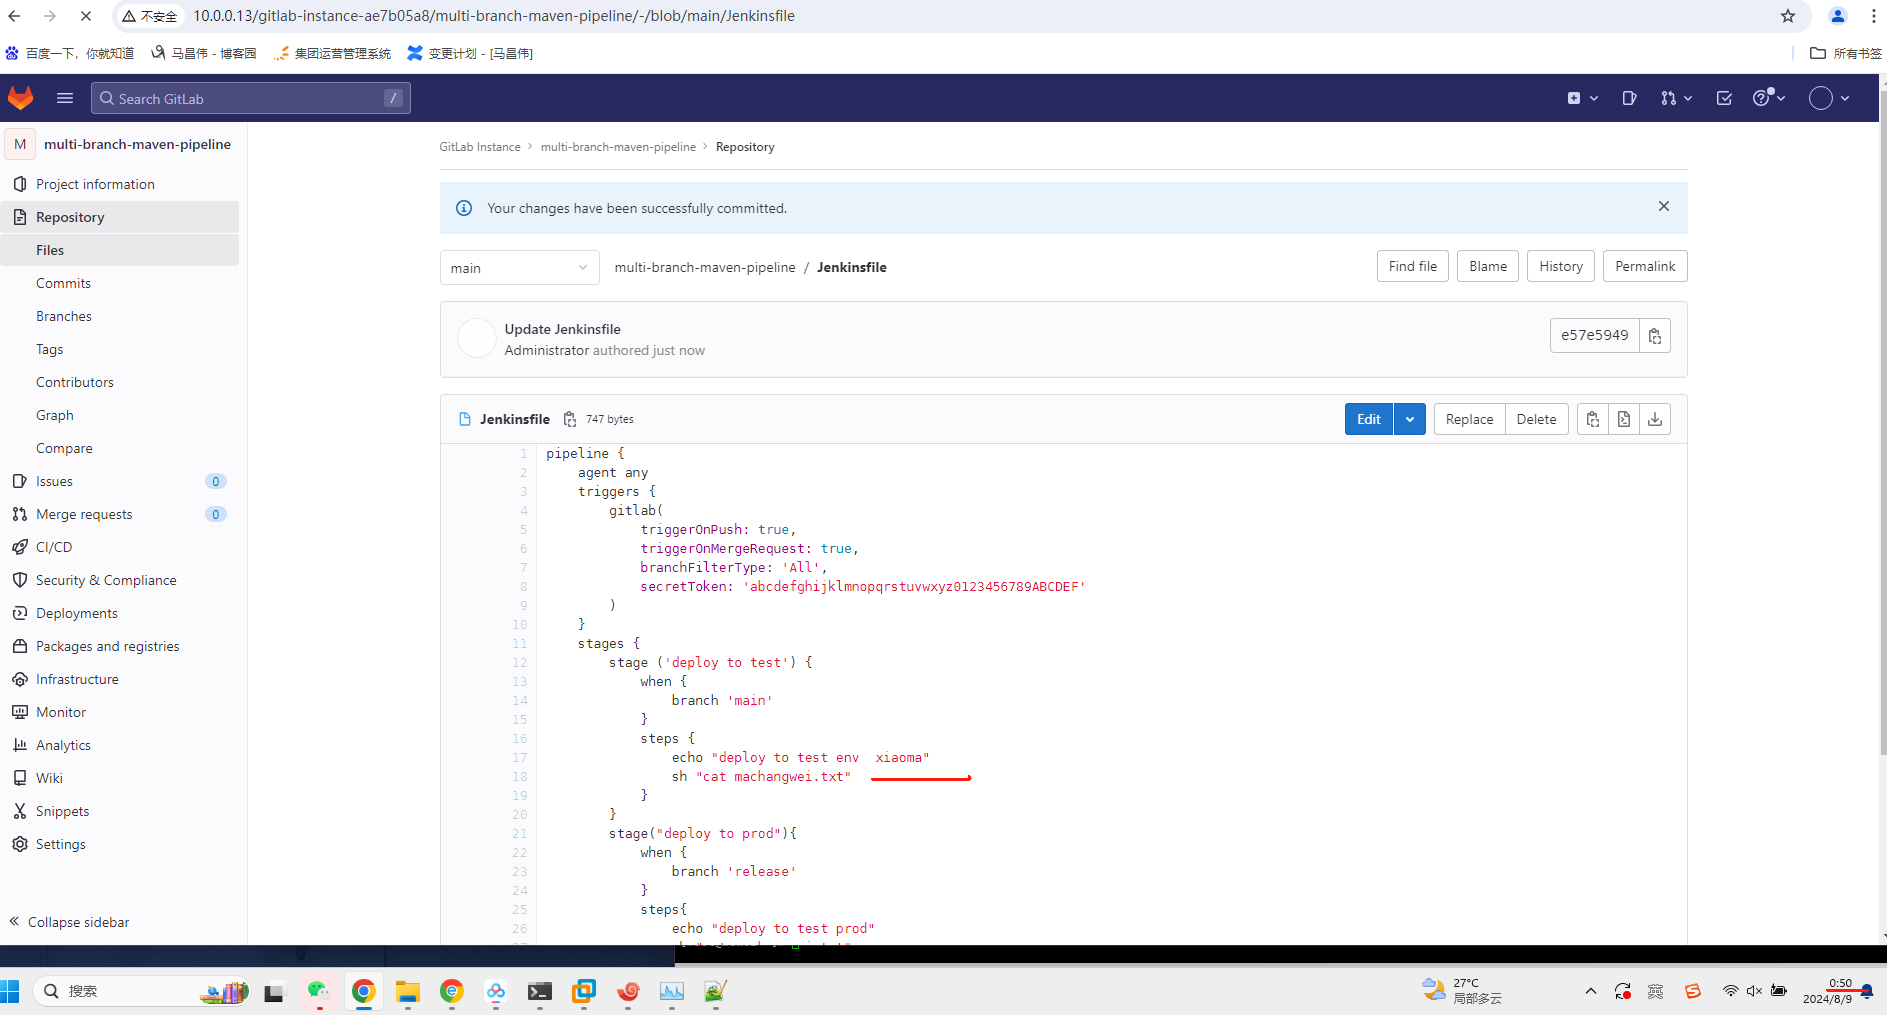
pipeline {
    agent any
    stages {
        stage ('deploy to test') {
            steps {
                script {
                    if (env.GIT_BRANCH == 'main') {
                        echo "deploy to test env"
                    }
                }
            }
        }
        stage("deploy to prod"){
            steps{
                script {
                    if (env.GIT_BRANCH == 'release') {
                        echo "deploy to test prod"
                    }
                }
            }
        }
    }
}
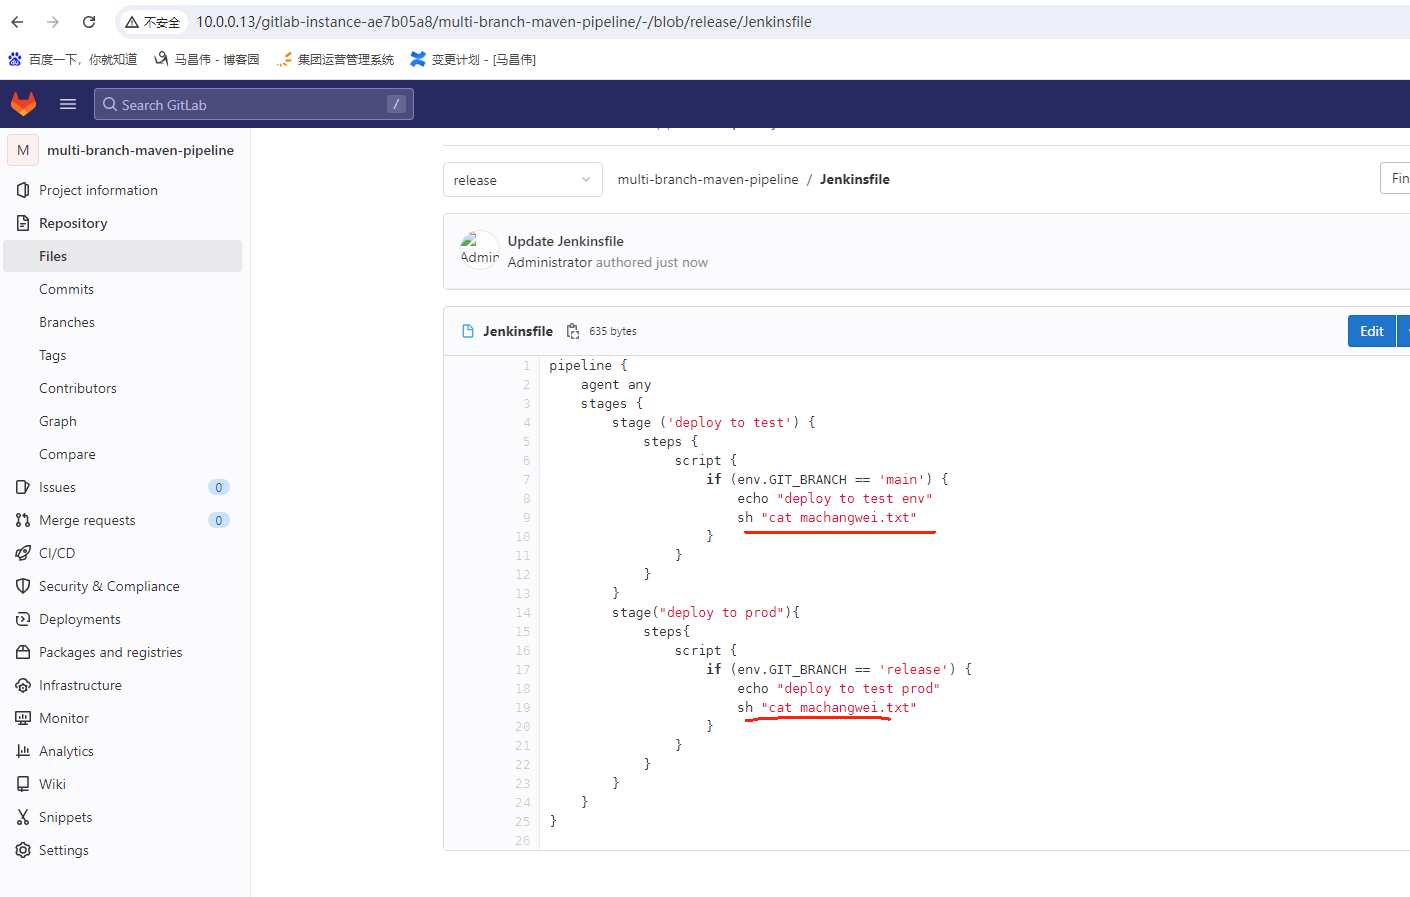
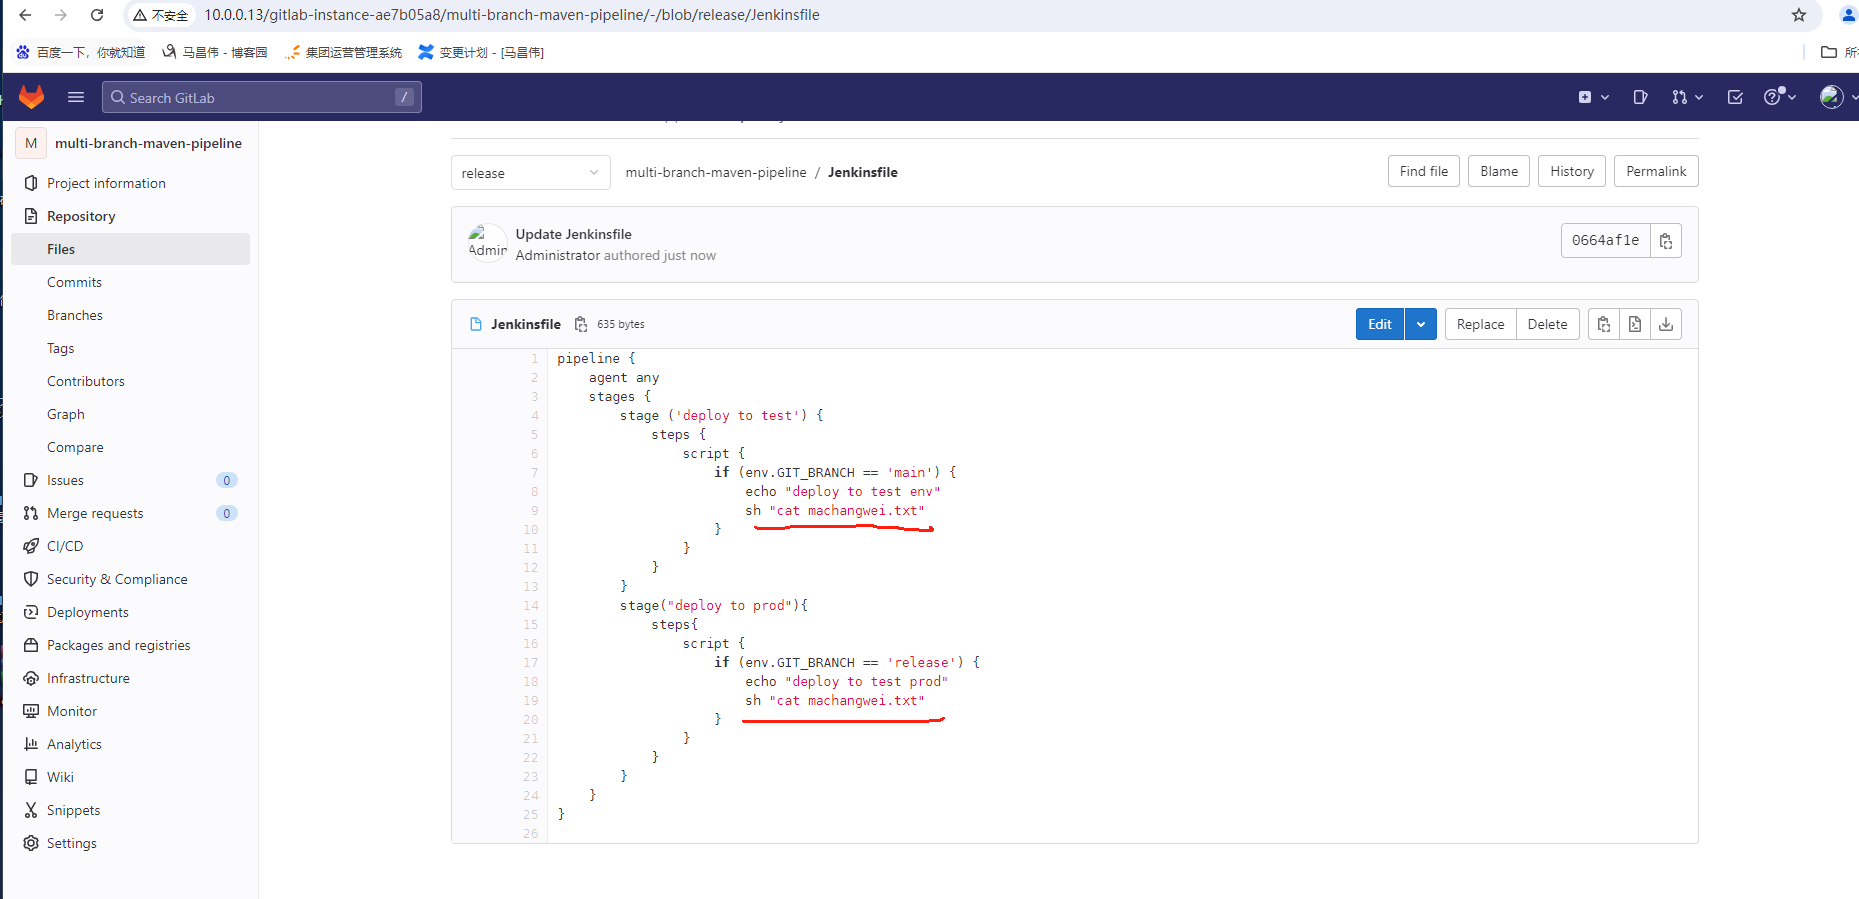
pipeline {
    agent any
    stages {
        stage ('deploy to test') {
            when {
                branch 'main'
            }
            steps {
                echo "deploy to test env"
                sh "cat machangwei.txt"
            }
        }
        stage("deploy to prod"){
            when {
                branch 'release'
            }
            steps{
                echo "deploy to test prod"
                sh "cat machangwei.txt"
            }
        }
    }
}
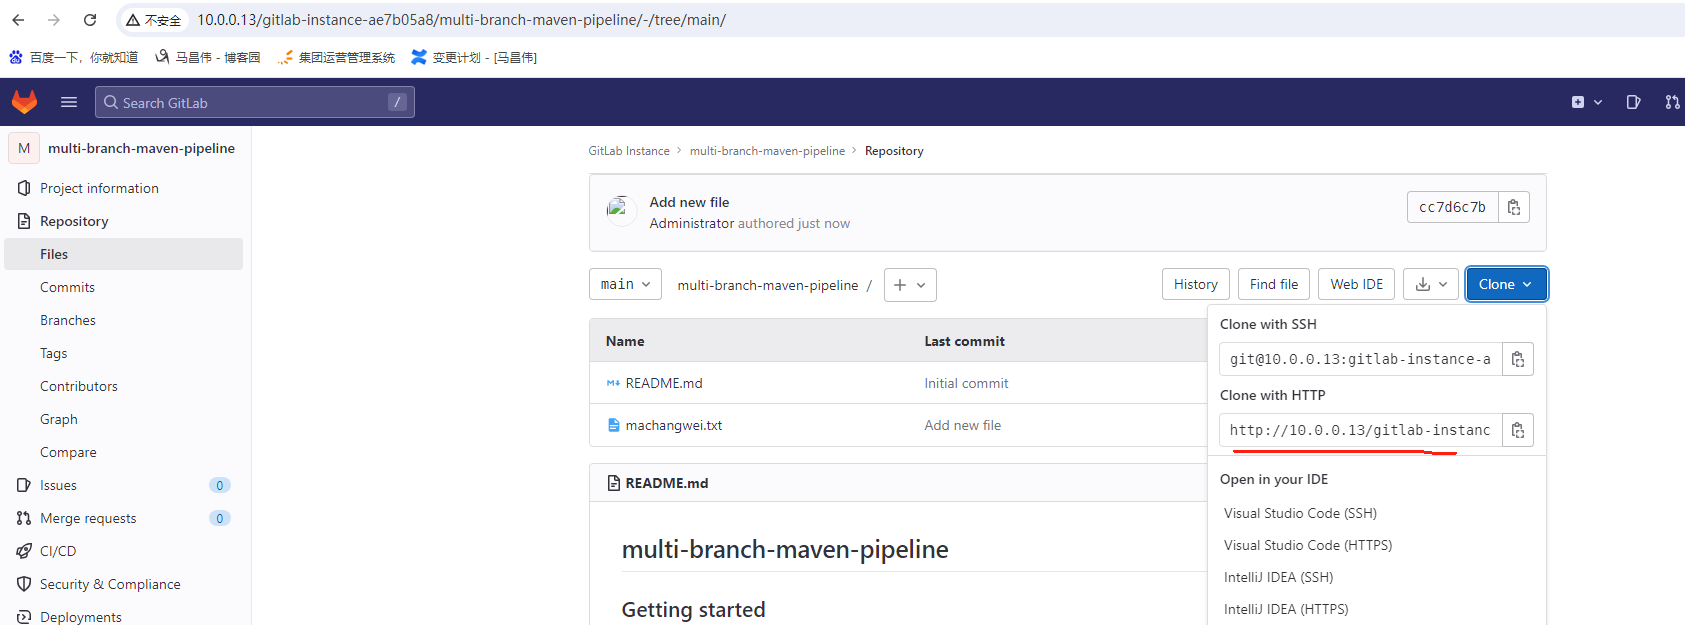
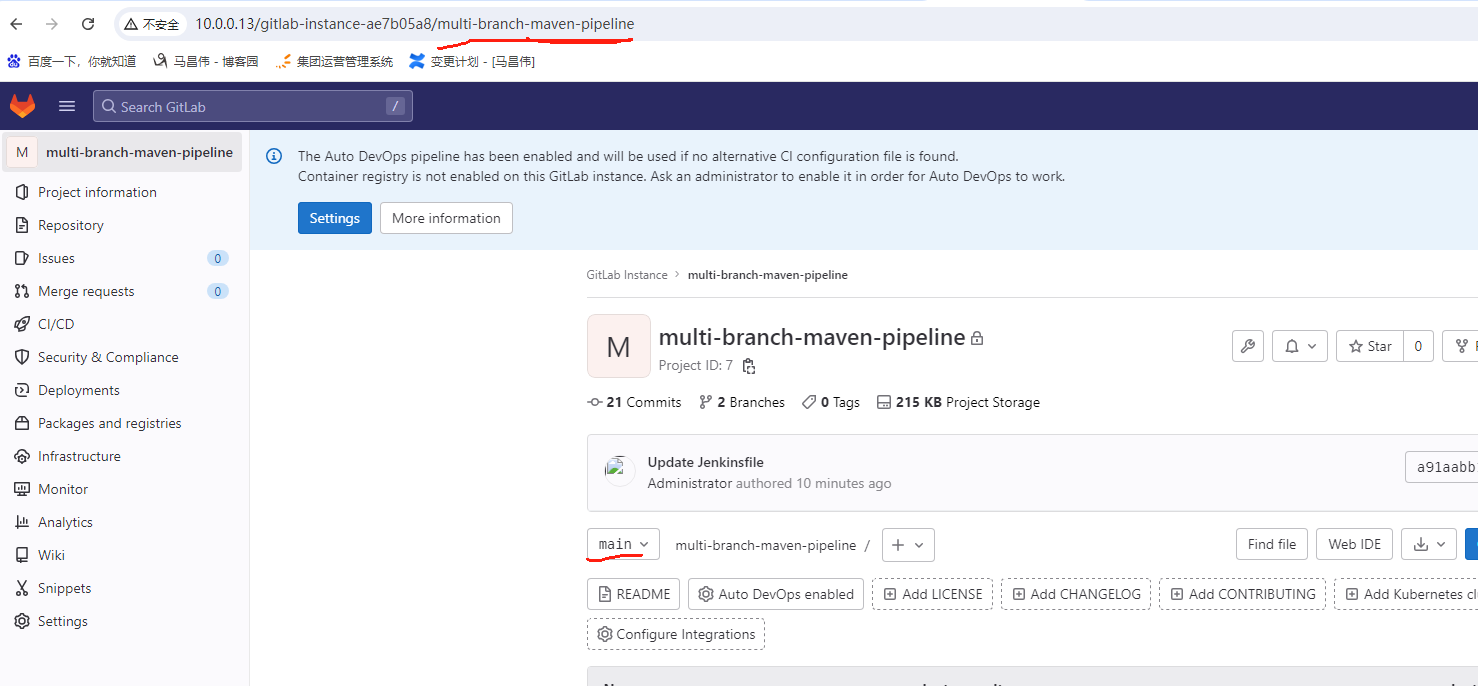
新建gitLab仓库
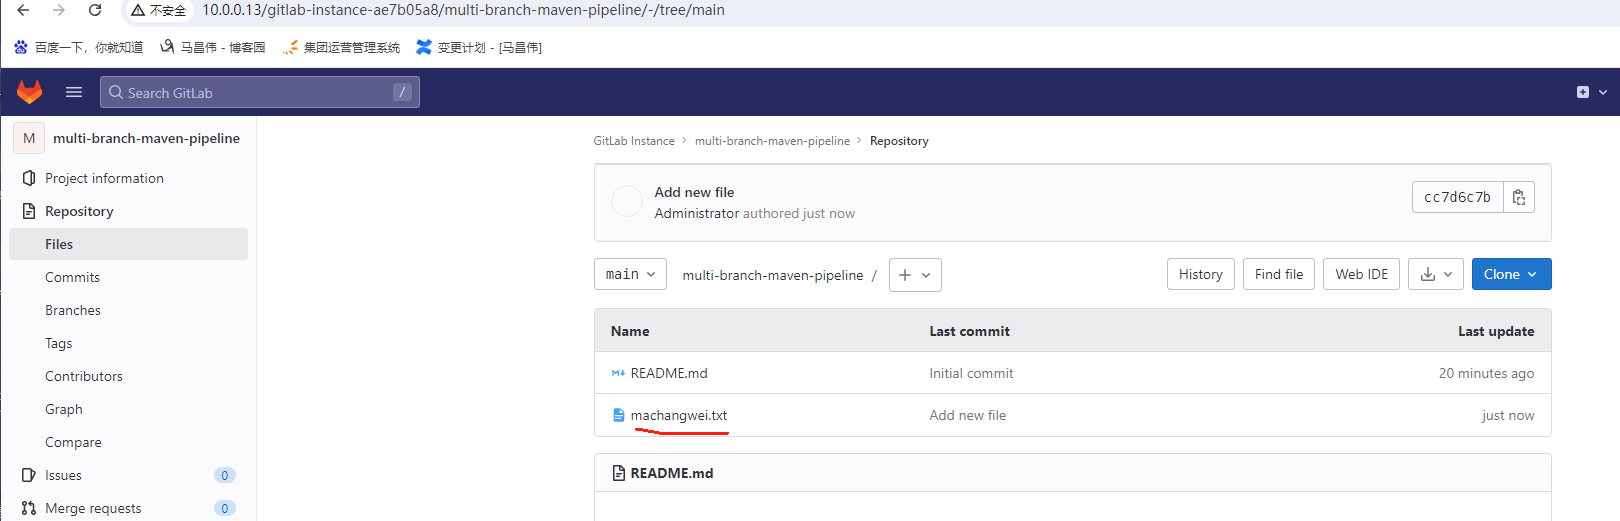
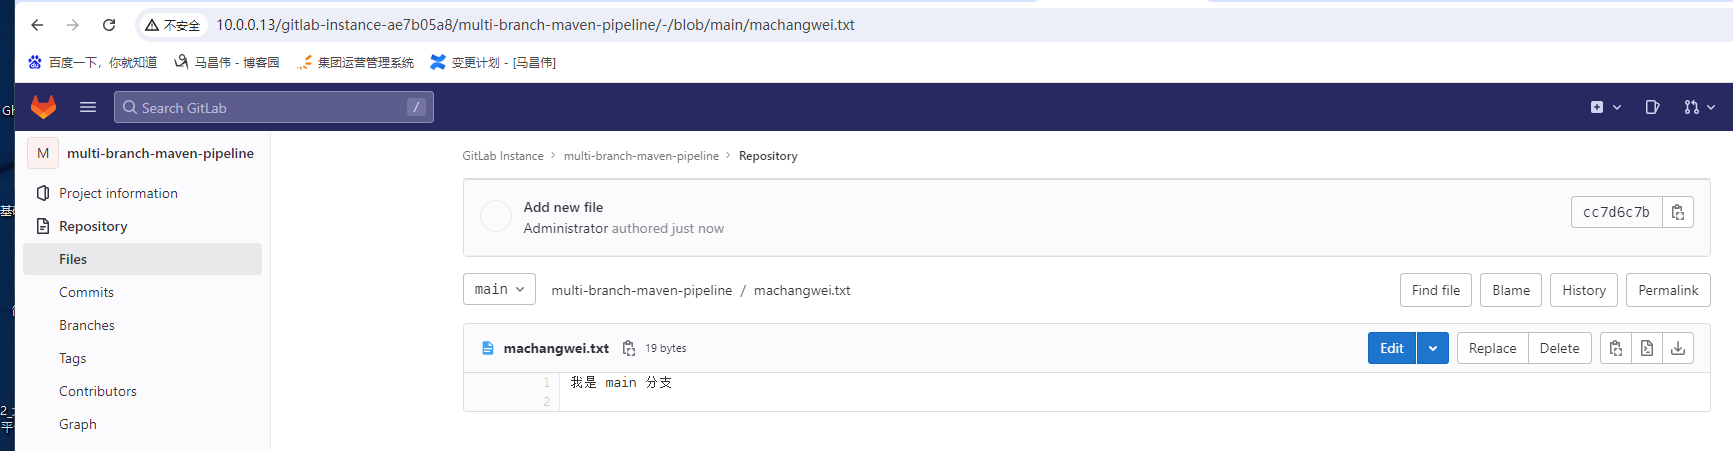
添加一个文件,并写上是main分支
创建多分支的流水线
查看配置


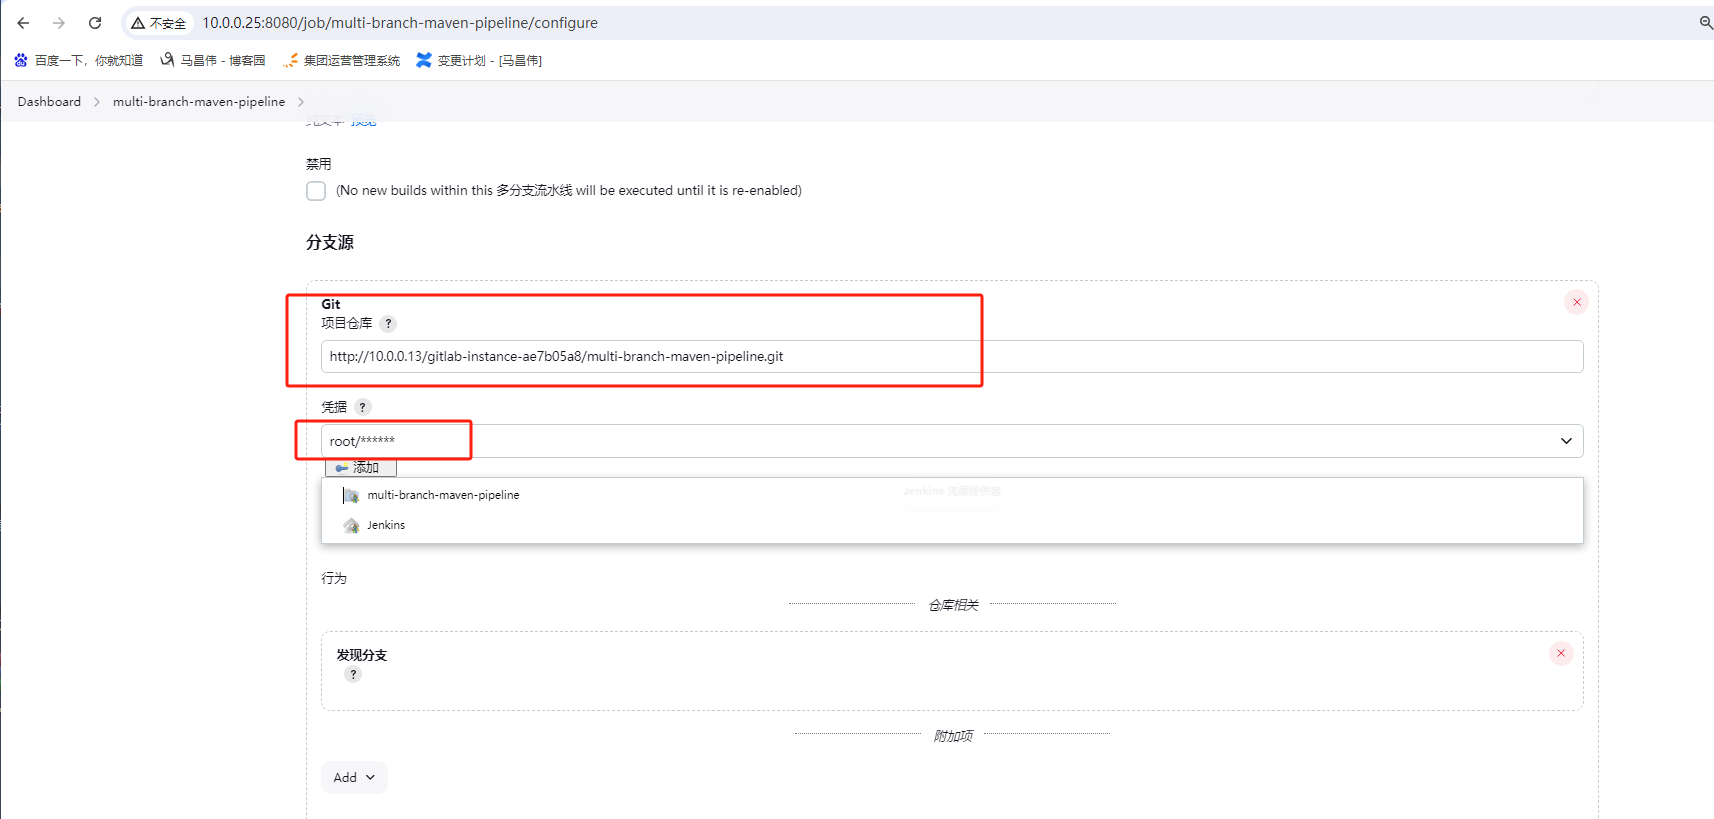
增加分支源
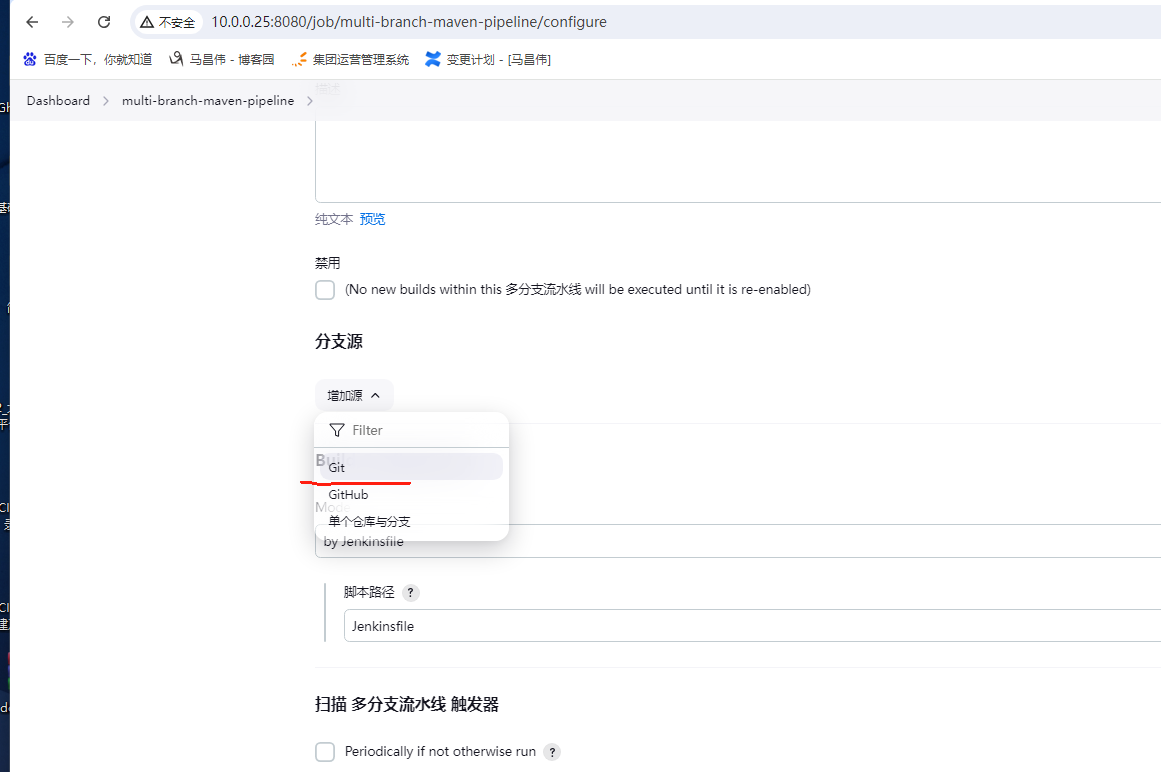
代码仓库
设置代码仓库地址
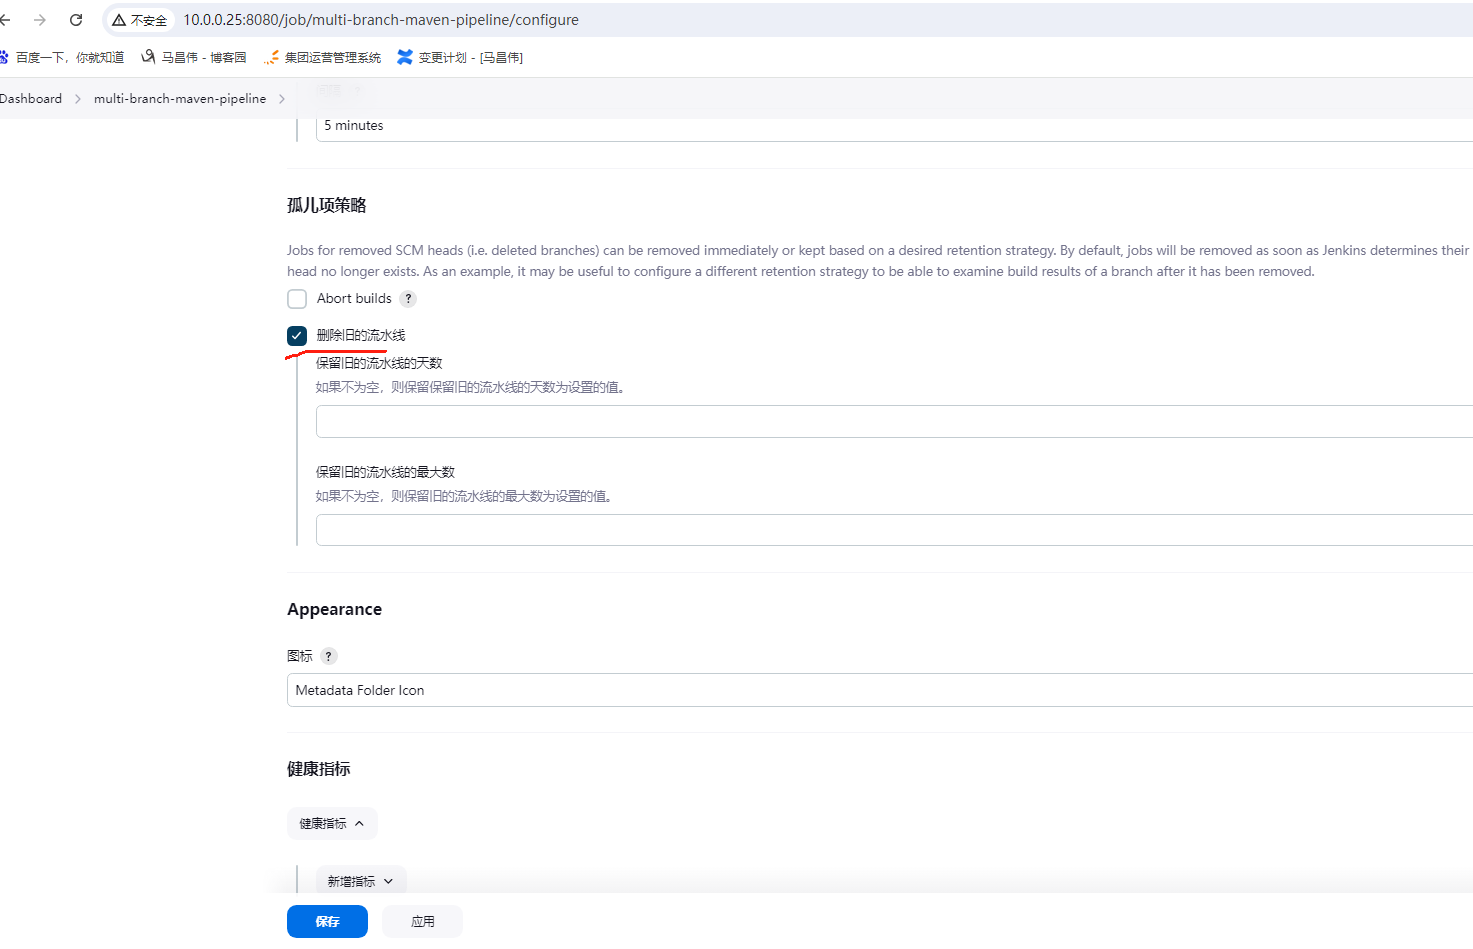
分支扫描触发器。我这里是测试,就设置5分钟

创建Jenkinsfile

gitlab加好之后,Jenkins这里立马保存。可以看到,在扫描多分支流水线
查看
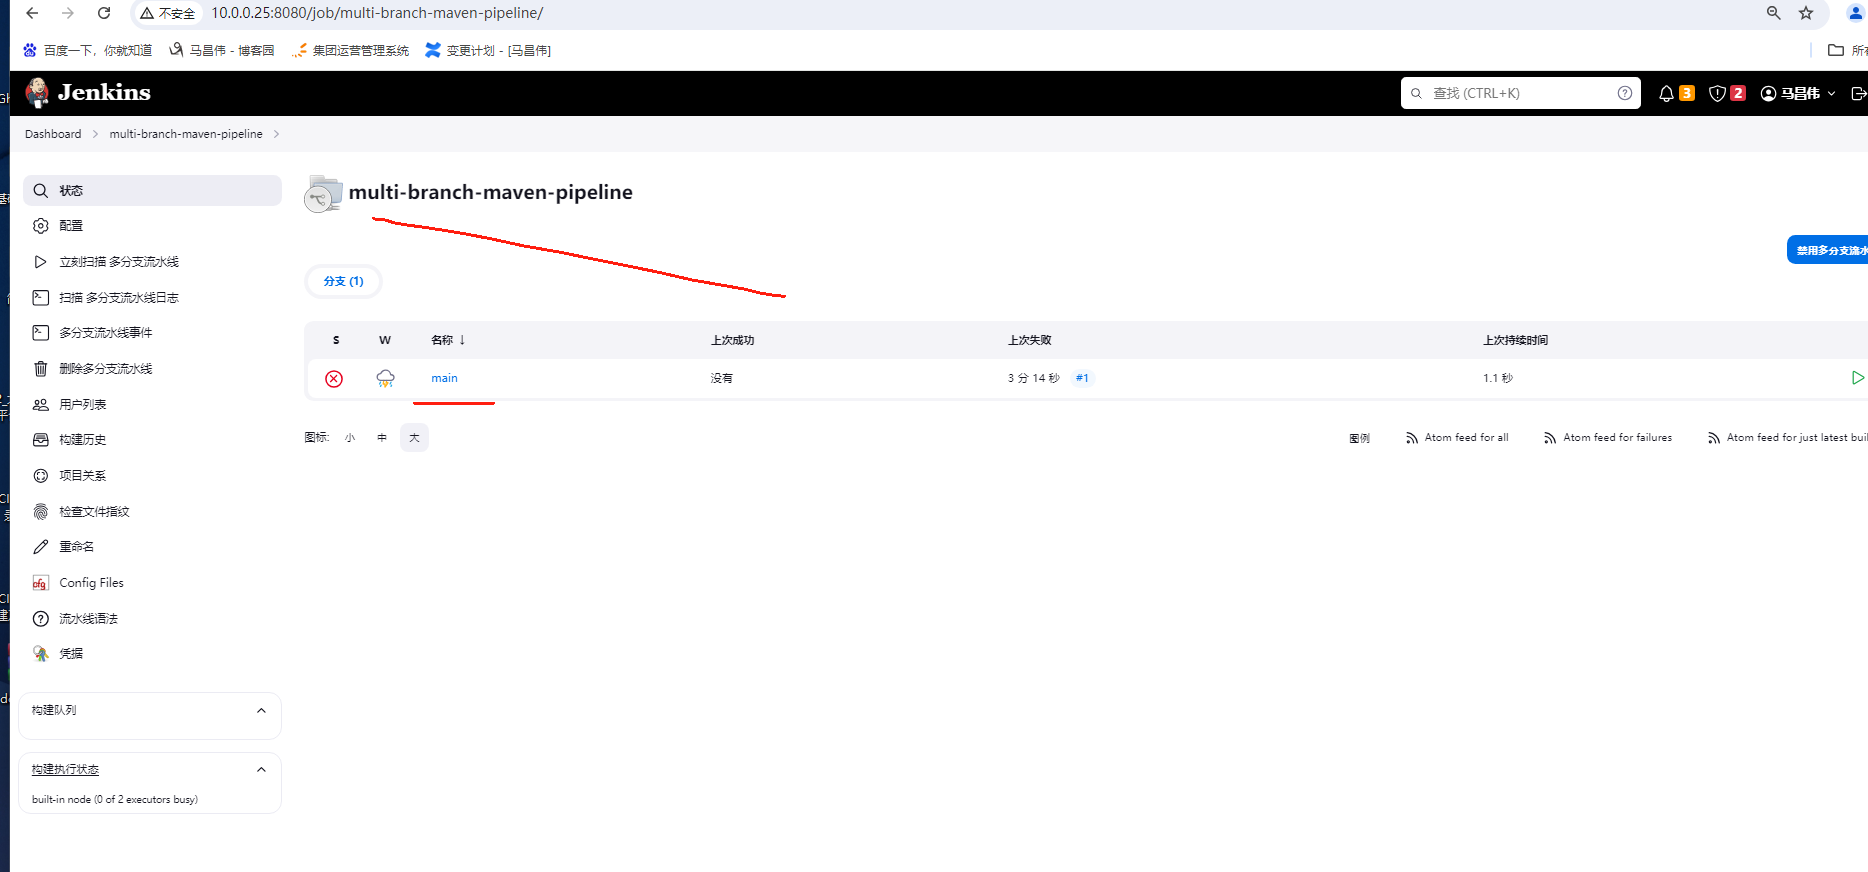
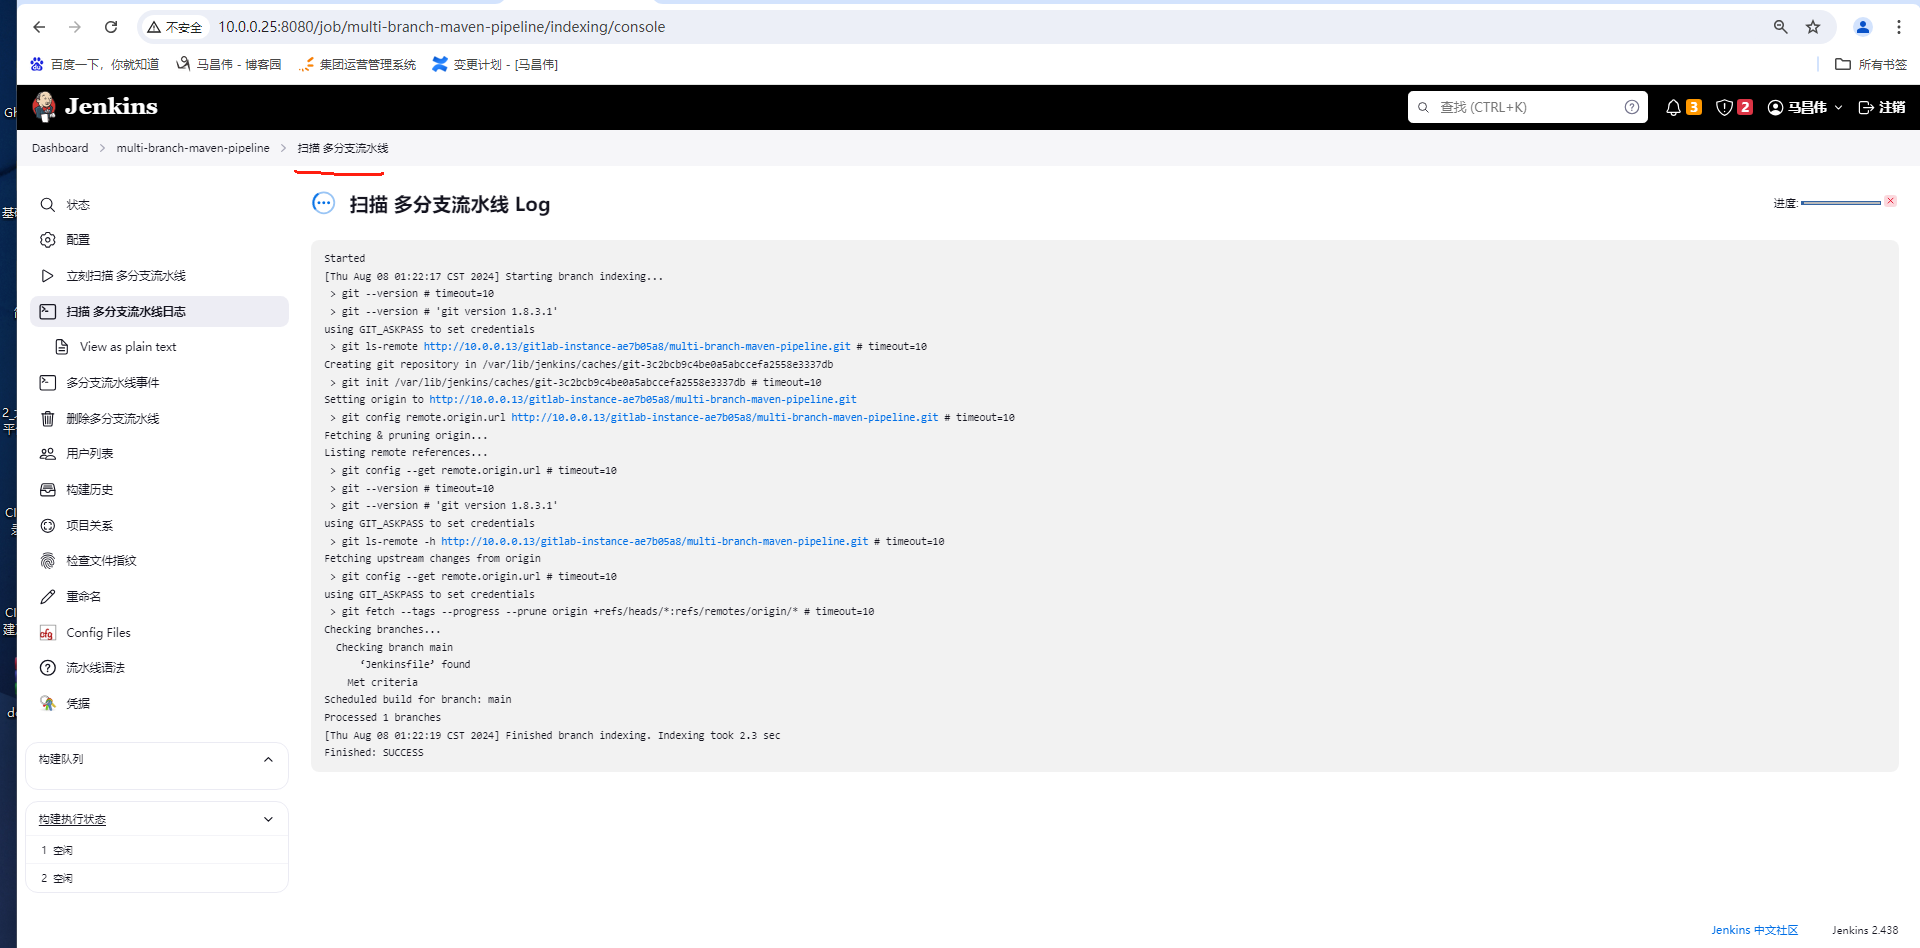
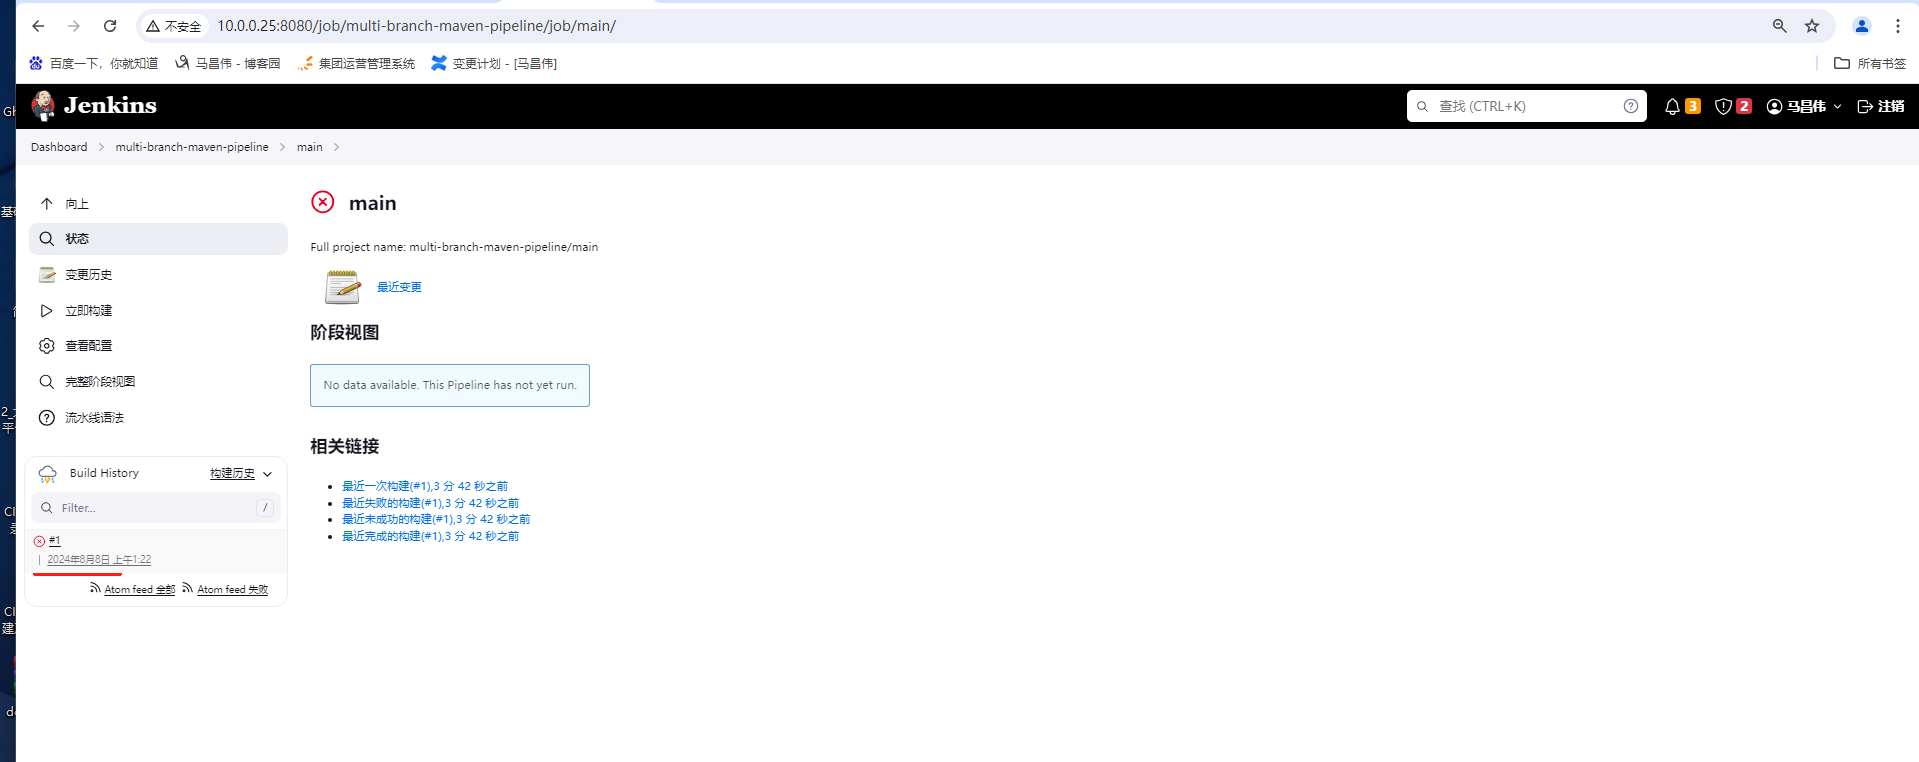
构建失败的,扫描时自动构建的
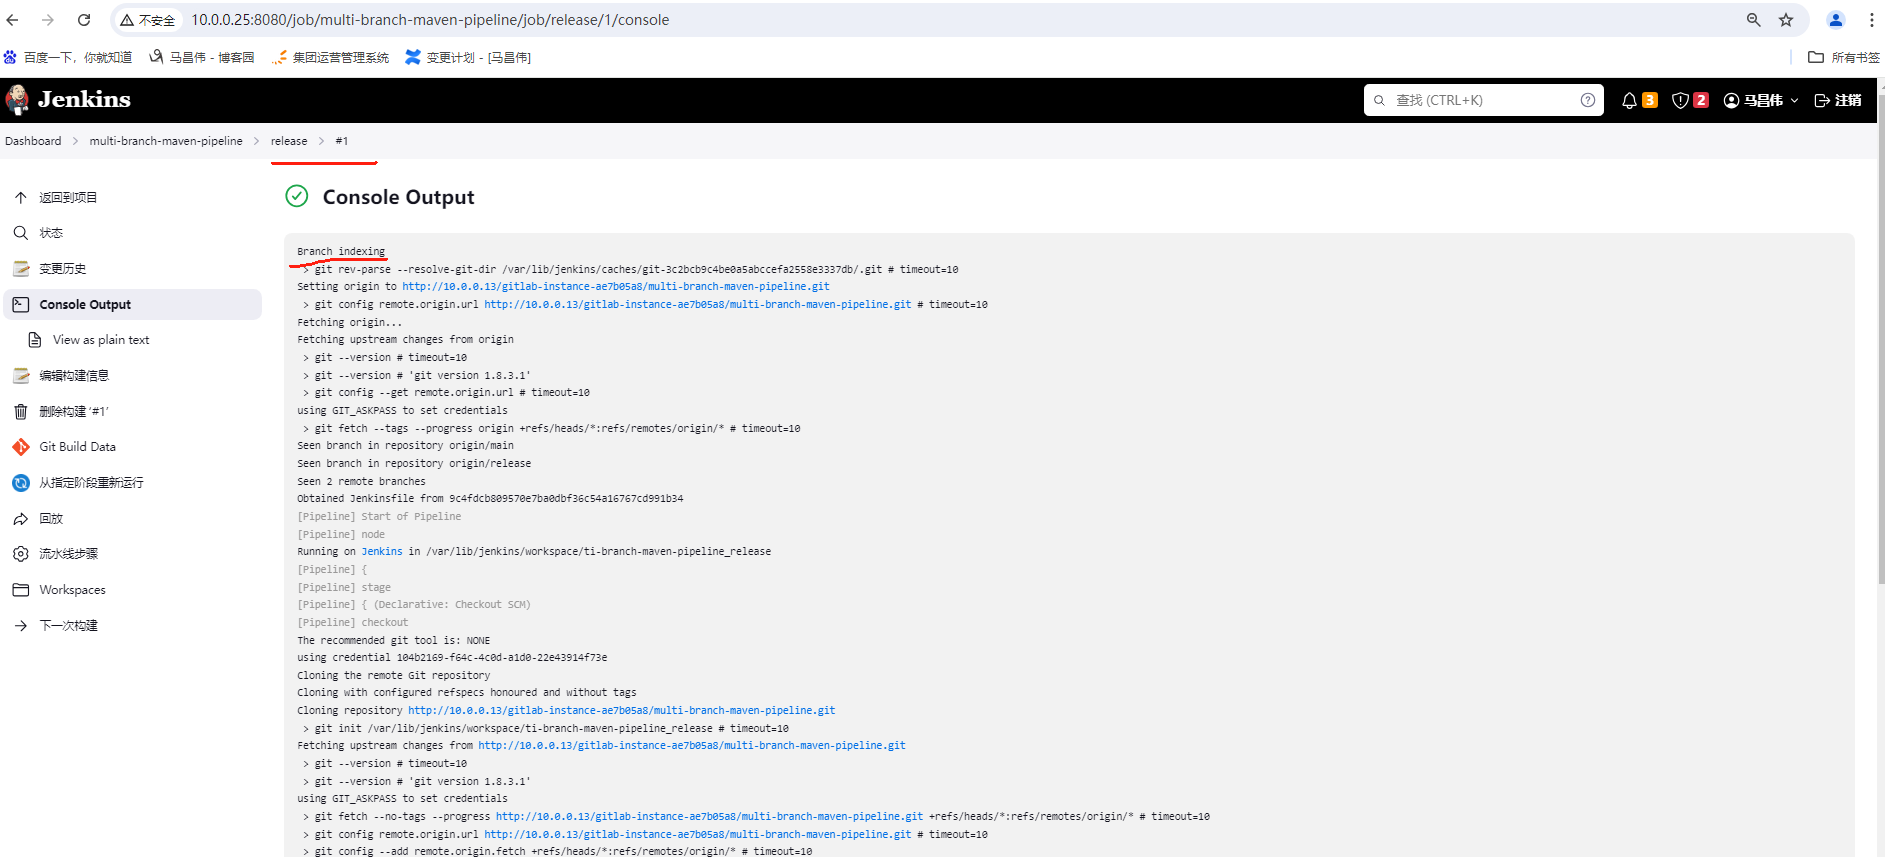
查看输出,语法错了
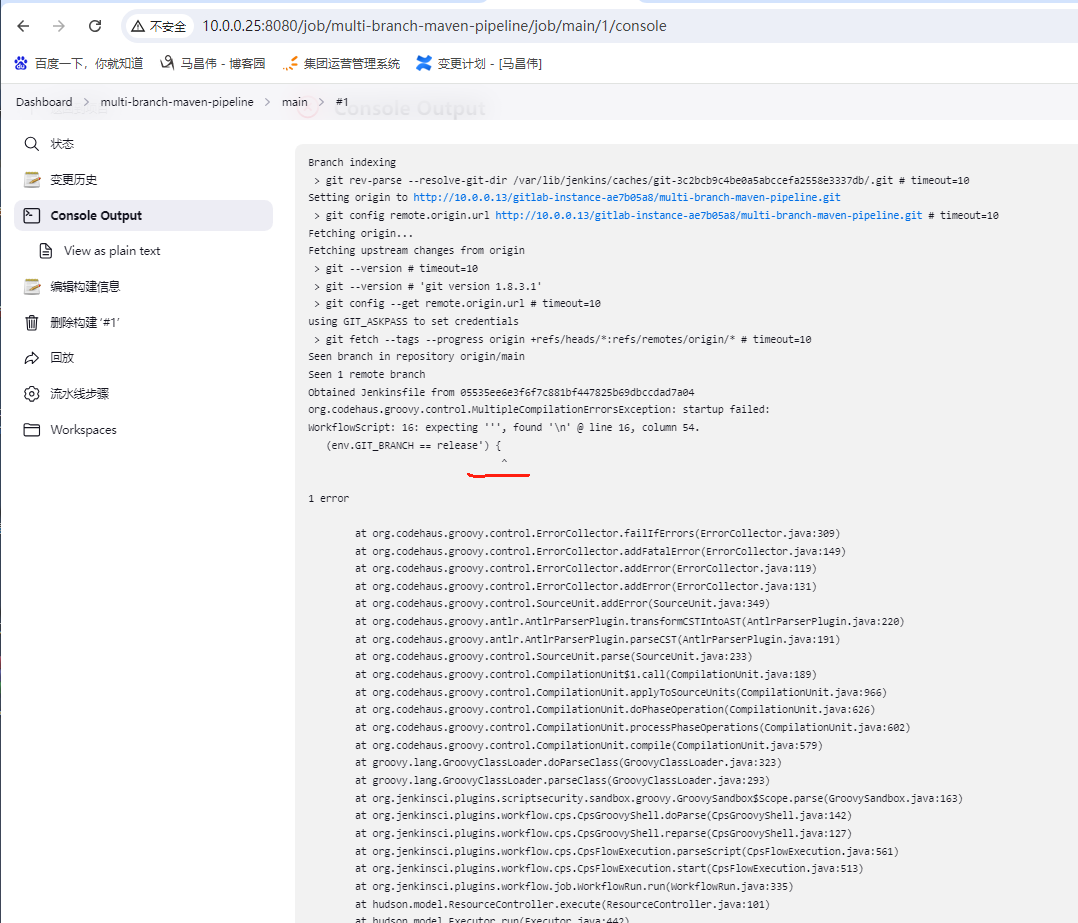
已经过了6分钟了,没有自动构建

刚刚修改好了Jenkinsfile,然后手动点立即构建,
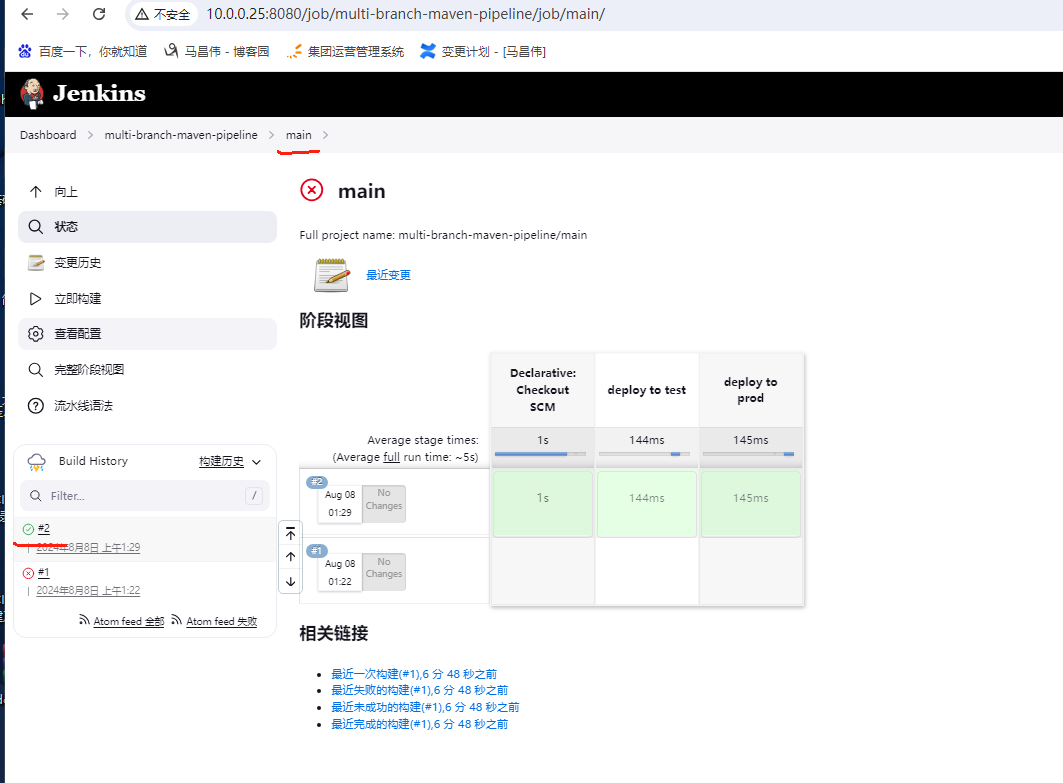
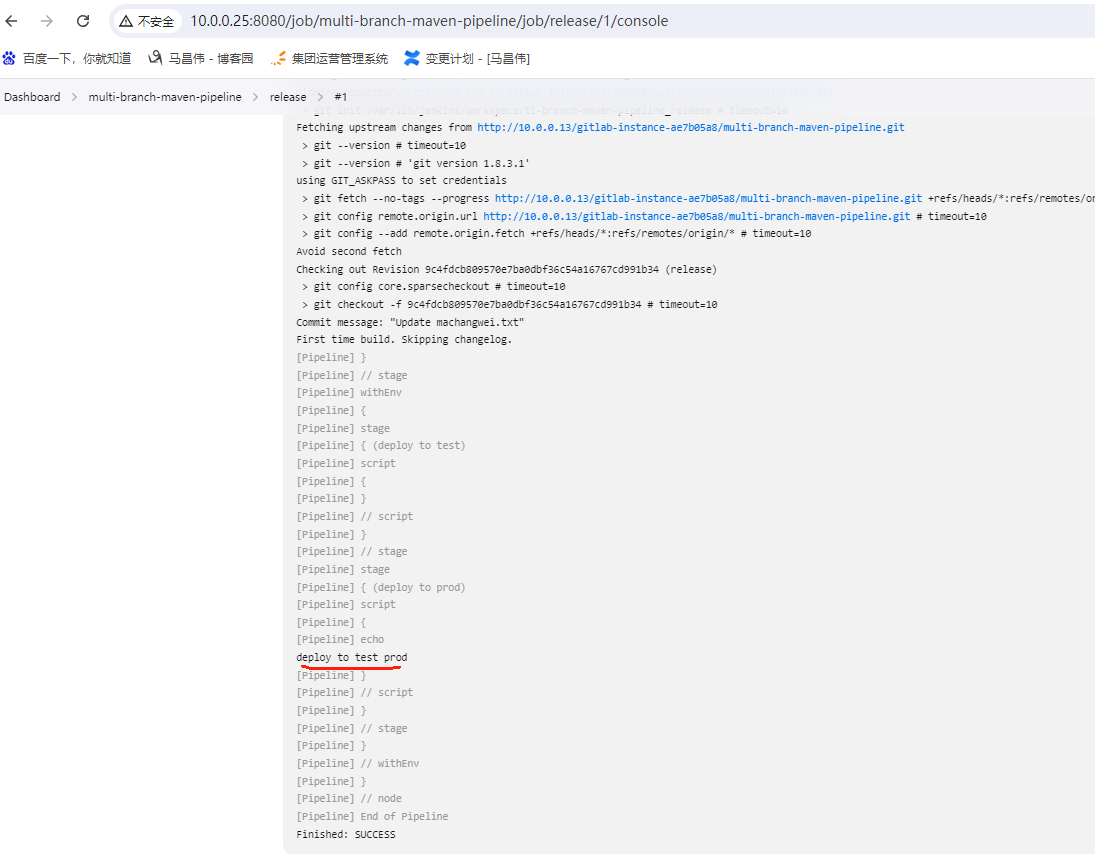
因为检测到是main主分支,所以这里只运行了判断是main分支里面的代码,其它没满足条件没执行
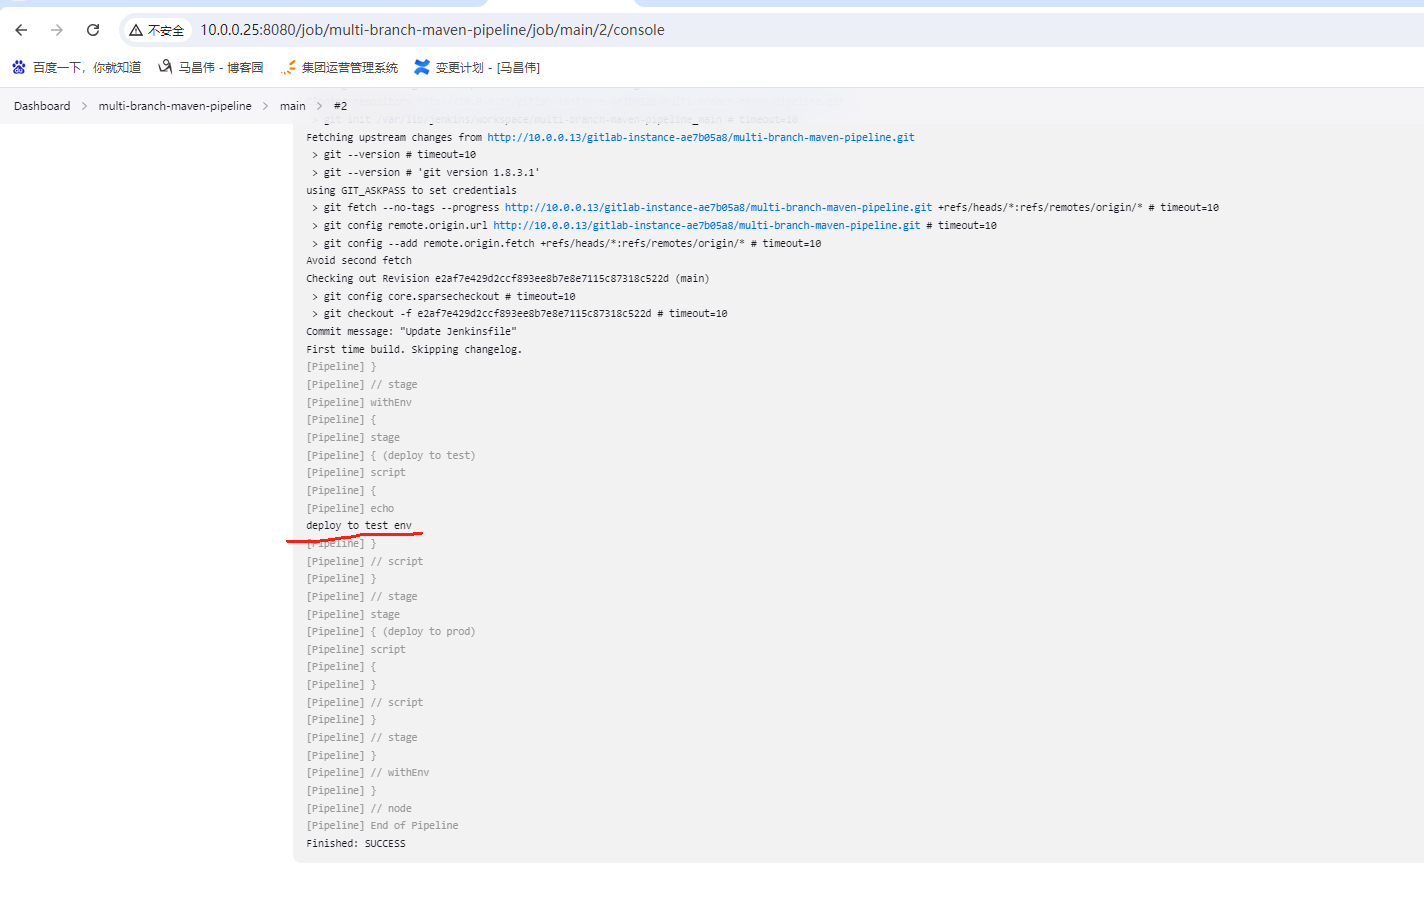
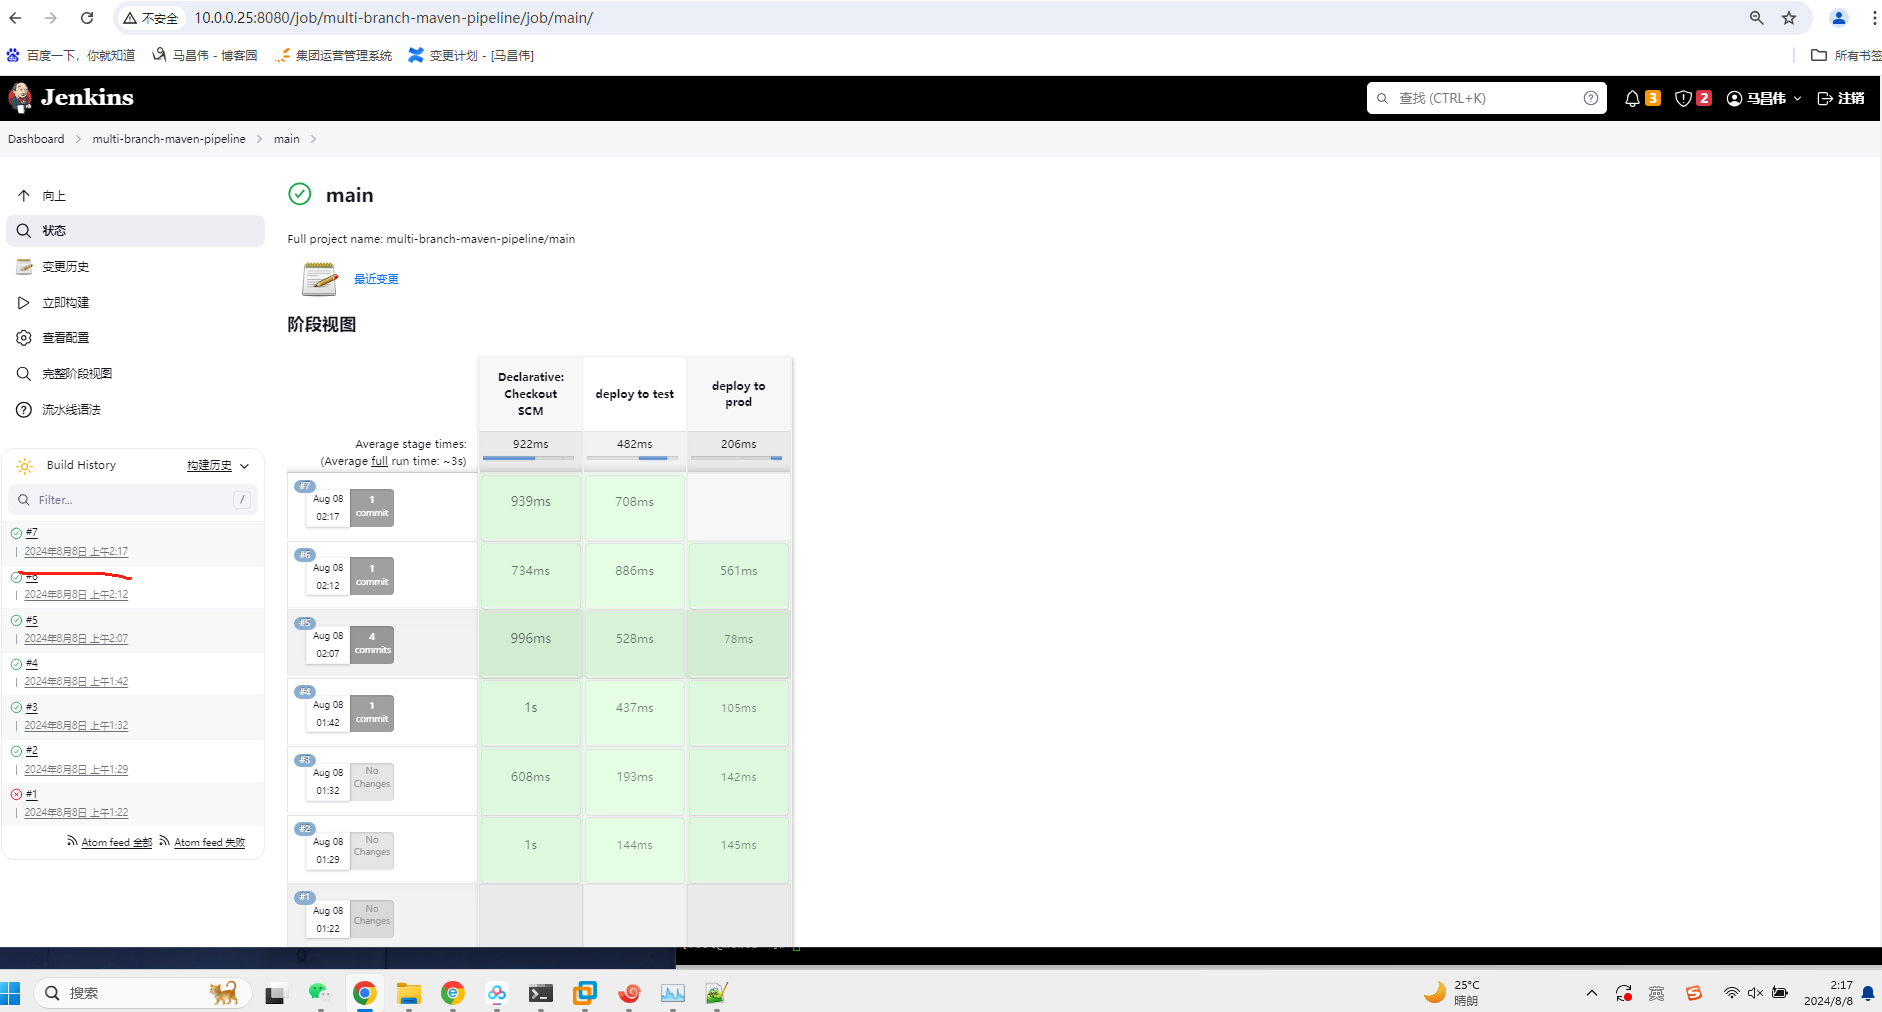
main成功

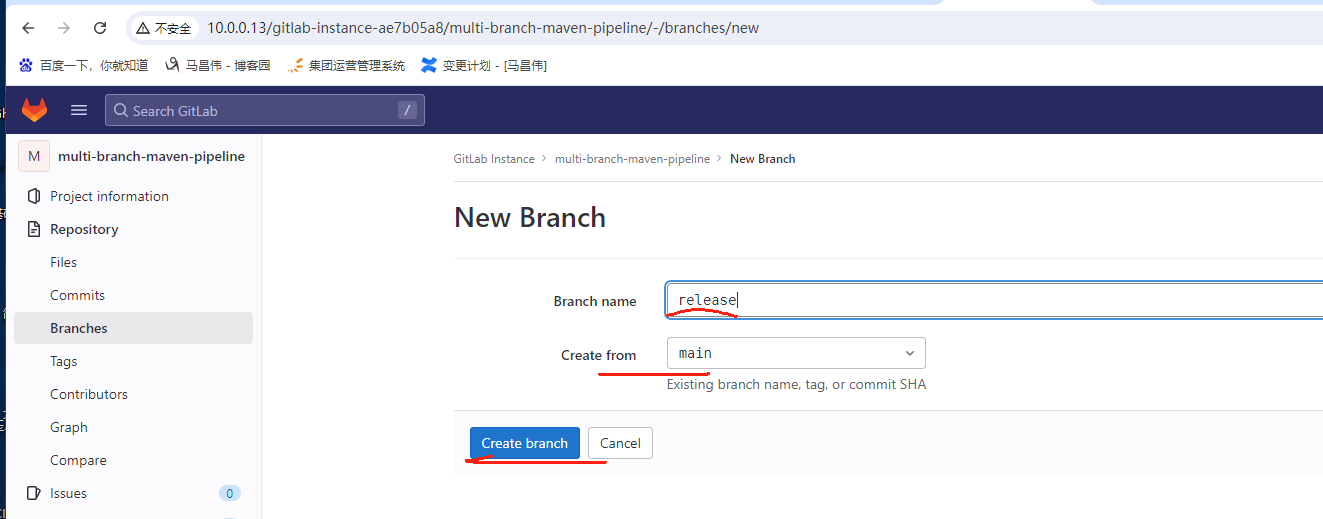
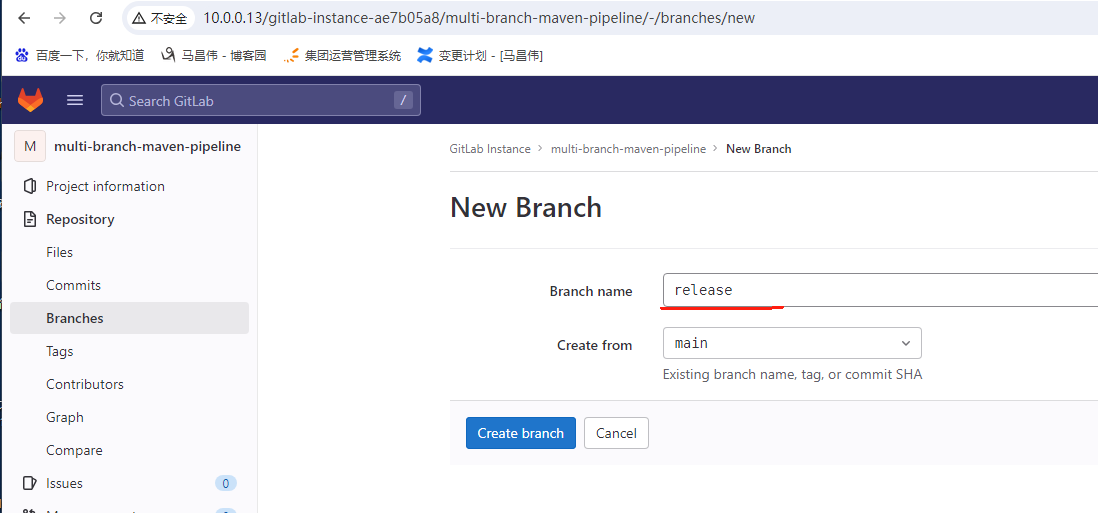
新增一个分支

从main创建release分支
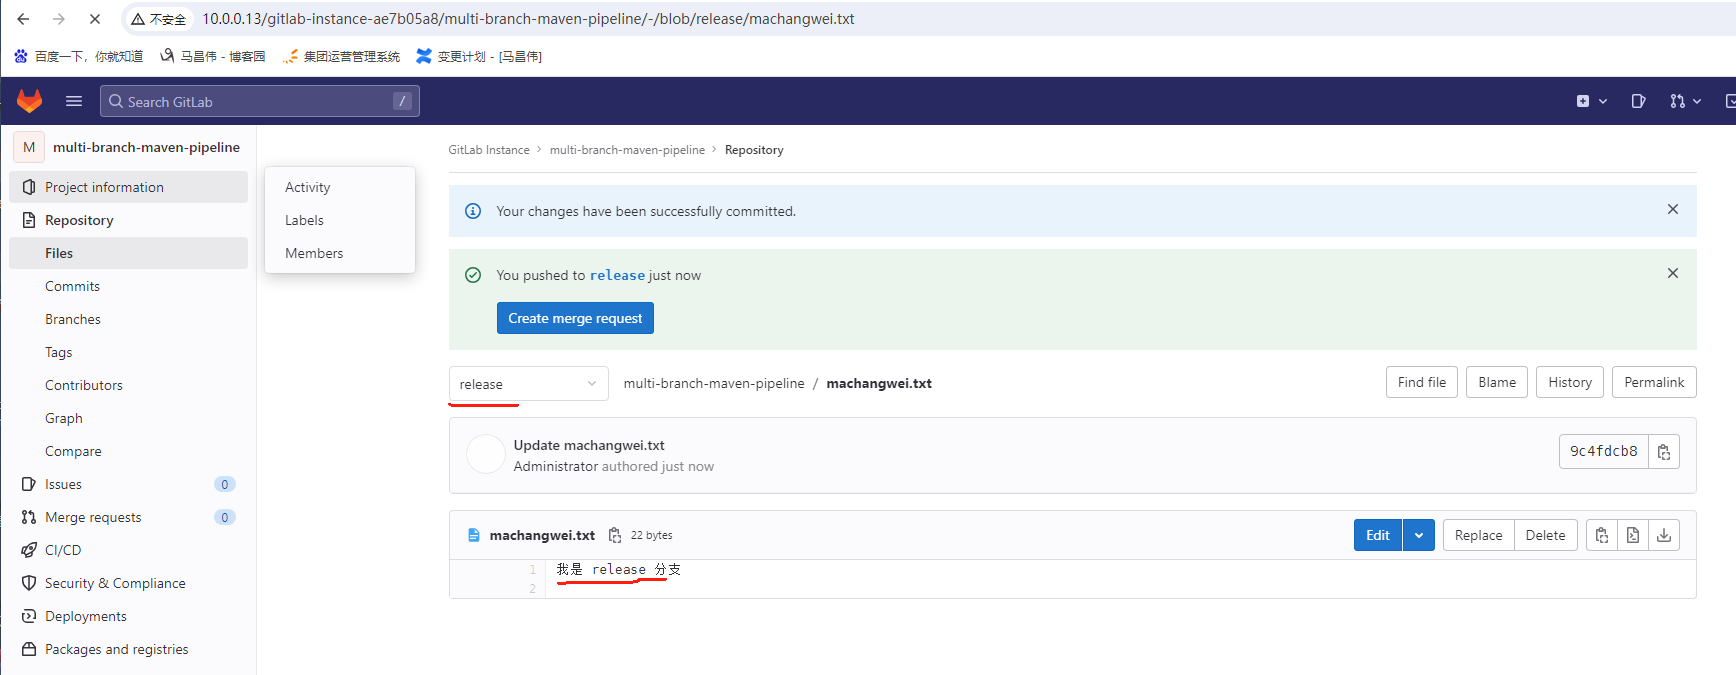
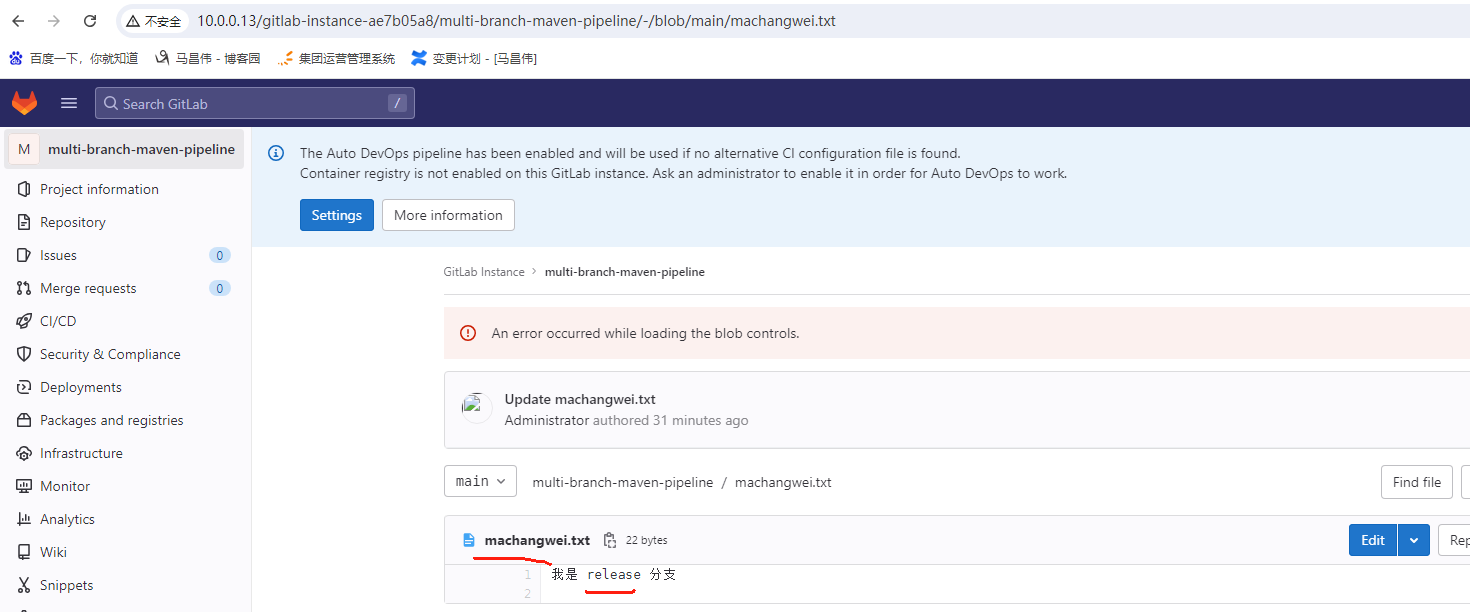
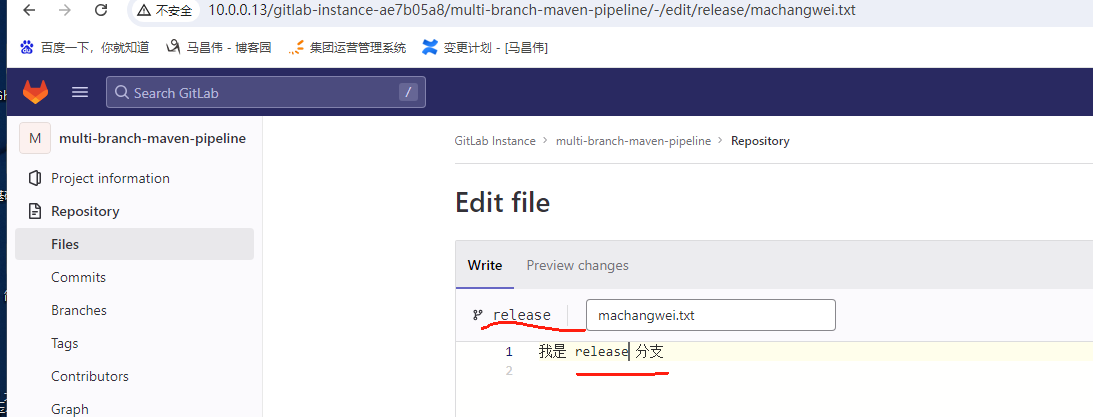
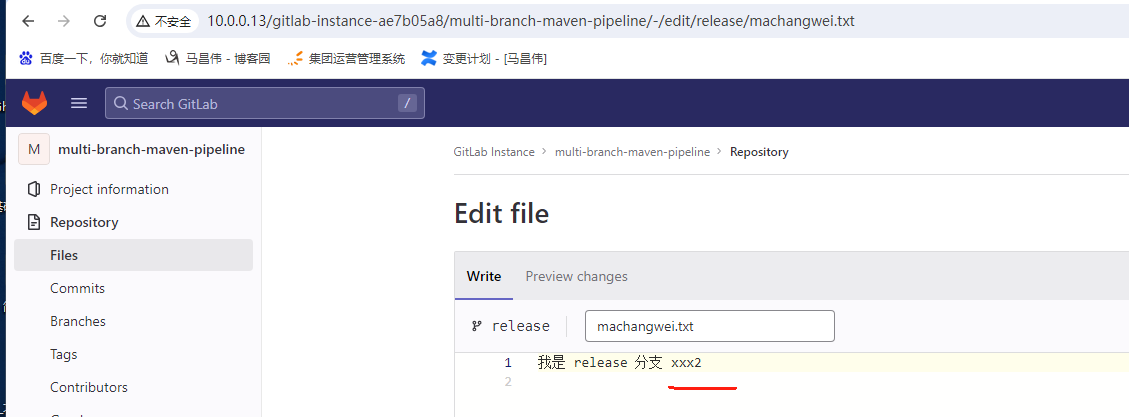
创建分支之后,修改文件内容

查看main分支,还是main

两个分支都修改好文件
自动扫描到新加的分支并且运行成功一次

5分钟后好像自动构建了一次
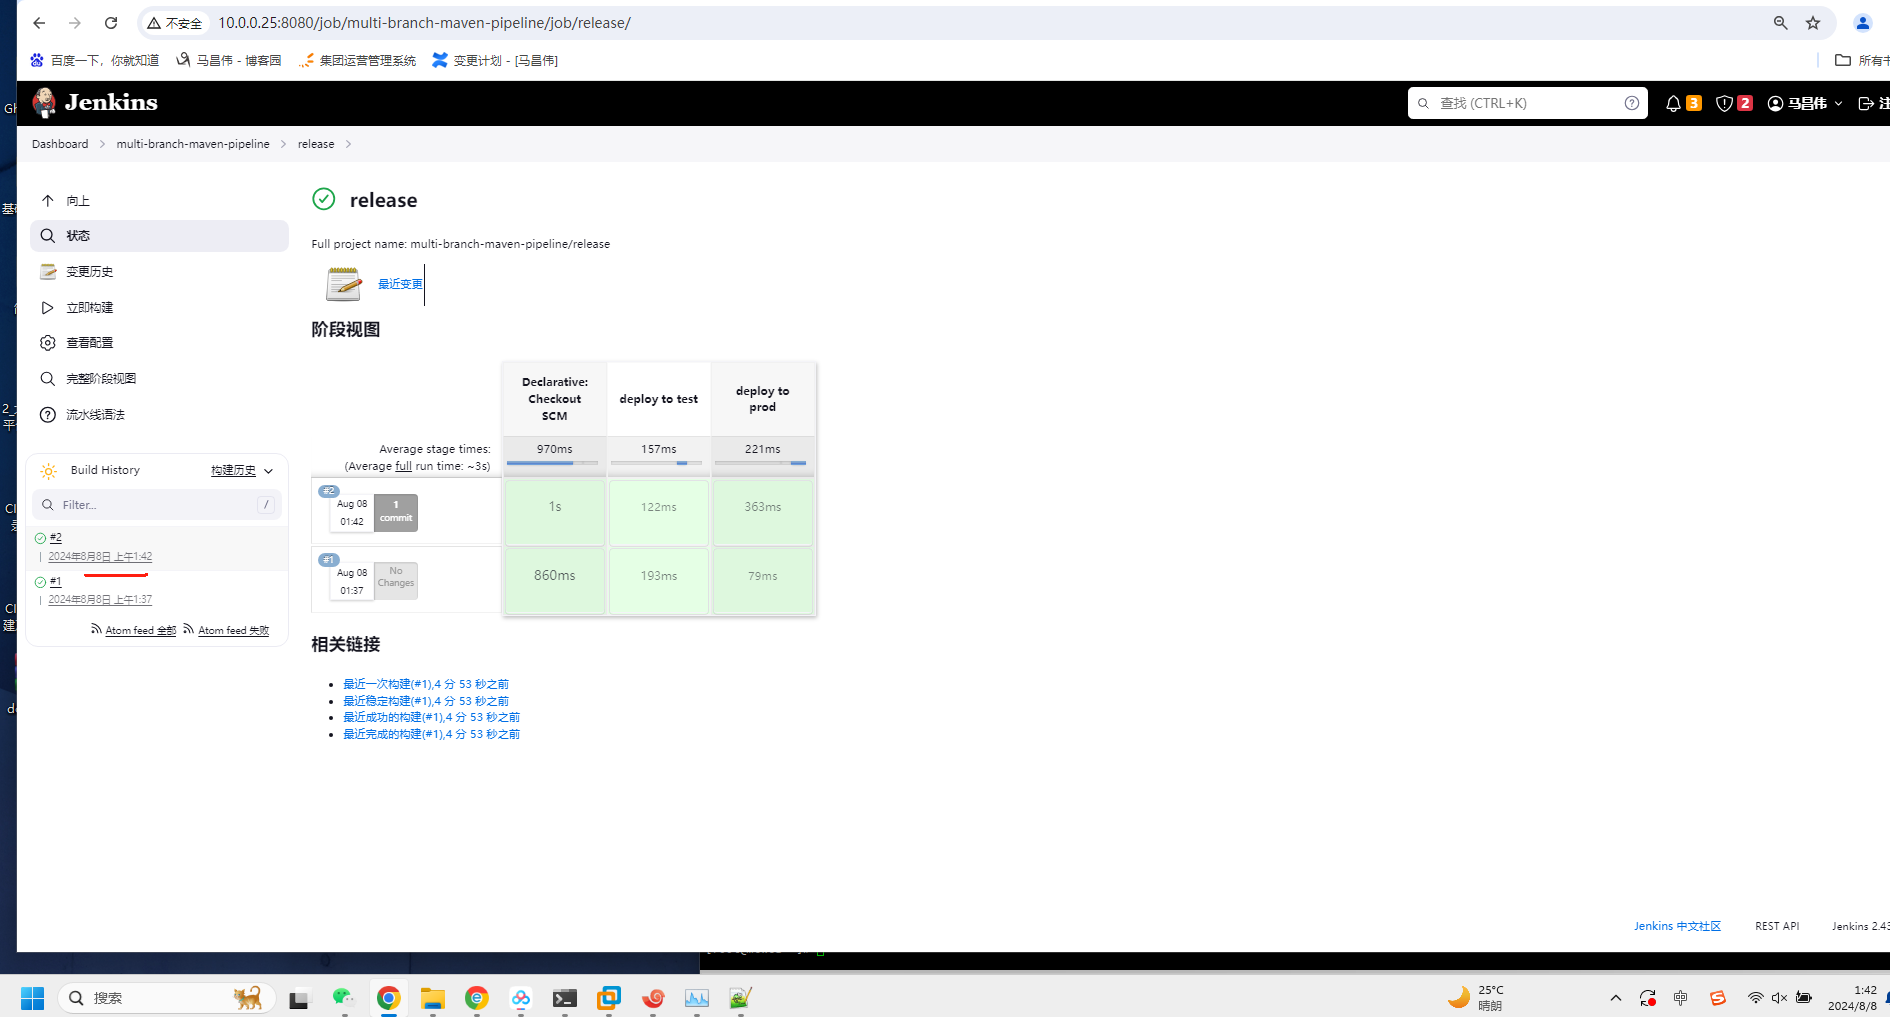
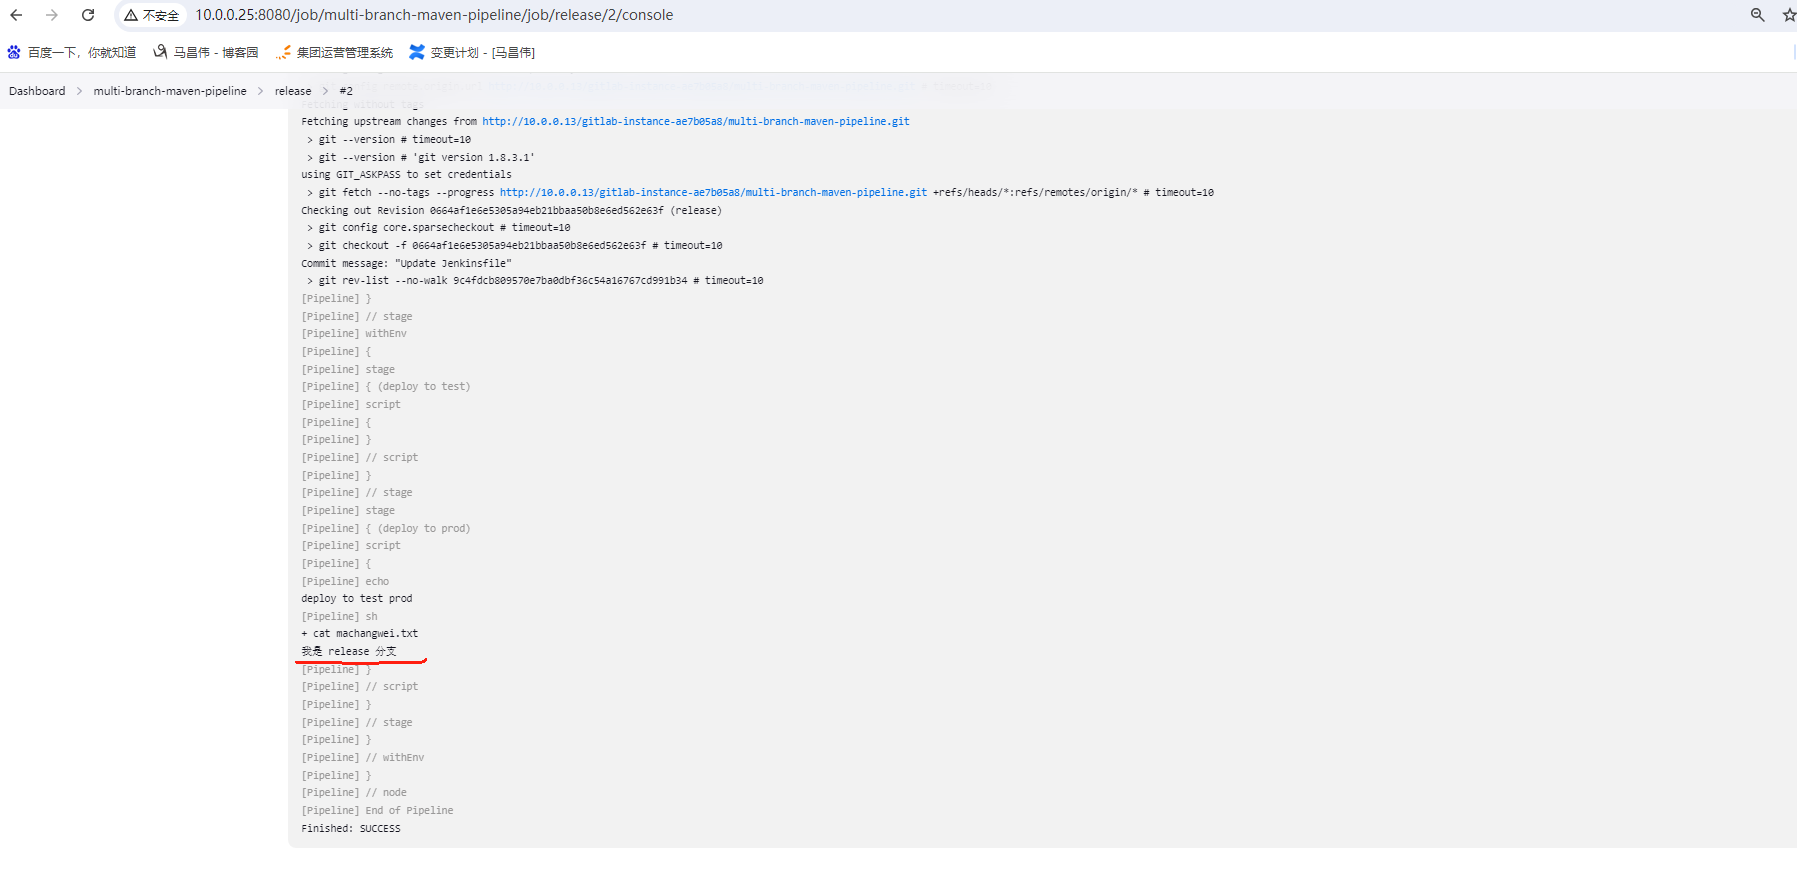
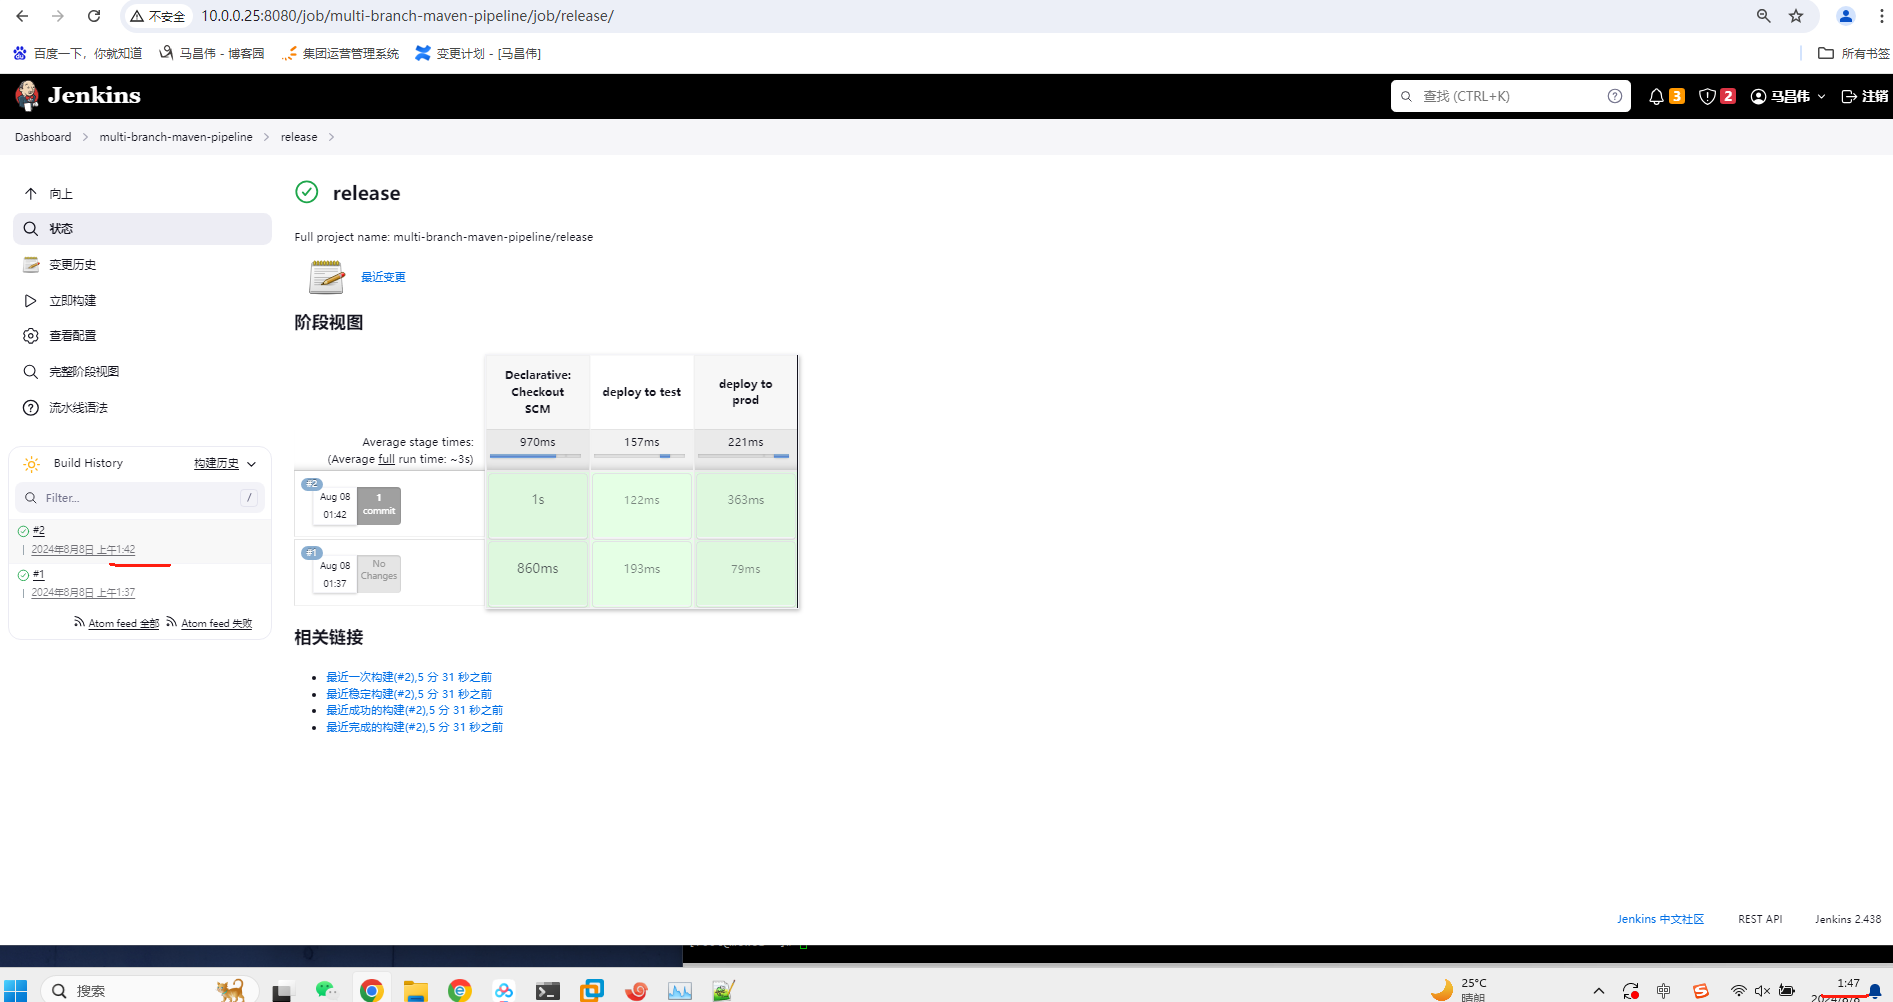
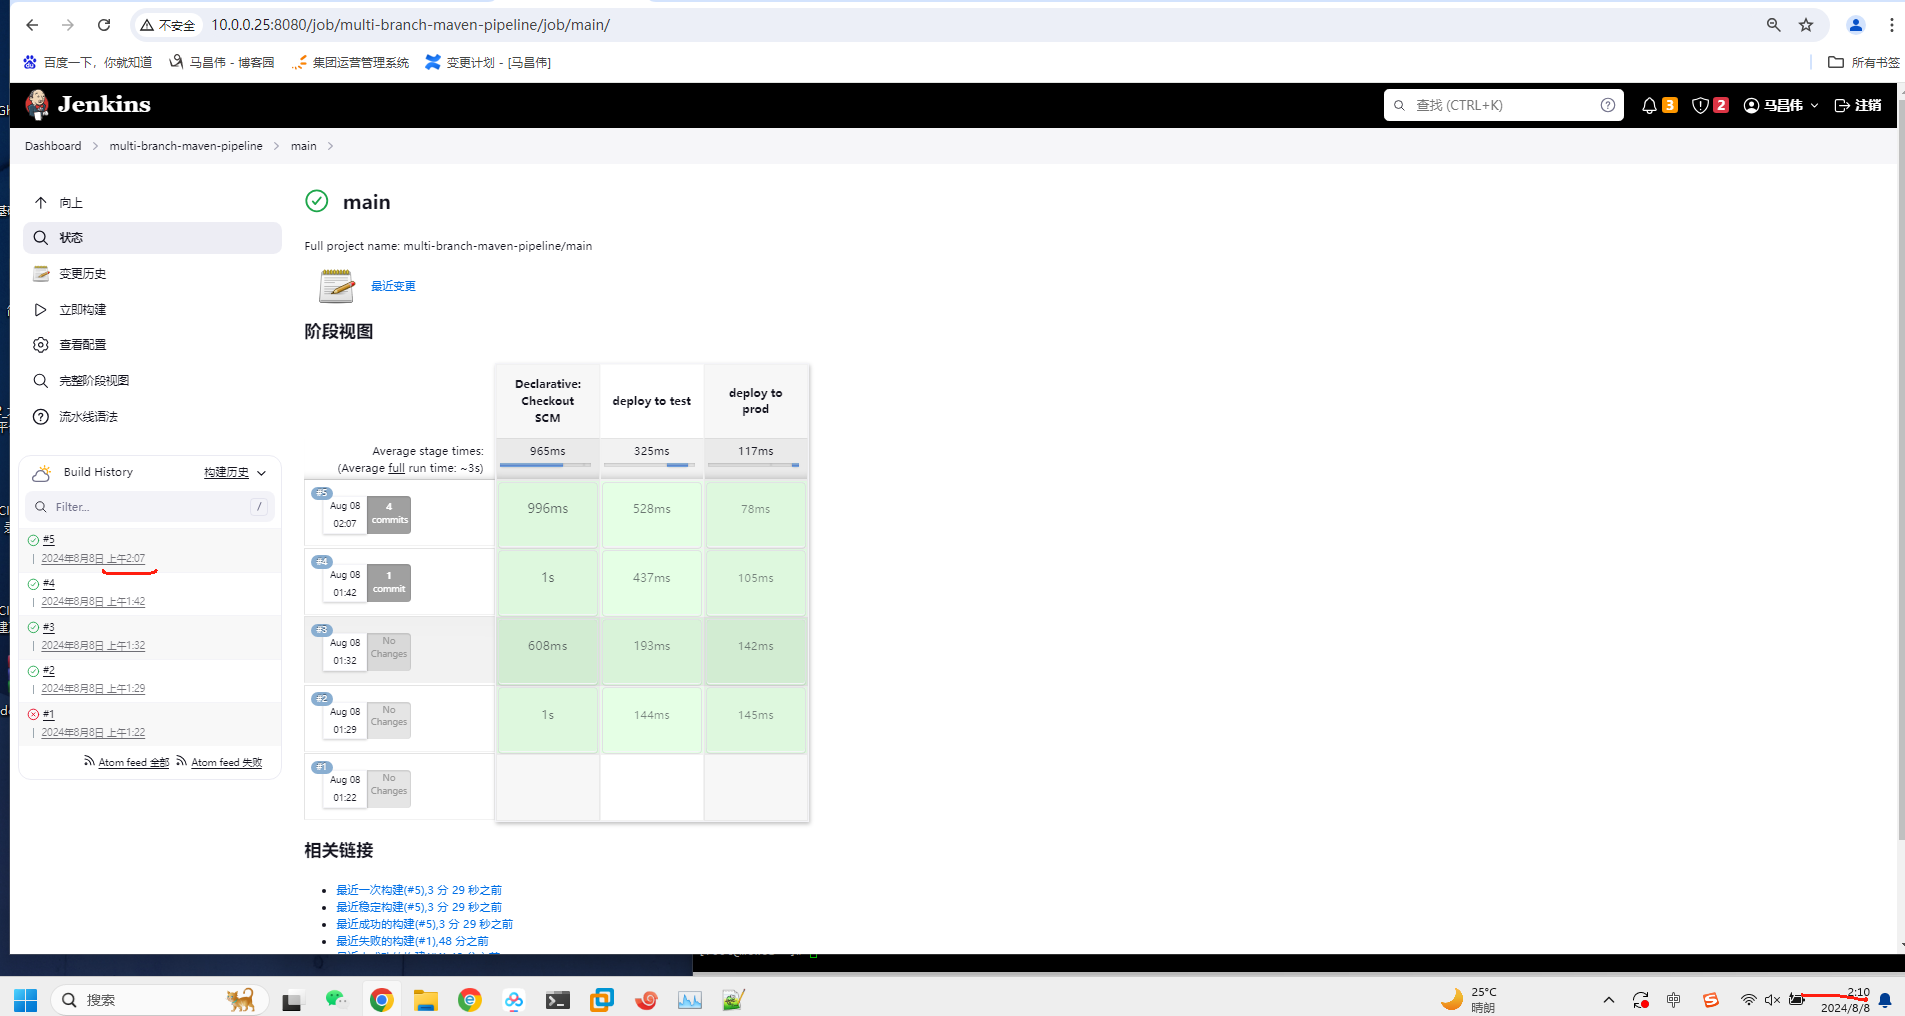
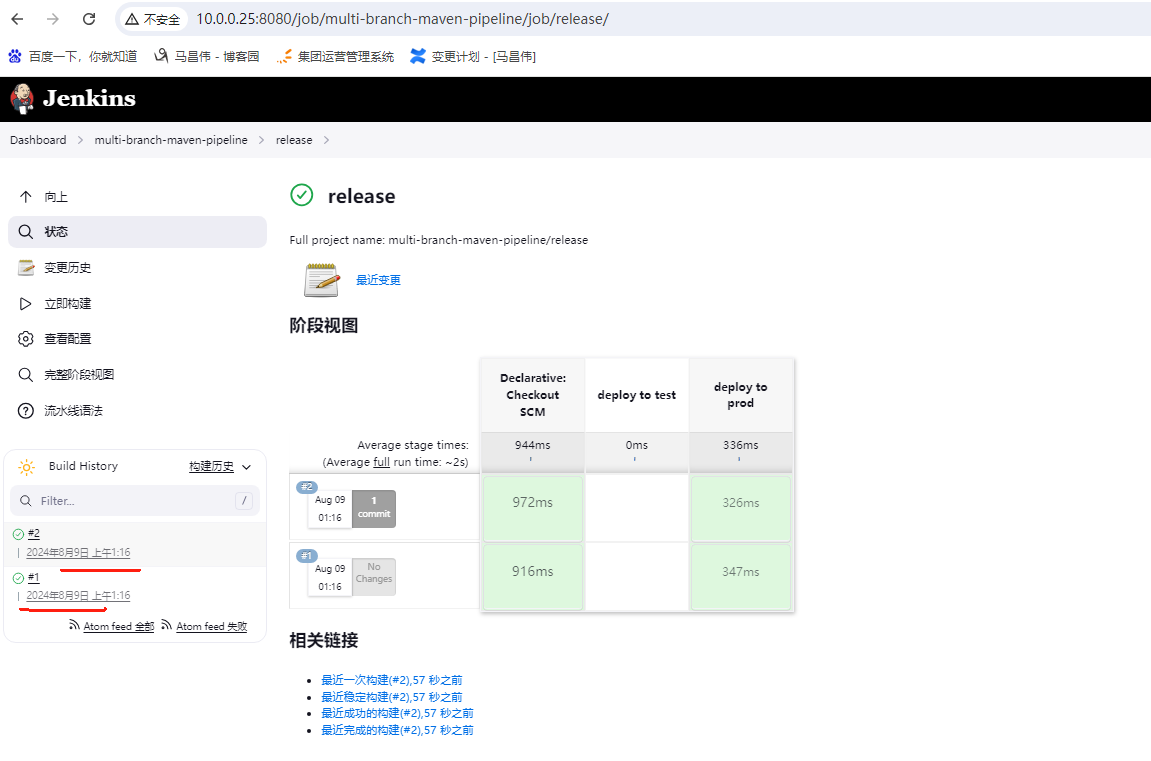
查看release构建1
可以看到,release分支,执行这个stage下面的代码
看下第二次的自动触发构建,因为我们添加了这个,然后5分钟后扫描。好像发现有提交,就给自动触发构建了。
已经过了5分钟了,但是还是没有自动触发构建
release分支,修改一下,看是否会触发该分支自动构建,在扫描时间到达之时
可以看到52分,也就是第一个5分钟,release没有修改,所以没有触发自动构建,第二个5分钟内,代码被修改过,再次扫描到代码,然后自动触发构建任务

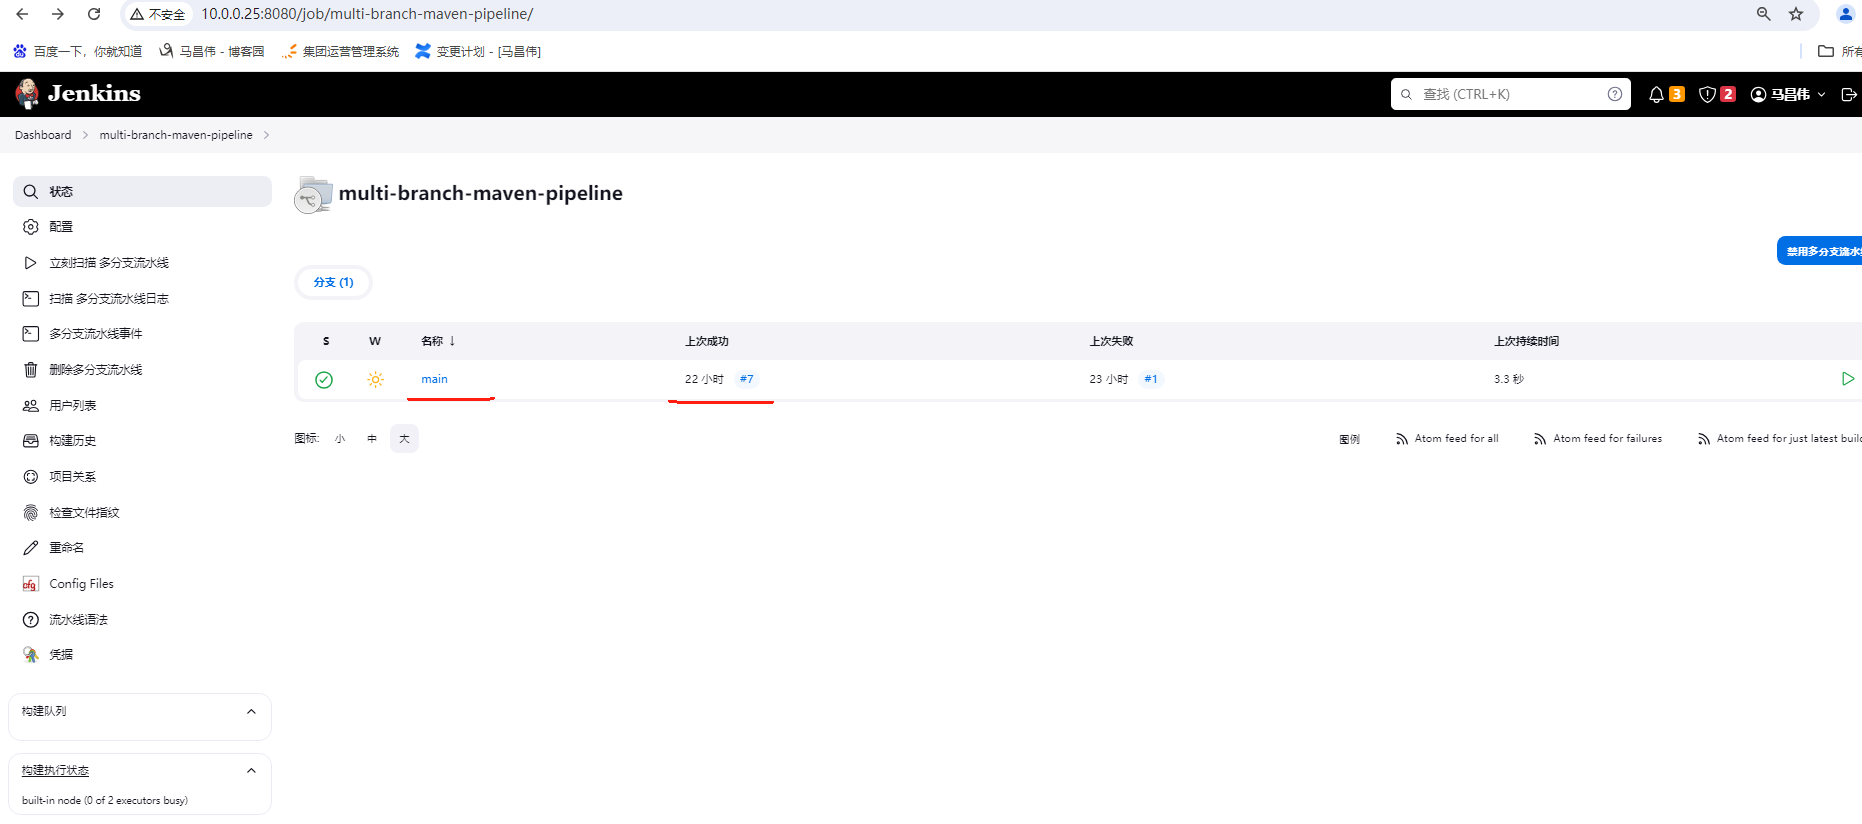
我们看下42-52之间,main分支的构建情况
可以看到,main在42到52之间没有构建任务执行。因为修改的是第二个五分钟的release版本,所以release是变动了,main这里没有构建
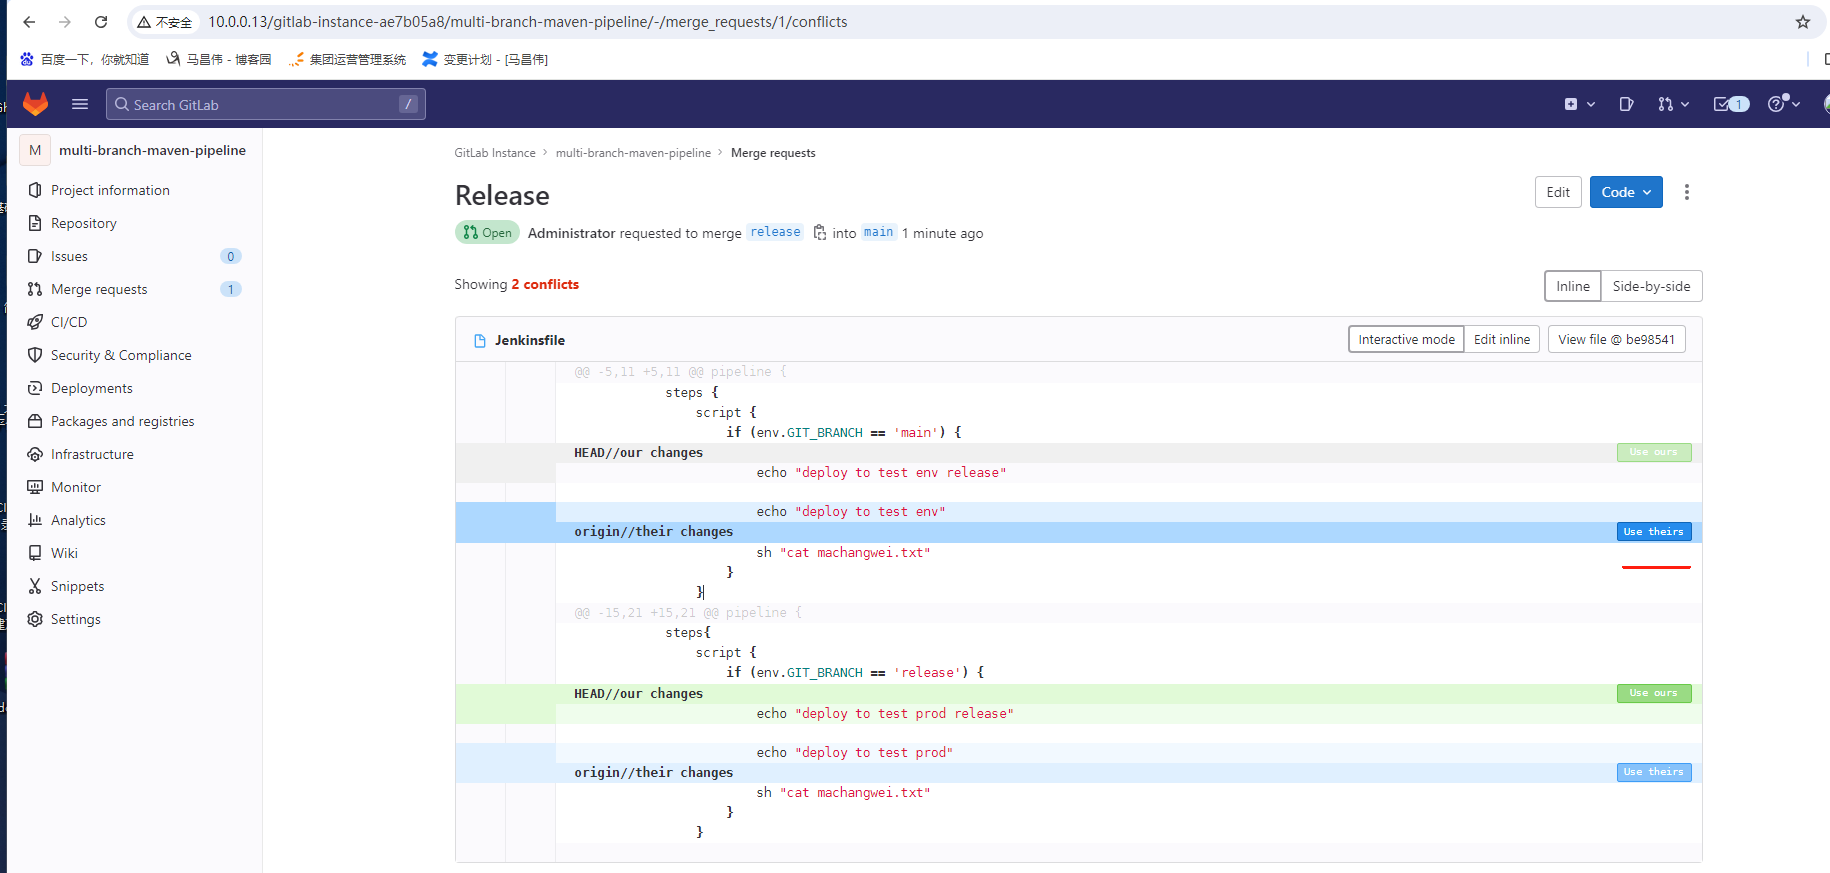
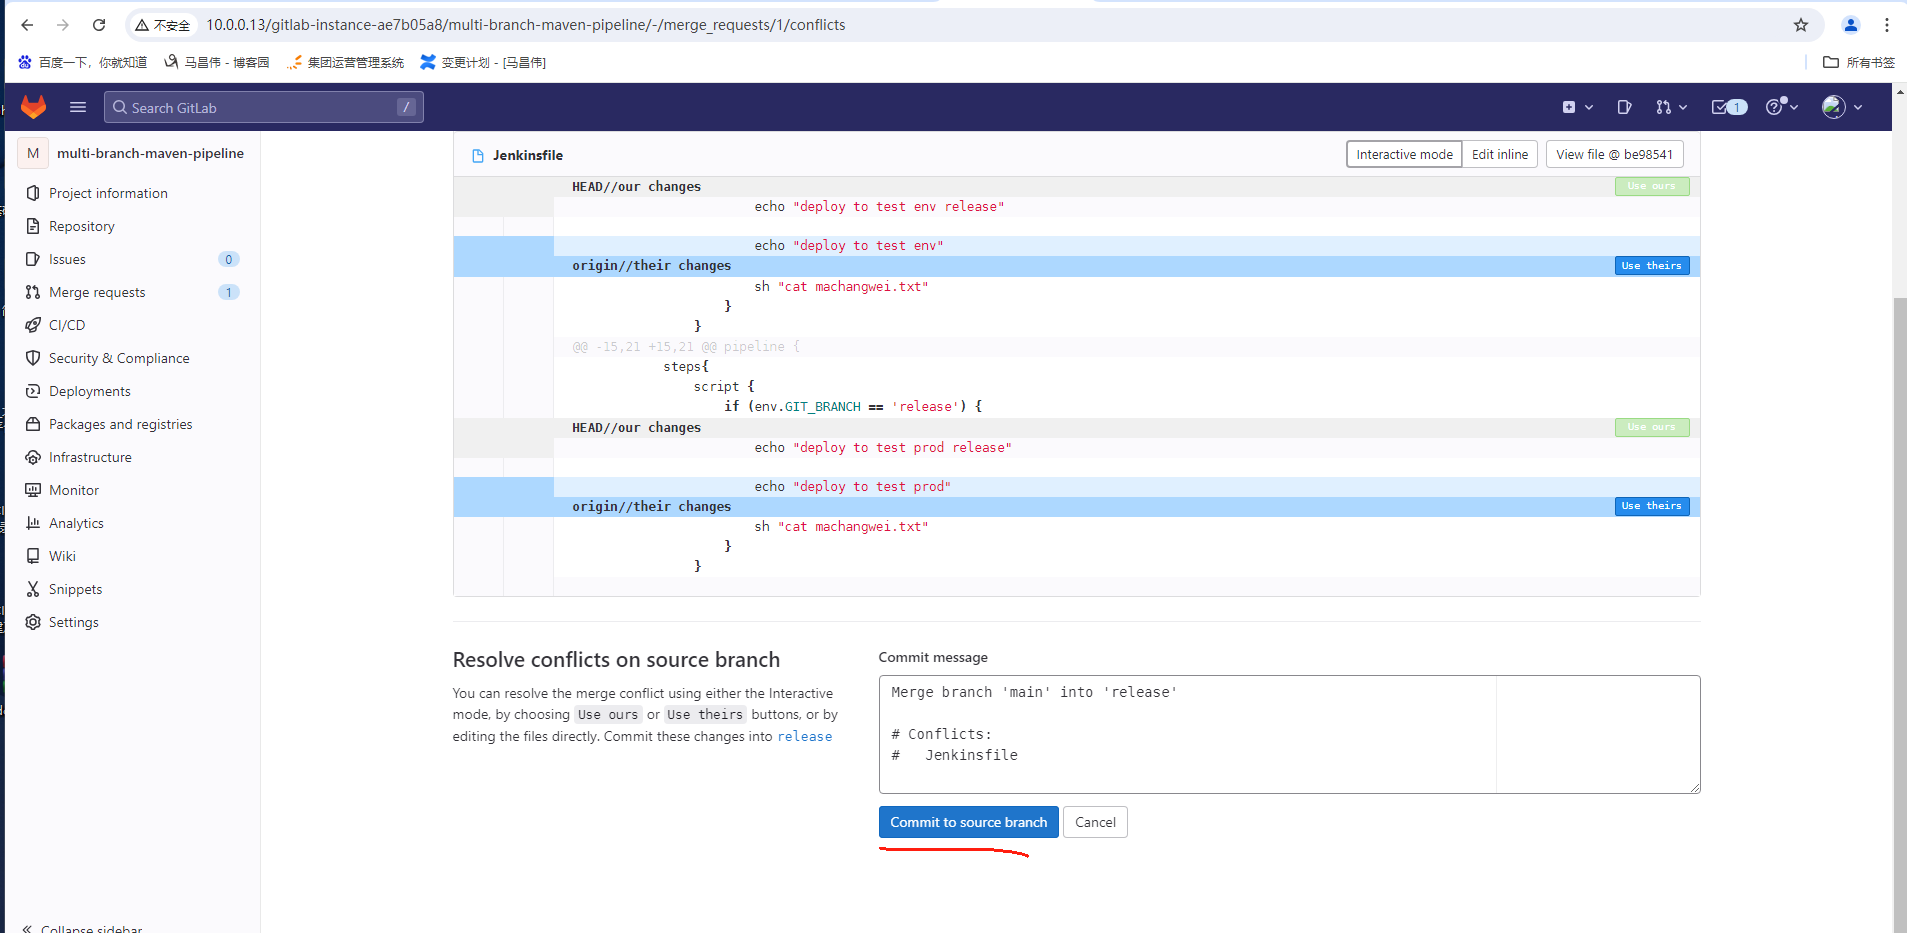
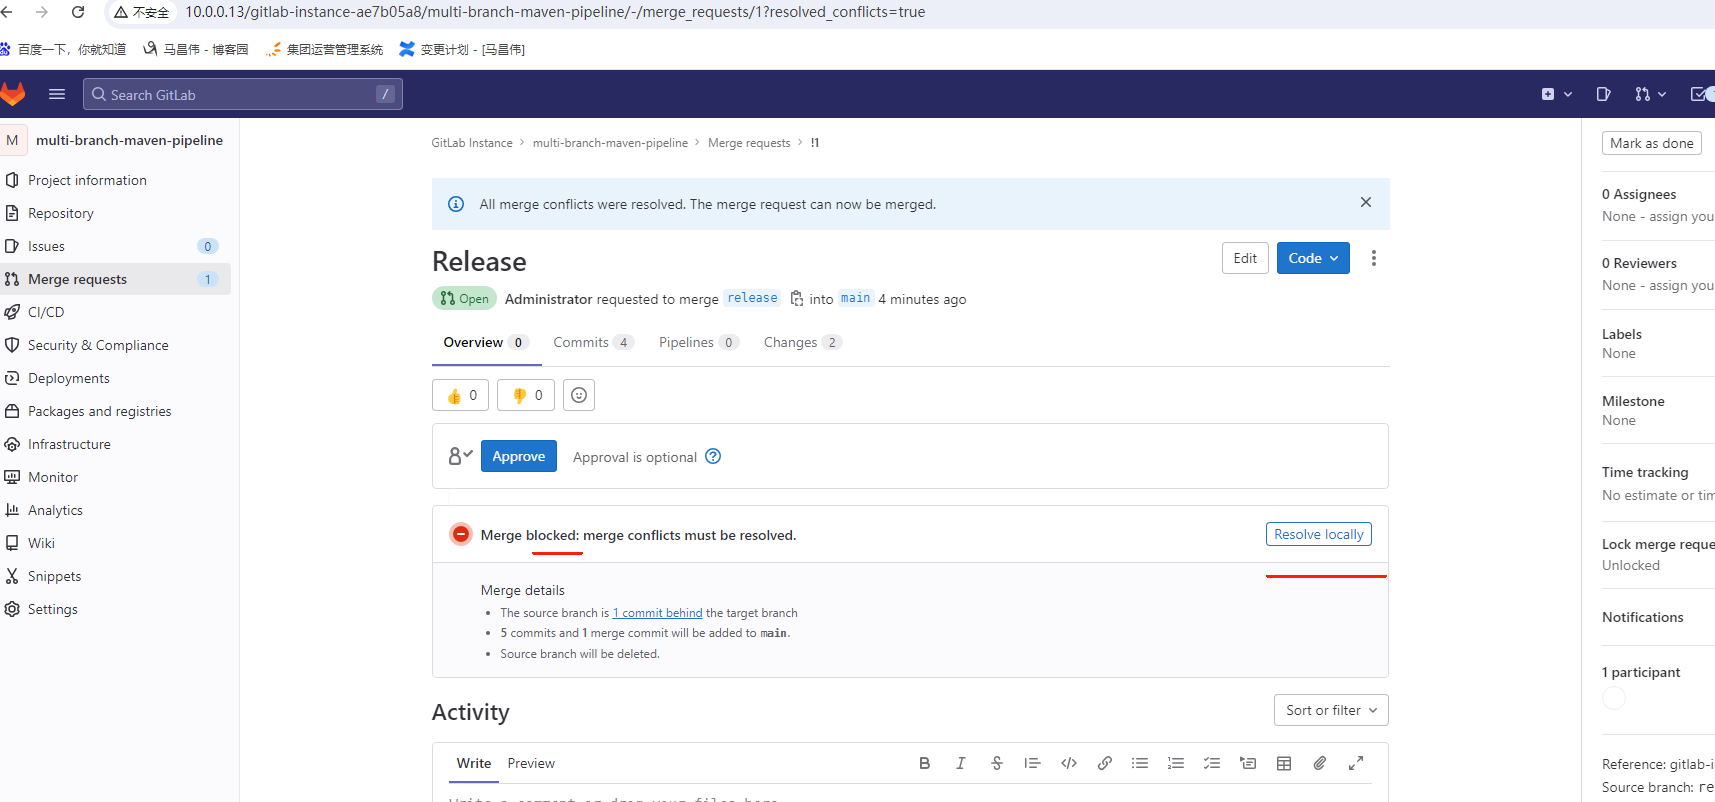
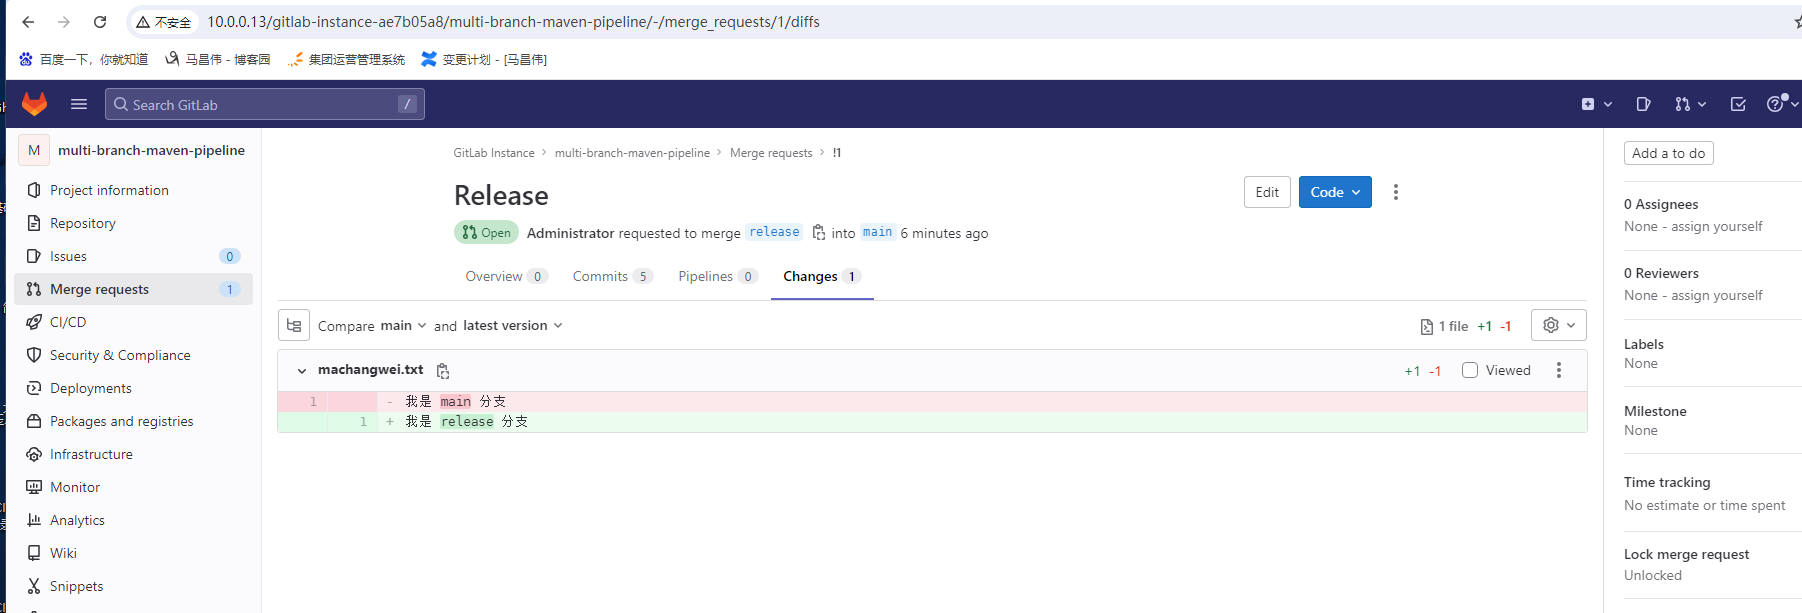
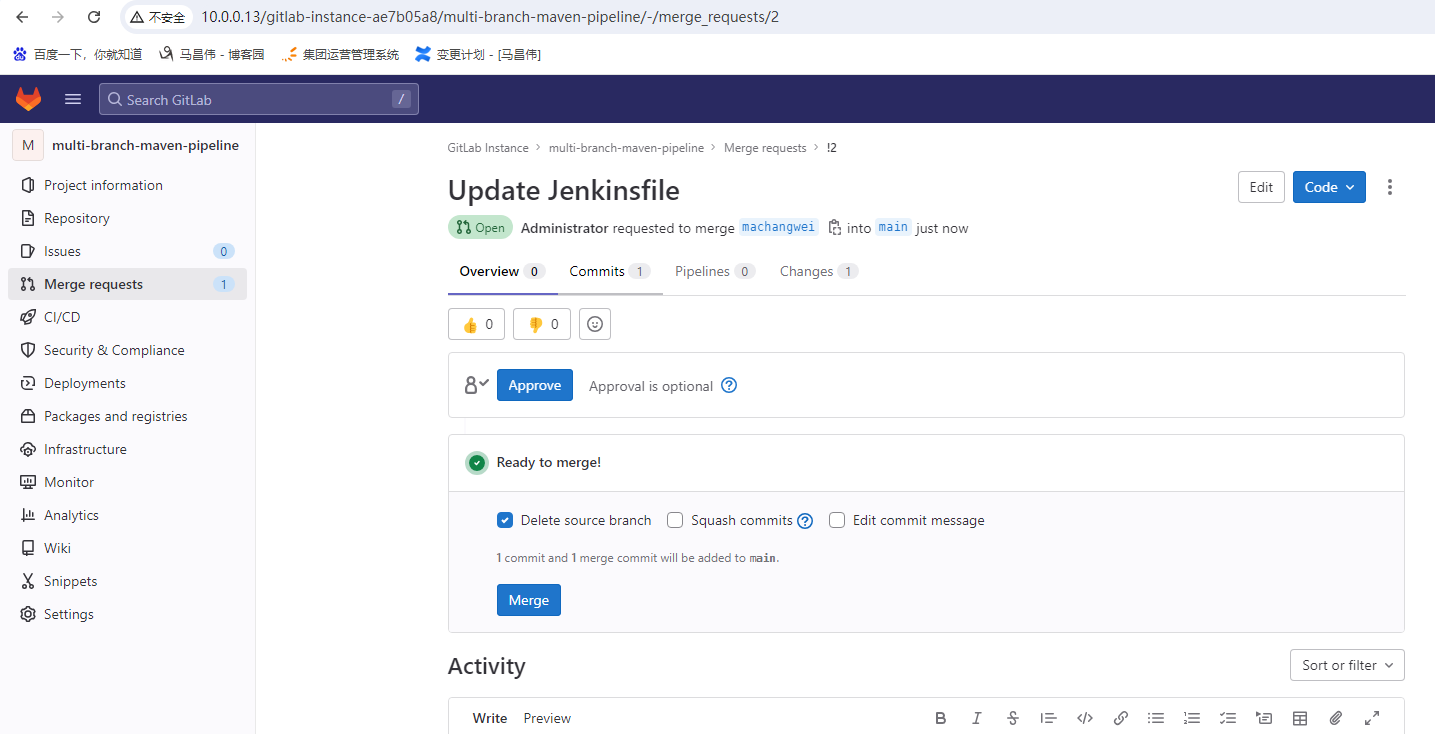
将release合并到main分支
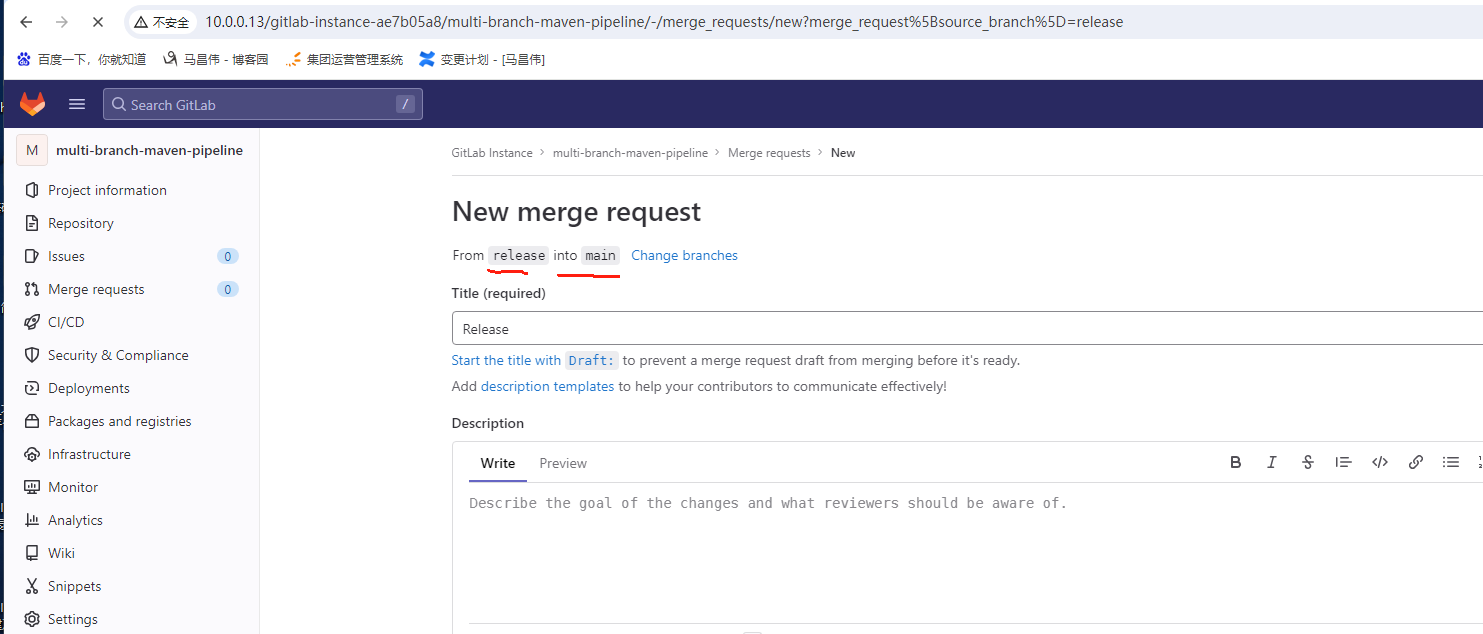

合并的时候,不要带release的,要蓝色的

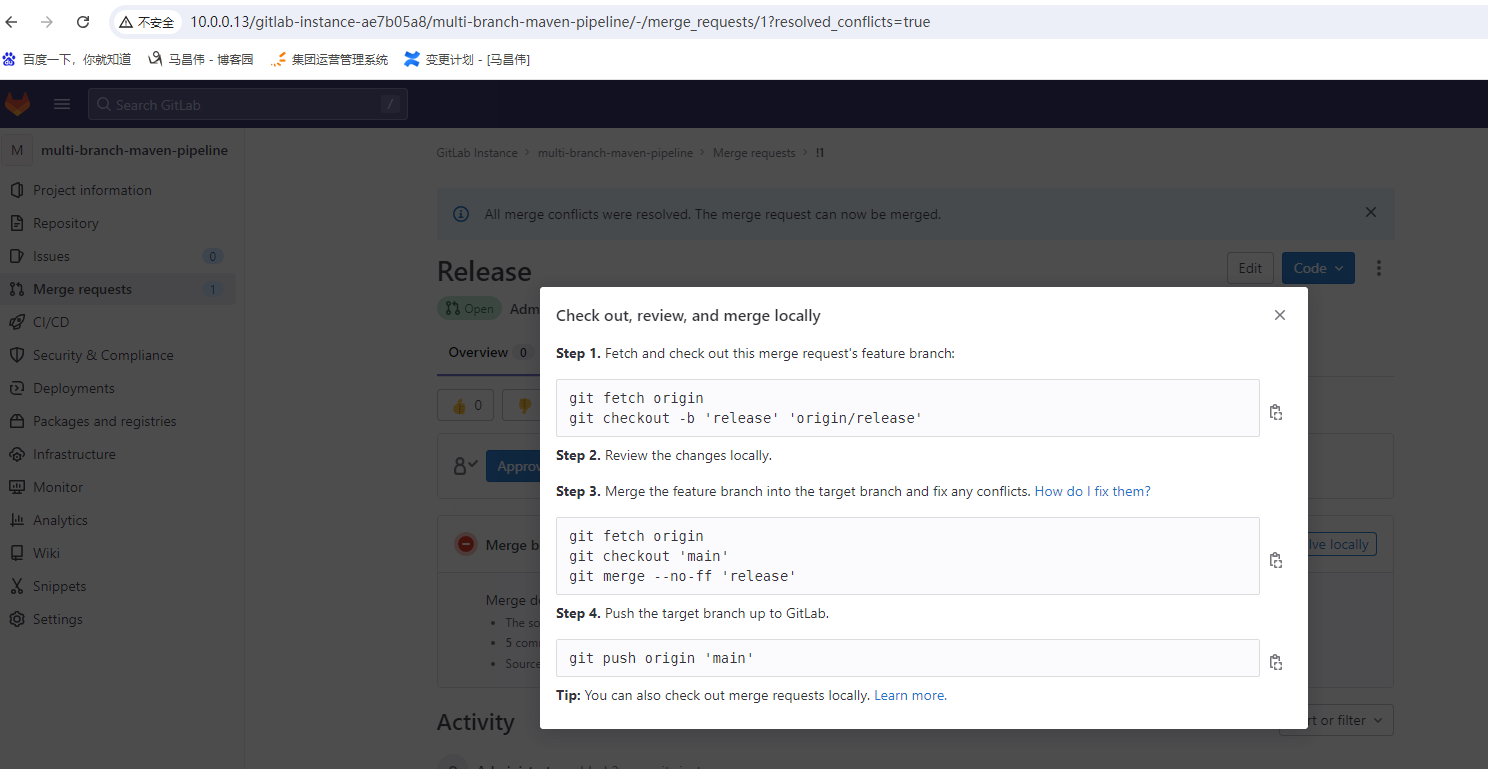
Step 1. Fetch and check out this merge request's feature branch:
git fetch origin
git checkout -b 'release' 'origin/release'
Step 2. Review the changes locally.
Step 3. Merge the feature branch into the target branch and fix any conflicts. How do I fix them?
git fetch origin
git checkout 'main'
git merge --no-ff 'release'
Step 4. Push the target branch up to GitLab.
git push origin 'main'
Tip: You can also check out merge requests locally. Learn more.
上面看完之后没管
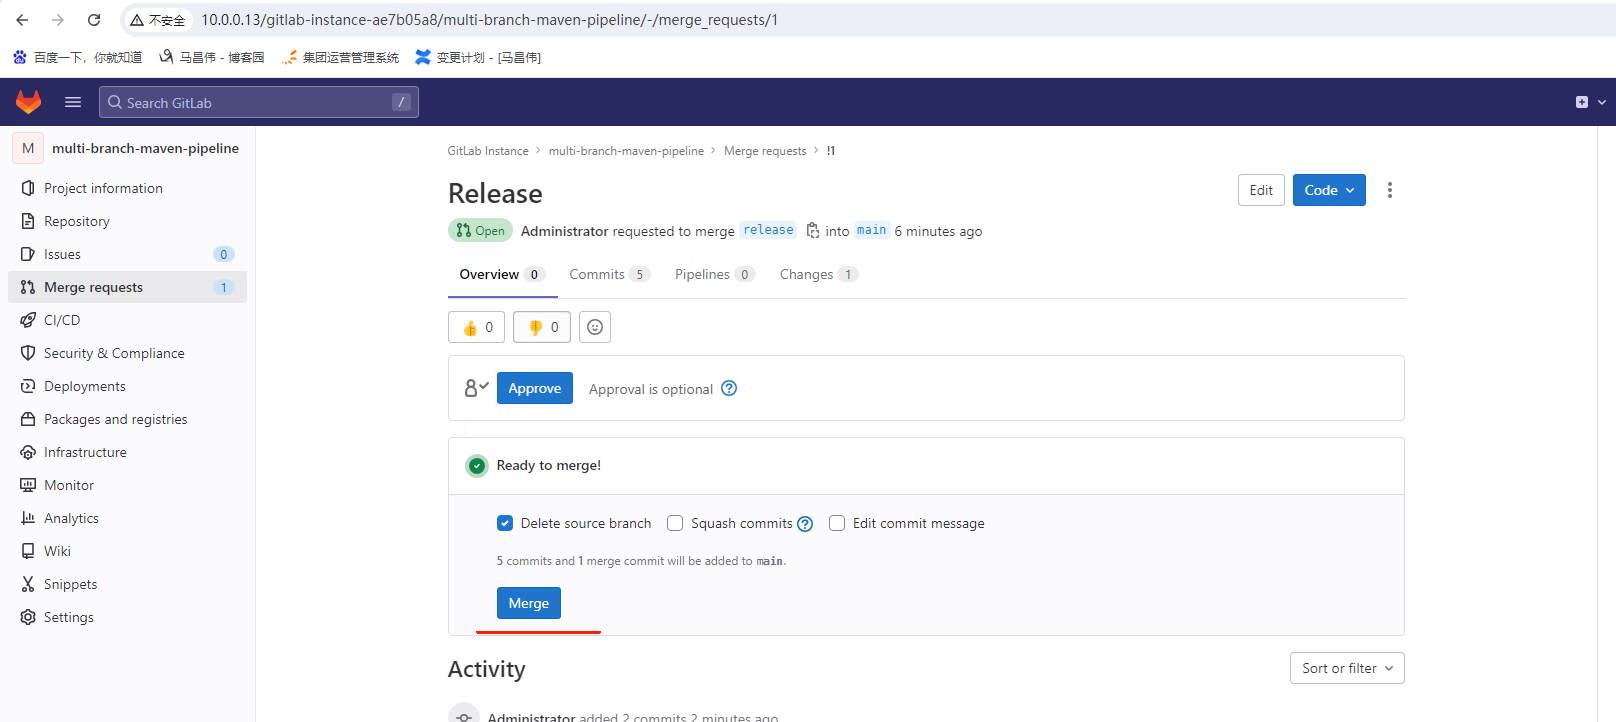
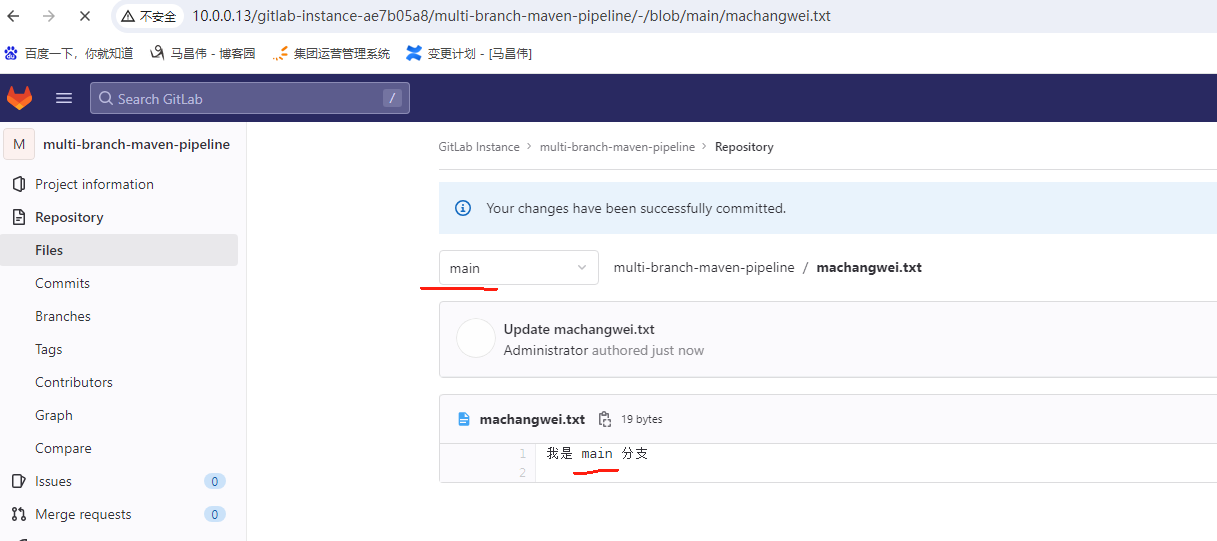
合并成功
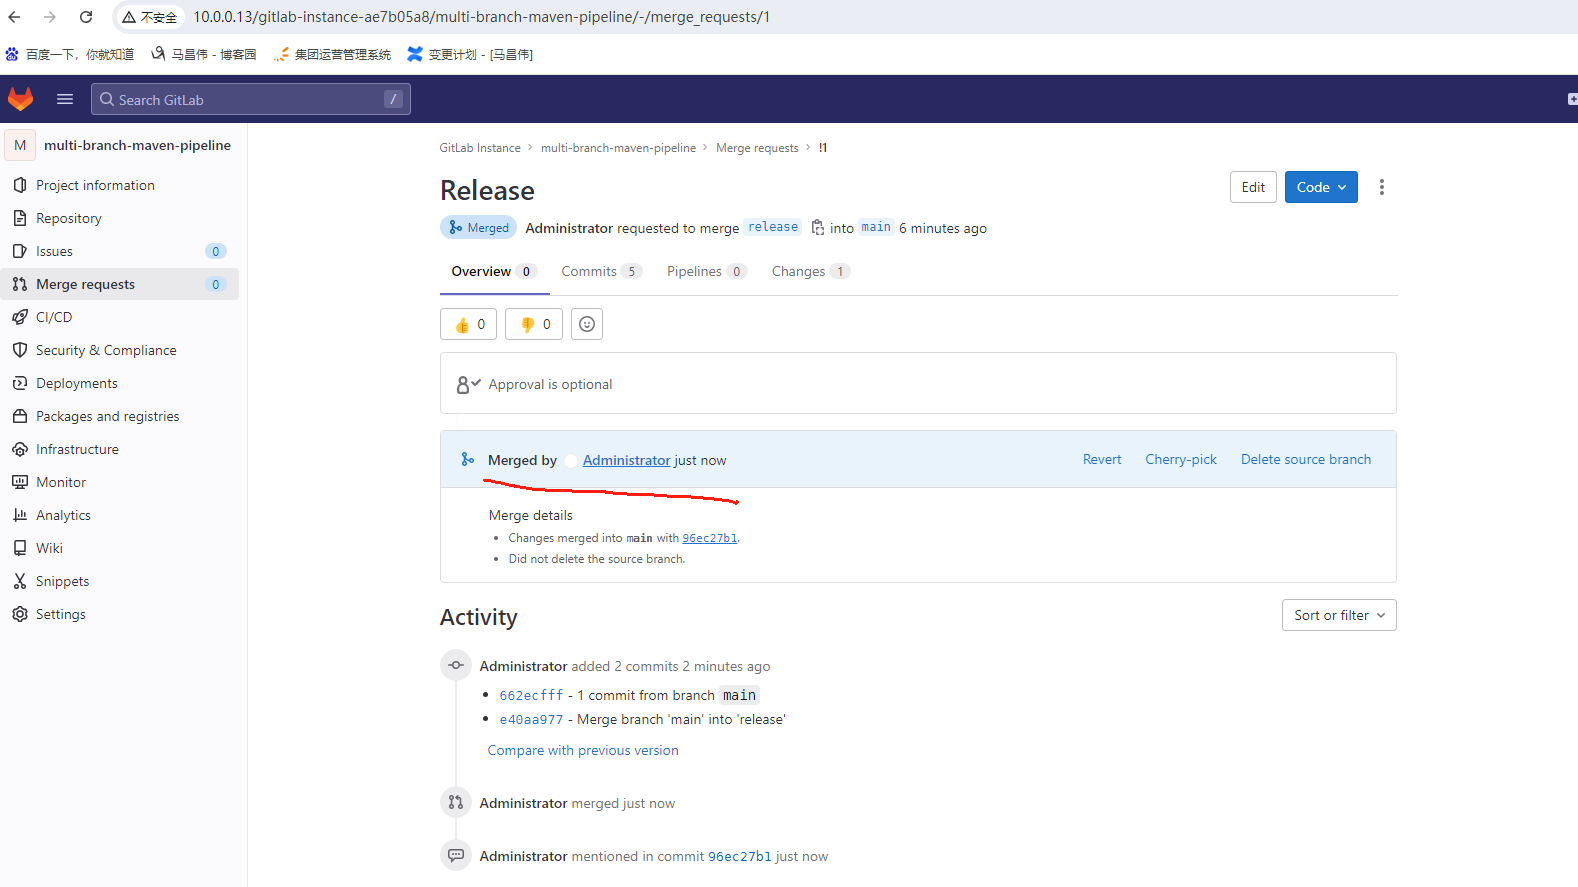
main这里没有 release,就是合并到这里了。从release合并到main,就是进入main的页面,然后创建合并,从release
这个文件没有做处理,就是成为和release的一样了

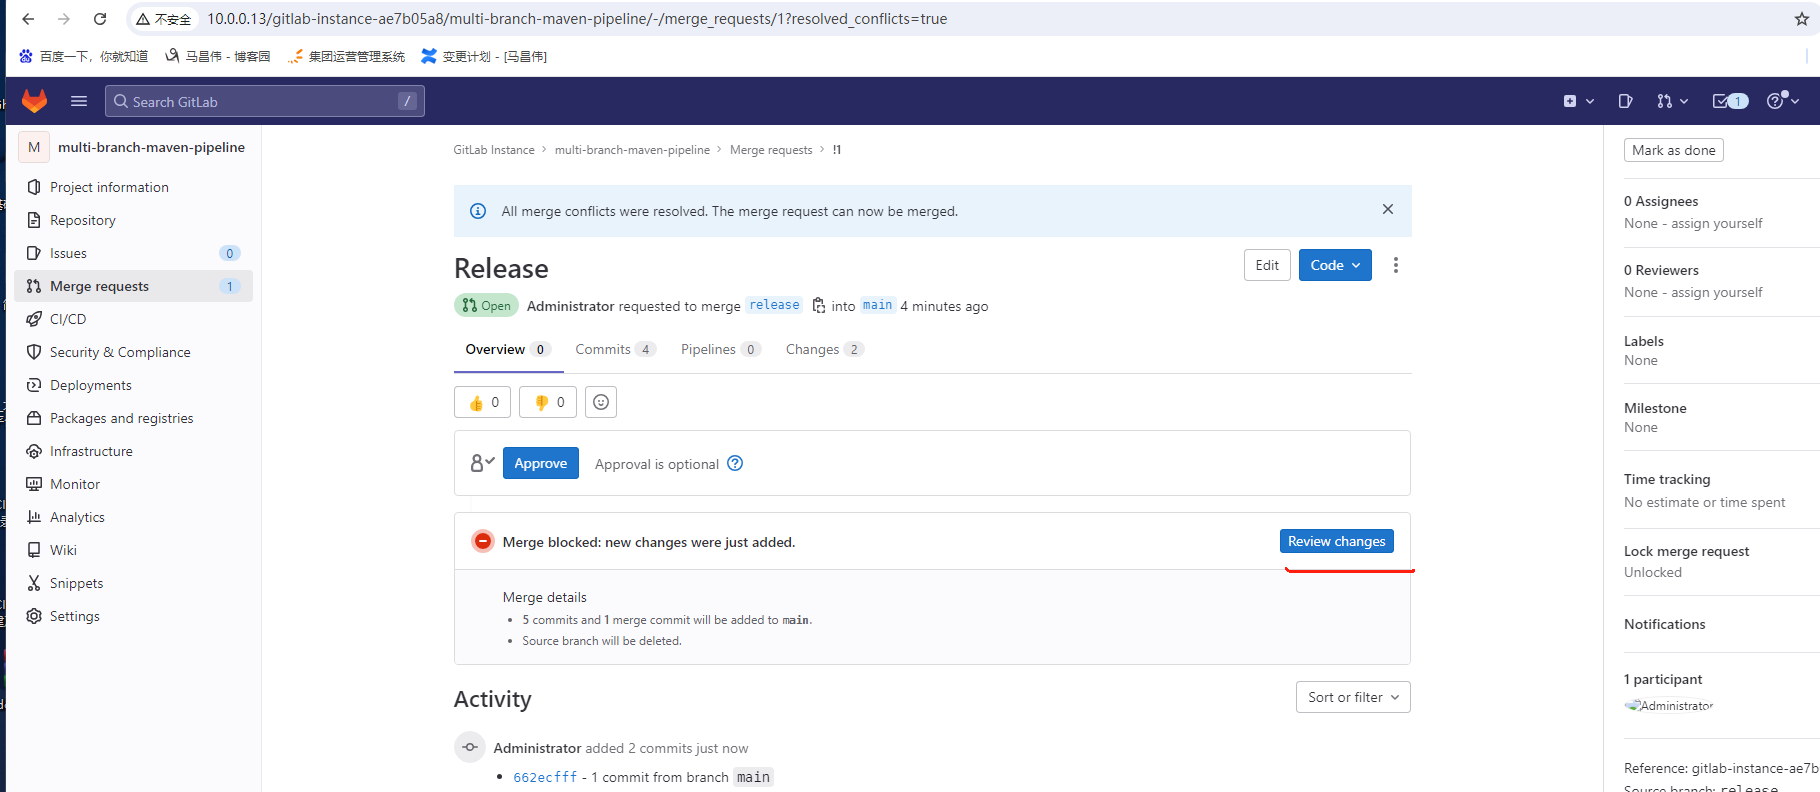
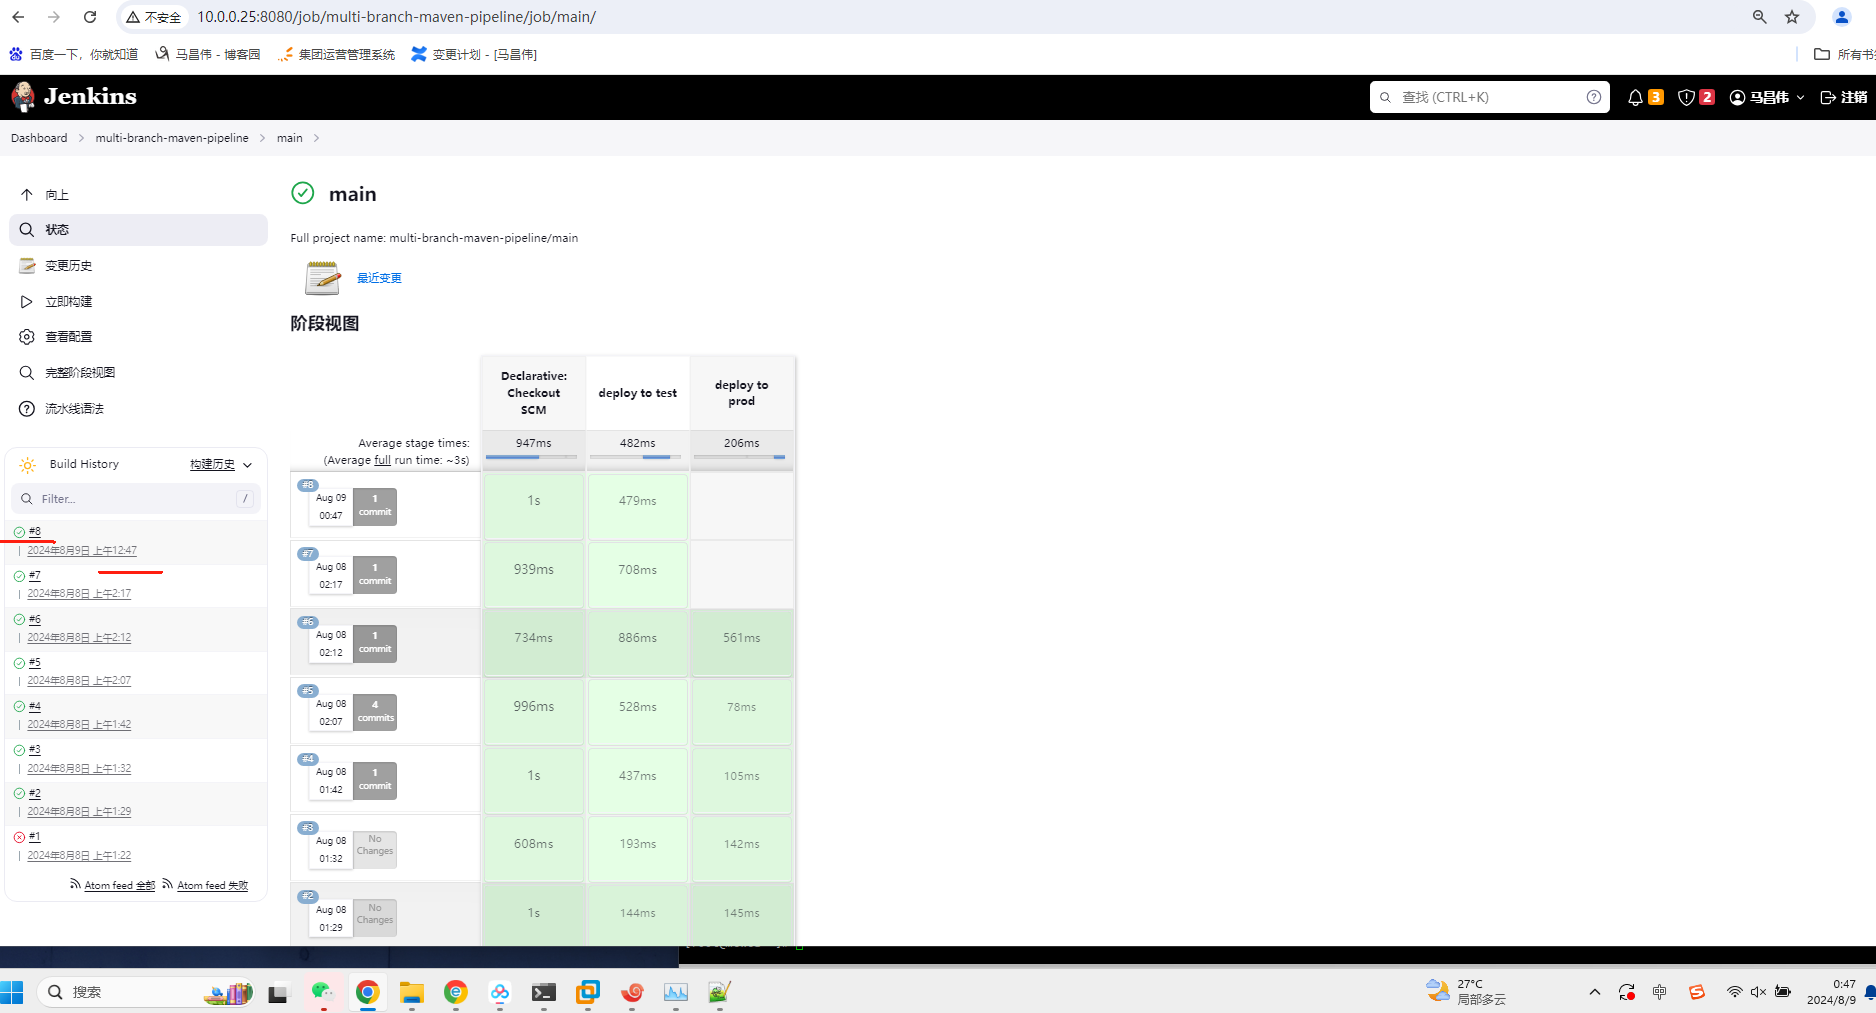
因为main被改动了,所以main分支自动触发构建了
使用when指令,让pipeline看起来更优雅
再次修改提交下
下面要进行改造了
改造之前
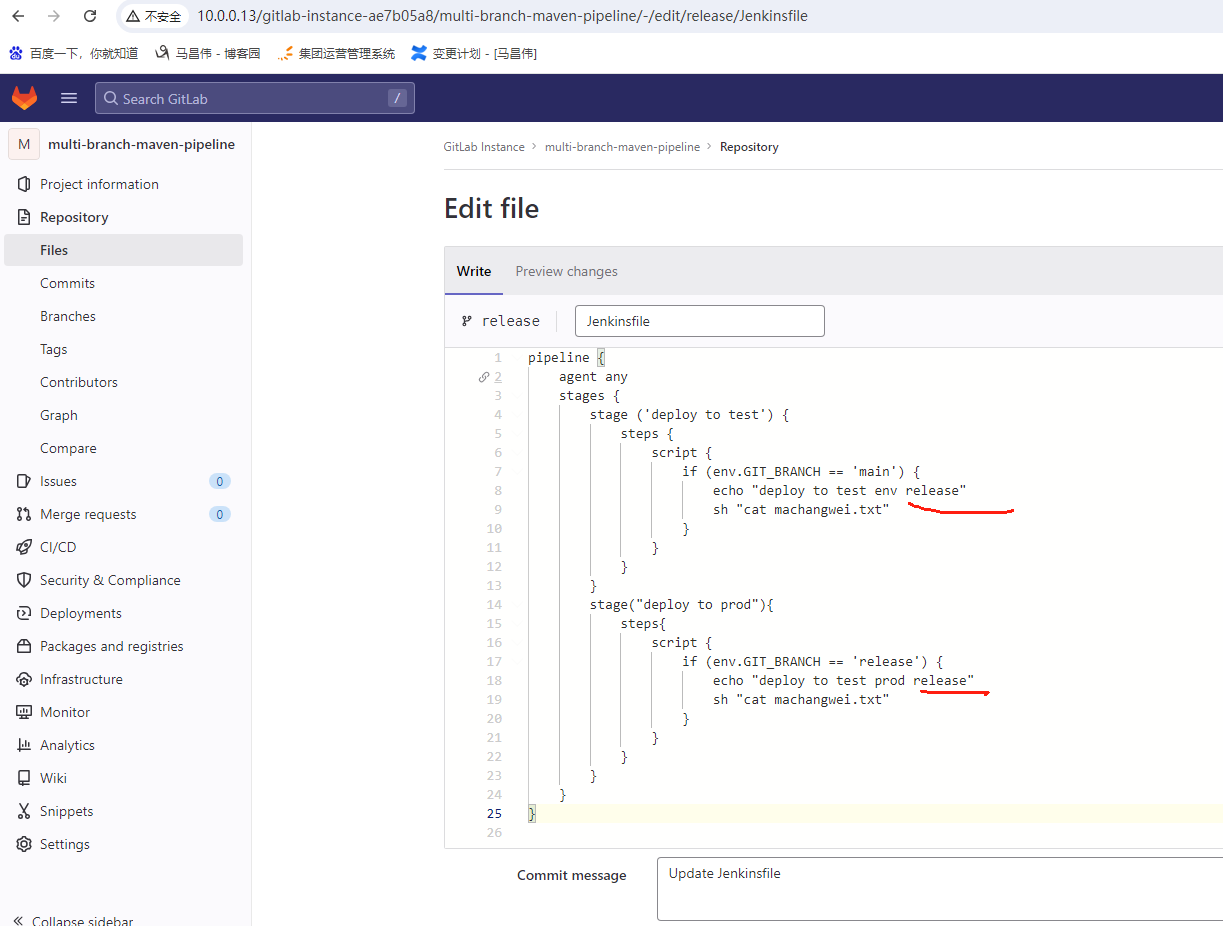
pipeline {
    agent any
    stages {
        stage ('deploy to test') {
            steps {
                script {
                    if (env.GIT_BRANCH == 'main') {
                        echo "deploy to test env"
                        sh "cat machangwei.txt"
                    }
                }
            }
        }
        stage("deploy to prod"){
            steps{
                script {
                    if (env.GIT_BRANCH == 'release') {
                        echo "deploy to test prod"
                        sh "cat machangwei.txt"
                    }
                }
            }
        }
    }
}
改造声明式之后,
pipeline {
    agent any
    stages {
        stage ('deploy to test') {
            when {
                branch 'main'
            }
            steps {
                echo "deploy to test env"
                sh "cat machangwei.txt"
            }
        }
        stage("deploy to prod"){
            when {
                branch 'release'
            }
            steps{
                echo "deploy to test prod"
                sh "cat machangwei.txt"
            }
        }
    }
}
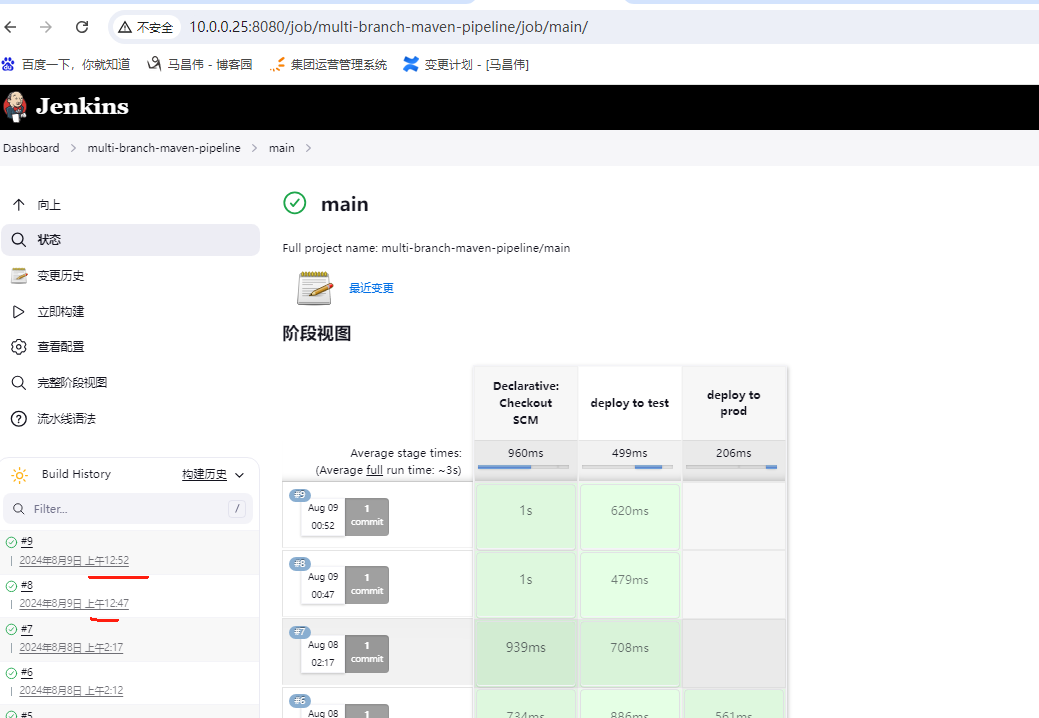
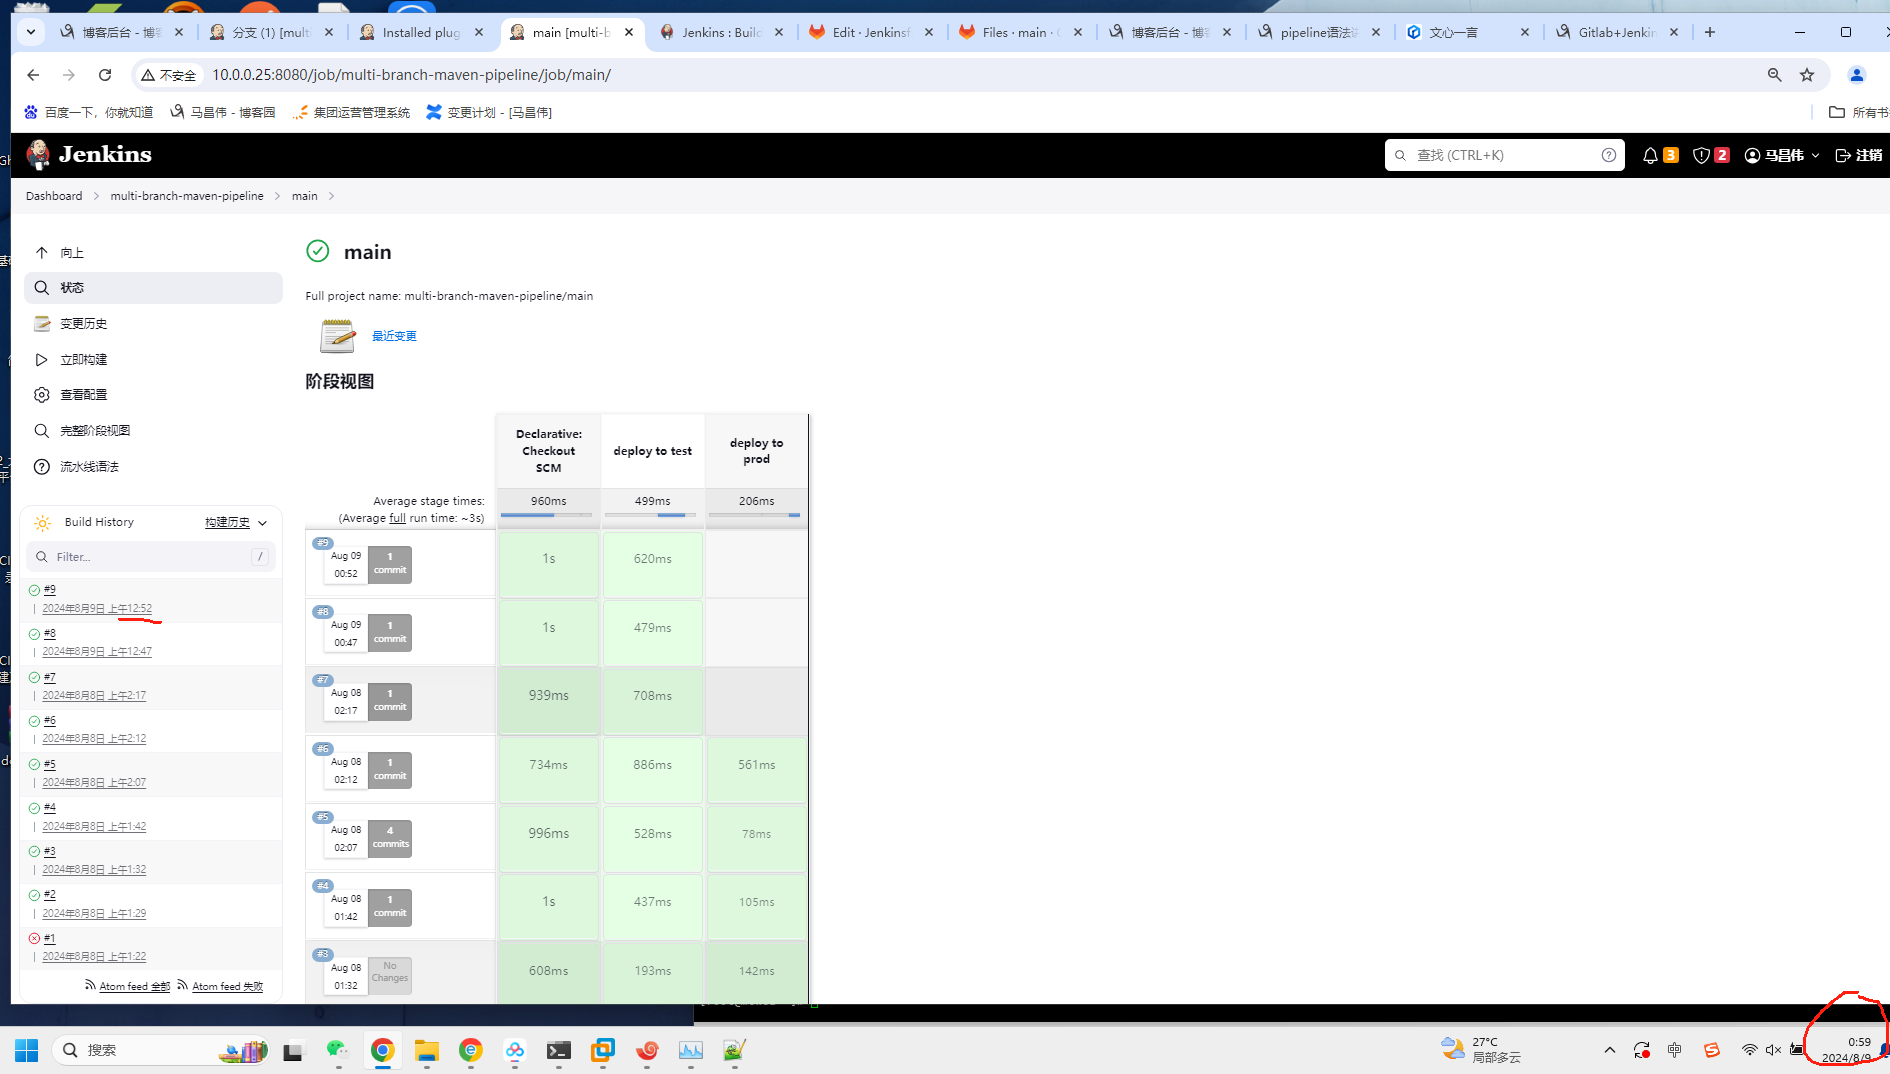
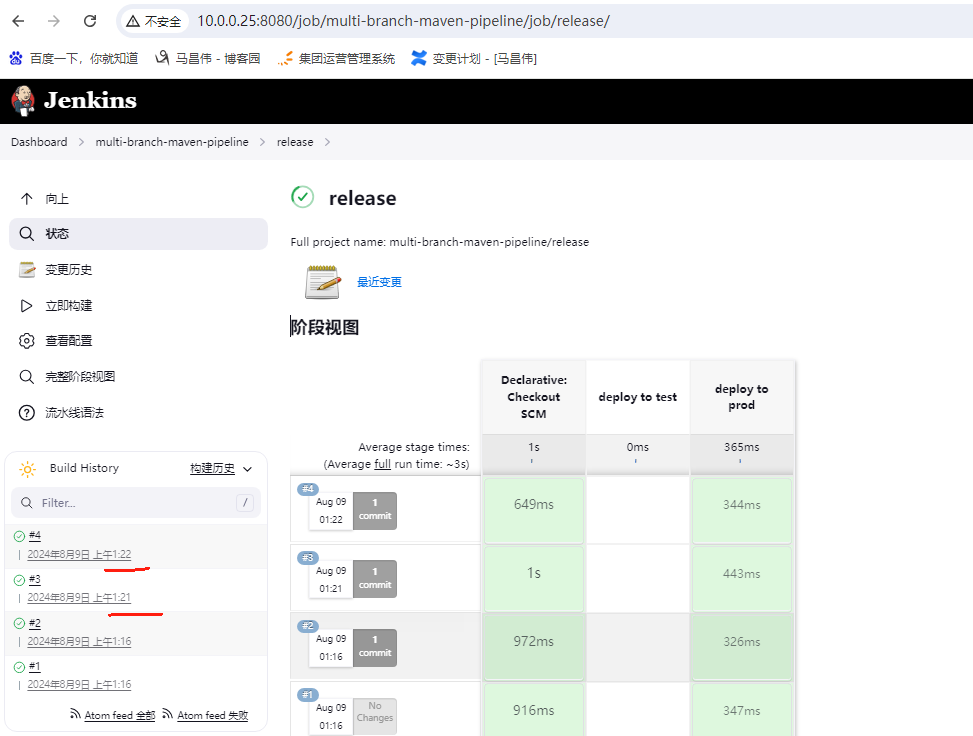
这样改了之后,照样可以正常多分支发布。7是提交代码之后发生的
when指令的用法案例
            when {
                branch 'main'
            }
            when {
                changelog '.*^\\[DEPENDENCY\\] .+$'
            }
            when {
                changeset "**/*.js"
            }
            when {
                environment name: 'DEPLOY_TO',value: 'production'
            }
            when {
                equals expected: 2,actual: currentBuiild.number
            }
            when {
                expression {
                    return env.BRANCH_NAME != 'master';
                }
            }
            when {
                buildingTag()
            }
            when {
                tag "release-*"
            }
            when {
                tag pattern: "release-*",comparator: "GLOB"
            }
            when {
                tag pattern: "release-3.1",comparator: "EQUALS"
            }
            when {
                tag pattern: "release-\\d+",comparator: "REGEXP"
            }
            when {
                allOf {
                    branch 'master';
                    environment name: 'DEPLOY_TO', value: 'production'
                }
            }
            when {
                anyOf {
                    branch 'master';
                    branch 'staging'
                }
            }
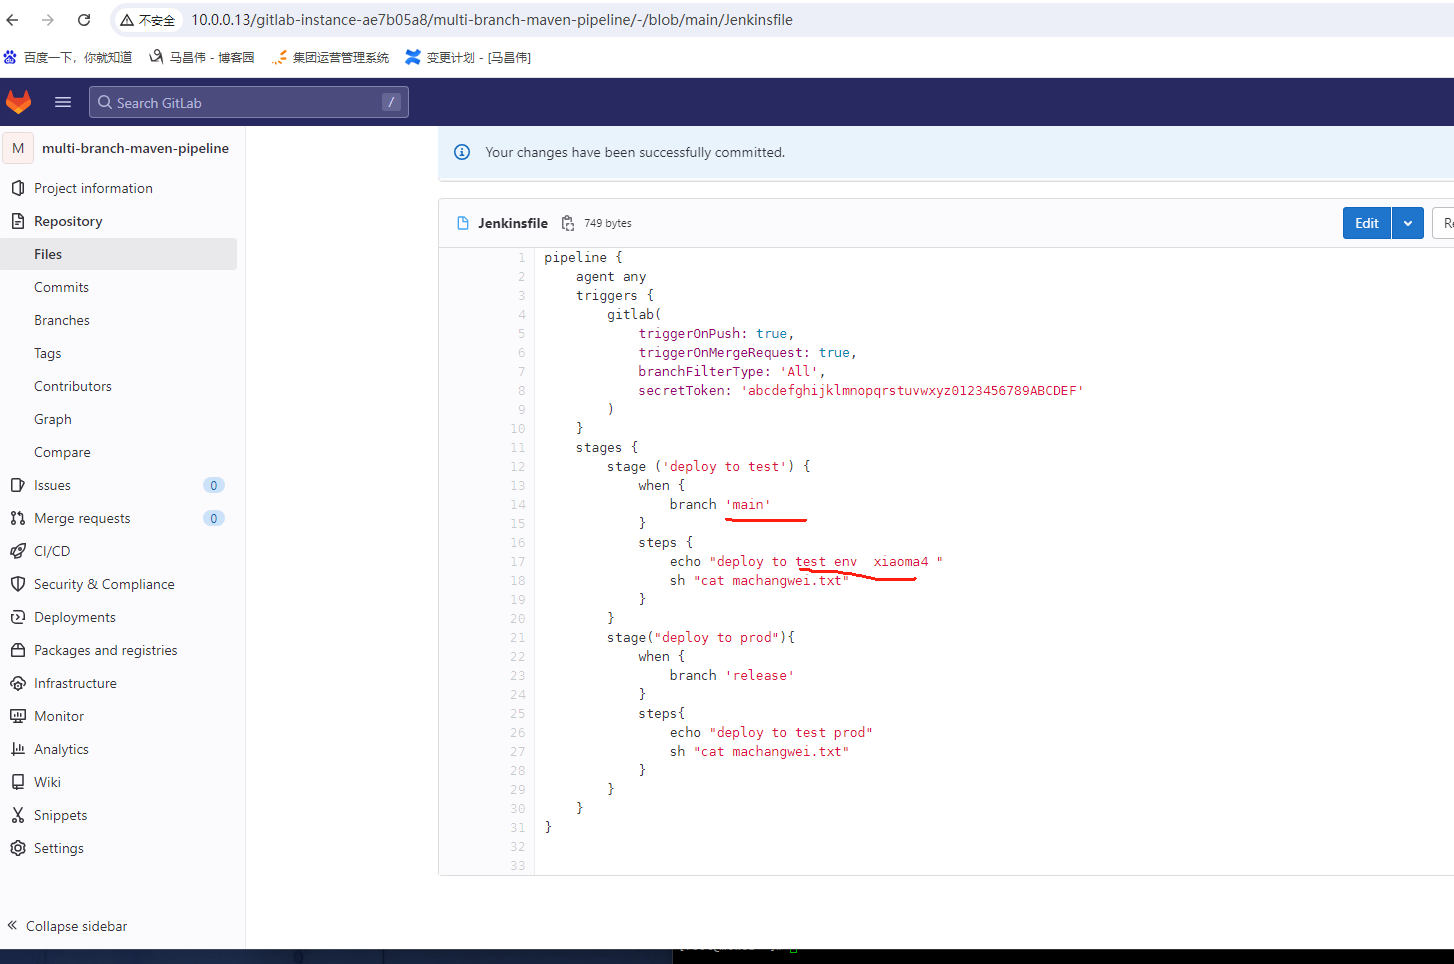
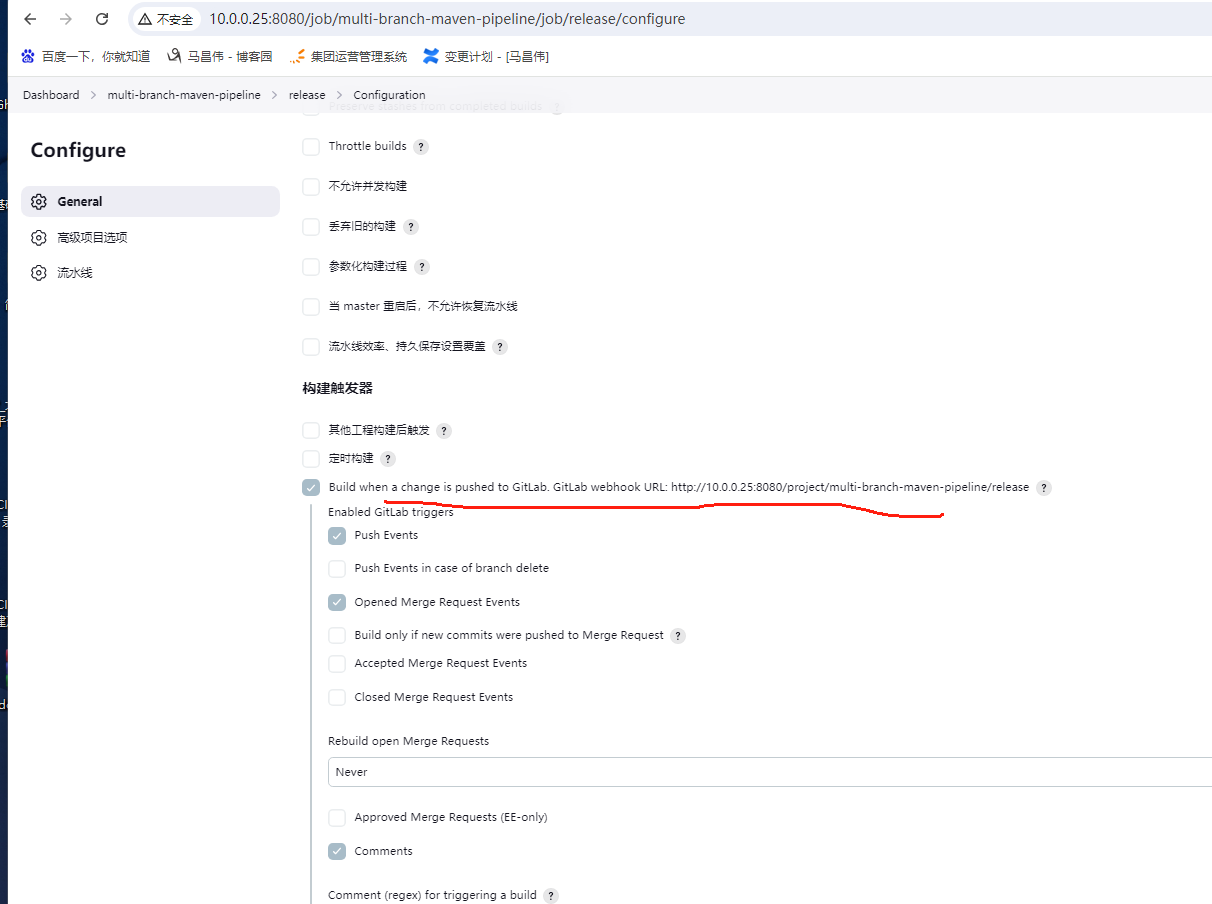
GitLab trigger 对多分支pipeline的支持
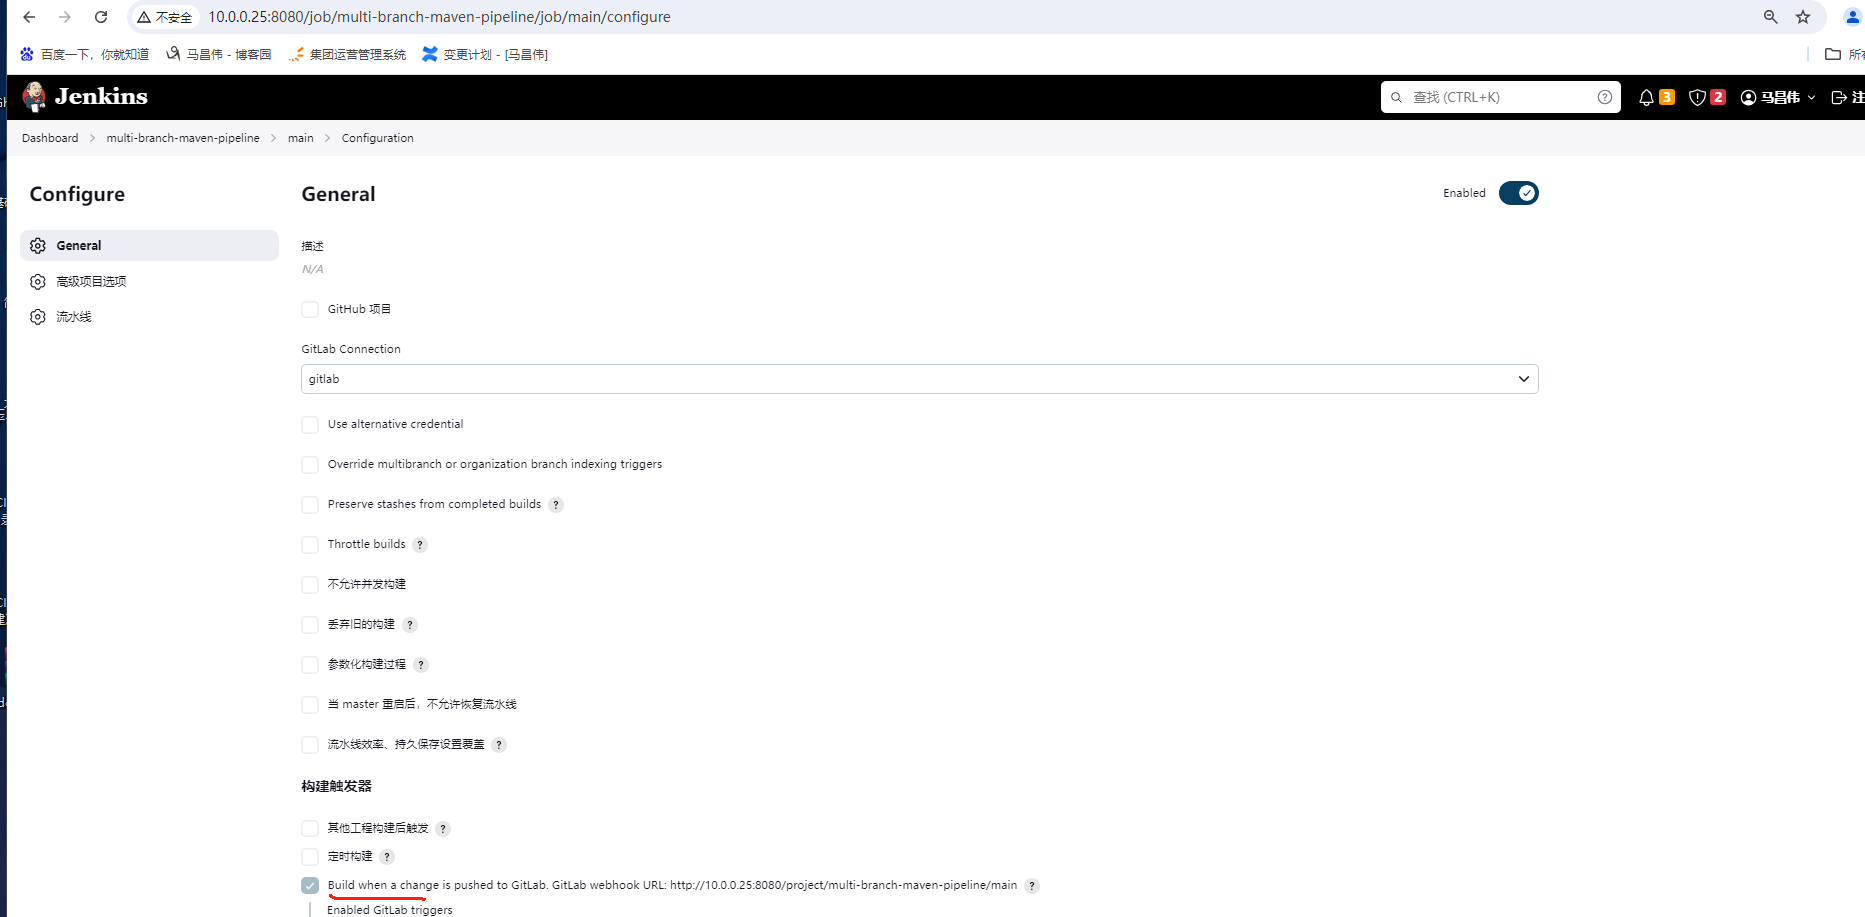
    triggers {
        gitlab(
            triggerOnPush: true,
            triggerOnMergeRequest: true,
            branchFilterType: 'All',
            secretToken: 'abcdefghijklmnopqrstuvwxyz0123456789ABCDEF'
        )
    }
pipeline {
    agent any
    triggers {
        gitlab(
            triggerOnPush: true,
            triggerOnMergeRequest: true,
            branchFilterType: 'All',
            secretToken: 'abcdefghijklmnopqrstuvwxyz0123456789ABCDEF'
        )
    }
    stages {
        stage ('deploy to test') {
            when {
                branch 'main'
            }
            steps {
                echo "deploy to test env  xiaoma4 "
                sh "cat machangwei.txt"
            }
        }
        stage("deploy to prod"){
            when {
                branch 'release'
            }
            steps{
                echo "deploy to test prod"
                sh "cat machangwei.txt"
            }
        }
    }
}

提交,好像上次合并的时候,把另外一个分支删除了,所以只有这一个main分支了,目前还没有进行构建,当修改Jenkinsfile之后。
过了一段时间,到达分支检测的时间之后,才触发构建
查看配置,此时已经同步Jenkinsfile配置了,下面我们只要提交就能立马自动构建了。不过好像没有成功,不是预想的这样,
查看高级设置
修改提交
发现还是5分钟后的检测时间,才构建的
创建分支,并修改

合并分支
合并并删除分支之后,并没有自动触发main分支自动构建
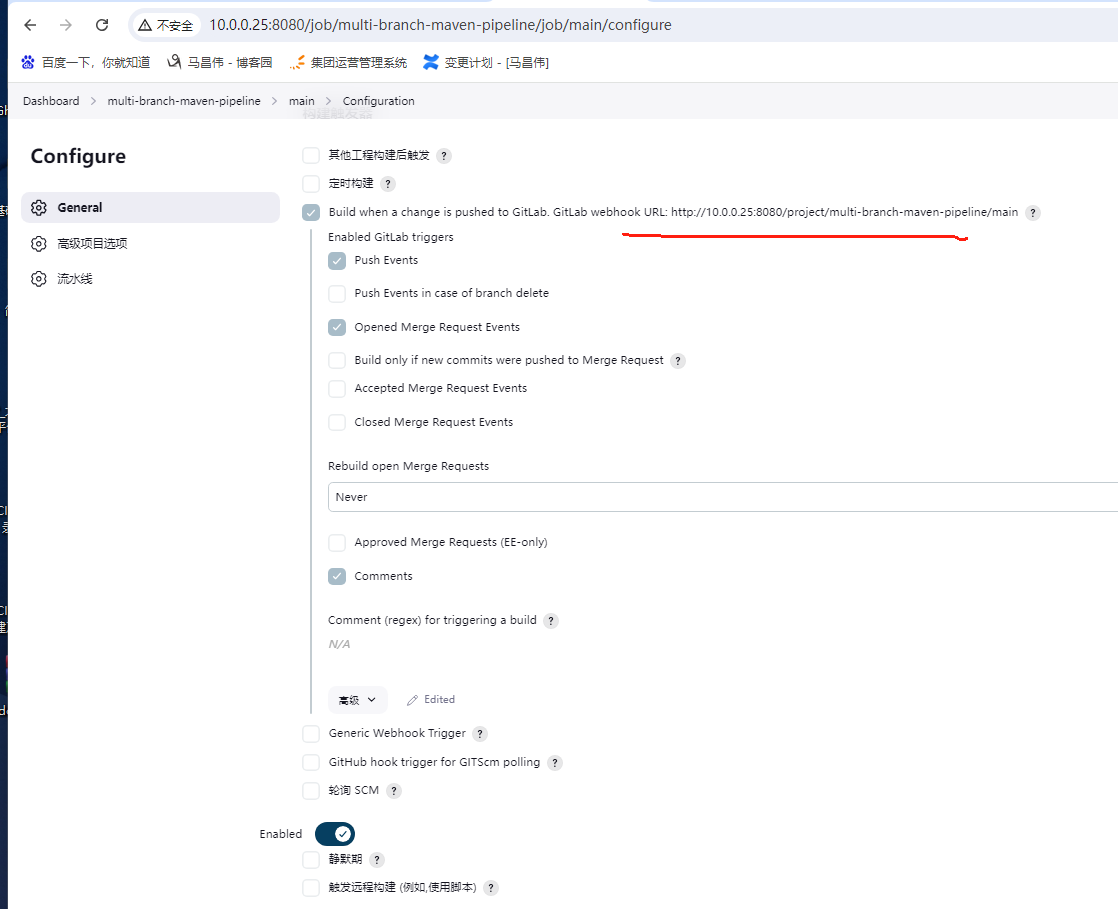
明白了,虽然Jenkins项目配置里,已经同步了Jenkinsfile里面的触发器配置了,但是gitLab里面没有新增这个钩子呢
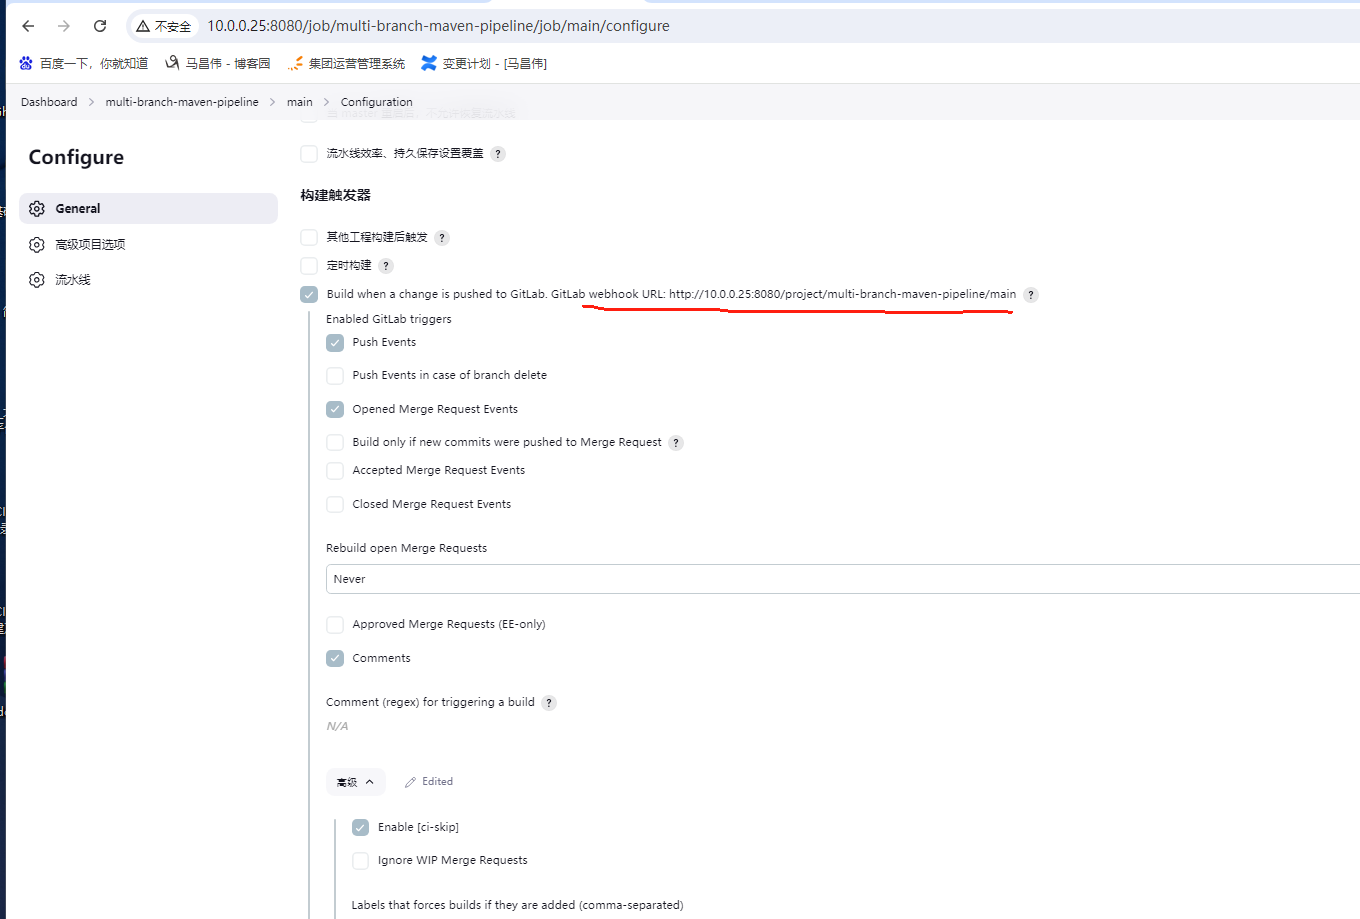
gitLab新增webhook
测试

执行成功
此时是1点02执行的
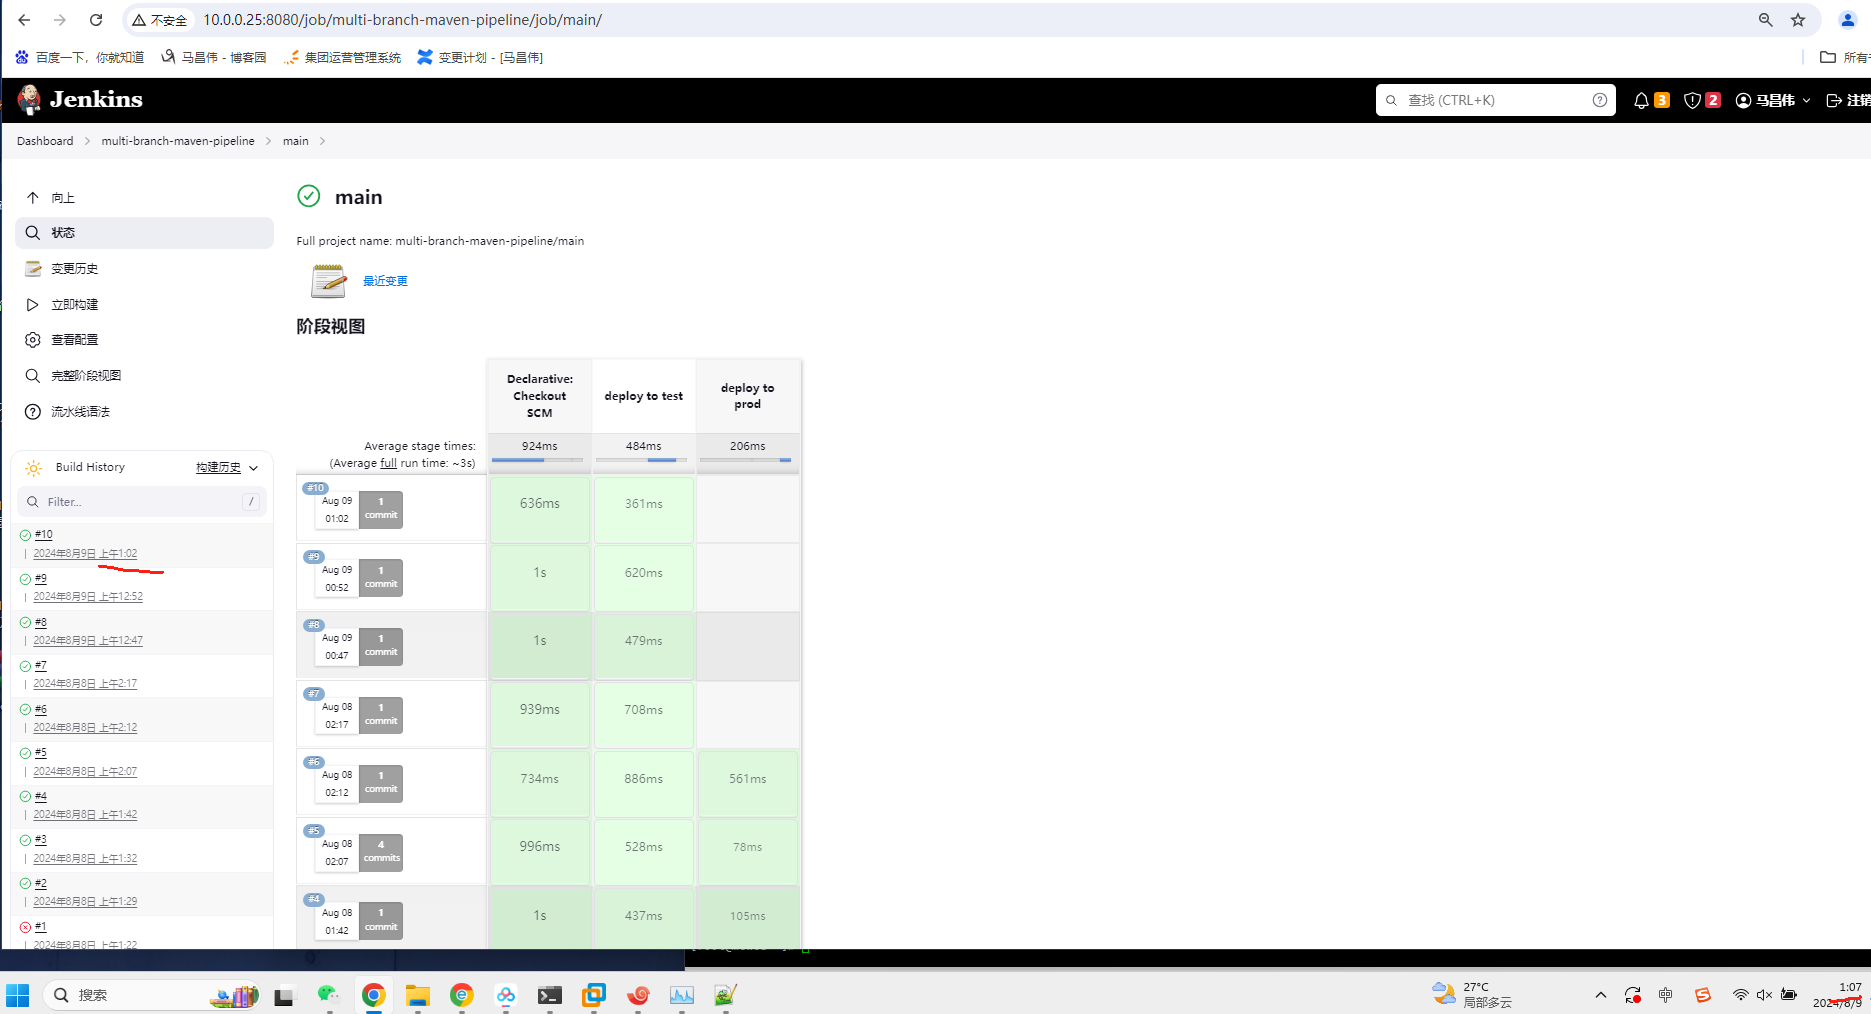
2改为3

提交之后,立马构建
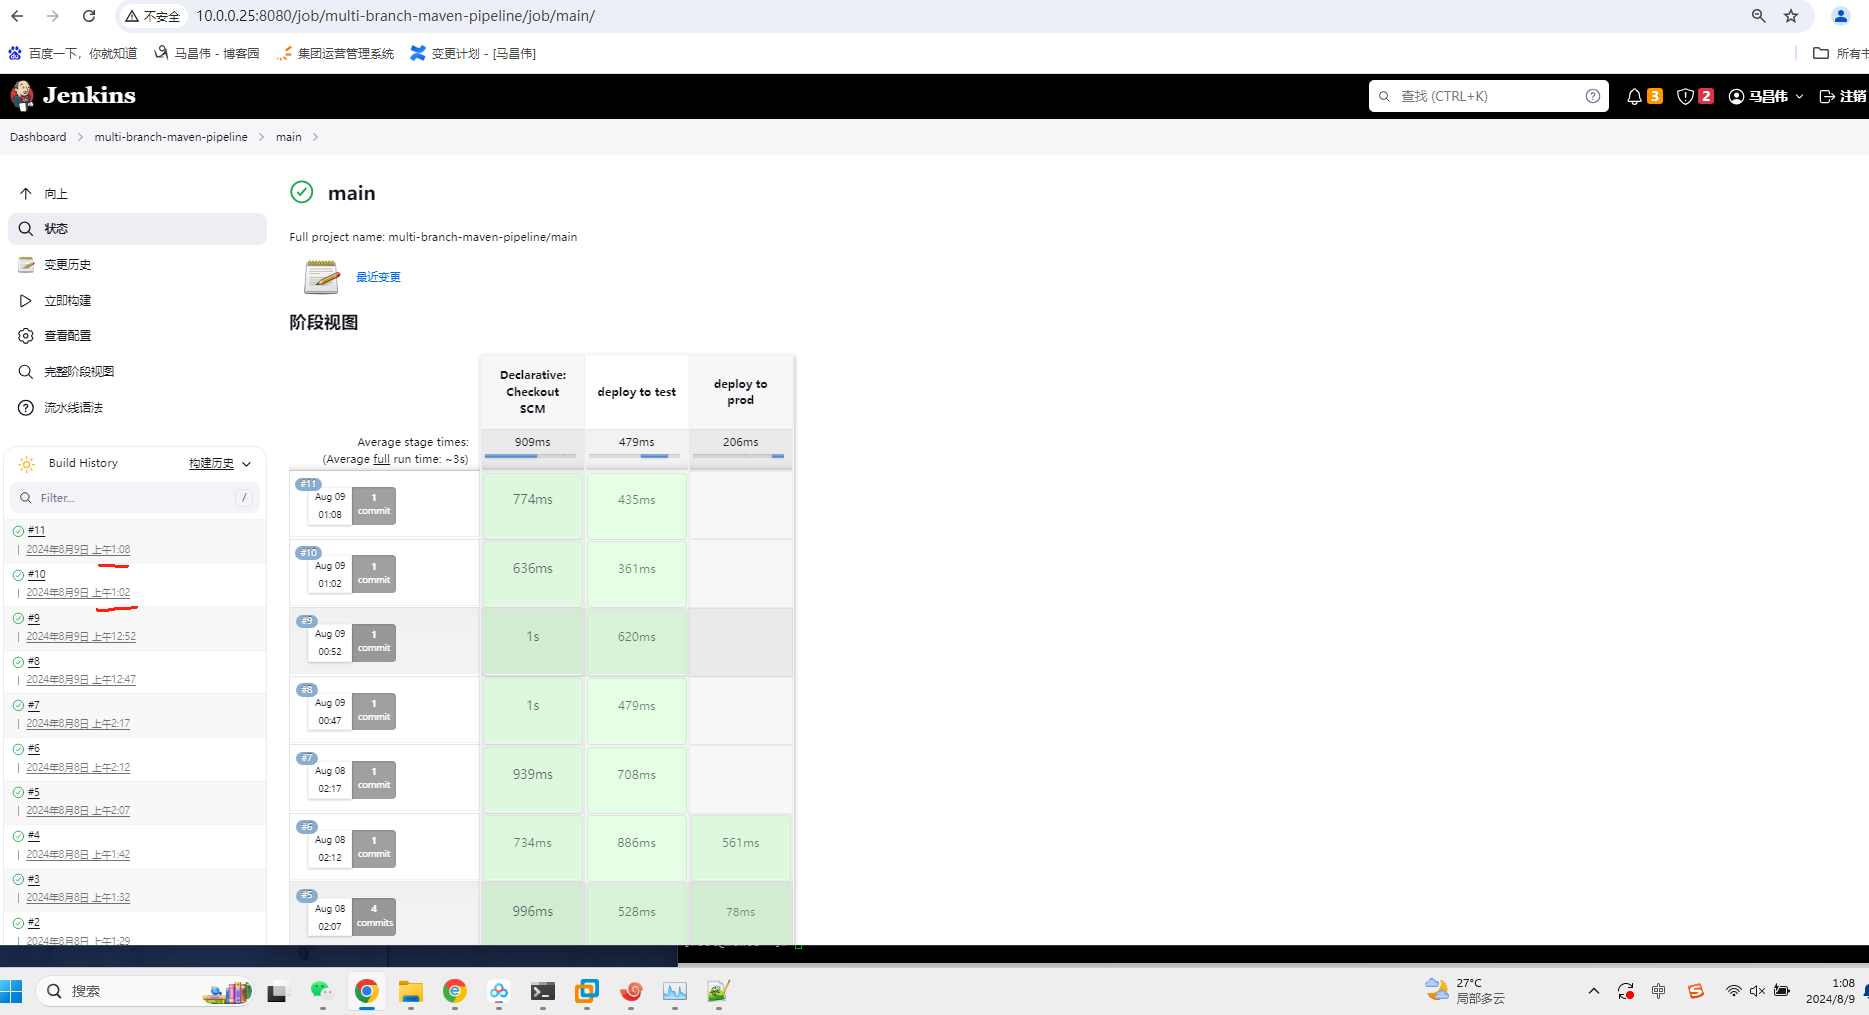
3改成4

提交之后,立马触发构建,不再是等待5分钟一次Jenkins的扫描来触发构建了
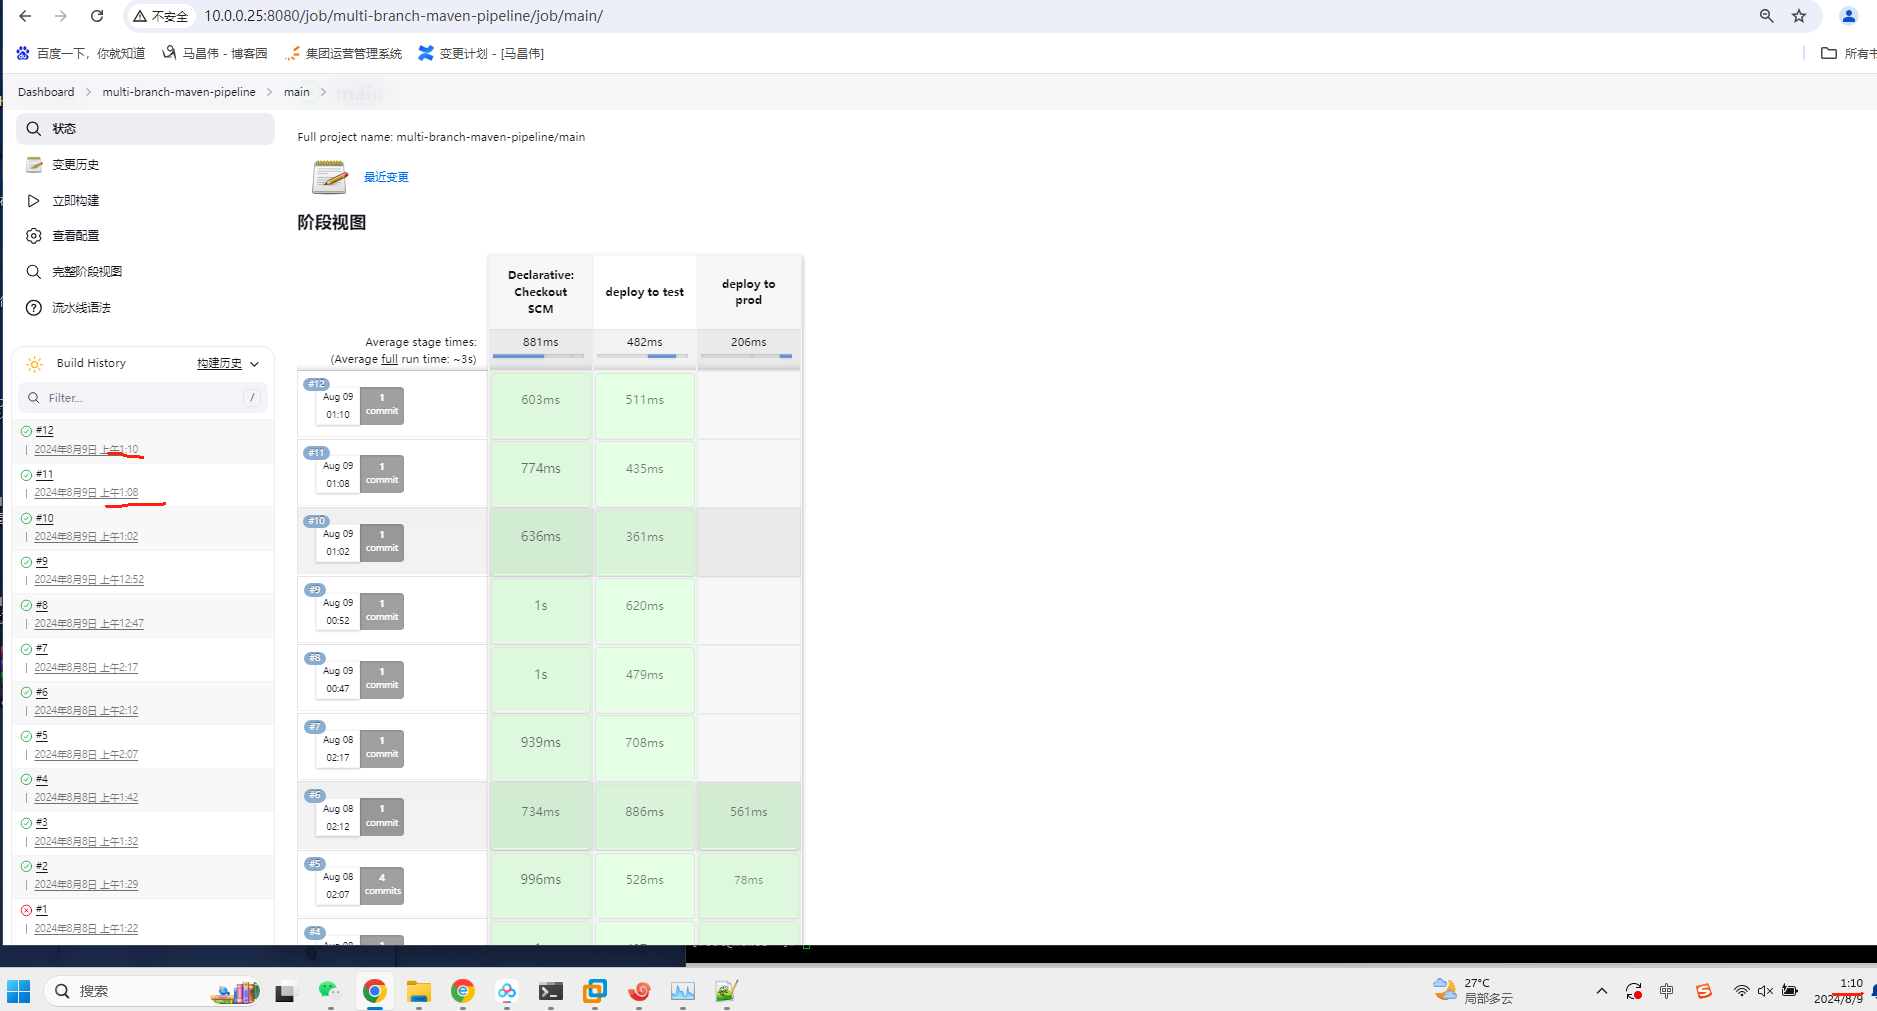
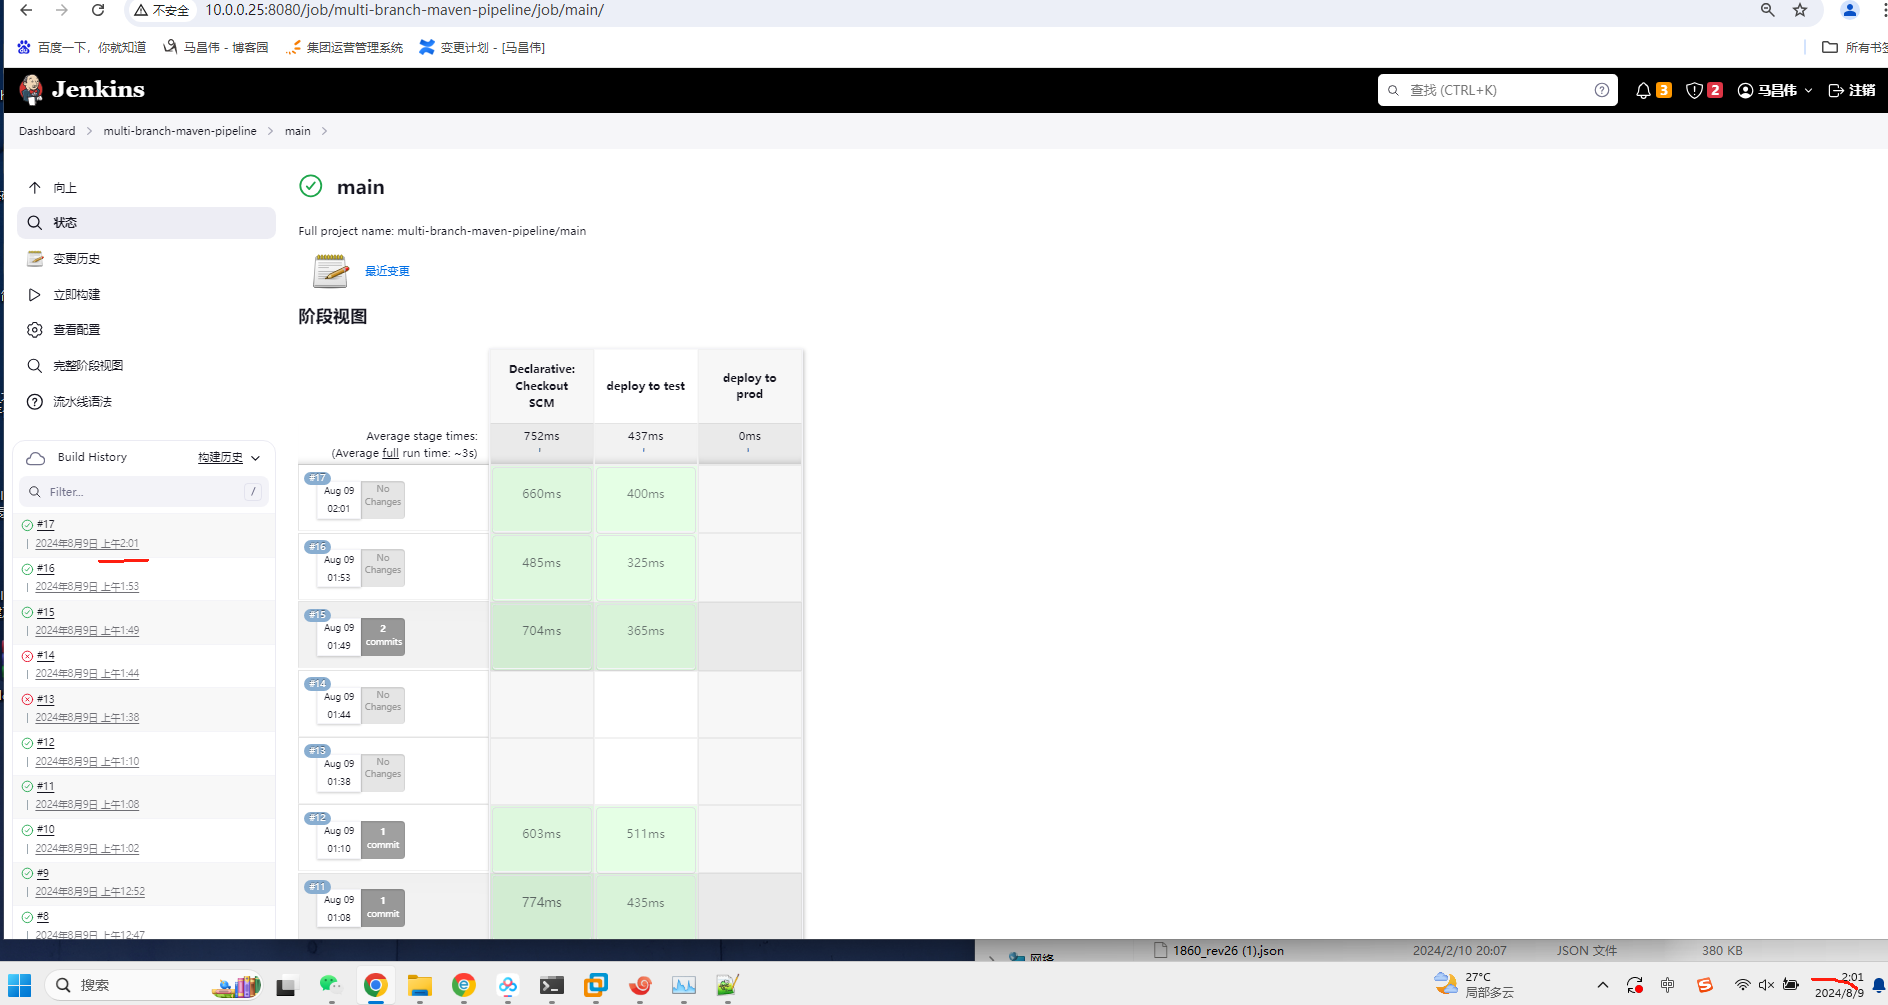
此时还是多分支构建pipeline,
可以看到,当判断是main分支,触发main分支的步骤;判断不是release分支,就跳过release分支的步骤了。

新增release分支,release分支不知道可不可以依靠gitLab trigger触发构建。还是只能等设置的5分钟一次的扫描触发
修改
多分支构建已经查看到多了一个分支,立马在Jenkins上新增一个分支了
创建release分支触发构建一次,修改shell脚本文件自动触发一次构建
查看release分支第二次自动触发的构建,可以看到,因为判断是release分支,所以运行的是release分支下定义的步骤。

修改release分支代码

这第三次构建,看不出是5分钟的扫描导致的,还是

重新修改提交
此时可以看到。这个gitLab trigger对其它分支,在我当前情况下也是起到作用的。立马构建,而不是等待5分钟后扫描触发
虽然我们这里url写的带main,但是我们在选择push event时,是选的所有分支,所以其它分支也是会用到gitLab trigger来触发构建的
Generic Webhook Trigger插件在多分支pipeline场景下的应用
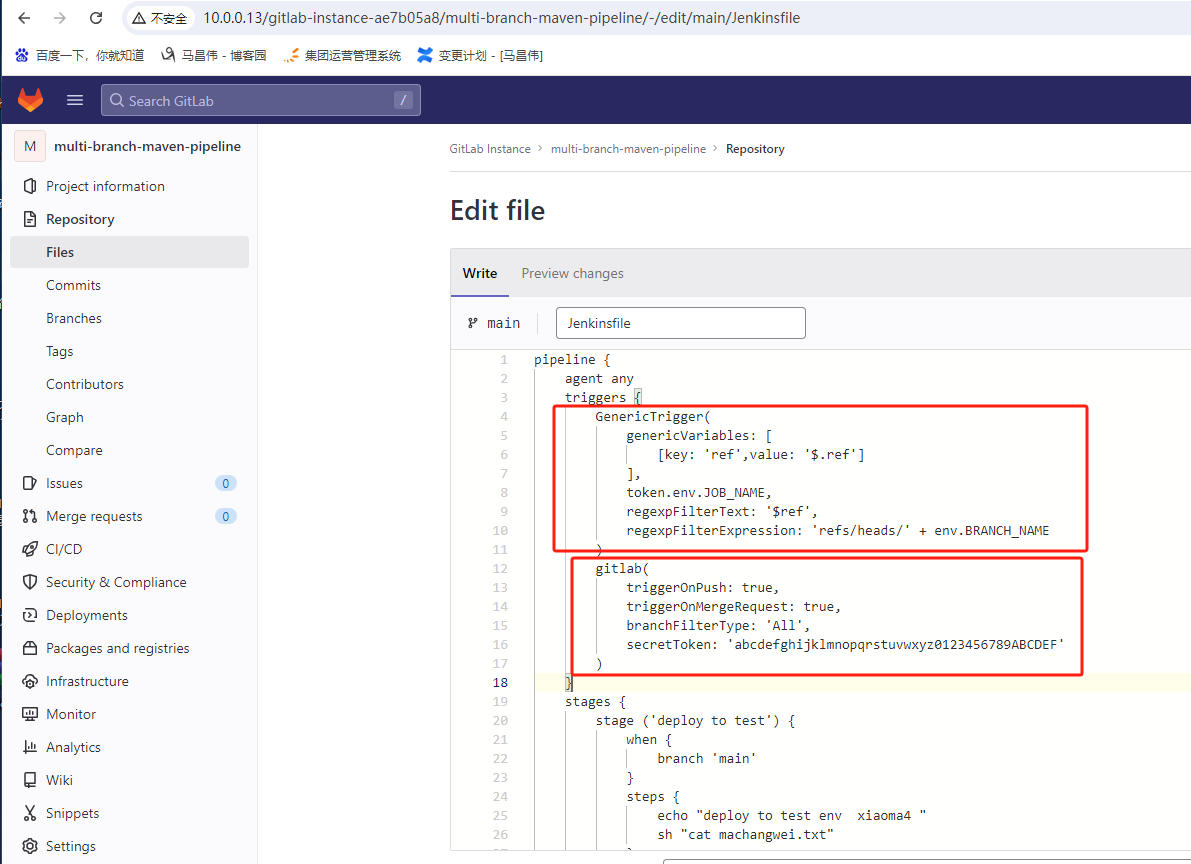
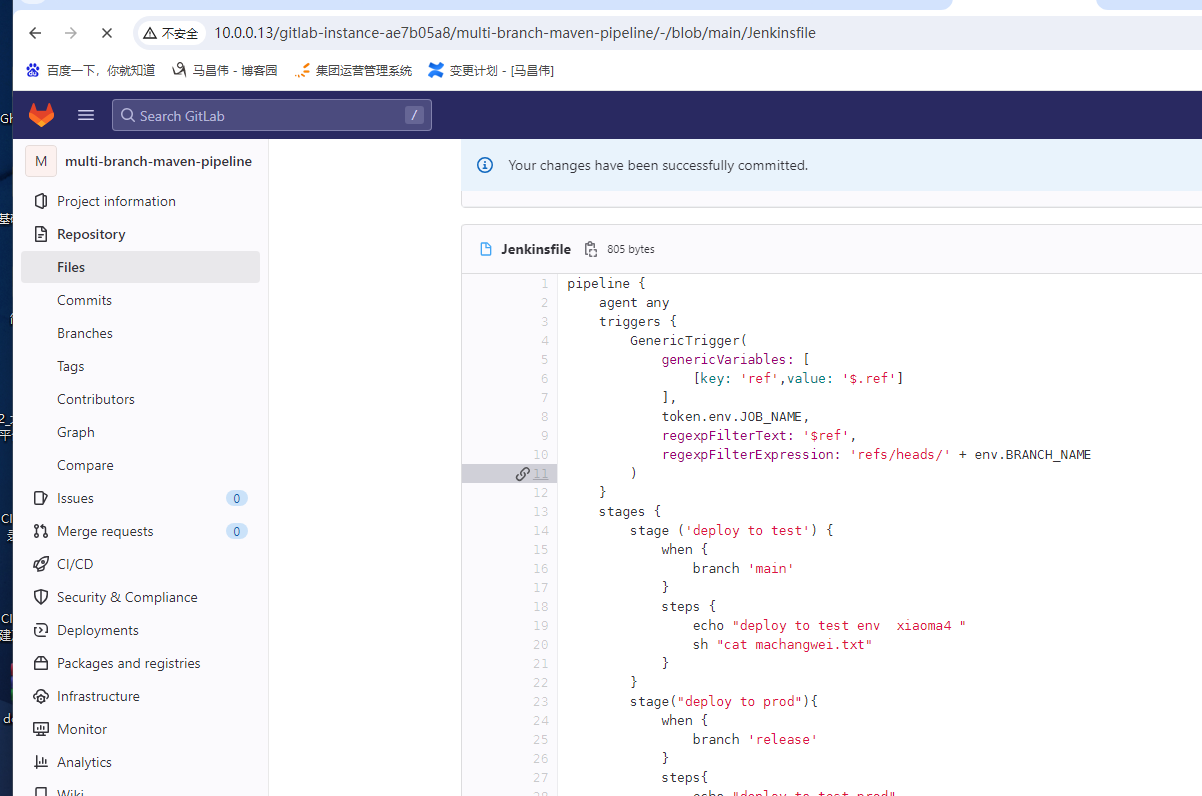
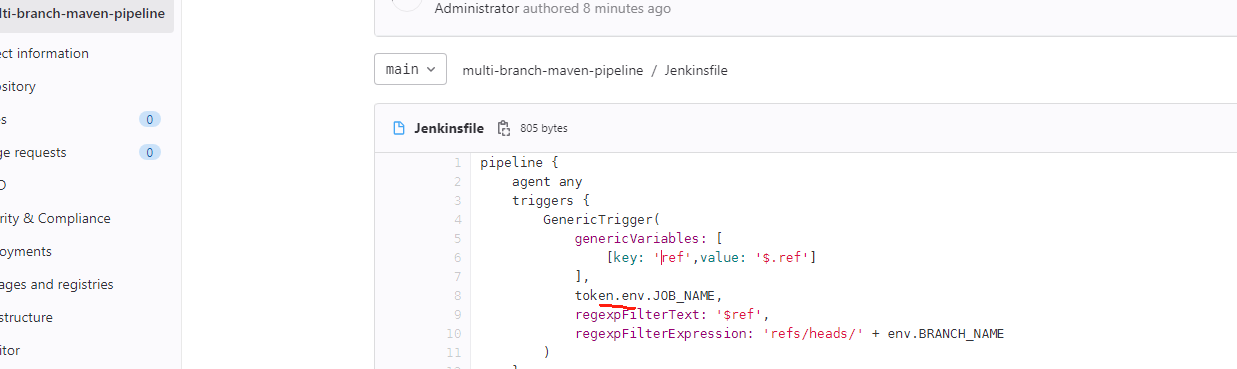
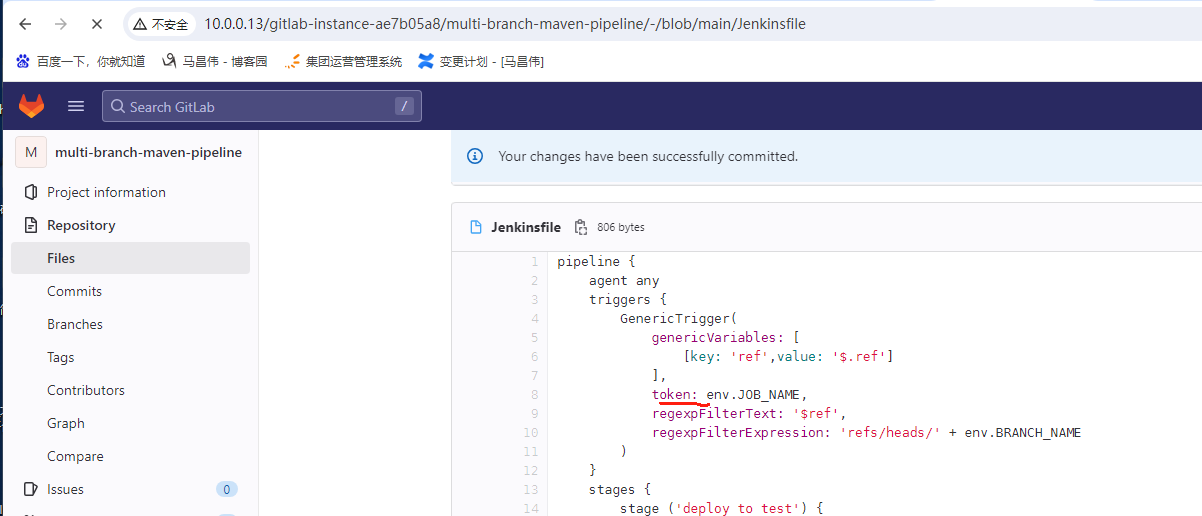
pipeline {
    agent any
    triggers {
        GenericTrigger(
            genericVariables: [
                [key: 'ref',value: '$.ref']
            ],
            token: env.JOB_NAME,
            regexpFilterText: '$ref',
            regexpFilterExpression: 'refs/heads/' + env.BRANCH_NAME
        )
    }
    stages {
        stage ('deploy to test') {
            when {
                branch 'main'
            }
            steps {
                echo "deploy to test env  xiaoma4 "
                sh "cat machangwei.txt"
            }
        }
        stage("deploy to prod"){
            when {
                branch 'release'
            }
            steps{
                echo "deploy to test prod"
                sh "cat machangwei.txt"
            }
        }
    }
}
前面我们已经安装了这个插件了。这里把上一节的钩子去掉
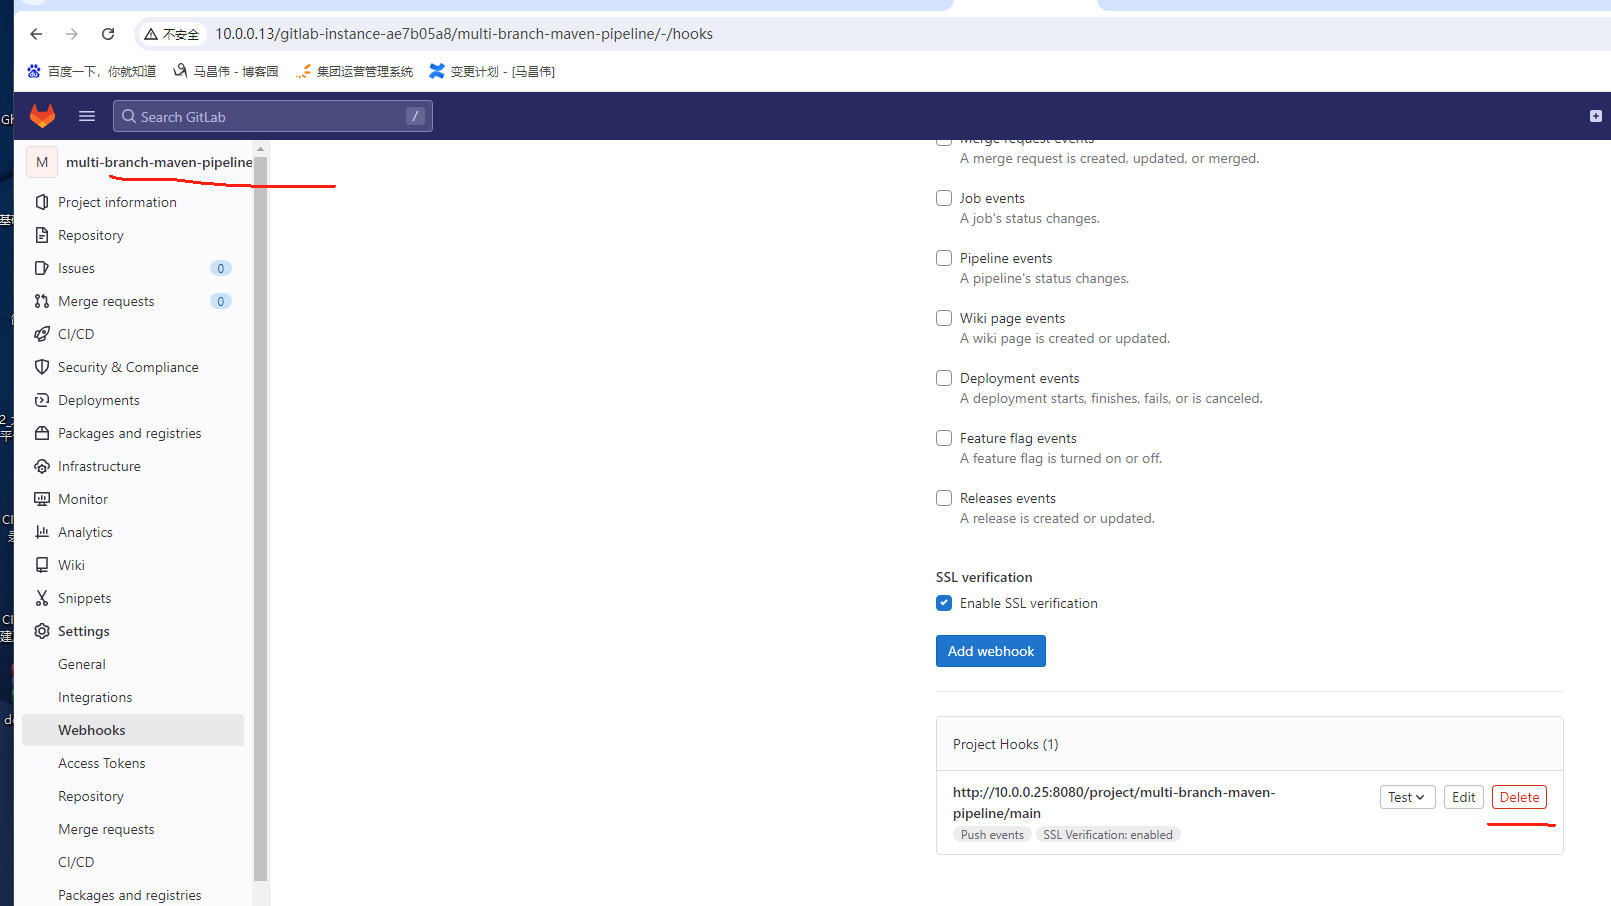
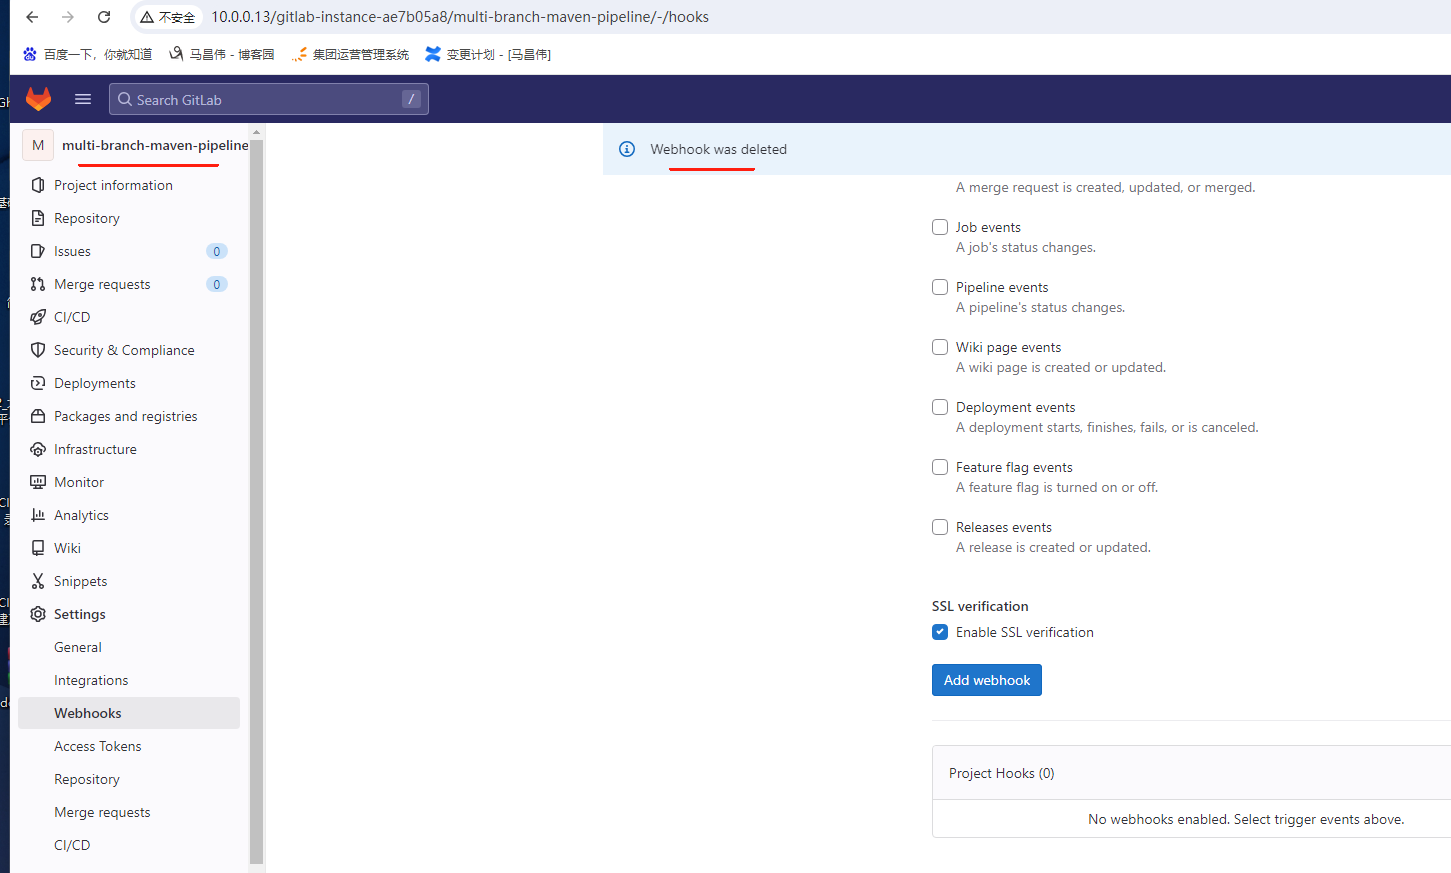
已经删除
删除下面的,用上面的插件触发构建
有时间可以测试一下,一个分支里面或者是多个分支,好像只能用一种触发器,毕竟Jenkins项目选择触发器那里,是个单选配置,所以的分支都是统一配置
我们可以从这里看,好像是不同的分支,可以有不同的触发器配置的

进入分支里面查看配置。也就是配置是分支单独出来的。我们刚刚改了main分支的Jenkinsfile,目前应该是5分中的Jenkins扫描触发的构建,构建失败
此时看配置,感觉还是用的gitLab trigger触发的,
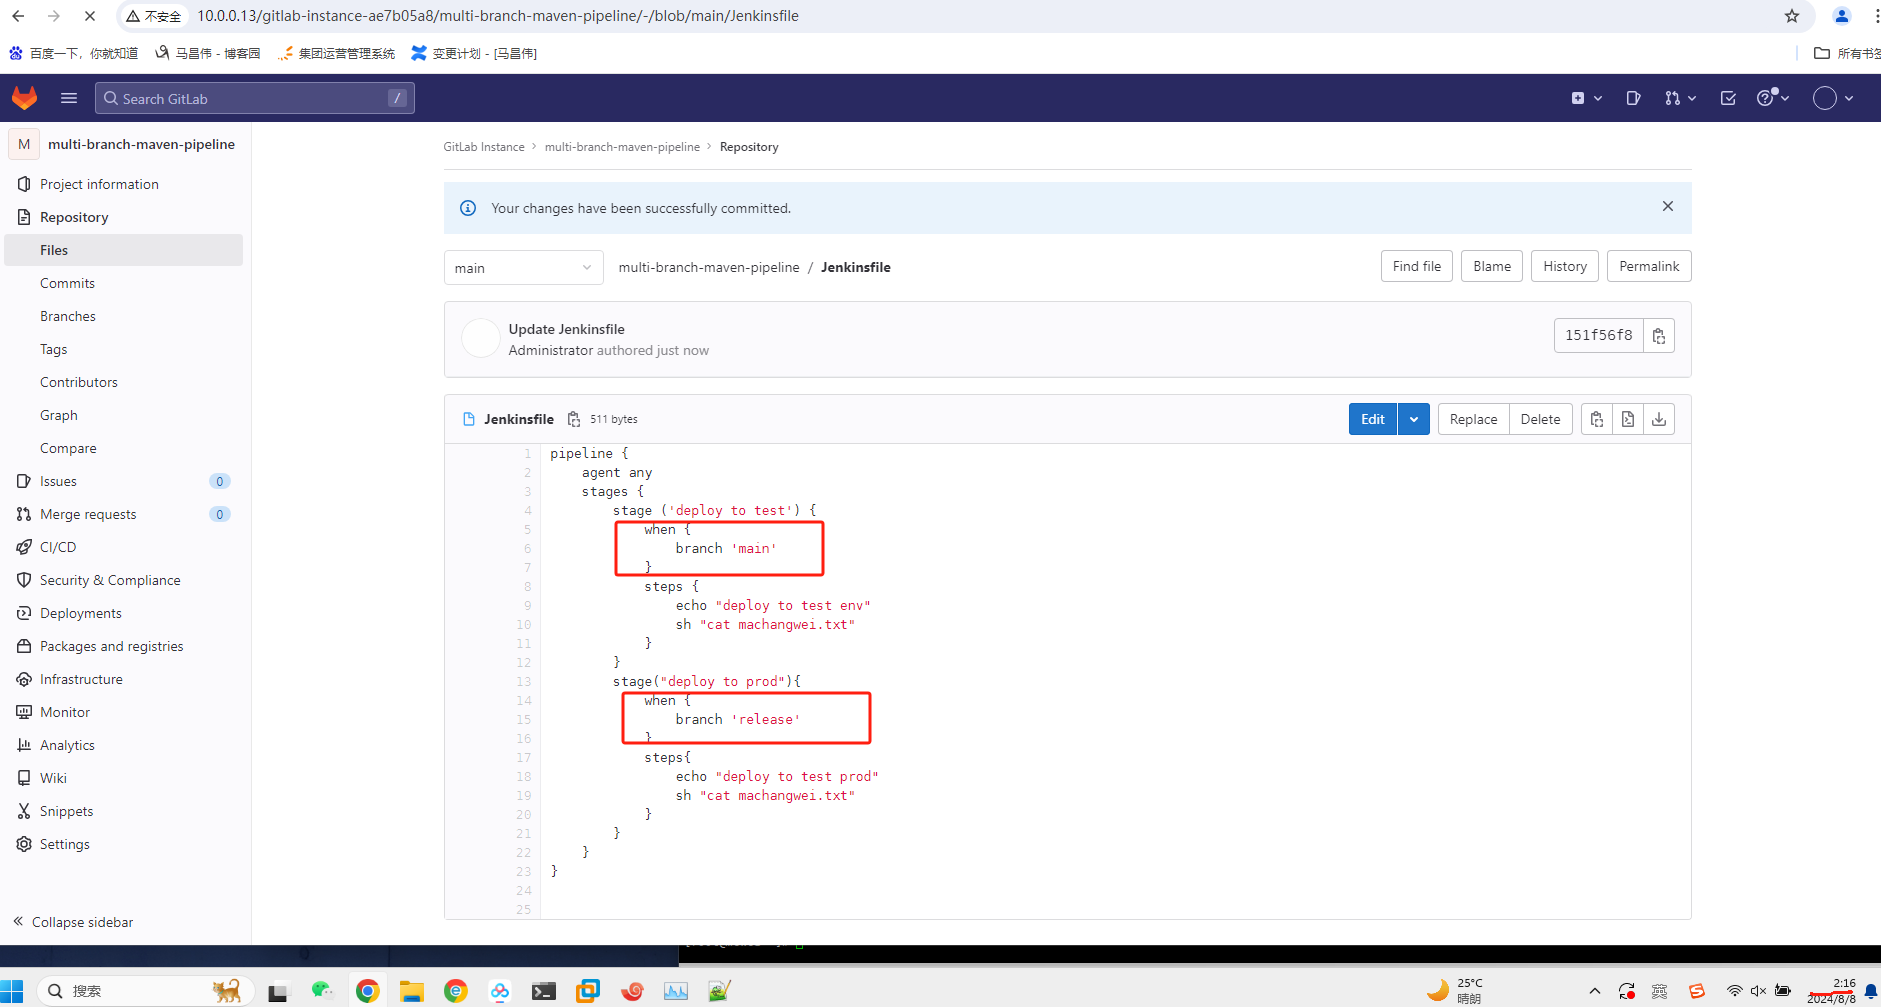
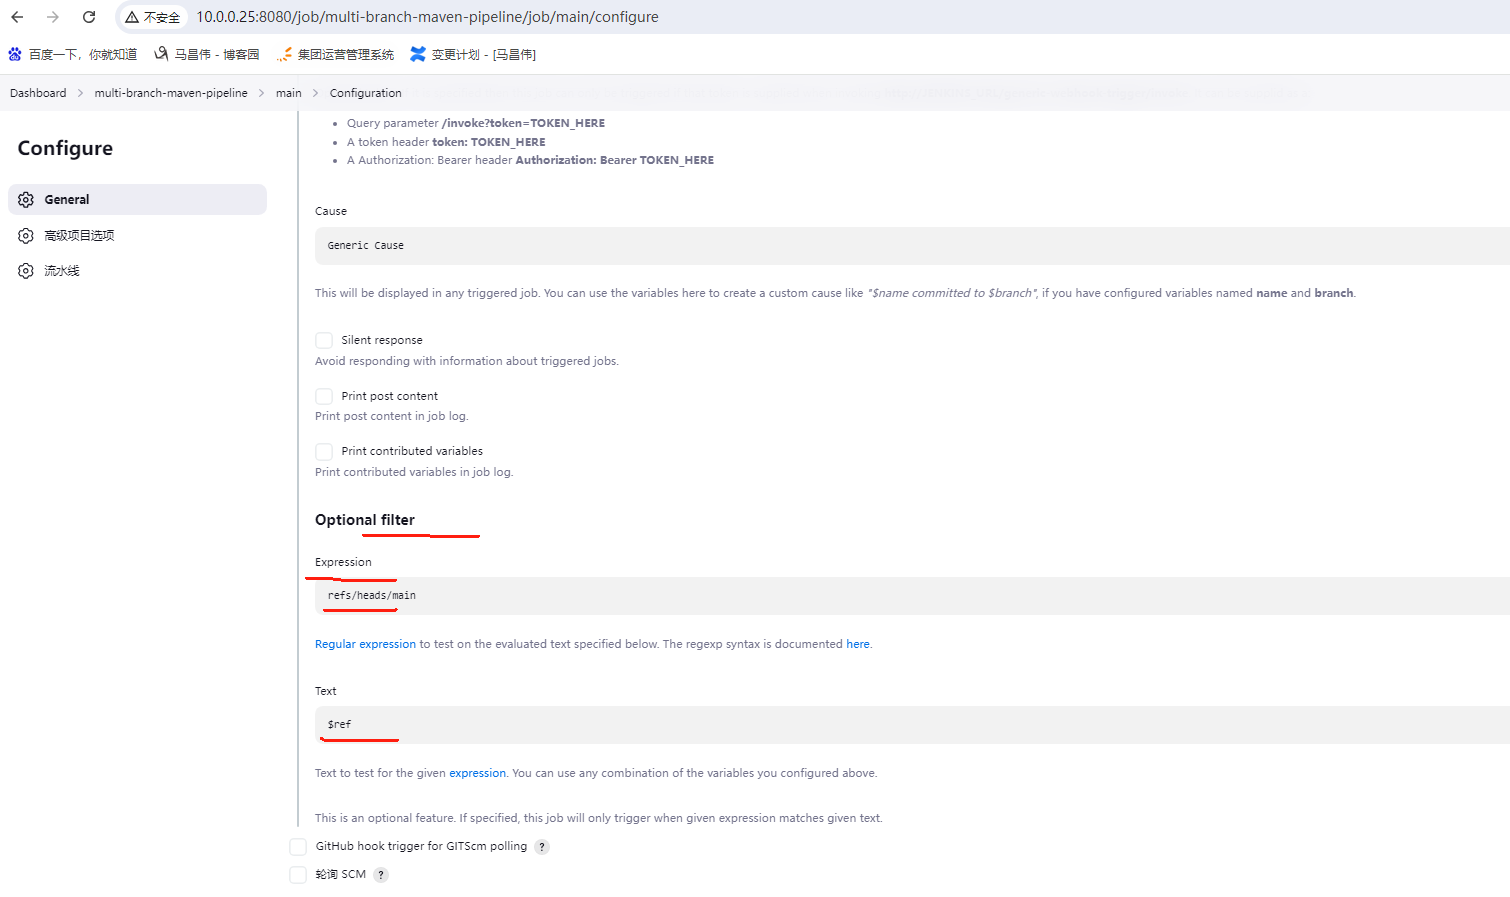
此时是语法有次导致的错误

这里应该写成冒号,写错了
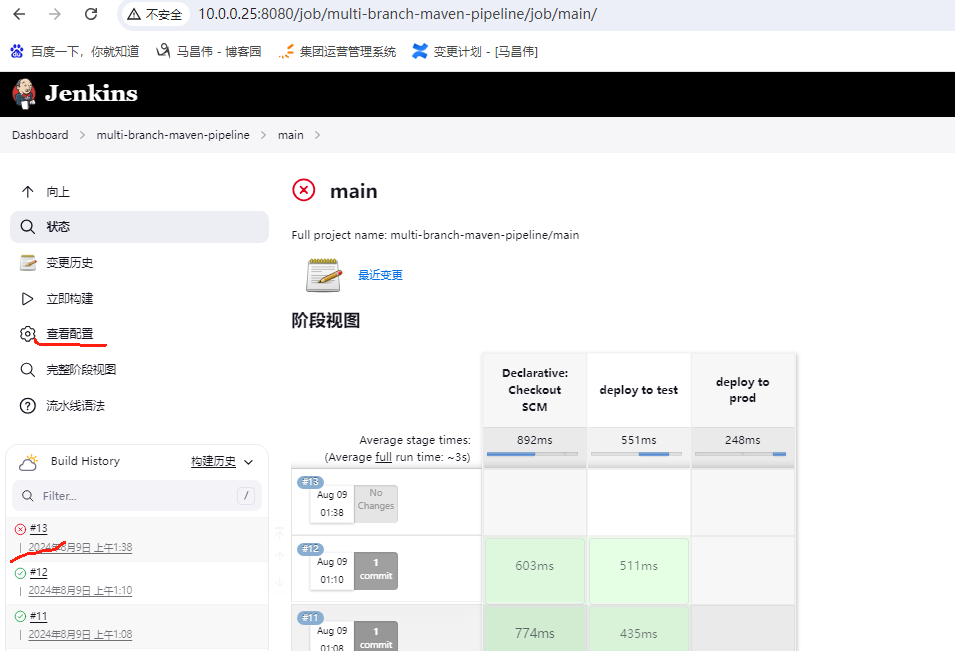
改完后手动触发构建一次,发现成功了。下面可以看到,多分支的构建,这里满足的分支是执行了的,没满足的是没有执行

此时再次查看,触发器已经从Jenkinsfile同步到Jenkins项目配置中了
http://JENKINS_URL/generic-webhook-trigger/invoke
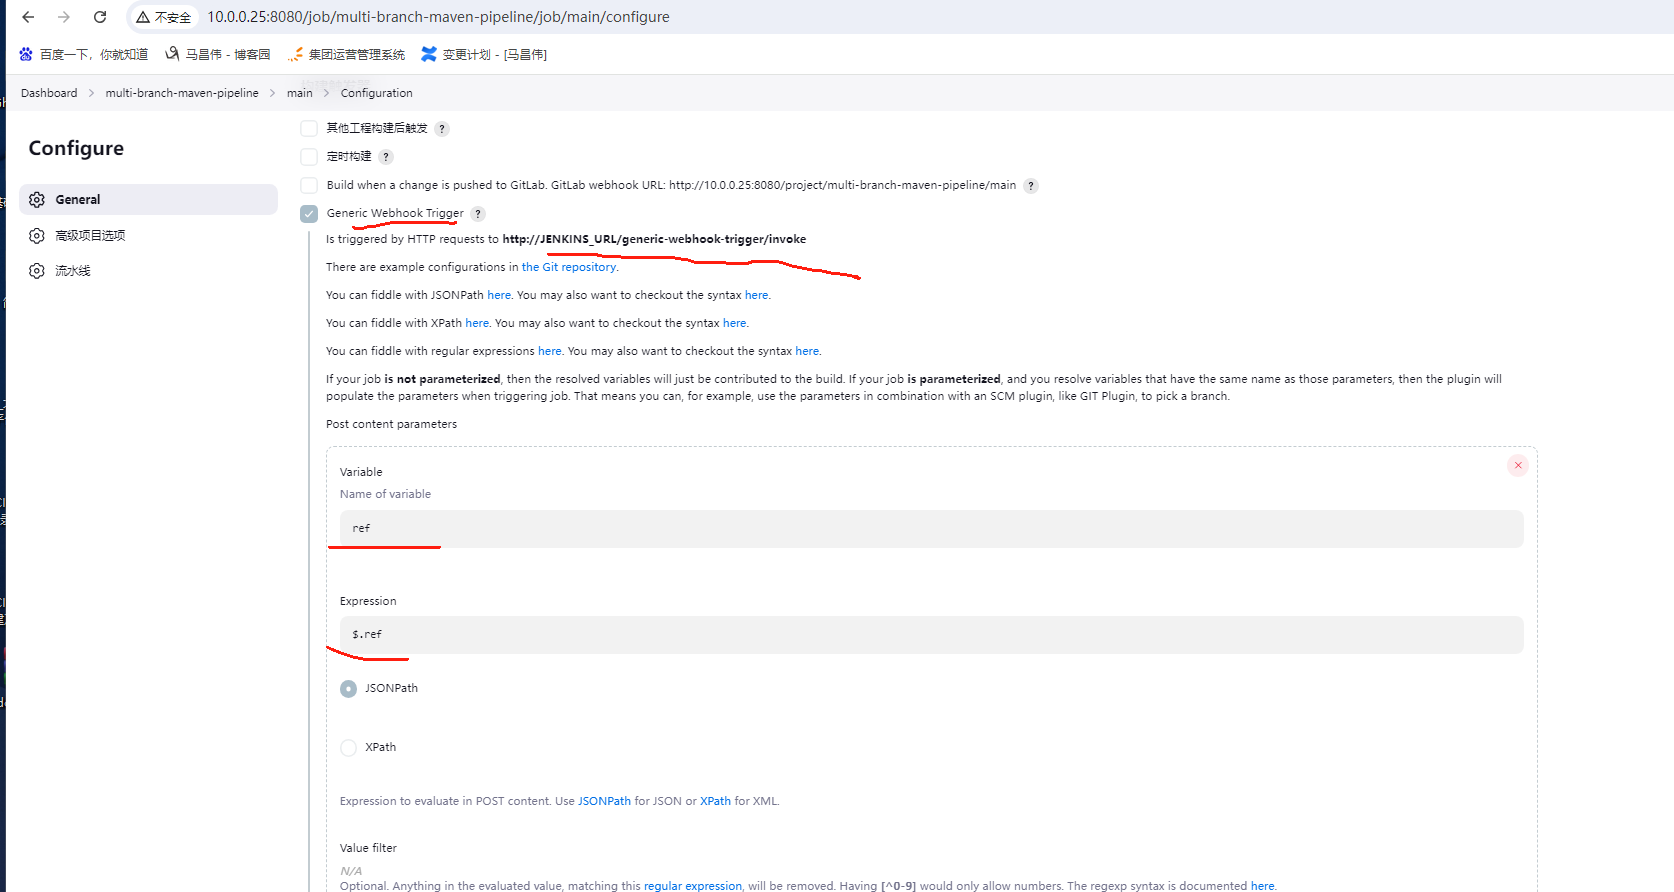
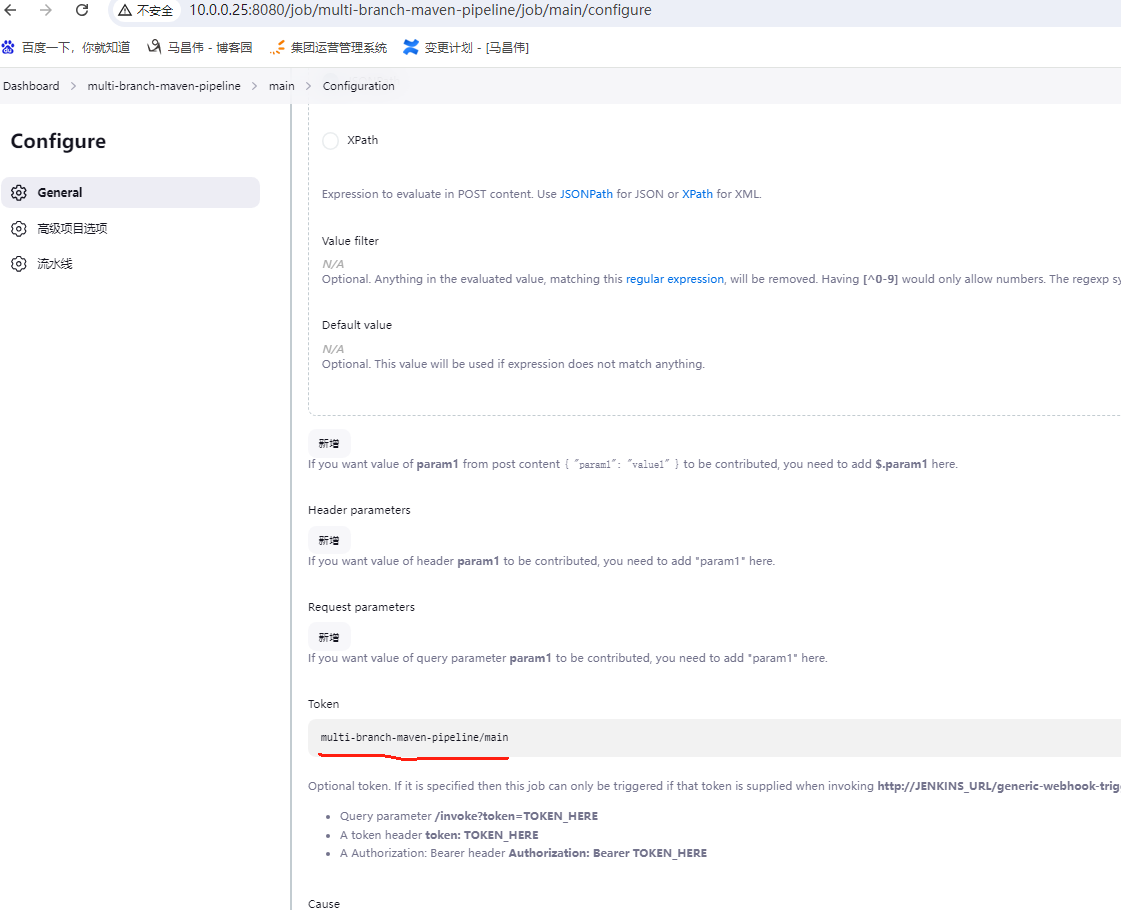
token是env.JOB_NAME
查看release分支,还是之前的触发器,不过我们在gitLab上将webhook删除了,我们可以加上。这样每个分支应该是可以用不同的触发器的
env.BRANCH_NAME 分支名字是项目名加上分支名 把这个当成token了,pipeline里面
curl请求之后,里面触发构建了
[root@mcw12 webapps]# curl -X POST -H "Content-Type: application/json" -d '{ "ref": "refs/heads/main"  }' -vs http://10.0.0.25:8080/generic-webhook-trigger/invoke?token=multi-branch-maven-pipeline/main
* About to connect() to 10.0.0.25 port 8080 (#0)
*   Trying 10.0.0.25...
* Connected to 10.0.0.25 (10.0.0.25) port 8080 (#0)
> POST /generic-webhook-trigger/invoke?token=multi-branch-maven-pipeline/main HTTP/1.1
> User-Agent: curl/7.29.0
> Host: 10.0.0.25:8080
> Accept: */*
> Content-Type: application/json
> Content-Length: 29
>
* upload completely sent off: 29 out of 29 bytes
< HTTP/1.1 200 OK
< Date: Thu, 08 Aug 2024 18:01:01 GMT
< X-Content-Type-Options: nosniff
< Content-Type: application/json;charset=utf-8
< Content-Length: 256
< Server: Jetty(10.0.18)
<
* Connection #0 to host 10.0.0.25 left intact
{"status":"ok","data":{"triggerResults":{"multi-branch-maven-pipeline/main":{"regexpFilterExpression":"refs/heads/main","triggered":true,"resolvedVariables":{"ref":"refs/heads/main"},"regexpFilterText":"refs/heads/main","id":578,"url":"queue/item/578/"}}}}[root@mcw12 webapps]#

 浙公网安备 33010602011771号