


Anroid组件滚动视图(ScollView)简单使用
ScollView应用展示

在xml文件中添加滚动视图
activity_main.xml
<?xml version="1.0" encoding="utf-8"?>
<RelativeLayout xmlns:android="http://schemas.android.com/apk/res/android"
    xmlns:app="http://schemas.android.com/apk/res-auto"
    xmlns:tools="http://schemas.android.com/tools"
    android:layout_width="match_parent"
    android:layout_height="match_parent"
    tools:context=".MainActivity">

    <ScrollView
        android:layout_width="match_parent"
        android:layout_height="wrap_content">

        <TextView
            android:id="@+id/content"
            android:layout_width="match_parent"
            android:layout_height="match_parent"
            android:text="@string/content"
            android:textSize="20sp" />
    </ScrollView>

</RelativeLayout>
效果:

这样就添加了一条垂直的滚动条。
如果要水平的滚动条用HorizontalScrollView
activity_main.xml
<?xml version="1.0" encoding="utf-8"?>
<RelativeLayout xmlns:android="http://schemas.android.com/apk/res/android"
    xmlns:app="http://schemas.android.com/apk/res-auto"
    xmlns:tools="http://schemas.android.com/tools"
    android:layout_width="match_parent"
    android:layout_height="match_parent"
    tools:context=".MainActivity">

    <HorizontalScrollView
        android:layout_width="wrap_content"
        android:layout_height="match_parent">

        <TextView
            android:id="@+id/content"
            android:layout_width="wrap_content"
            android:layout_height="wrap_content"
            android:text="@string/content"
            android:textSize="20sp" />
    </HorizontalScrollView>

</RelativeLayout>
效果

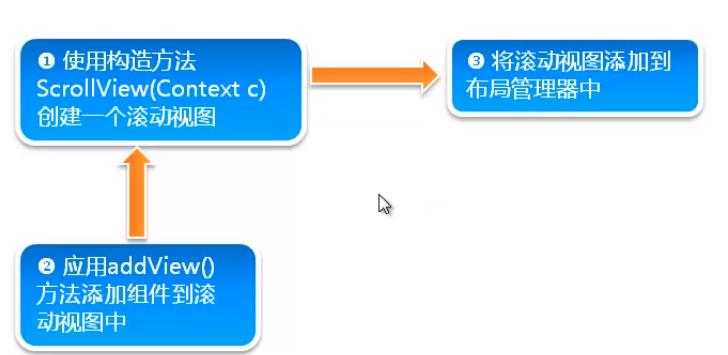
通过Java文件创建滚动视图
步骤:
activity_main.xml
<?xml version="1.0" encoding="utf-8"?>
<LinearLayout
    xmlns:android="http://schemas.android.com/apk/res/android"
    xmlns:tools="http://schemas.android.com/tools"
    android:id="@+id/ll"
    android:orientation="vertical"
    android:layout_width="match_parent"
    android:layout_height="match_parent"
    tools:context=".MainActivity">


</LinearLayout>
就一个LinearLayout给一个id:ll
在string.xml资源文件里写点内容
<resources>
    <string name="app_name">ScrollView2</string>
    <string name="directory">
        《龙族》是江南所著系列长篇魔幻小说,已出版《龙族1火之晨曦》《龙族2悼亡者之瞳》《龙族3黑月之潮(上、中、下)》《龙族4奥丁之渊》,《龙族5悼亡者的归来》2018年5月开始连载。《龙族》讲叙了少年路明非在申请国外大学时收到了来自芝加哥远郊处的一所私立大学——卡塞尔学院的邀请函,随着路明非同学坐上去往芝加哥的CC1000次列车,同时也踏上了与龙族争锋的征程。
.;..
 章节列表
龙族1火之晨曦
开篇序章:白帝城第一幕 卡塞尔之门
        一第一幕 卡塞尔之门 ·
        二第一幕 卡塞尔之门 ·
        三第一幕 卡塞尔之门 ·
          ....

    </string>
</resources>
MainActivity.java
package com.example.scrollview2;

import androidx.appcompat.app.AppCompatActivity;
import android.os.Bundle;
import android.widget.ImageView;
import android.widget.LinearLayout;
import android.widget.ScrollView;
import android.widget.TextView;

public class MainActivity extends AppCompatActivity {

    @Override
    protected void onCreate(Bundle savedInstanceState) {
        super.onCreate(savedInstanceState);
        setContentView(R.layout.activity_main);
        LinearLayout ll = (LinearLayout)findViewById(R.id.ll);
        LinearLayout ll2 = new LinearLayout(MainActivity.this);
        ll2.setOrientation(LinearLayout.VERTICAL);
        ScrollView scrollView = new ScrollView(MainActivity.this);
        ll.addView(scrollView);
        scrollView.addView(ll2);
        ImageView imageView = new ImageView(MainActivity.this);
        imageView.setImageResource(R.drawable.peargril);
        ll2.addView(imageView);
        TextView textView = new TextView(MainActivity.this);
        textView.setText(R.string.directory);
        ll2.addView(textView);
    }
}
效果:


 浙公网安备 33010602011771号