


spring security oathu2实现(demo)
主要spring security oathu2实现一般步骤
我们先来看一张图:
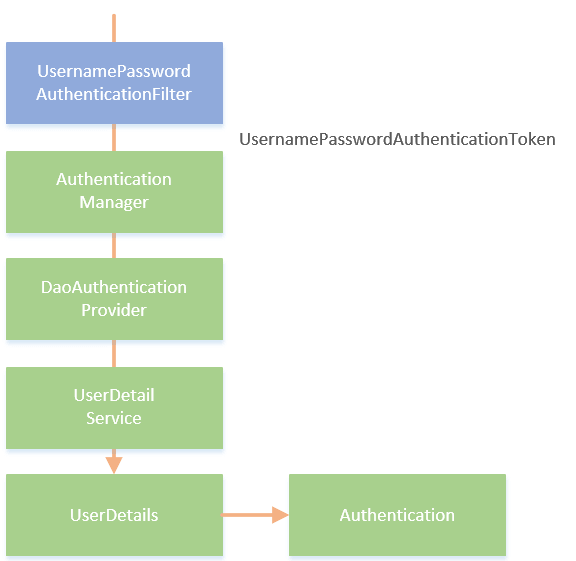
这是一般用户名 密码登录操作步骤,在spring security oauth2中是有全部实现的,所以主要注意使用,问题不大。
但现实中,每一个平台登录方式都有可能不一致,比如短信验证码登录,用户名密码加上验证码登录,等等的登录方式,那么我们应该怎么办呢?
其实呢,按照上图的一般套路,按照步骤分别去实现,也不难。
git@github.com:JasonAngela/auth-demo1.git 代码示例在github上,代码比较简单,一般来说认证服务 跟资源服务是分开写的,但是我为了更容易理解,就扎堆写在一起了。
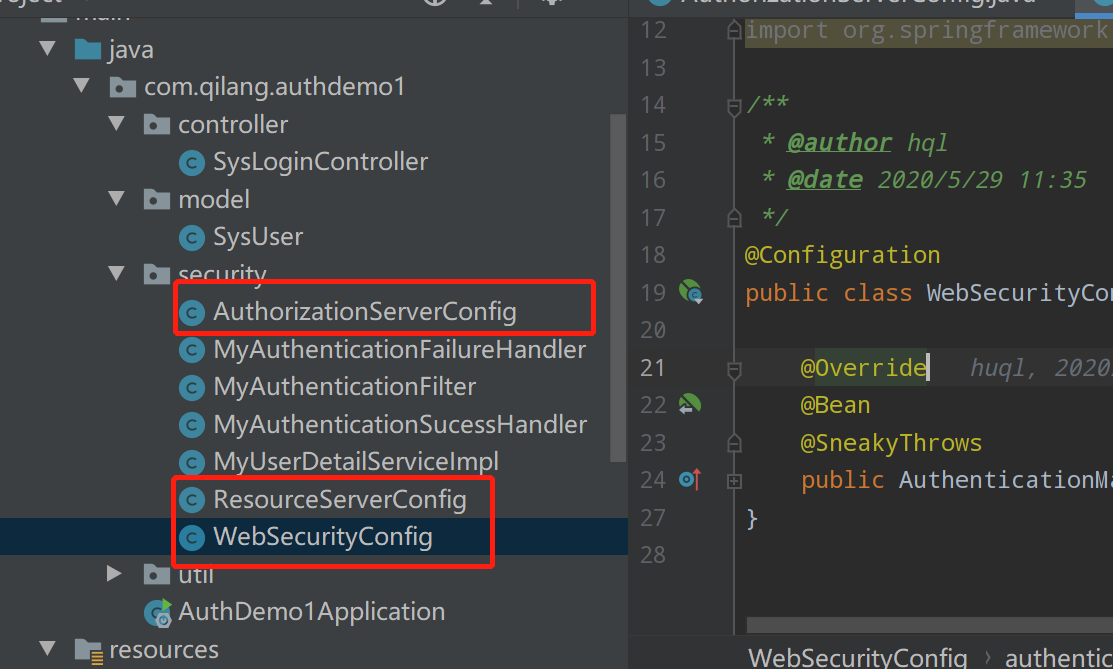
一般配置就是这三个,Filter是自己根据实际情况编写的登录代码。
@Component
public class MyAuthenticationFilter extends AbstractAuthenticationProcessingFilter {

   @Autowired
   private UserDetailsService userDetailsService;

   @Autowired
   private AuthenticationManager authenticationManager;

   @Autowired
   private PasswordEncoder passwordEncoder;

   @Override
   @Autowired
   public void setAuthenticationManager(AuthenticationManager authenticationManager) {
      super.setAuthenticationManager(authenticationManager);
   }

   public MyAuthenticationFilter(UserDetailsService userDetailsService, PasswordEncoder passwordEncoder) {
      super(new AntPathRequestMatcher("/login", "POST"));
      this.userDetailsService = userDetailsService;
      this.passwordEncoder = passwordEncoder;
   }

   @Override
   public Authentication attemptAuthentication(HttpServletRequest request, HttpServletResponse response)
         throws AuthenticationException, IOException, ServletException {
      if (!request.getMethod().equals("POST")) {
         throw new AuthenticationServiceException(
               "Authentication method not supported: " + request.getMethod());
      }

      String username = request.getParameter("username");
      String password = request.getParameter("password");

      if (username == null) {
         username = "";
      }

      if (password == null) {
         password = "";
      }

      username = username.trim();

      UserDetails user;
      try {
         user = userDetailsService.loadUserByUsername(username);
      } catch (UsernameNotFoundException var6) {
         throw new UsernameNotFoundException("账号或密码不正确");
      }

      UsernamePasswordAuthenticationToken authRequest = new UsernamePasswordAuthenticationToken(
            username, passwordEncoder.encode(password), user.getAuthorities() );
      return authRequest;
   }


   @Override
   @Autowired
   public void setAuthenticationSuccessHandler(AuthenticationSuccessHandler successHandler) {
      super.setAuthenticationSuccessHandler(successHandler);
   }

   @Override
   @Autowired
   public void setAuthenticationFailureHandler(AuthenticationFailureHandler failureHandler) {
      super.setAuthenticationFailureHandler(failureHandler);
   }
}
@Slf4j
@Component
public class MyAuthenticationSucessHandler implements AuthenticationSuccessHandler {

   @Autowired
   private ObjectMapper mapper;

   @Autowired
   @Lazy
   private DefaultTokenServices tokenServices;

   @Override
   public void onAuthenticationSuccess(HttpServletRequest request, HttpServletResponse response,
         Authentication authentication) throws IOException {
      try {
         TokenRequest tokenRequest = new TokenRequest(null, null, null, null);
         // 简化
         OAuth2Request oAuth2Request = tokenRequest.createOAuth2Request(new BaseClientDetails());
         OAuth2Authentication oAuth2Authentication = new OAuth2Authentication(oAuth2Request, authentication);
         OAuth2AccessToken oAuth2AccessToken = tokenServices.createAccessToken(oAuth2Authentication);
         log.info("获取token 成功:{}", oAuth2AccessToken.getValue());
         response.setCharacterEncoding("UTF-8");
         response.setContentType(MediaType.APPLICATION_JSON_UTF8_VALUE);
         //返回JSON
         String result = Json.toJsonString(JsonResult.builder()
               .code(HttpStatus.OK.value())
               .data(oAuth2AccessToken)
               .build());
         PrintWriter printWriter = response.getWriter();
         printWriter.append(result);
      } catch (IOException e) {
         throw new BadCredentialsException(
               "Failed to decode basic authentication token");
      }
   }
}
@Component
public class MyAuthenticationFailureHandler implements AuthenticationFailureHandler {

   @Autowired
   private ObjectMapper mapper;

   @Override
   public void onAuthenticationFailure(HttpServletRequest request, HttpServletResponse response,
         AuthenticationException exception) throws IOException {
      response.setStatus(HttpStatus.INTERNAL_SERVER_ERROR.value());
      response.setContentType("application/json;charset=utf-8");
      response.getWriter().write(mapper.writeValueAsString(exception.getMessage()));
   }
}
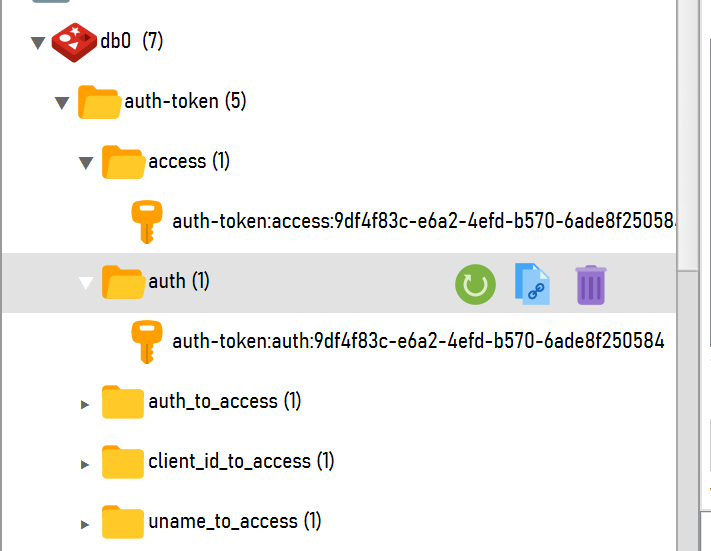
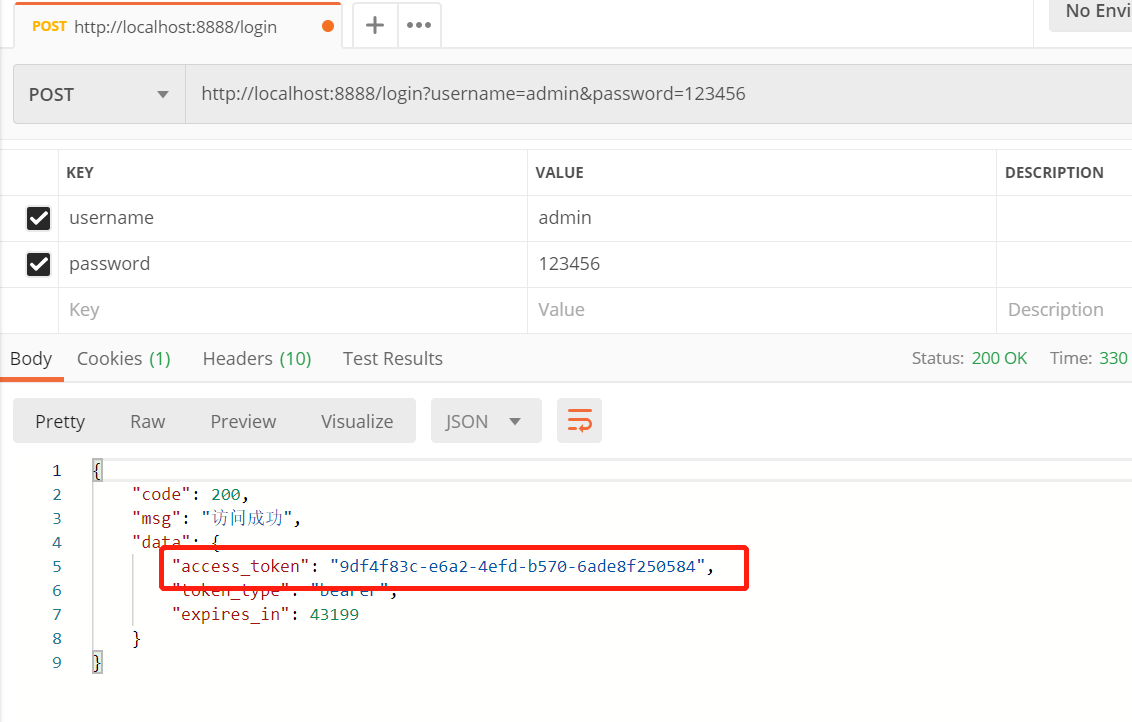
success这个我采用最终返回封装,这个可以自己定义生成token的方式,我这里是采用内置的
,采用redis存储
其余的代码可以看下demo,主要讲解这他框架的一般使用方式,封装好,用起来不难,但是原理的话就要靠自己去看了!

 浙公网安备 33010602011771号