directive 指令一
什么是Directive
Directive将一段html,js封装在一起,形成一个可以复用的独立个体,具有特定的功能。angularjs中的指令通常是比较小的组件,它相当于是给我们提供了一些公共的自定义的DOM元素、class属性或attr属性。除此之外,我们可以在这个基础上来操作scope,绑定事件,更改样式等等。通过Directive我们可以封装很多公共指令,比如分页、自动补全等多个指令,封装好后,我们下次复用只要在html页面上添加该指令就可以实现复杂的功能。
总结一下使用Directive的场景:
1.抽象一个自定义组件,在其他地方重用。
2.使html更具语义化,不需要深入研究代码和逻辑就可以知道页面实现了哪些功能。
angular封装了很多自己的指令,都是ng开头,比如ng-model,ng-controller,ng-show,ng-click等等,我们也可以封装自己的指令,在当前的节点上干点特别的事。
例子
html部分:
<body ng-app="testApp">
    <div ng-controller="testController">
        <input type="text" ng-model="city" placeholder="Enter a city" />
        <my-test ng-model="city" ></my-test>
        <span my-test="exp" ng-model="city"></span>
        <span ng-model="city"></span>
    </div>
</body>
js部分
var app = angular.module('testApp', [
    'directives',
    'controllers'
]);

// 自定义directive
var myDirective = angular.modeule('directives', []);
myDirective.directive('myTest', function() {
    return {
        restrict: 'EMAC',
        require: '^ngModel',
        scope: {
            ngModel: '='
        },
        template: '<div><h4>Weather for {{ngModel}}</h4</div>'
    };
});

// 定义controller
var myControllers = angular.module('controllers', []);
myControllers.controller('testController', [
    '$scope',
    function($scope) {
        $scope.name = 'this is directive1';
    }
]);
以上是一个自定义myTest这个directive的应用。来看一下定义一个directive可以用哪些格式和参数:
var myDirective = angular.module('directives', []);

myDirective.directive('directiveName', function() {
    return {
        template: '<div></div>',
        replace: false,
        transclude: true,
        restrict: 'E',
        scope: {},
        controller: function($scope, $element) {

        },
        complie: function(tElement, tAttrs, transclude) {
            return {
                pre: function preLink(scope, iElement, iAttrs, controller) {

                },
                post: function postLink(scope, iElement, iAttrs, controller) {

                }
            };
        },
        link: function(scope, iElement, iAttrs) {

        }
    };
});
我们可以发现directive最关键的部分就是通过return来设置参数,那么return里可以设置哪些参数呢,下面具体讲一讲这些参数及其说明。
1.name
当前scope的名称,一般声明时使用默认值,不用手动设置此属性。
2.priority
优先级。当有多个directive定义在同一个DOM元素上时,有时要明确他们的执行顺序。如果优先级相同,那么执行顺序不确定(一般情况下,优先级高的先执行,相同优先级的按照先绑定后执行)。
3.teminal
最后一组。如果设置为true,那么当前的priority将会成为最后一组执行的directive。也就是说,比这个directive的priority更低的directive将不会执行,同优先级的依然会执行,但执行顺序不确定。
4.scope
(1)true
表示为这个directive创建一个新的scope。如果在同一个元素中有多个directive需要新的scope的话,它还是只会创建一个scope。
(2){}
将会创建一个新的,独立的scope,这个scope与一般的scope的区别在于它不是通过原型继承父scope的。这对可复用的组件而言很有用,可以有效的防止读取或者修改父级scope的数据。
5.controller
controller允许其他directive通过指定名称的require进行共享,也就是说directive之间可以相互沟通,增强相互之间的行为。controller默认注入以下本地对象:
$scope:与当前元素结合的scope
$element:当前元素
$attrs:当前元素的属性对象
$transclude:一个预先绑定到当前scope的转置linking function
6.require
请求另外的controller,传入当前directive的linking function中,require需要传入一个directive controller的名称,如果没有对应的controller会抛出一个error。名称可以加入以下前缀:
?: 不要抛出异常,这就使得这个依赖变为一个可选项
^: 允许查找父元素的controller
7.restrict
EACM的子集的字符串,限制了directive为指定的声明方式。省略的话,directive将紧紧允许通过属性声明的方式:
E:元素
A:属性
C:class名
M:注释
比较常用的是EA
8.template
如果replace为true,则将模板内容替换当前的html元素,并将原来元素的属性,class一并转移;如果replace为false,则将模板元素作为当前元素的子元素。
9.templateUrl
与template基本一致,但模板通过指定的url进行加载。由于模板加载是异步的,所有compilation,linking都会暂停,等加载完毕后再执行。
10.replace
设置为true,那么模板将会替换当前元素,而不是作为子元素添加到当前元素中。(为true时模板必须要有一个根节点)
11.transclude
编译元素的内容,使它能够被directive使用。需要在模板中配合ngTransclude使用。
12.compile
13.link
看一个transclude的例子
<body>
    <hello>
        <br/><span>原始的内容,</span><br/>
        <span>还会在这里。</span>
    </hello>
    <hello>
    </hello>
</body>
var appModule = angular.module('app', []);
appModule.directive('hello', function() {
    return {
        restrict: 'E',
        template: '<div>Hi there <span ng-transclude></span></div>',
        transclude: true
    };
});
可以发现,这里的ng-transclude会把hello标签里内容读取出来,如果transclude设置为false,那么浏览器就不会处理hello这个标签里内容。
注意:如果指令使用了transclude参数,那么控制器就无法正常监听数据模型的变化。建议在链接函数里使用$watch服务。
接下来重点讲一下scope。
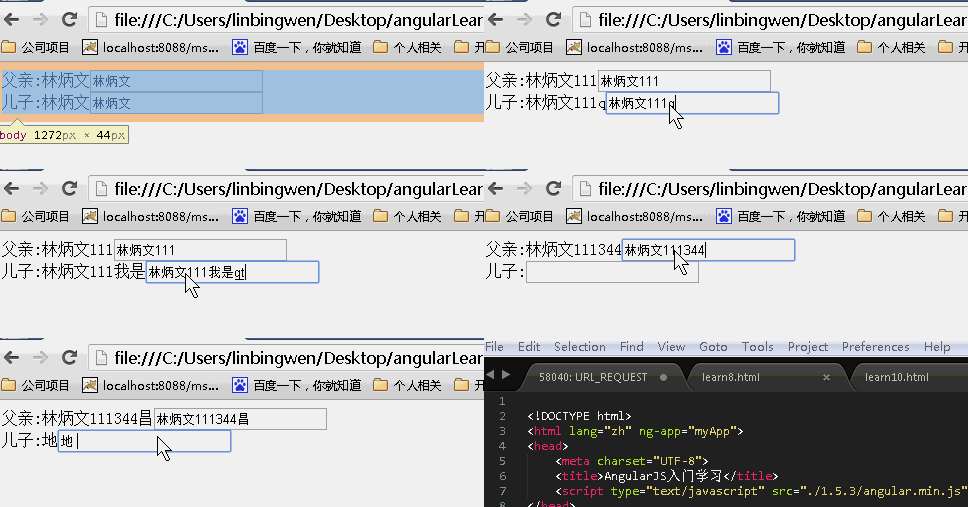
scope主要是用来隔离作用域的,那么scope在true,false,{}时值是如何变化的呢,看下面一个例子:
<body>
<div ng-controller='MainController'>
        父亲:{{name}}<input ng-model="name" />
        <div my-directive></div>
  </div>
</body>
<script type="text/javascript">
var app = angular.module('myApp', []);
app.controller('MainController', function ($scope) {
           $scope.name = '林炳文';
});
app.directive('myDirective', function () {
            return {
                restrict: 'EA',
                scope:false,
                template: '<div>儿子:{{ name }}<input ng-model="name"/></div>'
            };
});
</script>
scope:false时,子scope继承父scope的值,改变父亲的值,儿子的值也会改变,反之一样(继承不隔离) 
scope:true时,子scope继承父scope的值,改变父亲的值,儿子的值也会改变。但是改变儿子的值,父亲的值不变(继承隔离) 
scope:{}时,没有继承父scope,改变任何一方不会改变另一方的值(不继承隔离)
当你想要创建一个可重用的组件时,隔离作用域是一个很好的选择,这样可以防止父作用域被污染。那么隔离作用域后如何访问父级作用域呢?
angular通过绑定策略来访问父作用域的属性。
directive提供了三种方法同隔离之外的地方进行交互:
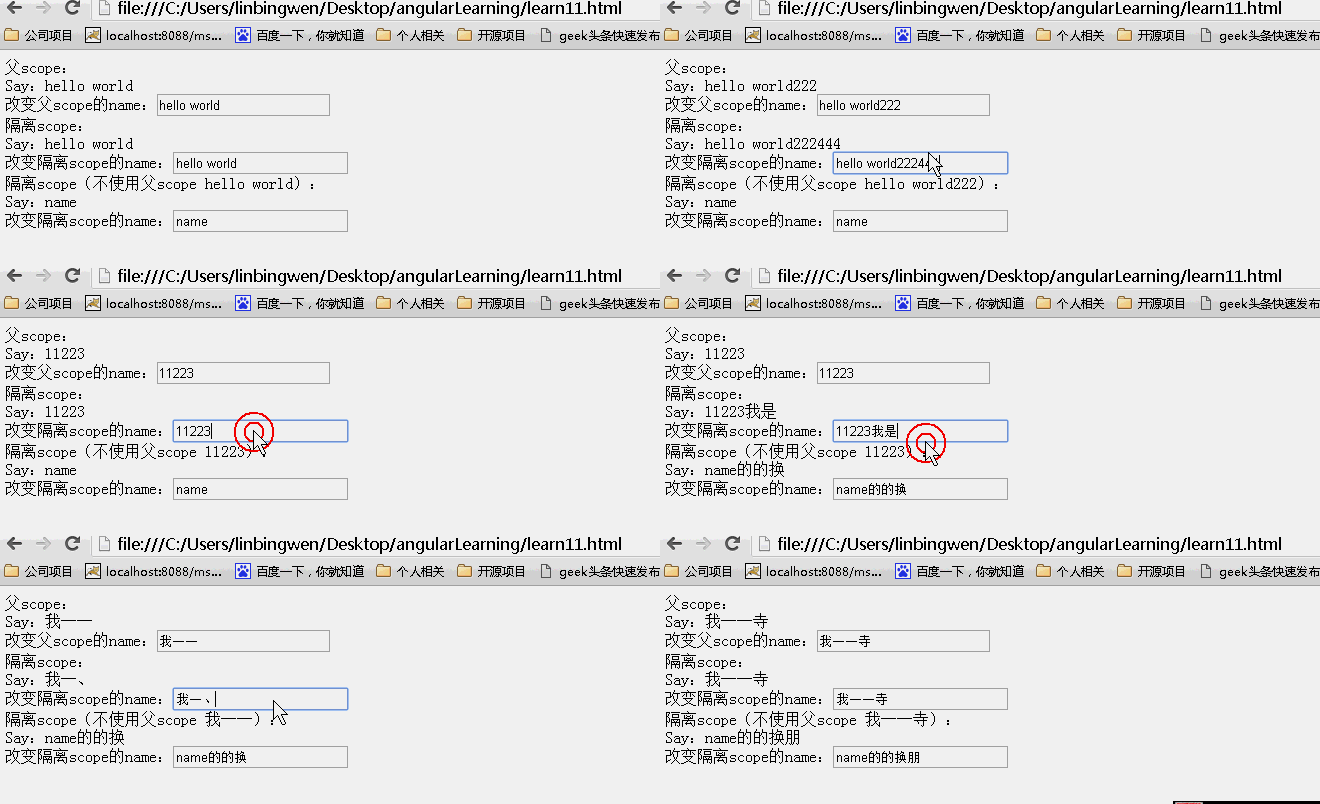
(1) @
主要通过directive所在的标签属性绑定外部字符串值。这种绑定是单向的,即父scope变化,directive中的scope的对应属性也会变化。但是隔离scope中的绑定变化,父scope是不知道的。
<div ng-controller="myController">
   <div class="result">
       <div>父scope:
           <div>Say:{{name}}<br>改变父scope的name:<input type="text" value="" ng-model="name"/></div>
       </div>
       <div>隔离scope:
           <div isolated-directive name="{{name}}"></div>
       </div>
        <div>隔离scope(不使用父scope {{name}}):
             <div isolated-directive name="name"></div>
        </div>
   </div>
</div>
var app = angular.module('myApp', []);
app.controller("myController", function ($scope) {
        $scope.name = "hello world";
}).directive("isolatedDirective", function () {
        return {
            scope: {
                name: "@"
            },
            template: 'Say:{{name}} <br>改变隔离scope的name:<input type="buttom" value="" ng-model="name" class="ng-pristine ng-valid">'
        };
    });

(2) =
通过directive的attr属性在局部scope和父scope的属性名之间建立双向绑定
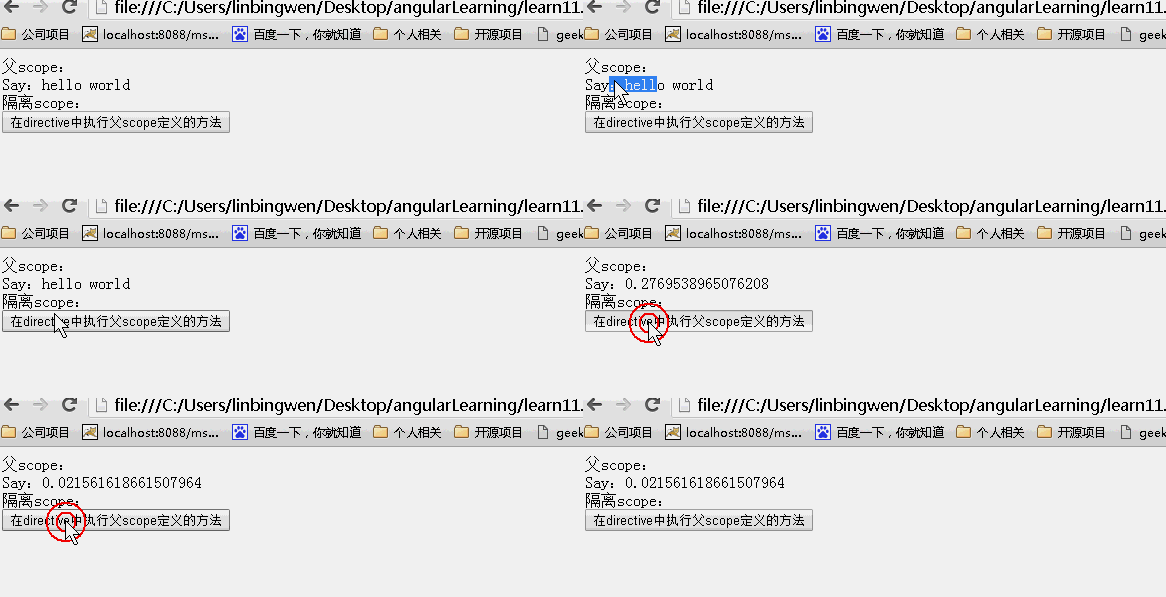
(3) &
directive在父scope的上下文中执行一个表达式,此表达式是一个function。directive可以通过一个父scope中的function,当directive中有什么动作需要更新到父scope中的时候,可以在父scope上下文中执行一段代码或一个函数。
<div  ng-controller="myController">
    <div>父scope:
        <div>Say:{{value}}</div>
    </div>
    <div>隔离scope:
        <div isolated-directive action="click()"></div>
    </div>
</div>
var app = angular.module('myApp', []);
app.controller("myController", function ($scope) {
    $scope.value = "hello world";
    $scope.click = function () {
        $scope.value = Math.random();
    };
}).directive("isolatedDirective", function () {
    return {
        scope: {
            action: "&"
        },
        template: '<input type="button" value="在directive中执行父scope定义的方法" ng-click="action()"/>'
        }
})

再看一个scope应用的例子
<body ng-app="testApp">
    <div ng-controller="attrtest">
        <my-attr info="naomi"></my-attr>
    </div>
</body>
myDirectives.directive('myAttr', function() {
    return {
        restrict: 'E',
        scope: {
            customerInfo: '=info'
        },
        template: 'Name: {{customerInfo.name}} Address: {{customerInfo.address}}<br>' +
                  'Name: {{vojta.name}} Address: {{vojta.address}}'
    };
});

myControllers.controller('attrtest',['$scope',
    function($scope) {
        $scope.naomi = {
            name: 'Naomi',
            address: '1600 Amphitheatre'
        };
        $scope.vojta = {
            name: 'Vojta',
            address: '3456 Somewhere Else'
        };
    }
]);
结果:
Name: Address:
Name: Vojta Address: 3456 Somewhere Else
接下来讲一下require
<body>
    <outer-directive>
        <inner-directive></inner-directive>
        <inner-directive2></inner-directive2>
    </outer-directive>
    <script>
        var app = angular.module('myApp', []);
        app.directive('outerDirective', function() {
            return {
                scope: {},
                restrict: 'AE',
                controller: function($scope) {
                    this.say = function(someDirective) {
                    console.log('Got:' + someDirective.message);
                    };
                }
            };
        });
        app.directive('innerDirective', function() {
            return {
                scope: {},
                restrict: 'AE',
                require: '^outerDirective',
                link: function(scope, elem, attrs, controllerInstance) {
                    scope.message = "Hi,leifeng";
                    controllerInstance.say(scope);
                }
            };
        });
        app.directive('innerDirective2', function() {
            return {
                scope: {},
                restrict: 'AE',
                require: '^outerDirective',
                link: function(scope, elem, attrs, controllerInstance) {
                    scope.message = "Hi,shushu";
                    controllerInstance.say(scope);
                }
            };
        });

    </script>

</body>
结果:
Got:Hi,leifeng
Got:Hi,shushu
上例中的innerDirective和innerDirective2复用了outerDirective的controller中的方法。这也进一步说明,指令中的controller是用来让不同指令间通信用的。
require的值是另一个指令的名称,但实际上引用的是那个指令的控制器实例。require非常有用,因为很多时候指令之间是要相互配合的,比如说require:'ngModel',那么当angular初始化它的时候,就会在它所在的元素上寻找一个叫做ng-model的指令,然后取得它的控制器实例。找到时候,就可以把这个控制器的实例作为Link函数的第四个参数传进来。
关于require:'ngModel'其他的一些用法,会在directive二讲到。
再说说controller,link,compile之间的关系
myController.controller('directive2',[
    '$scope',
    function($scope) {
        $scope.number = '1111 ';
    }
]);

myDirective.directive('exampleDirective', function() {
    return {
        restrict: 'E',
        template: '<p>Hello {{number}}!</p>',
        controller: function($scope, $element){
            $scope.number = $scope.number + "22222 ";
        },
        link: function(scope, el, attr) {
            scope.number = scope.number + "33333 ";
        },
        compile: function(element, attributes) {
            return {
                pre: function preLink(scope, element, attributes) {
                    scope.number = scope.number + "44444 ";
                },
                post: function postLink(scope, element, attributes) {
                    scope.number = scope.number + "55555 ";
                }
            };
        }
    }
});
<body ng-app="testApp">
    <div ng-controller="directive2">
        <example-directive></example-directive>
    </div>
</body>
看一下结果:
Hello 1111 22222 44444 5555 !
从结果可以看出,controller先运行,compile后运行,link不运行。
注掉compile,结果是:
Hello 1111 22222 33333 !
这次是controller先运行,link后运行。
也就是说,link和compile不兼容,一般的,compile比link的优先级要高。
注意,在controller和link中都可以定义方法,它们的区别是,controller主要是用来提供可在指令间复用的行为,但link链接函数只能在当前内部指令中定义行为,无法再指令复用。


 浙公网安备 33010602011771号