


OSFPv3的配置
实验目的
1. 掌握 OSPFv3 的配置方法
2. 掌握在帧中继环境下 OSPFv3 的配置方法
3. 掌握 OSPFv3 NSSA 的配置方法
4. 掌握外部路由汇总的配置
5. 掌握区域间路由的汇总配置
IPv4地址表
|
Device |
Interface |
IP Address |
|
R1 |
F 0/0 |
10.1.88.1 |
|
e 1/0 |
11.1.88.1 |
|
|
R5 |
S 3/0 |
192.168.88.5 |
|
R6 |
S 3/0 |
192.168.88.6 |
|
R3 |
F 0/0 |
10.1.88.3 |
|
S 3/0 |
192.168.88.3 |
|
|
R2 |
F 0/0 |
10.1.88.2 |
|
S 3/0 |
12.1.88.2 |
|
|
R7 |
e 1/0 |
11.1.88.7 |
|
S 3/0 |
12.1.88.7 |
第一步:开启R4的帧中继交换功能
R4(config)#frame-relay switching
第二步:配置接口的封装
R4(config)#int s3/0
R4(config-if)#no shutdown
R4(config-if)#clock rate 128000
R4(config-if)#encapsulation frame-relay
R4(config)#int s3/1
R4(config-if)#no shutdown
R4(config-if)#clock rate 128000
R4(config-if)#encapsulation frame-relay
R4(config)#int s3/2
R4(config-if)#no shutdown
R4(config-if)#clock rate 128000
R4(config-if)#encapsulation frame-relay
第三步:配置LMI类型
R4(config)#int s3/0
R4(config-if)#frame-relay lmi-type cisco
R4(config-if)#frame-relay intf-type dce
R4(config)#int s3/1
R4(config-if)#frame-relay lmi-type cisco
R4(config-if)#frame-relay intf-type dce
R4(config)#int s3/2
R4(config-if)#frame-relay lmi-type cisco
R4(config-if)#frame-relay intf-type dce
第四步:配置帧中继交换表
R4(config)#int s3/0
R4(config-if)#frame-relay route 103 interface s3/1 301
R4(config-if)#frame-relay route 104 interface s3/2 401
R4(config)#int s3/1
R4(config-if)#frame-relay route 301 interface Serial3/0 103
R4(config)#int s3/2
R4(config-if)#frame-relay route 401 interface Serial3/0 104
用show frame-relay route命令查看帧中继交换机是否正常

第五步:配置R3、R5、R6,使得他们能够互相通信
R3(config)#int s3/0
R3(config-if)#ip address 192.168.88.3 255.255.255.0
R3(config-if)#no shutdown
R3(config-if)#encapsulation frame-relay
R3(config-if)#frame-relay lmi-type cisco
R3(config-if)#no frame-relay inverse-arp //关闭自动映射
R3(config-if)#frame-relay map ip 192.168.88.5 103 broadcast
R3(config-if)#frame-relay map ip 192.168.88.6 104 broadcast
R5(config)#int s3/0
R5(config-if)#ip address 192.168.88.5 255.255.255.0
R5(config-if)#no shutdown
R5(config-if)#encapsulation frame-relay
R5(config-if)#no frame-relay inverse-arp
R5(config-if)#frame-relay map ip 192.168.88.3 301 broadcast
R6(config)#int s3/0
R6(config-if)#ip address 192.168.88.6 255.255.255.0
R6(config-if)#no shutdown
R6(config-if)#encapsulation frame-relay
R6(config-if)#no frame-relay inverse-arp
R6(config-if)#frame-relay map ip 192.168.88.3 401 broadcast
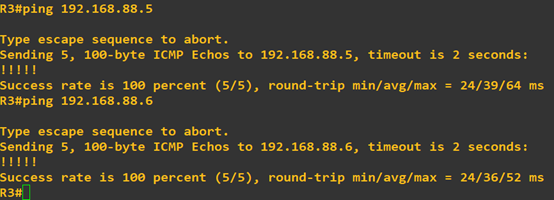
Ping命令测试
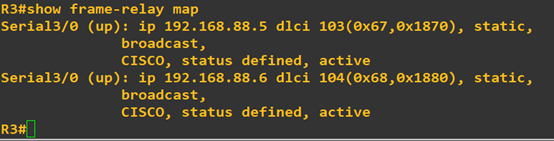
查看R3的帧中继表
第六步:开始配置OSPF
先配置外部路由器(R1、R3为例,R2、R7同理)
R1(config)#router ospf 1
R1(config-router)#router-id 1.1.1.1
R1(config-router)#area 1 nssa――配置区域 1 为 NSSA 区域
R1(config)#interface loopback 0
R1(config-if)#ip add 1.1.1.1 255.255.255.255
R1(config)#int f 0/0
R1(config-if)#ip add 10.1.88.1 255.255.255.0
R1(config-if)#no shutdown
R1(config-if)#ip ospf 1 area 0
R1(config-if)#int e1/0
R1(config-if)#ip add 11.1.88.1 255.255.255.0
R1(config-if)#no shut
R1(config-if)#ip ospf 1 area 1
R1(config-if)#ex
R1(config)#router ospf 1
R1(config-router)#network 1.1.1.1 0.0.0.0 area 0
R1(config-router)#network 10.1.88.1 0.0.0.255 area 0
R1(config-router)#network 11.1.88.1 0.0.0.255 area 1
R3(config)#router ospf 1
R3(config-router)#router-id 3.3.3.3
R3(config)#interface loopback 0
R3(config-if)#ip add 3.3.3.3 255.255.255.255
R3(config)#int f0/0
R3(config-if)#ip add 10.1.88.3 255.255.255.0
R3(config-if)#no shut
R3(config-if)#ip ospf 1 area 0
R3(config-if)#int s3/0
R3(config-if)#ip ospf 1 area 2
R3(config-if)#ex
R3(config)#router ospf 1
R3(config-router)#network 3.3.3.3 0.0.0.0 area 0
R3(config-router)#network 10.1.88.0 0.0.0.255 area 0
R3(config-router)#network 192.168.88.0 0.0.0.255 area 2
R3(config-router)#neighbor 192.168.88.5
R3(config-router)#neighbor 192.168.88.6
第七步:配置帧中继中路由器的ospf(R5为例,R6同理)
R5(config)#router ospf 1
R5(config-router)#router-id 5.5.5.5
R5(config-router)#ex
R5(config)#int loopback 0
R5(config-if)#ip add 5.5.5.5 255.255.255.255
R5(config-if)#ip ospf 1 area 2
R5(config-if)#int s3/0
R5(config-if)# ip ospf 1 area 2
R5(config-if)# ip ospf priority 0
R5(config)#router ospf 1
R5(config-router)#network 5.5.5.5 0.0.0.0 area 2
R5(config-router)#network 192.168.88.0 0.0.0.255 area 2
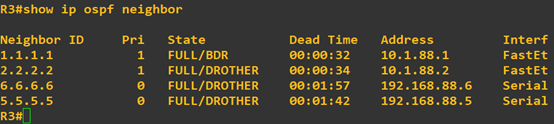
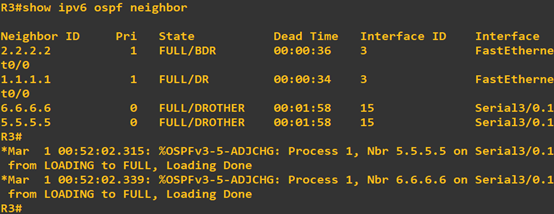
在R3上查看ospf邻居关系
Show ip ospf neighbor
测试路由通路情况
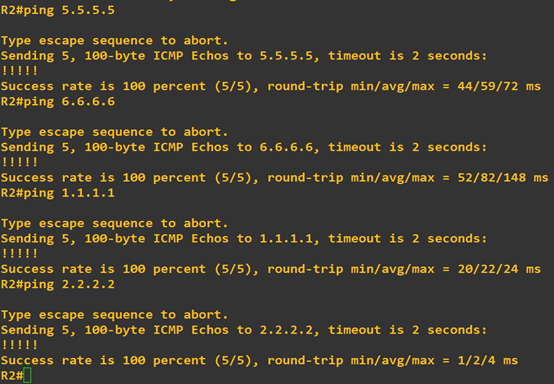
在R2上测试得出结果如下(从内部到外部结课ping通,完成实验要求)
由于RIPNG是对IPV6的设及的一种路由协议,不支持IPV4,所以在这没有做相关配置
Ospfv3配置
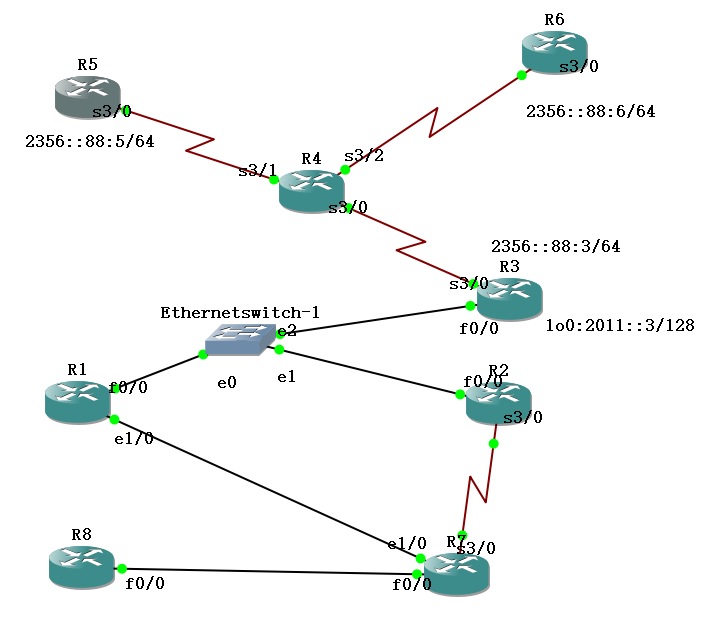
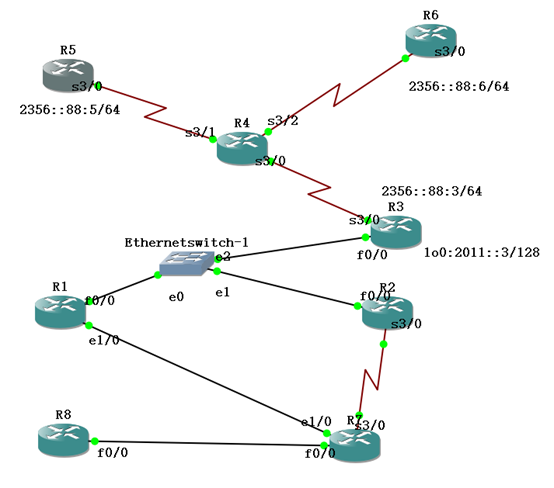
拓扑图
|
Device |
Interface |
IPv6 Address |
|
R3 |
F 0/0 |
2123::88:3/64 |
|
S 3/0.1 |
2356::88:3/64 |
|
|
Loopback 0 |
2011::1/128 |
|
|
R5 |
S 3/0.1 |
2356::88:5/64 |
|
Loopback 0 |
2033::1/128 |
|
|
R6 |
S 3/0.1 |
2356::88:6/64 |
|
Loopback 0 |
2044::1/128 |
|
|
R2 |
F 0/0 |
2123::88:2/64 |
|
S 3/0 |
2027::88:2/64: |
|
|
Loopback 0 |
2055::1/128 |
|
|
R1 |
F 0/0 |
2123::88:1/64 |
|
Loopback 0 |
2066::1/128 |
|
|
Loopback 1 |
2166::1/128 |
|
|
R7 |
S 3/0 |
2027::88:7/64: |
|
Loopback 0 |
2088::1/128 |
帧中继R4配置与ospfv2相同
第一步:完成接口IPV6地址的配置,切记不要忘了配置loopback0
R3(config)#ipv6 unicast-routing ―――全局打开 IPv6 路由功能
R3config)#interface loopback 0
R3(config-if)#ipv6 enable
R3(config-if)#ipv6 address 2011::1/128―――配置 loopback0 接口地址
R3(config-if)#int f 0/0
R3(config-if)#ipv6 enable
R3(config-if)# ipv6 address 2123::88:3/64
R3(config-if)#no shut
R3(config-if)#int s 3/0
R3(config-if)#ipv6 enable
R3(config-if)# encapsulation frame-relay
R3(config-if)#no shut
R3(config)#interface serial 3/0.1 multipoint
R3(config-subif)#ipv6 address 2356::88:3/64
R3(config-subif)#frame-relay map ipv6 2356::88:5 103 broadcast
R3(config-subif)#frame-relay map ipv6 2356::88:6 104 broadcast
R3(config-subif)#frame-relay map ipv6 2356::88:3 104 broadcast
R3(config-subif)#frame-relay map ipv6 FE80::C804:1CFF:FE48:8 104 broadcast
R3(config-subif)#frame-relay map ipv6 FE80::C803:1CFF:FE48:8 103 broadcast
R5(config)#ipv6 unicast-routing
R5(config)#interface loopback 0
R5(config-if)#ipv6 address 2033::1/128
R5(config-if)#int s 3/0
R5(config-if)#ipv6 enable
R5(config-if)# encapsulation frame-relay
R5(config-if)#no shutdown
R5(config)#interface serial 3/0.1 multipoint
R5(config-subif)#ipv6 address 2356::88:5/64
R5(config-subif)#frame-relay map ipv6 2356::88:3 301 broadcast
R5(config-subif)#frame-relay map ipv6 2356::88:6 301 broadcast
R5(config-subif)#frame-relay map ipv6 2356::88:5 301 broadcast
R5(config-subif)#frame-relay map ipv6 FE80::C804:1CFF:FE48:8 304 broadcast
R5(config-subif)#frame-relay map ipv6 FE80::C801:1CFF:FE48:8 301 broadcast
R6(config)#ipv6 unicast-routing
R6(config)#interface loopback 0
R6(config-if)#ipv6 address 2044::1/128
R6(config-if)#int s 3/0
R6(config-if)#ipv6 enable
R6(config-if)# encapsulation frame-relay
R6(config-if)#no shutdown
R6(config)#interface serial 3/0.1 multipoint
R6(config-subif)#ipv6 address 2356::88:6/64
R6(config-subif)#frame-relay map ipv6 2356::88:3 401 broadcast
R6(config-subif)#frame-relay map ipv6 2356::88:6 401 broadcast
R6(config-subif)#frame-relay map ipv6 2356::88:5 401 broadcast
R6(config-subif)#frame-relay map ipv6 FE80::C803:1CFF:FE48:8 403 broadcast
R6(config-subif)#frame-relay map ipv6 FE80::C801:1CFF:FE48:8 401 broadcast
R3上pingR5 56

第二步:按实验拓扑的区域,完成ospfv3配置区域1为nssa区域
R1(config)#ipv6 unicast-routing
R1(config)#ipv6 router ospf 1―――启动 OSPFv3 进程
R1(config-rtr)#router-id 1.1.1.1
R1(config-rtr)#area 1 nssa――配置区域 1 为 NSSA 区域
R1(config-rtr)#int f 0/0
R1(config-if)#ipv6 enable
R1(config-if)# ipv6 ospf 1 area 0
R1(config-if)#no shutdown
R1(config-if)#int loopback 0
R1(config-if)#ipv6 enable
R1(config-if)#ipv6 address 2066::1/128
R1(config-if)# ipv6 ospf 1 area 0
R1(config-if)#int e1/0
R1(config-if)#ipv6 enable
R1(config-if)# ipv6 ospf 1 area 1
R1(config-if)#no shutdown
R2(config)#ipv6 unicast-routing
R2(config)#ipv6 router ospf 1―――启动 OSPFv3 进程
R2(config-rtr)#router-id 2.2.2.2
R2(config-rtr)#area 1 nssa――配置区域 1 为 NSSA 区域
R2(config-rtr)#int f 0/0
R2(config-if)#ipv6 enable
R2(config-if)# ipv6 ospf 1 area 0
R2(config-if)#no shutdown
R2(config-if)#int loopback 0
R2(config-if)#ipv6 enable
R2(config-if)#ipv6 address 2055::1/128
R2(config-if)# ipv6 ospf 1 area 0
R2(config-if)#int s 3/0
R2(config-if)#ipv6 enable
R2(config-if)# ipv6 ospf 1 area 1
R2(config-if)#no shutdown
R3(config)#ipv6 unicast-routing
R3(config)#ipv6 router ospf 1―――启动 OSPFv3 进程
R3(config-rtr)#router-id 3.3.3.3
R3(config-rtr)#int f 0/0
R3(config-if)#ipv6 enable
R3(config-if)# ipv6 ospf 1 area 0
R3(config-if)#no shutdown
R3(config-if)#int loopback 0
R3(config-if)#ipv6 enable
R3(config-if)#ipv6 address 2011::1/128
R3(config-if)# ipv6 ospf 1 area 0
R3(config-if)#int s 3/0.1
R3(config-subif)#ipv6 enable
R3(config-subif)# ipv6 ospf 1 area 2
R3(config-subif)#ipv6 ospf neighbor FE80::C803:1CFF:FE48:8
R3(config-subif)#ipv6 ospf neighbor FE80::C804:1CFF:FE48:8
R3(config-subif)# ipv6 address FE80::C801:1CFF:FE48:8 link-local
R5(config)#ipv6 router ospf 1
R5(config-rtr)#router-id 5.5.5.5
R5(config-rtr)#int loopback 0
R5(config-if)#ipv6 enable
R5(config-if)#ipv6 address 2033::1/128
R5(config-if)# ipv6 ospf 1 area 2
R5(config-if)#int s 3/0.1
R5(config-subif)#ipv6 enable
R5(config-subif)# ipv6 ospf 1 area 2
R5(config-subif)# ipv6 ospf priority 0
R5(config-subif)# ipv6 address FE80::C803:1CFF:FE48:8 link-local
R6(config)#ipv6 router ospf 1
R6(config-rtr)#router-id 6.6.6.6
R6(config-rtr)#int loopback 0
R6(config-if)#ipv6 enable
R6(config-if)#ipv6 address 2044::1/128
R6(config-if)# ipv6 ospf 1 area 2
R6(config-if)#int s 3/0.1
R6(config-subif)#ipv6 enable
R6(config-subif)# ipv6 ospf 1 area 2
R6(config-subif)# ipv6 ospf priority 0
R6(config-subif)# ipv6 address FE80::C804:1CFF:FE48:8 link-local
R7(config)#ipv6 unicast-routing
R7(config)#ipv6 router ospf 1―――启动 OSPFv3 进程
R7(config-rtr)#router-id 7.7.7.7
R7(config-rtr)#area 1 nssa――配置区域 1 为 NSSA 区域
R7(config-rtr)#int s 3/0
R7(config-if)#ipv6 enable
R7(config-if)# ipv6 ospf 1 area 1
R7(config-if)#no shutdown
R7(config-if)#int loopback 0
R7(config-if)#ipv6 enable
R7(config-if)#ipv6 address 2088::1/128
R7(config-if)# ipv6 ospf 1 area 1
R7(config-if)#int e1/0
R7(config-if)#ipv6 enable
R7(config-if)# ipv6 ospf 1 area 1
R7(config-if)#no shutdown
第三步:检查ospfv3的邻居关系
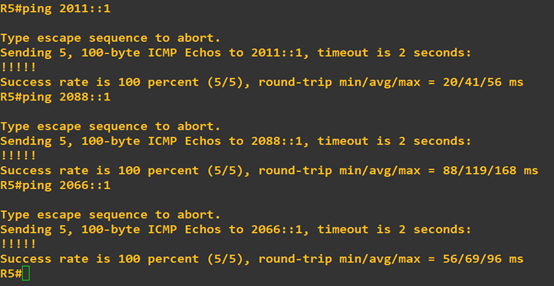
测试ping
引入外部路由类型5和外部路由类型7
在R1上新增加一个loopback1接口,地址为2166::1/128,然后重分布进入OSPFv3
R1(config)#interface loopback 1
R1(config-if)#ipv6 address 2166::1/128
R1(config-if)#exit
R1(config)#ipv6 router ospf 1
R1(config-rtr)#redistribute connected
配置 R7 和 R8 的 RIPng,然后重分布 RIPng 到 OSPFv3
R8(config)#ipv6 router rip yeslab
R8(config-rtr)#exit
R8(config)#interface fastEthernet 0/0
R8(config-if)#ipv6 rip yeslab enable
R8(config-if)#exit
R7(config)#ipv6 router rip yeslab
R7(config-rtr)#exit
R7(config)#interface fastEthernet 0/0
R7(config-if)#ipv6 rip yeslab enable
R7(config-if)#exit
R7(config)#ipv6 router ospf 1
R7(config-rtr)#redistribute rip yeslab 重分布 RIPng 到 OSPFv3
R7(config-rtr)#redistribute connected 重分布直连
总结
本次的作业较难,花费了较长的时间才做出来。主要的点在于帧中继的规则和OSPF的区域划分。不懂的问题也向同学请教了,大家一起互帮互助解决问题共同进步。

 浙公网安备 33010602011771号