
手写代码之面试题(二)
一、实现call/apply
特点:
1. 可以改变当前函数 this 的指向
2. 让当前函数执行
用法:
function f1() {
  console.log(1);
}
function f2() {
  console.log(2);
}
// 让 f1 的 this 指向 f2,并且让 f1 执行
f1.call(f2);  // 1
// 如果多个 call,会让 call 方法执行,并把 call 中的 this 指向改变成 fn2
f1.call.call.call(f2);
实现:
Function.prototype.call = function (context) {
  // 如果 context 存在,使用 context,如果 context 不存在,使用 window;如果 context 是普通类型,转成对象。
  context = context ? Object(context) : window;
  context.fn = this;
  let args = [];
  for(let i = 1; i < arguments.length; i++) {
    args.push('arguments['+i+']');
  }

  let r = eval('context.fn('+args+')');
  delete context.fn;
  return r;
}

Function.prototype.apply = function (context, args) {
  // 如果 context 存在,使用 context,如果 context 不存在,使用 window;如果 context 是普通类型,转成对象。
  context = context ? Object(context) : window;
  context.fn = this;

  if(!args){
    return context.fn();
  }

  let r = eval('context.fn('+args+')');
  delete context.fn;
  return r;
}
二、实现bind方法
特点:
1. bind 方法可以绑定 this 指向
2. bind 方法返回一个绑定后的函数
3. 如果绑定的函数被 new,当前函数的 this 就是当前的实例
4. new 出来的实例要保证原函数的原型对象上的属性不能丢失
用法:
-
用法一:
let person = {
  name: "Cherry",
}
function fn(name, age) {
  console.log(this.name+ '养了一只'+ name + '今年' + age + '了'); // Cherry养了一只猫今年2了
}
let bindFn = fn.bind(person, '猫');
bindFn(2);
-
用法二:
let person = {
  name: "Cherry",
}
function fn(name, age) {
  this.say = '说话'
  console.log(this);  // fn {say: "说话"}
}
let bindFn = fn.bind(person, '猫');
let instance = new bindFn(9);
-
用法三:
let person = {
  name: "Cherry",
}
function fn(name, age) {
  this.say = '说话'
}
fn.prototype.flag = '哺乳类'; let bindFn = fn.bind(person, '猫'); let instance = new bindFn(9); console.log(instance.flag);
实现:
Function.prototype.bind = function (context) {
  // this表示调用bind的函数
  let that = this;
  let bindArgs = Array.prototype.slice.call(arguments, 1);  //["猫"]
  function Fn() {}
  function fBound() {
    let args = Array.prototype.slice.call(arguments);  //[9]
    //this instanceof fBound为true表示构造函数的情况。如new bindFn(9);
    return that.apply(this instanceof fBound ? this : context, bindArgs.concat(args));
  }

  fn.prototype = this.prototype;
  fBound.prototype = new Fn();
  return fBound;
}
三、实现new关键字
特点:
1. 创建一个全新的对象,这个对象的__proto__要指向构造函数的原型对象
2. 执行构造函数
3. 返回值为object类型则作为new方法的返回值返回,否则返回上述全新对象
用法:
- 用法一:
function Animal(type) {
  this.type = type;   // 实例上的属性
}
Animal.prototype.say = function () {
  console.log('say');
}
let animal = new Animal('哺乳类');
console.log(animal.type); // 哺乳类
animal.say(); // say
- 用法二:
function Animal(type) {
  this.type = type;   // 实例上的属性
  // 如果当前构造函数返回的是一个引用类型,需要直接返回这个对象
  return {name: 'dog'}
}
Animal.prototype.say = function () {
  console.log('say');
}
let animal = new Animal('哺乳类');
console.log(animal); // {name: "dog"}
实现:
function mockNew() {
  // Constructor => animal,剩余的 arguments 就是其他的参数
  let Constructor = [].shift.call(arguments);
  let obj = {};  //返回的结果
  obj.__proto__ = Constructor.prototype;
  let r = Constructor.apply(obj, arguments);
  return r instanceof Object ? r : obj;
}

// 测试一下:
function Animal(type) {
  this.type = type;
}

Animal.prototype.say = function () {
  console.log('say');
}

let animal = mockNew(Animal, '哺乳类');

console.log(animal.type); // 哺乳类
animal.say(); // say
四、用ES5实现数组的map方法
特点:
1. 循环遍历数组,并返回一个新数组
2. 回调函数一共接收3个参数,分别是:「正在处理的当前元素的值、正在处理的当前元素的索引、正在遍历的集合对象」
用法:
let array = [1, 2, 3].map((item) => {
  return item * 2;
});
console.log(array);  // [2, 4, 6]
实现:
Array.prototype.map = function(fn) {
  let arr = [];
  for(let i = 0; i < this.length; i++) {
    arr.push(fn(this[i], i, this));
  }
  return arr;
};
五、用ES5实现数组的filter方法
特点:
1. 该方法返回一个由通过测试的元素组成的新数组,如果没有通过测试的元素,则返回一个空数组
2. 回调函数一共接收3个参数,同 map 方法一样。分别是:「正在处理的当前元素的值、正在处理的当前元素的索引、正在遍历的集合对象」
用法:
let array = [1, 2, 3].filter((item) => {
  return item > 2;
});
console.log(array); // [3]
实现:
Array.prototype.filter = function(fn) {
  let arr = [];
  for(let i = 0; i < this.length; i++) {
    fn(this[i]) && arr.push(this[i]);
  }
  return arr;
};
六、用ES5实现数组的some方法
特点:
1. 在数组中查找元素,如果找到一个符合条件的元素就返回true,如果所有元素都不符合条件就返回 false;
2. 回调函数一共接收3个参数,同 map 方法一样。分别是:「正在处理的当前元素的值、正在处理的当前元素的索引、正在遍历的集合对象」。
用法:
let flag = [1, 2, 3].some((item) => {
  return item > 1;
});
console.log(flag); // true
实现:
Array.prototype.some = function(fn) {
  for(let i = 0; i < this.length; i++) {
    if (fn(this[i])) {
      return true;
    }
  }
  return false;
};
七、用ES5实现数组的every方法
特点:
1. 检测一个数组中的元素是否都能符合条件,都符合条件返回true,有一个不符合则返回 false
2. 如果收到一个空数组,此方法在任何情况下都会返回 true
3. 回调函数一共接收3个参数,同 map 方法一样。分别是:「正在处理的当前元素的值、正在处理的当前元素的索引、正在遍历的集合对象」
用法:
let flag = [1, 2, 3].every((item) => {
  return item > 1;
});
console.log(flag); // false
实现:
Array.prototype.every = function(fn) {
  for(let i = 0; i < this.length; i++) {
    if(!fn(this[i])) {
      return false
    }
  }
  return true;
};
八、用ES5实现数组的find方法
特点:
- 在数组中查找元素,如果找到符合条件的元素就返回这个元素,如果没有符合条件的元素就返回 undefined,且找到后不会继续查找
- 回调函数一共接收3个参数,同 map 方法一样。分别是:「正在处理的当前元素的值、正在处理的当前元素的索引、正在遍历的集合对象」
用法:
let item = [1, 2, 3].find((item) => {
  return item > 1;
});
console.log(item); // 2
实现:
Array.prototype.find = function(fn) {
  for(let i = 0; i < this.length; i++) {
    if (fn(this[i])) return this[i];
  }
};
九、用ES5实现数组的forEach方法
特点:
1. 循环遍历数组,该方法没有返回值
2. 回调函数一共接收3个参数,同 map 方法一样。分别是:「正在处理的当前元素的值、正在处理的当前元素的索引、正在遍历的集合对象」
用法:
[1, 2, 3].forEach((item, index, array) => {
  // 1 0 [1, 2, 3]
  // 2 1 [1, 2, 3]
  // 3 2 [1, 2, 3]
  console.log(item, index, array)
});
实现:
Array.prototype.forEach = function(fn) {
  for(let i = 0; i < this.length; i++) {
    fn(this[i], i, this);
  }
};
十、用ES5实现数组的reduce方法
特点:
1. 初始值不传时的特殊处理:会默认用数组中的第一个元素
2. 函数的返回结果会作为下一次循环的 prev
3. 回调函数一共接收4个参数,分别是「上一次调用回调时返回的值、正在处理的元素、正在处理的元素的索引,正在遍历的集合对象」
用法:
let total = [1, 2, 3].reduce((prev, next, currentIndex, array) => {
  return prev + next;
}, 0);
console.log(total); // 6
实现:
Array.prototype.reduce = function(fn, prev) {
  for(let i = 0; i < this.length; i++) {
    // 初始值不传时的处理
    if (typeof prev === 'undefined') {
      // 明确回调函数的参数都有哪些
      prev = fn(this[i], this[i+1], i+1, this);
      ++i;
    } else {
      prev = fn(prev, this[i], i, this)
    }
  }
  // 函数的返回结果会作为下一次循环的 prev
  return prev;
};
十一、实现instanceof方法
特点:
1. 沿着原型链的向上查找,直到找到原型的最顶端,也就是Object.prototype。查找构造函数的 prototype 属性是否出现在某个实例对象的原型链上,如果找到了返回 true,没找到返回 false。
用法:
console.log([] instanceof Array); // true
console.log([] instanceof Object); // true

// 相当于:
console.log([].__proto__ === Array.prototype); // true
console.log([].__proto__.__proto__ === Object.prototype); // true
实现:
function myInstanceof(left, right) {
  left = left.__proto__;
  while(true) {
    if (left === null) {
      return false;
    }
    if (left === right.prototype) {
      return true;
    }
    left = left.__proto__;
  }
};

class A{};

const a = new A();
console.log(myInstanceof(a, A)); // true
console.log(myInstanceof(a, Object)); // true
console.log(myInstanceof(a, Array)); // false
十二、实现Object.create方法(经常考)
特点:
创建一个新对象,使用现有的对象来提供新创建的对象的__proto__
用法:
let demo = {
    c : '123'
};
let cc = Object.create(demo);
console.log(cc);
实现:
function create(proto) {
    function Fn() {};
    // 将Fn的原型指向传入的 proto
    Fn.prototype = proto;
    Fn.prototype.constructor = Fn;
    return new Fn();
};
十三、实现一个通用的柯里化函数
特点: 柯里化就是将一个函数的功能细化,把接受「多个参数」的函数变换成接受一个「单一参数」的函数,并且返回接受「余下参数」返回结果的一种应用。
1. 判断传递的参数是否达到执行函数的fn个数
2. 没有达到的话,继续返回新的函数,将fn函数继续返回并将剩余参数累加
3. 达到fn参数个数时,将累加后的参数传给fn执行
用法:
function sum(a, b, c, d, e) {
  return a+b+c+d+e;
};
let a = curring(sum)(1,2)(3,4)(5);
console.log(a); // 15
实现:
const curring = (fn, arr = []) => {
  let len = fn.length;
  return function (...args) {
    arr = [...arr, ...args];
    if (arr.length < len) {
      return curring(fn, arr);
    } else {
      return fn(...arr);
    }
  };
};
十四、实现一个反柯里化函数
特点: 使用call、apply可以让非数组借用一些其他类型的函数,比如,Array.prototype.push.call, Array.prototype.slice.call, uncrrying把这些方法泛化出来,不在只单单的用于数组,更好的语义化。
用法:
// 利用反柯里化创建检测数据类型的函数
let checkType = Object.prototype.toString.uncurring()

checkType(1); // [object Number]
checkType("hello"); // [object String]
checkType(true); // [object Boolean]
实现:
Function.prototype.uncurring = function () {
  var self = this;
  return function () {
    return Function.prototype.call.apply(self, arguments);
  }
};
十五、实现一个简单的节流函数(throttle)
特点:
1. 规定在一个单位时间内,只能触发一次函数。如果这个单位时间内触发多次函数,只有一次生效。
2. 节流重在加锁flag = false
应用场景:
scroll滚动事件,每隔特定描述执行回调函数
input输入框,每个特定时间发送请求或是展开下拉列表,(防抖也可以)
用法:
const throttleFn = throttle(fn, 300);
实现:
const throttle = (fn, delay = 500) => {
  let flag = true;
  return (...args) => {
    if (!flag) return;
    flag = false;
    setTimeout(() => {
      fn.apply(this, args);
      flag = true;
    }, delay);
  };
};
十六、实现一个简单的防抖函数(debounce)
特点:
1. 在事件被触发n秒后再执行回调,如果在这n秒内又被触发,则重新计时
2. 防抖重在清零clearTimeout(timer)
应用场景:
1. 浏览器窗口大小resize避免次数过于频繁
2. 登录,发短信等按钮避免发送多次请求
3. 文本编辑器实时保存
用法:
const debounceFn = debounce(fn, 300);
实现:
const debounce = (fn, delay) => {
  let timer = null;
  return (...args) => {
    clearTimeout(timer);
    timer = setTimeout(() => {
      fn.apply(this, args);
    }, delay);
  };
};
lodash、underscore等库中的节流防抖功能还提供了更多的配置参数,这里我们只是实现了最基本的节流防抖,感兴趣的同学可以看看lodash、underscore的源码。
十七、实现一个 Compose (组合)
特点:
将需要嵌套执行的函数平铺,嵌套执行就是一个函数的返回值将作为另一个函数的参数。该函数调用的方向是从右至左的(先执行 sum,再执行 toUpper,再执行 add)
用法:
function sum(a, b) {
  return a+b;
}
function toUpper(str) {
  return str.toUpperCase();
}
function add(str) {
  return '==='+str+'==='
}
// 使用 compose 之前:
console.log(add(toUpper(sum('cherry', '27')))); // ===CHERRY27===
// 使用 compose 之后:
console.log(compose(add, toUpper, sum)('cherry', '27')); // ===CHERRY27===
实现:
// 使用 ES5- reduceRight 实现
function compose(...fns) {
  return function (...args) {
    let lastFn = fns.pop();
    return fns.reduceRight((a, b) => {
      return b(a);
    }, lastFn(...args));
  };
}

// 使用 ES6 - reduceRight 实现
const compose = (...fns) => (...args) => {
  let lastFn = fns.pop();
  return fns.reduceRight((a, b) => b(a), lastFn(...args));
};

// 使用 ES6 - reduce 一行代码实现:
const compose = (...fns) => fns.reduce((a, b) => (...args) => a(b(...args)));
十八、实现一个 Pipe (管道)
特点:
pipe函数跟compose函数的作用是一样的,也是将参数平铺,只不过他的顺序是从左往右。(先执行 splitString,再执行 count)
用法:
function splitString(str) {
  return str.split(' ');
}

function count(array) {
  return array.length;
}

// 使用 pipe 之前:
console.log(count(splitString('hello cherry'))); // 2
// 使用 pipe 之后:
console.log(pipe(splitString, count)('hello cherry')); // 2
实现:
const pipe = function(){
  const args = [].slice.apply(arguments);
  return function(x) {
    return args.reduce((res, cb) => cb(res), x);
  }
}

// 使用 ES5- reduceRight 实现
function pipe(...fns) {
  return function (...args) {
    let lastFn = fns.shift();
    return fns.reduceRight((a, b) => {
      return b(a);
    }, lastFn(...args));
  };
}

// 使用 ES6 - reduceRight 实现
const pipe = (...fns) => (...args) => {
  let lastFn = fns.shift();
  return fns.reduceRight((a, b) => b(a), lastFn(...args));
};

// 使用 ES6 - reduce 一行代码实现:(redux源码)
const pipe = (...fns) => (...args) => fns.reduce((a, b) => b(a), ...args);
十九、实现一个模版引擎
特点:with语法 + 字符串拼接 + new Function来实现
1. 先将字符串中的<%=%>替换掉,拼出一个结果的字符串;
2. 再采用new Function的方式执行该字符串,并且使用with解决作用域的问题。
用法:
const ejs = require('ejs');
const path = require('path');

ejs.renderFile(path.resolve(__dirname, 'template.html'),{name: 'Cherry', age: 27, arr: [1, 2, 3]}, function(err, data) {
  console.log(data);
})
// ===== template.html =====
<!DOCTYPE html>
<html lang="en">
<head>
  <meta charset="UTF-8">
  <meta name="viewport" content="width=device-width, initial-scale=1.0">
  <title>Document</title>
</head>
<body>
  <%=name%>  <%=age%>
  <%arr.forEach(item =>{%>
      <li><%=item%></li>
  <%})%>
</body>
</html>
实现:
我们用{ {} }替换<%=%>标签来模拟实现一个模版引擎,实现原理是一样的,重点看实现原理哈。
// ===== my-template.html =====
<!DOCTYPE html>
<html lang="en">
<head>
  <meta charset="UTF-8">
  <meta name="viewport" content="width=device-width, initial-scale=1.0">
  <title>Document</title>
</head>
<body>
  {{name}}  {{age}}
  {%arr.forEach(item => {%}
      <li>{{item}}</li>
  {%})%}
</body>
</html>
const fs = require('fs');
const path = require('path');
const renderFile = (filePath, obj, cb) => {
  fs.readFile(filePath, 'utf8', function(err, html) {
    if(err) {
      return cb(err, html);
    }
    html = html.replace(/\{\{([^}]+)\}\}/g, function() {
      console.log(arguments[1], arguments[2]);
      let key = arguments[1].trim();
      return '${' + key + '}';
    });
    let head = `let str = '';\r\n with(obj){\r\n`;
    head += 'str+=`';
    html = html.replace(/\{\%([^%]+)\%\}/g, function() {
      return '`\r\n' + arguments[1] + '\r\nstr+=`\r\n';
    });
    let tail = '`}\r\n return str;';
    let fn = new Function('obj', head + html + tail);
    cb(err, fn(obj));
  });
};
renderFile(path.resolve(__dirname, 'my-template.html'),{name: 'Cherry', age: 27, arr: [1, 2, 3]}, function(err, data) {
  console.log(data);
});
二十、使用ES5实现类的继承
1. 构造函数继承
思路:
在子类的构造函数中执行父类的构造函数。并为其绑定子类的this,让父类的构造函数把成员的属性和方法都挂在子类的this这样能避免实例之间共享一个原型实例,又能向父类构造函数传参。
实现:
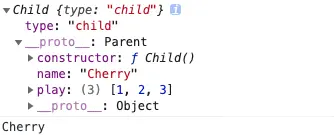
// 父类
function Parent(){
  this.name = 'Cherry';
}
// 父类的原型方法
Parent.prototype.getName = function() {
  return this.name;
};
// 子类
function Child(){
  Parent.call(this);
  this.type = 'child';
};
const child = new Child();
console.log(child); // Child { name: 'Cherry', type: 'child' }
console.log(child.getName()); // 报错,找不到getName(), 构造函数继承的方式继承不到父类原型上的属性和方法

这么看使用构造函数继承的缺点已经很明显了:继承不到父类原型上的属性和方法,那么引出下面的方法。
2. 原型链继承
思路:
让子类的原型指向父类的实例,当子类实例找不到对用的属性和方法时,就会沿着原型链向上找,也就是去父类的实例上找,从而实现对父类属性和方法的继承。
实现:
function Parent() {
  this.name = 'Cherry';
  this.play = [1, 2, 3];
}
Parent.prototype.getName = function() {
  return this.name;
}
function Child() {
  this.type = 'child';
}
// 子类的原型对象指向父类实例
Child.prototype = new Parent();
// 根据原型链的规则,顺便绑定一下constructor, 这一步不影响继承, 只是在用到constructor时会需要
Child.prototype.constructor = Child;

const child = new Child();
console.log(child);  // Parent { type: 'child' }
console.log(child.getName()); // Cherry
看似没有问题,父类的方法和属性都能够访问,但实际上有一个潜在的问题:
const child1 = new Child();
const child2 = new Child();
child1.play.push(4);
console.log(child1.play, child2.play); // [ 1, 2, 3, 4 ] [ 1, 2, 3, 4 ]

在上面这个例子中,虽然我只改变了child1的play属性,但是child2的play属性也跟着变了。原因是因为两个实例引用的是同一个原型对象。
由此我们可以发现,使用原型链继承有以下两个缺点:
1. 由于所有Child实例原型都指向同一个Parent实例, 因此对某个Child实例的父类引用类型变量修改会影响所有的Child实例
2. 在创建子类实例时无法向父类构造传参, 即没有实现super()的功能
3. 组合式继承
既然原型链继承和构造函数继承各有互补的优缺点,那么我们为什么不组合起来使用呢,所以就有了综合二者的组合式继承。
function Parent () {
  this.name = 'Cherry';
  this.play = [1, 2, 3];
}
Parent.prototype.getName = function() {
  return this.name;
}
function Child() {
  // 构造函数继承
  Parent.call(this);
  this.type = 'child';
}
//原型链继承
Child.prototype = new Parent();
// 如果不指定 Child.prototype.constructor 为 Child,根据原型链规则会默认向上查找,最后会指向 Parent
Child.prototype.constructor = Child;

const child1 = new Child();
const child2 = new Child();
console.log(child1); // Child { name: 'Cherry', play: [ 1, 2, 3 ], type: 'child' }
console.log(child1.getName()); // Cherry
child1.play.push(4);
console.log(child1.play, child2.play); // [ 1, 2, 3, 4 ] [ 1, 2, 3 ]
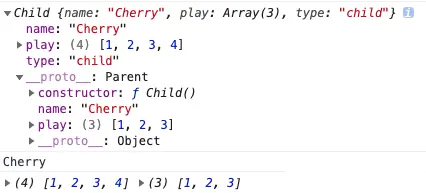
我们通过控制台的输出结果可以看到,之前的问题都得到了解决。但是这里又增加了一个新问题,那就是Parent的构造函数会多执行了一次Child.prototype = new Parent();虽然这并不影响父类的继承,但子类创建实例时,原型中会存在两份相同的属性和方法,这并不优雅。那么如何解决这个问题?
4. 寄生式组合继承
为了解决构造函数被执行两次的问题, 我们将指向父类实例改为指向父类原型, 减去一次构造函数的执行。
function Parent () {
  this.name = 'Cherry';
  this.play = [1, 2, 3];
}
Parent.prototype.getName = function() {
  return this.name
}
function Child() {
  Parent.call(this);
  this.type = 'child';
}
// 将`指向父类实例`改为`指向父类原型`
Child.prototype = Parent.prototype;
Child.prototype.constructor = Child;

const child1 = new Child();
const child2 = new Child();
console.log(child1); // Child { name: 'Cherry', play: [ 1, 2, 3 ], type: 'child' }
console.log(child1.getName()); // Cherry
child1.play.push(4);
console.log(child1.play, child2.play); // [ 1, 2, 3, 4 ] [ 1, 2, 3 ]
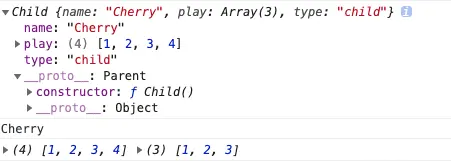
但这种方式存在一个问题,由于子类原型和父类原型指向同一个对象,我们对子类原型的操作会影响到父类原型,例如给Child.prototype增加一个getName()方法,那么会使Parent.prototype上也增加或被覆盖一个getName()方法,为了解决这个问题,我们会给Parent.prototype做一个浅拷贝。
function Parent () {
  this.name = 'Cherry';
  this.play = [1, 2, 3];
}
Parent.prototype.getName = function() {
  return this.name
}
function Child() {
  Parent.call(this);
  this.type = 'child';
}
// 给Parent.prototype做一个浅拷贝
Child.prototype = Object.create(Parent.prototype);
Child.prototype.constructor = Child;

const child1 = new Child();
const child2 = new Child();
console.log(child1); // Child { name: 'Cherry', play: [ 1, 2, 3 ], type: 'child' }
console.log(child1.getName()); // Cherry
child1.play.push(4);
console.log(child1.play, child2.play); // [ 1, 2, 3, 4 ] [ 1, 2, 3 ]

到这里我们就完成了ES5环境下的继承的实现,这种继承方式称为寄生组合式继承,是目前最成熟的继承方式,babel对ES6继承的转化也是使用了寄生组合式继承。
二十一、实现数组扁平化
概念:将一个多维数组变为一维数组:
[1, [2, 3, [4, 5]]] ------> [1, 2, 3, 4, 5]
1. ES6的flat()
let arr = [1, [2, 3, [4, 5]]];
arr.flat(Infinity);
2. 序列化后正则
let arr = [1, [2, 3, [4, 5]]];
let str = JSON.stringify(arr).replace(/(\[|\])/g, '');
str = '[' + str + ']';
JSON.parse(str);   // [1, 2, 3, 4, 5]
3. 递归处理
对于树状结构的数据,最直接的处理方式就是递归
let arr = [1, [2, 3, [4, 5]]];
function flat(arr) {
  let result = [];
  for (const item of arr) {
    item instanceof Array ? result = result.concat(flat(item)) : result.push(item)
  }
  return result;
}
flat(arr);  // [1, 2, 3, 4, 5]
4. reduce
遍历数组每一项,若值为数组则递归遍历,否则直接累加。
let arr = [1, [2, 3, [4, 5]]];
function flat(arr) {
  return arr.reduce((prev, current) => {
    return prev.concat(current instanceof Array ? flat(current) : current)
  }, [])
}
flat(arr); // [1, 2, 3, 4, 5]
5. 迭代+扩展运算符
es6的扩展运算符能将二维数组变为一维
// 每次while都会合并一层的元素,然后arr.some判定数组中是否存在数组,如果存在,继续进入第二次循环进行合并
let arr = [1, [1,2], [1,2,3,[4,4,4]]]
while (arr.some(Array.isArray)) {
  arr = [].concat(...arr);
}
console.log(arr); // [ 1, 1, 2, 1, 2, 3, 4, 4, 4 ]
二十二、实现数组去重
1. 使用 filter 方法
filter 方法可以过滤掉不符合条件的元素,并返回一个新数组,任何不符合条件的数组都将不在过滤后的数组中。
let arr = ["banana", "apple", "orange", "lemon", "apple", "lemon"];
function removeDuplicates(data) {
  return data.filter((value, index) => data.indexOf(value) === index);
}
console.log(removeDuplicates(arr)); // [ 'banana', 'apple', 'orange', 'lemon' ]
我们还可以通过简单的调整,使用filter方法从数据中检索出重复值
let arr = ["banana", "apple", "orange", "lemon", "apple", "lemon"];
function removeDuplicates(data) {
  return data.filter((value, index) => data.indexOf(value) !== index);
}
console.log(removeDuplicates(arr)); // [ 'apple', 'lemon' ]
2.使用 ES6 的 Set
Set 是 ES6 中的新对象类型,用于创建唯一key的集合。
let arr = ["banana", "apple", "orange", "lemon", "apple", "lemon"];
function removeDuplicates(data) {
  return [...new Set(data)];
}
console.log(removeDuplicates(arr)); // [ 'banana', 'apple', 'orange', 'lemon' ]
3. 使用 forEach 方法
forEach 方法可以遍历数组中的元素,如果该元素不在数组中,就将该元素push到数组中。
let arr = ["banana", "apple", "orange", "lemon", "apple", "lemon"];
function removeDuplicates(data) {
  let unique = [];
  data.forEach(element => {
    if (!unique.includes(element)) {
      unique.push(element);
    }
  });
  return unique;
}
console.log(removeDuplicates(arr)); // [ 'banana', 'apple', 'orange', 'lemon' ]
4.使用 reduce 方法
let arr = ["banana", "apple", "orange", "lemon", "apple", "lemon"];
function removeDuplicates(data) {
  let unique = data.reduce(function (a, b) {
    if (a.indexOf(b) < 0) a.push(b);
    return a;
  }, []);
  return unique;
}
console.log(removeDuplicates(arr)); // [ 'banana', 'apple', 'orange', 'lemon' ]
或者:
let arr = ["banana", "apple", "orange", "lemon", "apple", "lemon"];
function removeDuplicates(data) {
  return data.reduce((acc, curr) => acc.includes(curr) ? acc : [...acc, curr], []);
}
console.log(removeDuplicates(arr)); // [ 'banana', 'apple', 'orange', 'lemon' ]
5.在数组原型上添加去重方法
let arr = ["banana", "apple", "orange", "lemon", "apple", "lemon"];
Array.prototype.unique = function () {
  let unique = [];
  for (let i = 0; i < this.length; i++) {
    const current = this[i];
    if (unique.indexOf(current) < 0) unique.push(current);
  }
  return unique;
}
console.log(arr.unique()); // [ 'banana', 'apple', 'orange', 'lemon' ]
6. Array.from + ES6 Set
let arr = ["banana", "apple", "orange", "lemon", "apple", "lemon"];
function removeDuplicates(data) {
  return Array.from(new Set(arr))
}
console.log(removeDuplicates(arr)); // [ 'banana', 'apple', 'orange', 'lemon' ]
7.从对象数组中删除重复的对象
有时,我们需要通过属性的名称从对象数据中删除重复的对象,我们可以使用 Map 来实现:
let users = [
  { id: 1, name: 'susan', age: 25 },
  { id: 2, name: 'cherry', age: 28 },
  { id: 3, name: 'cindy', age: 27 },
  { id: 2, name: 'cherry', age: 28 },
  { id: 1, name: 'susan', age: 25 },
]
function uniqueByKey(data, key) {
  return [
    ...new Map(
      data.map(x => [key(x), x])
    ).values()
  ]
}
console.log(uniqueByKey(users, item => item.id));
// [ { id: 1, name: 'susan', age: 25 },
//   { id: 2, name: 'cherry', age: 28 },
//   { id: 3, name: 'cindy', age: 27 } ]
或者用reduce实现:
let users = [
  { id: 1, name: 'susan', age: 25 },
  { id: 2, name: 'cherry', age: 28 },
  { id: 3, name: 'cindy', age: 27 },
  { id: 2, name: 'cherry', age: 28 },
  { id: 1, name: 'susan', age: 25 },
]
function uniqueByKey(data, key) {
  const object = {};
  data = data.reduce((prev, next) => {
    // eslint-disable-next-line no-unused-expressions
    object[next[key]]
      ? ''
      : (object[next[key]] = true && prev.push(next));
    return prev;
  }, []);
  return data;
}
console.log(uniqueByKey(users, "id"));
// [ { id: 1, name: 'susan', age: 25 },
//   { id: 2, name: 'cherry', age: 28 },
//   { id: 3, name: 'cindy', age: 27 } ]
二十三、实现数组的取交集,并集,差集
1. 取交集
☘️ Array.prototype.includes
let a = [1, 2, 3];
let b = [2, 4, 5];
let intersection = a.filter(v => b.includes(v));
console.log(intersection); // [ 2 ]
☘️ Array.from
let a = [1, 2, 3];
let b = [2, 4, 5];
let aSet = new Set(a);
let bSet = new Set(b);
let intersection = Array.from(new Set(a.filter(v => bSet.has(v))));
console.log(intersection); // [ 2 ]
☘️ Array.prototype.indexOf
let a = [1, 2, 3];
let b = [2, 4, 5];
let intersection = a.filter((v) => b.indexOf(v) > -1);

console.log(intersection); // [ 2 ]
2. 取并集
☘️ Array.prototype.includes
let a = [1, 2, 3];
let b = [2, 4, 5];
let union = a.concat(b.filter(v => !a.includes(v)));
console.log(union); // [ 1, 2, 3, 4, 5 ]
☘️ Array.from
let a = [1, 2, 3];
let b = [2, 4, 5];
let aSet = new Set(a);
let bSet = new Set(b);
let union = Array.from(new Set(a.concat(b)));

console.log(union); // [ 1, 2, 3, 4, 5 ]
☘️ Array.prototype.indexOf
let a = [1, 2, 3];
let b = [2, 4, 5];
let union = a.concat(b.filter((v) => a.indexOf(v) === -1));

console.log(union); // [ 1, 2, 3, 4, 5 ]
3. 取差集
☘️ Array.prototype.includes
let a = [1, 2, 3];
let b = [2, 4, 5];
let difference = a.concat(b).filter(v => !a.includes(v) || !b.includes(v));
console.log(difference); // [ 1, 3, 4, 5 ]
☘️ Array.from
let a = [1, 2, 3];
let b = [2, 4, 5];
let aSet = new Set(a);
let bSet = new Set(b);
let difference = Array.from(new Set(a.concat(b).filter(v => !aSet.has(v) || !bSet.has(v))));
console.log(difference); // [ 1, 3, 4, 5 ]
☘️ Array.prototype.indexOf
let a = [1, 2, 3];
let b = [2, 4, 5];
let difference = a.filter((v) => b.indexOf(v) === -1).concat(b.filter((v) => a.indexOf(v) === -1));
console.log(difference); // [ 1, 3, 4, 5 ]
二十四、实现发布订阅模式
发布订阅模式 一共分为两个部分:on、emit。发布和订阅之间没有依赖关系,发布者告诉第三方(事件频道)发生了改变,第三方再通知订阅者发生了改变。
-
on:就是把一些函数维护到数组中
-
emit:让数组中的方法依次执行
let fs = require("fs");
let event = {
  arr: [],
  on(fn) {
    this.arr.push(fn);
  },
  emit() {
    this.arr.forEach(fn => fn());
  }
}
event.on(function () {
  console.log("读取了一个");
})
event.on(function () {
  if (Object.keys(school).length === 2) {
    console.log("读取完毕");
  }
})
let school = {};
fs.readFile('./name.txt', 'utf8', function (err, data) {
  school.name = data;
  event.emit();
});
fs.readFile('./age.txt', 'utf8', function (err, data) {
  school.age = data;
  event.emit();
});
二十五、实现观察者模式
观察者模式 是基于发布订阅模式的,分为观察者和被观察者两部分,需要被观察者先收集观察者,当被观察者的状态改变时通知观察者。观察者和被观察者之间存在关系,被观察者数据发生变化时直接通知观察者改变。
比如:现在有一家之口,爸爸、妈妈和小宝宝,爸爸妈妈告诉小宝宝你有任何状态变化都要通知我们,当小宝宝饿了的时候,就会通知爸爸妈妈过来处理。这里的小宝宝就是被观察者Subject,爸爸妈妈就是观察者Observer,小宝宝维护了一个观察者队列,当自己有任何状态改变的时候都直接通知队列中的观察者。
class Subject {  // 被观察者:小宝宝
  constructor(name)  {
    this.name = name;
    this.state = "开心的";
    this.observer = [];
  }
  attach(o) {
    this.observer.push(o);
  }
  setState(newState) {
    this.state = newState;
    this.observer.forEach(o => o.update(this));
  }
}

class Observer { // 观察者:爸爸 妈妈
  constructor(name) {
    this.name = name;
  }
  update(baby) {
    console.log("当前"+this.name+"被通知了,当前小宝宝的状态是:"+baby.state);
  }
}

// 爸爸妈妈需要观察小宝宝的心理变化
let baby = new Subject("小宝宝");
let father = new Observer("爸爸");
let mother = new Observer("妈妈");
baby.attach(father);
baby.attach(mother);
baby.setState("我饿了");
所以,我用下图表示这两个模式最重要的区别:

二十六、实现单例模式
单例模式是创建型设计模式的一种。确保全局中有且仅有一个对象实例,并提供一个访问它的全局访问点,如线程池、全局缓存、window 对象等。
1. 常规实现:
// 单例构造函数
function CreateSingleton (name) {
    this.name = name;
    this.getName();
};
// 获取实例的名字
CreateSingleton.prototype.getName = function() {
    console.log(this.name)
};
// 单例对象
var Singleton = (function(){
    var instance;
    return function (name) {
        if(!instance) {
            instance = new CreateSingleton(name);
        }
        return instance;
    }
})();

// 创建实例对象1
var a = new Singleton('a');
// 创建实例对象2
var b = new Singleton('b');

console.log(a === b);
2. 用闭包和Proxy属性拦截实现
const singletonify = (className) => {
  return new Proxy(className.prototype.constructor, {
    instance: null,
    construct: (target, argumentsList) => {
      if (!this.instance)
        this.instance = new target(...argumentsList);
      return this.instance;
    }
  });
}

class MyClass {
  constructor(msg) {
    this.msg = msg;
  }
  printMsg() {
    console.log(this.msg);
  }
}

MySingletonClass = singletonify(MyClass);

const myObj = new MySingletonClass('first');
myObj.printMsg();           // 'first'
const myObj2 = new MySingletonClass('second');
myObj2.printMsg();     // 'first'
二十七、手写字符串转二进制
function charToBinary(text) {
  let code = "";
  for (let i of text) {
    // 字符编码
    let number = i.charCodeAt().toString(2);
    // 1 bytes = 8bit,将 number 不足8位的0补上
    for (let a = 0; a <= 8 - number.length; a++) {
       number = 0 + number;
    }
    code += number;
  }
  return code;
}
二十八、手写二进制转Base64
// 将二进制数据每 6bit 位替换成一个 base64 字符
function binaryTobase64(code) {
  let base64Code = "ABCDEFGHIJKLMNOPQRSTUVWXYZabcdefghijklmnopqrstuvwxyz0123456789+/";
  let res = '';
  // 1 bytes = 8bit,6bit 位替换成一个 base64 字符
  // 所以每 3 bytes 的数据,能成功替换成 4 个 base64 字符

  // 对不足 24 bit (也就是 3 bytes) 的情况进行特殊处理
  if (code.length % 24 === 8) {
    code += '0000';
    res += '=='
  }
  if (code.length % 24 === 16) {
    code += '00';
    res += '='
  }

  let encode = '';
  // code 按 6bit 一组,转换为
  for (let i = 0; i < code.length; i += 6) {
    let item = code.slice(i, i + 6);
    encode += base64Code[parseInt(item, 2)];
  }
  return encode + res;
}
二十九、手写字符转Base64
function base64encode(text) {
  let base64Code = "ABCDEFGHIJKLMNOPQRSTUVWXYZabcdefghijklmnopqrstuvwxyz0123456789+/=";
  let res = '';
  let i = 0;
  while (i < text.length) {
    let char1, char2, char3, enc1, enc2, enc3, enc4;

    // 三个字符一组,转二进制
    char1 = text.charCodeAt(i++);
    char2 = text.charCodeAt(i++);
    char3 = text.charCodeAt(i++);

    enc1 = char1 >> 2; // 取第 1 字节的前 6 位

    // 三个一组处理
    if (isNaN(char2)) {
      // 只有 1 字节的时候
      enc2 = ((char1 & 3) << 4) | (0 >> 4);
      // 第65个字符用来代替补位的 = 号
      enc3 = enc4 = 64;
    } else if (isNaN(char3)) {
      // 只有 2 字节的时候
      enc2 = ((char1 & 3) << 4) | (char2 >> 4);
      enc3 = ((char2 & 15) << 2) | (0 >> 6);
      enc4 = 64;
    } else {
      enc2 = ((char1 & 3) << 4) | (char2 >> 4); // 取第 1 个字节的后 2 位(3 = 11 << 4 = 110000) + 第 2 个字节的前 4 位
      enc3 = ((char2 & 15) << 2) | (char3 >> 6); // 取第 2 个字节的后 4 位 (15 = 1111 << 2 = 111100) + 第 3 个字节的前 2 位
      enc4 = char3 & 63; // 取最后一个字节的最后 6 位 (63 = 111111)
    }

    // 转base64
    res += base64Code.charAt(enc1) + base64Code.charAt(enc2) + base64Code.charAt(enc3) + base64Code.charAt(enc4)
  }

  return res;
}
最优解:
let encodedData = window.btoa("this is a example");
console.log(encodedData); // dGhpcyBpcyBhIGV4YW1wbGU=

let decodeData = window.atob(encodedData);
console.log(decodeData); // this is a example
三十、实现一个可以拖拽的DIV
思路:
-
有一个DIV层,设定position属性为absolute或fixed,通过更改其left,top来更改层的相对位置。
-
在DIV层上绑定mousedown事件,设置一个拖动开始的标志为true,拖动结束的标志为false,本例为isMouseDown。
-
拖动时的细节优化,如:
-
鼠标于DIV的相对位置
-
拖动时防止文字被选中
-
限定DIV的移动范围,拖动到边界处的处理
-
当鼠标移出窗口时失去焦点的处理
-
当鼠标移动到iframe上的处理
-
let injectedHTML = document.createElement("DIV");
    injectedHTML.innerHTML = '<dragBox id="dragBox" class="drag-box">\
  <dragBoxBar id="dragBoxBar" class="no-select"></dragBoxBar>\
  <injectedBox id="injectedBox">CONTENT</injectedBox>\
  </dragBox>';

document.body.appendChild(injectedHTML);

let isMouseDown,
  initX,
  initY,
  height = injectedBox.offsetHeight,
  width = injectedBox.offsetWidth,
  dragBoxBar = document.getElementById('dragBoxBar');


dragBoxBar.addEventListener('mousedown', function(e) {
  isMouseDown = true;
  document.body.classList.add('no-select');
  injectedBox.classList.add('pointer-events');
  initX = e.offsetX;
  initY = e.offsetY;
  dragBox.style.opacity = 0.5;
})

dragBoxBar.addEventListener('mouseup', function(e) {
  mouseupHandler();
})

document.addEventListener('mousemove', function(e) {
  if (isMouseDown) {
    let cx = e.clientX - initX,
        cy = e.clientY - initY;
    if (cx < 0) {
        cx = 0;
    }
    if (cy < 0) {
        cy = 0;
    }
    if (window.innerWidth - e.clientX + initX < width + 16) {
        cx = window.innerWidth - width;
    }
    if (e.clientY > window.innerHeight - height - dragBoxBar.offsetHeight + initY) {
        cy = window.innerHeight - dragBoxBar.offsetHeight - height;
    }
    dragBox.style.left = cx + 'px';
    dragBox.style.top = cy + 'px';
  }
})

document.addEventListener('mouseup', function(e) {
  if (e.clientY > window.innerWidth || e.clientY < 0 || e.clientX < 0 || e.clientX > window.innerHeight) {
    mouseupHandler();
  }
});

function mouseupHandler() {
  isMouseDown = false;
  document.body.classList.remove('no-select');
  injectedBox.classList.remove('pointer-events');
  dragBox.style.opacity = 1;
}
* {
  margin: 0;
  padding: 0;
  border: none
}

body,
html {
  height: 100%;
  width: 100%;
}

.drag-box {
  user-select: none;
  background: #f0f0f0;
  z-index: 2147483647;
  position: fixed;
  left: 0;
  top: 0;
  width: 200px;
}
#dragBoxBar {
  align-items: center;
  display: flex;
  justify-content: space-between;
  background: #ccc;
  width: 100%;
  height: 40px;
  cursor: move;
  user-select: none;
}
.no-select {
  user-select: none;
}
.pointer-events {
  pointer-events: none;
}
.no-border {
  border: none;
}
#injectedBox {
  height: 160px;
  display: flex;
  align-items: center;
  justify-content: center;
  font-size: 2rem;
  background: #eee;
}
三十一、实现一个批量请求函数 multiRequest(urls, maxNum)
function loadImg(url) {
  return new Promise((resolve, reject) => {
    const img = new Image();
    img.onload = function() {
      console.log(url, "加载完成");
      resolve(img);
    };
    img.onerror = function() {
      reject(new Error('Error at:' + url));
    };
    img.src = url;
  })
}

function multiRequest(urls, maxNum) {
  const firstMaxNum = urls.splice(0, maxNum);
  let promises = firstMaxNum.map((url, index)=>{
    return loadImg(url).then(()=>{
      return index
    })
  })
  return urls.reduce((res, cur)=>{
    return res.then(()=>{
      return Promise.race(promises)
    }).then((idx)=>{
      promises[idx] = loadImg(cur).then(()=>{
        return idx
      })
    })
  }, Promise.resolve()).then(()=>{
    return Promise.all(promises)
  })
}

multiRequest(urls, 4).then(()=>{
  console.log('finish')
})
三十二、实现一个 sleep 函数
思路:比如 sleep(1000) 意味着等待1000毫秒,可从 Promise、Generator、Async/Await 等角度实现。
//Promise
const sleep = time => {
  return new Promise(resolve => setTimeout(resolve,time))
}
sleep(1000).then(()=>{
  console.log(1)
})

//Generator
function* sleepGenerator(time) {
  yield new Promise(function(resolve,reject){
    setTimeout(resolve,time);
  })
}
sleepGenerator(1000).next().value.then(()=>{console.log(1)})

//async
function sleep(time) {
  return new Promise(resolve => setTimeout(resolve,time))
}
async function output() {
  let out = await sleep(1000);
  console.log(1);
  return out;
}
output();

//ES5
function sleep(callback,time) {
  if(typeof callback === 'function')
    setTimeout(callback,time)
}

function output(){
  console.log(1);
}
sleep(output,1000);
三十三、模拟实现一个 localStorage
'use strict'
const valuesMap = new Map()

class LocalStorage {
  getItem (key) {
    const stringKey = String(key)
    if (valuesMap.has(key)) {
      return String(valuesMap.get(stringKey))
    }
    return null
  }

  setItem (key, val) {
    valuesMap.set(String(key), String(val))
  }

  removeItem (key) {
    valuesMap.delete(key)
  }

  clear () {
    valuesMap.clear()
  }

  key (i) {
    if (arguments.length === 0) {
      throw new TypeError("Failed to execute 'key' on 'Storage': 1 argument required, but only 0 present.") // this is a TypeError implemented on Chrome, Firefox throws Not enough arguments to Storage.key.
    }
    let arr = Array.from(valuesMap.keys())
    return arr[i]
  }

  get length () {
    return valuesMap.size
  }
}
const instance = new LocalStorage()

global.localStorage = new Proxy(instance, {
  set: function (obj, prop, value) {
    if (LocalStorage.prototype.hasOwnProperty(prop)) {
      instance[prop] = value
    } else {
      instance.setItem(prop, value)
    }
    return true
  },
  get: function (target, name) {
    if (LocalStorage.prototype.hasOwnProperty(name)) {
      return instance[name]
    }
    if (valuesMap.has(name)) {
      return instance.getItem(name)
    }
  }
})

 浙公网安备 33010602011771号