


vue3.x之初始setup
Vue 3.0中的
setup函数是一个全新的选项,它是在组件创建时执行的一个函数,用于替代Vue2.x中的beforeCreate和created钩子函数。setup函数的作用是将组件的状态和行为进行分离,使得组件更加清晰和易于维护。
一、初识setup
1. 概念
setup函数是Vue 3.0新增的一个关键字,它是在组件创建时执行的函数。该函数接收两个参数:props和context。其中,props是一个对象,包含了组件接收到的所有props属性;context是一个对象,包含了一些与组件实例相关的属性和方法。在setup函数中,我们可以使用这两个参数来访问并设置组件的状态和行为。
import { ref, onMounted } from 'vue'

export default {
  name: 'App',
  //setup函数是组合式API的入口函数,调用在beforeCreated之前
  setup(props, context) {
    //1.定义普通变量
    let count_normal = 0;
    //2.定义响应式变量
    let count_reactive = ref(0)
    //3.定义方法
    function myFn() {
      alert(123)
    }
    //4.定义生命周期钩子函数
    onMounted(() => {

    });
    //5.等等...

    //👀注意点:返回值类型要么是对象,要么是渲染函数。
    //在组合式API中定义的变量/方法,要想在外界使用,必须通过return {xxx,xxx},以返回对象的形式暴露出去
    return { count_reactive, myFn, count_normal }
  }
}
参数
⏰ props
setup 函数中的第一个参数是 props。props是一个响应对象,包含父组件传递给子组件的所有数据。
在子组件中使用props进行接收。 包含配置声明并传入的所有的属性的对象。也就是说:如果你想通过props的方式输出父组件传递给子组件的值。 你需要使用props进行接收配置。即props:{......} 如果你未通过Props进行接受配置,则输出的值是undefined
- 父组件
<template>
  <header>
    <div> 父组件 </div>
    <HelloWorld :mytitle="msg" otherTitle="别人的标题"></HelloWorld>
  </header>
</template>

<script lang="ts">
import HelloWorld from './components/HelloWorld.vue';

export default {
  name: 'App',
  components:{HelloWorld},
  //setup函数是组合式API的入口函数,调用在beforeCreated之前
  setup(props, context) {
    //1.定义普通变量
    let msg = {
      title:'父组件给子组件的数据'
    }
    return {msg}
  }
}
</script>
- 子组件
<template>
  <div @click="sonHander">我是子组件中的数据</div>
</template>

<script lang="ts">
export default {
  name:'HelloWorld',
  props:{//👀 用于声明我要接受那些父组件中传入的属性,只有在这里声明,才能在下面setup函数中的props参数中获取到相关属性值;在这里不声明,下面获取不到
    mytitle:{ //这里的配置项还是给vue2.x一致。
      type:Object
    }
  },
  setup(props,contenxt){
    //自定义函数
    function sonHander(){
      console.log('打印props的值:',props);
    }
    return {sonHander}
  }
}
</script>
- 效果如下
![]()
-
改成同时也包含“otherTitle”,效果如下
![]()


⏰ context
setup 函数中的第一个参数是 context。context是一个普通对象,包括attrs,emit,slots三个属性。详情如下图

🐝 attrs:值为对象,包含:组件外部传递过来,但没有在props配置中声明的属性, 相当于
this.$attrs。可以理解为就是props不要的那些,attrs给拿走了!
-
父组件
<template>
  <header>
    <div> 父组件 </div>
    <HelloWorld :mytitle="msg" otherTitle="别人的标题"></HelloWorld>
  </header>
</template>

<script lang="ts">
import HelloWorld from './components/HelloWorld.vue';

export default {
  name: 'App',
  components:{HelloWorld},
  //setup函数是组合式API的入口函数,调用在beforeCreated之前
  setup(props, context) {
    //1.定义普通变量
    let msg = {
      title:'父组件给子组件的数据'
    }
    return { msg}
  }
}
</script>
-
子组件
<template>
  <div @click="sonHander">我是子组件中的数据</div>
</template>

<script lang="ts">
export default {
  name:'HelloWorld',
  props:{//👀用于声明我要接受那些传入的属性,只有在这里声明,才能在下面setup函数中的props参数中获取到相关属性值
    mytitle:{ //这里的配置项还是给vue2.x一致。
      type:Object
    },
  },
  setup(props,contenxt){
    //自定义函数
    function sonHander(){
      console.log('打印props的值:',props);
      console.log('打印context.attrs的值:',contenxt.attrs)
    }
    return {sonHander}
  }
}
</script>
效果如下
![]()

🐝 emit: 分发自定义事件的函数, 相当于
this.$emit。
- 父组件
<template>
  <header>
    <div> 父组件 </div>
    <HelloWorld @sonclick='handleSonClick'></HelloWorld>
  </header>
</template>

<script lang="ts">
import HelloWorld from './components/HelloWorld.vue';

export default {
  name: 'App',
  components:{HelloWorld},
  //setup函数是组合式API的入口函数,调用在beforeCreated之前
  setup() {
    //1.自定义函数
    function handleSonClick(value:string){
      console.log(value);
    }
    return {handleSonClick}
  }
}
</script>
- 子组件
<template>
  <div @click="sonHander">我是子组件中的数据</div>
</template>

<script lang="ts">
export default {
  name:'HelloWorld',
  setup(props,contenxt){
    //自定义函数
    function sonHander(){
      contenxt.emit('sonclick','子组件传递给父组件')
    }
    return {sonHander}
  }
}
</script>
- 效果如下
![]()

🐝 slots: 收到的插槽内容, 相当于
this.$slots
- 父组件
<template>
  <header>
    <div> 父组件 </div>
    <HelloWorld>
      <!-- 具名插槽1 -->
      <template v-slot:header>
        <span>头部信息</span>
      </template>

      <!-- 具名插槽2 -->
      <template v-slot:footer>
        <span>尾部信息</span>
      </template>

    </HelloWorld>
  </header>
</template>

<script lang="ts">
import HelloWorld from './components/HelloWorld.vue';

export default {
  name: 'App',
  components: { HelloWorld },
  //setup函数是组合式API的入口函数,调用在beforeCreated之前
  setup() {

    return {}
  }
}
</script>
- 子组件
<template>
  <div @click="sonHander">我是子组件中的数据</div>
  <slot name="header"></slot>
  <slot name="footer"></slot>
</template>

<script lang="ts">
export default {
  name:'HelloWorld',
  setup(props,contenxt){
    //自定义函数
    function sonHander(){
      console.log("打印context下面的slots属性",contenxt.slots);
    }
    return {sonHander}
  }
}
</script>
-
效果如下
![]()

返回值
⏰ 返回一个对象
对象中的属性、方法,在模板中均可使用。
<script lang="ts">
import { onMounted } from 'vue';
import HelloWorld from './components/HelloWorld.vue';

export default {
  name: 'App',
  components: { HelloWorld },
  //setup函数是组合式API的入口函数,调用在beforeCreated之前
  setup() {
    //1.定义普通变量
    let value_normal = '普通变量';
    //2.定义响应式变量
    let value_reactive = '响应式变量'
    //3。定义方法
    function myFn(){
      alert(123)
    }
    //4.定义生命周期钩子函数
    onMounted(()=>{

    })
    //5.等等

    //👀注意点:
    //在组合式API中定义的变量/方法,要想在外界使用,必须通过return {xxx,xxx},以返回对象的形式暴露出去
    return {value_normal, value_reactive, myFn, onMounted}
  }
}
</script>
⏰ 返回一个渲染函数
setup 还可以返回一个渲染函数,该函数可以直接使用在同一作用域中声明的响应式状态:
import { h, ref, reactive } from 'vue'

export default {
  setup () {
    const readersNumber = ref(0)
    const book = reactive({ title: 'Vue 3 Guide' })
    // 请注意这里我们需要显式使用 ref 的 value
    return () => h('div', [readersNumber.value, book.title])
  },
}
返回一个渲染函数将阻止我们返回任何其它的东西。从内部来说这不应该成为一个问题,但当我们想要将这个组件的方法通过模板 ref 暴露给父组件时就不一样了。
我们可以通过调用 expose 来解决这个问题,给它传递一个对象,其中定义的 property 将可以被外部组件实例访问:
import { h, ref } from 'vue'
export default {
  setup (props, { expose }) {
    const count = ref(0)
    const increment = () => ++count.value

    // expost 用于暴露一个对象,这个对象的所有属性都将挂载到组件实例上
    expose({
      increment,
    })

    return () => h('div', count.value)
  },
}
这个 increment 方法现在将可以通过父组件的模板 ref 访问。
⚠️返回一个渲染函数时,渲染函数渲染的内容将取代模板里面内容。
2.setup中如何使用this
在Vue3中,setup函数中的this指向的是undefined,因为setup函数是在组件实例化之前执行的(beforeCreate时还没有创建组件实例),此时还没有this对象。因此,在setup函数中不能使用this关键字。
🔔 如果想要在setup函数中访问组件实例的属性或方法,可以使用Vue3提供的两个新的函数:
getCurrentInstance和ctx。getCurrentInstance函数可以获取当前组件实例对象,而ctx则是一个包含了props、attrs、emit等属性和方法的上下文对象。
如果有一个组件,其中有一个data属性和一个方法:
- vue2.x
<template>
  <div>{{ message }}</div>
</template>

<script>
export default {
  data() {
    return {
      message: 'hello world'
    }
  },
  methods: {
    sayHello() {
      console.log('hello')
    }
  }
}
</script>
-
v3.0x
import { getCurrentInstance } from 'vue'

export default {
  setup() {
    const instance = getCurrentInstance()
    const message = instance.data.message
    const sayHello = instance.ctx.sayHello

    return {
      message,
      sayHello
    }
  }
}
在上面的例子中,我们通过getCurrentInstance函数获取了当前组件实例对象,并通过instance.data.message和instance.ctx.sayHello访问了组件实例的数据和方法。最终,我们将这些数据和方法作为对象返回,以供模板使用。
二、如何使用setup函数
1.setup 函数内声明响应式的数据和计算属性
在setup函数中,我们可以像Vue 2.x中一样声明响应式的数据和计算属性。不过在Vue 3.0中,我们需要使用ref和computed函数来完成这些操作。
<template>
  <header>
    <div> 父组件 </div>
    <div>{{ count }}, {{ doubleCount }}</div>
    <button @click="increase">increase</button>
  </header>
</template>

<script lang="ts">

//👀:需要什么导入什么
import { ref,computed} from 'vue'

export default {
  name: 'App',
  //setup函数是组合式API的入口函数,调用在beforeCreated之前
  setup() {
    //1.定义响应式变量
    const count = ref(0);
    //2.定义计算属性,通过computed
    const doubleCount = computed(()=>count.value * 2)
    //3.定义函数
    function increase(){
      count.value++
    }

    //3.将相关属性,函数,暴露给外界方便使用
    return{count,doubleCount,increase}
  }
}
</script>
在上面的代码中,我们使用ref函数来声明一个响应式的count变量,并使用computed函数来创建一个计算属性doubleCount,该计算属性依赖于count变量。
2.setup 函数内注册 watch 监听
除了旧版的 Options API 可以在组件选项上使用 watch 以外, Vue 3 中还可以在 setup 函数中注册 watch 监听。
可以从 Vue 中导入 watch 函数,它接受 3 个参数:
- 一个想要侦听的响应式引用或 getter 函数
- 一个回调
- 可选的配置选项
import { ref, watch } from 'vue'
export default {
  setup () {
    const count = ref(0)
    const AddCount = () => {
      // 在 js 中,访问响应式变量要访问变量的 value 属性
      count.value++
      console.log(count.value)
    }
    // 可以监听到 count 的变化
    watch(count, (newValue, oldValue) => {
      console.log(newValue, oldValue)
    })
    return {count,AddCount}
  },
}
监听组件 props 变化:
import { toRefs, watch } from 'vue'
export default {
  props: {
    propName: {
      type: String,
      default: 'defaultValue',
    },
  },
  setup (props) {
    const { propName } = toRefs(props)
    watch(propName, (newValue, oldValue) => {
      console.log(newValue, oldValue)
    })
  },
}
3.setup 函数内注册事件处理函数
在Vue 2.x中,我们可以在methods选项中定义一个事件处理函数。而在Vue 3.0中,我们可以在setup函数中使用普通的JavaScript函数来实现相同的功能。
<template>
  <header>
    <div> 父组件 </div>
    <div>{{ count }}, {{ doubleCount }}</div>
    <button @click="increase">increase</button>
  </header>
</template>

<script lang="ts">

//👀:需要什么导入什么
import { ref,computed} from 'vue'

export default {
  name: 'App',
  //setup函数是组合式API的入口函数,调用在beforeCreated之前
  setup() {
    //1.定义响应式变量
    const count = ref(0);
    //2.定义计算属性,通过computed
    const doubleCount = computed(()=>count.value * 2)
    //3.定义函数
    function increase(){
      count.value++
    }

    //3.将相关属性,函数,暴露给外界方便使用
    return{count,doubleCount,increase}
  }
}
</script>
在上面的代码中,我们使用ref声明了一个响应式的count变量,并定义了一个名为increment的函数,在点击按钮时会将count变量的值加1。
4.setup 函数内定义生命周期钩子函数
在Vue 2.x中,我们可以在created和mounted钩子函数中执行一些初始化操作。而在Vue 3.0中,我们可以在setup函数中使用onMounted和onUnmounted函数来实现相同的功能。
<template>
  <header>
    <div> 父组件 </div>
    <div>{{ message }}</div>
  </header>
</template>

<script lang="ts">

//👀:需要什么导入什么
import { log } from 'console';
import { ref, onMounted, onUnmounted } from 'vue'

export default {
  name: 'App',
  //setup函数是组合式API的入口函数,调用在beforeCreated之前
  setup() {
    //1.定义响应式变量
    const message = ref('');

    //2.声明钩子
    onMounted(() => {
      console.log('mounted');
    })
    onUnmounted(() => {
      console.log('unmounted');
      clearInterval(intervalId)
    });

    //3.定义函数
    //每一秒拼接一个'hello'
    const intervalId = setInterval(() => {
      message.value += 'hello'
    }, 1000)

    //4.将相关属性,函数,暴露给外界方便使用
    return { message }
  }
}
</script>
在上面的代码中,我们使用ref声明了一个响应式的message变量,并使用setInterval函数定时向该变量中添加字符串。在setup函数中,我们使用onMounted函数注册一个函数,在组件挂载时执行;使用onUnmounted函数注册一个函数,在组件卸载时执行。在本例中,我们在组件卸载时清除了定时器。
⏰ setup内所有可用生命周期
可以通过在 Options API 的生命周期钩子前面加上 on 来访问组件的生命周期钩子。
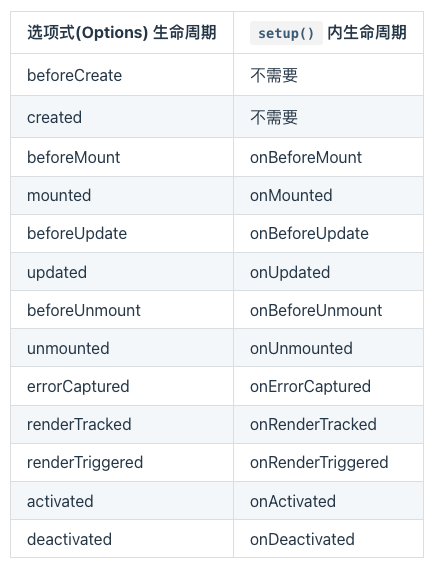
可以看到,beforeCreate, created 两个生命周期是不需要在 setup 函数中使用的,因为 setup 就能代表这两个生命周期,这两个生命周期编写的任何代码都应该直接在 setup 函数中编写。
4.setup 函数注册子组件
在Vue 2.x中,我们可以使用components选项将子组件注册到父组件中。而在Vue 3.0中,我们可以在setup函数中使用普通的JavaScript函数来注册子组件。
<template>
  <div>
    <Child />
  </div>
</template>

<script>
import { defineComponent } from 'vue';
import Child from './Child.vue';

export default defineComponent({
  name: 'Example',
  components: {
    Child
  },
  setup() {
    return {};
  }
});
</script>
在上面的代码中,我们使用defineComponent函数定义了一个具有注册子组件能力的组件。在setup函数中,我们返回了一个空对象。
6.setup 函数访问父级组件的属性和方法
在Vue 2.x中,我们可以通过$parent和$emit等属性和方法来访问父级组件的属性和方法。而在Vue 3.0中,我们可以在setup函数中使用inject和provide函数来获取和提供属性。
- 父组件
<!-- parent -->
<template>
  <div>
    <Child :increment="increment" />
  </div>
</template>

<script>
import { defineComponent, ref } from 'vue';
import Child from './Child.vue';

export default defineComponent({
  name: 'Example',
  components: {
    Child
  },
  setup() {
    const count = ref(0);
    const increment = () => {
      count.value++;
    };
    provide('increment', increment);
    return {count};
  }
});
</script>
- 子组件
<!-- child -->
<template>
  <button @click="increment">{{ count }}</button>
</template>

<script>
import { defineComponent, inject } from 'vue';

export default defineComponent({
  name: 'Child',
  props: ['increment'],
  setup() {
    const count = inject('count');
    return {count};
  }
});
</script>
在上面的代码中,我们使用provide函数提供了一个名为increment的函数,并在子组件中使用inject函数获取该函数。注意,在调用provide函数时,我们需要传递一个键值对,表示提供的属性和值的关系。
7.setup 函数访问路由和状态管理器等全局对象
除了访问父级组件的属性和方法之外,我们还可以在setup函数中访问其他全局对象,比如路由和状态管理器等。
<template>
  <div>{{ count }}</div>
</template>

<script>
import { ref } from 'vue';
import { useRoute, useRouter } from 'vue-router';

export default {
  name: 'Example',
  setup() {
    const count = ref(0);
    const route = useRoute();
    const router = useRouter();
    const navigate = () => {
      router.push('/');
    };
    return {
      count,
      route,
      navigate
    };
  }
};
</script>
在上面的代码中,我们使用useRoute和useRouter函数来访问路由相关的属性和方法。其中,useRoute函数返回了当前路由对象,包含了当前路由的路径、参数、查询参数等信息;useRouter函数返回了一个路由管理器对象,包含了一些常用的路由操作方法,比如push和replace等。在setup函数中,我们为组件提供了一个名为navigate的函数,用于跳转到主页。


 浙公网安备 33010602011771号