vue2.x之vuex的模块化使用(二)
辅助函数
首先我们先来介绍几个辅助函数: mapState, mapGetters, mapMutations, mapActions。可以发现它们有一个共同点,就是map+组成部分,这些辅助函数的主要目的就是帮助我们快速获取对应部分的属性,这样在开发中就能省去很多重复代码,使用上更加简单。
mapState
mapState就是状态state的辅助函数。
⏰ 直接访问state
在这之前提醒一下,安装的vuex版本一定要和vue版本对应,vue3里面可以使用最新版的vuex,但是在vue2中不要安装最新版本的vuex,否则使用store的时候会报undefined,也就是说如果版本安装不对应,没法使用store哦,一定要注意哦!<br>
<div>获取vuex中的a: {{ $store.state.a }}</div>
<div>获取vuex中的b: {{ $store.state.b }}</div>
<div>获取vuex中的c: {{ $store.state.c }}</div>
如果组件中有很多地方都使用到state里的值,那么页面上就会出现很多$store.state,这样模板看起来就很不简洁,使用下面的辅助函数mapState就可以避免这问题。
⏰ 使用mapState辅助函数
mapState函数是帮助我们生成计算属性的. 基础用法 当计算属性的名称和state里面的名称相同的时候,可以传入字符串数组的形式。
computed: {
  mapState(['a'])
}
mapState返回的是一个对象,如果需要将多个对象合并为一个,可以使用对象展开运算符。
computed: {
  ...mapState(['a', 'b', 'c'])
}
⏰ 实例应用
上面代码改写成mapState,可以写成这样
<template>
  <div class="hello">
    <div>获取vuex中的a: {{ a }}</div>
    <div>获取vuex中的b: {{ b }}</div>
    <div>获取vuex中的c: {{ c }}</div>
  </div>
</template>

<script>
import { mapState } from 'vuex'
export default {
  name: 'HelloWorld',
  data () {
    return {
    }
  },
  computed: {
    ...mapState(['a', 'b', 'c'])
  },
  methods: {
  }
}
</script>
效果如下:

mapGetters
mapGetters是getter的辅助函数。是将store中的getter映射到局部计算属性。
定义下面的这种getter
const getters = {
  odds: state => {
    return state.d.filter(item => item % 2 !== 0)
  }
}
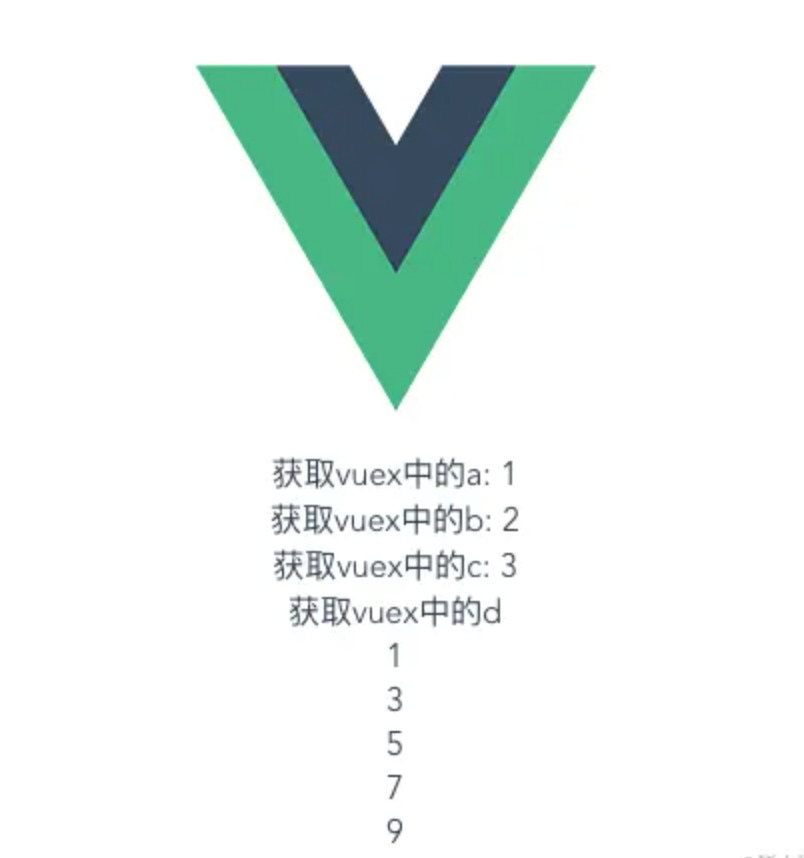
⏰ 直接获取getter
<template>
  <div class="hello">
    <div>获取vuex中的a: {{ a }}</div>
    <div>获取vuex中的b: {{ b }}</div>
    <div>获取vuex中的c: {{ c }}</div>
    <div>
      获取vuex中的d
      <div v-for="(item, index) in $store.getters.odds" :key="index">
        {{item}}
      </div>
    </div>
  </div>
</template>
效果如下:

⏰ 使用mapGetters辅助函数
mapGetters函数也是要在计算属性中使用的。 基本用法 如果想给getter属性另取一个名字,就使用对象形式
computed: {
  ...mapGetters({
    // 把 `this.oddVal` 映射为 `this.$store.getters.odds`
    oddVal: 'odds'
  })
},
如果名字和属性名相同,那么就传入一个数组即可
computed: {
  ...mapGetters(['odds'])
},
⏰ 实例应用
<template>
  <div class="hello">
    <div>获取vuex中的a: {{ a }}</div>
    <div>获取vuex中的b: {{ b }}</div>
    <div>获取vuex中的c: {{ c }}</div>
    <div>
      获取vuex中的d
      <div v-for="(item, index) in odds" :key="index">
        {{item}}
      </div>
    </div>
  </div>
</template>

<script>
import { mapState, mapGetters } from 'vuex'
export default {
  name: 'HelloWorld',
  data () {
    return {
    }
  },
  computed: {
    ...mapState(['a', 'b', 'c']),
    ...mapGetters(['odds'])
  },
  methods: {
  }
}
</script>
mapMutations
mapMutations是mutation的辅助函数。
⏰ 定义一个mutation
const mutations = {
  increment (state, value) {
    state.a += value
  }
}
⏰ 直接使用mutations
<button @click="addA">增加a</button>
methods: {
  addA () {
    this.$store.commit('increment', 2)
  }
}
效果如下:

⏰ 使用mapMutations辅助函数
mapMutations是mutations的辅助函数。 基本用法 将this.increment映射成this.$store.commit('increment')
methods: {
  ...mapMutations(['increment'])
}
将this.addA映射成this.$store.commit('increment')
...mapMutations({
  addA: 'increment'
})
如何需要支持负荷,直接在使用increment的地方使用()传参即可。
methods: {
  ...mapMutations(['increment'])
}
⏰ 使用mapMutations辅助函数
<button @click="increment">增加a</button>
methods: {
  ...mapMutations(['increment', '2'])
}
但是这时候存在一个问题,此时拼接的时候不是相加,而是将事件当做字符串拼接起来了。如图所示:

因为此时'2'是作为负载对象传进去了,如果想要传参数的时候,直接在调用的时候使用()传递即可。
<button @click="increment(2)">增加a</button>
methods: {
  ...mapMutations(['increment'])
}
mapActions
mapActions是actions的辅助函数,actions也可以用来修改状态,和mutations相比,支持异步函数。
⏰ 定义一个actions
const actions = {
  increment (context, value) {
    context.commit('increment', value)
  }
}
⏰ 直接使用actions
<button @click="addA">增加a</button>
addA () {
  this.$store.dispatch('increment', 4)
}
⏰ 使用mapActions辅助函数
基本用法:它的用法和mapMutation的用法一模一样,只是映射的是actions
将this.increment映射成this.$store.dispatch('increment')
methods: {
  ...mapActions(['increment'])
}
将this.addA映射成this.$store.dispatch('increment')
...mapActions({
  addA: 'increment'
})
如何需要支持负荷,直接在使用increment的地方使用()传参即可。
methods: {
  ...mapActions(['increment'])
}
实例
<button @click="increment(4)">增加a</button>
methods: {
  ...mapMutations(['increment']),
  ...mapActions(['increment'])
}
模块化使用vuex
在实际项目开发的时候,往往业务很复杂,我们需要按照功能模块区分state,因此模块化使用vuex在实际开发的时候是十分重要的,一般有两种形式:
- 使用module属性配置模块
- 从项目目录开始模块化
使用module属性配置模块
这种方式非常简单,vuex给我们提供了module属性,我们只需要将我们的模块化内容配置在这里即可。
// store.js
import Vue from 'vue'
import Vuex from 'vuex'

Vue.use(Vuex)
const moduleA = {
  state: {
    a: 1,
    b: 2,
    c: 3,
    d: [1, 2, 3, 4, 5, 6, 7, 8, 9, 10]
  },
  getters: {
    odds: state => {
      return state.d.filter(item => item % 2 !== 0)
    }
  },
  mutations: {
    ncrement (state, value) {
      state.a += value
    }
  },
  actions: {
    increment (context, value) {
      context.commit('increment', value)
    }
  }
}
const moduleB = {
  state: {
    a: 1,
    b: 2,
    c: 3,
    d: [1, 2, 3, 4, 5, 6, 7, 8, 9, 10]
  },
  getters: {
    evens: state => {
      return state.d.filter(item => item % 2 === 0)
    }
  },
  mutations: {
    add (state, value) {
      state.a += value
    }
  },
  actions: {
    add (context, value) {
      context.commit('add', value)
    }
  }
}

export default new Vuex.Store({
  modules: {
    a: moduleA,
    b: moduleB
  }
})
如果还有一些公共的state, getters, mutations, actions那么也是可以配置在里面的,否则可以不配置
export default new Vuex.Store({
  state,
  getters,
  mutations,
  actions,
  modules: {
    a: moduleA,
    b: moduleB
  }
})
上面这段代码中不同模块之间最终会合并,会校验命名,不允许模块之间存在相同名称,否则会报错。 保证不同名称之间互不烦扰,那么使用方式就是和以前一样的。
⏰ 命名空间
如果觉得修改命名,让不同模块之间的命名不同很麻烦,vuex提供了一个属性namespaced,如果在模块中配置了这个属性为true,那么就说明只要保证当前模块内部不重名就可以,不用管模块之间。因为 模块被注册后,它的所有 getter、action 及 mutation 都会自动根据模块注册的路径调整命名,这样就不可能重名了。
import Vue from 'vue'
import Vuex from 'vuex'

Vue.use(Vuex)
const moduleA = {
  namespaced: true,
  state: {
    a: 1,
    b: 2,
    c: 3,
    d: [1, 2, 3, 4, 5, 6, 7, 8, 9, 10]
  },
  getters: {
    odds: state => {
      return state.d.filter(item => item % 2 !== 0)
    }
  },
  mutations: {
    increment (state, value) {
      state.a += value
    }
  },
  actions: {
    increment (context, value) {
      context.commit('increment', value)
    }
  }
}
const moduleB = {
  namespaced: true,
  state: {
    a: 1,
    b: 2,
    c: 3,
    d: [1, 2, 3, 4, 5, 6, 7, 8, 9, 10]
  },
  getters: {
    odds: state => {
      return state.d.filter(item => item % 2 === 0)
    }
  },
  mutations: {
    increment (state, value) {
      state.a += value
    }
  },
  actions: {
    increment (context, value) {
      context.commit('increment', value)
    }
  }
}

export default new Vuex.Store({
  modules: {
    a: moduleA,
    b: moduleB
  }
})
这时候按照之前的调用方式页面就会报错(unknown action type: increment) 这是因为添加了命名空间后,页面按照原来的方式已经找不到我们定义的东西了。 state和mapState 从state的打印信息来看,也是需要加上模块名的

this.$store.state.a.a

import {mapState} from 'vuex'
 computed:{
     ...mapState('a',['a','b', 'c'])
 }
getters和mapGetters 对于getters这类,需要加上模块名。因为有模块之后,getters内容如下:

this.$store.getters['a/odds']

...mapGetters({
  odds: 'a/odds'
})
mutations和mapMutations 从下面打印信息可以看出来, mutations内容如下:

因此也需要加上模块名
this.$store.commit('a/increment', 2)

...mapMutations({
  increment: 'a/increment'
})
actions和mapActions actions和mutations一样,从下面打印信息可以看出来, actions 因此也需要加上模块名

this.$store.dispatch('a/increment', 2)

...mapActions({
  increment: 'a/increment'
})
从项目目录开始模块化
虽然上面那种方式确实实现了模块化开发,但是所有代码还是放在了同一个文件中,从项目目录开始模块化实际上是第一个的深度优化,在开发过程中我们使用这种方式也要更多一些。
将模块的代码拆成独立的文件:a.js和b.js,把这些文件放在module文件夹里面,目录如下:

⏰ a.js
文件内容如下:
export default {
  namespaced: true,
  state: {
    a: 1,
    b: 2,
    c: 3,
    d: [1, 2, 3, 4, 5, 6, 7, 8, 9, 10]
  },
  getters: {
    odds: state => {
      return state.d.filter(item => item % 2 !== 0)
    }
  },
  mutations: {
    increment (state, value) {
      state.a += value
    }
  },
  actions: {
    increment (context, value) {
      context.commit('increment', value)
    }
  }
}
⏰ b.js
文件内容如下:
export default {
  namespaced: true,
  state: {
    a: 1,
    b: 2,
    c: 3,
    d: [1, 2, 3, 4, 5, 6, 7, 8, 9, 10]
  },
  getters: {
    odds: state => {
      return state.d.filter(item => item % 2 === 0)
    }
  },
  mutations: {
    increment (state, value) {
      state.a += value
    }
  },
  actions: {
    increment (context, value) {
      context.commit('increment', value)
    }
  }
}
⏰ index.js
文件内容如下
import Vue from 'vue'
import Vuex from 'vuex'
import a from './modules/a'
import b from './modules/b'

Vue.use(Vuex)

export default new Vuex.Store({
  modules: {
    a,
    b
  }
})


 浙公网安备 33010602011771号