


iOS 动画相关总结
一,iOS相关常用的动画
在iOS实际开发中常用的动画无非是以下四种:
- UIView动画。
- 核心动画。
- 帧动画。
- 自定义转场动画。
1.UIView动画
UIView动画是iOS开发中最廉价也是最常用的动画。UIView动画能够设置的动画属性有:
- frame
- bounds
- center
- transform
- alpha
- backgroundColor
- contentStretch
1.1 UIView动画实现方式
UIView动画实现方式有普通方式和Block方式,不过平常我们一般会直接使用Block的方式。简单,粗暴,管用!先说说普通方式实现动画。
-
开始动画语句:
// 第一个参数: 动画标识
// 第二个参数: 附加参数,在设置代理情况下,此参数将发送到setAnimationWillStartSelector和setAnimationDidStopSelector所指定的方法,大部分情况,设置为nil.
[UIView beginAnimations:(nullable NSString *) context:(nullable void *)];
-
结束动画语句:
[UIView commitAnimations];
-
动画参数的属性设置:
//动画持续时间 [UIView setAnimationDuration:(NSTimeInterval)]; //动画的代理对象 [UIView setAnimationDelegate:(nullable id)]; //设置动画将开始时代理对象执行的SEL [UIView setAnimationWillStartSelector:(nullable SEL)]; //设置动画延迟执行的时间 [UIView setAnimationDelay:(NSTimeInterval)]; //设置动画的重复次数 [UIView setAnimationRepeatCount:(float)]; //设置动画的曲线 /* UIViewAnimationCurve的枚举值: UIViewAnimationCurveEaseInOut, // 慢进慢出(默认值) UIViewAnimationCurveEaseIn, // 慢进 UIViewAnimationCurveEaseOut, // 慢出 UIViewAnimationCurveLinear // 匀速 */ [UIView setAnimationCurve:(UIViewAnimationCurve)]; //设置是否从当前状态开始播放动画 /* 假设上一个动画正在播放,且尚未播放完毕,我们将要进行一个新的动画: 当为YES时:动画将从上一个动画所在的状态开始播放 当为NO时:动画将从上一个动画所指定的最终状态开始播放(此时上一个动画马上结束) */ [UIView setAnimationBeginsFromCurrentState:YES]; //设置动画是否继续执行相反的动画 [UIView setAnimationRepeatAutoreverses:(BOOL)]; //是否禁用动画效果(对象属性依然会被改变,只是没有动画效果) [UIView setAnimationsEnabled:(BOOL)]; //设置视图的过渡效果 /* 第一个参数:UIViewAnimationTransition的枚举值如下 UIViewAnimationTransitionNone, //不使用动画 UIViewAnimationTransitionFlipFromLeft, //从左向右旋转翻页 UIViewAnimationTransitionFlipFromRight, //从右向左旋转翻页 UIViewAnimationTransitionCurlUp, //从下往上卷曲翻页 UIViewAnimationTransitionCurlDown, //从上往下卷曲翻页 第二个参数:需要过渡效果的View 第三个参数:是否使用视图缓存,YES:视图在开始和结束时渲染一次;NO:视图在每一帧都渲染 */ [UIView setAnimationTransition:(UIViewAnimationTransition) forView:(nonnull UIView *) cache:(BOOL)]; -
示例:
- 示例一
- (void)touchesBegan:(NSSet<UITouch *> *)touches withEvent:(UIEvent *)event{ UITouch *tuch = touches.anyObject; CGPoint point = [tuch locationInView:self.view]; [UIView beginAnimations:@"testAnimation" context:nil]; [UIView setAnimationDuration:3.0]; [UIView setAnimationDelegate:self]; //设置动画将开始时代理对象执行的SEL [UIView setAnimationWillStartSelector:@selector(animationDoing)]; //设置动画延迟执行的时间 [UIView setAnimationDelay:0]; [UIView setAnimationRepeatCount:MAXFLOAT]; [UIView setAnimationCurve:UIViewAnimationCurveLinear]; //设置动画是否继续执行相反的动画 [UIView setAnimationRepeatAutoreverses:YES]; self.redView.center = point; self.redView.transform = CGAffineTransformMakeScale(1.5, 1.5); self.redView.transform = CGAffineTransformMakeRotation(M_PI); [UIView commitAnimations]; } - UIView动画例子1.gif
![]()
- 示例一

-
- 示例二
- (void)touchesBegan:(NSSet<UITouch *> *)touches withEvent:(UIEvent *)event{ // 转成动画 (flip) [UIView beginAnimations:@"imageViewTranslation" context:nil]; [UIView setAnimationDuration:2.0]; [UIView setAnimationDelegate:self]; [UIView setAnimationWillStartSelector:@selector(startAnimation)]; [UIView setAnimationDidStopSelector:@selector(stopAnimation)]; [UIView setAnimationRepeatCount:1.0]; [UIView setAnimationCurve:UIViewAnimationCurveEaseInOut]; [UIView setAnimationRepeatAutoreverses:YES]; [UIView setAnimationRepeatCount:MAXFLOAT]; [UIView setAnimationTransition:UIViewAnimationTransitionFlipFromLeft forView:self.imageView cache:YES]; if (++count % 2 ==0) { self.imageView.image = [UIImage imageNamed:@"yh_detial_ty"]; }else{ self.imageView.image = [UIImage imageNamed:@"yh_detial_bz"]; } [UIView commitAnimations]; } -
UIView动画例子2.gif
![]()
- 示例三
- (void)touchesBegan:(NSSet<UITouch *> *)touches withEvent:(UIEvent *)event{ [UIView beginAnimations:@"test" context:nil]; [UIView setAnimationDuration:1.0]; [UIView setAnimationRepeatCount:MAXFLOAT]; [UIView setAnimationTransition:UIViewAnimationTransitionCurlUp forView:self.redView cache:YES]; [UIView commitAnimations]; } -
UIView动画例子3.gif
![]()
- 示例二


1.2 UIView Block 动画
ios4.0以后增加了Block动画块,提供了更简洁的方式来实现动画.
-
日常开发中一般也是使用Block形式创建动画。
- 最简洁的Block动画:包含时间和动画:
[UIView animateWithDuration:(NSTimeInterval) //动画持续时间 animations:^{ //执行的动画 }]; - 带有动画提交回调的Block动画
[UIView animateWithDuration:(NSTimeInterval) //动画持续时间 animations:^{ //执行的动画 } completion:^(BOOL finished) { //动画执行提交后的操作 }]; - 可以设置延时时间和过渡效果的Block动画
[UIView animateWithDuration:(NSTimeInterval) //动画持续时间 delay:(NSTimeInterval) //动画延迟执行的时间 options:(UIViewAnimationOptions) //动画的过渡效果 animations:^{ //执行的动画 } completion:^(BOOL finished) { //动画执行提交后的操作 }]; - UIViewAnimationOptions的枚举值如下,可组合使用:
UIViewAnimationOptionLayoutSubviews //进行动画时布局子控件 UIViewAnimationOptionAllowUserInteraction //进行动画时允许用户交互 UIViewAnimationOptionBeginFromCurrentState //从当前状态开始动画 UIViewAnimationOptionRepeat //无限重复执行动画 UIViewAnimationOptionAutoreverse //执行动画回路 UIViewAnimationOptionOverrideInheritedDuration //忽略嵌套动画的执行时间设置 UIViewAnimationOptionOverrideInheritedCurve //忽略嵌套动画的曲线设置 UIViewAnimationOptionAllowAnimatedContent //转场:进行动画时重绘视图 UIViewAnimationOptionShowHideTransitionViews //转场:移除(添加和移除图层的)动画效果 UIViewAnimationOptionOverrideInheritedOptions //不继承父动画设置 UIViewAnimationOptionCurveEaseInOut //时间曲线,慢进慢出(默认值) UIViewAnimationOptionCurveEaseIn //时间曲线,慢进 UIViewAnimationOptionCurveEaseOut //时间曲线,慢出 UIViewAnimationOptionCurveLinear //时间曲线,匀速 UIViewAnimationOptionTransitionNone //转场,不使用动画 UIViewAnimationOptionTransitionFlipFromLeft //转场,从左向右旋转翻页 UIViewAnimationOptionTransitionFlipFromRight //转场,从右向左旋转翻页 UIViewAnimationOptionTransitionCurlUp //转场,下往上卷曲翻页 UIViewAnimationOptionTransitionCurlDown //转场,从上往下卷曲翻页 UIViewAnimationOptionTransitionCrossDissolve //转场,交叉消失和出现 UIViewAnimationOptionTransitionFlipFromTop //转场,从上向下旋转翻页 UIViewAnimationOptionTransitionFlipFromBottom //转场,从下向上旋转翻页 - Spring动画ios7.0以后新增了Spring动画(IOS系统动画大部分采用Spring Animation, 适用所有可被添加动画效果的属性)
[UIView animateWithDuration:(NSTimeInterval)//动画持续时间
                      delay:(NSTimeInterval)//动画延迟执行的时间
     usingSpringWithDamping:(CGFloat)//震动效果,范围0~1,数值越小震动效果越明显
      initialSpringVelocity:(CGFloat)//初始速度,数值越大初始速度越快
                    options:(UIViewAnimationOptions)//动画的过渡效果
                 animations:^{ //执行的动画
}
                 completion:^(BOOL finished) { //动画执行提交后的操作
}];
- 最简洁的Block动画:包含时间和动画:
-
Keyframes动画
IOS7.0后新增了关键帧动画,支持属性关键帧,不支持路径关键帧[UIView animateKeyframesWithDuration:(NSTimeInterval)//动画持续时间 delay:(NSTimeInterval)//动画延迟执行的时间 options:(UIViewKeyframeAnimationOptions)//动画的过渡效果 animations:^{ //执行的关键帧动画 } completion:^(BOOL finished) { //动画执行提交后的操作 }];
-
- UIViewKeyframeAnimationOptions的枚举值如下,可组合使用:
UIViewAnimationOptionLayoutSubviews           //进行动画时布局子控件
UIViewAnimationOptionAllowUserInteraction     //进行动画时允许用户交互
UIViewAnimationOptionBeginFromCurrentState    //从当前状态开始动画
UIViewAnimationOptionRepeat                   //无限重复执行动画
UIViewAnimationOptionAutoreverse              //执行动画回路
UIViewAnimationOptionOverrideInheritedDuration //忽略嵌套动画的执行时间设置
UIViewAnimationOptionOverrideInheritedOptions //不继承父动画设置
UIViewKeyframeAnimationOptionCalculationModeLinear     //运算模式 :连续
UIViewKeyframeAnimationOptionCalculationModeDiscrete   //运算模式 :离散
UIViewKeyframeAnimationOptionCalculationModePaced      //运算模式 :均匀执行
UIViewKeyframeAnimationOptionCalculationModeCubic      //运算模式 :平滑
UIViewKeyframeAnimationOptionCalculationModeCubicPaced //运算模式 :平滑均匀
各种运算模式的直观比较如下图:
![]()
UIViewKeyframeAnimationOptions效果对比图.png
- UIViewKeyframeAnimationOptions的枚举值如下,可组合使用:

-
- 增加关键帧方法:
[UIView addKeyframeWithRelativeStartTime:(double)//动画开始的时间(占总时间的比例)
                        relativeDuration:(double) //动画持续时间(占总时间的比例)
                              animations:^{ //执行的动画

}];
- 增加关键帧方法:
-
transition转场动画
- a.从旧视图到新视图的动画效果
[UIView transitionFromView:(nonnull UIView *)
                    toView:(nonnull UIView *)
                  duration:(NSTimeInterval)
                   options:(UIViewAnimationOptions)
                completion:^(BOOL finished) {//动画执行提交后的操作
}];
在该动画过程中,fromView 会从父视图中移除,并将 toView 添加到父视图中,注意转场动画的作用对象是父视图(过渡效果体现在父视图上)。调用该方法相当于执行下面两句代码:
[fromView.superview addSubview:toView]; [fromView removeFromSuperview]; -
b.单个视图的过渡效果
[UIView transitionWithView:(nonnull UIView *)
                  duration:(NSTimeInterval)
                   options:(UIViewAnimationOptions)
                animations:^{//执行的动画
}
                completion:^(BOOL finished) {//动画执行提交后的操作
}];
- a.从旧视图到新视图的动画效果
-
示例
- 示例一
[UIView animateWithDuration:3.0 animations:^{ self.redView.center = point; self.redView.transform = CGAffineTransformMakeScale(1.5, 1.5); self.redView.transform = CGAffineTransformMakeRotation(M_PI); } completion:^(BOOL finished) { [UIView animateWithDuration:2.0 animations:^{ self.redView.frame = CGRectMake(100, 100, 100, 100); self.redView.transform = CGAffineTransformMakeScale(1 / 1.5,1 / 1.5); self.redView.transform = CGAffineTransformMakeRotation(M_PI); }]; }];![]()
UIView动画例子3.gif 示例二- (void)touchesBegan:(NSSet<UITouch *> *)touches withEvent:(UIEvent *)event{ self.redView.alpha = 0; /* animateWithDuration 动画持续时间 delay 动画延迟执行的时间 usingSpringWithDamping 震动效果,范围0~1,数值越小震动效果越明显 initialSpringVelocity 初始速度,数值越大初始速度越快 options 动画的过渡效果 */ [UIView animateWithDuration:3.0 delay:1.0 usingSpringWithDamping:0.3 initialSpringVelocity:1 options:UIViewAnimationOptionAllowUserInteraction animations:^{ self.redView.alpha = 1.0; self.redView.frame = CGRectMake(200, 350, 140, 140); } completion:^(BOOL finished) { [self.redView removeFromSuperview]; }]; }![]()
UIView动画例子4.gif
- 示例一


2.核心动画
说道核心动画,那就不得不先说下CALayer。
- 在iOS系统中,你能看得见摸得着的东西基本上都是UIView,比如一个按钮、一个文本标签、一个文本输入框、一个图标等等,这些都是UIView。
- 其实UIView之所以能显示在屏幕上,完全是因为它内部的一个层。
- 在创建UIView对象时,UIView内部会自动创建一个层(即CALayer对象),通过UIView的layer属性可以访问这个层。当UIView需要显示到屏幕上时,会调用drawRect:方法进行绘图,并且会将所有内容绘制在自己的层上,绘图完毕后,系统会将层拷贝到屏幕上,于是就完成了UIView的显示。
- 换句话说,UIView本身不具备显示的功能,是它内部的层才有显示功能。
上面已经说过了,UIView之所以能够显示,完全是因为内部的CALayer对象。因此,通过操作这个CALayer对象,可以很方便地调整UIView的一些界面属性,比如:阴影、圆角大小、边框宽度和颜色等。
//下面是CALayer的一些属性介绍
//宽度和高度
@property CGRect bounds;
//位置(默认指中点,具体由anchorPoint决定)
@property CGPoint position;
//锚点(x,y的范围都是0-1),决定了position的含义
@property CGPoint anchorPoint;
//背景颜色(CGColorRef类型)
@propertyCGColorRefbackgroundColor;
//形变属性
@property CATransform3D transform;
//边框颜色(CGColorRef类型)
@property  CGColorRef  borderColor;
//边框宽度
@property CGFloat borderWidth;
//圆角半径
@property CGFloat cornerRadius;
//内容(比如设置为图片CGImageRef)
@property(retain) id contents;
说明:可以通过设置contents属性给UIView设置背景图片,注意必须是CGImage才能显示,我们可以在UIImage对象后面加上.CGImage直接转换,转换之后还需要在前面加上(id)进行强转。
// 跨框架赋值需要进行桥接
self.view.layer.contents = (__bridge id _Nullable)([UIImage imageNamed:@"123"].CGImage);
值得注意的是,UIView的CALayer对象(层)通过layer属性可以访问这个层。要注意的是,这个默认的层不允许重新创建,但可以往层里面添加子层。UIView可以通过addSubview:方法添加子视图,类似地,CALayer可以通过addSublayer:方法添加子层
2.1 CALayer对象有两个比较重要的属性,那就是position和anchorPoint。
- position和anchorPoint属性都是CGPoint类型的
- position可以用来设置CALayer在父层中的位置,它是以父层的左上角为坐标原点(0, 0)
- anchorPoint称为"定位点",它决定着CALayer身上的哪个点会在position属性所指的位置。它的x、y取值范围都是0~1,默认值为(0.5, 0.5)
-
创建一个CALayer,添加到控制器的view的layer中
 CALayer *myLayer = [CALayer layer];
 // 设置层的宽度和高度(100x100)
 myLayer.bounds = CGRectMake(0, 0, 100, 100);
 // 设置层的位置
 myLayer.position = CGPointMake(100, 100);
 // 设置层的背景颜色:红色
 myLayer.backgroundColor = [UIColor redColor].CGColor;
 // 添加myLayer到控制器的view的layer中
 [self.view.layer addSublayer:myLayer];
第5行设置了myLayer的position为(100, 100),又因为anchorPoint默认是(0.5, 0.5),所以最后的效果是:myLayer的中点会在父层的(100, 100)位置
![]()
注意,蓝色线是我自己加上去的,方便大家理解,并不是默认的显示效果。两条蓝色线的宽度均为100。
-
2.若将anchorPoint改为(0, 0),myLayer的左上角会在(100, 100)位置1 myLayer.anchorPoint = CGPointMake(0, 0);
![]()
-
3.若将anchorPoint改为(1, 1),myLayer的右下角会在(100, 100)位置1 myLayer.anchorPoint = CGPointMake(1, 1);
![]()
-
4.将anchorPoint改为(0, 1),myLayer的左下角会在(100, 100)位置1 myLayer.anchorPoint = CGPointMake(0, 1);
![]()


-
总结:
我想,你应该已经大概明白anchorPoint的用途了吧,它决定着CALayer身上的哪个点会在position所指定的位置上。它的x、y取值范围都是0~1,默认值为(0.5, 0.5),因此,默认情况下,CALayer的中点会在position所指定的位置上。当anchorPoint为其他值时,以此类推。anchorPoint是视图的中心点,position是视图的位置,位置会和中心点重叠。所以我们在开发中可以通过修改视图的layer.anchorPoint或者layer.position实现特定的动画效果。
两份代码,上面那个是anchorPoint为(0.5, 0.5)也就是默认情况下,下面那个是(0, 0)。
-
示例一:anchorPoint为(0.5, 0.5)
![]()
代码如下:
self.redView.layer.anchorPoint = CGPointMake(0.5, 0.5); [UIView animateWithDuration:3.0 animations:^{ self.redView.transform = CGAffineTransformMakeRotation(M_PI); } completion:^(BOOL finished) { }]; -
示例二:anchorPoint(0,0)
![]()
代码如下:
self.redView.layer.anchorPoint = CGPointMake(0, 0);
[UIView animateWithDuration:3.0 animations:^{
    self.redView.transform = CGAffineTransformMakeRotation(M_PI);
} completion:^(BOOL finished) {

}];
-


2.2 隐式动画
根层与非根层:
- 每一个UIView内部都默认关联着一个CALayer,我们可用称这个Layer为Root Layer(根层)
- 所有的非Root Layer,也就是手动创建的CALayer对象,都存在着隐式动画
当对非Root Layer的部分属性进行修改时,默认会自动产生一些动画效果,而这些属性称为Animatable Properties(可动画属性)。
常见的几个可动画属性:
bounds:用于设置CALayer的宽度和高度。修改这个属性会产生缩放动画
backgroundColor:用于设置CALayer的背景色。修改这个属性会产生背景色的渐变动画
position:用于设置CALayer的位置。修改这个属性会产生平移动画
可以通过事务关闭隐式动画:
[CATransaction begin];
// 关闭隐式动画
[CATransaction setDisableActions:YES];

self.myview.layer.position = CGPointMake(10, 10);
[CATransaction commit];
扯得有点远了,我们继续回到主题,下面正式介绍核心动画。
2.3 Core Animation简介
Core Animation,中文翻译为核心动画,它是一组非常强大的动画处理API,使用它能做出非常炫丽的动画效果,而且往往是事半功倍。也就是说,使用少量的代码就可以实现非常强大的功能。
Core Animation可以用在Mac OS X和iOS平台。
Core Animation的动画执行过程都是在后台操作的,不会阻塞主线程。
要注意的是,Core Animation是直接作用在CALayer上的,并非UIView。
-
核心动画
如果是xcode5之前的版本,使用它需要先添加QuartzCore.framework和引入对应的框架<QuartzCore/QuartzCore.h>开发步骤:
1.使用它需要先添加QuartzCore.framework框架和引入主头文件<QuartzCore/QuartzCore.h>
2.初始化一个CAAnimation对象,并设置一些动画相关属性
3.通过调用CALayer的addAnimation:forKey:方法增加CAAnimation对象到CALayer中,这样就能开始执行动画了
4.通过调用CALayer的removeAnimationForKey:方法可以停止CALayer中的动画![]()
CAAnimation继承结构.png -
CAAnimation——所有动画对象的父类
是所有动画对象的父类,负责控制动画的持续时间和速度,是个抽象类,不能直接使用,应该使用它具体的子类属性说明:(带*号代表来自CAMediaTiming协议的属性)
- *duration:动画的持续时间
- *repeatCount:重复次数,无限循环可以设置HUGE_VALF或者MAXFLOAT
- *repeatDuration:重复时间
- removedOnCompletion:默认为YES,代表动画执行完毕后就从图层上移除,图形会恢复到动画执行前的状态。如果想让图层保持显示动画执行后的状态,那就设置为NO,不过还要设置fillMode为kCAFillModeForwards
- *fillMode:决定当前对象在非active时间段的行为。比如动画开始之前或者动画结束之后
- *beginTime:可以用来设置动画延迟执行时间,若想延迟2s,就设置为CACurrentMediaTime()+2,CACurrentMediaTime()为图层的当前时间
- timingFunction:速度控制函数,控制动画运行的节奏
- delegate:动画代理

-
CAAnimation——动画填充模式
- fillMode属性值(要想fillMode有效,最好设置removedOnCompletion = NO)
- kCAFillModeRemoved 这个是默认值,也就是说当动画开始前和动画结束后,动画对layer都没有影响,动画结束后,layer会恢复到之前的状态
- kCAFillModeForwards 当动画结束后,layer会一直保持着动画最后的状态
- kCAFillModeBackwards 在动画开始前,只需要将动画加入了一个layer,layer便立即进入动画的初始状态并等待动画开始。
- kCAFillModeBoth 这个其实就是上面两个的合成.动画加入后开始之前,layer便处于动画初始状态,动画结束后layer保持动画最后的状态
-
CAAnimation——速度控制函数
速度控制函数(CAMediaTimingFunction)
- kCAMediaTimingFunctionLinear(线性):匀速,给你一个相对静态的感觉
- kCAMediaTimingFunctionEaseIn(渐进):动画缓慢进入,然后加速离开
- kCAMediaTimingFunctionEaseOut(渐出):动画全速进入,然后减速的到达目的地
- kCAMediaTimingFunctionEaseInEaseOut(渐进渐出):动画缓慢的进入,中间加速,然后减速的到达目的地。这个是默认的动画行为。
设置动画的执行节奏anim.timingFunction = [CAMediaTimingFunction functionWithName:kCAMediaTimingFunctionLinear];
-
CAAnimation——动画代理方法
CAAnimation在分类中定义了代理方法,是给NSObject添加的分类,所以任何对象,成为CAAnimation的代理都可以
@interface NSObject (CAAnimationDelegate) /* Called when the animation begins its active duration. */ 动画开始的时候调用 - (void)animationDidStart:(CAAnimation *)anim; 动画停止的时候调用 - (void)animationDidStop:(CAAnimation *)anim finished:(BOOL)flag; @end -
CALayer上动画的暂停和恢复
#pragma mark 暂停CALayer的动画
-(void)pauseLayer:(CALayer*)layer {
    CFTimeInterval pausedTime = [layer convertTime:CACurrentMediaTime() fromLayer:nil];
    让CALayer的时间停止走动
    layer.speed = 0.0;
    让CALayer的时间停留在pausedTime这个时刻
    layer.timeOffset = pausedTime;
}
-
CALayer上动画的恢复
#pragma mark 恢复CALayer的动画
-(void)resumeLayer:(CALayer*)layer {
    CFTimeInterval pausedTime = layer.timeOffset;
    1. 让CALayer的时间继续行走
    layer.speed = 1.0;
    2. 取消上次记录的停留时刻
    layer.timeOffset = 0.0;
    3. 取消上次设置的时间
    layer.beginTime = 0.0;
    4. 计算暂停的时间(这里也可以用CACurrentMediaTime()-pausedTime)
    CFTimeInterval timeSincePause = [layer convertTime:CACurrentMediaTime() fromLayer:nil] - pausedTime;
    5. 设置相对于父坐标系的开始时间(往后退timeSincePause)
    layer.beginTime = timeSincePause;
}
-
CAPropertyAnimation
是CAAnimation的子类,也是个抽象类,要想创建动画对象,应该使用它的两个子类:
CABasicAnimation
CAKeyframeAnimation
属性说明:keyPath:通过指定CALayer的一个属性名称为keyPath(NSString类型),并且对CALayer的这个属性的值进行修改,达到相应的动画效果。比如,指定@“position”为keyPath,就修改CALayer的position属性的值,以达到平移的动画效果
-
CABasicAnimation——基本动画
基本动画,是CAPropertyAnimation的子类
属性说明:
keyPath:要改变的属性名称(传字符串)fromValue:keyPath相应属性的初始值
toValue:keyPath相应属性的结束值
动画过程说明:随着动画的进行,在长度为duration的持续时间内,keyPath相应属性的值从fromValue渐渐地变为toValue
keyPath内容是CALayer的可动画Animatable属性
如果fillMode=kCAFillModeForwards同时removedOnComletion=NO,那么在动画执行完毕后,图层会保持显示动画执行后的状态。但在实质上,图层的属性值还是动画执行前的初始值,并没有真正被改变。
//创建动画
CABasicAnimation *anim = [CABasicAnimation animation];;
/*设置动画对象
  keyPath决定了执行怎样的动画,调用layer的哪个属性来执行动画
  position:平移
*/
anim.keyPath = @"position";
//包装成对象
anim.fromValue = [NSValue valueWithCGPoint:CGPointMake(0, 0)];;
anim.toValue = [NSValue valueWithCGPoint:CGPointMake(200, 300)];
anim.duration = 2.0;
//让图层保持动画执行完毕后的状态
//执行完毕以后不要删除动画
anim.removedOnCompletion = NO;
//保持最新的状态
anim.fillMode = kCAFillModeForwards;
//添加动画
[self.layer addAnimation:anim forKey:nil];
举个例子
![]()
CABasicAnimation.gif代码如下:
//创建动画对象 CABasicAnimation *anim = [CABasicAnimation animation]; //设置动画属性 anim.keyPath = @"position.y"; anim.toValue = @300; //动画提交时,会自动删除动画 anim.removedOnCompletion = NO; //设置动画最后保持状态 anim.fillMode = kCAFillModeForwards; //添加动画对象 [self.redView.layer addAnimation:anim forKey:nil]; -
CAKeyframeAnimation——关键帧动画
关键帧动画,也是CAPropertyAnimation的子类,与CABasicAnimation的区别是:CABasicAnimation只能从一个数值(fromValue)变到另一个数值(toValue),而CAKeyframeAnimation会使用一个NSArray保存这些数值
属性说明:
values:上述的NSArray对象。里面的元素称为“关键帧”(keyframe)。动画对象会在指定的时间(duration)内,依次显示values数组中的每一个关键帧path:代表路径可以设置一个CGPathRef、CGMutablePathRef,让图层按照路径轨迹移动。path只对CALayer的
anchorPoint和position起作用。如果设置了path,那么values将被忽略
keyTimes:可以为对应的关键帧指定对应的时间点,其取值范围为0到1.0,keyTimes中的每一个时间值都对应values中的每一帧。如果没有设置keyTimes,各个关键帧的时间是平分的
CABasicAnimation可看做是只有2个关键帧的CAKeyframeAnimation
//创建动画
CAKeyframeAnimation *anim = [CAKeyframeAnimation animation];;
//设置动画对象
//keyPath决定了执行怎样的动画,调整哪个属性来执行动画
anim.keyPath = @"position";
NSValue *v1 = [NSValue valueWithCGPoint:CGPointMake(100, 0)]; NSValue *v2 = [NSValue valueWithCGPoint:CGPointMake(200, 0)]; NSValue *v3 = [NSValue valueWithCGPoint:CGPointMake(300, 0)]; NSValue *v4 = [NSValue valueWithCGPoint:CGPointMake(400, 0)]; anim.values = @[v1,v2,v3,v4]; anim.duration = 2.0; //让图层保持动画执行完毕后的状态 //状态执行完毕后不要删除动画 anim.removedOnCompletion = NO; //保持最新的状态 anim.fillMode = kCAFillModeForwards; //添加动画 [self.layer addAnimation:anim forKey:nil]; //根据路径创建动画 //创建动画 CAKeyframeAnimation *anim = [CAKeyframeAnimation animation];; anim.keyPath = @"position"; anim.removedOnCompletion = NO; anim.fillMode = kCAFillModeForwards; anim.duration = 2.0; //创建一个路径 CGMutablePathRef path = CGPathCreateMutable(); //路径的范围 CGPathAddEllipseInRect(path, NULL, CGRectMake(100, 100, 200, 200)); //添加路径 anim.path = path; //释放路径(带Create的函数创建的对象都需要手动释放,否则会内存泄露) CGPathRelease(path); //添加到View的layer [self.redView.layer addAnimation:anim forKey];举个例子
![]()
CAKeyframeAnimation.gif代码如下:
//帧动画
CAKeyframeAnimation *anim = [CAKeyframeAnimation animation];
anim.keyPath = @"transform.rotation";
anim.values = @[@(angle2Radio(-5)),@(angle2Radio(5)),@(angle2Radio(-5))];
anim.repeatCount = MAXFLOAT;
//自动反转
//anim.autoreverses = YES;
[self.imageV.layer addAnimation:anim forKey:nil];
再举个例子
![]()
CAKeyframeAnimation(路径动画).gif代码如下:
#import "ViewController.h"
@interface ViewController ()
/** 注释*/
@property (nonatomic ,weak) CALayer *fistLayer;
/**! 图片数组*/
@property (strong, nonatomic)  NSMutableArray *imageArray;
@end

@implementation ViewController
- (void)viewDidLoad {
    [super viewDidLoad];
    //设置背景
    self.view.layer.contents = (id)[UIImage imageNamed:@"bg"].CGImage;
    CALayer *fistLayer = [CALayer layer];
    fistLayer.frame = CGRectMake(100, 288, 89, 40);
    fistLayer.backgroundColor = [UIColor redColor].CGColor;
    [self.view.layer addSublayer:fistLayer];
    self.fistLayer = fistLayer;

    //fistLayer.transform = CATransform3DMakeRotation(M_PI, 0, 0, 1);
    //加载图片
    NSMutableArray *imageArray = [NSMutableArray array];
    for (int i = 0; i < 10; i++) {
        UIImage *image = [UIImage imageNamed:[NSString stringWithFormat:@"fish%d",i]];
        [imageArray addObject:image];
    }
    self.imageArray = imageArray;
    //添加定时器
    [NSTimer scheduledTimerWithTimeInterval:0.1 target:self selector:@selector(update) userInfo:nil repeats:YES];

    //添加动画
    CAKeyframeAnimation *anim = [CAKeyframeAnimation animation];
    anim.keyPath = @"position";

    UIBezierPath *path = [UIBezierPath bezierPath];
    [path moveToPoint:CGPointMake(100, 200)];
    [path addLineToPoint:CGPointMake(350, 200)];
    [path addLineToPoint:CGPointMake(350, 500)];
    [path addQuadCurveToPoint:CGPointMake(100, 200) controlPoint:CGPointMake(150, 700)];

    //传入路径
    anim.path = path.CGPath;
    anim.duration  = 5;
    anim.repeatCount = MAXFLOAT;
    anim.calculationMode = @"cubicPaced";
    anim.rotationMode = @"autoReverse";
    [fistLayer addAnimation:anim forKey:nil];
}

static int _imageIndex = 0;
- (void)update {
    //从数组当中取出图片
    UIImage *image = self.imageArray[_imageIndex];
    self.fistLayer.contents = (id)image.CGImage;
    _imageIndex++;
    if (_imageIndex > 9) {
        _imageIndex = 0;
    }
}
@end
-
-
转场动画——CATransition
CATransition是CAAnimation的子类,用于做转场动画,能够为层提供移出屏幕和移入屏幕的动画效果。iOS比Mac OS X的转场动画效果少一点
UINavigationController就是通过CATransition实现了将控制器的视图推入屏幕的动画效果动画属性:(有的属性是具备方向的,详情看下图)
type:动画过渡类型
subtype:动画过渡方向
startProgress:动画起点(在整体动画的百分比)
endProgress:动画终点(在整体动画的百分比)![]()
转场动画过渡效果.pngCATransition *anim = [CATransition animation]; 转场类型 anim.type = @"cube"; 动画执行时间 anim.duration = 0.5; 动画执行方向 anim.subtype = kCATransitionFromLeft; 添加到View的layer [self.redView.layer addAnimation:anim forKey];举个例子
![]()
CATransition.gif
#import "ViewController.h" @interface ViewController () @property (weak, nonatomic) IBOutlet UIImageView *imageV; @end @implementation ViewController - (void)viewDidLoad { [super viewDidLoad]; self.imageV.userInteractionEnabled = YES; ///添加手势 ///左轻扫 UISwipeGestureRecognizer *leftSwipe = [[UISwipeGestureRecognizer alloc] initWithTarget:self action:@selector(swipe:)]; leftSwipe.direction = UISwipeGestureRecognizerDirectionLeft; [self.imageV addGestureRecognizer:leftSwipe]; ///右轻扫 UISwipeGestureRecognizer *rightSwipe = [[UISwipeGestureRecognizer alloc] initWithTarget:self action:@selector(swipe:)]; rightSwipe.direction = UISwipeGestureRecognizerDirectionRight; [self.imageV addGestureRecognizer:rightSwipe]; } static int _imageIndex = 0; - (void)swipe:(UISwipeGestureRecognizer *)swipe { //转场代码与转场动画必须得在同一个方法当中. NSString *dir = nil; if (swipe.direction == UISwipeGestureRecognizerDirectionLeft) { _imageIndex++; if (_imageIndex > 4) { _imageIndex = 0; } NSString *imageName = [NSString stringWithFormat:@"%d",_imageIndex]; self.imageV.image = [UIImage imageNamed:imageName]; dir = @"fromRight"; }else if (swipe.direction == UISwipeGestureRecognizerDirectionRight) { _imageIndex--; if (_imageIndex < 0) { _imageIndex = 4; } NSString *imageName = [NSString stringWithFormat:@"%d",_imageIndex]; self.imageV.image = [UIImage imageNamed:imageName]; dir = @"fromLeft"; } //添加动画 CATransition *anim = [CATransition animation]; //设置转场类型 anim.type = @"cube"; //设置转场的方向 anim.subtype = dir; anim.duration = 0.5; //动画从哪个点开始 //anim.startProgress = 0.2; //anim.endProgress = 0.3; [self.imageV.layer addAnimation:anim forKey:nil]; } - (void)didReceiveMemoryWarning { [super didReceiveMemoryWarning]; // Dispose of any resources that can be recreated. } @end -
CAAnimationGroup——动画组
动画组,是CAAnimation的子类,可以保存一组动画对象,将CAAnimationGroup对象加入层后,组中所有动画对象可以同时并发运行
属性说明:animations:用来保存一组动画对象的NSArray默认情况下,一组动画对象是同时运行的,也可以通过设置动画对象的beginTime属性来更改动画的开始时间
CAAnimationGroup *group = [CAAnimationGroup animation];
//创建旋转动画对象
CABasicAnimation *retate = [CABasicAnimation animation];
//layer的旋转属性
retate.keyPath = @"transform.rotation";
//角度
retate.toValue = @(M_PI);
//创建缩放动画对象
CABasicAnimation *scale = [CABasicAnimation animation];
//缩放属性
scale.keyPath = @"transform.scale";
//缩放比例
scale.toValue = @(0.0);
//添加到动画组当中
group.animations = @[retate,scale];
//执行动画时间
group.duration = 2.0;
//执行完以后不要删除动画
group.removedOnCompletion = NO;
//保持最新的状态
group.fillMode = kCAFillModeForwards;
[self.view.layer addAnimation:group forKey:nil];
举个例子
![]()
CAAnimationGroup.gif
代码如下:
- (void)touchesBegan:(NSSet<UITouch *> *)touches withEvent:(UIEvent *)event {
    //移动
    CABasicAnimation *anim = [CABasicAnimation animation];
    anim.keyPath =  @"position.y";
    anim.toValue = @500;
    //anim.removedOnCompletion = NO;
    //anim.fillMode = kCAFillModeForwards;
    //[self.redView.layer addAnimation:anim forKey:nil];
    //
    //缩放
    CABasicAnimation *anim2 = [CABasicAnimation animation];
    anim2.keyPath =  @"transform.scale";
    anim2.toValue = @0.5;
    //anim2.removedOnCompletion = NO;
    //anim2.fillMode = kCAFillModeForwards;
    //[self.redView.layer addAnimation:anim2 forKey:nil];

    CAAnimationGroup *groupAnim = [CAAnimationGroup animation];
    //会执行数组当中每一个动画对象
    groupAnim.animations = @[anim,anim2];
    groupAnim.removedOnCompletion = NO;
    groupAnim.fillMode = kCAFillModeForwards;
    [self.redView.layer addAnimation:groupAnim forKey:nil];
}


2.4 三大动画:(不需要交互的时候可以选择以下动画)
-
CAAnimationGroup——动画组
-
CAKeyframeAnimation——关键帧动画
-
转场动画——CATransition
1.创建转场动画:[CATransition animation];
2.设置动画属性值
3.添加到需要专场动画的图层上 [ layer addAimation:animation forKer:nil];转场动画的类型(NSString *type)fade : 交叉淡化过渡 push : 新视图把旧视图推出去 moveIn: 新视图移到旧视图上面 reveal: 将旧视图移开,显示下面的新视图 cube : 立方体翻滚效果 oglFlip : 上下左右翻转效果 suckEffect : 收缩效果,如一块布被抽走 rippleEffect: 水滴效果 pageCurl : 向上翻页效果 pageUnCurl : 向下翻页效果 cameraIrisHollowOpen : 相机镜头打开效果 cameraIrisHollowClos : 相机镜头关闭效果
-
- 使用UIView动画函数实现转场动画——单视图
///参数说明: ///duration:动画的持续时间 ///view:需要进行转场动画的视图 ///options:转场动画的类型 ///animations:将改变视图属性的代码放在这个block中 ///completion:动画结束后,会自动调用这个block + (void)transitionWithView:(UIView *)view duration:(NSTimeInterval)duration options:(UIViewAnimationOptions)options animations:(void (^)(void))animations completion:(void (^)(BOOL finished))completion; - 使用UIView动画函数实现转场动画——双视图
参数说明:
duration:动画的持续时间
options:转场动画的类型
animations:将改变视图属性的代码放在这个block中
completion:动画结束后,会自动调用这个block
+ (void)transitionFromView:(UIView *)fromView
                    toView:(UIView *)toView
                  duration:(NSTimeInterval)duration
                   options:(UIViewAnimationOptions)options
                completion:(void (^)(BOOL finished))completion;
- 使用UIView动画函数实现转场动画——单视图
注意:核心动画只是修改了控件的图形树,换句话说就是只是修改了他的显示,并没有改变控件的真实位置!!!也就是说在动画的过程中点击控件是不能跟用户进行交互的,切记切记!!!当然,点击控件的起始位置是可以的。
3.帧动画
这里讲的帧动画是指UIIMageView自带的动画。顺带跟大家讲下怎么将一个git动态图里面的图片取出来,并加以显示。动画属性:
// for one cycle of images. default is number of images * 1/30th of a second (i.e. 30 fps)
@property (nonatomic) NSTimeInterval animationDuration;
// 0 means infinite (default is 0)
@property (nonatomic) NSInteger animationRepeatCount;
举个例子

帧动画.gif
代码如下:
- (void)touchesBegan:(NSSet<UITouch *> *)touches withEvent:(UIEvent *)event{
    NSArray *imageArray = [self getImageArrayWithGIFNameWit:@"aisi"];
    self.imageView.animationImages = imageArray;
    self.imageView.animationDuration = 3;
    self.imageView.animationRepeatCount = MAXFLOAT;
    [self.imageView startAnimating];
    dispatch_after(dispatch_time(DISPATCH_TIME_NOW, (int64_t)(5.0 * NSEC_PER_SEC)), dispatch_get_main_queue(), ^{
        [_imageView stopAnimating];
    });
}

- (NSArray<UIImage *> *)getImageArrayWithGIFNameWit:(NSString *)imageName {
    NSMutableArray *imageArray = [NSMutableArray array];
    NSString *path = [[NSBundle mainBundle] pathForResource:imageName ofType:@"gif"];
    NSData *data = [NSData dataWithContentsOfFile:path];

    if (!data) {
        NSLog(@"图片不存在!");
        return nil;
    }

    CGImageSourceRef source = CGImageSourceCreateWithData((__bridge CFDataRef)data, NULL);
    size_t count = CGImageSourceGetCount(source);

    if (count <= 1) {
        [imageArray addObject:[[UIImage alloc] initWithData:data]];
    }else {
        for (size_t i = 0; i < count; i++) {
            CGImageRef image = CGImageSourceCreateImageAtIndex(source, i, NULL);
            [imageArray addObject:[UIImage imageWithCGImage:image scale:[UIScreen mainScreen].scale orientation:UIImageOrientationUp]];
            CGImageRelease(image);
        }
    }
    CFRelease(source);
    return imageArray;
}
4.自定义转场动画
4.1、勾弦
-
转场的本质是下一场景的视图替换当前场景的视图以及相应的控制器的替换,表现为当前视图消失和下一视图出现。容器类 VC 的转场里 fromView 和 toView 是 containerView 的子层次的视图,而 Modal 转场里 presentingView 与ontainerView 是同层次的视图,只有 presentedView 是 containerView 的子层次视图。Custom 模式下 Modal 转场结束时 fromView 并未从视图结构中移除;FullScreen 模式的 Modal 转场结束后 fromView 主动被从视图结构中移除了。Custom 模式下,在 dismiss 中,不要像其他转场中那样将 toView加入 containerView 中,否则 dismiss 结束后本来可见的 presentingView 将会随着 containerView 一起被移除。
-
在 Modal 转场中,presentingView 并非 containerView 的子视图,这时通过
viewForKey:方法来获取presentingView 得到的是 nil,必须通过viewControllerForKey:得到presentingVC 后来获取。当 UIViewController 的modalPresentationStyle属性为.Custom或.FullScreen时,就有机会定制转场效果,此时modalTransitionStyle指定的转场动画将会被忽略。 -
容器 VC 的转场的代理由容器 VC 自身提供,Modal 转场的代理由 presentedVC(目标控制器) 提供。Modal 转场在 Custom 模式下必须区分 presentation 和 dismiss 转场,而在 FullScreen 模式下可以不用这么做,因为 UIKit 会在 dismiss 转场结束后自动将 presentingView 放置到原来的位置。转场代理(Transitioning Delegate)根据不同的转场类型提供其所需要的动画控制类和交互控制类。
-
动画控制类(器)(Animation Controller)遵从
UIViewControllerAnimatedTransitioning协议,并且负责执行实际的动画。交互控制类(器)(Interaction Controller)遵从UIViewControllerInteractiveTransition协议来控制可交互的转场动画。转场上下文(Transitioning Context)定义了转场时需要的元数据(比如转场所参与了的视图控制器和视图的属性),其遵从UIViewControllerContextTransitioning协议,并且这是由系统负责生成和提供。 -
转场协调器(Transition Coordinators)可以在运行转场动画时,并行地运行其他动画。转场协调器遵从
UIViewControllerTransitionCoordinator协议。转场动画交互方式分两种,第一种是属于非交互式:必须要实现动画控制类,第二种交互方式:必须要实现动画控制类和交互控制类(例如可以通过手势的滑动距离来控制转场动画的一个进度,一般应用中都可以通过手势的滑动来推出一个视图控制器)。
4.2 相关类联系图
![]()
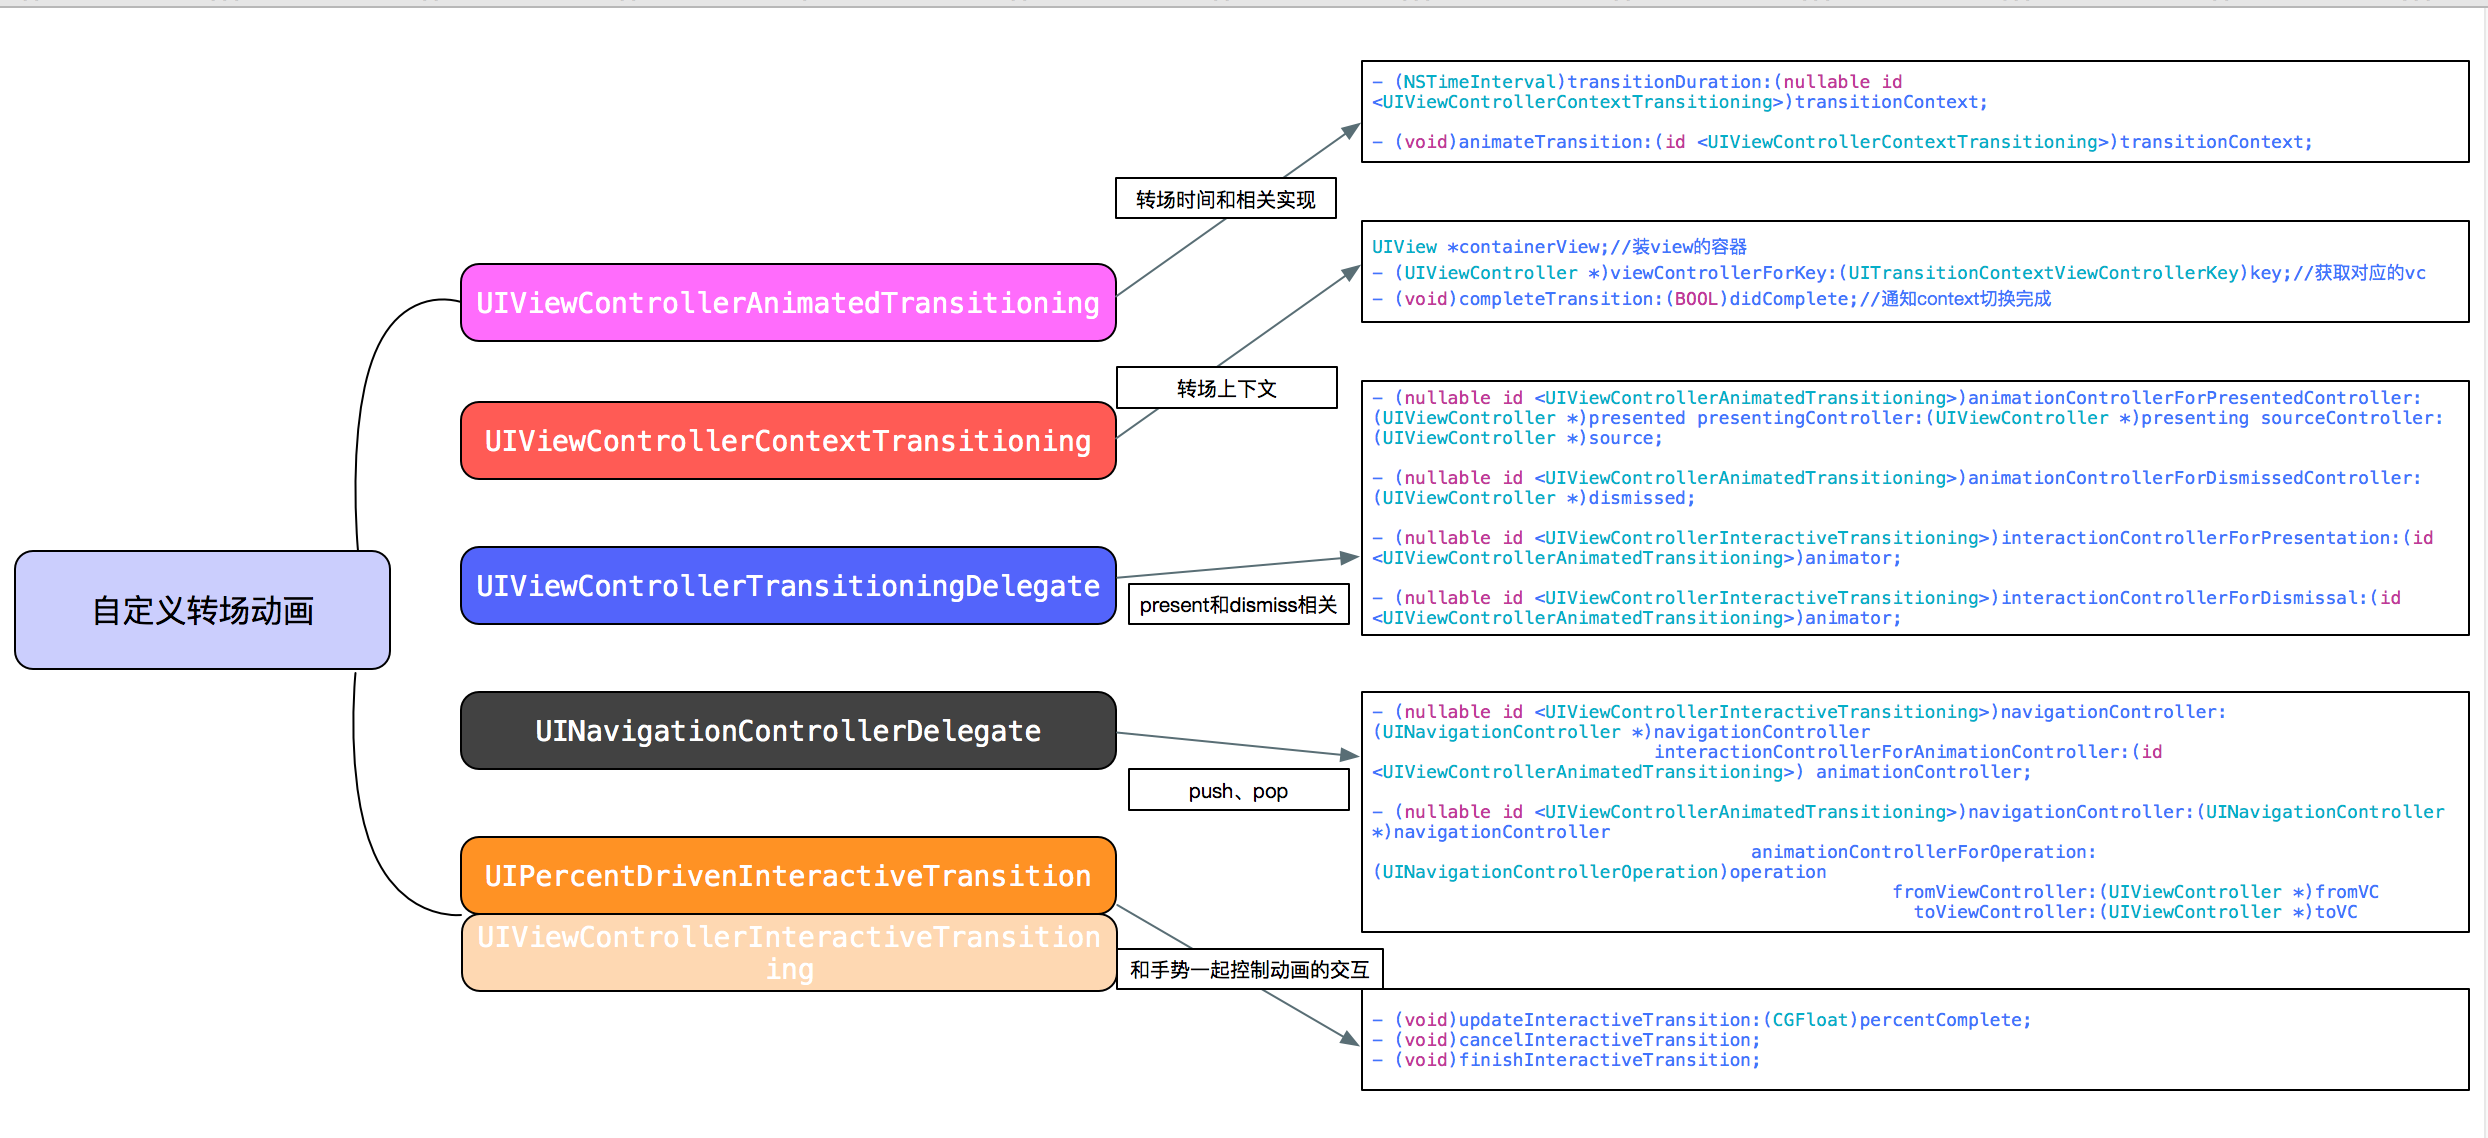
说到转场动画,其实无非就是我们常用的push pop present dismiss四种动画,其中前面两个是成对使用,后面两个成对使用,我们先看看push这组在自定义转场动画中所涉及到的类
由于push动画组需要配合navigationController来使用,所以上图中的UINavigationControllerDelegate肯定是我们需要的类
-
UINavigationControllerDelegate
-
先来看看其中需要用到的函数
- (nullable id <UIViewControllerInteractiveTransitioning>)navigationController:(UINavigationController *)navigationController
                                   interactionControllerForAnimationController:(id <UIViewControllerAnimatedTransitioning>) animationController NS_AVAILABLE_IOS(7_0);

- (nullable id <UIViewControllerAnimatedTransitioning>)navigationController:(UINavigationController *)navigationController
                                            animationControllerForOperation:(UINavigationControllerOperation)operation
                                                         fromViewController:(UIViewController *)fromVC
                                                           toViewController:(UIViewController *)toVC NS_AVAILABLE_IOS(7_0);
第一个函数的返回值是一个
id <UIViewControllerInteractiveTransitioning>值
第二个函数返回的值是一个id <UIViewControllerAnimatedTransitioning>值
那么我们就先从这两个返回值入手,来看下两个函数的作用 -
UIViewControllerInteractiveTransitioning 、UIPercentDrivenInteractiveTransition
这两个类又是干什么的呢?
UIPercentDrivenInteractiveTransition遵守协议UIViewControllerInteractiveTransitioning,通过查阅资料了解到,UIPercentDrivenInteractiveTransition这个类的对象会根据我们的手势,来决定我们的自定义过渡的完成度,也就是这两个其实是和手势交互相关联的,自然而然我们就想到了iOS 7引进的侧滑手势,对,就是侧滑手势,说到这里,我就顺带介绍一个类,UIScreenEdgePanGestureRecognizer,手势侧滑的类,具体怎么使用,后面我会陆续讲到。涉及函数
/// 更新进度
- (void)updateInteractiveTransition:(CGFloat)percentComplete;
/// 取消转场 回到转场前的效果
- (void)cancelInteractiveTransition;
/// 完成转场
- (void)finishInteractiveTransition;
-
-
-
UIViewControllerAnimatedTransitioning
在这个类中,我们又看到了两个函数
//转场时间 - (NSTimeInterval)transitionDuration:(nullable id <UIViewControllerContextTransitioning>)transitionContext; - (void)animateTransition:(id <UIViewControllerContextTransitioning>)transitionContext; -
其中又涉及到一个新的类
UIViewControllerContextTransitioning,那么这个又是干什么的呢?我们等下再来了解,先来谈谈第一个函数transitionDuration,从返回值我们可以猜测出这是和时间有关的,没错,这就是我们自定义转场动画所需要的时间
那么下面我们就来看看UIViewControllerContextTransitioning
-
-
-
UIViewControllerContextTransitioning
这个类就是我们自定义转场动画所需要的核心,即转场动画的上下文,定义了转场时需要的元素,比如在转场过程中所参与的视图控制器和视图的相关属性
//转场动画的容器 @property(nonatomic, readonly) UIView *containerView; //通过对应的`key`可以得到我们需要的`vc` - (UIViewController *)viewControllerForKey:(UITransitionContextViewControllerKey)key //转场动画完成时候调用,必须调用,否则在进行其他转场没有任何效果 - (void)completeTransition:(BOOL)didComplete -
看到这里,我们现在再去看
UINavigationControllerDelegate中的两个函数和UIViewControllerAnimatedTransitioning中的animateTransition函数,就能完全理解了//主要用于手势交互转场 for push or pop - (nullable id <UIViewControllerInteractiveTransitioning>)navigationController:(UINavigationController *)navigationController interactionControllerForAnimationController:(id <UIViewControllerAnimatedTransitioning>) animationController NS_AVAILABLE_IOS(7_0); //非手势交互转场 for push or pop - (nullable id <UIViewControllerAnimatedTransitioning>)navigationController:(UINavigationController *)navigationController animationControllerForOperation:(UINavigationControllerOperation)operation fromViewController:(UIViewController *)fromVC toViewController:(UIViewController *)toVC NS_AVAILABLE_IOS(7_0); //实现转场动画 通过transitionContext - (void)animateTransition:(id <UIViewControllerContextTransitioning>)transitionContext; -
到此,我们还有一个类没有了解,那就是
UIViewControllerTransitioningDelegate有了前面的分析,我们可以很好的理解
-
-
UIViewControllerTransitioningDelegate
主要是针对
present和dismiss动画的转场///非手势转场交互 for present - (id<UIViewControllerAnimatedTransitioning>)animationControllerForPresentedController:(UIViewController *)presented presentingController:(UIViewController *)presenting
sourceController:(UIViewController *)source ///非手势转场交互 for dismiss - (id<UIViewControllerAnimatedTransitioning>)animationControllerForDismissedController:(UIViewController *)dismissed ///手势交互 for dismiss - (id<UIViewControllerInteractiveTransitioning>)interactionControllerForDismissal:(id<UIViewControllerAnimatedTransitioning>)animator ///手势交互 for present - (id<UIViewControllerInteractiveTransitioning>)interactionControllerForPresentation:(id<UIViewControllerAnimatedTransitioning>)animator
4.3、简单转场
- 基本类型
UIViewAnimationOptionLayoutSubviews:动画过程中保证子视图跟随运动。
UIViewAnimationOptionAllowUserInteraction:动画过程中允许用户交互。
UIViewAnimationOptionBeginFromCurrentState:所有视图从当前状态开始运行。
UIViewAnimationOptionRepeat:重复运行动画。
UIViewAnimationOptionAutoreverse :动画运行到结束点后仍然以动画方式回到初始点。
UIViewAnimationOptionOverrideInheritedDuration:忽略嵌套动画时间设置。
UIViewAnimationOptionOverrideInheritedCurve:忽略嵌套动画速度设置。
UIViewAnimationOptionAllowAnimatedContent:动画过程中重绘视图(注意仅仅适用于转场动画)。
UIViewAnimationOptionShowHideTransitionViews:视图切换时直接隐藏旧视图、显示新视图, 而不是将旧视图从父视图移除(仅仅适用于转场动画) UIViewAnimationOptionOverrideInheritedOptions :不继承父动画设置或动画类型。
- 动画速度控制(可从其中选择一个设置)
UIViewAnimationOptionCurveEaseInOut:动画先缓慢,然后逐渐加速。 UIViewAnimationOptionCurveEaseIn :动画逐渐变慢。 UIViewAnimationOptionCurveEaseOut:动画逐渐加速。 UIViewAnimationOptionCurveLinear :动画匀速执行,默认值。 - 转场类型(仅适用于转场动画设置,可以从中选择一个进行设置,基本动画、关键帧动画不需要设置)
UIViewAnimationOptionTransitionNone:没有转场动画效果。 UIViewAnimationOptionTransitionFlipFromLeft :从左侧翻转效果。 UIViewAnimationOptionTransitionFlipFromRight:从右侧翻转效果。 UIViewAnimationOptionTransitionCurlUp:向后翻页的动画过渡效果。 UIViewAnimationOptionTransitionCurlDown :向前翻页的动画过渡效果。 UIViewAnimationOptionTransitionCrossDissolve:旧视图溶解消失显示下一个新视图的效果。 UIViewAnimationOptionTransitionFlipFromTop :从上方翻转效果。 UIViewAnimationOptionTransitionFlipFromBottom:从底部翻转效果。 -
简单使用
作用于fromView的父视图,切换两个view,将formView从其父视图上移除,将toView重新粘在其父视图上,展现一个动画效果。
[UIView transitionFromView:self.view
                    toView:redView
                  duration:5.0
                   options: UIViewAnimationOptionCurveLinear
                completion:^(BOOL finished) {
        NSLog(@"转场动画完成")
}];
重绘View视图,任何其子视图的改变或者其自身的改变都会触发转场动画的效果。
[UIView transitionWithView:self.view
                  duration:2.0
                   options: UIViewAnimationOptionCurveLinear
                animations:^{
    self.view.alpha = 0.1;
}               completion:^(BOOL finished) {
    NSLog(@"动画完成")
}];
4.4 模态转场
源控制器A–>目标控制器B。
-
(1) 提要
可以只使用一个动画控制器Animator,但是要对Present/Dismiss分别实现。模态的类型默认为FullScreen,即在Present时,会移除fromView,而类型设置为Custom时,就会使fromView与toView共存。present时,要把toView加入到container的视图层级,dismiss时,要把fromView从container的视图层级中移除。非交互式转场,需要在动画执行完毕声明complete
[transitionContext completeTransition:YES];交互式转场,需要判断转场完成或者取消。BOOL isCancelled = transitionContext.transitionWasCancelled;
// 考虑到转场中途可能取消的情况,转场结束后,恢复视图状态。
fromView.transform = CGAffineTransformIdentity;
toView.transform = CGAffineTransformIdentity;在模态中,设置将要跳转到的视图控制器(presentedViewController)的transitioningDelegate。充当代理的对象可以是源视图控制器(presentingViewController),也可以是自己创建的对象,它需要为转场动画提供一个animator对象。animator对象的animateTransition是整个动画的核心逻辑。
-
(2) 无交互
设置目标控制器B的代理(可以是A,也可以是B)以及模态动画类型(常用UIModalPresentationCustom或UIModalPresentationFullScreen)。
YAShareViewController *shareViewController = [[YAShareViewController alloc] init];
// 设置转场代理
shareViewController.transitioningDelegate = self;
// 设置转场动画类型
shareViewController.modalPresentationStyle = UIModalPresentationCustom;
[self presentViewController:shareViewController animated:YES completion:nil];
// 目标控制器的代理遵守UIViewControllerTransitioningDelegate协议并相关实现方法代理方法中的动画管理者Animator独立存在,可以新建一继承自NSObject且遵守
UIViewControllerAnimatedTransitioning协议的对象担任(仅仅遵守协议实现方法即可,不需设置代理)。#pragma mark – Life Cycle
+ (instancetype)transitionAnimatorWithType:(TransitionAnimatorType)transitionAnimatorType {
YATransitionAnimator *animator = [[YATransitionAnimator alloc] init];
animator.transitionAnimatorType = transitionAnimatorType;
return animator;
}
-
(3) 交互
(坑多,所以一般不用下列方式,取而代之使用
UIPresentationController。)在目标控制器的代理方法中,实现交互式代理方法:
// 1.交互出现动画
- (nullable id <UIViewControllerInteractiveTransitioning>)interactionControllerForPresentation:(id <UIViewControllerAnimatedTransitioning>)animator {
    return [[YAInteractiveTransition alloc] init];
}

// 2.交互消失动画
- (nullable id <UIViewControllerInteractiveTransitioning>)interactionControllerForDismissal:(id <UIViewControllerAnimatedTransitioning>)animator {
    return [[YAInteractiveTransition alloc] init];
}
新建一继承自
UIPercentDrivenInteractiveTransition的交互组件类(最好这么做,也可以自定义类遵守UIViewControllerInteractiveTransitioning协议,但极不推荐),实现必须的startInteractiveTransition方法。- (void)startInteractiveTransition:(id<UIViewControllerContextTransitioning>)transitionContext {} -
(4) UIPresentationController
iOS8后的新API,极其方便。
把管理权限交给UIPresentationController。设置模态动画类型后,只需要在目标控制器的代理方法中实现:- (nullable UIPresentationController *)presentationControllerForPresentedViewController:(UIViewController *)presented
presentingViewController:(nullable UIViewController *)presenting
sourceViewController:(UIViewController *)source {
return [[YAPresentationController alloc] initWithPresentedViewController:presented presentingViewController:presenting];
}那么所有的工作就在YAPresentationController控制器中了。
实现相应的方法://在呈现过渡即将开始的时候被调用的
- (void)presentationTransitionWillBegin{
// 源控制器的View
[self.containerView addSubview:self.presentingViewController.view];
// 背景View
[self.containerView addSubview:self.backgroundView];
// 目标控制器View
[self.containerView addSubview:self.presentedView];
}
//在呈现过渡结束时被调用的
- (void)presentationTransitionDidEnd:(BOOL)completed{
}
//在退出过渡即将开始的时候被调用的
- (void)dismissalTransitionWillBegin{
}
//在退出的过渡结束时被调用的
- (void)dismissalTransitionDidEnd:(BOOL)completed{
}
// 调整呈现的View的frame
- (CGRect)frameOfPresentedViewInContainerView{
}
4.5、NavigationController转场
设置源控制器的导航控制器的代理,遵守UINavigationControllerDelegate协议,根据交互式或者非交互式实现相应方法.在方法中根据Push或者Pop返回相应的自定义动画控制器(或者交互控制器)。
// 交互式
- (nullable id <UIViewControllerInteractiveTransitioning>)navigationController:(UINavigationController *)navigationController
                                   interactionControllerForAnimationController:(id <UIViewControllerAnimatedTransitioning>) animationController {

}

// 非交互式
- (nullable id <UIViewControllerAnimatedTransitioning>)navigationController:(UINavigationController *)navigationController
                                            animationControllerForOperation:(UINavigationControllerOperation)operation
                                                         fromViewController:(UIViewController *)fromVC
                                                           toViewController:(UIViewController *)toVC {
  if (operation == UINavigationControllerOperationPush) {//Push情况下
      return [YATransitionAnimator transitionAnimatorWithType:TransitionAnimatorPush];
  } else if (operation == UINavigationControllerOperationPop) { // Pop情况下
      return [YATransitionAnimator transitionAnimatorWithType:TransitionAnimatorPop];
  } else {
      return nil;
  }
}
4.6、TabBarController转场
与导航控制器类似,设置源控制器的tabBarController的代理,遵循UITabBarControllerDelegate,实现相应的方法,只不过它既没有模态的Present和Dismiss,也没有导航控制器的Push和Pop,只有一种方式,更加简单,同样,在方法中返回自定义的动画控制器(或者交互控制器)。
- (id <UIViewControllerInteractiveTransitioning>)tabBarController:(UITabBarController *)tabBarController
                      interactionControllerForAnimationController: (id <UIViewControllerAnimatedTransitioning>)animationController {}


- (id <UIViewControllerAnimatedTransitioning>)tabBarController:(UITabBarController *)tabBarController
            animationControllerForTransitionFromViewController:(UIViewController *)fromVC
                                              toViewController:(UIViewController *)toVC {}
二,相关文章


 浙公网安备 33010602011771号