
Python GIL 多线程机制 (C source code)
最近阅读《Python源码剖析》对进程线程的封装解释:
GIL,Global Interpreter Lock,对于python的多线程机制非常重要,其如何实现的?代码中实现如下:

指向一个void*,C语言中的空指针类型可以指向任意类型。Python建立多线程环境的动作只会执行一次。
PyEval_InitThreads--》PyThread_allocate_lock创建GIL之后,当前线程开始遵守python的多线程机制,即任何调用Python C API之前需要先获得GIL.
也就是代码中PyThread_acquire_lock尝试获取GIL。


static PyMethodDef thread_methods[] = {
    {"start_new_thread",        (PyCFunction)thread_PyThread_start_new_thread,
                            METH_VARARGS,
                            start_new_doc},
    {"start_new",               (PyCFunction)thread_PyThread_start_new_thread,
                            METH_VARARGS,
                            start_new_doc},
    {"allocate_lock",           (PyCFunction)thread_PyThread_allocate_lock,
     METH_NOARGS, allocate_doc},
    {"allocate",                (PyCFunction)thread_PyThread_allocate_lock,
     METH_NOARGS, allocate_doc},
    {"exit_thread",             (PyCFunction)thread_PyThread_exit_thread,
     METH_NOARGS, exit_doc},
    {"exit",                    (PyCFunction)thread_PyThread_exit_thread,
     METH_NOARGS, exit_doc},
    {"interrupt_main",          (PyCFunction)thread_PyThread_interrupt_main,
     METH_NOARGS, interrupt_doc},
    {"get_ident",               (PyCFunction)thread_get_ident,
     METH_NOARGS, get_ident_doc},
    {"_count",                  (PyCFunction)thread__count,
     METH_NOARGS, _count_doc},
    {"stack_size",              (PyCFunction)thread_stack_size,
                            METH_VARARGS,
                            stack_size_doc},
    {NULL,                      NULL}           /* sentinel */
};

/*创建bootstate,并初始化,其保存关于线程的一切信息,如线程过程,和参数等,*/
static PyObject *
thread_PyThread_start_new_thread(PyObject *self, PyObject *fargs)
{
    PyObject *func, *args, *keyw = NULL;
    struct bootstate *boot;
    long ident;

    if (!PyArg_UnpackTuple(fargs, "start_new_thread", 2, 3,
                           &func, &args, &keyw))
        return NULL;
    if (!PyCallable_Check(func)) {
        PyErr_SetString(PyExc_TypeError,
                        "first arg must be callable");
        return NULL;
    }
    if (!PyTuple_Check(args)) {
        PyErr_SetString(PyExc_TypeError,
                        "2nd arg must be a tuple");
        return NULL;
    }
    if (keyw != NULL && !PyDict_Check(keyw)) {
        PyErr_SetString(PyExc_TypeError,
                        "optional 3rd arg must be a dictionary");
        return NULL;
    }
    boot = PyMem_NEW(struct bootstate, 1);
    if (boot == NULL)
        return PyErr_NoMemory();
    boot->interp = PyThreadState_GET()->interp;
    boot->func = func;
    boot->args = args;
    boot->keyw = keyw;
    boot->tstate = _PyThreadState_Prealloc(boot->interp);
    if (boot->tstate == NULL) {
        PyMem_DEL(boot);
        return PyErr_NoMemory();
    }
    Py_INCREF(func);
    Py_INCREF(args);
    Py_XINCREF(keyw);
    PyEval_InitThreads(); /* Start the interpreter's thread-awareness */
    ident = PyThread_start_new_thread(t_bootstrap, (void*) boot);
    if (ident == -1) {
        PyErr_SetString(ThreadError, "can't start new thread");
        Py_DECREF(func);
        Py_DECREF(args);
        Py_XDECREF(keyw);
        PyThreadState_Clear(boot->tstate);
        PyMem_DEL(boot);
        return NULL;
    }
    return PyInt_FromLong(ident);
}


/*以boot为参数,创建一个原生线程*/
PyThreadState *
_PyThreadState_Prealloc(PyInterpreterState *interp)
{
    return new_threadstate(interp, 0);
}

static PyThreadState *
new_threadstate(PyInterpreterState *interp, int init)
{
    PyThreadState *tstate = (PyThreadState *)malloc(sizeof(PyThreadState));

    if (_PyThreadState_GetFrame == NULL)
        _PyThreadState_GetFrame = threadstate_getframe;

    if (tstate != NULL) {
        tstate->interp = interp;

        tstate->frame = NULL;
        tstate->recursion_depth = 0;
        tstate->tracing = 0;
        tstate->use_tracing = 0;
        tstate->tick_counter = 0;
        tstate->gilstate_counter = 0;
        tstate->async_exc = NULL;
#ifdef WITH_THREAD
        tstate->thread_id = PyThread_get_thread_ident();
#else
        tstate->thread_id = 0;
#endif

        tstate->dict = NULL;

        tstate->curexc_type = NULL;
        tstate->curexc_value = NULL;
        tstate->curexc_traceback = NULL;

        tstate->exc_type = NULL;
        tstate->exc_value = NULL;
        tstate->exc_traceback = NULL;

        tstate->c_profilefunc = NULL;
        tstate->c_tracefunc = NULL;
        tstate->c_profileobj = NULL;
        tstate->c_traceobj = NULL;

        tstate->trash_delete_nesting = 0;
        tstate->trash_delete_later = NULL;

        if (init)
            _PyThreadState_Init(tstate);

        HEAD_LOCK();
        tstate->next = interp->tstate_head;
        interp->tstate_head = tstate;
        HEAD_UNLOCK();
    }

    return tstate;
}
GIL(NRMUTEX)对象,结构中有4个成员,其中hevent就是Win32平台下的Event内核对象,而thread_id则记录任意时刻获取的GIL的线程ID。
 1 /*
 2  * Lock support. It has too be implemented as semaphores.
 3  * I [Dag] tried to implement it with mutex but I could find a way to
 4  * tell whether a thread already own the lock or not.
 5  */
 6 PyThread_type_lock
 7 PyThread_allocate_lock(void)
 8 {
 9     PNRMUTEX aLock;
10
11     dprintf(("PyThread_allocate_lock called\n"));
12     if (!initialized)
13         PyThread_init_thread();
14
15     aLock = AllocNonRecursiveMutex() ;
16
17     dprintf(("%ld: PyThread_allocate_lock() -> %p\n", PyThread_get_thread_ident(), aLock));
18
19     return (PyThread_type_lock) aLock;
20 }
21
22 typedef struct NRMUTEX {
23     LONG   owned ;
24     DWORD  thread_id ;
25     HANDLE hevent ;
26 } NRMUTEX, *PNRMUTEX ;
27
28 PNRMUTEX
29 AllocNonRecursiveMutex(void)
30 {
31     PNRMUTEX mutex = (PNRMUTEX)malloc(sizeof(NRMUTEX)) ;
32     if (mutex && !InitializeNonRecursiveMutex(mutex))
33     {
34         free(mutex) ;
35         mutex = NULL ;
36     }
37     return mutex ;
38 }
39
40 BOOL
41 InitializeNonRecursiveMutex(PNRMUTEX mutex)
42 {
43     mutex->owned = -1 ;  /* No threads have entered NonRecursiveMutex */
44     mutex->thread_id = 0 ;
45     mutex->hevent = CreateEvent(NULL, FALSE, FALSE, NULL) ;
46     return mutex->hevent != NULL ;      /* TRUE if the mutex is created */
47 }
PyThread_acquire_lock尝试获取GIL代码如下:
void
PyEval_InitThreads(void)
{
    if (interpreter_lock)
        return;
    interpreter_lock = PyThread_allocate_lock();
    PyThread_acquire_lock(interpreter_lock, 1);
    main_thread = PyThread_get_thread_ident();
}
/*
 * Return 1 on success if the lock was acquired
 *
 * and 0 if the lock was not acquired. This means a 0 is returned
 * if the lock has already been acquired by this thread!
 */
int
PyThread_acquire_lock(PyThread_type_lock aLock, int waitflag)
{
    int success ;

    dprintf(("%ld: PyThread_acquire_lock(%p, %d) called\n", PyThread_get_thread_ident(),aLock, waitflag));

    success = aLock && EnterNonRecursiveMutex((PNRMUTEX) aLock, (waitflag ? INFINITE : 0)) == WAIT_OBJECT_0 ;

    dprintf(("%ld: PyThread_acquire_lock(%p, %d) -> %d\n", PyThread_get_thread_ident(),aLock, waitflag, success));

    return success;
}
Windown下调用系统的WaitForSingleObject
DWORD
EnterNonRecursiveMutex(PNRMUTEX mutex, BOOL wait)
{
    /* Assume that the thread waits successfully */
    DWORD ret ;

    /* InterlockedIncrement(&mutex->owned) == 0 means that no thread currently owns the mutex */
    if (!wait)
    {
        if (InterlockedCompareExchange(&mutex->owned, 0, -1) != -1)
            return WAIT_TIMEOUT ;
        ret = WAIT_OBJECT_0 ;
    }
    else
        ret = InterlockedIncrement(&mutex->owned) ?
            /* Some thread owns the mutex, let's wait... */
            WaitForSingleObject(mutex->hevent, INFINITE) : WAIT_OBJECT_0 ;

    mutex->thread_id = GetCurrentThreadId() ; /* We own it */
    return ret ;
}
Linux下则使用互斥锁metux和lock机制,条件等待机制一起使用。
先由本线程调用status = pthread_mutex_lock( &thelock->mut )锁住,mutex保持锁定状态,并在线程挂起进入等待前解锁。
然后status = pthread_cond_wait(&thelock->lock_released,&thelock->mut);
之后status = pthread_mutex_unlock( &thelock->mut );
int
PyThread_acquire_lock(PyThread_type_lock lock, int waitflag)
{
    int success;
    pthread_lock *thelock = (pthread_lock *)lock;
    int status, error = 0;

    dprintf(("PyThread_acquire_lock(%p, %d) called\n", lock, waitflag));

    status = pthread_mutex_lock( &thelock->mut );
    CHECK_STATUS("pthread_mutex_lock[1]");
    success = thelock->locked == 0;

    if ( !success && waitflag ) {
        /* continue trying until we get the lock */

        /* mut must be locked by me -- part of the condition
         * protocol */
        while ( thelock->locked ) {
            status = pthread_cond_wait(&thelock->lock_released,
                                       &thelock->mut);
            CHECK_STATUS("pthread_cond_wait");
        }
        success = 1;
    }
    if (success) thelock->locked = 1;
    status = pthread_mutex_unlock( &thelock->mut );
    CHECK_STATUS("pthread_mutex_unlock[1]");

    if (error) success = 0;
    dprintf(("PyThread_acquire_lock(%p, %d) -> %d\n", lock, waitflag, success));
    return success;
}

python创建子线程过程:
多线程环境初始化之后,python开始创建底层平台的原生线程。主线程通过调用 thread_PyThread_start_new_thread-》PyThread_start_new_thread完成子线程的工作,返回子线程的ID。子线程的ID只有被激活才能从子线程中获取,因此主线程等待这个子线程的ID,一旦子线程设置好ID,就会设法唤醒主线程。至此,主线程和子线程开始分道扬镳。主线程在返回子线程ID之后,继续执行后续的字节码。
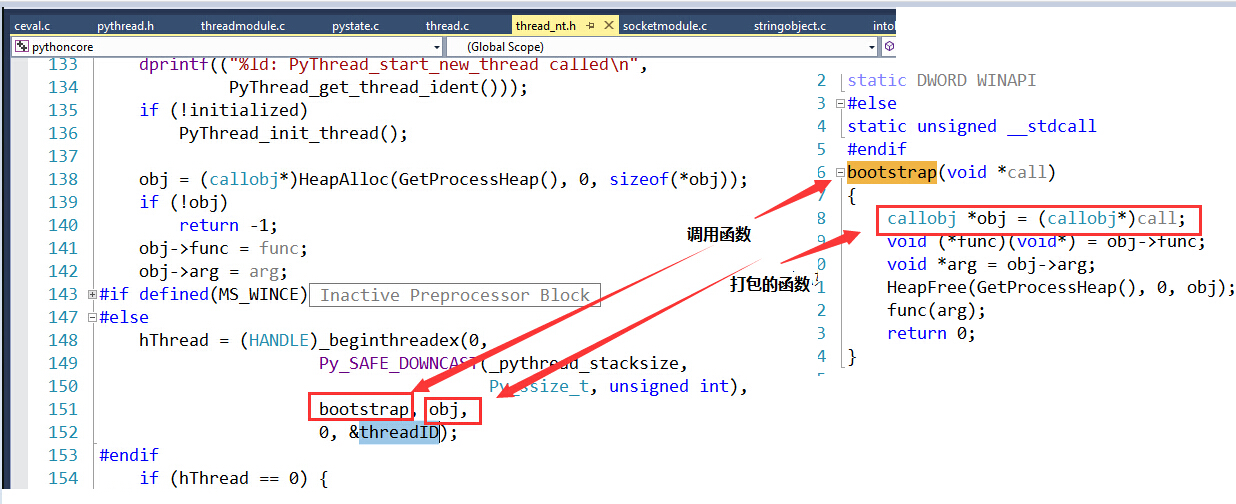
PyThread_start_new_thread传入的func是函数t_bootstrap,而arg则是bootstate结构体boot。而boot中保存着程序中所定义的线程信息。PyThread_start_new_thread首先将func和arg都打包到一个类型为callobj结构体中。
创建好子线程之后,其开始与主线程对GIL竞争。在t_bootstrap中调用PyEval_AcquireThread申请GIL,成功之后就申请到GIL,接下来子线程调用PyEval_CallObjectWithKeywords并最终调用我们熟悉的函数PyEval_EvalFrameEx,也就是python的字节码执行引擎。之后执行完毕,进行清理扫尾工作PyThreadState_DeleteCurrent释放GIL。
t_bootstrap 看上去似乎子线程一直执行到释放GIL,他们是如何激活多线程机制的呢?答案在于函数PyEval_EvalFrameEx中,python内部维护的模拟中断时钟不断激活线程的调度机制,从而实现子线程和主线程的切换。
执行秩序: thread_PyThread_start_new_thread-》PyThread_start_new_thread-》bootstrap--》t_bootstrap
t_bootstrap 代码:
static void
t_bootstrap(void *boot_raw)
{
    struct bootstate *boot = (struct bootstate *) boot_raw;
    PyThreadState *tstate;
    PyObject *res;

    tstate = boot->tstate;
    tstate->thread_id = PyThread_get_thread_ident();
    _PyThreadState_Init(tstate);
    PyEval_AcquireThread(tstate);
    nb_threads++;
    res = PyEval_CallObjectWithKeywords(
        boot->func, boot->args, boot->keyw);
    if (res == NULL) {
        if (PyErr_ExceptionMatches(PyExc_SystemExit))
            PyErr_Clear();
        else {
            PyObject *file;
            PyObject *exc, *value, *tb;
            PyErr_Fetch(&exc, &value, &tb);
            PySys_WriteStderr(
                "Unhandled exception in thread started by ");
            file = PySys_GetObject("stderr");
            if (file)
                PyFile_WriteObject(boot->func, file, 0);
            else
                PyObject_Print(boot->func, stderr, 0);
            PySys_WriteStderr("\n");
            PyErr_Restore(exc, value, tb);
            PyErr_PrintEx(0);
        }
    }
    else
        Py_DECREF(res);
    Py_DECREF(boot->func);
    Py_DECREF(boot->args);
    Py_XDECREF(boot->keyw);
    PyMem_DEL(boot_raw);
    nb_threads--;
    PyThreadState_Clear(tstate);
    PyThreadState_DeleteCurrent();
    PyThread_exit_thread();
}
完成打包之后,调用Win32下的创建thread API 函数CreateThread或者_beginthreadex ,然后通过bootstrap调用我们定义的函数(例如自己的test.py中的def testThread 函数)
函数打包,调用代码:

 浙公网安备 33010602011771号