
Devops 开发运维高级篇之Jenkins+Docker+SpringCloud微服务持续集成——部署方案优化
Devops 开发运维高级篇之Jenkins+Docker+SpringCloud微服务持续集成——部署方案优化
之前我们做的方案部署都是只能选择一个微服务部署并只有一台生产服务器,每个微服务只有一个实例,容错率低
如何去解决?
- 在一个Jenkins工程中可以选择多个微服务同时发布
- 在一个Jenkins工程中可以选择多台生产服务器同时部署
- 每个微服务都是以集群高可用形式部署
Jenkins+Docker+SpringCloud集群部署流程说明
修改所有微服务配置:
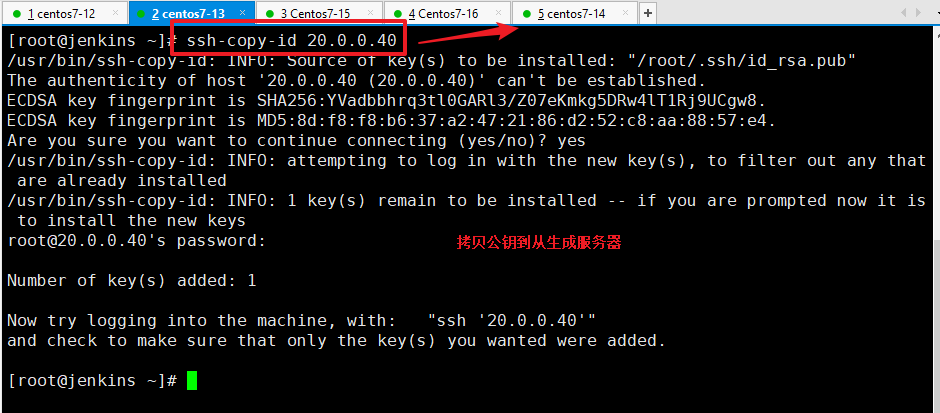
再开一台生产服务器 装有docker环境
从jenkins服务器拷贝公钥去这一台生成服务器2的
然后修改docker的私服地址:
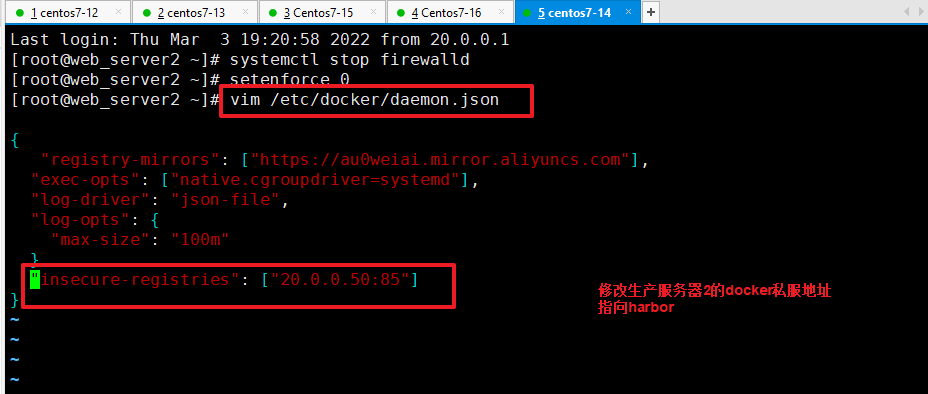
记得重启docker!
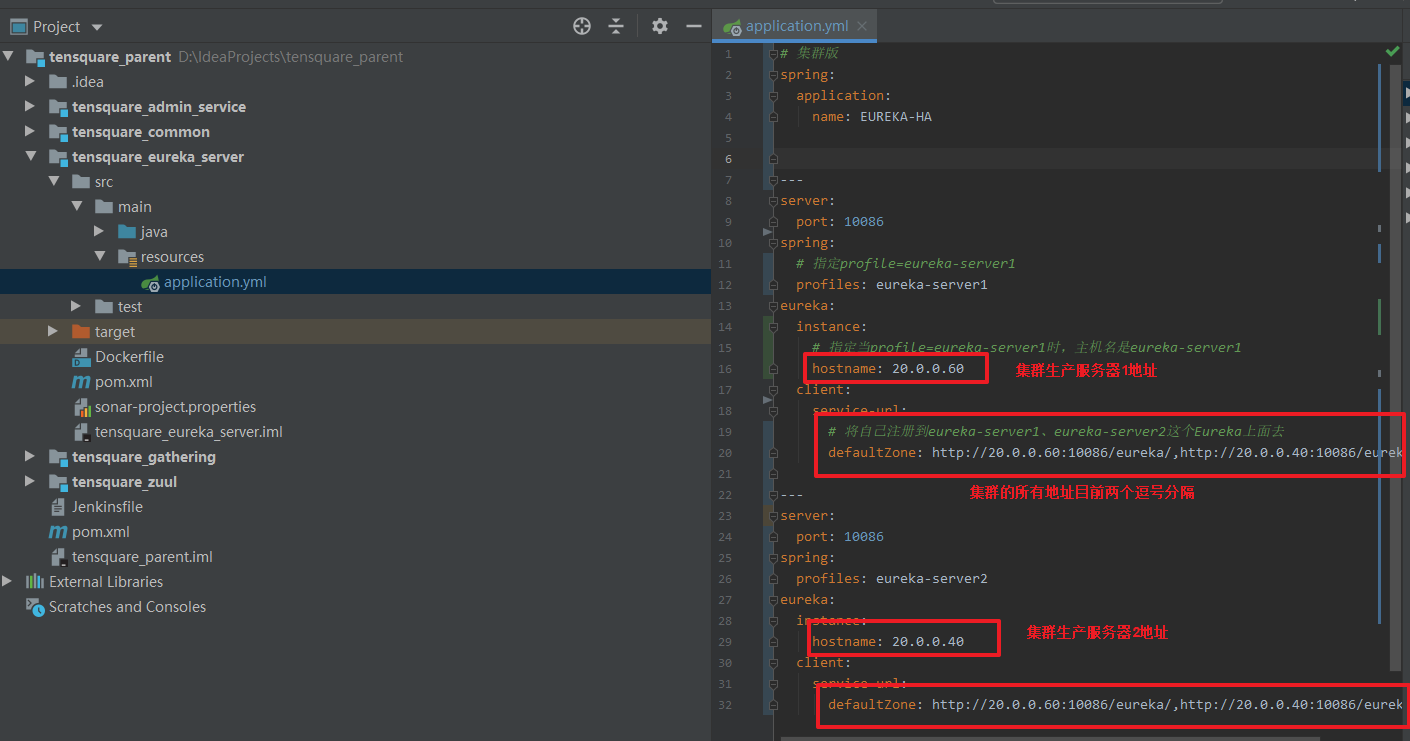
注册中心配置:(原来的单机版改成集群版)
# 集群版
spring:
  application:
    name: EUREKA-HA


---
server:
  port: 10086
spring:
  # 指定profile=eureka-server1
  profiles: eureka-server1
eureka:
  instance:
    # 指定当profile=eureka-server1时,主机名是eureka-server1
    hostname: 20.0.0.60
  client:
    service-url:
      # 将自己注册到eureka-server1、eureka-server2这个Eureka上面去
      defaultZone: http://20.0.0.60:10086/eureka/,http://20.0.0.40:10086/eureka/

---
server:
  port: 10086
spring:
  profiles: eureka-server2
eureka:
  instance:
    hostname: 20.0.0.40
  client:
    service-url:
      defaultZone: http://20.0.0.60:10086/eureka/,http://20.0.0.40:10086/eureka/
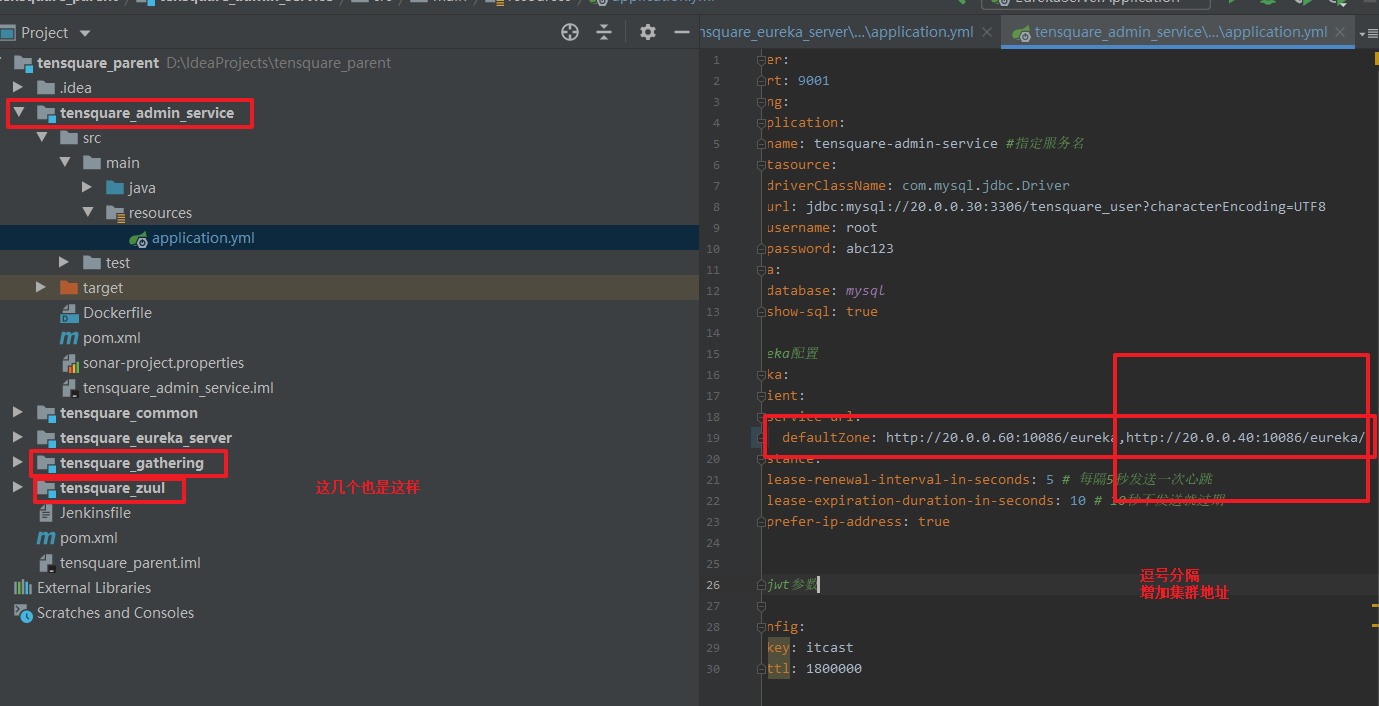
其它微服务的配置:
eureka:
  client:
    service-url:
      defaultZone: http://20.0.0.60:10086/eureka,http://20.0.0.40:10086/eureka/
#上面的这个是eureka访问地址

instance:
    lease-renewal-interval-in-seconds: 5 # 每隔5秒发送一次心跳
    lease-expiration-duration-in-seconds: 10 # 10秒不发送就过期
    prefer-ip-address: true
全部修改完就去吧代码提交到Gitlab中!push!
编写deployCluster.sh部署脚本,放到两台生产服务器中路径:/opt/jenkins_shell/deployCluster.sh
#! /bin/sh
#接收外部参数
harbor_url=$1
harbor_project_name=$2
project_name=$3
tag=$4
port=$5
profile=$6

imageName=$harbor_url/$harbor_project_name/$project_name:$tag

echo "$imageName"

#查询容器是否存在,存在则删除
containerId=`docker ps -a | grep -w ${project_name}:${tag}  | awk '{print $1}'`

if [ "$containerId" !=  "" ] ; then
    #停掉容器
    docker stop $containerId

    #删除容器
    docker rm $containerId

 echo "成功删除容器"
fi

#查询镜像是否存在,存在则删除
imageId=`docker images | grep -w $project_name  | awk '{print $3}'`

if [ "$imageId" !=  "" ] ; then

    #删除镜像
    docker rmi -f $imageId

 echo "成功删除镜像"
fi


# 登录Harbor
docker login -u lvbu -p Lvbu1234 $harbor_url

# 下载镜像
docker pull $imageName

# 启动容器
docker run -di -p $port:$port $imageName $profile

echo "容器启动成功"
然后就是更改Jenkinsfile 代码!!增加循环构建编译打包!还有集群部署的代码!
//git的凭证
def git_auth="d5bb0e98-15f2-477f-8db7-2c33ecc6c644"
//git的URL
def git_url="git@20.0.0.20:root/tensquare_back.git"
//镜像标签
def tag="latest"
//harbor的url地址
def harbor_url="20.0.0.50:85"
//镜像仓库名
def harbor_name="tensquare"
//harbor的凭证
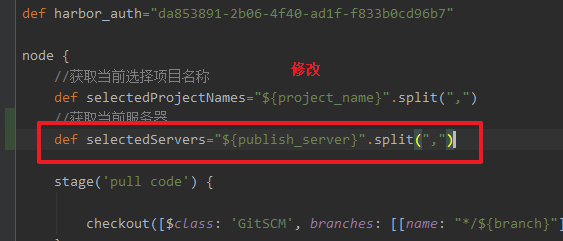
def harbor_auth="da853891-2b06-4f40-ad1f-f833b0cd96b7"
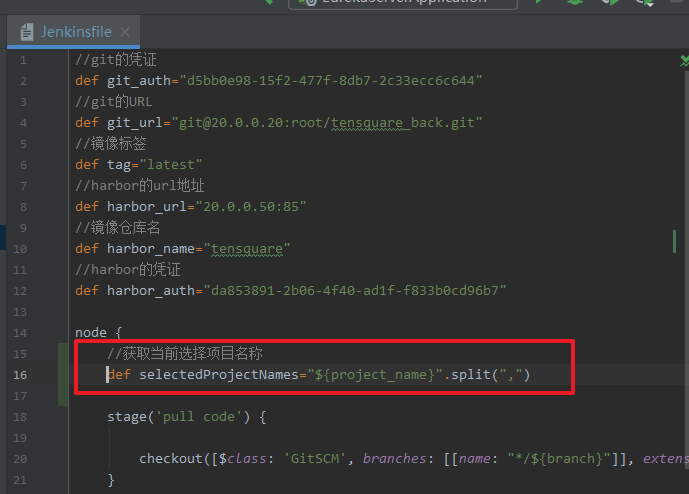
node {
//获取当前选择项目名称
def selectedProjectNames="${project_name}".split(",")
//获取当前选择服务器
def selectedServers="${publish_server}".split(",")
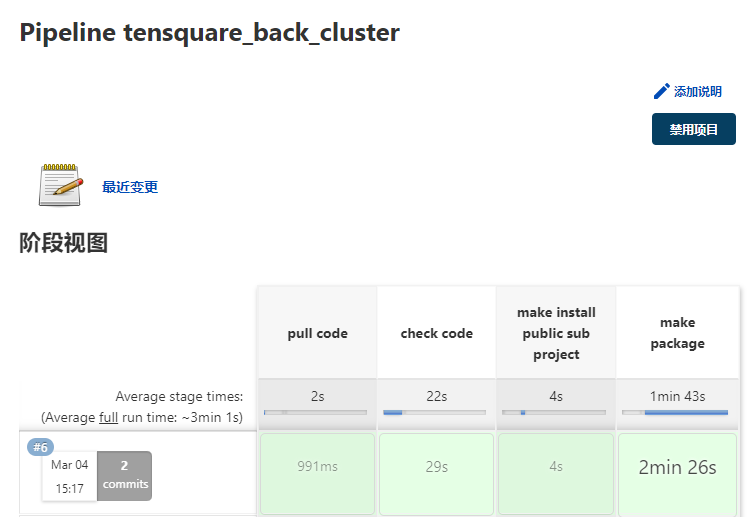
stage('pull code') {
checkout([$class: 'GitSCM', branches: [[name: "*/${branch}"]], extensions: [], userRemoteConfigs: [[credentialsId: "${git_auth}", url: "${git_url}"]]])
}
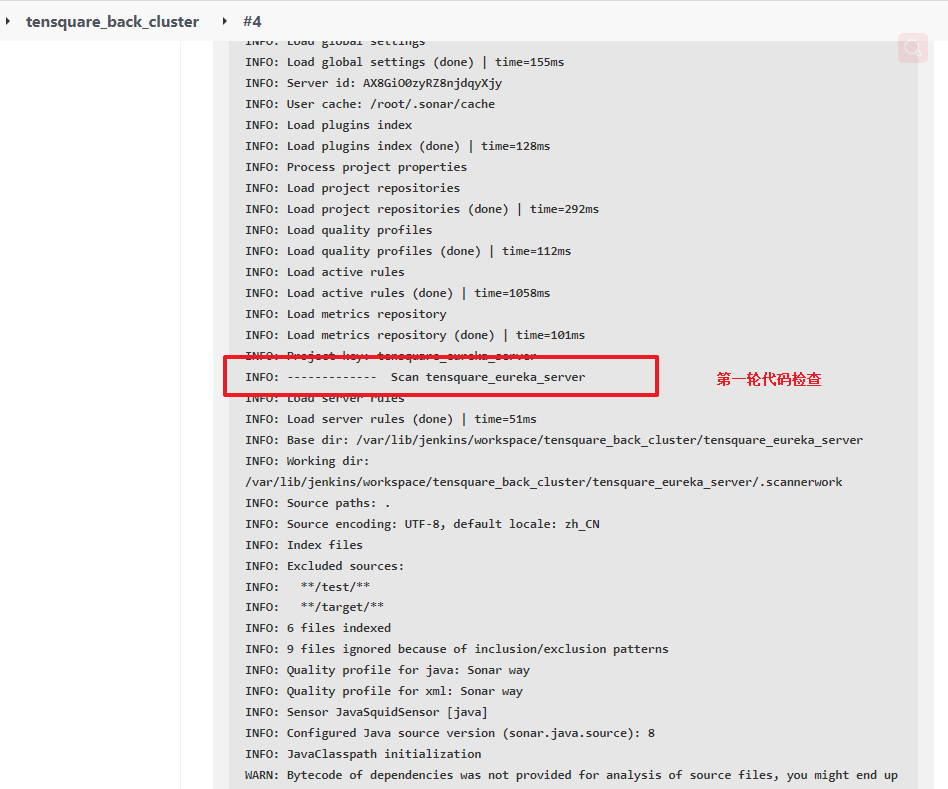
stage('check code') {
for(int i=0;i<selectedProjectNames.length;i++){
//项目信息 tensquare_eureka_server@10086
def projectInfo=selectedProjectNames[i]
//当前的项目名称
def currentProjectName="${projectInfo}".split("@")[0]
//当前的项目端口
def currentProjectPort="${projectInfo}".split("@")[1]
//定义SonarQubeScanner工具
def scannerHome = tool 'sonar-scanner'
//引用SonarQube系统环境
withSonarQubeEnv('sonarqube') {
sh """
cd ${currentProjectName}
${scannerHome}/bin/sonar-scanner
"""
}
}
}
//添加公共子工程
stage('make install public sub project') {
sh "mvn -f tensquare_common clean install"
}
//打包微服务项目,制作镜像
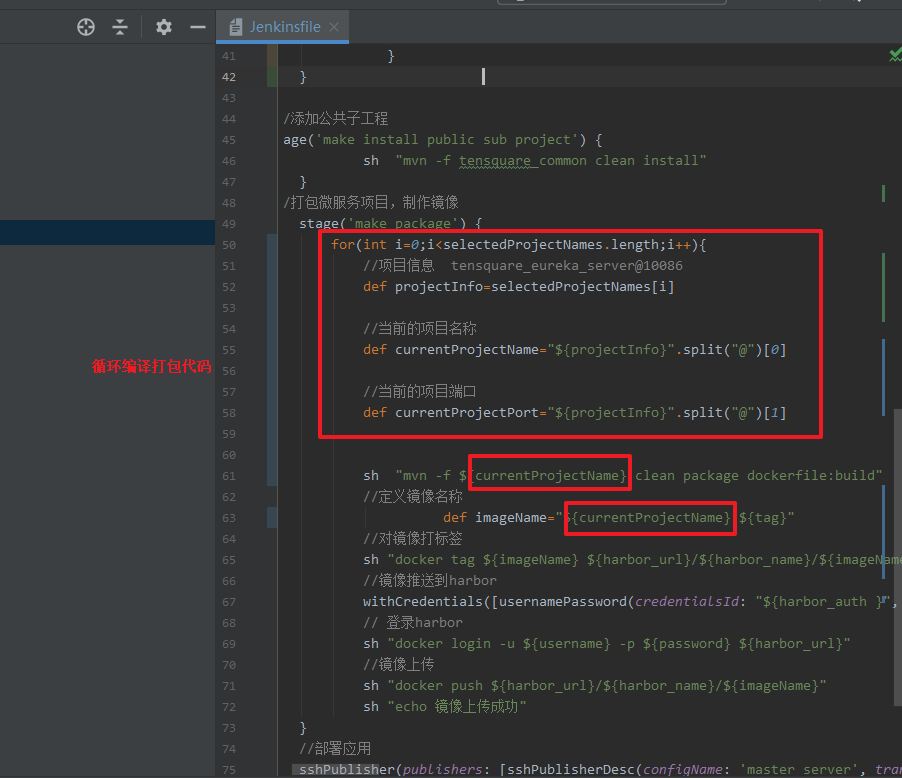
stage('make package') {
for(int i=0;i<selectedProjectNames.length;i++){
//项目信息 tensquare_eureka_server@10086
def projectInfo=selectedProjectNames[i]
//当前的项目名称
def currentProjectName="${projectInfo}".split("@")[0]
//当前的项目端口
def currentProjectPort="${projectInfo}".split("@")[1]
sh "mvn -f ${currentProjectName} clean package dockerfile:build"
//定义镜像名称
def imageName="${currentProjectName}:${tag}"
//对镜像打标签
sh "docker tag ${imageName} ${harbor_url}/${harbor_name}/${imageName}"
//镜像推送到harbor
withCredentials([usernamePassword(credentialsId: "${harbor_auth }", passwordVariable: 'password', usernameVariable: 'username')]) {
// 登录harbor
sh "docker login -u ${username} -p ${password} ${harbor_url}"
//镜像上传
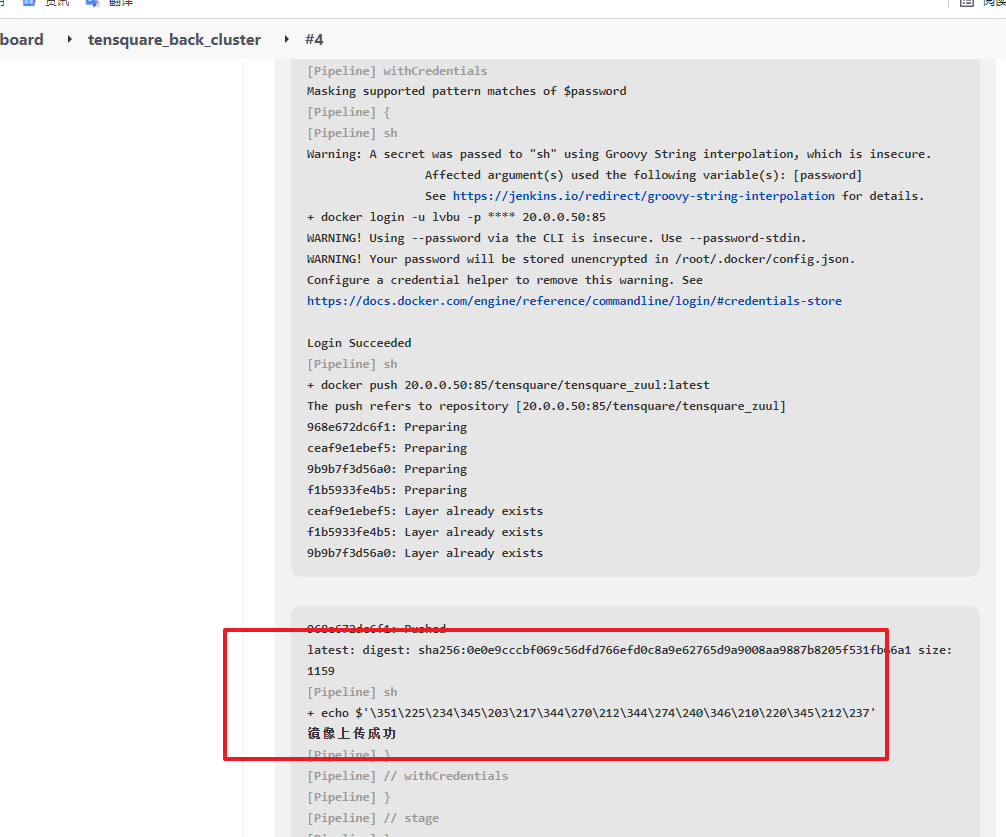
sh "docker push ${harbor_url}/${harbor_name}/${imageName}"
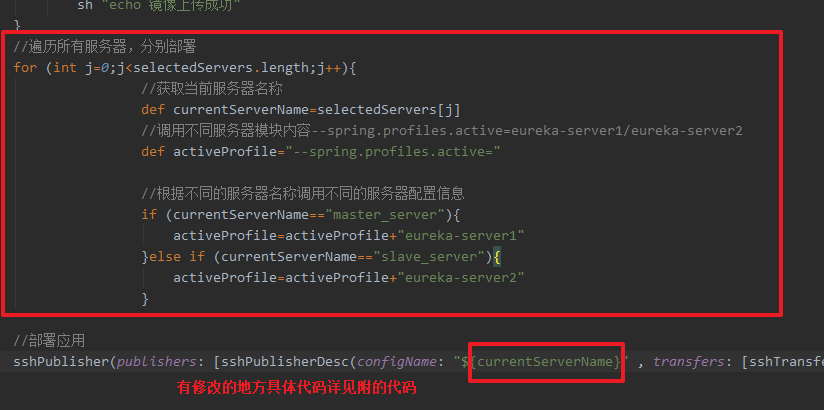
sh "echo 镜像上传成功"
}
//遍历所有服务器,分别部署
for (int j=0;j<selectedServers.length;j++){
//获取当前服务器名称
def currentServerName=selectedServers[j]
//调用不同服务器模块内容--spring.profiles.active=eureka-server1/eureka-server2
def activeProfile="--spring.profiles.active="
//根据不同的服务器名称调用不同的服务器配置信息
if (currentServerName=="master_server"){
activeProfile=activeProfile+"eureka-server1"
}else if (currentServerName=="slave_server"){
activeProfile=activeProfile+"eureka-server2"
}
//部署应用
sshPublisher(publishers: [sshPublisherDesc(configName: "${currentServerName}" , transfers: [sshTransfer(cleanRemote: false, excludes: '', execCommand: "/opt/jenkins_shell/deployCluster.sh ${harbor_url} ${harbor_name} ${currentProjectName} ${tag} ${currentProjectPort} ${activeProfile}", execTimeout: 120000, flatten: false, makeEmptyDirs: false, noDefaultExcludes: false, patternSeparator: '[, ]+', remoteDirectory: '', remoteDirectorySDF: false, removePrefix: '', sourceFiles: '')], usePromotionTimestamp: false, useWorkspaceInPromotion: false, verbose: false)])
}
}
}
}

然后继续提交push到gitlab中!!!
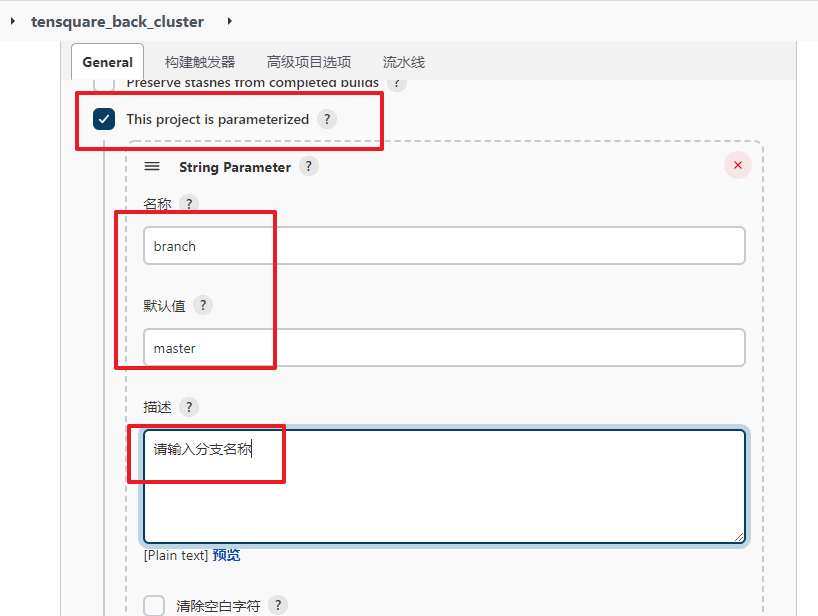
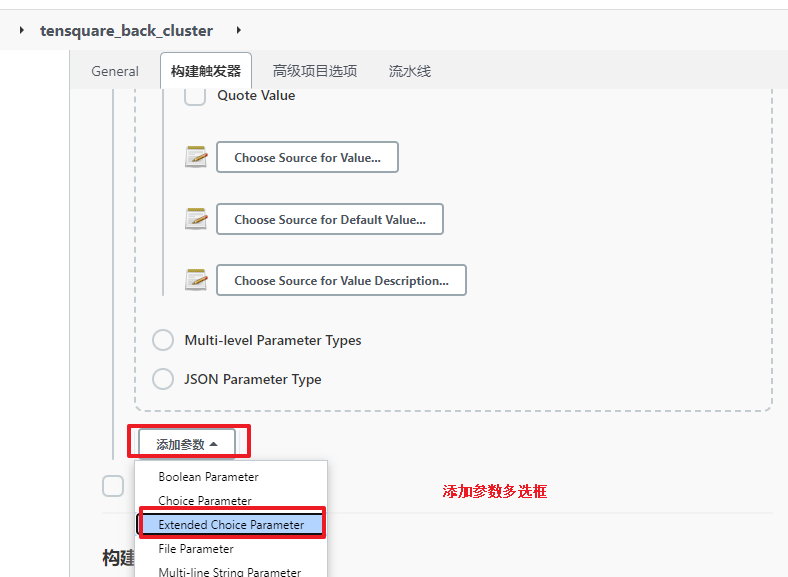
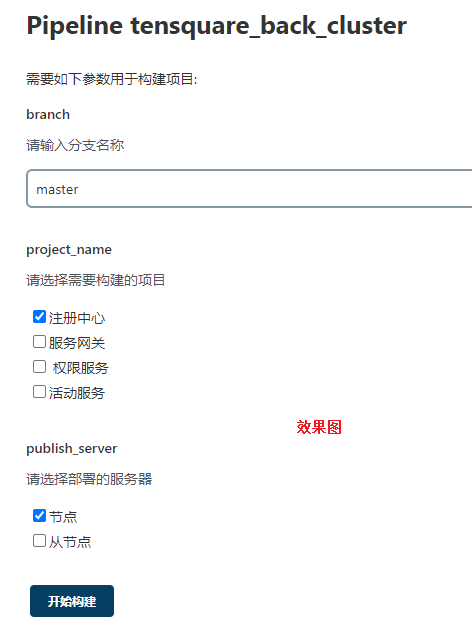
设计Jenkins集群项目的构建参数
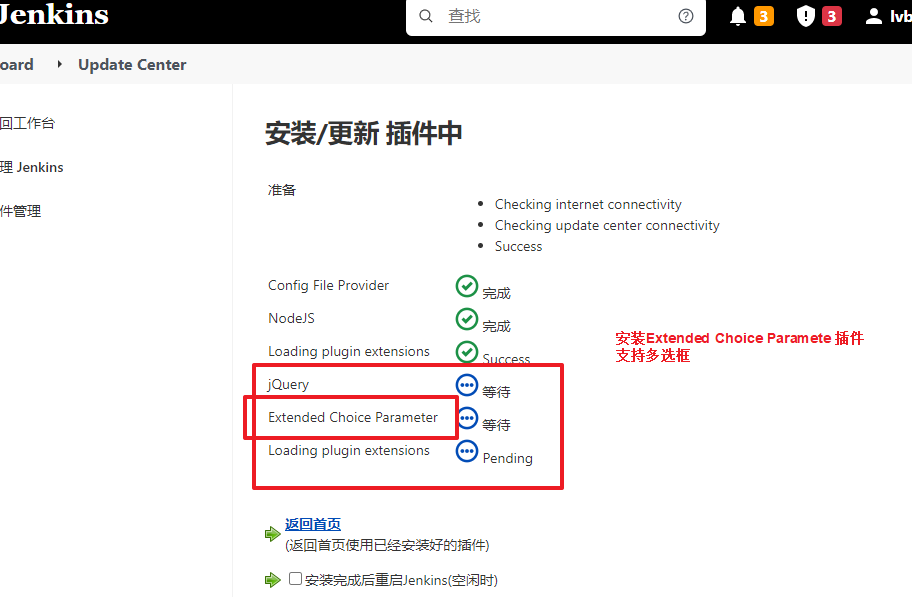
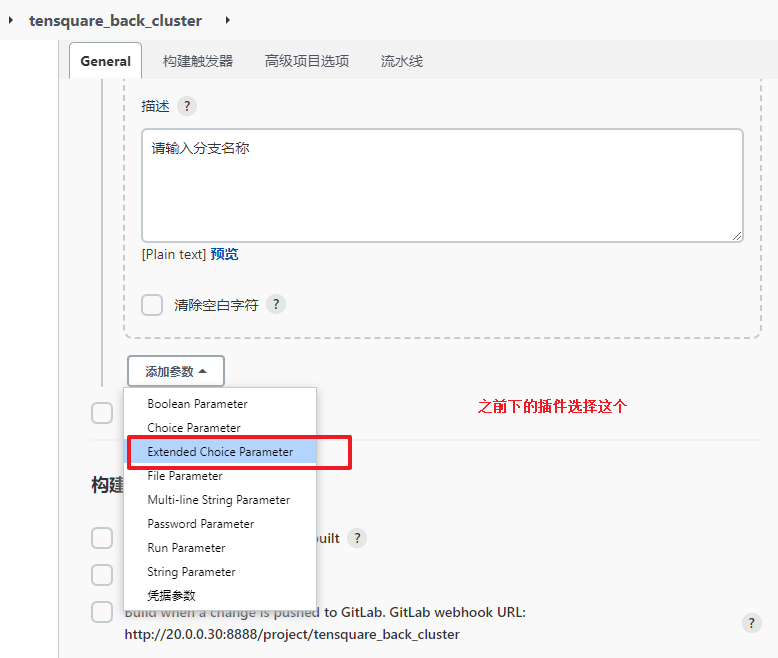
安装Extended Choice Parameter插件
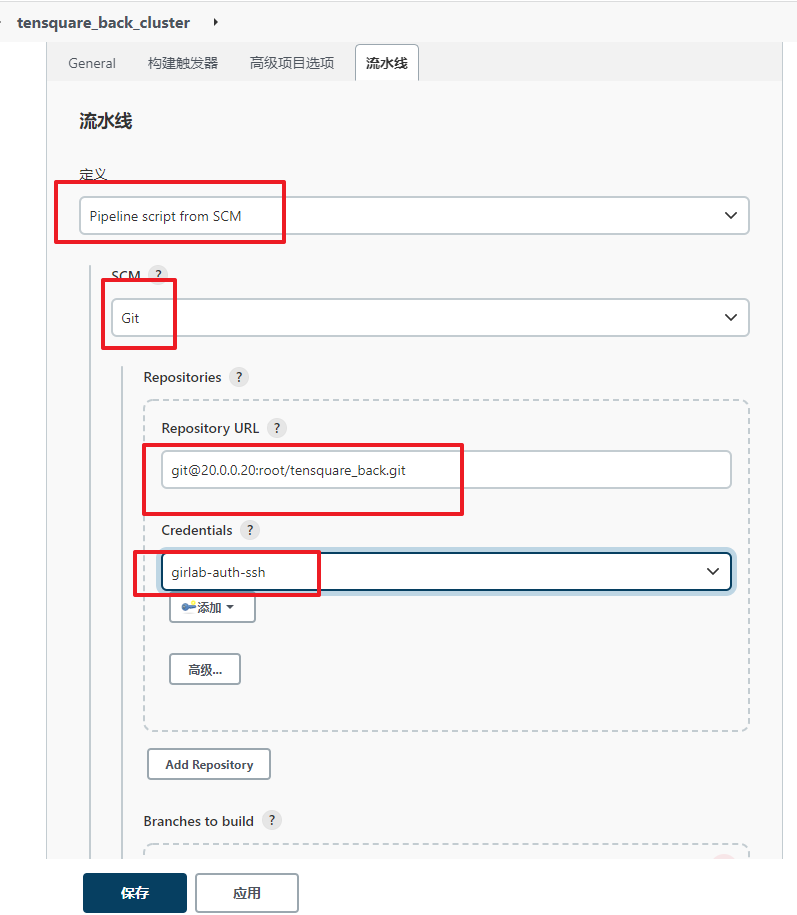
创建流水线项目:

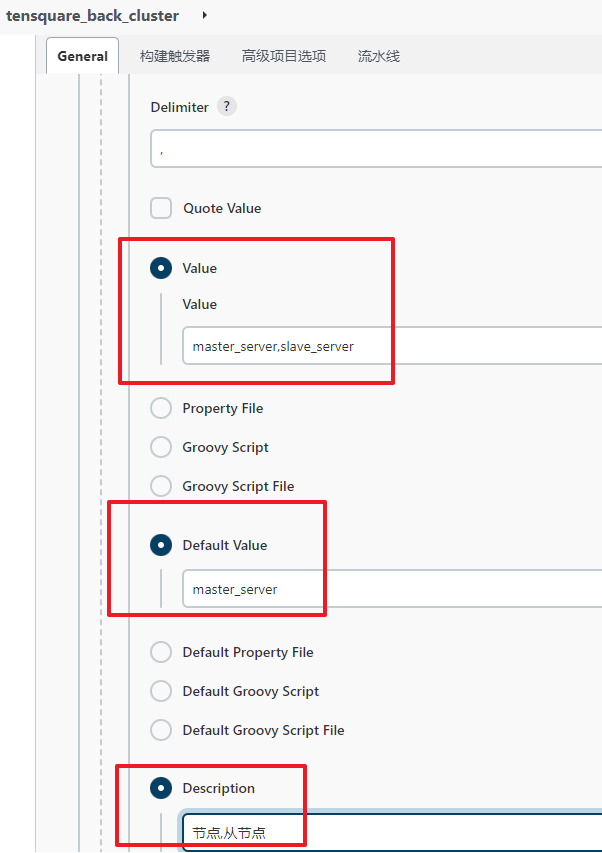
添加参数:字符串参数:分支名称:
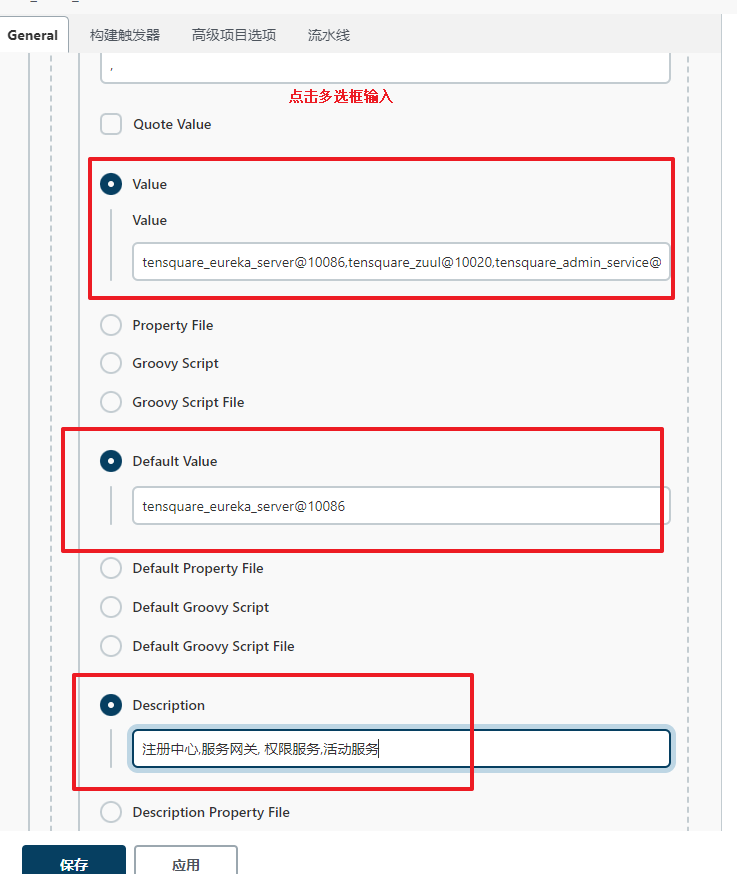
然后插件下好了就会有多选框:项目名称:

然后继续修改配置另一台生成服务器的:
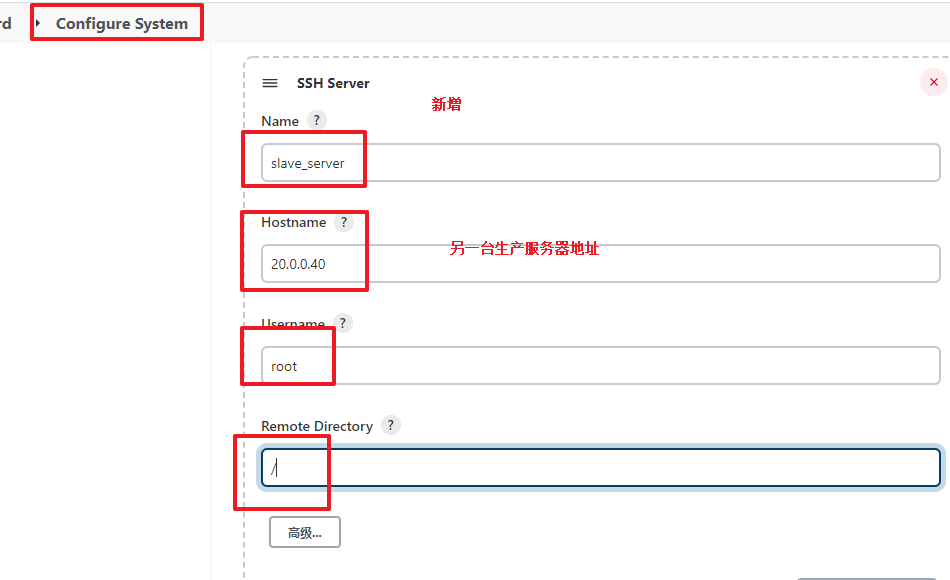
新增多选框:

保存后
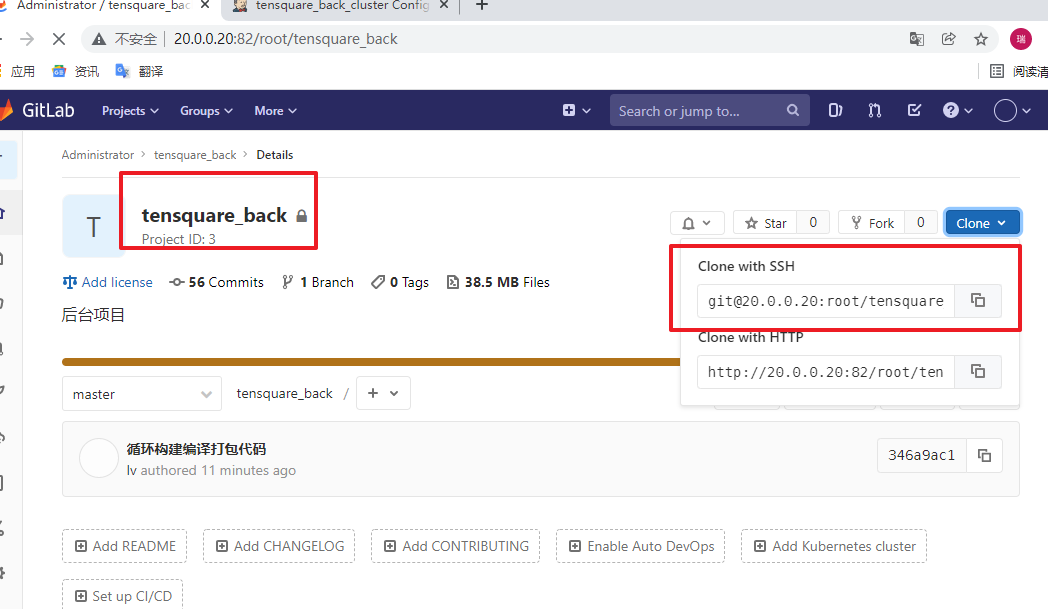
然后把gitlab的后端项目ssh复制一下url 下面会用到!
然后就可以开始构建看效果图:
然后就开始构建:
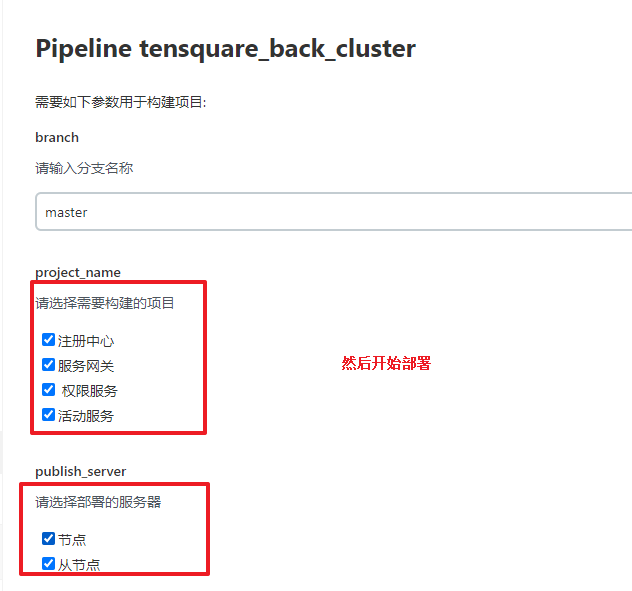

最后结果图!!!
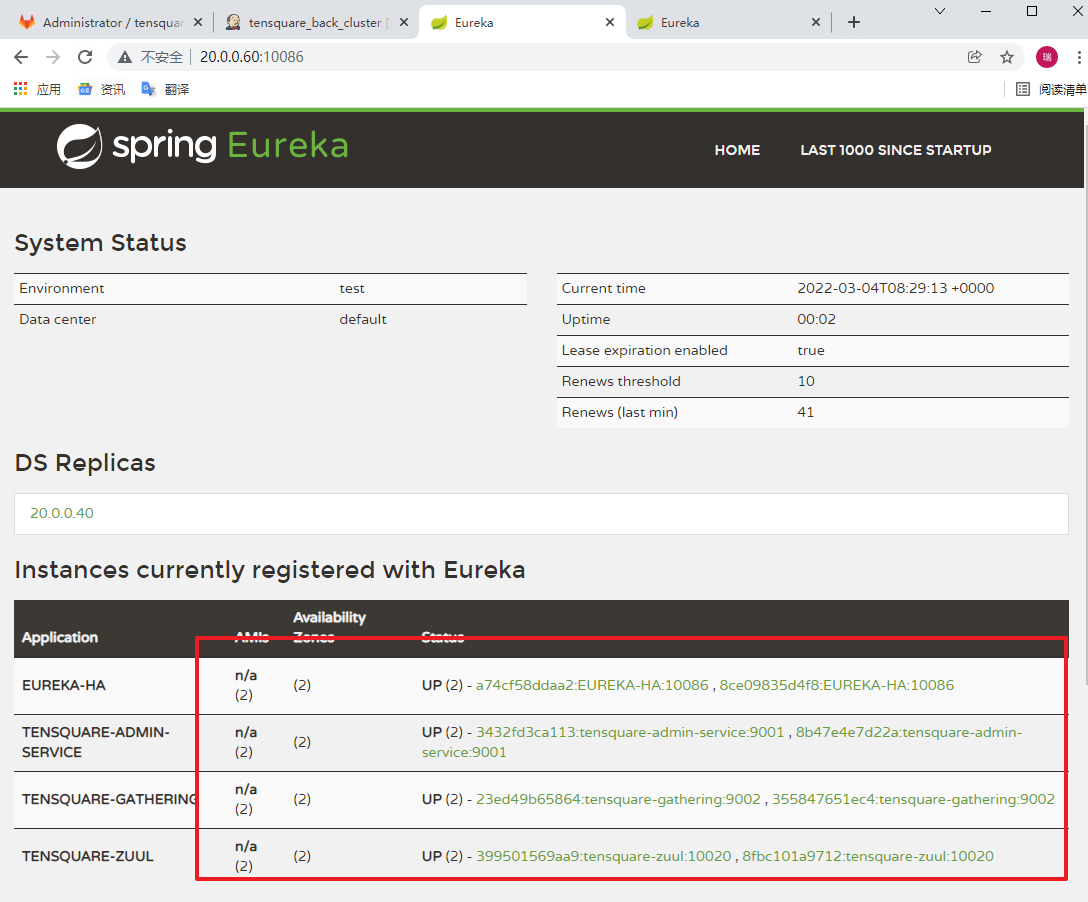
访问两台生产服务器地址:20.0.0.60:10086 、 20.0.0.40:10086
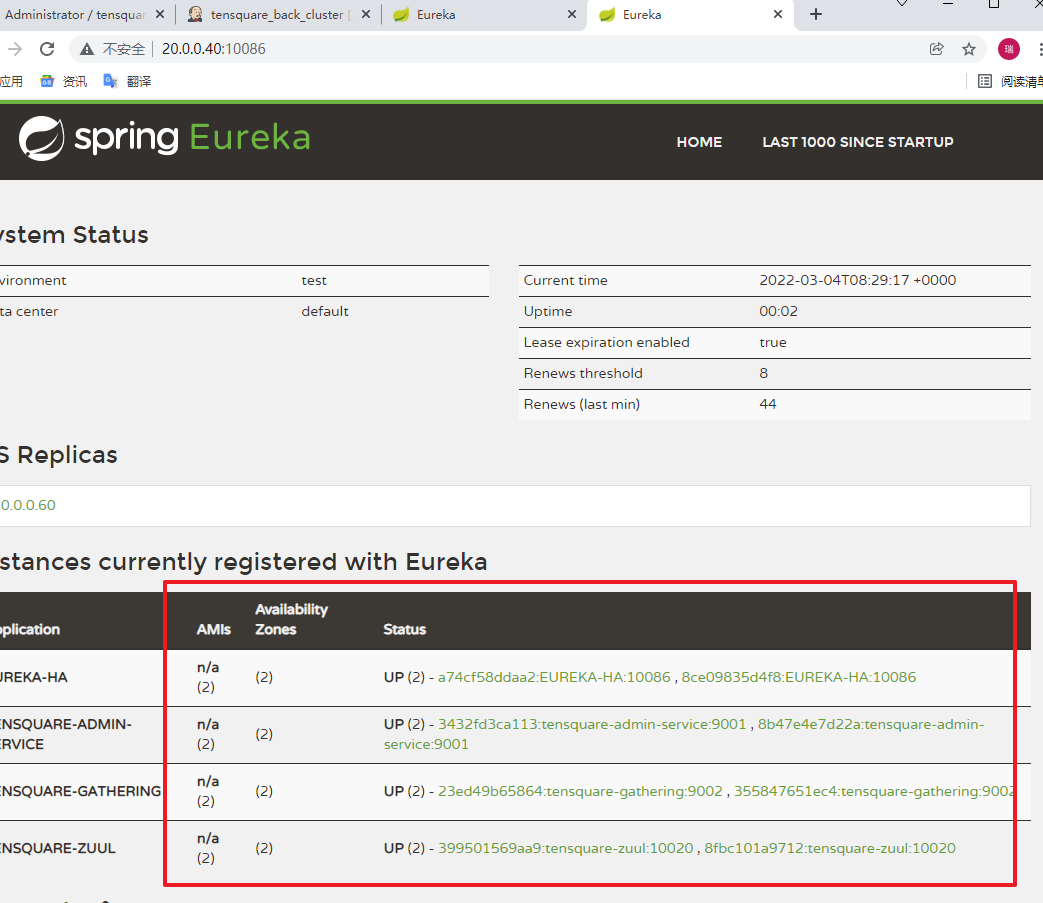
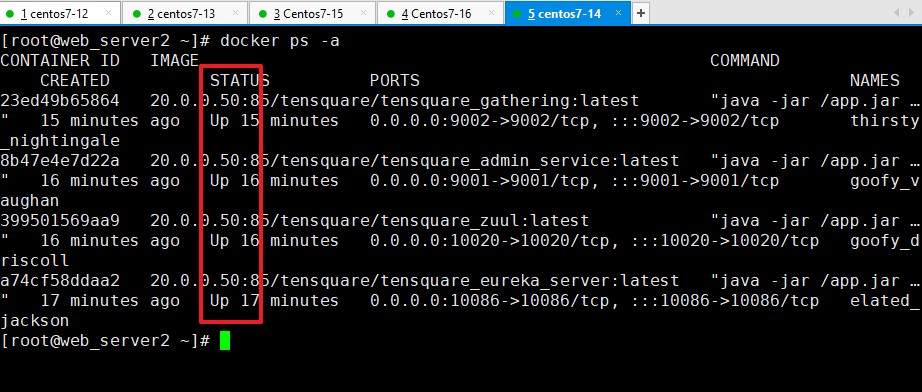
另一台的生成服务器:看容器:
Nginx+Zuul集群实现高可用网关
docker2服务器上安装nginx
#下载依赖源下载nginx
yum install epel-release -y
yum -y install nginx
修改配置:
vim /etc/nginx/nginx.confn
内容如下:
upstream zuulServer{
        server 20.0.0.60:10020 weight=1;
        server 20.0.0.40:10020 weight=1;
}
location / {
            proxy_pass http://zuulServer/;
}

保存后重启nginx:
systemctl restart nginx
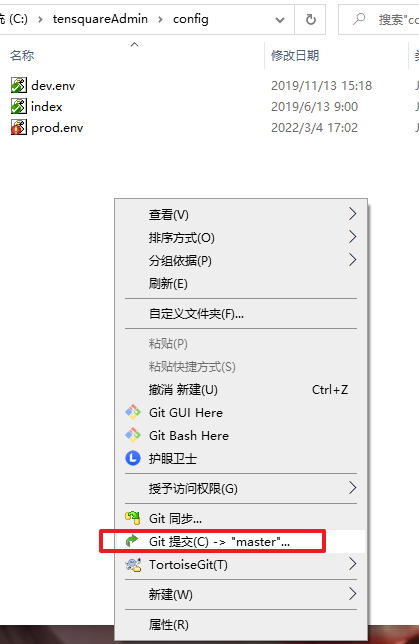
然后去修改nginx前端的访问地址:

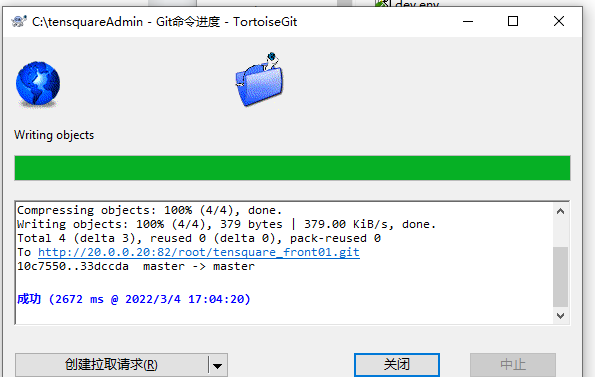
然后提交推送:
再次构建前端项目:

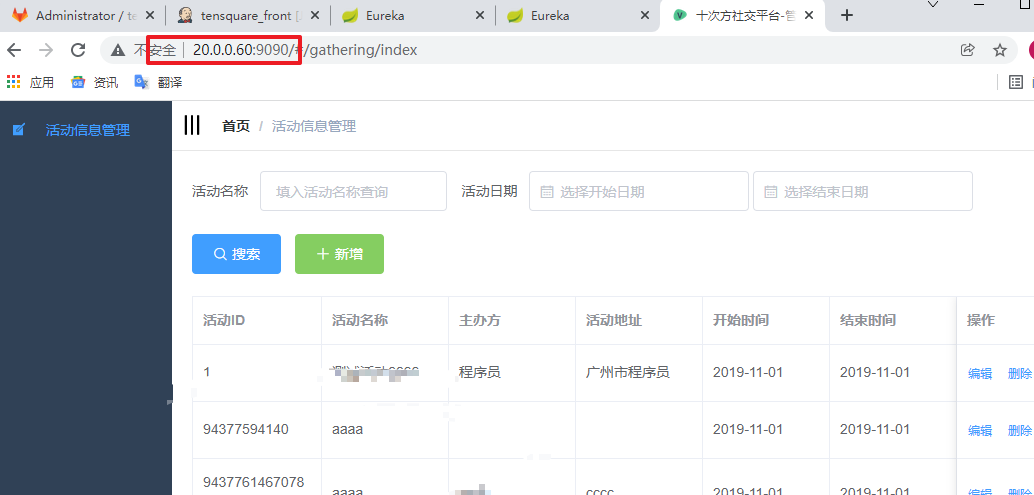
访问集群网站:
自古英雄多磨难

 浙公网安备 33010602011771号