EasyUI DataGrid 分页实现示例
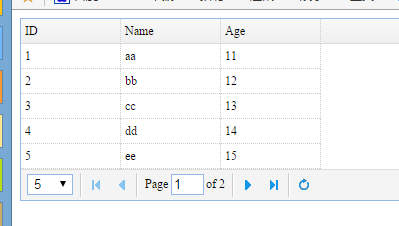
使用easyui可以很方便的开发web程序,这儿仅展示一个后台使用mvc来实现分页的示例,截图如下

示例代码如下
1. 创建模型类,代码如下

using System;
using System.Collections.Generic;
using System.Linq;
using System.Web;

namespace EasyuiDemo.Models
{
    public class Student
    {
        public int ID { get; set; }

        public string Name { get; set; }

        public int Age { get; set; }
    }
}
2. 因为easyui加载数据的格式有要求,所以创建一个模型包装类以方便序列化为json,代码如下

using System;
using System.Collections.Generic;
using System.Linq;
using System.Web;

namespace EasyuiDemo.Models
{
    public class PageModel<T>
    {
        public int total { get; set; }

        public List<T> rows { get; set; }
    }
}
3. 在控制器中创建一个静态的模型集合以作为数据源,并提供对应的处理分页的动作,代码如下

using System;
using System.Collections.Generic;
using System.Linq;
using System.Web;
using System.Web.Mvc;
using EasyuiDemo.Models;
using Newtonsoft.Json;

namespace EasyuiDemo.Controllers
{
    public class HomeController : Controller
    {
        private static List<Student> list;

        static HomeController()
        {
            list = new List<Student>();
            list.Add(new Student() { ID = 1, Name = "aa", Age = 11 });
            list.Add(new Student() { ID = 2, Name = "bb", Age = 12 });
            list.Add(new Student() { ID = 3, Name = "cc", Age = 13 });
            list.Add(new Student() { ID = 4, Name = "dd", Age = 14 });
            list.Add(new Student() { ID = 5, Name = "ee", Age = 15 });
            list.Add(new Student() { ID = 6, Name = "ff", Age = 16 });
            list.Add(new Student() { ID = 7, Name = "gg", Age = 17 });
            list.Add(new Student() { ID = 8, Name = "hh", Age = 18 });
            list.Add(new Student() { ID = 9, Name = "ii", Age = 19 });
            list.Add(new Student() { ID = 10, Name = "jj", Age = 20 });
        }

        // GET: Home
        public ActionResult Index()
        {
            return View();
        }

        public string Page()
        {
            int page = 1;
            int rows = 5;
            if(Request.Params["page"] != null)
            {
                page = Convert.ToInt32(Request.Params["page"]);
            }
            if (Request.Params["rows"] != null)
            {
                rows = Convert.ToInt32(Request.Params["rows"]);
            }
            PageModel<Student> pdata = new PageModel<Student>();
            pdata.total = list.Count;
            pdata.rows = list.GetRange(rows * (page - 1), rows);
            return JsonConvert.SerializeObject(pdata);
        }
    }
}
4. 视图页面代码如下

@{
    Layout = null;
}

<!DOCTYPE html>

<html>
<head>
    <meta name="viewport" content="width=device-width" />
    <title>Index</title>
    <link rel="stylesheet" href="~/Content/themes/default/easyui.css"/>
    <script src="~/scripts/jquery-1.11.3.js"></script>
    <script src="~/scripts/jquery.easyui-1.4.5.js"></script>
    <script>
        $(function () {
            $("#dg").datagrid({
                url: "/home/page",
                columns: [[
                    { field: 'ID', title: 'ID', width: 100 },
                    { field: 'Name', title: 'Name', width: 100 },
                    { field: 'Age', title: 'Age', width: 100 }
                ]],
                pageSize: 5,
                pageList: [5, 10],
                pagination: true
            })
        })
    </script>
</head>
<body>
    <div id="dg">
    </div>
</body>
</html>
datagrid设定pageSize时必须设定pageList,且pageSize的值要在pageList中,否则就是用默认的10.
如上就完成了datagrid的分页是用。


 浙公网安备 33010602011771号