Jetson tk1 刷机后要做的几件事
参考简书文章:
http://www.jianshu.com/p/997ede860d74
1. 查看Jetson TK1 L4T版本
head -n 1 /etc/nv_tegra_release
2. 查看系统位数(32/64),当然是32位的了
getconf LONG_BIT
3. 修改密码(ubuntu太长了)
sudo passwd ubuntu(root或对应的用户名)
4. 按照上一篇教程,更新软件源
参考上一篇博客
5. 安装git
sudo apt-get update
sudo apt-get install git
6. 配置postFlash脚本:
git clone https://github.com/jetsonhacks/postFlash.git
cd postFlash
./configureSystem.sh
这个脚本主要帮我们完成了一下一些事:
- Chromium is installed as a browser. Firefox has issues downloading .zip files, so Chromium is a good alternative. Two other applications are also installed, aptitude and git.
- USB 3.0 is enabled. The default is USB 2.0, /boot/extlinux/extlinux.conf must be modified to enable USB 3.0.
- Two scripts are installed in /usr/local/bin. To conserve power, by default the Jetson suspends power to the USB ports when they are not in use. In a desktop environment, this can lead to issues with devices such as cameras and webcams. The first script disables USB autosuspend.
- Also to conserve power, the Jetson manipulates the CPU cores and GPU clock speeds. The second script sets everything up for maximum performance.
7. 安装Grinch Kernel (本人未安装)
这一部分主要参考了以下这篇博客:
Install Grinch Kernel for L4T 21.3 on NVIDIA Jetson TK1
以及以下git中的代码:
https://github.com/jetsonhacks/installGrinch
关于Grinch是什么,为什么Nvidia没有默认安装Grinch:
Many people, especially those coming from desktop platforms, wonder why the Jetson lacks initial support for a wide variety of external peripherals when removed from the box. The reason is that the Jetson is an embedded development kit, which means its main initial intent was to help developers build devices that include the Tegra K1 chip. If you think about it from that perspective, it wouldn’t make much sense to have extra drivers and cruft installed that a device doesn’t use. For example, if you were building a phone, it doesn’t make sense to have drivers for 20 different wireless cards that the phone doesn’t contain.
However, the Jetson is also powerful enough to be a general purpose desktop computer. Desktop computer users have certain expectations, including being able to add devices and drivers, or have support for common devices available. Fortunately the Jetson community, led by user Santyago built a new Linux kernel named Grinch which includes a lot of the features to which most desktop users are accustomed.
安装方式如下:
git clone https://github.com/jetsonhacks/installGrinch.git
cd installGrinch
./installGrinch.sh
8. 安装ROS Indigo
这一部分主要参考了以下几篇文章:
Ubuntu ARM install of ROS Indigo
Robot Operating System (ROS) on NVIDIA Jetson TK1
git clone https://github.com/jetsonhacks/installROS.git
cd installROS
设置Rviz。至于安装脚本为什么没有默认设置RVIZ,我们可以参考官方wiki上的说明:
It is not recommended to run rviz on most ARM-based CPUs. They're generally too slow, and the version of OpenGL that is provided by the software (mesa) libraries it not new enough to start rviz.
'IF' you have a powerful board with a GPU and vendor-supplied OpenGL libraries, it might be possible to run rviz. The IFC6410 and the NVidia Jetson TK1 are two such boards where rviz will run, although neither is fast enough for graphics-heavy tasks such as displaying pointclouds.
Note that rviz will segfault if you have the GTK_IM_MODULE environment variable set, so it's best to unset it in your~/.bashrc:
unset GTK_IM_MODULE
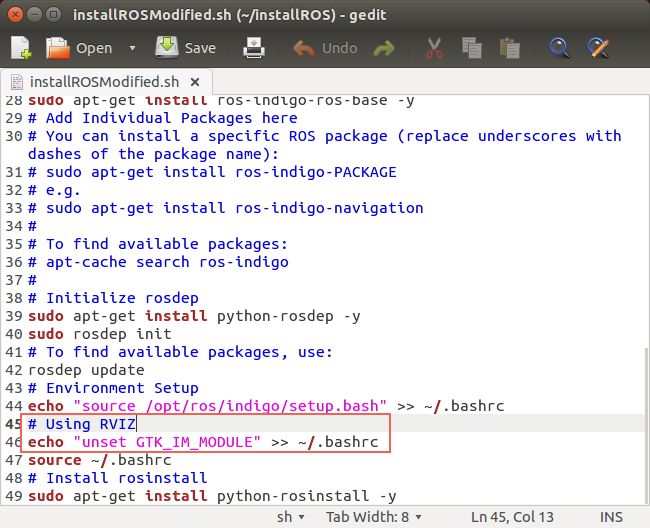
根据官方wiki,设置RVIZ的方式很简单,我们只需在installROS.sh文件中加入如图所示的代码即可:
![]()
最后,在Terminal 中运行:
./installROS.h
等待一段时间,ROS Indigo就应该安装好了,可以运行 roscore 检查是否安装成功。
9. 安装g++编译器
没有 g++ 编译器,ROS没法跑:
sudo apt-get install g++
10. Hacking for OpenCV(还没做)
这一部分主要参考了以下几篇文章:
ROS, OpenCV and OpenCV4Tegra on the NVIDIA Jetson TK1
http://myzharbot.robot-home.it/blog/software/ros-nvidia-jetson-tx1-jetson-tk1-opencv-ultimate-guide/
需要修改的文件如下:
- /opt/ros/<ros-version>/lib/pkgconfig/cv_bridge.pc
- /opt/ros/<ros-version>/lib/pkgconfig/image_geometry.pc
- /opt/ros/<ros-version>/share/cv_bridge/cmake/cv_bridgeConfig.cmake
- /opt/ros/<ros-version>/share/image_geometry/cmake/image_geometryConfig.cmake
先备份:
sudo cp /opt/ros/indigo/lib/pkgconfig/cv_bridge.pc /opt/ros/indigo/lib/pkgconfig/cv_bridge.pc-bak
sudo cp /opt/ros/indigo/lib/pkgconfig/image_geometry.pc /opt/ros/indigo/lib/pkgconfig/image_geometry.pc-bak
sudo cp /opt/ros/indigo/share/cv_bridge/cmake/cv_bridgeConfig.cmake /opt/ros/indigo/share/cv_bridge/cmake/cv_bridgeConfig.cmake-bak
sudo cp /opt/ros/indigo/share/image_geometry/cmake/image_geometryConfig.cmake /opt/ros/indigo/share/image_geometry/cmake/image_geometryConfig.cmake-bak
对以上每个文件做如下修改:
- remove each instance
/usr/lib/arm-linux-gnueabihf/libopencv_ocl.so.2.4.8; - replace each instance of
/usr/lib/arm-linux-gnueabihf/with/usr/lib; - replace each instance of
2.4.8with2.4.12(or the current version of OpenCV in opencv4tegra package)
sudo gedit /opt/ros/indigo/lib/pkgconfig/cv_bridge.pc &
sudo gedit /opt/ros/indigo/lib/pkgconfig/image_geometry.pc &
sudo gedit /opt/ros/indigo/share/cv_bridge/cmake/cv_bridgeConfig.cmake &
sudo gedit /opt/ros/indigo/share/image_geometry/cmake/image_geometryConfig.cmake &
安装Kinect Driver等后续工作可以参考:
http://www.jianshu.com/p/997ede860d74
作者:白菜菜白
出处:http://www.cnblogs.com/lvchaoshun/
本文版权归作者和博客园共有,欢迎转载,但未经作者同意必须保留此段声明,且在文章页面明显位置给出原文连接,否则保留追究法律责任的权利。

 浙公网安备 33010602011771号