04.使用Google Gemini API和ChatGPT API构建应用
准备工作
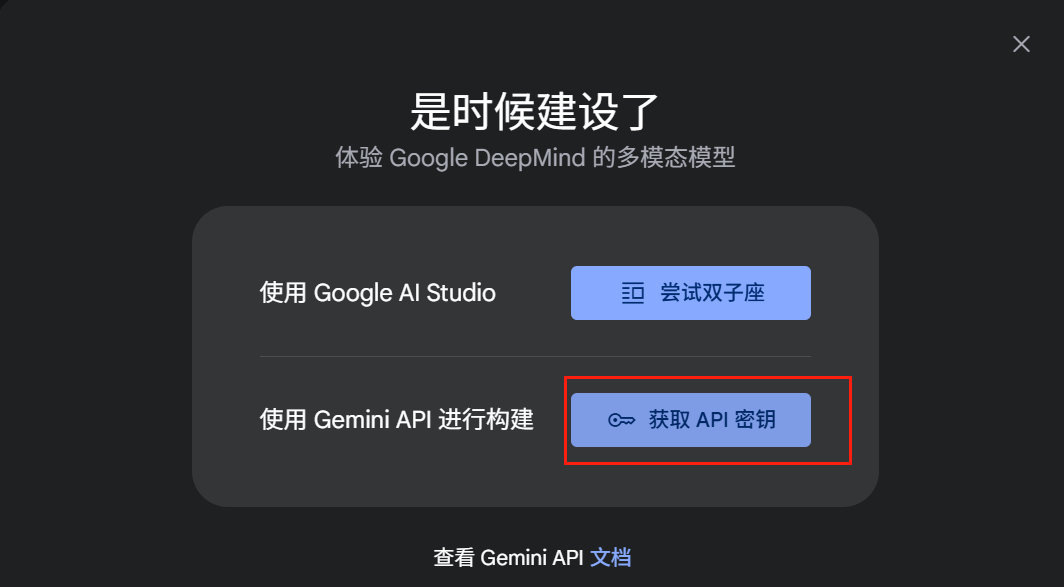
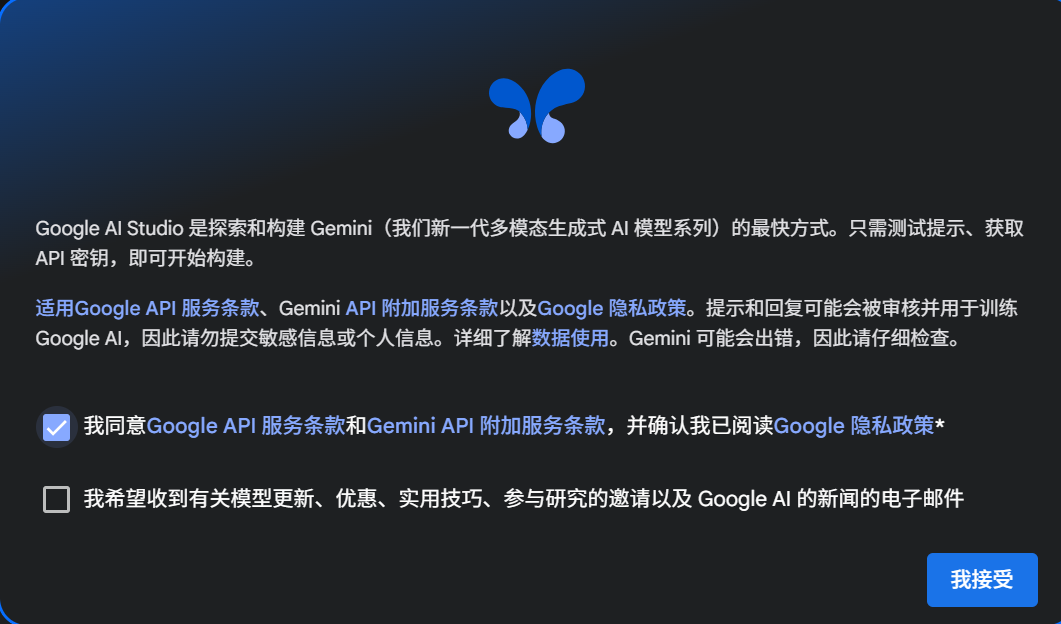
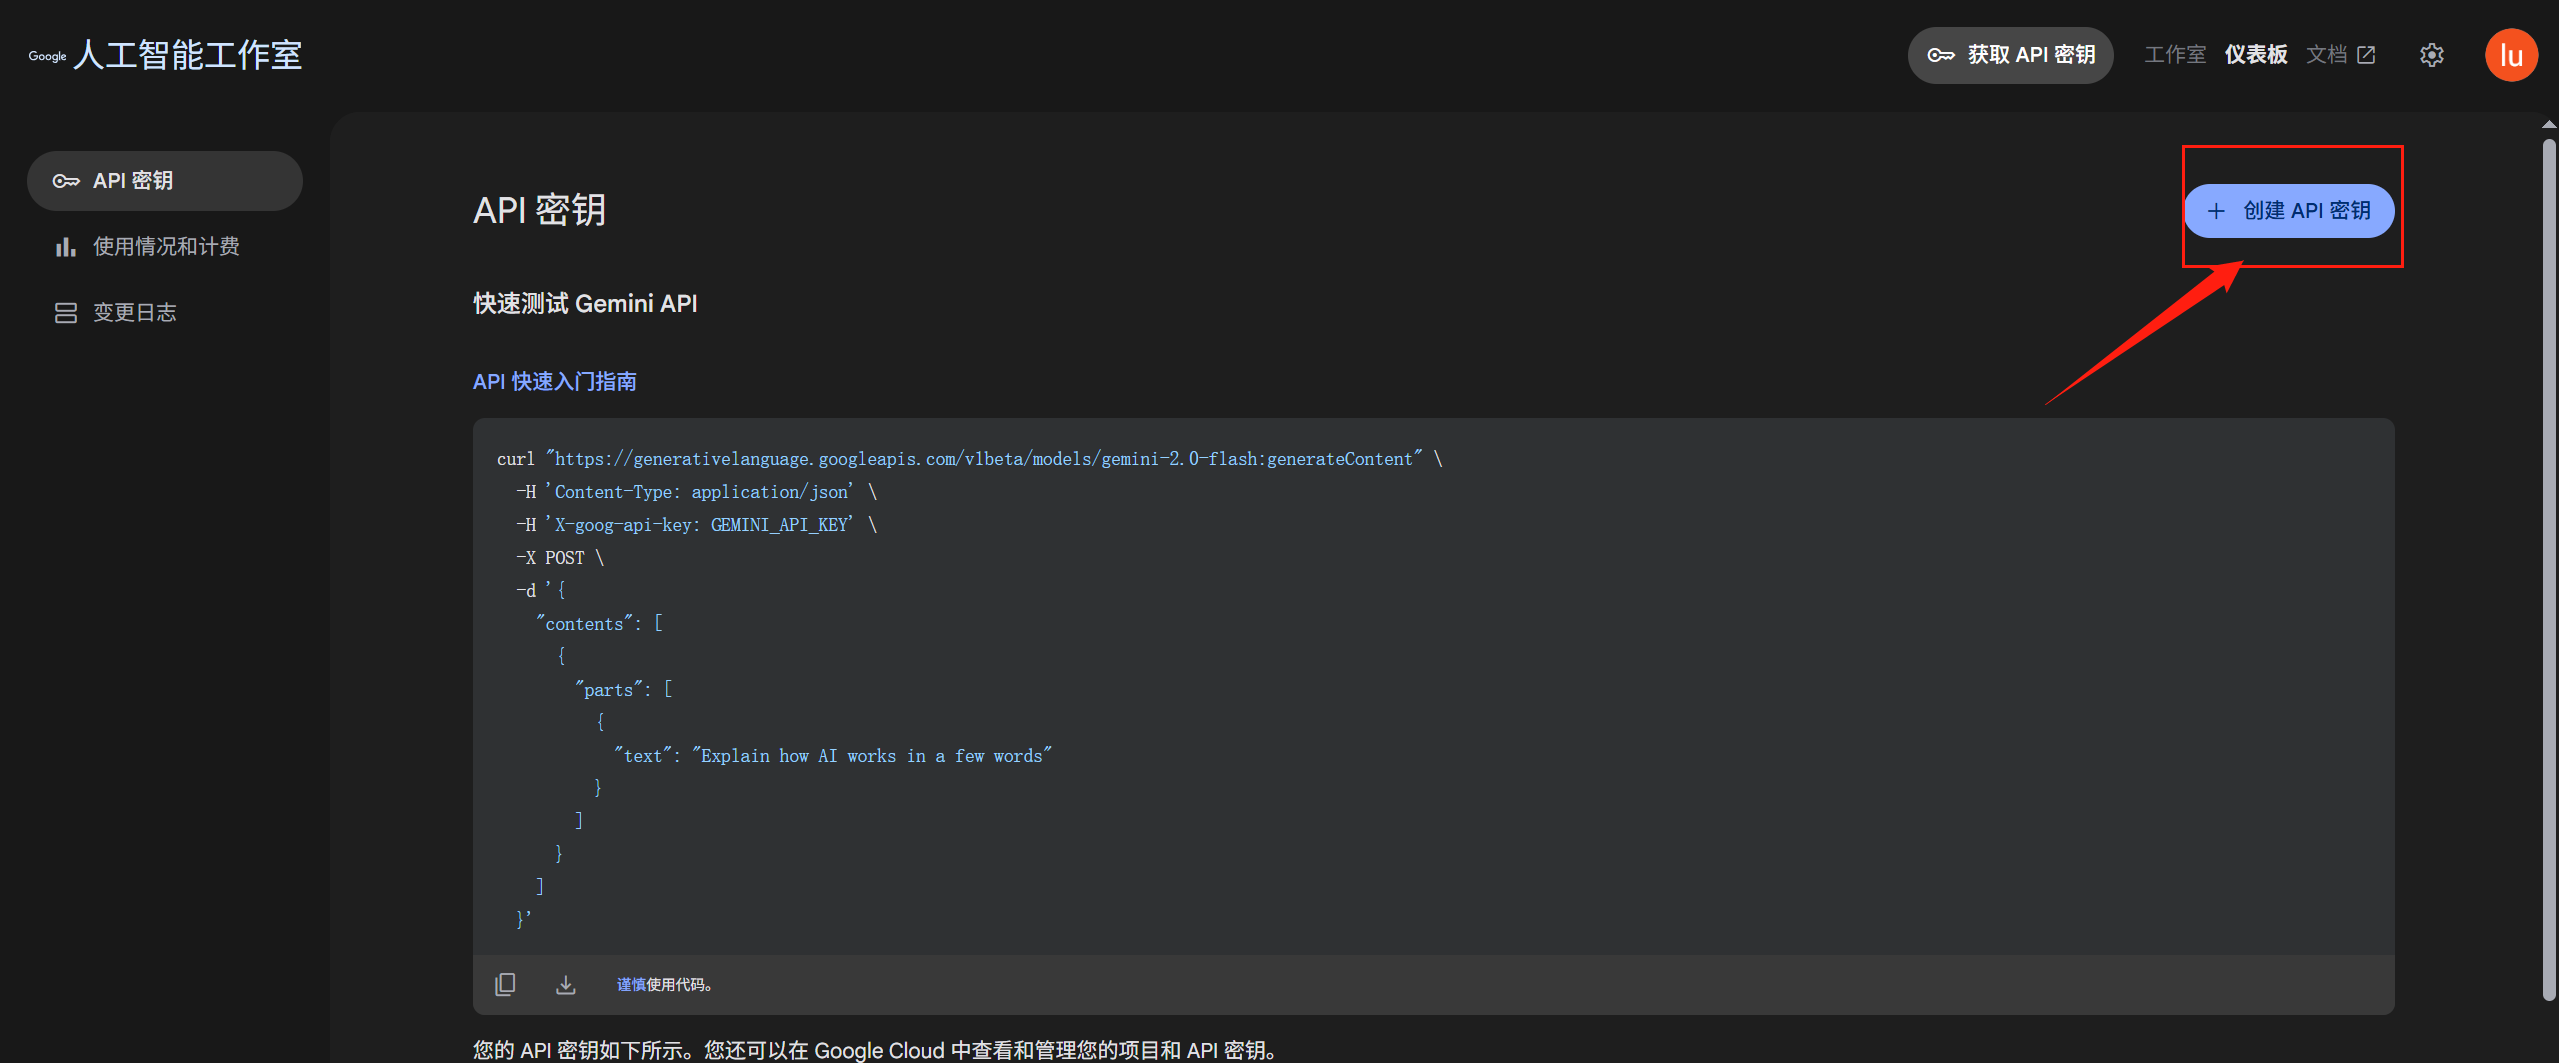
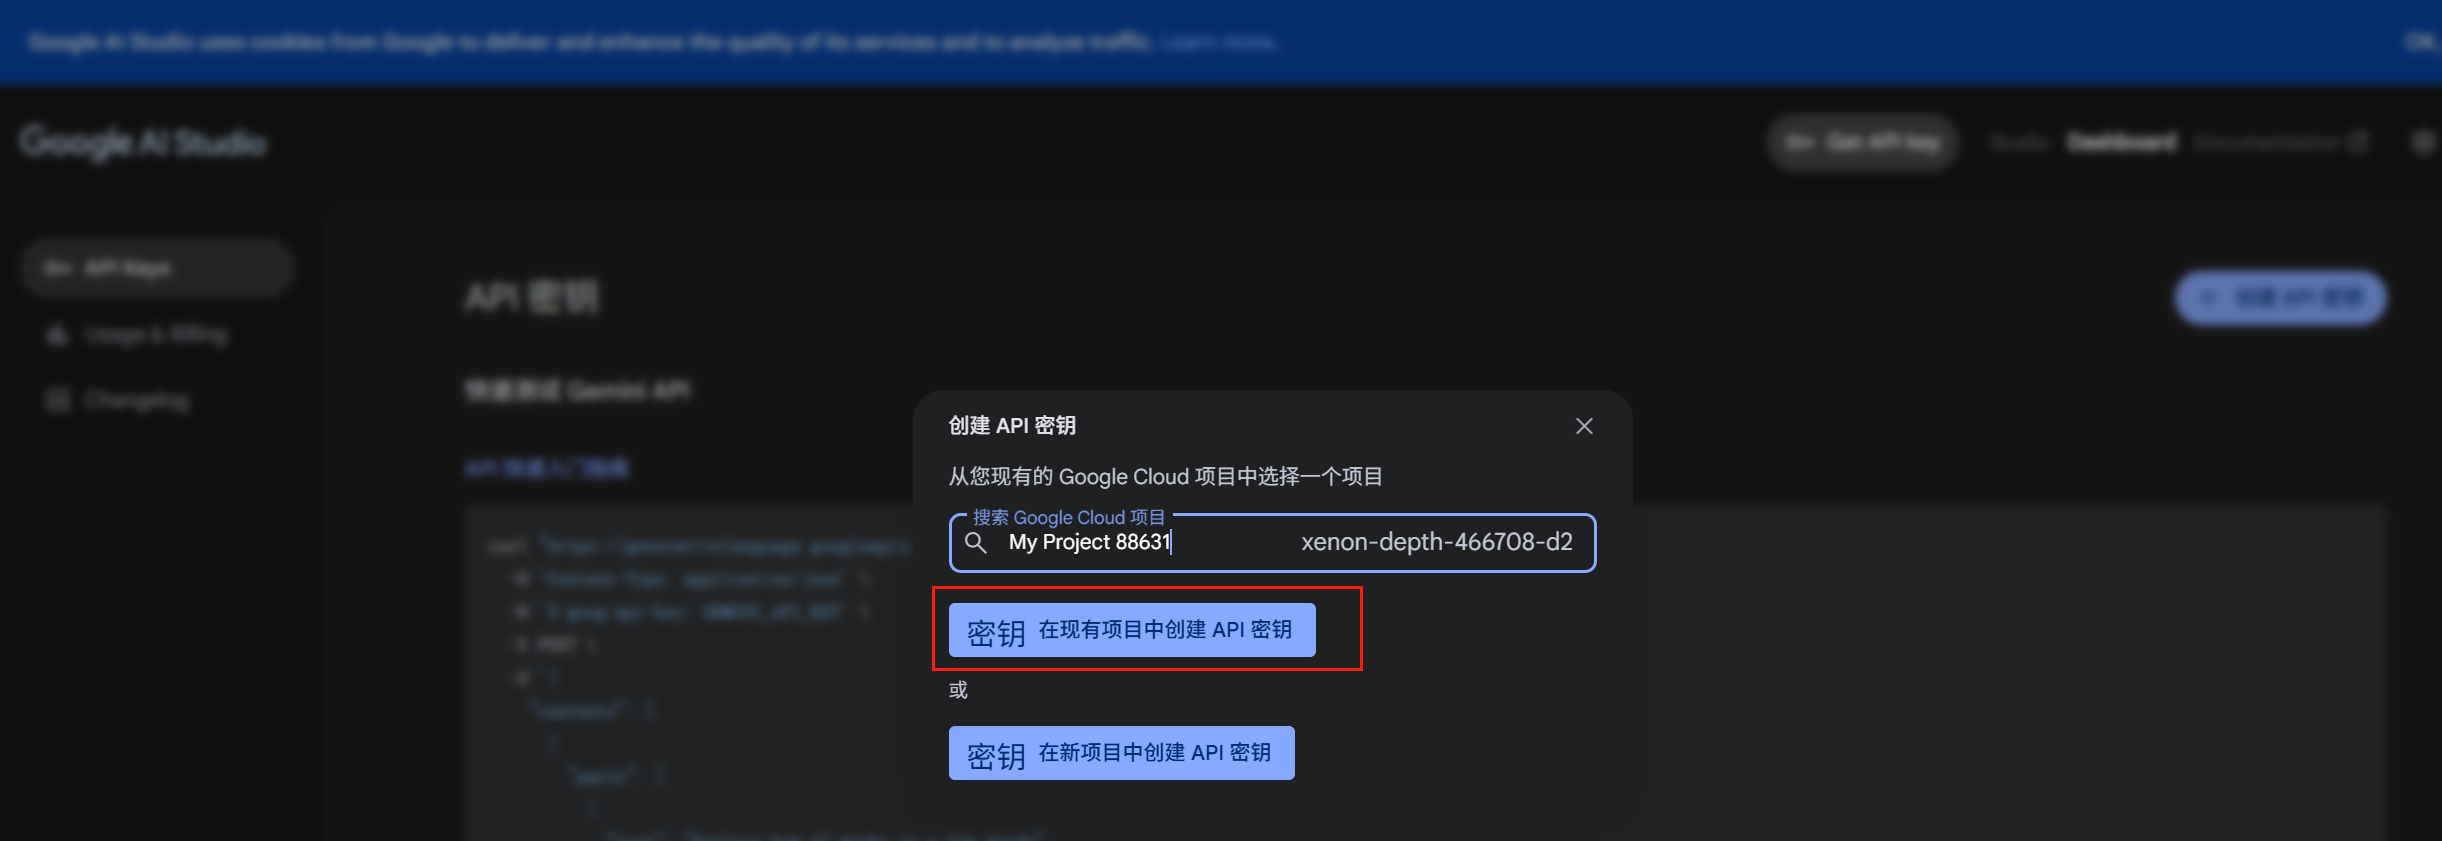
Google Gemini API密钥获取
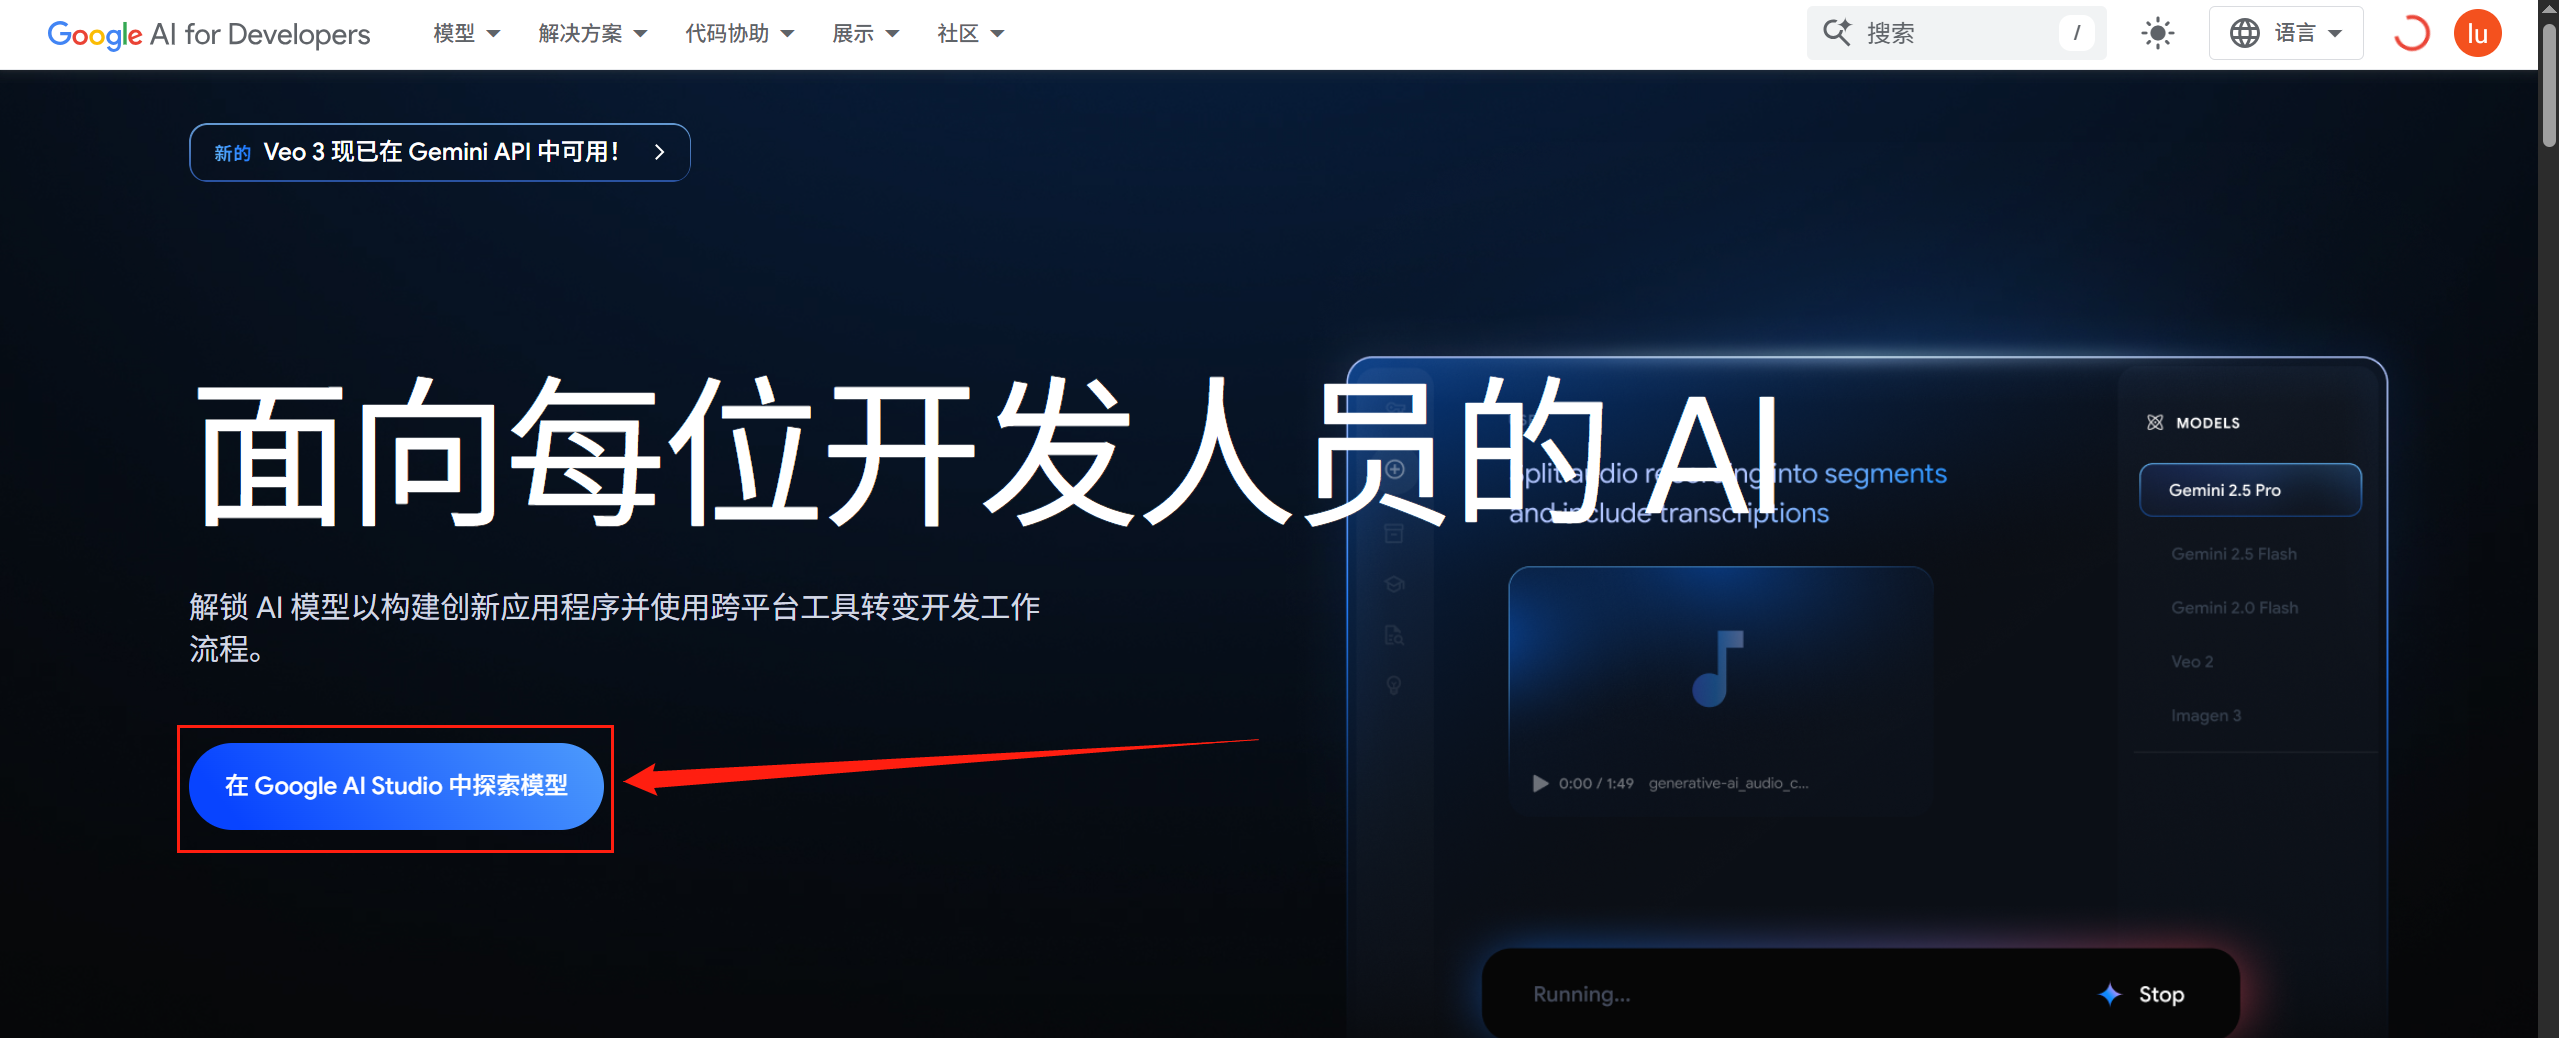
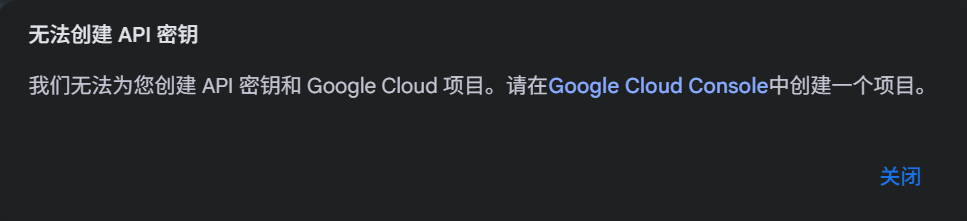
![]()
点击上面的报错链接会跳转到:
https://console.cloud.google.com/projectcreate
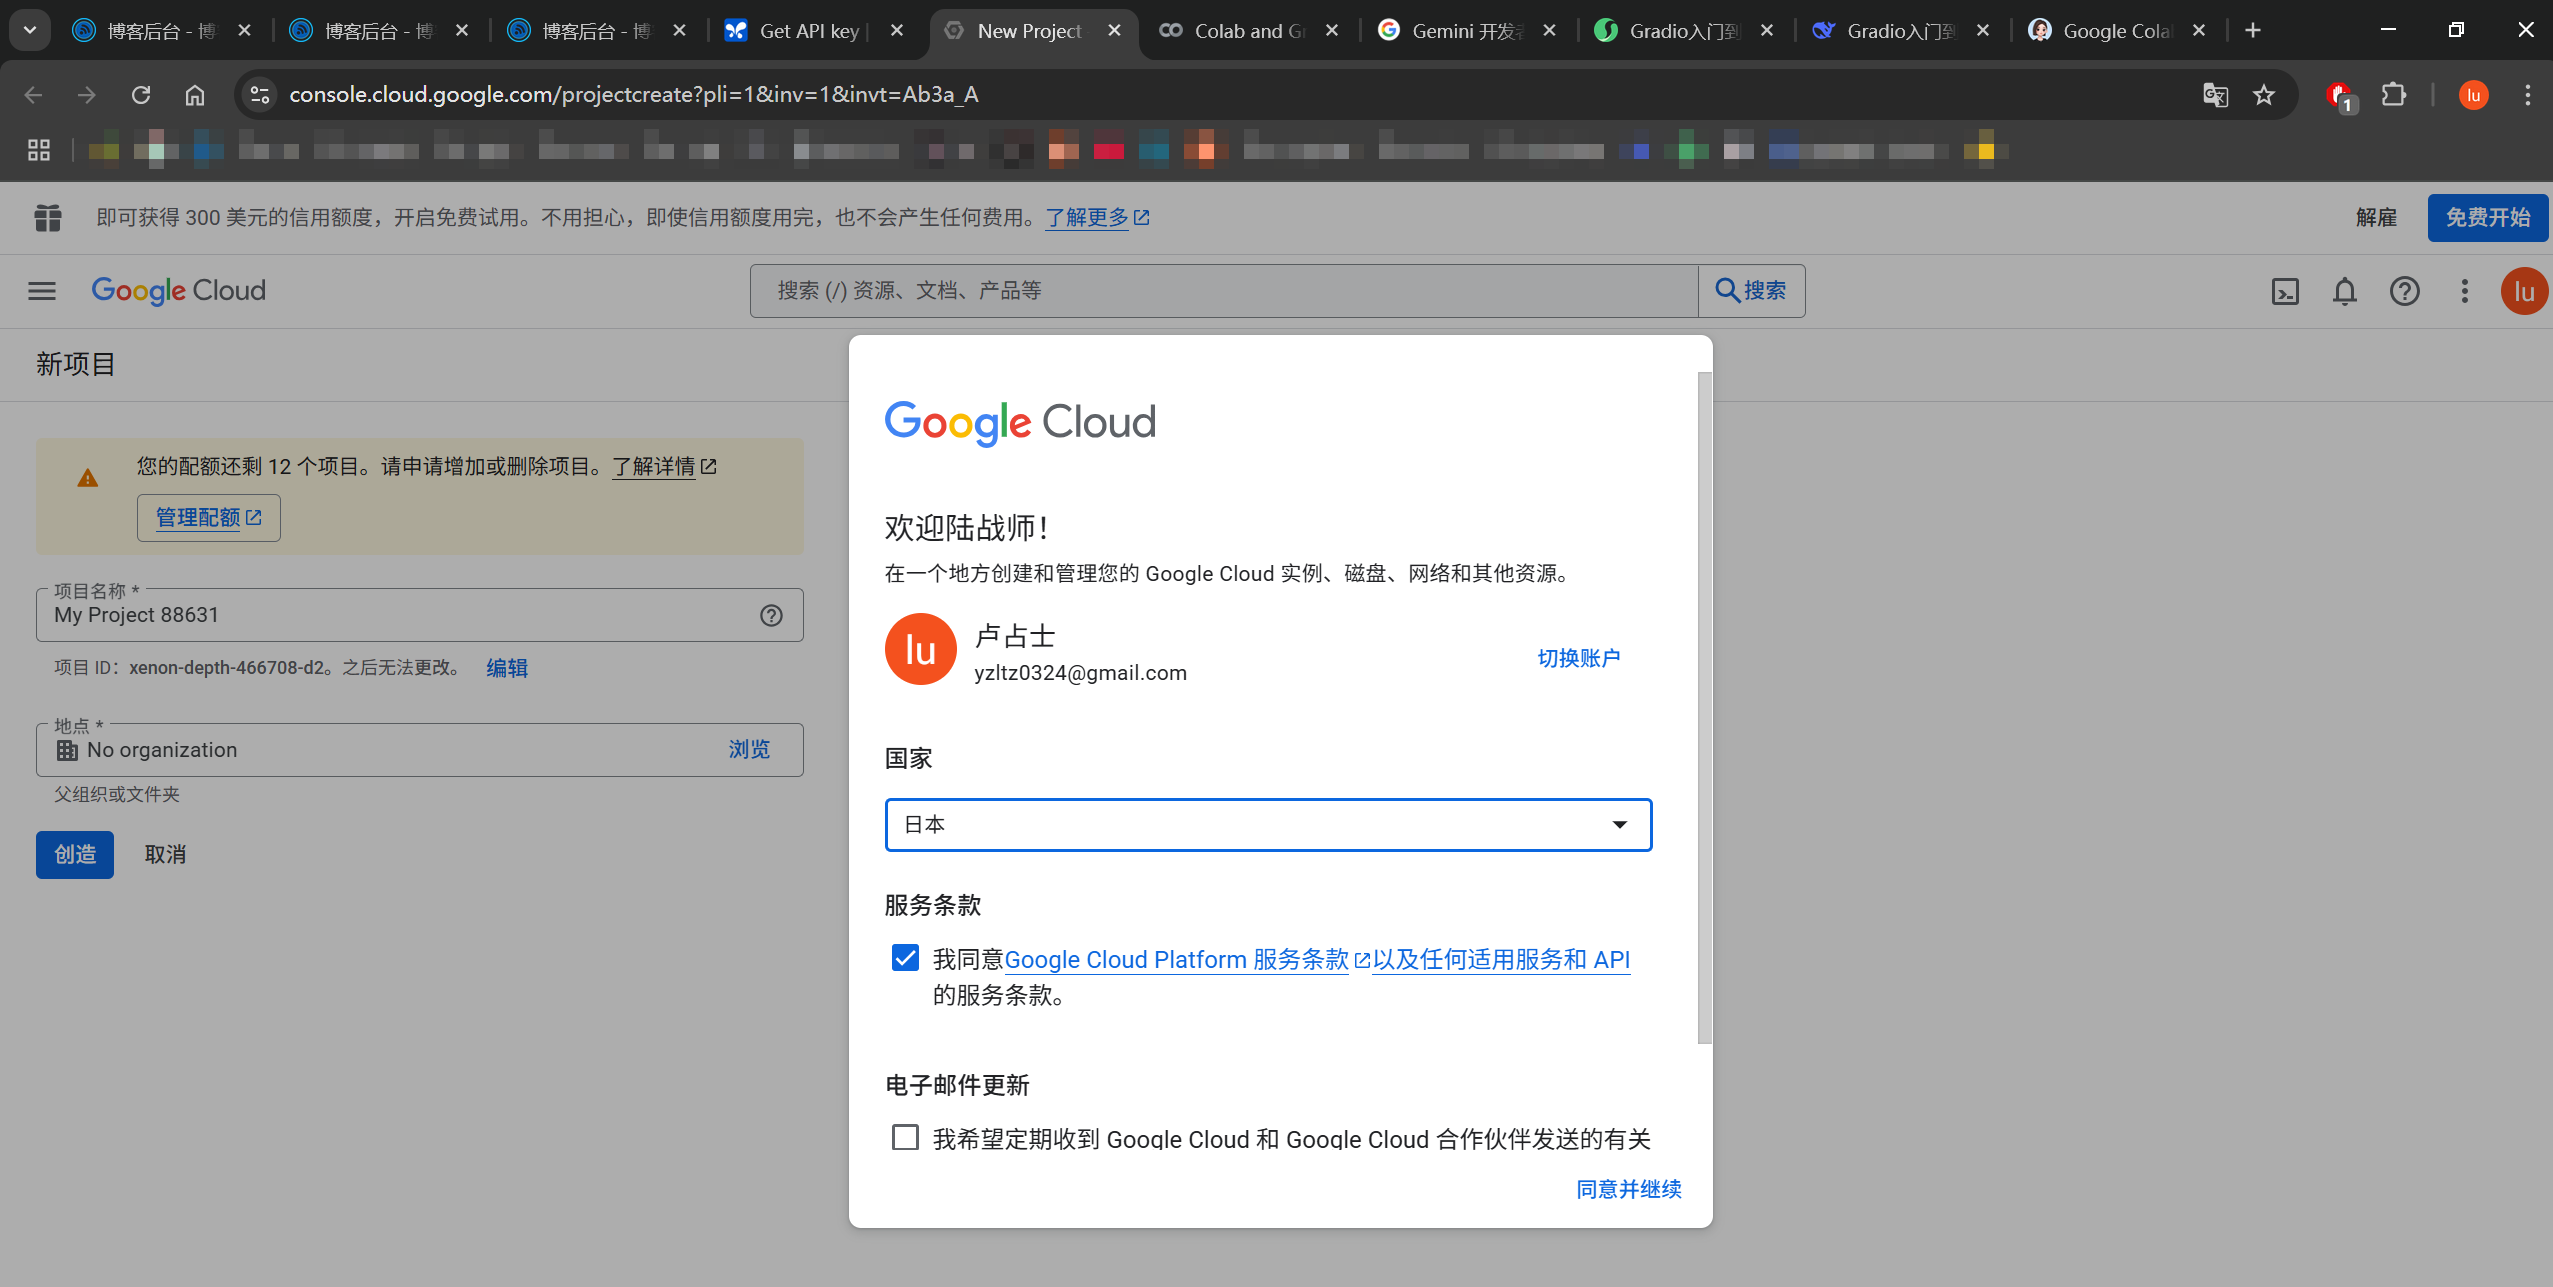
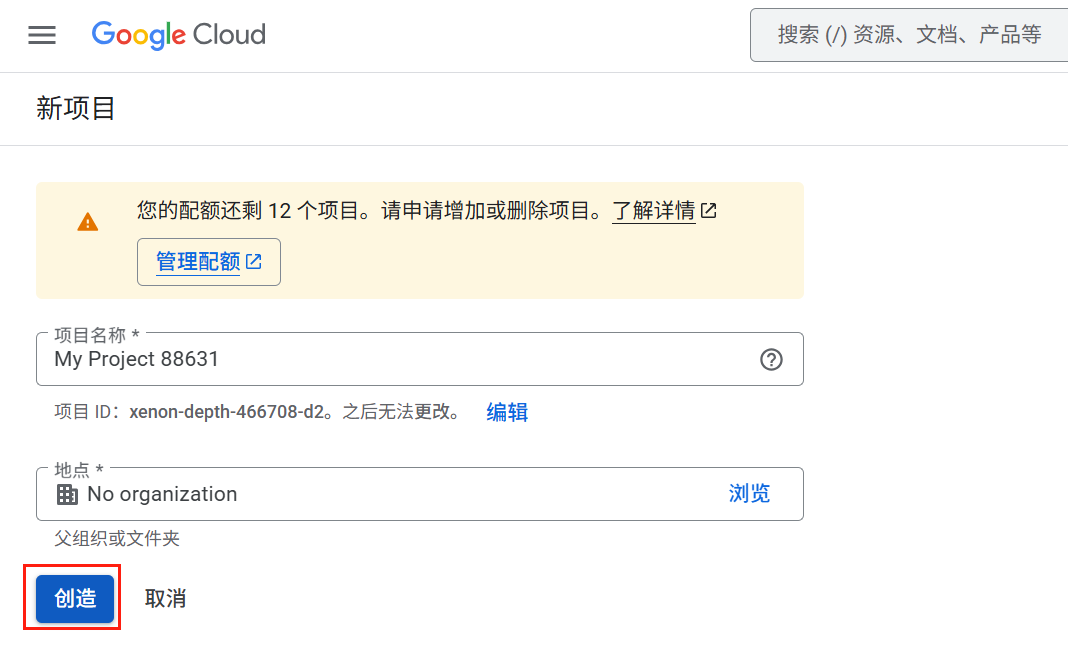
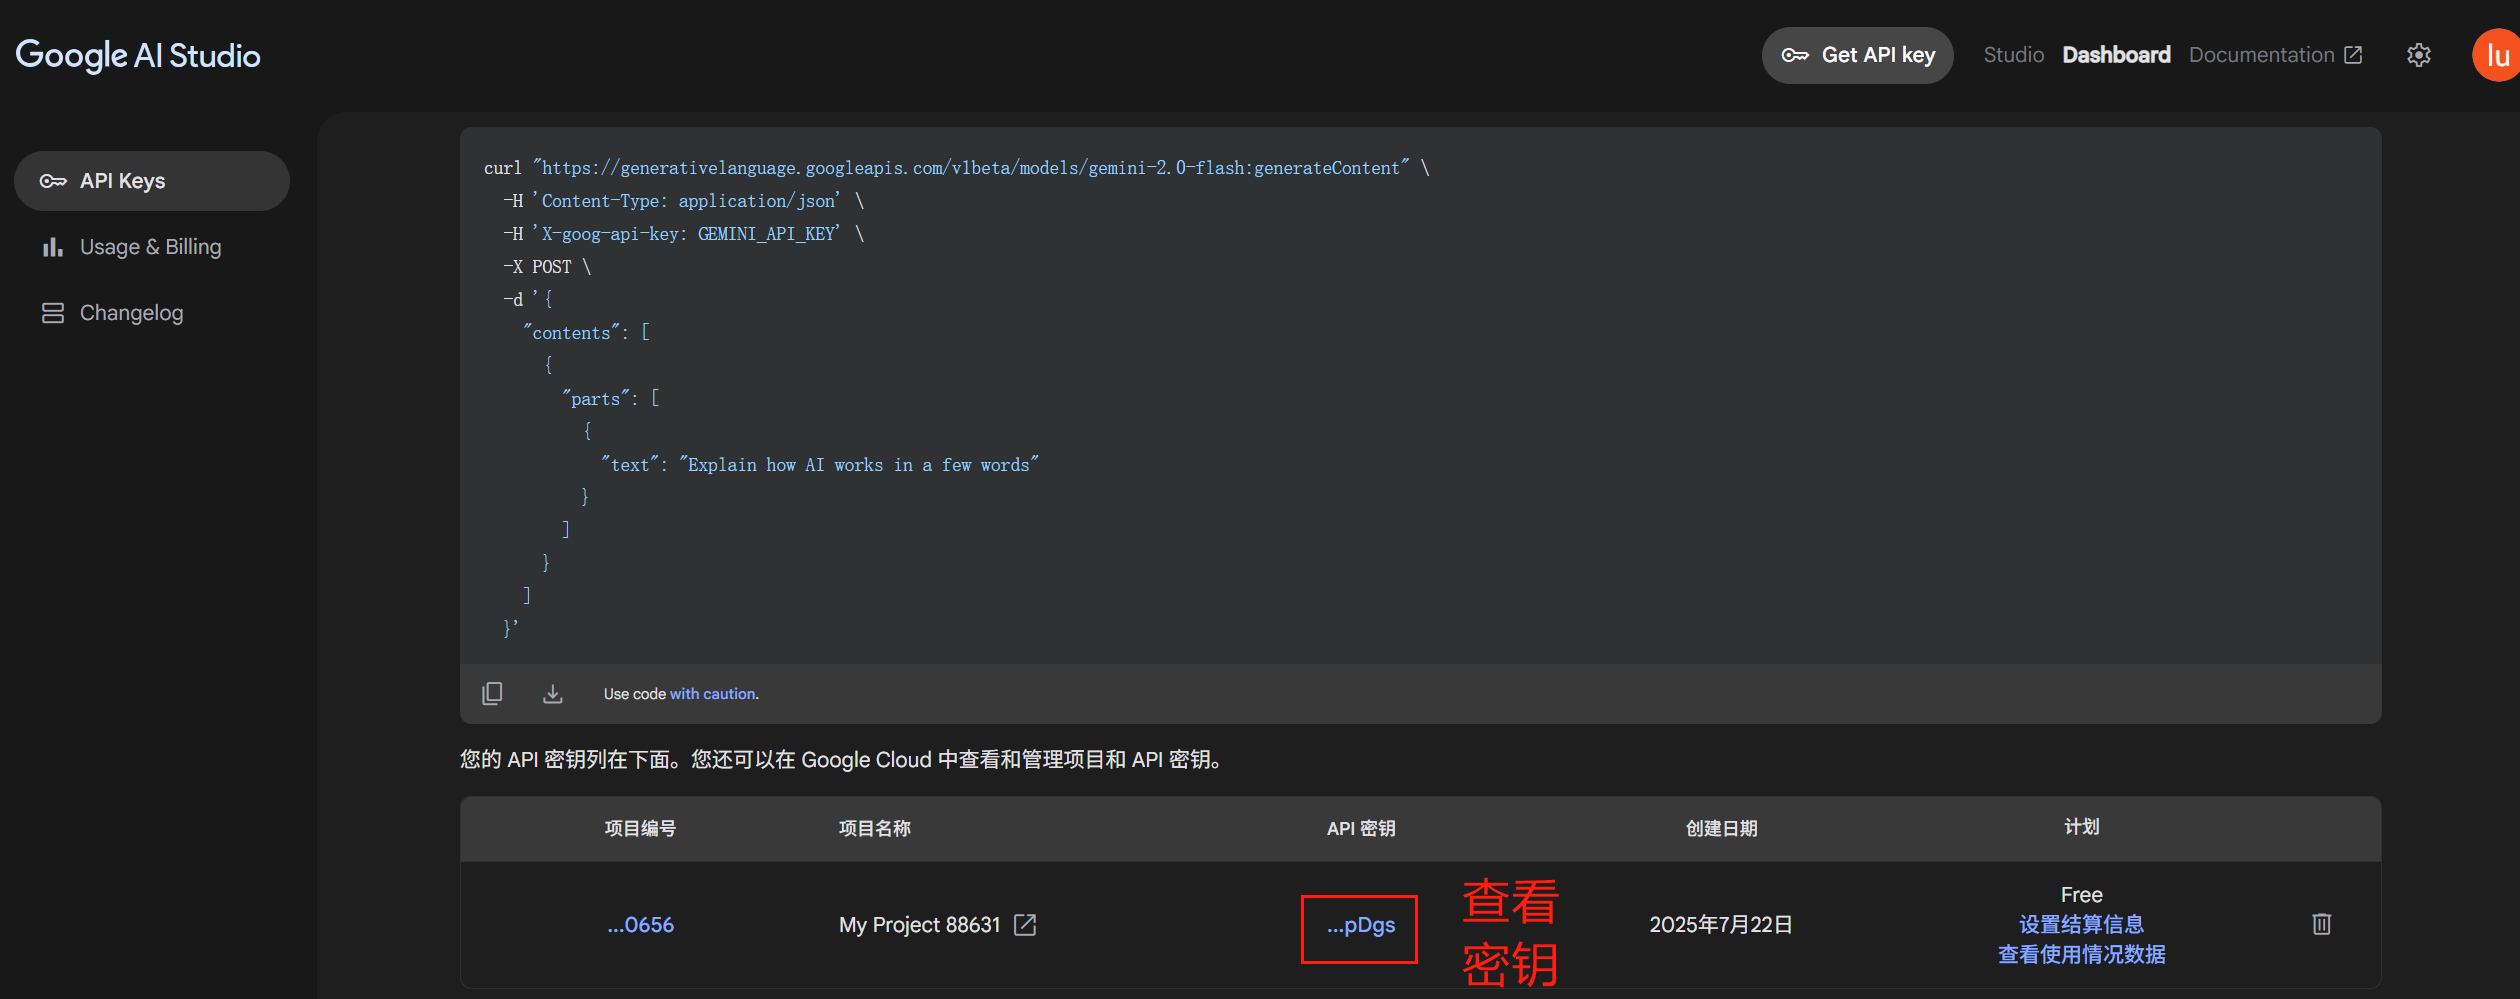
创建完项目之后,重新回到创建秘钥的界面(刷新):
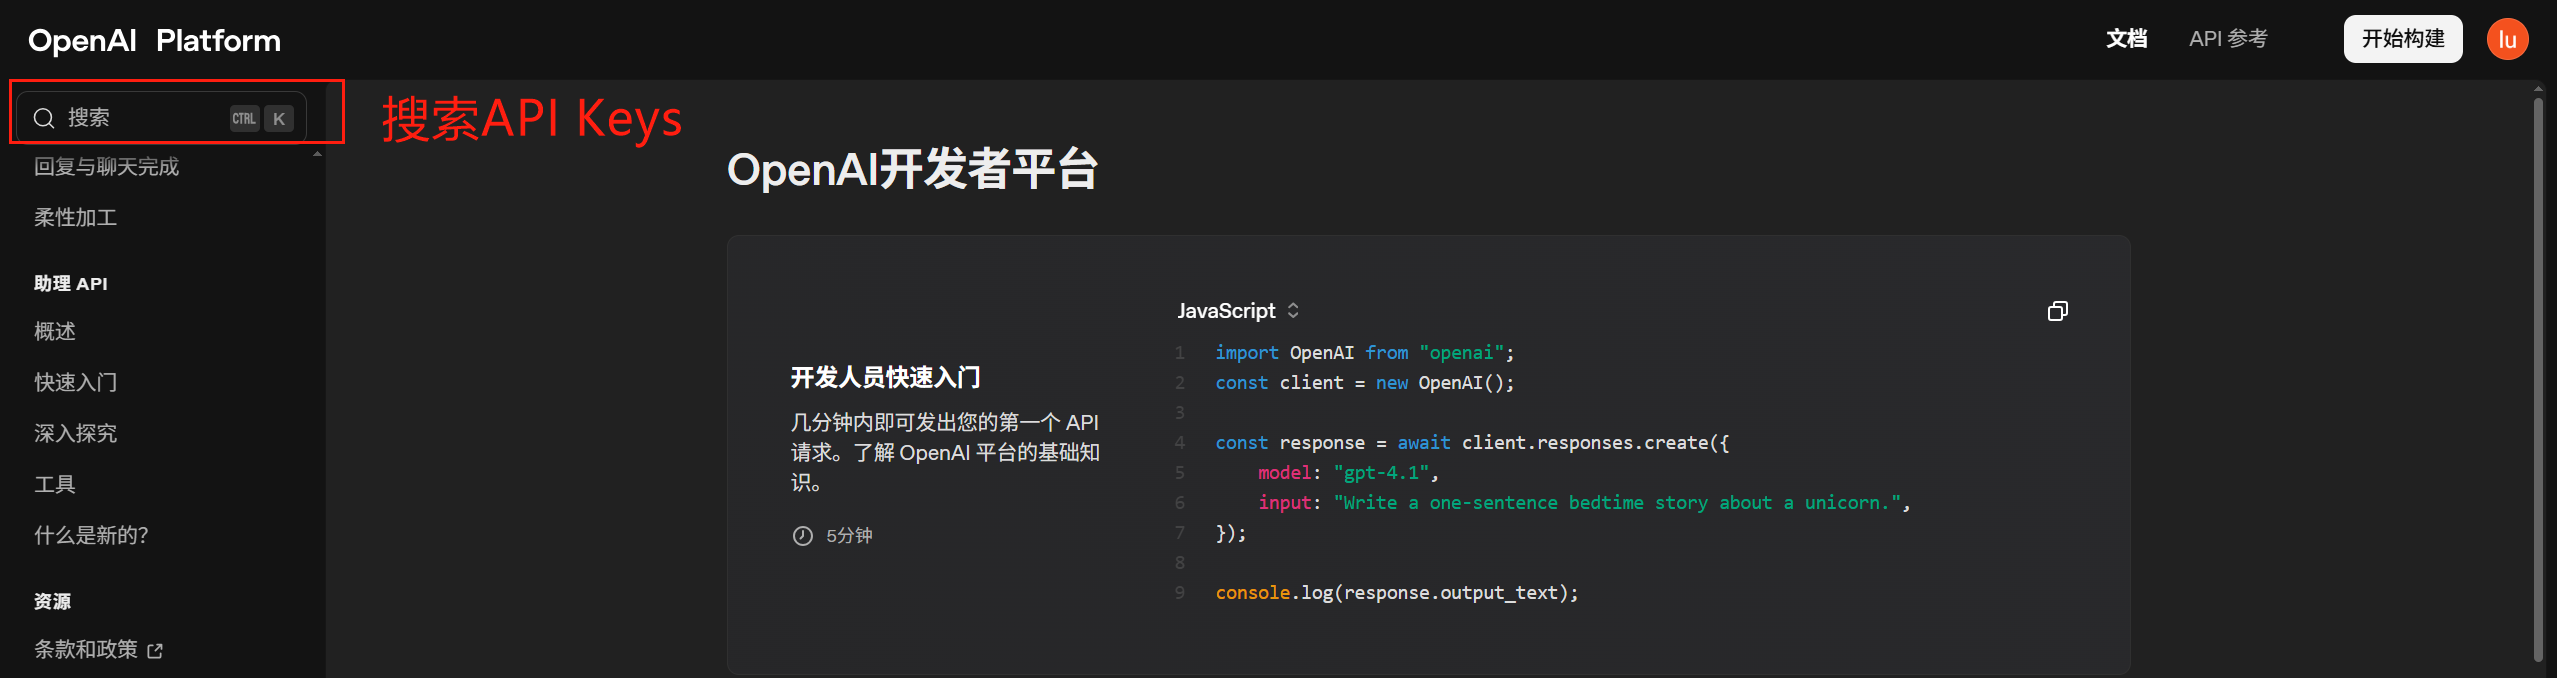
ChatGPT API密钥获取
https://openai.com/zh-Hans-CN/

大部分人可能使用过ChatGPT账号登录过,但是API平台账号要重新注册:
登录之后:


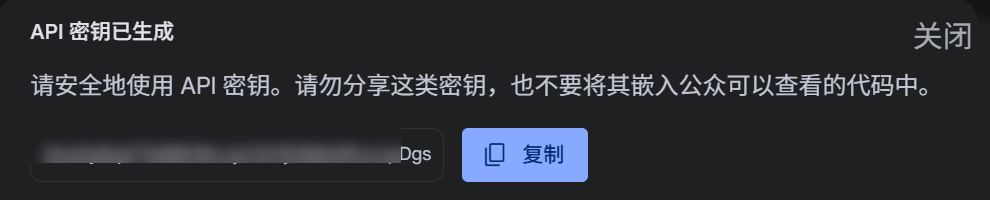
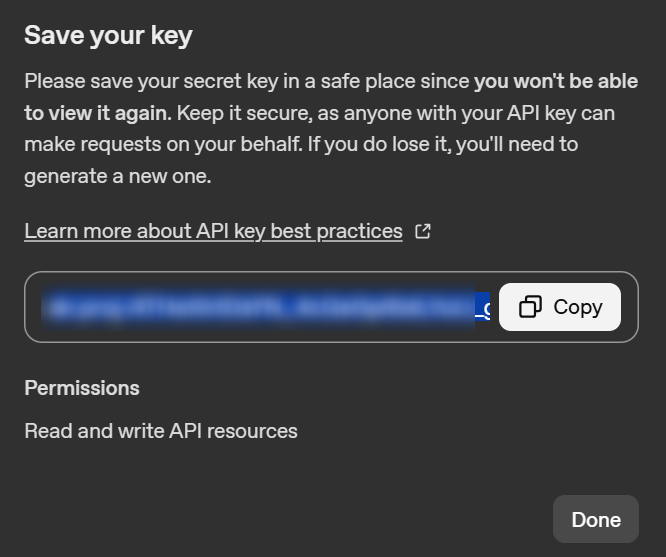
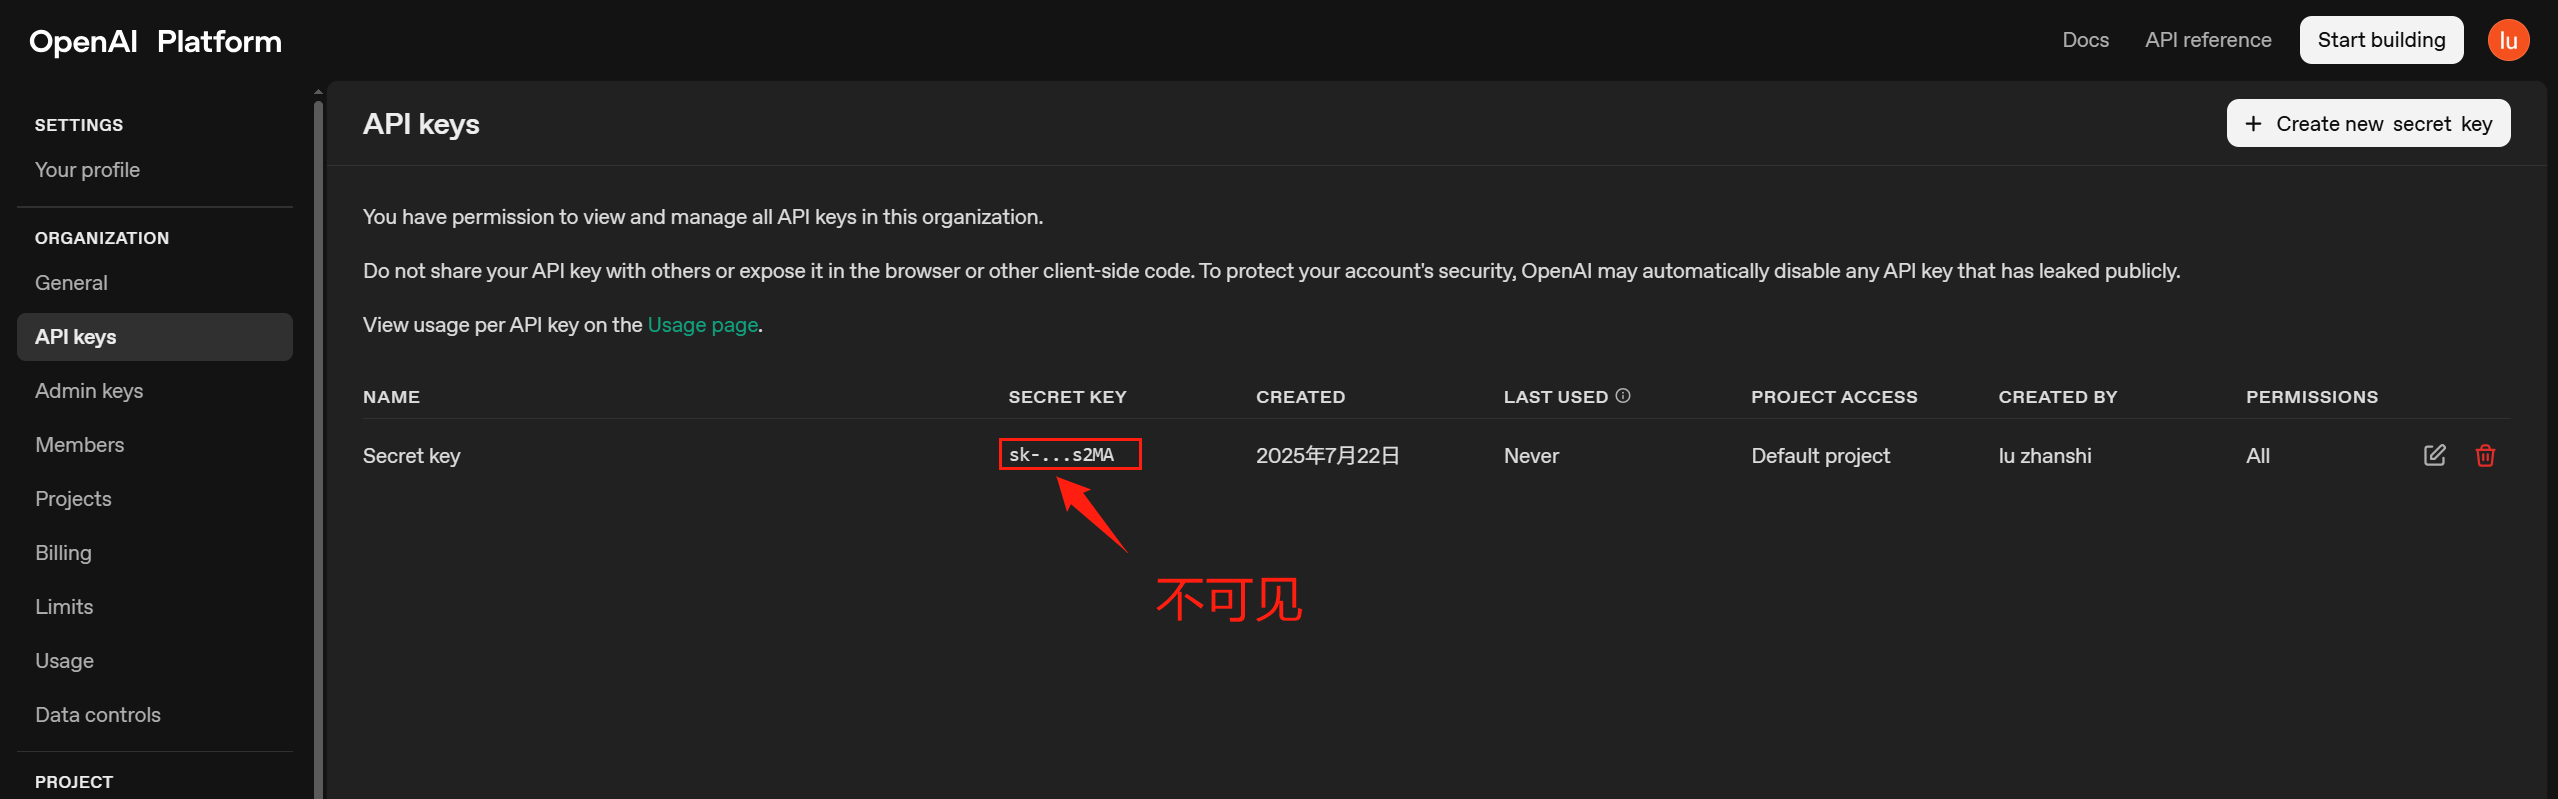
注意:创建完API Key之后,请立即复制保存,因为之后再也看不到完整的它了:
应用构建
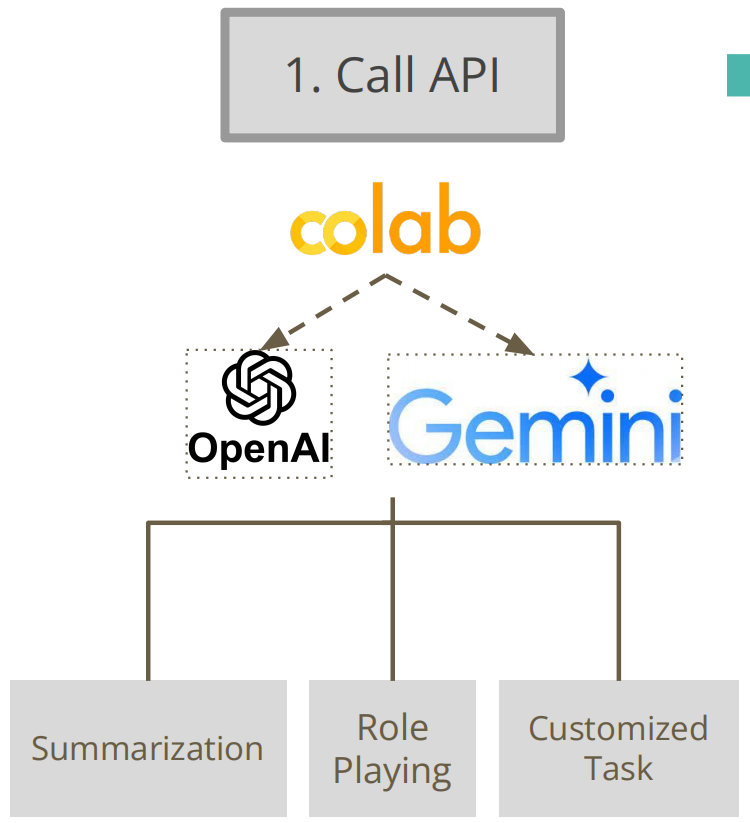

Google Gemini API
安装SDK
安装所有必要的软件包(google),这可能需要一些时间。
!pip install googlefrom google import genai
client = genai.Client(api_key="AIzaSyBqA1TeB8KWmJjvCKrfjQlM6WfurIJpDgs")
response = client.models.generate_content(
model="gemini-2.5-flash",
contents="How does AI work?"
)
print(response.text)点击查看返回内容
AI, or Artificial Intelligence, fundamentally works by enabling machines to **learn from data** and **make decisions or predictions** based on that learning, rather than being explicitly programmed for every possible scenario.

Think of it like teaching a child: instead of giving them a strict rulebook for every situation, you expose them to many examples, give them feedback, and they gradually learn to identify patterns and make their own informed choices.

Here's a breakdown of the core process:

1.  **Data Collection & Preparation (The Fuel):**
配合Gradio生成聊天页面
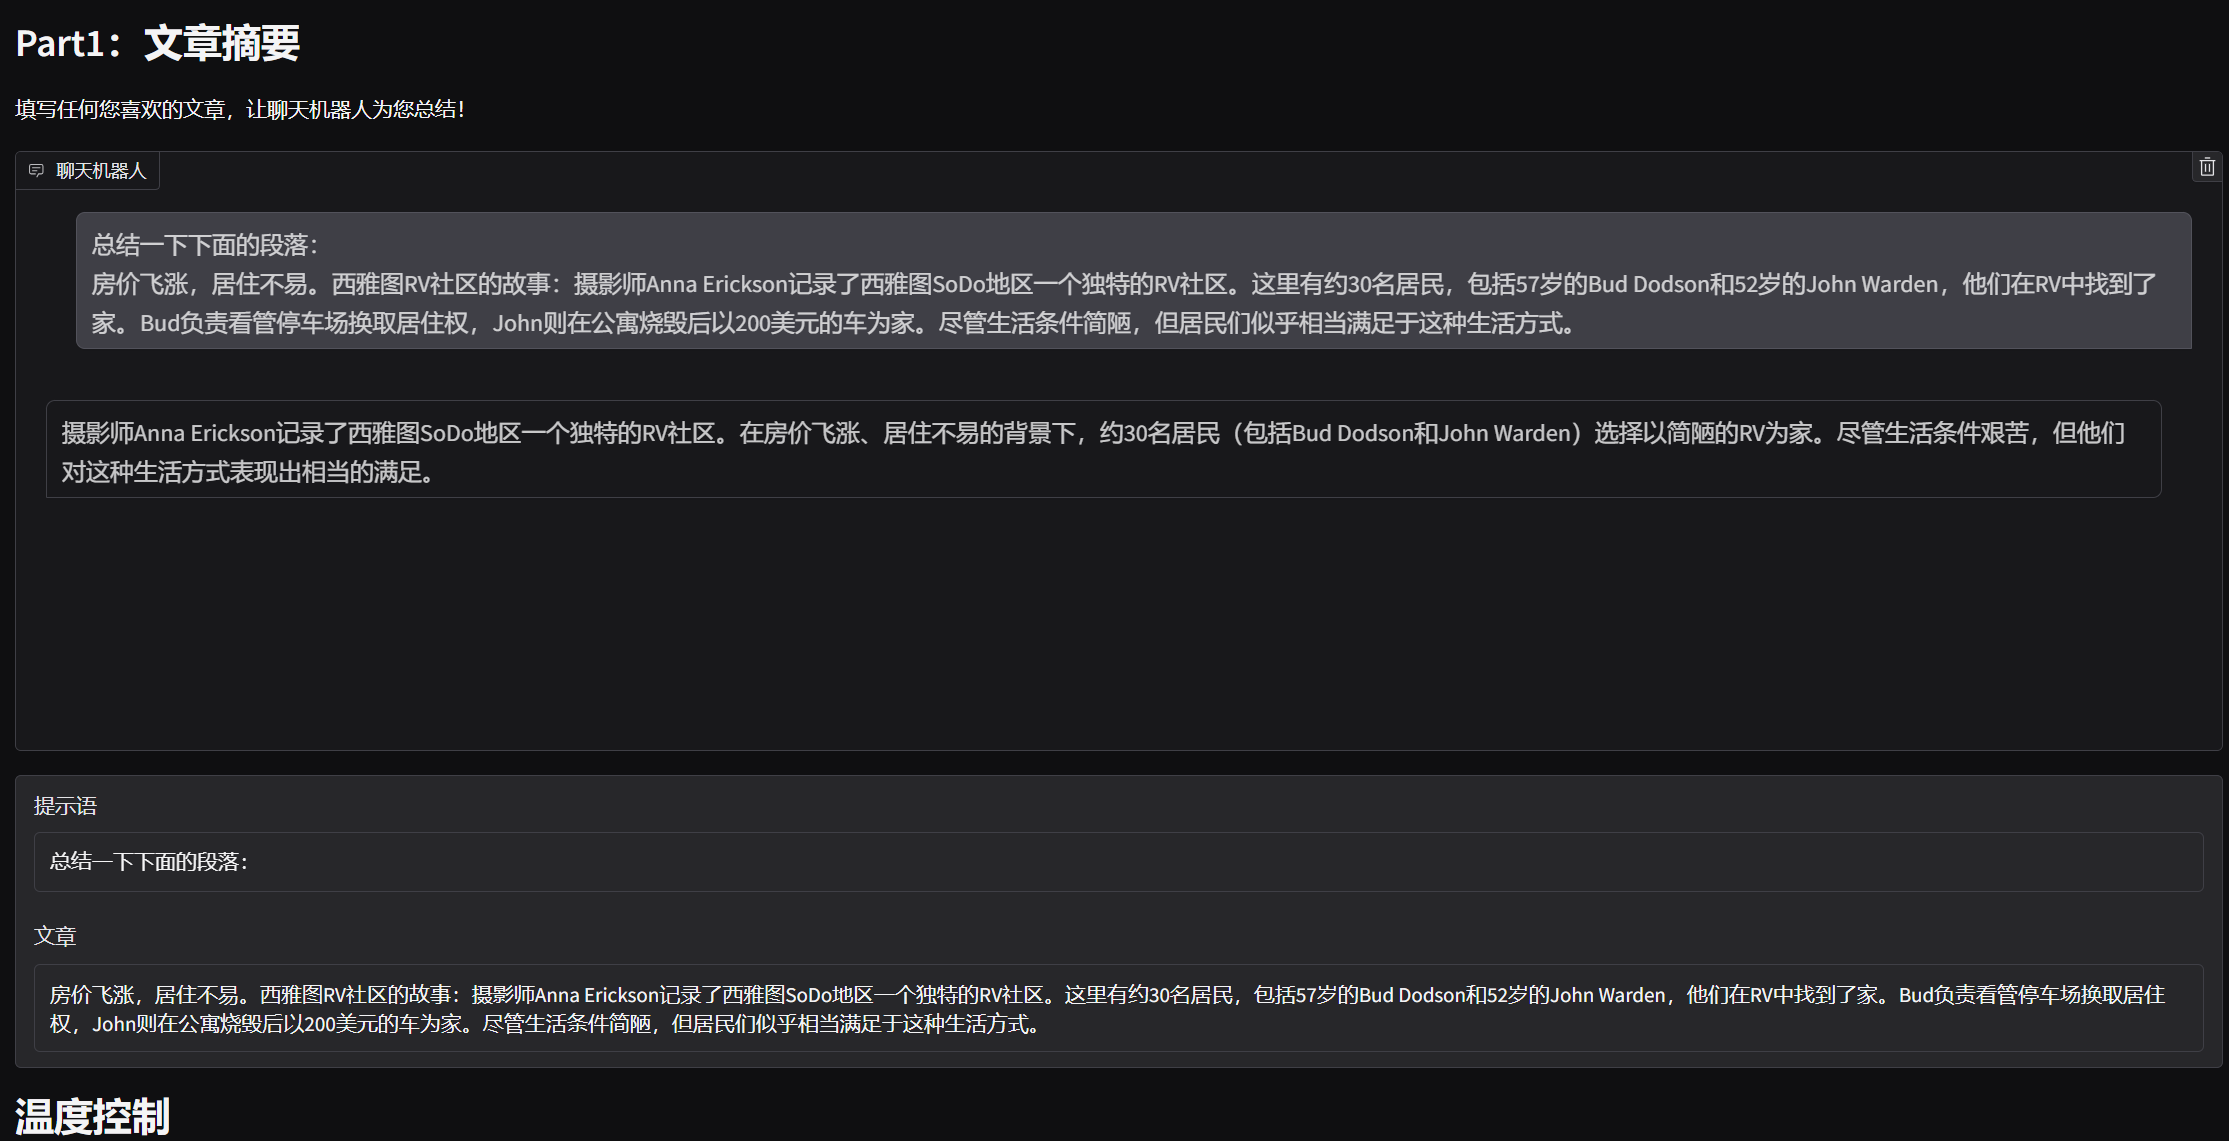
在本任务中,你需要让你的聊天机器人成为一个总结器。它的任务是,当用户输入一篇文章时,它能为用户总结该文章。
你需要:
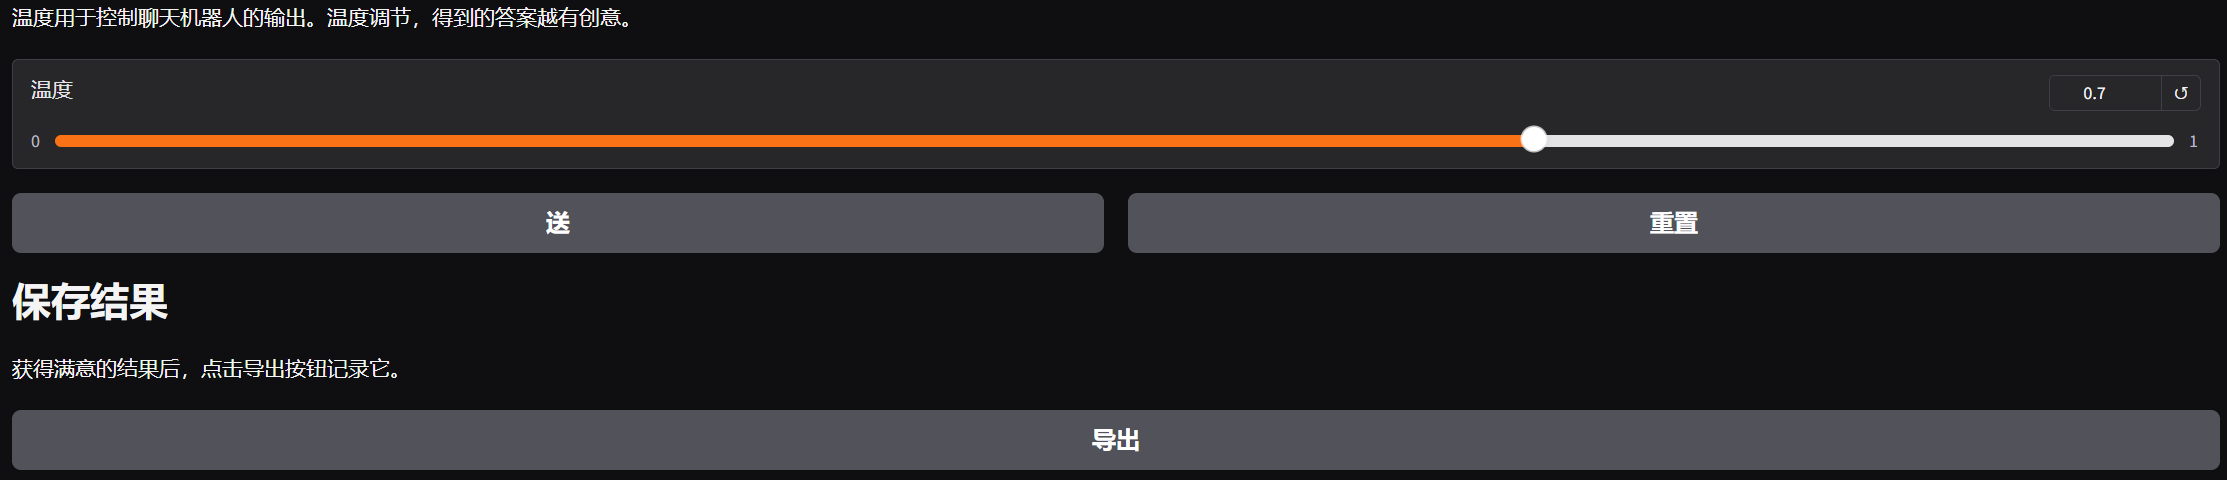
想出一个用于总结的提示词,并填入 “prompt_for_summarization”(总结提示词)中。 点击运行按钮(成功执行后,运行按钮会变成相应状态 )。将会弹出一个界面,如下所示(如果你使用深色模式,可能会看起来有点不同 )。 自行找一篇文章,或者使用我们提供的示例文章,并将其填入名为 “文章” 的代码块中。 点击 “发送” 按钮生成总结内容。(你可以使用 “温度” 滑块来控制输出内容的创造性。 )
from google import genai
from google.colab import userdata
from google.genai import types
import gradio as gr
import json
from typing import List, Dict, Tuple

# 从Colab用户数据中获取Google API密钥
api_key = userdata.get('GOOGLE_API_KEY')
# 创建Google AI客户端实例
client = genai.Client(api_key=api_key)


## TODO: 在此处填写您的提示语
prompt_for_summarization = "请在此处填写您的提示语"

# 清空对话的函数
def reset() -> List:
    """重置聊天机器人对话历史"""
    return []

# 调用模型生成摘要的函数
def interact_summarization(prompt: str, article: str, temp=1.0) -> List[Tuple[str, str]]:
    """调用AI模型生成文章摘要

    参数:
        prompt: 提示语,指导模型如何生成摘要
        article: 需要被总结的文章内容
        temp: 温度参数,控制生成文本的创造性(0.0-1.0)

    返回:
        包含输入文本和模型响应的元组列表
    """
    # 将提示语和文章内容组合成完整的输入文本
    input_text = f"{prompt}\n{article}"


    # 调用Google AI模型生成内容
    response = client.models.generate_content(
        model="gemini-2.5-flash",  # 指定使用的模型
        contents=input_text,  # 传入输入文本
        config=types.GenerateContentConfig(  # 配置生成参数
            temperature=temp  # 设置温度参数(此处覆盖了之前的设置)
        )
    )

    # 返回输入文本和模型响应的元组
    return [(input_text, response.text)]

# 导出对话日志的函数
def export_summarization(chatbot: List[Tuple[str, str]], article: str) -> None:
    """将聊天记录导出为JSON文件

    参数:
        chatbot: 聊天记录,包含输入和响应的元组列表
        article: 被总结的文章内容
    """
    # 创建要导出的数据对象
    target = {"chatbot": chatbot, "article": article}
    # 将数据写入JSON文件
    with open("part1.json", "w") as file:
        json.dump(target, file)


# 构建Gradio用户界面的部分
with gr.Blocks() as demo:
    # 界面标题和说明
    gr.Markdown("# Part1: 文章摘要\n填写任何您喜欢的文章,让聊天机器人为您总结!")

    # 聊天机器人显示区域
    chatbot = gr.Chatbot()

    # 提示语输入框(隐藏)
    prompt_textbox = gr.Textbox(label="提示语", value=prompt_for_summarization, visible=True)

    # 文章输入框(带有默认文章)
    article_textbox = gr.Textbox(
        label="文章",
        interactive=True,
        value="房价飞涨,居住不易。西雅图RV社区的故事:摄影师Anna Erickson记录了西雅图SoDo地区一个独特的RV社区。这里有约30名居民,包括57岁的Bud Dodson和52岁的John Warden,他们在RV中找到了家。Bud负责看管停车场换取居住权,John则在公寓烧毁后以200美元的车为家。尽管生活条件简陋,但居民们似乎相当满足于这种生活方式。"
    )

    # 温度控制区域
    with gr.Column():
        gr.Markdown("# 温度控制\n温度用于控制聊天机器人的输出。温度越高,得到的回答越有创造性。")
        # 温度滑块控件
        temperature_slider = gr.Slider(0.0, 1.0, 0.7, step=0.1, label="温度")

    # 操作按钮区域
    with gr.Row():
        # 发送按钮
        sent_button = gr.Button(value="发送")
        # 重置按钮
        reset_button = gr.Button(value="重置")

    # 结果导出区域
    with gr.Column():
        gr.Markdown("# 保存结果\n获得满意的结果后,点击导出按钮记录它。")
        # 导出按钮
        export_button = gr.Button(value="导出")

    # 连接按钮事件
    # 发送按钮点击事件
    sent_button.click(
        interact_summarization,
        inputs=[prompt_textbox, article_textbox, temperature_slider],
        outputs=[chatbot]
    )
    # 重置按钮点击事件
    reset_button.click(reset, outputs=[chatbot])
    # 导出按钮点击事件
    export_button.click(export_summarization, inputs=[chatbot, article_textbox])

# 启动Gradio应用(调试模式)
demo.launch(debug=True)
检查并打印你的结果
这一部分用于检查你的 “part1.json” 文件是否包含所有正确的内容。之后,你可以将结果复制到我们的评分系统中并获得分数。
你需要:
确保文件列表中存在你想要提交给评分系统的 “part1.json” 文件(如果没有,可以使用上传按钮上传)。 点击运行按钮。会出现一个冻结的 Gradio 界面,该界面会重现你的结果。 确认结果正确后,你可以向下滚动到标注为 “将此部分复制到评分系统” 的地方。这里应该有两个区块,一个标注为 “article(文章)”,另一个标注为 “summarization(总结)”。将相应的值复制到评分系统中对应的区块,然后点击 “提交” 以获得分数。
# load the conversation log json file
with open("part1.json", "r") as f:
    context = json.load(f)

chatbot = context['chatbot']
article = context['article']
summarization = chatbot[0][-1]

# This part constructs the Gradio UI interface
with gr.Blocks() as demo:
    gr.Markdown("# Part1: Summarization\nFill in any article you like and let the chatbot summarize it for you!!")
    chatbot = gr.Chatbot(value = context['chatbot'])
    article_textbox = gr.Textbox(label="Article", interactive = False, value = context['article'])
    with gr.Column():
        gr.Markdown("# Copy this part to the grading system.")
        gr.Textbox(label = "article", value = article, show_copy_button = True)
        gr.Textbox(label="summarization", value = summarization, show_copy_button = True)

demo.launch(debug = True)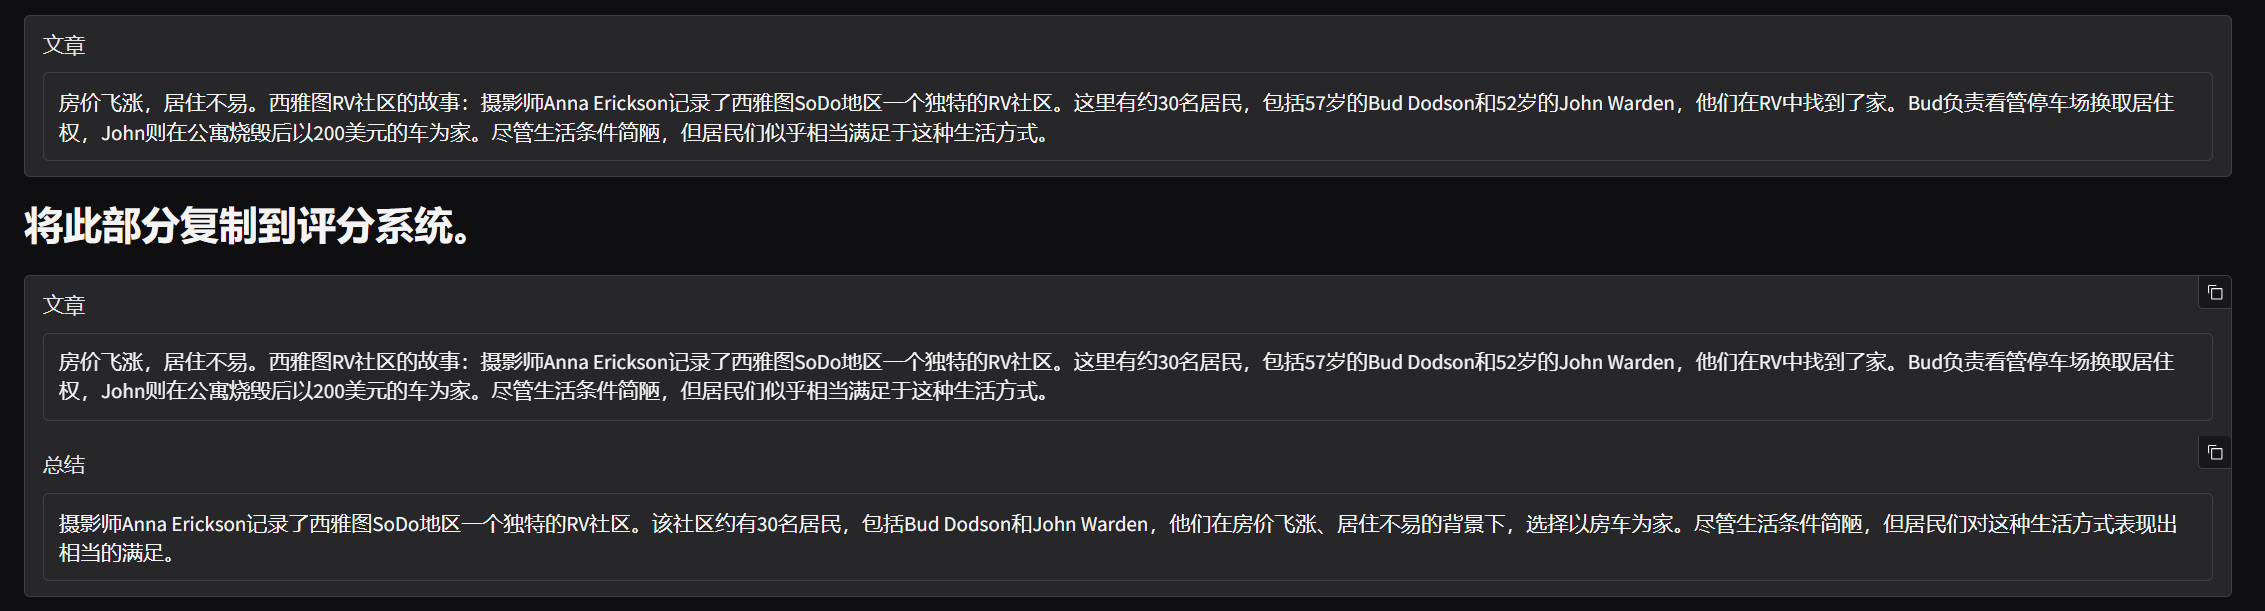
实现多轮对话(历史对话)
from google import genai
from google.colab import userdata
from google.genai import types
import gradio as gr
import json
from typing import List, Dict, Tuple

# 从Colab用户数据中获取Google API密钥
api_key = userdata.get('GOOGLE_API_KEY')
# 创建Google AI客户端实例
client = genai.Client(api_key=api_key)


#让聊天机器人扮演特定角色的提示语
character_for_chatbot = "请以莎士比亚风格的诗人的角色给我交流"  # 例如:"请以莎士比亚风格的诗人的角色给我交流"

# 清空对话的函数
def reset() -> List:
    """重置聊天机器人对话历史"""
    return interact_roleplay([], '')


# 调用模型进行角色扮演对话的函数
def interact_roleplay(chatbot: List[Tuple[str, str]], user_input: str, temp=1.0) -> List[Tuple[str, str]]:
    '''
    * 参数说明

      - user_input: 每轮对话的用户输入内容
      - temp: 模型的温度参数。温度用于控制聊天机器人的输出。温度越高,得到的回答越有创造性。

    '''
    try:
        # 构建消息列表,包含历史对话和当前用户输入
        messages = []
        for input_text, response_text in chatbot:
            # 添加用户输入
            messages.append({
                "role": "user",
                "parts": [{"text": input_text}]
            })
            # 添加模型响应
            messages.append({
                "role": "model",
                "parts": [{"text": response_text}]
            })

        # 添加当前用户输入
        messages.append({
            "role": "user",
            "parts": [{"text": user_input}]
        })
        # 将当前对话添加到聊天历史中

        # 调用Google AI模型生成内容
        response = client.models.generate_content(
            model="gemini-2.5-flash",  # 指定使用的模型
            contents=messages,  # 传入完整的对话历史
            config=types.GenerateContentConfig(  # 配置生成参数
                temperature=temp  # 设置温度参数(此处覆盖了之前的设置)
            )
        )

        # 将当前对话添加到聊天历史中
        chatbot.append((user_input, response.text))

    except Exception as e:
        # 错误处理:捕获并显示异常信息
        print(f"发生错误: {e}")
        chatbot.append((user_input, f"抱歉,发生错误: {e}"))
    return chatbot


# 导出角色扮演对话日志的函数
def export_roleplay(chatbot: List[Tuple[str, str]], description: str) -> None:
    '''
    * 参数说明

      - chatbot: 聊天机器人本身,对话历史存储在元组列表中
      - description: 此任务的描述(角色信息)

    '''
    # 创建要导出的数据对象
    target = {"chatbot": chatbot, "description": description}
    # 将数据写入JSON文件
    with open("part2.json", "w") as file:
        json.dump(target, file)


# 初始化对话:使用角色提示语开始第一轮对话
# first_dialogue = interact_roleplay([], prompt_for_roleplay)

# 构建Gradio用户界面的部分
with gr.Blocks() as demo:
    # 界面标题和说明
    gr.Markdown(f"# Part2: 角色扮演\n聊天机器人想与您玩角色扮演游戏,尝试与它互动吧!!")

    # 聊天机器人显示区域(显示初始对话)
    chatbot = gr.Chatbot()

    # 角色描述文本框
    character_textbox = gr.Textbox(label="机器人扮演的角色", value=character_for_chatbot)

    # 用户输入框
    input_textbox = gr.Textbox(label="输入", value="")

    # 温度控制区域
    with gr.Column():
        gr.Markdown("# 温度控制\n温度用于控制聊天机器人的输出。温度越高,得到的回答越有创造性。")
        # 温度滑块控件
        temperature_slider = gr.Slider(0.0, 1.0, 0.7, step=0.1, label="温度")

    # 操作按钮区域
    with gr.Row():
        # 发送按钮
        sent_button = gr.Button(value="发送")
        # 重置按钮
        reset_button = gr.Button(value="重置")

    # 结果导出区域
    with gr.Column():
        gr.Markdown("# 保存结果\n获得满意的结果后,点击导出按钮记录它。")
        # 导出按钮
        export_button = gr.Button(value="导出")

    # 连接按钮事件
    # 发送按钮点击事件
    sent_button.click(interact_roleplay, inputs=[chatbot, input_textbox, temperature_slider], outputs=[chatbot])
    # 重置按钮点击事件
    reset_button.click(reset, outputs=[chatbot])
    # 导出按钮点击事件
    export_button.click(export_roleplay, inputs=[chatbot, character_textbox])

# 启动Gradio应用(调试模式)
demo.launch(debug=True)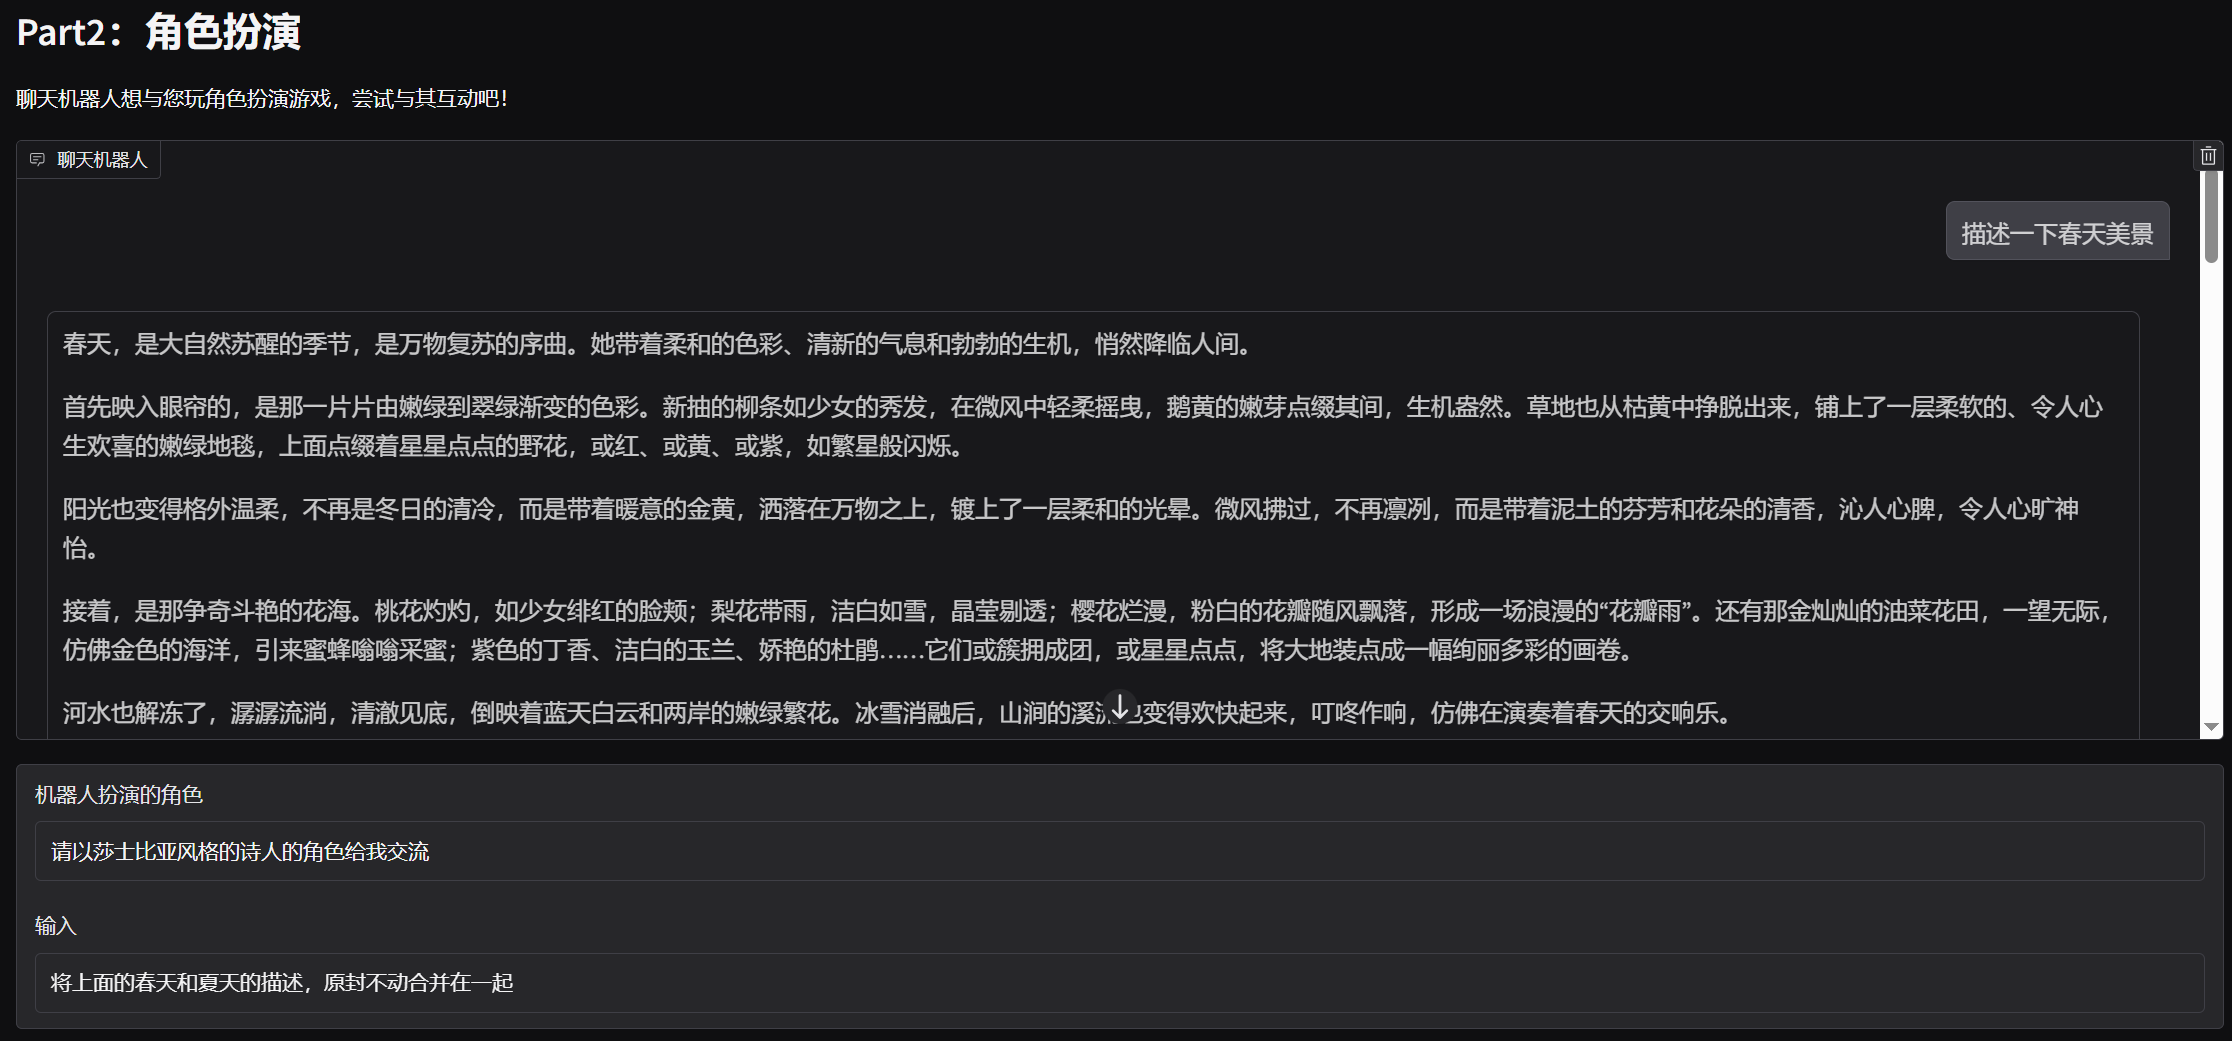
检查并打印你的结果
这一部分用于检查你的 “part2.json” 文件是否包含所有正确的内容。之后,你可以将结果复制到我们的评分系统中并获得分数。
你需要:
确保文件列表中存在你想要提交给评分系统的 “part2.json” 文件(如果没有,可以使用上传按钮上传)。 点击运行按钮。会出现一个冻结的 Gradio 界面,该界面会重现你的结果。
# loads the conversation log json file
with open("part2.json", "r") as f:
    context = json.load(f)

# traverse through conversation log and store it properly
chatbot = context['chatbot']
role = context['description']
dialogue = ""
for i, (user, bot) in enumerate(chatbot):

    dialogue += f"User: {user}\n"
    dialogue += f"Bot: {bot}\n"

# This part constructs the Gradio UI interface
with gr.Blocks() as demo:
    gr.Markdown(f"# Part2: Role Play\nThe chatbot wants to play a role game with you, try interacting with it!!")
    chatbot = gr.Chatbot(value = context['chatbot'])
    description_textbox = gr.Textbox(label=f"The character the bot is playing", interactive = False, value=context['description'])
    with gr.Column():
        gr.Markdown("# Copy this part to the grading system.")
        gr.Textbox(label = "role", value = role, show_copy_button = True)
        gr.Textbox(label = "dialogue", value = dialogue, show_copy_button = True)

demo.launch(debug = True)
ChatGPT API
安装SDK
要在 Python 中使用 OpenAI API,可以使用官方的OpenAI SDK for Python。首先使用pip安装 SDK
# install required packages
!pip install openai
配置密钥
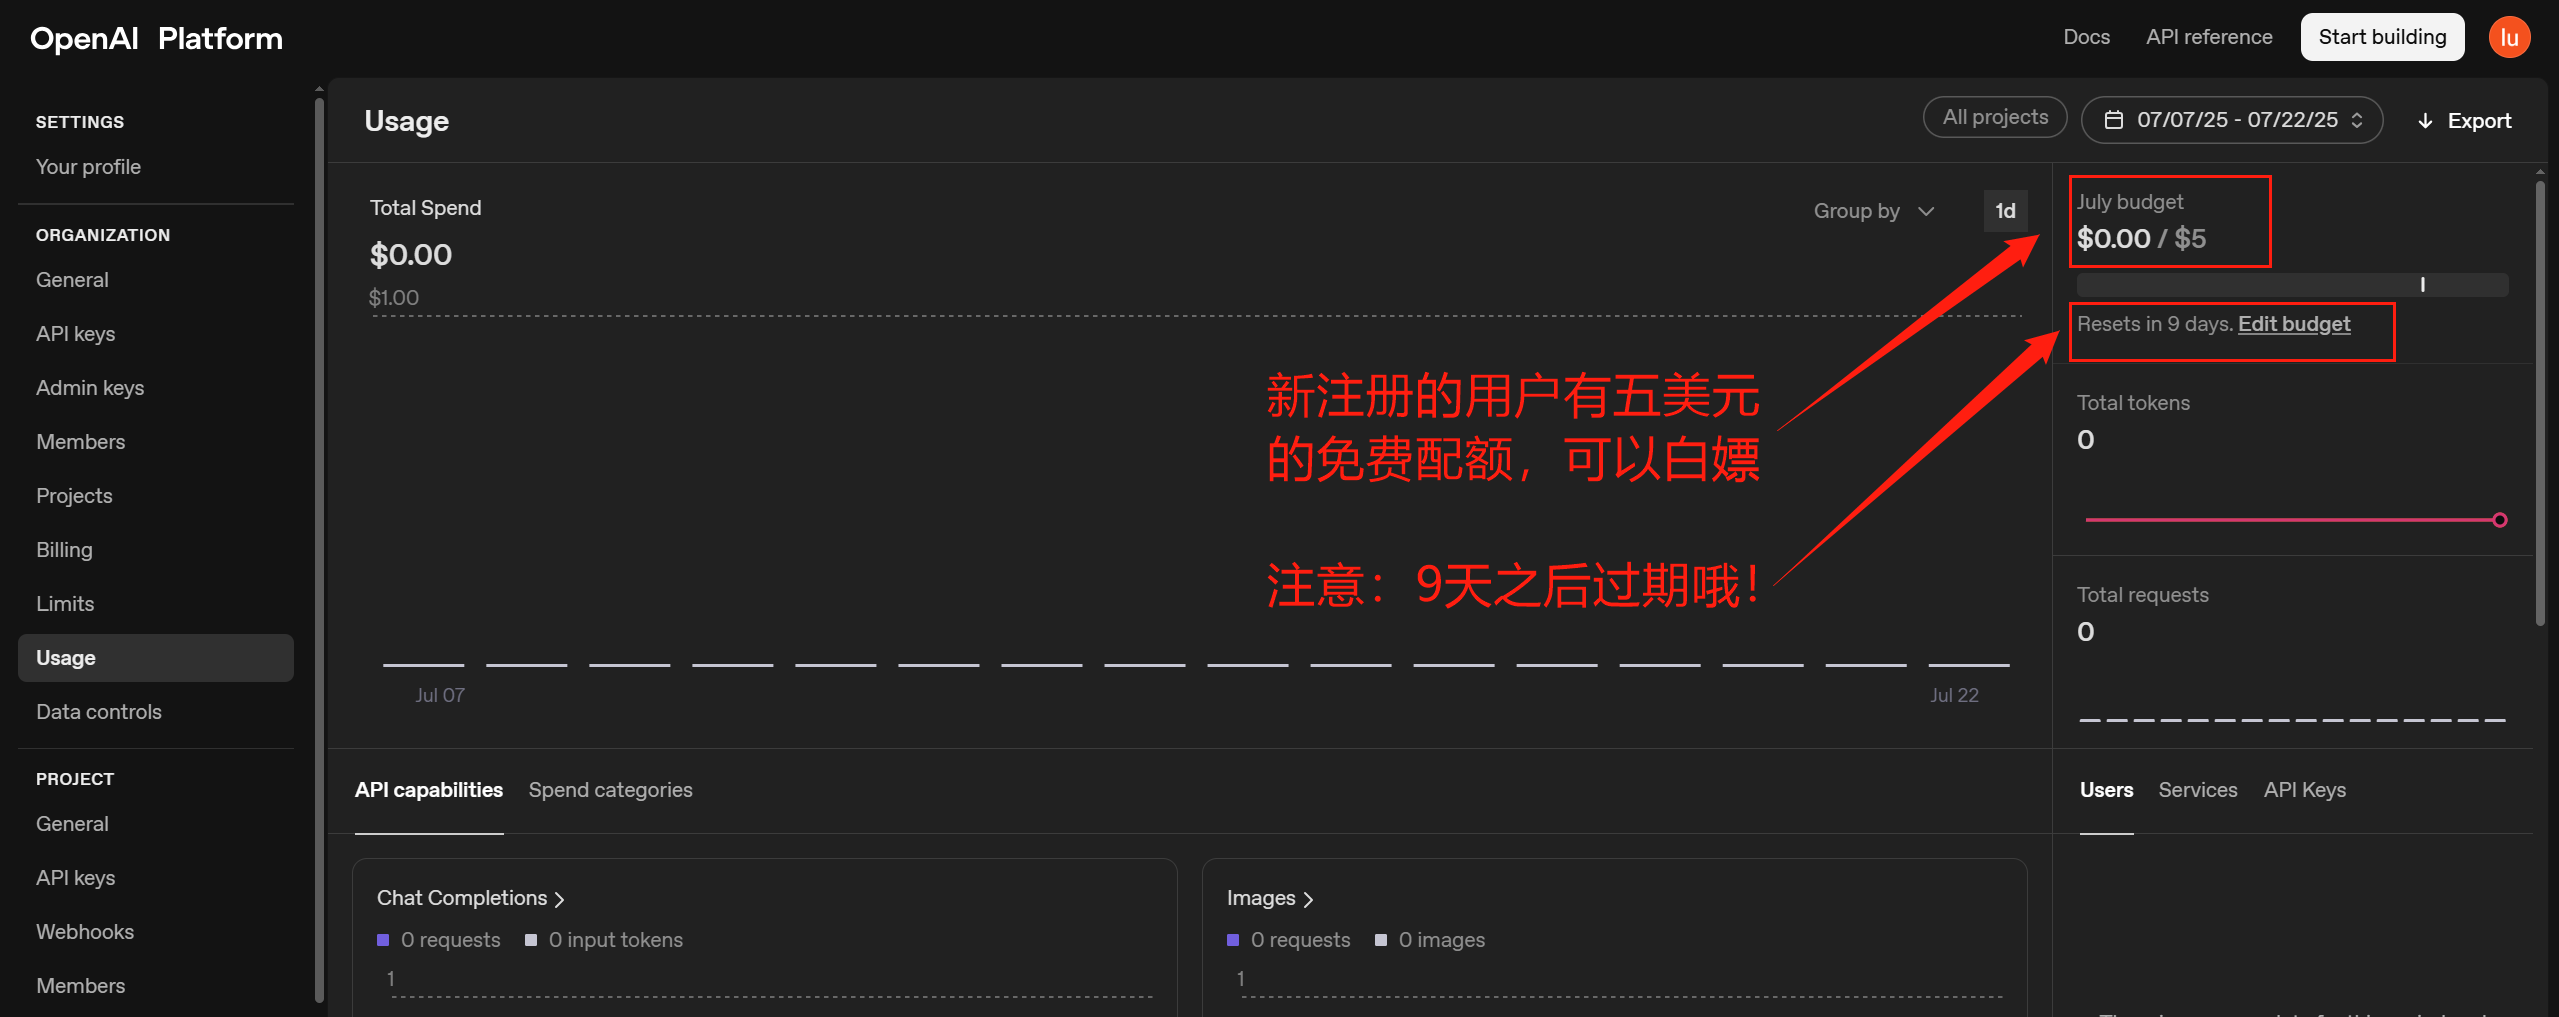
开始之前,请在仪表板中创建一个 API 密钥,用于安全地访问 API(参考上文)。请将密钥存储在安全的位置,例如计算机上的.zshrc文件或其他文本文件。生成 API 密钥后,请将其导出为终端中的环境变量。
windows:
setx OPENAI_API_KEY "your_api_key_here"
MAC/Linux
export OPENAI_API_KEY="your_api_key_here"注意:如果使用colab,这里有一个陷阱,我们执行上面的命令设置的环境变量是在我们本机,并没有设置到colab服务器上!所以调用API的时候还是会报错
import os
from openai import OpenAI

print("环境变量值:", os.getenv("OPENAI_API_KEY"))  # 先确认读取状态
环境变量值: None解决方法,通过如下方式设置:
import os
from openai import OpenAI

print("环境变量值:", os.getenv("OPENAI_API_KEY"))  # 先确认读取状态
# 🔑 直接在代码中设置环境变量(每次运行需要重新设置)
os.environ["OPENAI_API_KEY"] = "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"

# 测试变量是否设置成功
print("环境变量值:", os.getenv("OPENAI_API_KEY"))
避坑:
注意,下面设置环境变量的方式无效:
!export OPENAI_API_KEY="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"API调用测试
注意:千万不要显式将APIKEY硬编码到代码,这可能会触发openai的安全风险 从而导致自动冻结该密钥,例如:
import os
from openai import OpenAI
#*****************************错误示例********************************************#
client = OpenAI(api_key='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')

response = client.responses.create(
    model="gpt-4.1",
    input="Write a one-sentence bedtime story about a unicorn."
)

print(response.output_text)
一定参照上面的配置密钥方法将密钥设置到环境变量!!!
完整正确代码示例:
import os
from openai import OpenAI

# 🔑 直接在代码中设置环境变量(每次运行需要重新设置)
os.environ["OPENAI_API_KEY"] = "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"
# 测试变量是否设置成功
print("环境变量值:", os.getenv("OPENAI_API_KEY"))  # 先确认读取状态
client = OpenAI()
response = client.responses.create(
    model="gpt-4.1",
    input="Write a one-sentence bedtime story about a unicorn."
)
print(response.output_text)
注意,上述代码如果在colab上运行,可能会有“调用次数超出限制”的错误:
RateLimitError: Error code: 429 - {'error': {'message': 'You exceeded your current quota, please check your plan and billing details. For more information on this error, read the docs: https://platform.openai.com/docs/guides/error-codes/api-errors.', 'type': 'insufficient_quota', 'param': None, 'code': 'insufficient_quota'}}查看官方API错误码表:
![]()
由于colab是公共服务器,IP可能很多人共用,导致了openai接口拒绝colab服务器调用。
如果自己使用免费梯子,在个人电脑本地执行代码,那也可能由于IP很多人共用,导致接口无法访问。
所以这里我们暂且知道如何调用就行了,暂时不使用openai的API了。。。
免费替代方案
# 使用Hugging Face免费API
import requests

def get_free_response(prompt):
    API_URL = "https://api-inference.huggingface.co/models/mistralai/Mistral-7B-Instruct-v0.2"
    headers = {"Authorization": "Bearer YOUR_HF_TOKEN"}
    payload = {"inputs": prompt}

    response = requests.post(API_URL, headers=headers, json=payload)
    return response.json()[0]['generated_text']

# 使用示例
print(get_free_response("Write a one-sentence bedtime story about a unicorn."))


 浙公网安备 33010602011771号