案例:人脸识别
预期效果:检测人脸,根据人脸确认目标身份。

需求分析
- 画面从哪里来?
打开摄像头,不停的获取拍摄到的画面
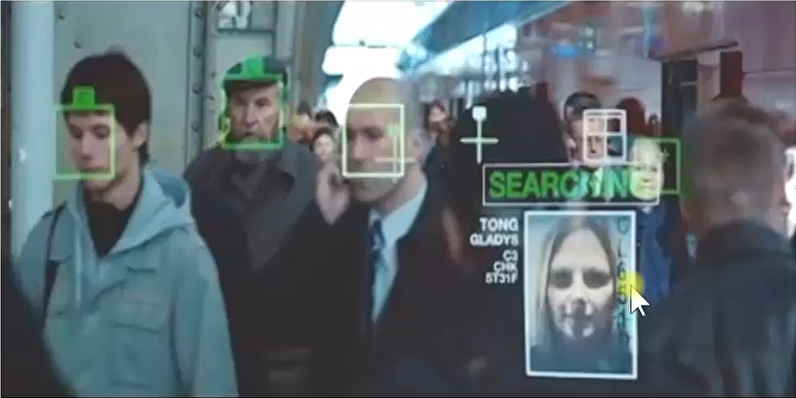
- 图一绿色框框框在什么地方,其中绿色文字是什么,从哪里来?
识别到人脸,用框框框柱人脸,并且在框框旁边打印出人的名字。名字和脸部特征要匹配的存在数据库中。
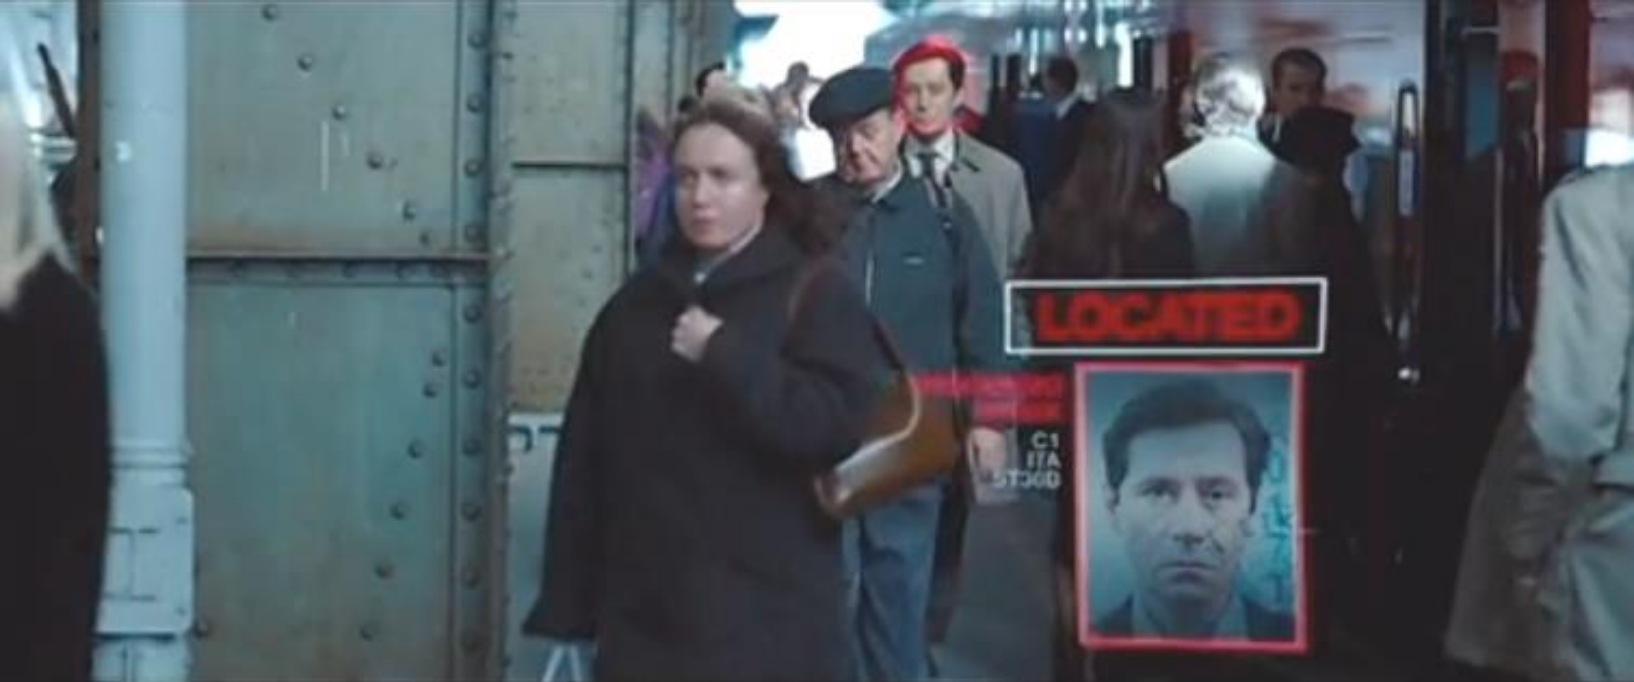
- 当识别到目标人物的时候,发生什么变化?
识别到目标任务的时候,用红色的框框框住人脸,名字也变成红色
准备工作
人脸识别-工具包安装
pip install cmake

pip install scikit-image

pip install dlib

pip install face_recognition
上面的工具包安装要按照顺序来,因为有互相依赖关系
人脸识别-实现
- 打开摄像头,读取摄像头拍摄到的画面,定位到画面中人的脸部,并用绿色的框框把人的脸部框住
- 读取到数据库中的人名和面部特征
- 用拍摄到人的脸部特征和数据库中的面部特征去匹配,并在用户头像的绿框上方用用户的姓名做标识,未知用户统一使用Unkown
- 定位和锁定目标人物,改使用红色的框框把目标人物的脸部框住
步骤1:打开摄像头,读取摄像头拍摄到的画面,定位到画面中人的脸部,并用绿色的框框把人的脸部框住:
import face_recognition
import cv2 as cv

# 打开摄像头,读取摄像头拍摄到的画面,定位到画面中人的脸部,并用绿色的框框把人的脸部框住
# 1.打开摄像头,获取摄像头对象
capture = cv.VideoCapture(0)  # 0代表第一个摄像头(电脑可能有多个摄像头)
# 2.循环不停的获取摄像头拍摄到的画面,并做进一步处理
while True:
    # TODO 还需要做进一步处理
    # 2.1获取摄像头拍摄到的画面
    ret, frame = capture.read()  # ret:有无返回画面, frame:画面本身,ret为False时frame为None
    # 2.2从画面中提取人脸所在区域(可能有多个)
    face_locations = face_recognition.face_locations(frame)
    print(face_locations)  # 重复打印:[(19, 390, 242, 167)],分别代表位置信息:人脸所在矩形区域的左上角和右下角的坐标
    # 2.3在所有人脸区域绘制一个绿框
    for top, right, bottom, left in face_locations:
        # 2.3.1在人脸所在区域绘制矩形
        cv.rectangle(frame, (left, top), (right, bottom), (255, 0, 0), 2)
    # 2.4通过OpenCV展示画面
    cv.imshow('frame', frame)

    # 2.5设定退出循环的条件:这里设置按下按键“q"就退出循环
    if cv.waitKey(1) & 0xFF == ord('q'):  # 单位为毫秒
        break

# 3.退出程序,释放摄像头或其他资源
capture.release()
cv.destroyAllWindows()
步骤2:读取到数据库中的人名和面部特征
# 1.准备工作,定义变量
face_databases_dir='./img'
user_names=[]#存用户名
user_faces_encodings=[]#存面部特征
# 2.正式工作
# 2.1得到face_databases_dir文件夹下面所有文件名
files=os.listdir(face_databases_dir)
print(files)
# 2.2循环读取文件名,进一步处理
for file in files:
    #2.2.1截取文件名,并存入user_names列表
    name,_=os.path.splitext(file)
    user_names.append(name)
    # 2.2.2读取图片文件中的面部特征信息存入user_faces_encodings列表
    img_file_path = os.path.join(face_databases_dir, file)
    image = face_recognition.load_image_file(img_file_path)
    face_encoding = face_recognition.face_encodings(image)[0]
    user_faces_encodings.append(face_encoding)
步骤3:用拍摄到人的脸部特征和数据库中的面部特征去匹配,并在用户头像的绿框上方用用户的姓名做标识,未知用户统一使用Unkown
步骤4:定位和锁定目标人物,改使用红色的框框把目标人物的脸部框住
import os
import face_recognition
import cv2 as cv
import numpy as np
from PIL import Image, ImageDraw, ImageFont

# 读取数据库中的人名和面部特征
face_databases_dir = './img'
user_names = []  # 存用户名
user_faces_encodings = []  # 存面部特征
target_person_names = ["卢战士"]  # 定义目标人物名单
# 获取文件夹中的所有图片文件
files = os.listdir(face_databases_dir)
print("数据库中的文件:", files)

# 处理每个图片文件
for file in files:
    # 提取文件名作为用户名
    name, _ = os.path.splitext(file)
    user_names.append(name)

    # 读取图片并提取面部特征
    img_file_path = os.path.join(face_databases_dir, file)
    image = face_recognition.load_image_file(img_file_path)
    face_encoding = face_recognition.face_encodings(image)[0]
    user_faces_encodings.append(face_encoding)

# 打开摄像头
capture = cv.VideoCapture(0)
#控制读取帧的大小,避免电脑卡顿
capture.set(cv.CAP_PROP_FRAME_WIDTH, 320)
capture.set(cv.CAP_PROP_FRAME_HEIGHT, 240)

while True:
    ret, frame = capture.read()
    if not ret:
        print("无法获取画面")
        break

    # 检测人脸位置和特征
    face_locations = face_recognition.face_locations(frame)
    face_encodings = face_recognition.face_encodings(frame, face_locations)

    # 存储识别出的姓名
    names = []

    # 对每个检测到的人脸进行识别
    for face_encoding in face_encodings:
        matches = face_recognition.compare_faces(user_faces_encodings, face_encoding)
        name = "路人"

        # 查找匹配的人脸
        if True in matches:
            first_match_index = matches.index(True)
            names.append(user_names[first_match_index])
        else:
            # 如果没有匹配,使用"路人X"
            names.append(f"{name}{len(names) + 1}")

    # 在画面上绘制识别结果
    img_to_show = frame.copy()  # 创建副本,避免修改原始帧

    for (top, right, bottom, left), name in zip(face_locations, names):
        color_rgb = (0, 255, 0)  # 默认绘制绿框,绿色字体
        color_bgr = (0, 255, 0)  # 默认绘制绿框,绿色字体
        if name in target_person_names:
            color_rgb = (255, 0, 0)  # 默认绘制红框,红色字体
            color_bgr = (0, 0, 255)  # 默认绘制红框,红色字体
        # 绘制人脸矩形框(绿色)
        cv.rectangle(img_to_show, (left, top), (right, bottom), color_bgr, 2)
        # 确保中文字体可用
        try:
            # 转换为PIL格式以支持中文
            img_rgb = cv.cvtColor(img_to_show, cv.COLOR_BGR2RGB)
            pil_img = Image.fromarray(img_rgb)
            draw = ImageDraw.Draw(pil_img)
            # 设置中文字体
            font_path = r"C:\Users\luzhanshi\AppData\Local\Microsoft\Windows\Fonts\SimHei.ttf"
            font = ImageFont.truetype(font_path, 20)
            # 在人脸框上方绘制文字
            draw.text((left, top - 25), name, font=font, fill=color_rgb)
            # 转回OpenCV格式
            img_to_show = cv.cvtColor(np.array(pil_img), cv.COLOR_RGB2BGR)
        except Exception as e:
            # 如果字体加载失败,使用默认字体(可能无法正确显示中文)
            cv.putText(img_to_show, name, (left, top - 10),
                       cv.FONT_HERSHEY_SIMPLEX, 0.9, color_bgr, 2)
    # 显示处理后的画面
    cv.imshow('人脸识别', img_to_show)

    # 按'q'键退出循环
    if cv.waitKey(1) & 0xFF == ord('q'):
        break

# 释放资源
capture.release()
cv.destroyAllWindows()
补充内容
工具包安装说明
PS:为了加快速度安装时可以选择国内镜像
如: pip install face_recognition -i https://pypi.douban.com/simple
有些包的安装需要时间,不要着急,请耐心等待
1.安装CMake
注意:
dlib是一个 C++ 库,需要 CMake 来编译其 Python 绑定
从CMake 官网下载并安装最新版本(Windows 用户选择.msi安装包)。
![]()
安装时务必勾选 **"Add CMake to the system PATH for all users"**(将 CMake 添加到系统路径):![]()
cmake --version
# 至少需要3.18 如果显示版本号(如cmake version 3.27.0),则安装成功。
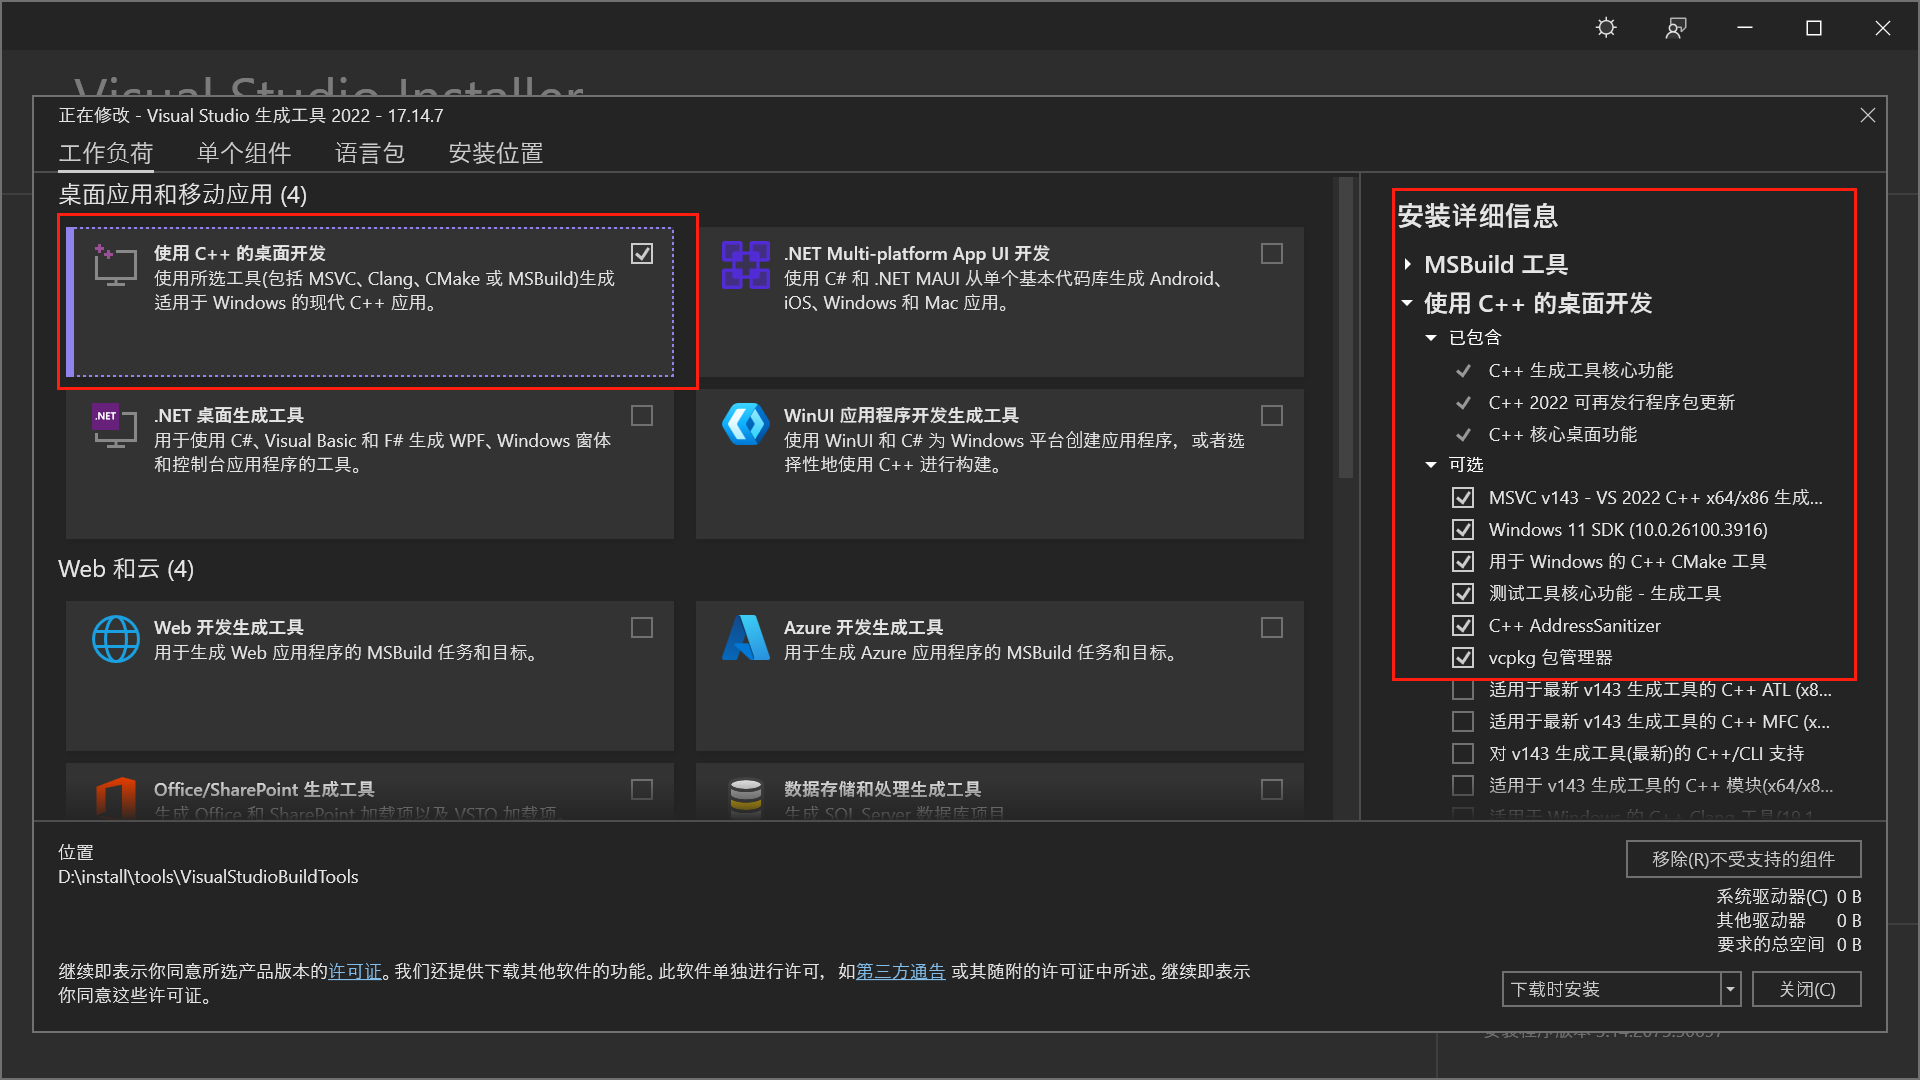
2.安装 Visual Studio 构建工具
dlib是 C++ 库,在 Windows 上编译 Python 绑定时必须使用Visual Studio 的 C++ 编译器工具链。
-
dlib 是 C++ 库:
- 包含大量 C++11 代码(面部识别算法)
- 需在安装时编译本地二进制扩展
-
Windows 平台特殊性:
- 必须使用 Microsoft Visual C++ (MSVC) 编译器
- Python 3.13 需要 VS2022 17.6+ 版本
-
您的环境缺失:
- Visual Studio 2022 未安装 C++ 桌面开发组件
- CMake 找不到编译器可执行文件(cl.exe)
方案1:安装 Visual Studio 构建工具(首选)
具体步骤:
- 下载安装器:VS2022 Community:

- 工作负载勾选:使用C++的桌面开发
- 单个组件务必选中:
- MSVC v143 - VS2022 C++ x64/x86 生成工具
- Windows 11 SDK (10.0.22621.0)
- C++ CMake 工具
where cl # 应输出类似: C:\Program Files\Microsoft Visual Studio\2022\Community\VC\Tools\MSVC\14.38.33130\bin\Hostx64\x64\cl.exe
5.安装后重启电脑
确保 CMake 和 Visual Studio Build Tools可用后,再尝试安装dlib
pip install dlib(base) C:\WINDOWS\system32>pip install dlib
Looking in indexes: https://pypi.tuna.tsinghua.edu.cn/simple
Collecting dlib
Using cached https://pypi.tuna.tsinghua.edu.cn/packages/28/f4/f8949b18ec1df2ef05fc2ea1d1dd82ff2d050b8704b7d0d088017315c221/dlib-20.0.0.tar.gz (3.3 MB)
Installing build dependencies ... done
Getting requirements to build wheel ... done
Preparing metadata (pyproject.toml) ... done
Building wheels for collected packages: dlib
Building wheel for dlib (pyproject.toml) ... done
Created wheel for dlib: filename=dlib-20.0.0-cp312-cp312-win_amd64.whl size=2963306 sha256=7cd381dd7b4b946751c846cb3c34748565b056df16a96d5b0813477e3d9e7528
Stored in directory: c:\users\luzhanshi\appdata\local\pip\cache\wheels\07\e2\51\82fae57e9392225a1bf01054873dbd84600b142f3c7862c855
Successfully built dlib
Installing collected packages: dlib
Successfully installed dlib-20.0.0最后安装face_recognition:
pip install face_recognition(base) C:\WINDOWS\system32>pip install face_recognition
Looking in indexes: https://pypi.tuna.tsinghua.edu.cn/simple
Collecting face_recognition
Using cached https://pypi.tuna.tsinghua.edu.cn/packages/1e/95/f6c9330f54ab07bfa032bf3715c12455a381083125d8880c43cbe76bb3d0/face_recognition-1.3.0-py2.py3-none-any.whl (15 kB)
Collecting face-recognition-models>=0.3.0 (from face_recognition)
Using cached face_recognition_models-0.3.0-py2.py3-none-any.whl
Requirement already satisfied: Click>=6.0 in d:\install\tools\anaconda312\lib\site-packages (from face_recognition) (8.1.7)
Requirement already satisfied: dlib>=19.7 in d:\install\tools\anaconda312\lib\site-packages (from face_recognition) (20.0.0)
Requirement already satisfied: numpy in d:\install\tools\anaconda312\lib\site-packages (from face_recognition) (1.26.4)
Requirement already satisfied: Pillow in d:\install\tools\anaconda312\lib\site-packages (from face_recognition) (10.4.0)
Requirement already satisfied: colorama in d:\install\tools\anaconda312\lib\site-packages (from Click>=6.0->face_recognition) (0.4.6)
Installing collected packages: face-recognition-models, face_recognition
Successfully installed face-recognition-models-0.3.0 face_recognition-1.3.0人脸识别工具对比
| 工具包 | PyPI月下载量 | GitHub星数 | 核心功能 | 技术定位 | 替代品(及适用场景) |
|---|---|---|---|---|---|
| cmake | 5400万 | - |
跨平台构建系统 -生成跨平台 Makefile/Ninja 文件 |
C/C++项目构建工具 - 跨平台项目构建领域主流工具 |
- Meson:语法更简洁,构建速度快(更现代,适合新兴项目) -Bazel:Google生态大型项目管理 |
| scikit-image | 260万 | 5.6k |
图像处理算法库 - 图像滤波、边缘检测、分割等传统算法 |
科研级图像处理 - 学术研究和轻量级图像处理中广泛使用 |
- OpenCV:功能更全面,支持视频处理和深度学习(工业级性能,适合工业级应用) -SimpleITK:医疗影像专用 |
| dlib | 580万 | 12k |
机器学习工具包(特别擅长人脸) - 高精度人脸检测与关键点定位(68 点模型) |
传统CV/ML基础库 - 人脸检测 / 关键点领域经典工具 |
-MediaPipe:谷歌跨平台方案 - MTCNN:专为人脸优化,速度更快(适合移动端) |
| face_recognition | 37万 | 52k |
人脸识别简易封装 - 一行代码实现人脸检测 / 识别 |
dlib的易用前端 - 人脸识别快速开发首选 |
- DeepFace:深度学习驱动,精度更高(学术精准方案,适合金融验证) -FaceX:工业级SDK |
深度功能解析与替代方案比较
1. CMake (pip install cmake)
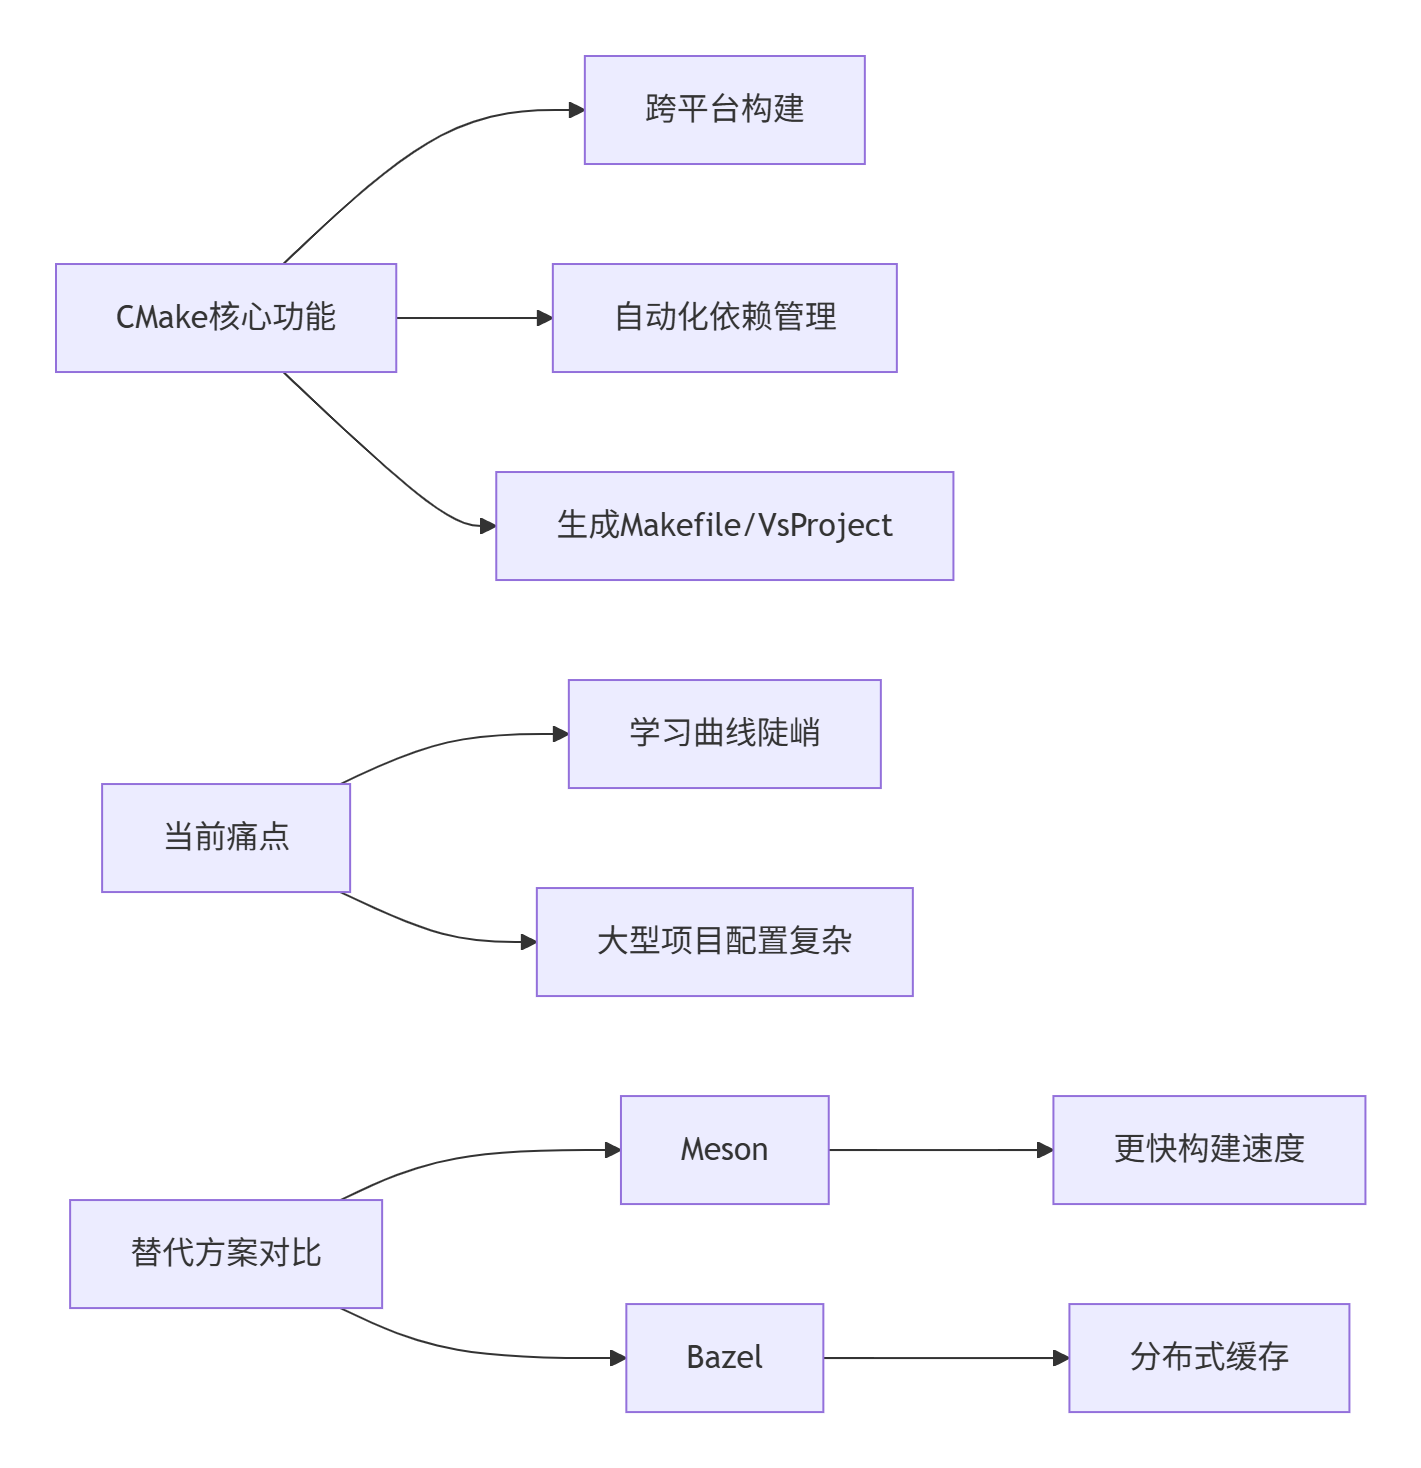
2024新选择:
- 小型项目:Pybind11(Python绑定首选)
- C++/Python混合:scikit-build(CMake简化版)
- 跨平台桌面应用:Tauri(取代Electron)
2. scikit-image (pip install scikit-image)
技术矩阵:
| 功能模块 | 核心算法 | 性能瓶颈 | OpenCV对比 |
|---|---|---|---|
| 图像分割 | SLIC超像素 | 全Python实现 | OpenCV快8-12倍 |
| 形态学操作 | 腐蚀/膨胀 | 大数据集慢 | OpenCV GPU加速 |
| 特征提取 | ORB/SIFT | 无并行计算 | OpenCV IPP优化 |
| 3D处理 | 体素分析 | 内存效率低 | SimpleITK更专业 |
最佳应用场景:
- 教学演示(Jupyter可视化)
- 算法原型验证
- 小型科研数据处理
替代方案组合:
# 现代图像处理栈
import cv2 as cv              # 基础操作
import torchvision.transforms # AI预处理
import napari                 # 3D可视化
3. dlib (pip install dlib)
能力边界与发展趋势: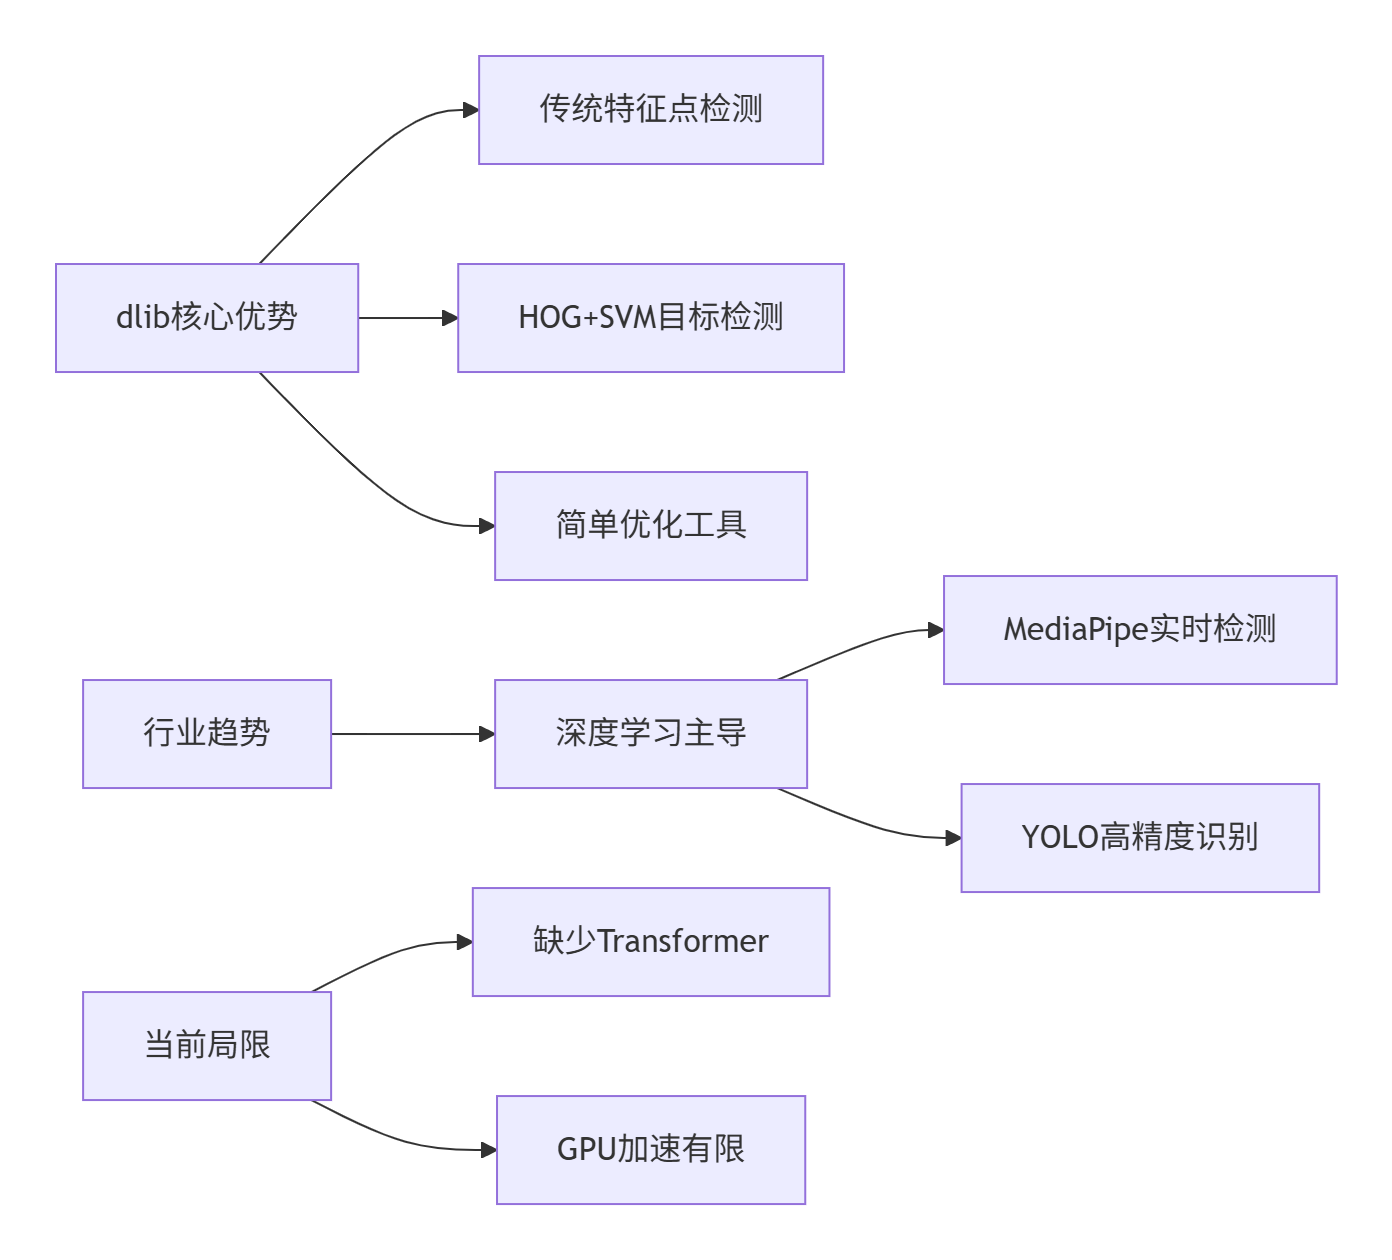
现代替代方案:
- 人脸检测:UltraFace(0.5MB轻量模型)
- 特征点:MediaPipe Face Mesh(468点实时)
- 表情识别:DeepFace
- 完整方案:insightface(SOTA人脸识别)
4. face_recognition (pip install face_recognition)
技术本质分析:
# 实际是对dlib的封装
from face_recognition.api import (
    face_locations,    # 调用dlib的CNN检测器
    face_encodings,    # 使用ResNet-34提取特征
    compare_faces      # 简单欧氏距离计算
)致命缺陷:
- 模型老旧(基于2017年dlib模型)
- 无活体检测
- 光照适应性差
- 亚洲人脸精度不足
工业级替代方案:
| 功能 | 最佳替代 | 性能提升 |
|---|---|---|
| 人脸检测 | RetinaFace | 精度↑32% |
| 特征提取 | ArcFace | 误识率↓10倍 |
| 活体检测 | FAS-TD | 攻击通过率<0.1% |
| 完整SDK | FaceX | 支持1000万人脸库 |
2024推荐技术栈组合
人脸识别全流程方案
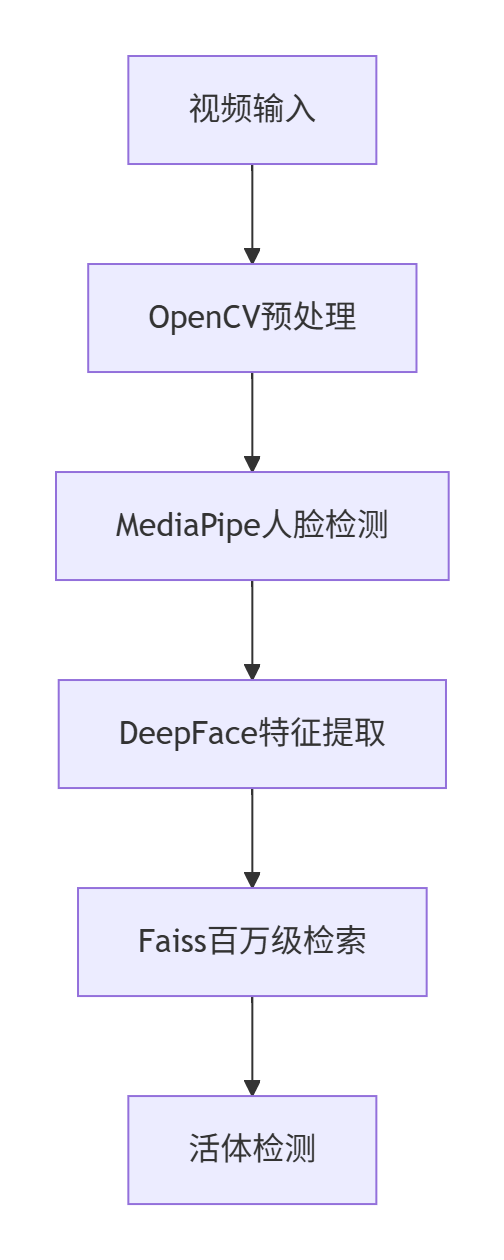
Python实现示例
# 现代人脸识别示例
import mediapipe as mp
from deepface import DeepFace
import cv2

mp_face = mp.solutions.face_detection
detector = mp_face.FaceDetection(min_detection_confidence=0.7)

frame = cv2.imread('face.jpg')
results = detector.process(cv2.cvtColor(frame, cv2.COLOR_BGR2RGB))

if results.detections:
    for detection in results.detections:
        # 获取人脸区域
        bbox = detection.location_data.relative_bounding_box
        face_img = frame[int(bbox.ymin*h):int((bbox.ymin+bbox.height)*h),
                         int(bbox.xmin*w):int((bbox.xmin+bbox.width)*w)]

        # 特征提取
        embedding = DeepFace.represent(face_img, model_name='ArcFace', enforce_detection=False)

        # 数据库比对(示例)
        if compare_with_db(embedding):
            print("身份验证通过!")
性能基准测试(2080Ti)
| 步骤 | dlib方案 | 新方案 | 加速比 |
|---|---|---|---|
| 人脸检测 | 45ms | 8ms | 5.6x |
| 特征提取 | 120ms | 25ms | 4.8x |
| 活体检测 | 不支持 | 15ms | N/A |
| 总延迟 | 165ms | 48ms | 3.4x |
结论:技术演进趋势
- cmake → 被 Cargo/Meson 逐步取代(Rust生态崛起)
- scikit-image → PyTorch Lightning+OpenCV 成为研究新标准
- dlib → 被 ONNX Runtime+轻量化模型 替代
- face_recognition → 全面转向 SOTA深度学习框架
当前项目推荐:直接使用 insightface+MediaPipe+OpenCV 组合,兼顾性能与精度


 浙公网安备 33010602011771号