css定位
css定位 position
 可以实现图片和元素重叠,浮动解决不了的事情
 例如图片的切换
-
绝对定位(脱离文档流 相对浏览器左上角)
-
相对定位(不脱离文档流 相对自身原始位置)
-
固定定位(脱离文档流 相对浏览器视窗,滚动也不改变)
-
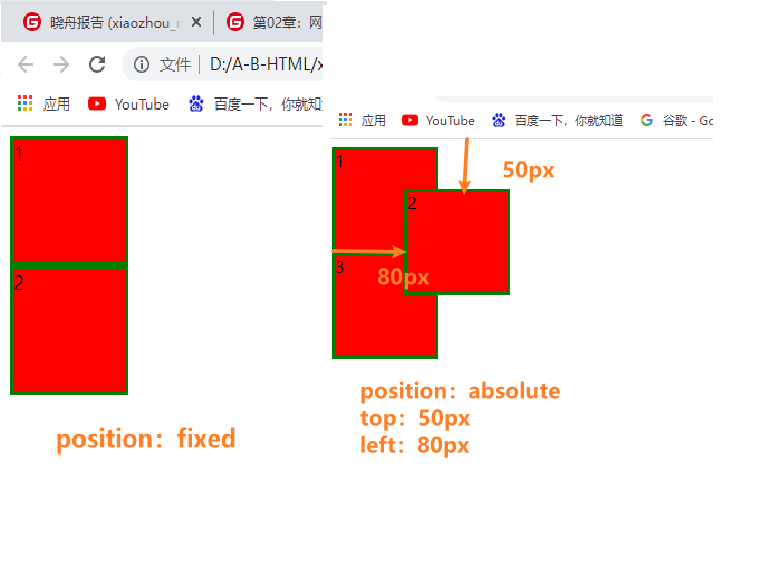
设置z轴()
绝对定位 absolute
脱离文档流
参照物默认的位置是浏览器的左上方或者父级元素是相对定位或者绝对定位的元素
<body>
<div class="box">1</div>
<div class="box pos">2</div>
<div class="box">3</div>
</body>
.box{
width:100px;
height:100px;
background-color: red;
border:3px solid green;
}
.pos{
/* 绝对定位 */
position:absolute;
top:50px;
left:50px;
}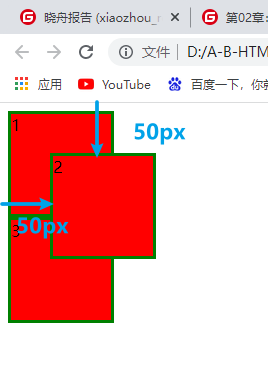
相对定位 relative
不脱离文档流
参照为是原始自己的位置
    .pos{

             /*相对定位*/
             position:relative;
             top:50px;
             left:80px;
         }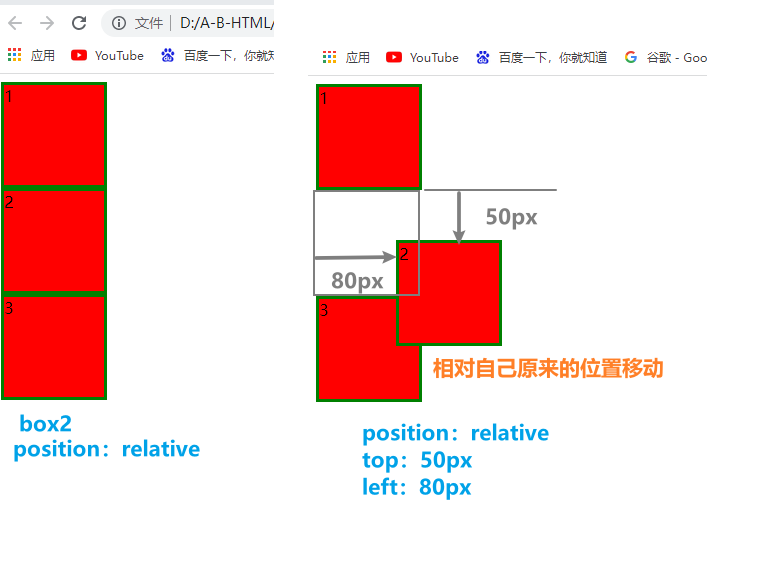
固定定位 fixed
脱离文档流
参照物默认的位置是浏览器的视窗
.pos{
/* 固定定位 */
position:fixed;
top:50px;
left:80px;
}
fixed和absolute的区别是,
当浏览器的屏幕滚动时候,元素还是不变。类似返回顶部使用fixed body{
height:2000 px;
}
设置z轴 z-index
值是整数
当值为正整数的时候,越大越靠近用户 z-index:9
默认的元素,不设置z-index ,默认为z-index:0
当值为负数是,-1,比默认的元素还后一层 z-index:-1
一般使用绝对定位的时候,父元素为相对定位,这样可以相对父元素来定位
 //默认
 .pos{
             /* 固定定位 */
             position:fixed;
             top:50px;
             left:80px;
         }

         .pos3{
             position:absolute;
             top:50px;
             left:100px;

             }
 /* 想让2在3上方 */
 z-index: 9;
 background-color: yellow;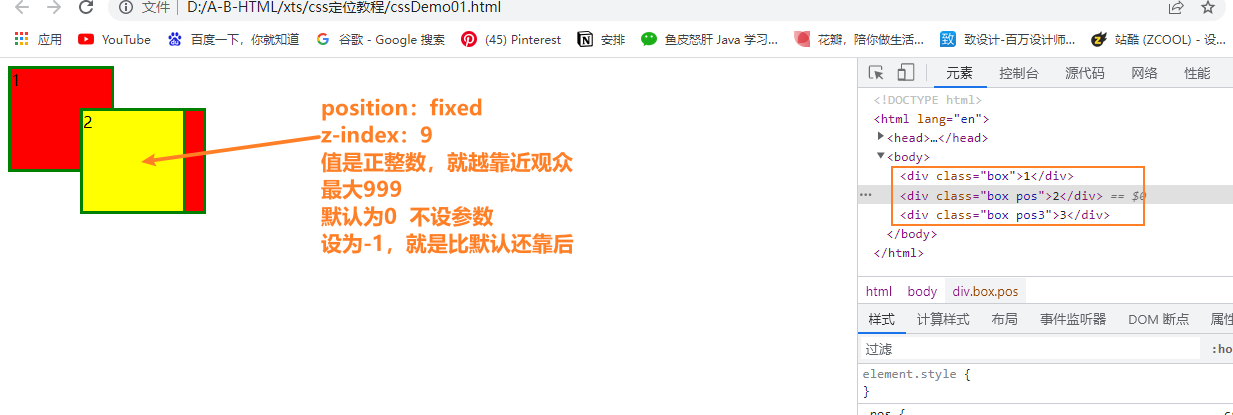
  /*3为-1的时候*/
 z-index: -1;
 background-color: blue;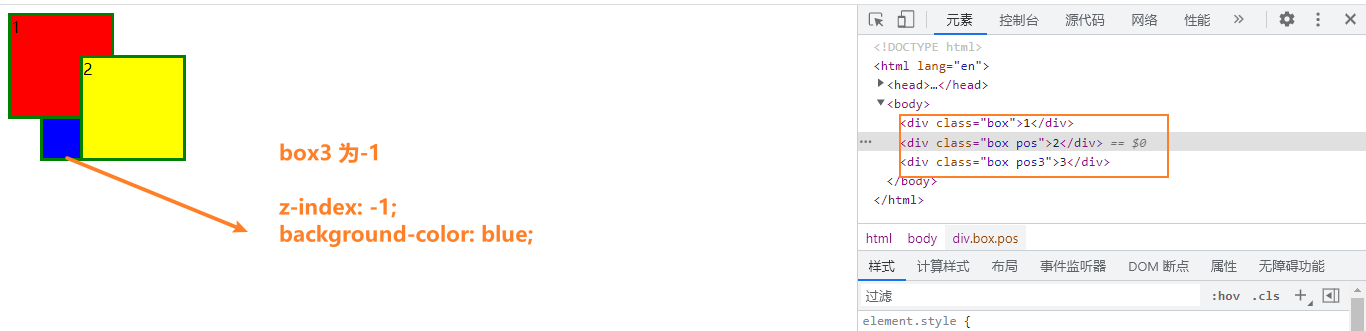
案例
实现返回顶部的按钮
//实现返回顶部的按钮
<style>
/* 固定定位 */
.btn{
bottom:60px;
right:60px;
}
.help button{
position: fixed;
width: 48px;
height: 48px;
border-radius: 24px;
margin-top: 6px;
background-color: rgb(54, 180, 45);
border: 0px;
font-size: 12px;
color: aliceblue;
text-align: center;
}
.help .btn1{
bottom:200px;
right:60px;
}
.help .btn2{
bottom:256px;
right:60px;
}
.help .btn3{
bottom:312px;
right:60px;
}
</style>
</head>
<body>
<h1>hello word!</h1>
<h1>hello word!</h1>
<h1>hello word!</h1>
<h1>hello word!</h1>
<h1>hello word!</h1>
<h1>hello word!</h1>
<h1>hello word!</h1>
<h1>hello word!</h1>
<h1>hello word!</h1>
<h1>hello word!</h1>
<img src="../images/bannerroll (1).jpg" alt="">
<div class="help">
<button class="btn1">帮助</button>
<button class="btn2">评论</button>
<button class="btn3">举报</button>
<button class="btn"><a href="#">返回顶部</a></button>
</div>
<!-- <a href="#">才是可以让文档回到顶部-->
</body>
</html>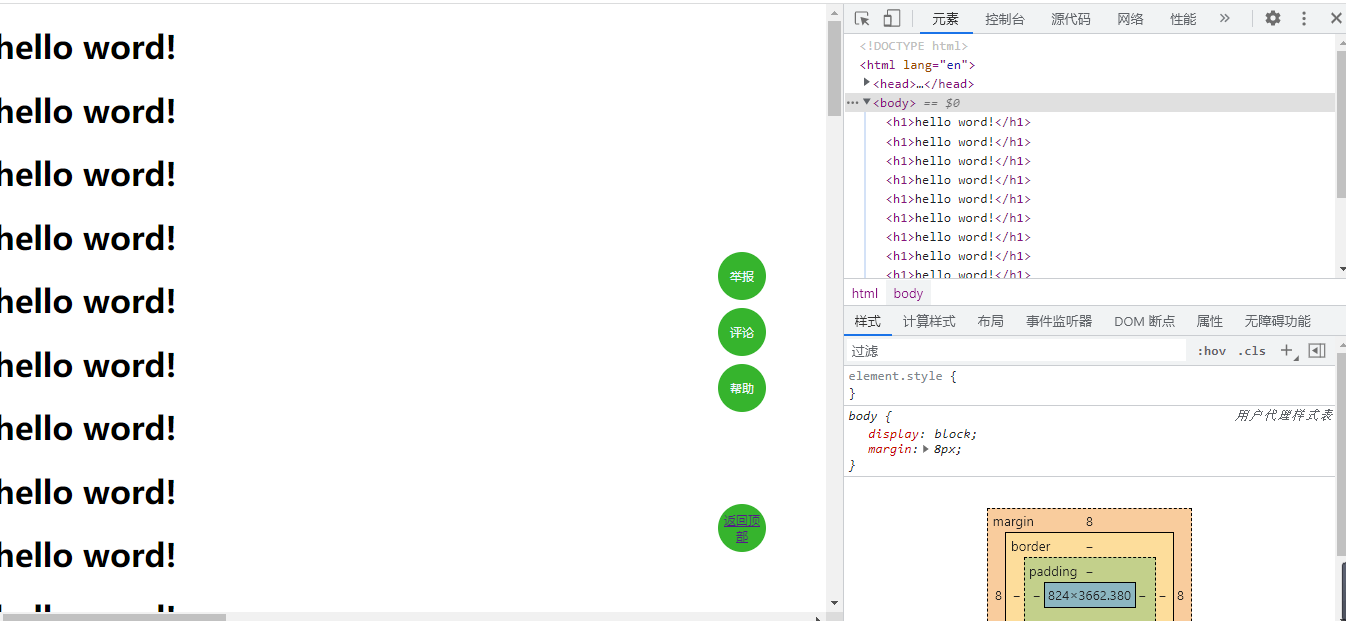
实现图片上显示数字列表的功能(还可以切换图片的功能)
<!DOCTYPE html>
<html lang="en">
<head>
<meta charset="UTF-8" />
<meta http-equiv="X-UA-Compatible" content="IE=edge" />
<meta name="viewport" content="width=device-width, initial-scale=1.0" />
<title>实现图片上显示数字列表的功能</title>
<style>
body,
ul,
li {
margin: 0;
padding: 0;
}
.pic-container {
width: 300px;
margin: 50px auto;
border: 24px solid wheat;
border-radius: 16px;
position: relative;
overflow: hidden;
}
.pic {
width: 1500px;
display: flex;
transition: 0.4s;
}
img {
width: 300px;
}
ul {
list-style-type: none;
position: absolute;
bottom: 12px;
float: right;
right: 8px;
}
li {
font-size: 12px;
text-decoration: none;
width: 16px;
height: 16px;
background-color: #fff;
margin-left: 4px;
float: left;
text-align: center;
}
</style>
</head>
<body>
<div class="pic-container">
<div class="pic">
<img src="../images/bannerroll (5).jpg" alt="" />
<img src="../images/bannerroll (2).jpg" alt="" />
<img src="../images/bannerroll (4).jpg" alt="" />
<img src="../images/bannerroll (3).jpg" alt="" />
<img src="../images/bannerroll (1).jpg" alt="" />
</div>
<ul class="list">
<li>1</li>
<li>2</li>
<li>3</li>
<li>4</li>
<li>5</li>
</ul>
</div>
<script>
//绑定事件
// 让点击就可以切换图片
let imgList = [
"../images/bannerroll (5).jpg",
"../images/bannerroll (2).jpg",
"../images/bannerroll (4).jpg",
"../images/bannerroll (3).jpg",
"../images/bannerroll (1).jpg",
];
let pic = document.querySelector(".pic");
let btn = document.querySelectorAll("li");
let imgs = document.querySelectorAll("img");
for (let i in btn) {
btn[i].onclick = function () {
//让图片的横向移动300px*第i张,
//加入translation:0.4s 有缓慢动的感觉
pic.style.transform = `translate(${i * -300}px)`;
};
}
</script>
</body>
</html>


 浙公网安备 33010602011771号