FastDFS安装配置
安装libfastcommon依赖环境
官网下载,或者链接:https://pan.baidu.com/s/1jIVjy0Q 密码:jxkj(其他人的网盘)
tar -zxvf libfastcommon.tar.gz
cd libfastcommon-1.0.7/
./make.sh
./make.sh install
cp /usr/lib64/libfastcommon.so /usr/lib
安装FastDFS
官网下载,或者链接:https://pan.baidu.com/s/1c2SDMjI 密码:8ujt(其他人的网盘)
tar -zxvf FastDFS_v5.05.tar.gz
cd FastDFS/
./make.sh
./make.sh install

启动tracker
安装tracker,由于tracker运行程序就是fasfdfs,直接用配置文件运行即可
cd /etc/fdfs
cp tracker.conf.sample tracker.conf
cp storage.conf.sample storage.conf
vi tracker.conf

修改如下数据
# Tracker 数据和日志目录地址(此目录必须存在,子目录会自动创建)
base_path=/opt/fastdfs/tracker
# HTTP 服务端口
http.server_port=80
创建上面目录
mkdir /opt/fastdfs/tracker
启动
systemctl start fdfs_trackerd
设置开机启动
chkconfig fdfs_trackerd on
启动错误记录:


[root@VM_176_134_centos fdfs]# systemctl start fdfs_trackerd
Job for fdfs_trackerd.service failed because the control process exited with error code. See "systemctl status fdfs_trackerd.service" and "journalctl -xe" for details.
[root@VM_176_134_centos fdfs]# journalctl -xe
Dec 28 12:02:22 VM_176_134_centos systemd[1]: fdfs_trackerd.service: control process exited, code=exited status=2
Dec 28 12:02:22 VM_176_134_centos systemd[1]: Failed to start LSB: FastDFS tracker server.
-- Subject: Unit fdfs_trackerd.service has failed
-- Defined-By: systemd
-- Support: http://lists.freedesktop.org/mailman/listinfo/systemd-devel
--
-- Unit fdfs_trackerd.service has failed.
--
-- The result is failed.
Dec 28 12:02:22 VM_176_134_centos systemd[1]: Unit fdfs_trackerd.service entered failed state.
Dec 28 12:02:22 VM_176_134_centos systemd[1]: fdfs_trackerd.service failed.
Dec 28 12:02:22 VM_176_134_centos polkitd[1584]: Unregistered Authentication Agent for unix-process:3685:66989990 (system bus name :1.25092, object path /org/freedesktop/PolicyKit1/AuthenticationA
Dec 28 12:02:40 VM_176_134_centos sshd[3703]: Invalid user ubnt from 206.189.225.113
Dec 28 12:02:40 VM_176_134_centos sshd[3703]: input_userauth_request: invalid user ubnt [preauth]
Dec 28 12:02:40 VM_176_134_centos sshd[3703]: pam_unix(sshd:auth): check pass; user unknown
Dec 28 12:02:40 VM_176_134_centos sshd[3703]: pam_unix(sshd:auth): authentication failure; logname= uid=0 euid=0 tty=ssh ruser= rhost=206.189.225.113
Dec 28 12:02:42 VM_176_134_centos sshd[3703]: Failed password for invalid user ubnt from 206.189.225.113 port 36530 ssh2
Dec 28 12:02:42 VM_176_134_centos sshd[3703]: Received disconnect from 206.189.225.113: 11: Bye Bye [preauth]
Dec 28 12:02:51 VM_176_134_centos sshd[3712]: Invalid user admin from 206.189.225.113
Dec 28 12:02:51 VM_176_134_centos sshd[3712]: input_userauth_request: invalid user admin [preauth]
Dec 28 12:02:51 VM_176_134_centos sshd[3712]: pam_unix(sshd:auth): check pass; user unknown
Dec 28 12:02:51 VM_176_134_centos sshd[3712]: pam_unix(sshd:auth): authentication failure; logname= uid=0 euid=0 tty=ssh ruser= rhost=206.189.225.113
Dec 28 12:02:52 VM_176_134_centos sshd[3712]: Failed password for invalid user admin from 206.189.225.113 port 43716 ssh2
Dec 28 12:02:52 VM_176_134_centos sshd[3712]: Connection closed by 206.189.225.113 [preauth]
Dec 28 12:03:01 VM_176_134_centos systemd[1]: Started Session 12492 of user root.
-- Subject: Unit session-12492.scope has finished start-up
-- Defined-By: systemd
-- Support: http://lists.freedesktop.org/mailman/listinfo/systemd-devel
--
-- Unit session-12492.scope has finished starting up.
--
-- The start-up result is done.
Dec 28 12:03:01 VM_176_134_centos CROND[3730]: (root) CMD (/usr/local/qcloud/stargate/admin/start.sh > /dev/null 2>&1 &)
Dec 28 12:03:10 VM_176_134_centos sshd[3750]: Invalid user eo from 106.37.75.74
Dec 28 12:03:10 VM_176_134_centos sshd[3750]: input_userauth_request: invalid user eo [preauth]
Dec 28 12:03:10 VM_176_134_centos sshd[3750]: pam_unix(sshd:auth): check pass; user unknown
Dec 28 12:03:10 VM_176_134_centos sshd[3750]: pam_unix(sshd:auth): authentication failure; logname= uid=0 euid=0 tty=ssh ruser= rhost=106.37.75.74
Dec 28 12:03:12 VM_176_134_centos sshd[3750]: Failed password for invalid user eo from 106.37.75.74 port 56156 ssh2
Dec 28 12:03:12 VM_176_134_centos sshd[3750]: Received disconnect from 106.37.75.74: 11: Bye Bye [preauth]
解决记录:
上面错误日志可发现file /usr/local/bin/fdfs_trackerd does not exist!

查找:find / -name fdfs_trackerd
得到结果:
/etc/rc.d/init.d/fdfs_trackerd
/usr/bin/fdfs_trackerd
/root/FastDFS/init.d/fdfs_trackerd
/root/FastDFS/tracker/fdfs_trackerd
检查trackerd.conf,并没指定此路径,难道在环境变量?不去折腾,直接复制,其它找不到的文件做同样处理

cp /usr/bin/fdfs_trackerd /usr/local/bin/fdfs_trackerd
cp /usr/bin/stop.sh /usr/local/bin/stop.sh
cp /usr/bin/restart.sh /usr/local/bin/restart.sh
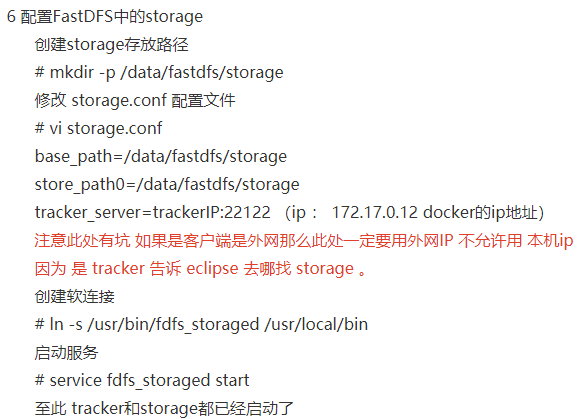
启动storage
由于storage和tracker运行的都是fastDFS程序,每一台服务器都部署一台fasfDFS,一台服务器是tracker,一台是storage。
cd /etc/fdfs
cp storage.conf.sample storage.conf
vi storage.conf
修改如下
base_path=/opt/fastdfs/storage
store_path0=/opt/fastdfs/file
tracker_server=10.0.0.111:22122
创建上面文件夹
mkdir /opt/fastdfs/storage
mkdir /opt/fastdfs/file
启动systemctl start fdfs_storaged
设置开机启动
chkconfig fdfs_storaged on
启动问题记录:启不起来storage
解决方法: tracker_server=10.0.0.111:22122,不能写成127.0.0.1,必须写外网访问到的?
参考如下:
内部上传文件测试
切换目录:cd /etc/fdfs/
拷贝配置:cp client.conf.sample client.conf
修改配置:vi client.conf
base_path=/opt/fastdfs/client
tracker_server=10.200.67.5:22122
生成文件夹:mkdir /opt/fastdfs/client
生成测试文件:echo hello>>test.txt
上传文件:/usr/bin/fdfs_upload_file /etc/fdfs/client.conf test.txt
上传结果:group1/M00/00/00/CshDBVwvEheAMjRsAAAABncc3SA527.txt
[root@localhost fdfs]# ls
anti-steal.jpg  client.conf.sample  http.conf  mime.types  mod_fastdfs.conf  storage.conf  storage.conf.sample  tracker.conf  tracker.conf.sample
[root@localhost fdfs]# cp client.conf.sample client.conf
[root@localhost fdfs]# vi client.conf
[root@localhost fdfs]# hello >>test.txt
-bash: hello: command not found
[root@localhost fdfs]# echo hello>>test.txt
[root@localhost fdfs]# /usr/bin/fdfs_upload_file /etc/fdfs/client.conf test.txt
[2019-01-04 15:57:20] ERROR - file: ../client/client_func.c, line: 257, "/opt/fastdfs/client" can't be accessed, error info: No such file or directory
[root@localhost fdfs]# mkdir /opt/fastdfs/client
[root@localhost fdfs]# /usr/bin/fdfs_upload_file /etc/fdfs/client.conf test.txt
group1/M00/00/00/CshDBVwvEheAMjRsAAAABncc3SA527.txt
在/opt/fastdfs/file/data/00/00可以找到刚刚上传的文件
[root@localhost fdfs]# cd /opt/fastdfs/
[root@localhost fastdfs]# ls
client  file  storage  tracker
[root@localhost fastdfs]# cd file/
[root@localhost file]# ls
data
[root@localhost file]# cd data/
[root@localhost data]# ls
00  06  0C  12  18  1E  24  2A  30  36  3C  42  48  4E  54  5A  60  66  6C  72  78  7E  84  8A  90  96  9C  A2  A8  AE  B4  BA  C0  C6  CC  D2  D8  DE  E4  EA  F0  F6  FC
01  07  0D  13  19  1F  25  2B  31  37  3D  43  49  4F  55  5B  61  67  6D  73  79  7F  85  8B  91  97  9D  A3  A9  AF  B5  BB  C1  C7  CD  D3  D9  DF  E5  EB  F1  F7  FD
02  08  0E  14  1A  20  26  2C  32  38  3E  44  4A  50  56  5C  62  68  6E  74  7A  80  86  8C  92  98  9E  A4  AA  B0  B6  BC  C2  C8  CE  D4  DA  E0  E6  EC  F2  F8  FE
03  09  0F  15  1B  21  27  2D  33  39  3F  45  4B  51  57  5D  63  69  6F  75  7B  81  87  8D  93  99  9F  A5  AB  B1  B7  BD  C3  C9  CF  D5  DB  E1  E7  ED  F3  F9  FF
04  0A  10  16  1C  22  28  2E  34  3A  40  46  4C  52  58  5E  64  6A  70  76  7C  82  88  8E  94  9A  A0  A6  AC  B2  B8  BE  C4  CA  D0  D6  DC  E2  E8  EE  F4  FA
05  0B  11  17  1D  23  29  2F  35  3B  41  47  4D  53  59  5F  65  6B  71  77  7D  83  89  8F  95  9B  A1  A7  AD  B3  B9  BF  C5  CB  D1  D7  DD  E3  E9  EF  F5  FB
[root@localhost data]# cd 0
00/ 01/ 02/ 03/ 04/ 05/ 06/ 07/ 08/ 09/ 0A/ 0B/ 0C/ 0D/ 0E/ 0F/
[root@localhost data]# cd 00
[root@localhost 00]# ls
00  06  0C  12  18  1E  24  2A  30  36  3C  42  48  4E  54  5A  60  66  6C  72  78  7E  84  8A  90  96  9C  A2  A8  AE  B4  BA  C0  C6  CC  D2  D8  DE  E4  EA  F0  F6  FC
01  07  0D  13  19  1F  25  2B  31  37  3D  43  49  4F  55  5B  61  67  6D  73  79  7F  85  8B  91  97  9D  A3  A9  AF  B5  BB  C1  C7  CD  D3  D9  DF  E5  EB  F1  F7  FD
02  08  0E  14  1A  20  26  2C  32  38  3E  44  4A  50  56  5C  62  68  6E  74  7A  80  86  8C  92  98  9E  A4  AA  B0  B6  BC  C2  C8  CE  D4  DA  E0  E6  EC  F2  F8  FE
03  09  0F  15  1B  21  27  2D  33  39  3F  45  4B  51  57  5D  63  69  6F  75  7B  81  87  8D  93  99  9F  A5  AB  B1  B7  BD  C3  C9  CF  D5  DB  E1  E7  ED  F3  F9  FF
04  0A  10  16  1C  22  28  2E  34  3A  40  46  4C  52  58  5E  64  6A  70  76  7C  82  88  8E  94  9A  A0  A6  AC  B2  B8  BE  C4  CA  D0  D6  DC  E2  E8  EE  F4  FA
05  0B  11  17  1D  23  29  2F  35  3B  41  47  4D  53  59  5F  65  6B  71  77  7D  83  89  8F  95  9B  A1  A7  AD  B3  B9  BF  C5  CB  D1  D7  DD  E3  E9  EF  F5  FB
[root@localhost 00]# cd 00
[root@localhost 00]# ls
CshDBVwvEheAMjRsAAAABncc3SA527.txt
[root@localhost 00]# pwd
/opt/fastdfs/file/data/00/00
理论上给这个路径通过nginx映射出去就行了,没必要装模块
也就是说,nignx.conf加入server如下代码就行:
        location /group1/M00 {
            #ngx_fastdfs_module;
            alias /opt/fastdfs/file/data;
        }
安装fastdfs-nginx-module模块
下载文件:wget https://github.com/happyfish100/fastdfs-nginx-module/archive/5e5f3566bbfa57418b5506aaefbe107a42c9fcb1.zip
此处可能出现下载文件没有后缀:mv 5e5f3566bbfa57418b5506aaefbe107a42c9fcb1 5e5f3566bbfa57418b5506aaefbe107a42c9fcb1.zip
解压:unzip 5e5f3566bbfa57418b5506aaefbe107a42c9fcb1.zip
重命名:mv fastdfs-nginx-module-5e5f3566bbfa57418b5506aaefbe107a42c9fcb1 fastdfs-nginx-module-master
安装nginx
上传安装包:put E:\yz_index\installPackage\nginx-1.14.0.tar.gz
解压:tar -zxvf nginx-1.14.0.tar.gz
切换目录:cd nginx-1.14.0
安装时添加上面的模块:./configure --add-module=../fastdfs-nginx-module-master/src
编译:make
安装:make install
启动:/usr/local/nginx/sbin/nginx
设置开机启动:vim /etc/rc.local
添加一行,内容如下:/usr/local/nginx/sbin/nginx
给权限:chmod 755 /etc/rc.local
查看安装模块:/usr/local/nginx/sbin/nginx -V

切换到fastdfs-nginx-module-master目录
复制配置文件到fdfs目录: cp src/mod_fastdfs.conf /etc/fdfs/
复制fastdfs解压部分文件到/etc/fdfs
cd /root/FastDFS/conf/
cp anti-steal.jpg http.conf mime.types /etc/fdfs/
nginx启用模块
在80端口下添加fastdfs-nginx模块
location /group1/M00 {
    ngx_fastdfs_module;
}
listen 80 端口值是要与 /etc/fdfs/storage.conf 中的 http.server_port=80 (前面改成80了)相对应。如果改成其它端口,则需要统一,同时在防火墙中打开该端口。
参考
docker下搭建fastFDS单机版(附storage端口号不显示解决方案)

 浙公网安备 33010602011771号