Dynamics 365 Customer Engagement中插件的调试
微软动态CRM专家罗勇 ,回复319或者20190319可方便获取本文,同时可以在第一间得到我发布的最新博文信息,follow me!我的网站是 www.luoyong.me 。
本文主要根据官方的教程 Tutorial: Debug a plug-in 而写,使用的环境是我自己搭建在Azure VM中的,版本为 版本 1612 (9.0.2.3034) (DB 9.0.2.3034) (本地) 。
最近开始我的博文使用的Dynamics 365 Customer Engagement版本都不再使用V8.2版本,而会使用V9.X版本。插件程序集需要引用 Microsoft.CrmSdk.CoreAssemblies 这个NuGet包的最新版本,当然针对的.NET Framework 也要变化,使用的版本是 4.6.2版本,若还没有下载,可以去 .NET SDKs for Visual Studio 下载 .NET Framework 4.6.2 Develper Pack 安装即可。
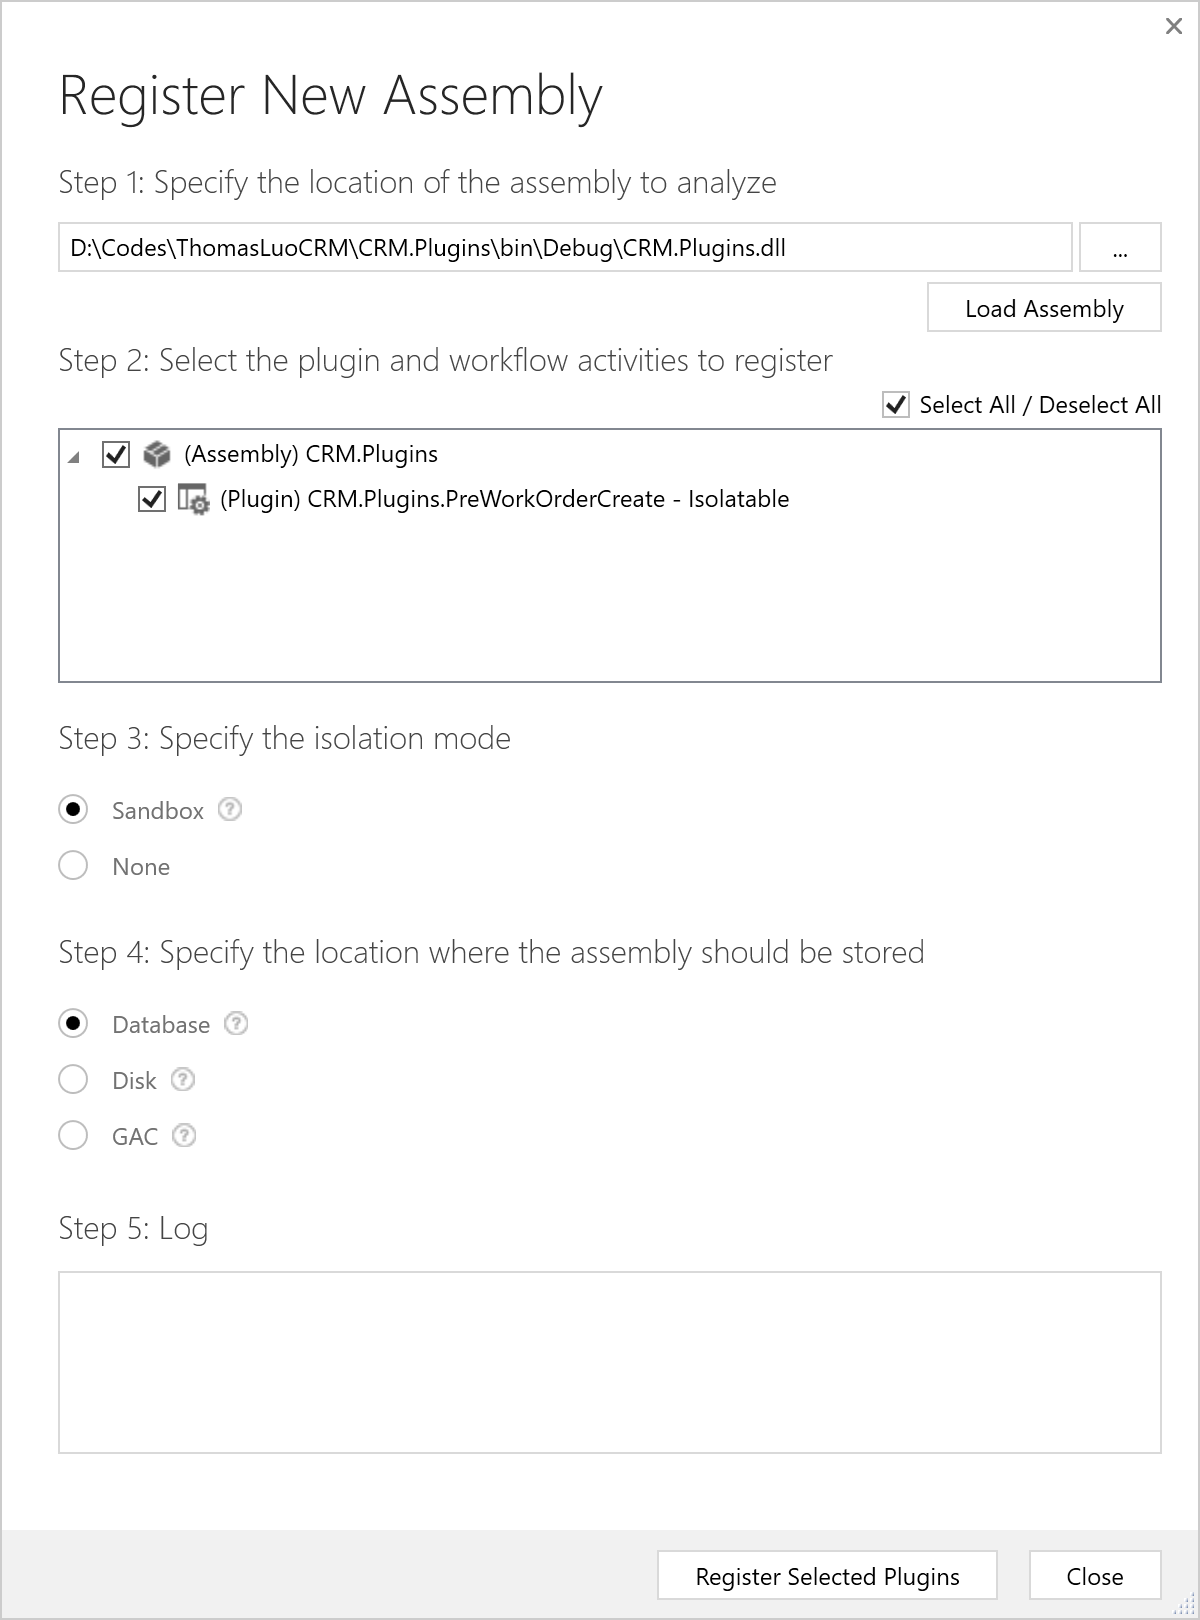
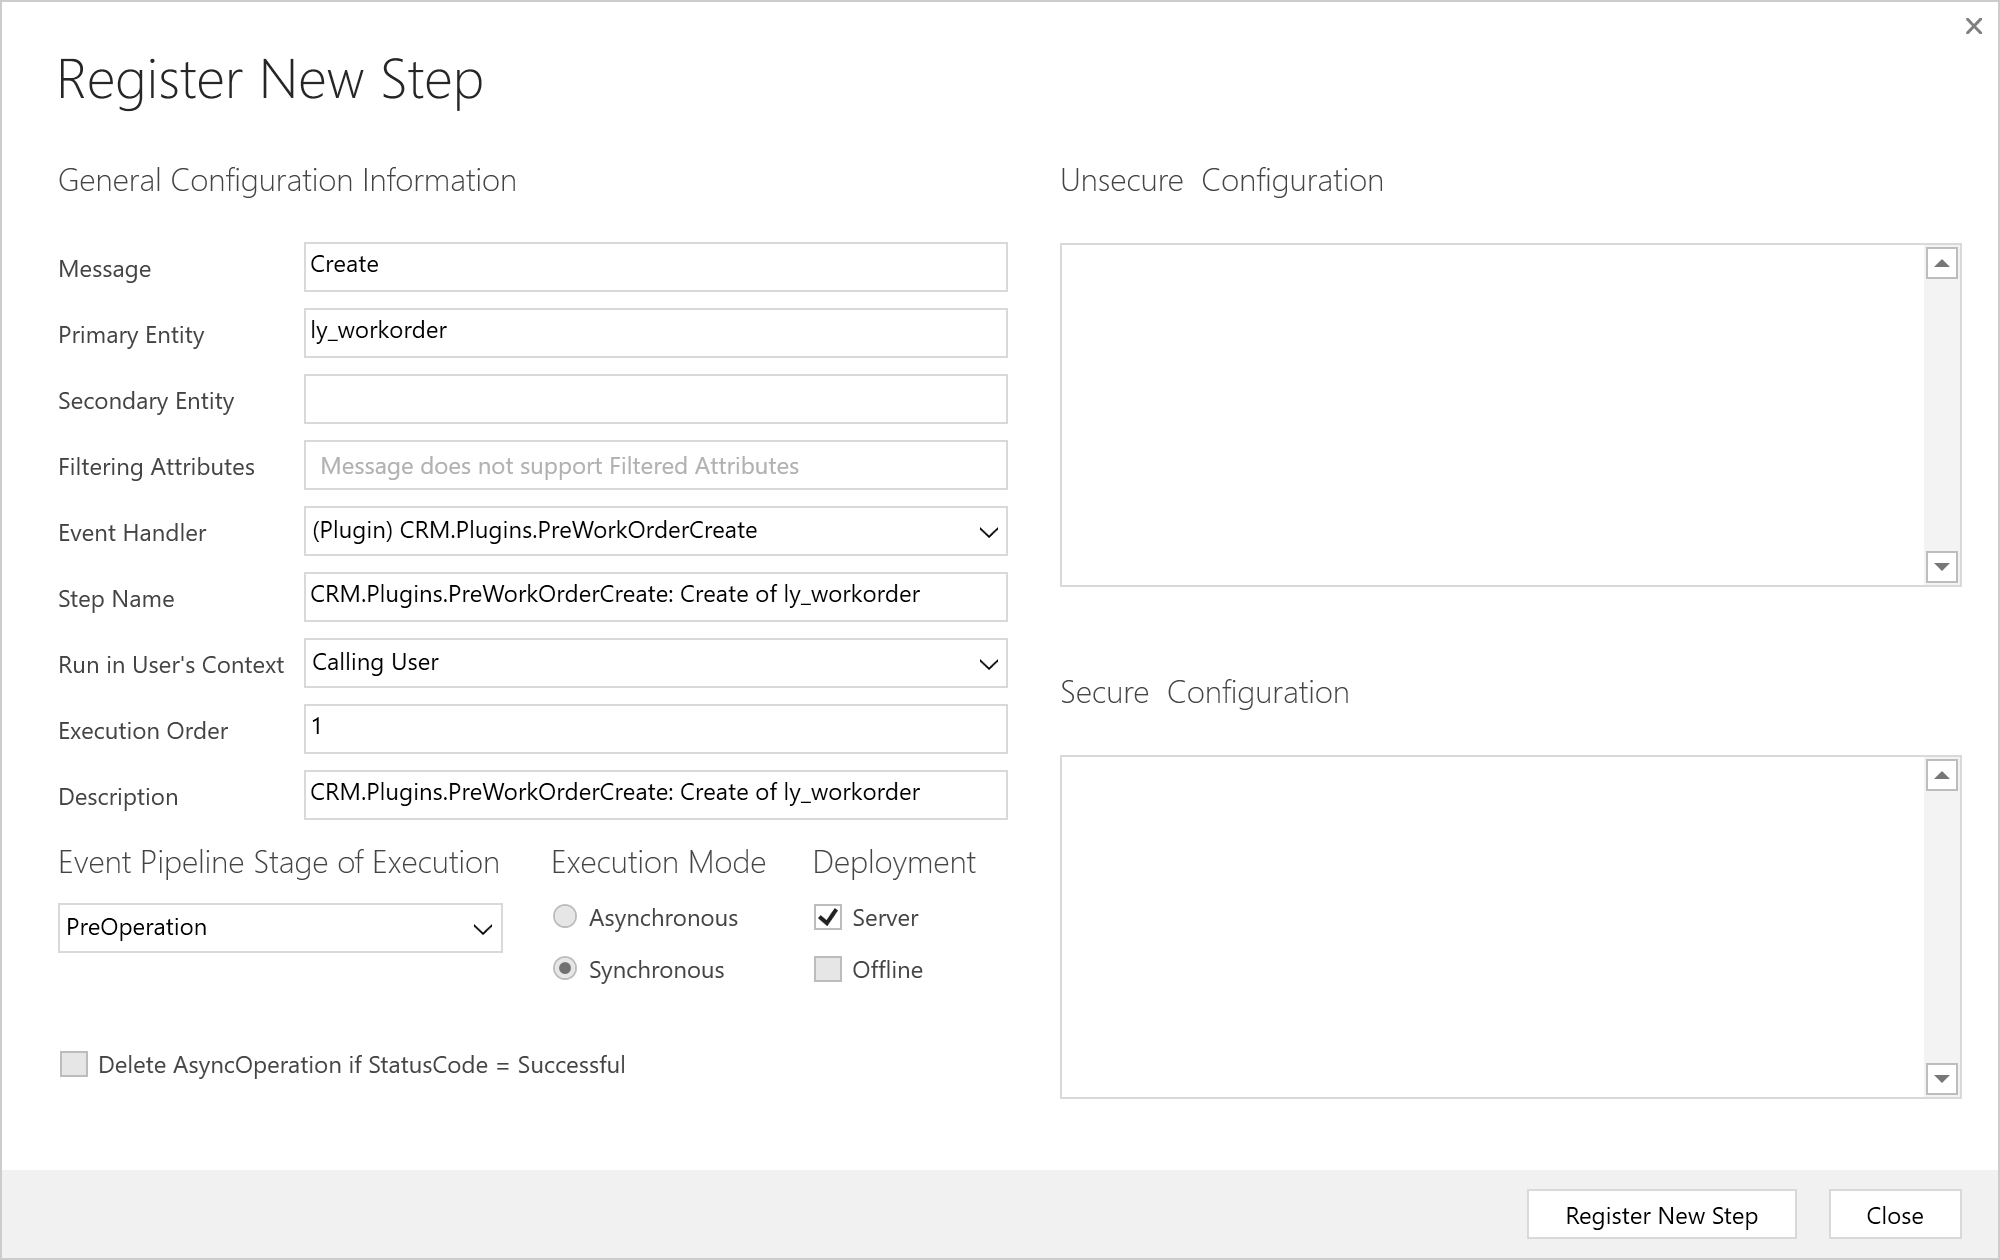
根据 Tutorial: Write and register a plug-in ,我注册个简单的插件,代码很简单,如下:
using System;
using System.Security.Cryptography;
using System.ServiceModel;
using Microsoft.Xrm.Sdk;

namespace CRM.Plugins
{
    public class PreWorkOrderCreate : IPlugin
    {
        public void Execute(IServiceProvider serviceProvider)
        {
            ITracingService tracingService = (ITracingService)serviceProvider.GetService(typeof(ITracingService));
            IPluginExecutionContext context = (IPluginExecutionContext)serviceProvider.GetService(typeof(IPluginExecutionContext));
            if (context.InputParameters.Contains("Target") && context.InputParameters["Target"] is Entity)
            {
                Entity currentEntity = (Entity)context.InputParameters["Target"];
                IOrganizationServiceFactory serviceFactory = (IOrganizationServiceFactory)serviceProvider.GetService(typeof(IOrganizationServiceFactory));
                IOrganizationService service = serviceFactory.CreateOrganizationService(context.UserId);
                try
                {
                    var rng = new RNGCryptoServiceProvider();
                    byte[] data = new byte[100000];
                    int seed = BitConverter.ToInt32(data, 0);
                    var rand = new Random(seed);
                    currentEntity["ly_autonum"] = rand.Next(1, 100000).ToString("000000");
                }
                catch (FaultException<OrganizationServiceFault> ex)
                {
                    throw new InvalidPluginExecutionException("An error occurred in PreWorkOrderCreate.", ex);
                }
                catch (Exception ex)
                {
                    tracingService.Trace("PreWorkOrderCreate unexpected exception: {0}", ex.Message);
                    throw;
                }
            }
        }
    }
}
这里贴两个注册插件的截图:因为我自己搭建的OP V9.0环境注册插件报错,所以我用CRM Online来完成本博文的,报错信息如下:此插件程序集使用了版本 4.6.2 的 .NET Framework。目前,Microsoft Dynamics 365 要求插件程序集使用版本 4.5.2 的 .NET Framework。请使用 .NET Framework 版本 4.5.2 重新生成此程序集,然后重试。
特别说明,本地部署版本注册插件报错的问题在 Microsoft Dynamics 365 Server v9.0 (on-premises) Update 0.3 中解决了。
然后我测试下插件代码基本有效。
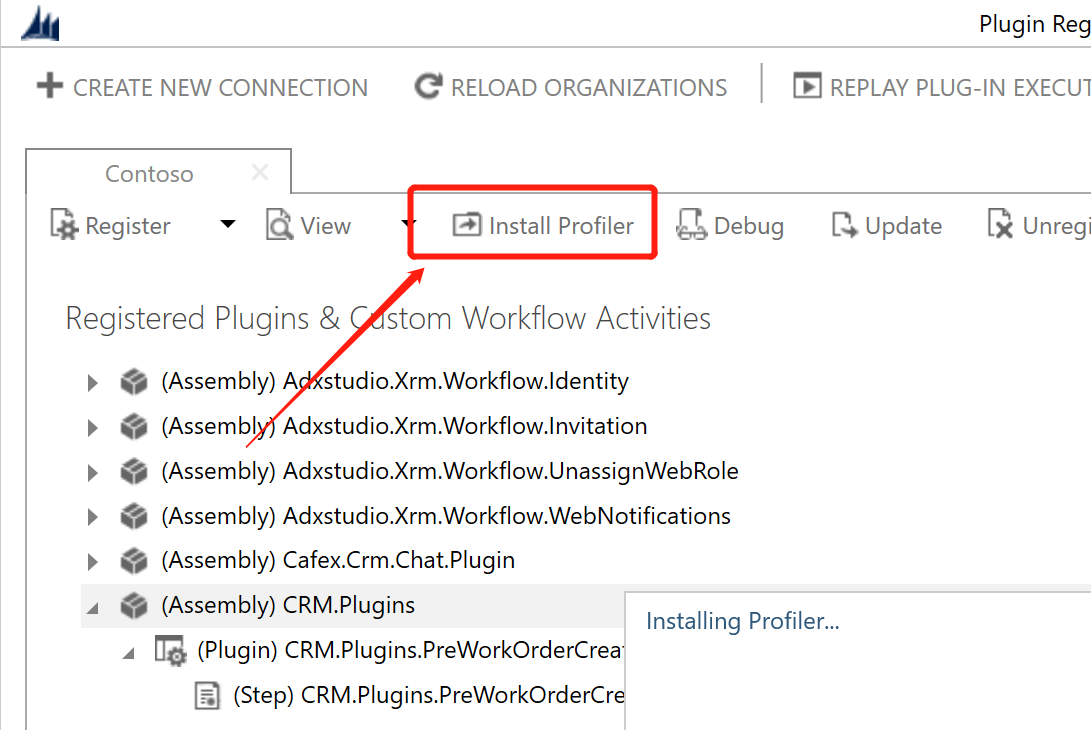
下面开始讲述如何调试插件。首先点击插件注册工具上的【Install Profiler】安装,我安装失败,报错如下,原来是我这个用户虽然有系统管理员角色,但是其【Access Mode】为Administration,所以会缺少很多权限。将这个用户在Office 365 Admin Portal中授予其Dynamics 365 Customer Engagement的许可(License)稍等一会儿待该用户的【Access Mode】变成Read-Write后重新点击插件注册工具上的【Install Profiler】按钮即可。
Microsoft.Crm.CrmSecurityException: SecLib::CheckPrivilege failed. User: 28eafdf4-363a-e911-a9ae-000d3a1ad5ea, PrivilegeName: prvCreateContractTemplate, PrivilegeId: d6cd0451-bca1-42b0-9ffd-5596a3b9a8f9, Required Depth: Basic, BusinessUnitId: 5d2366b2-3b1d-e911-a9b1-000d3a1adfba, MetadataCache Privileges Count: 3998, User Privileges Count: 555 ---> Microsoft.Crm.CrmSecurityException: SecLib::CheckPrivilege failed. User: 28eafdf4-363a-e911-a9ae-000d3a1ad5ea, PrivilegeName: prvCreateContractTemplate, PrivilegeId: d6cd0451-bca1-42b0-9ffd-5596a3b9a8f9, Required Depth: Basic, BusinessUnitId: 5d2366b2-3b1d-e911-a9b1-000d3a1adfba, MetadataCache Privileges Count: 3998, User Privileges Count: 555
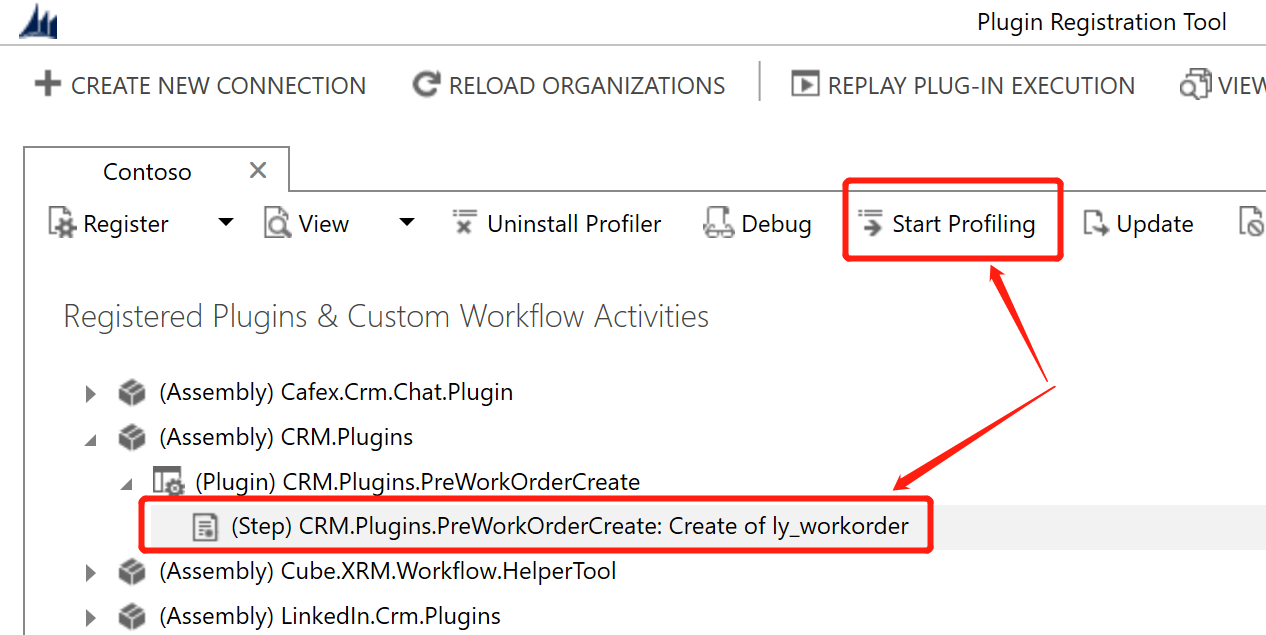
然后选中我要调试的插件步骤,然后点击 【Start Profiling】这个菜单项
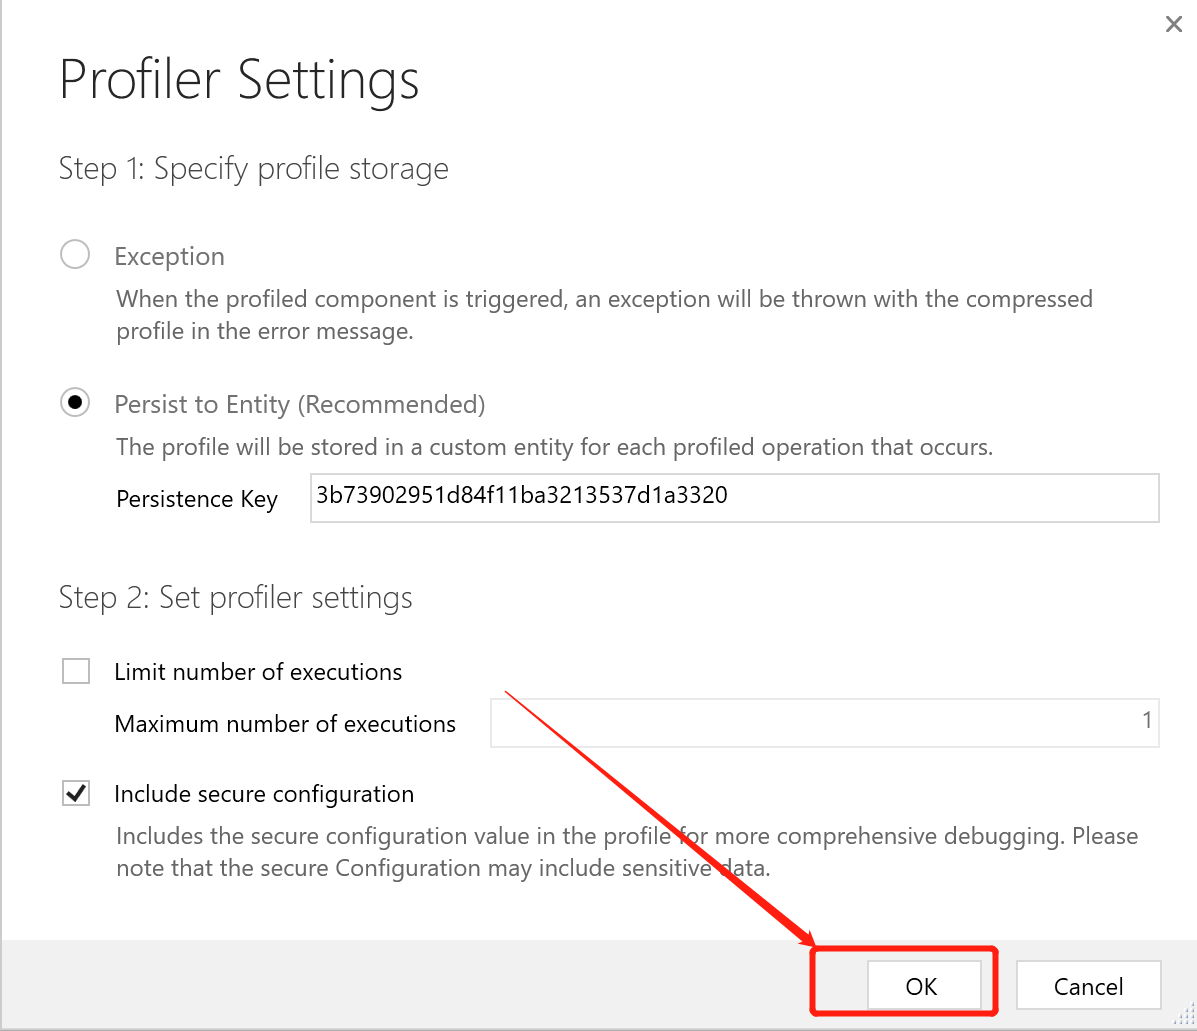
保持不变,直接点击 【OK】按钮。
【Start Profiling】成功的话可以看到这个插件步骤后面多了【Profiled】,然后我要触发这个插件的执行,我这里就简单,创建一条【工单】记录就可以。然后点击 【Stop Profiling】按钮停止Profile,Stop Profiling成功的话,这个插件步骤后面多了的【Profiled】字眼会消失。

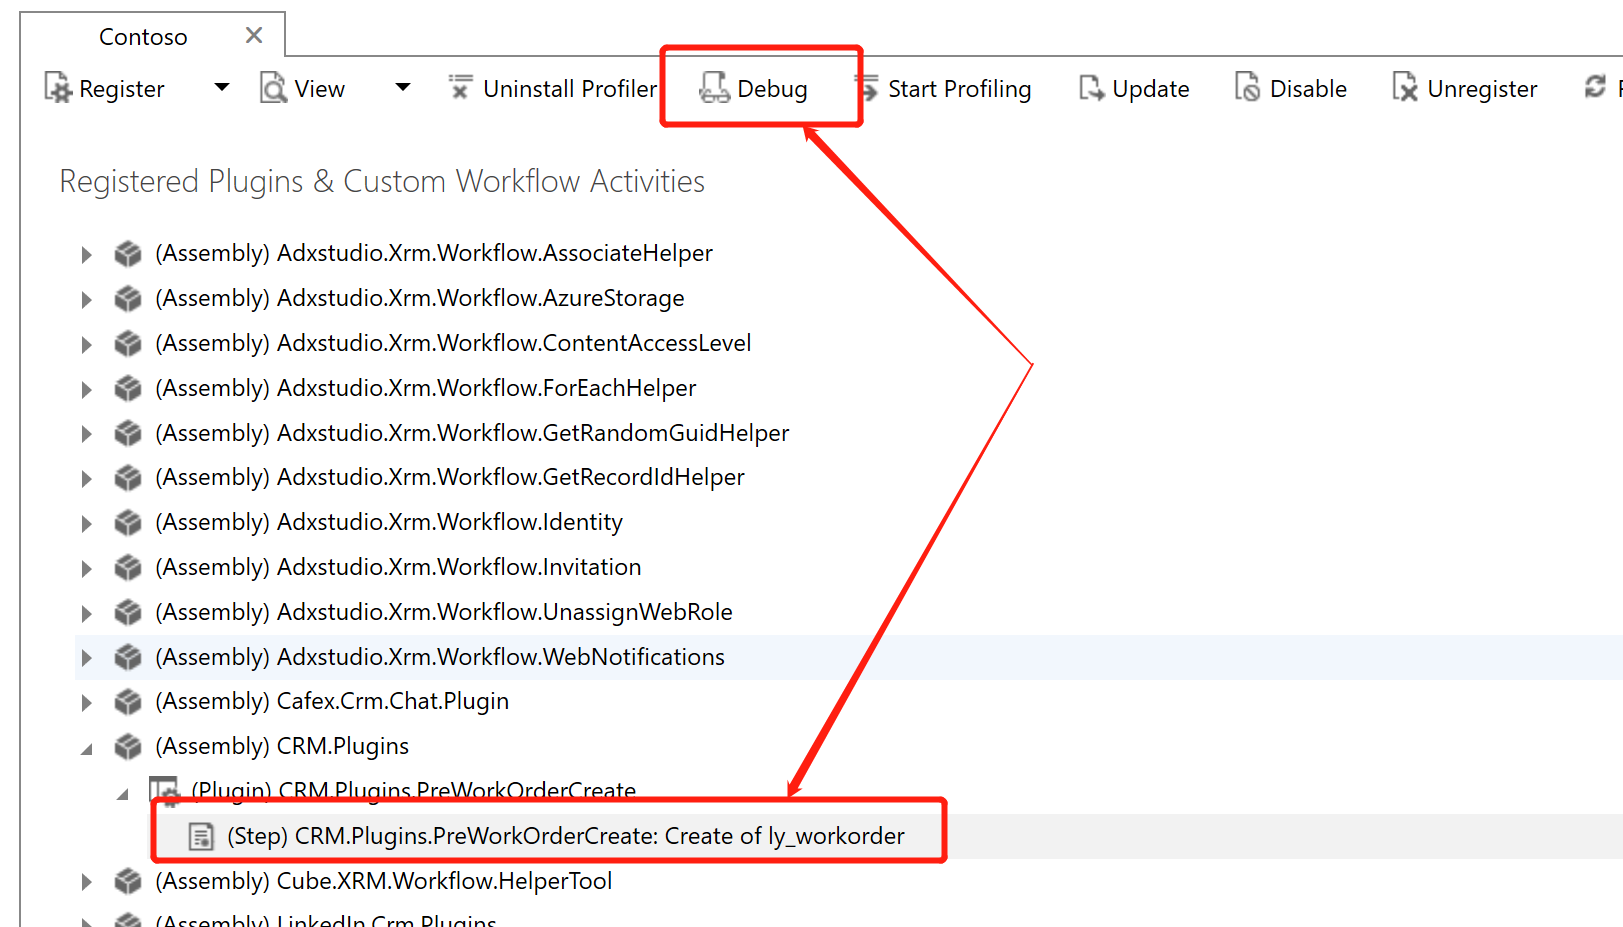
在选中要调试的插件步骤的前提下,点击 【Debug】按钮。
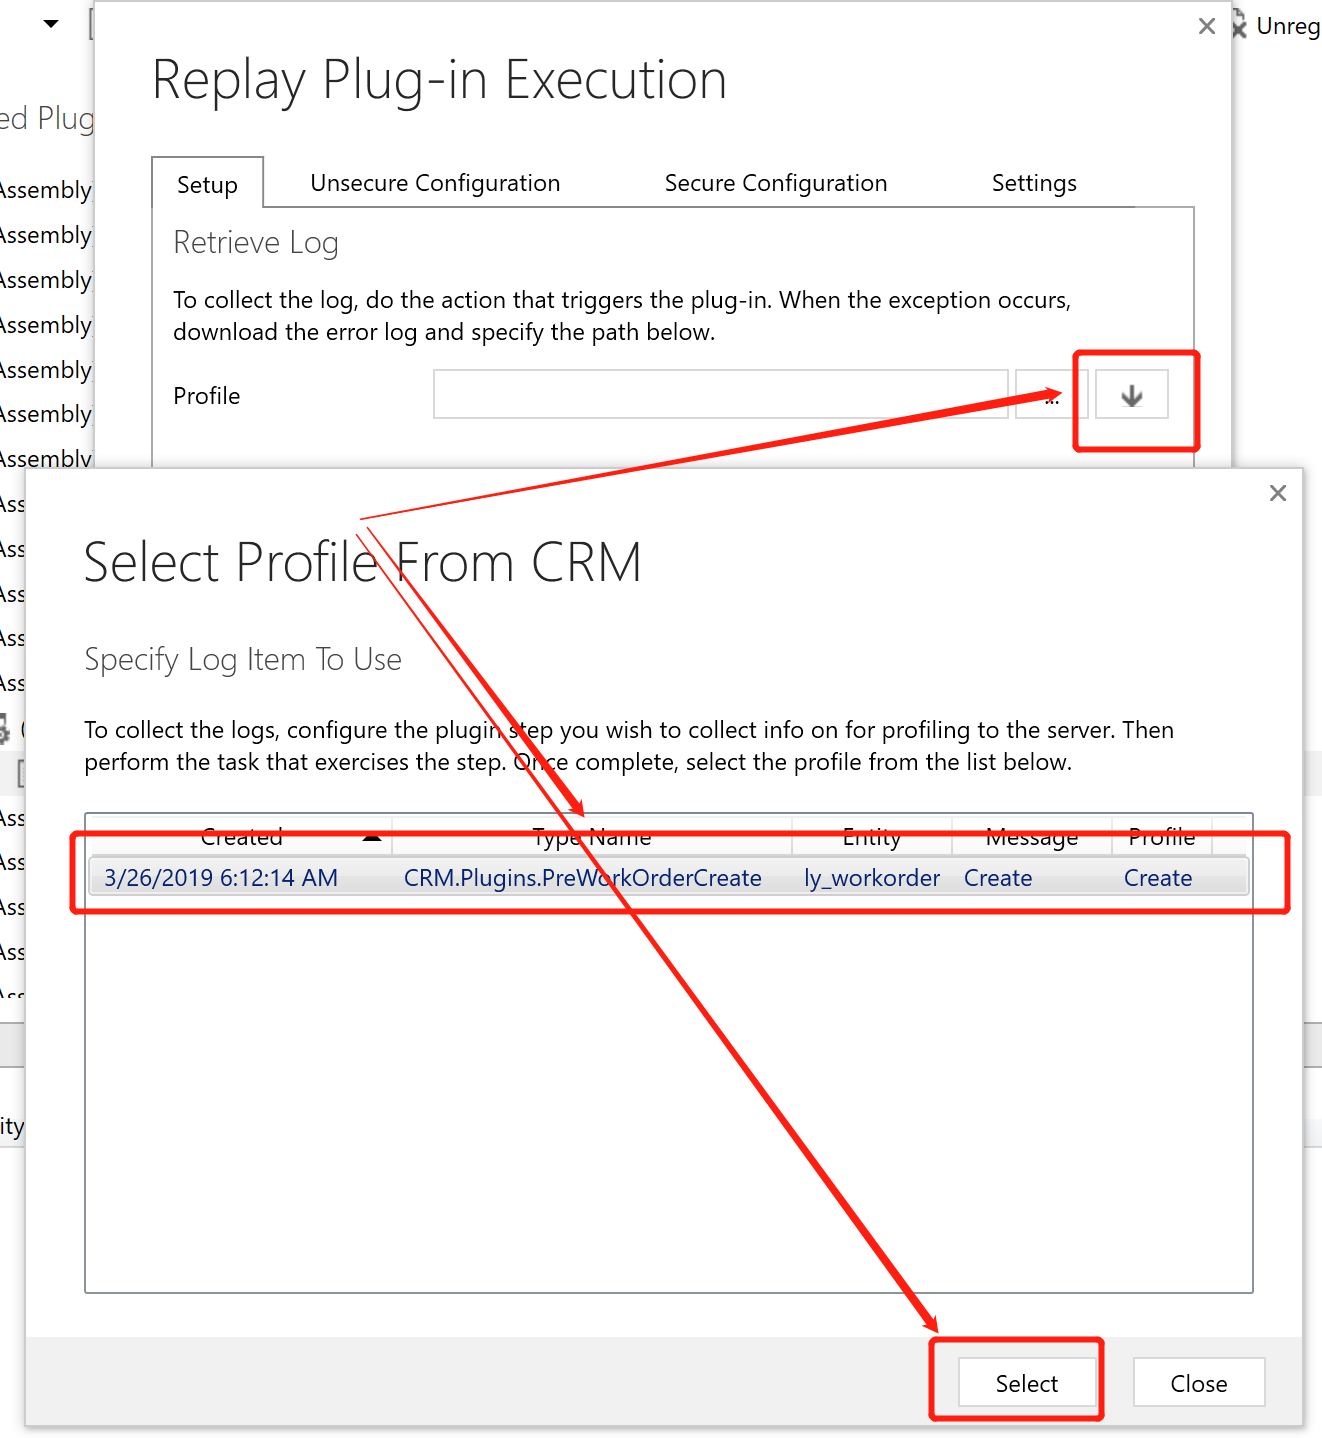
在弹出的对话框中,点击Profile 文本框旁边的向下按钮,会弹出【Select Profile From CRM】窗口,选择合适的记录(每次记录成功的Profile都有一条记录,所以可能会出来多条,根据Created和Type Name选择合适的)后点击【Select】按钮。
然后选择合适的【Assembly Location】和【Plugin】,也就是插件编译的程序集,此时不要点击【Start Execution】按钮,请继续后面的步骤。
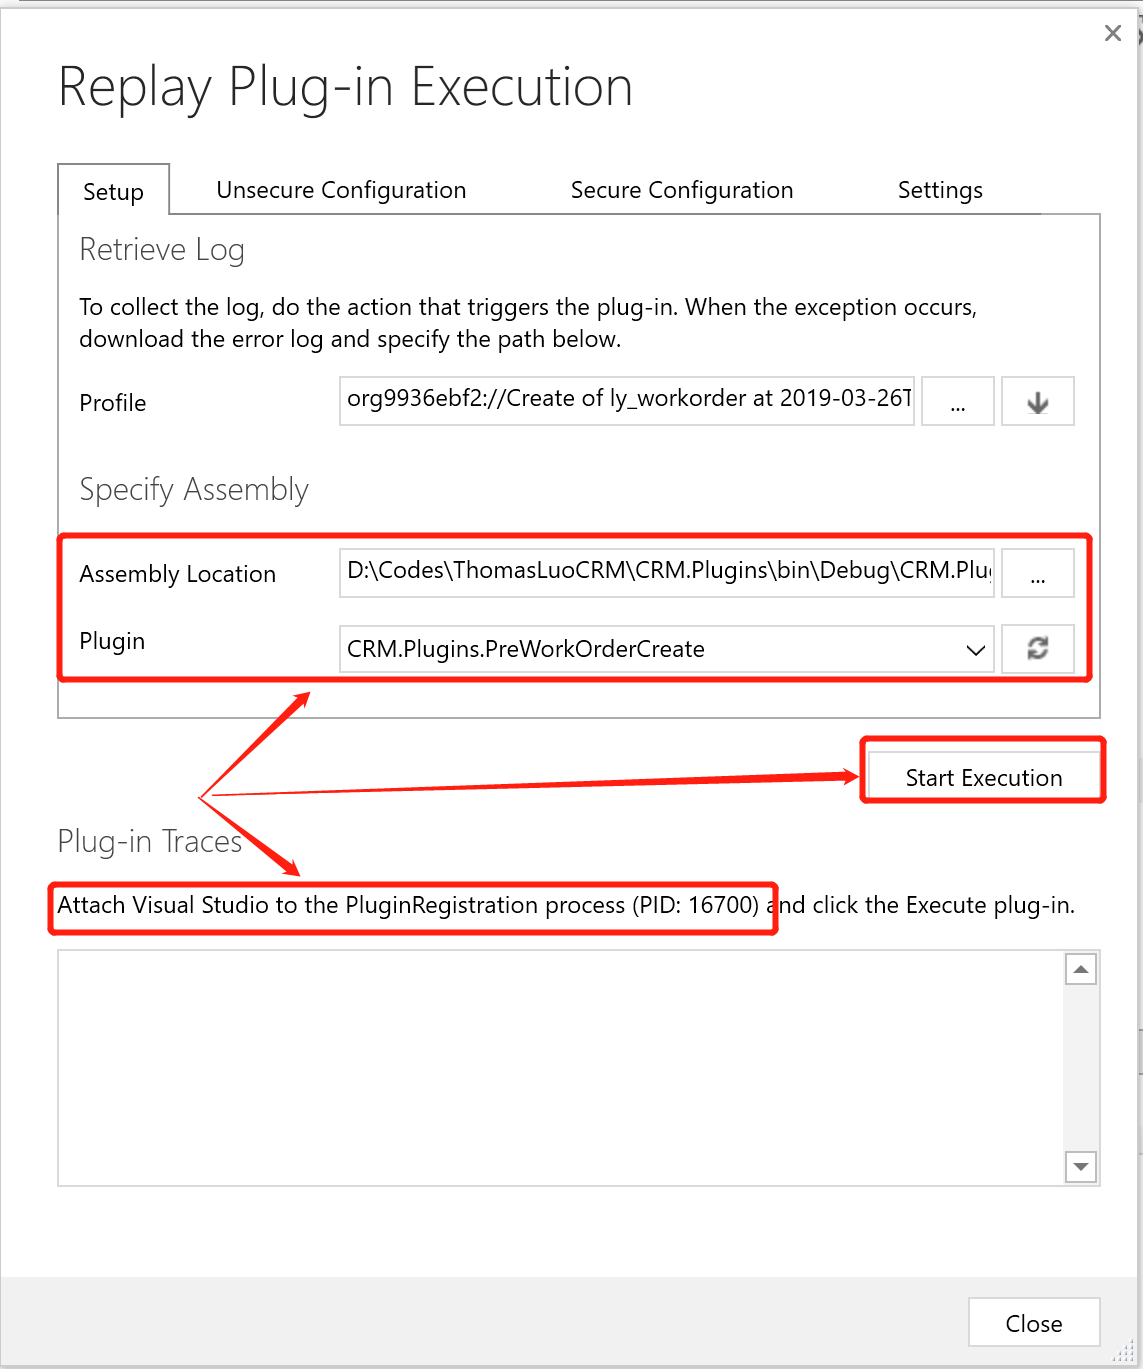
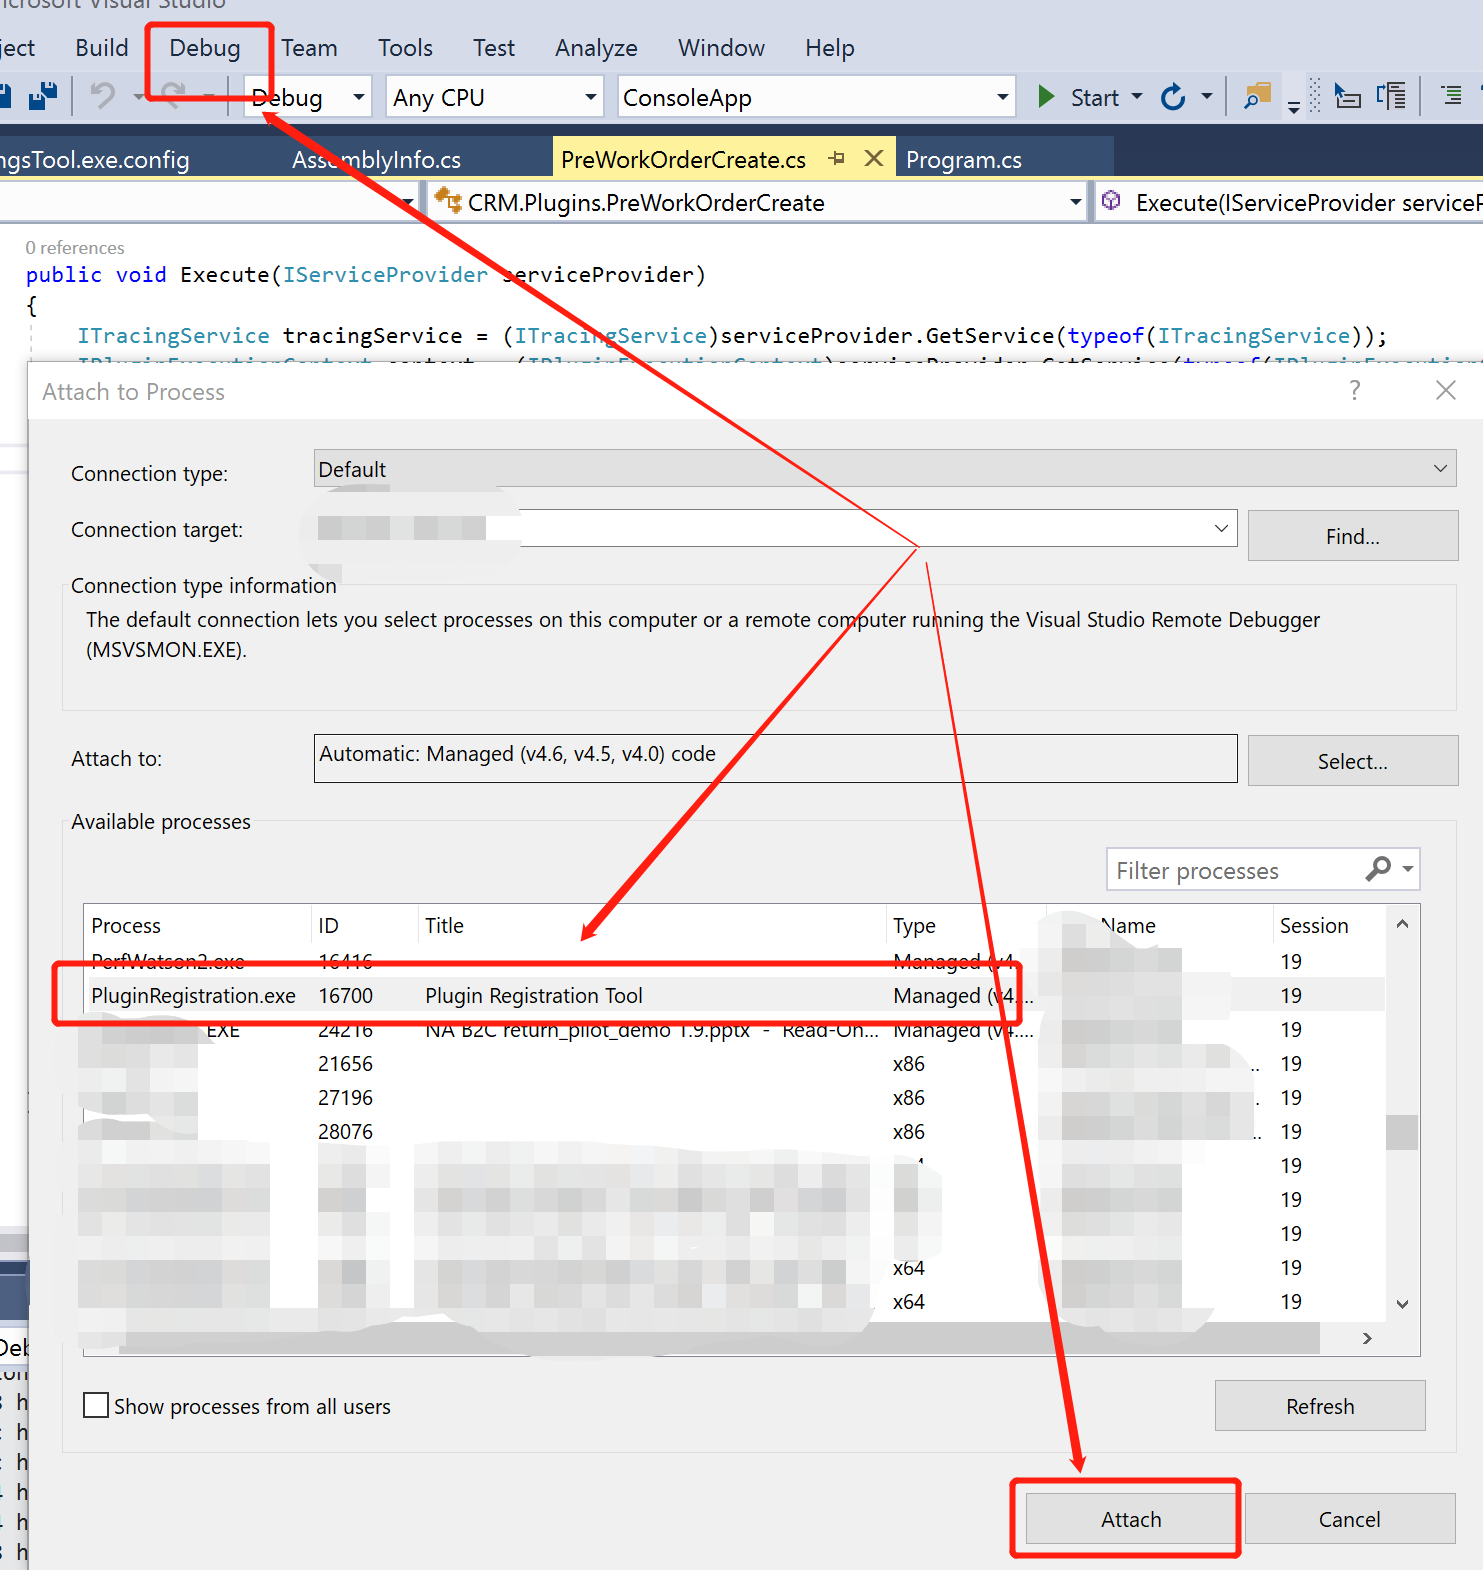
然后在Visual Studio对插件的代码设置好断点,再点击【Debug】 > 【Attach to Process】,在弹出的如下【Attach to Process】框中,找到名称为【PluginRegistration.exe】的Process (前面步骤的截图中已经告知了这个Process 的ID为16700,刚好对上),点击【Attach】后。点击前面步骤截图中的【Start Execution】按钮。
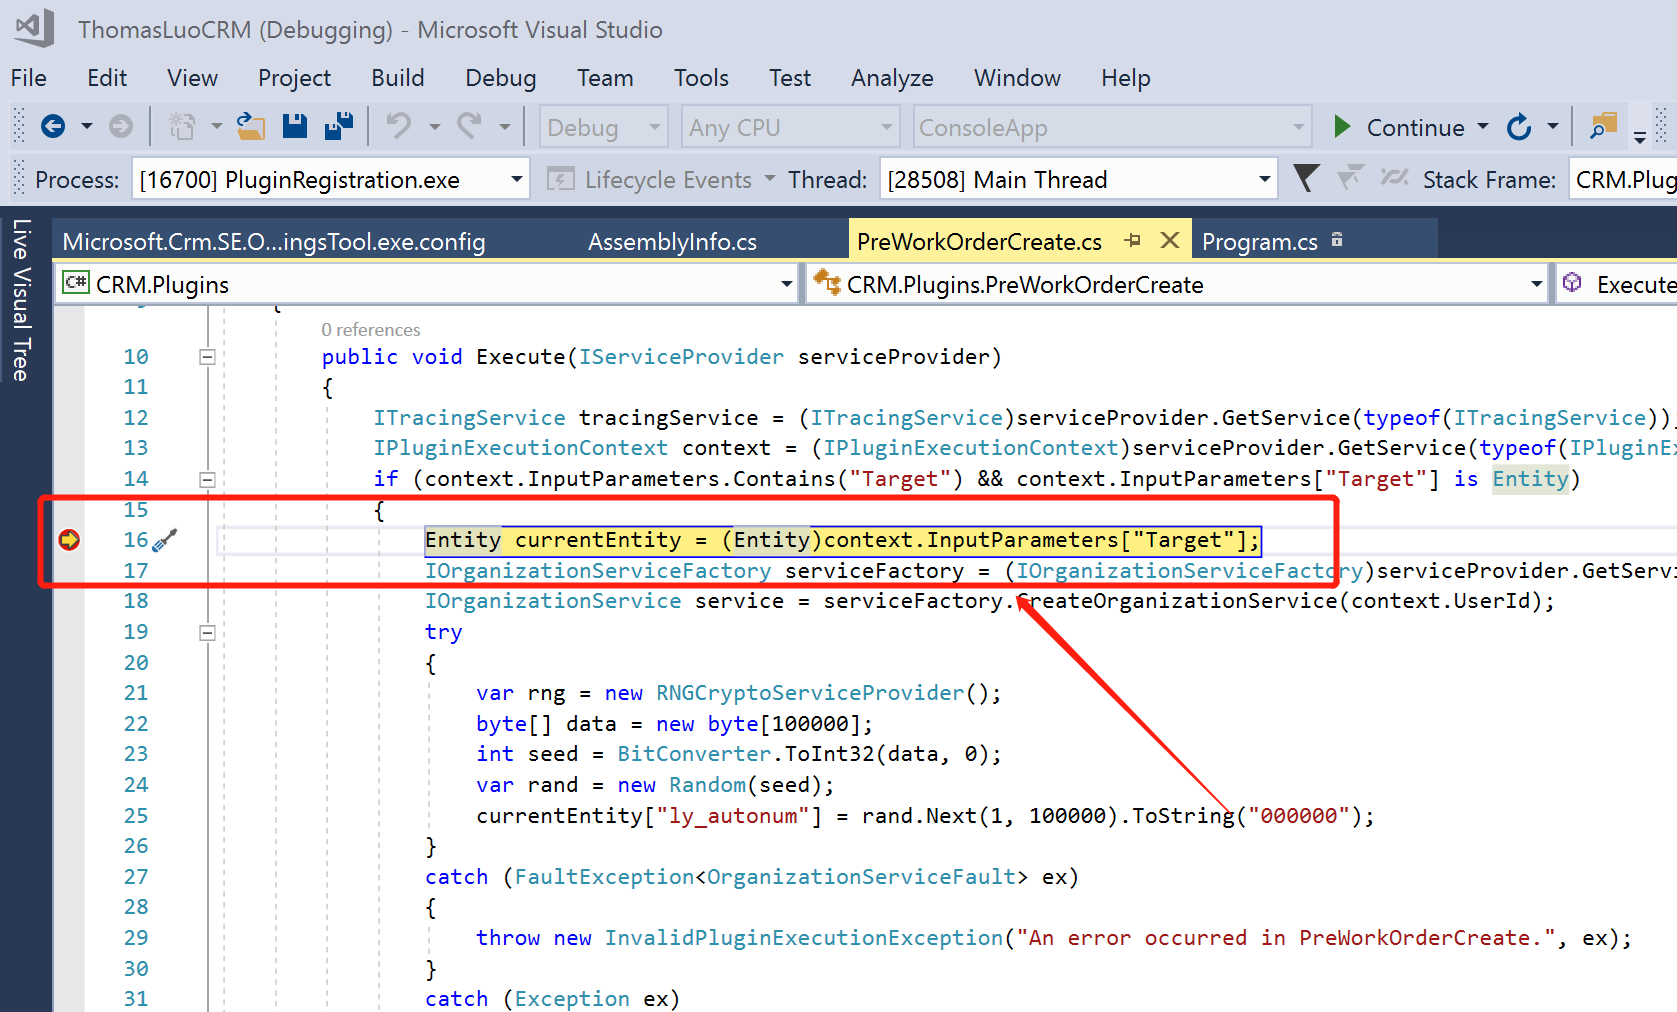
可以看到下图,击中断点,你可以尽情调试拉。

 浙公网安备 33010602011771号