mybatis详细笔记一(自用)
一.MyBatis基础知识
掌握点
- 掌握MyBati中常用API的使用方法
- 正确编写MyBatis的配置文件
- 正确编写MyBatis中的映射文件
MyBatis是一款优秀的持久层框架,它支持制定化SQL,储存过程以及高级映射。MyBatis将JDBC进行了封装,避免了直接使用JDBC操作数据库()。MyBatis可以使用简单的①XML或者②注解配置映射类和表之间的关系,将接口和JAVA的POJO(Plain Ordinary Java Object,普通的Java对象)映射成数据库中记录。
MyBatis的配置文件
1.设置配置编码格式
在web.xml中添加filter标签,设置编码为UTF-8
<filter>
	<filter-name>encoding</filter-name>
	<filter-class>org.springframework.web.filter.CharacterEncodingFilter</filter-class>
	<async-supported>true</async-supported>
	<init-param>
	  <param-name>encoding</param-name>
	  <param-value>utf-8</param-value>
	</init-param>
	<init-param>
	  <param-name>forceEncoding</param-name>
	  <param-value>true</param-value>
	</init-param>
  </filter>
2.properties元素的介绍和使用
properties是一个配置属性的元素,该元素通常用于将内部的配置外在话,即通过外部的配置文件动态地替换内部定义的属性。常用的如数据库的连接等属性。
- driver:mysql的驱动
- url:数据库的url地址。localhost本地地址。替换localhost为192./././地址则访问该地址的数据库
- username:连接数据库的用户名
- password:连接数据库的密码
具体根据自己的实际情况填写。
db.properties的配置文件,文件内容如下:
jdbc.driver=com.mysql.cj.jdbc.Driver
jdbc.url=jdbc:mysql://localhost:3306/ssm?useUnicode=true&characterEncoding=utf8
jdbc.username=root
jdbc.password=123456
在有了db.properties属性文件的导入,就可以修改配置文件中连接数据库的信息,代码如下:
3.mybatis-config.xml
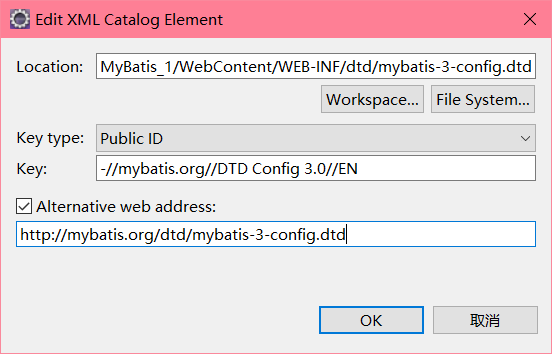
在eclipse中,mybatis-config.xml需要快捷配置则需要进行配置.dtd文件,配置的位置如下。
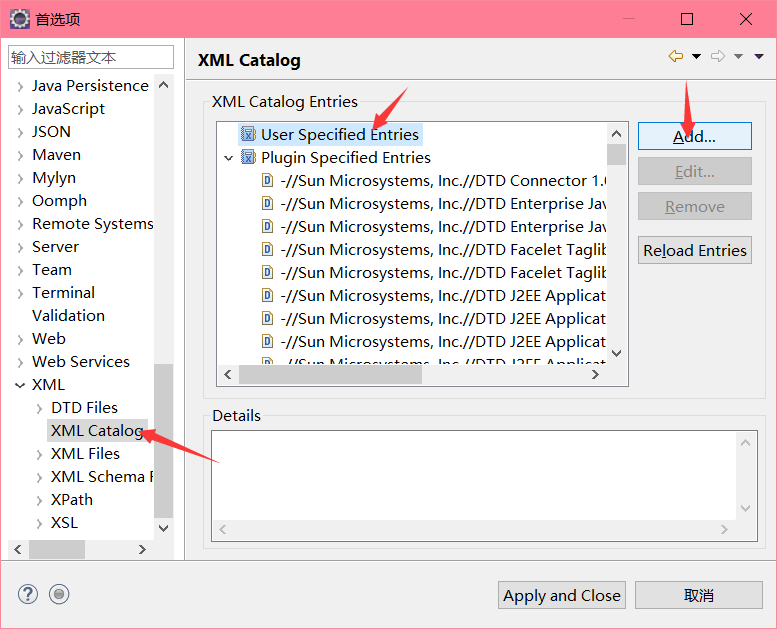
mybatis-3-config.dtd的添加和mybatis-3-mapper.dtd同理。
在配置完毕后就可以进行快捷敲代码了。
在src下创建MyBatis配置文件mybatis-config.xml。
<?xml version="1.0" encoding="UTF-8"?>
<!DOCTYPE configuration PUBLIC "-//mybatis.org//DTD Config 3.0//EN"
"http://mybatis.org/dtd/mybatis-3-config.dtd">

<configuration>
	<properties resource="db.properties"/>
	<!-- 定义别名 -->
	<typeAliases>
		<package name="com.po"/>
	</typeAliases>
	<!--  配置环境,默认的环境id为mysql-->
	<environments default="mysql">
	<!--  配置id为mysql的数据库环境-->
		<environment id="mysql">
			<!--  使用jdbc的事务管理-->
			<transactionManager type="JDBC"/>
			<!--  数据库连接池-->
			<dataSource type="POOLED">
				<!--  数据库驱动.在driver值中,会因为版本过低导致无法启动驱动,无法是使用cannot find com.mysql.cj.jdbc.Driver驱动-->
				<property name="driver" value="${jdbc.driver}"/>

				<!--  连接数据库-->
				<property name="url" value="${jdbc.url}"/>

				<!--  连接数据库的用户名-->
				<property name="username" value="${jdbc.username}"/>

				<!--  连接数据库的密码-->
				<property name="password" value="${jdbc.password}"/>
			</dataSource>
		</environment>
	</environments>

	<!--  配置mapper的位置-->
	<mappers>
		<mapper resource="com/mapper/StudentMapper.xml"/>
	</mappers>
</configuration>
在配置好数据库的配置文件后
在com.utils包中写一个SrudnetUtils.java类,用来获取可以操作数据的对象。
package com.utils;

import java.io.IOException;
import java.io.Reader;

import org.apache.ibatis.io.Resources;
import org.apache.ibatis.session.SqlSession;
import org.apache.ibatis.session.SqlSessionFactory;
import org.apache.ibatis.session.SqlSessionFactoryBuilder;

public class SrudnetUtils {
//	初始化sqlSessionFactory对象
	private static SqlSessionFactory sqlSessionFactory=null;

	static {
		Reader reader;
		try {
//			使用MyBatis提供的Resources类加载MyBatis的配置文件
			reader = Resources.getResourceAsReader("mybatis-config.xml");
//			构建sqlSessionFactory工厂
			sqlSessionFactory=new SqlSessionFactoryBuilder().build(reader);
		} catch (IOException e) {
			// TODO 自动生成的 catch 块
			e.printStackTrace();
		}

	}
//	获取SqlSession对象的静态方法
	public static SqlSession getSession() {
		return sqlSessionFactory.openSession();
	}

}
完成工具类后
在com.po包中创建一个实体类Student.java
package com.po;

public class Student {
	private Integer id;
	private String loginname;
	private String username;
	private Integer age;


	public Student() {//无参构造函数
		super();
	}

	public Student(Integer id, String loginname, String username, Integer age) {//带参构造函数
		super();
		this.id = id;
		this.loginname = loginname;
		this.username = username;
		this.age = age;
	}
//	get和set
	public Integer getId() {
		return id;
	}
	public void setId(Integer id) {
		this.id = id;
	}
	public String getLoginname() {
		return loginname;
	}
	public void setLoginname(String loginname) {
		this.loginname = loginname;
	}
	public String getUsername() {
		return username;
	}
	public void setUsername(String username) {
		this.username = username;
	}
	public Integer getAge() {
		return age;
	}
	public void setAge(Integer age) {
		this.age = age;
	}

//	toString方法
	@Override
	public String toString() {
		return "Student [id=" + id + ", loginname=" + loginname + ", username=" + username + ", age=" + age + "]";
	}
}
在com.mapper包中创建映射文件
StudentMapper.xml
<?xml version="1.0" encoding="UTF-8"?>
<!DOCTYPE mapper
  PUBLIC "-//mybatis.org//DTD Mapper 3.0//EN"
  "http://mybatis.org/dtd/mybatis-3-mapper.dtd">

  <mapper namespace="com.mapper.StudentMapper">
		<!--查询一条数据  -->
		<select id="selectOneStudentById" resultType="Student">
			select * from student where id=#{id}
		</select>

		<!--查询全部数据  -->
		<select id="selectAllStudent" resultType="Student">
			select * from student
		</select>
  </mapper>
最后创建测试类
在测试用例中调用SrudnetUtils.java类中的SqlSession()得到一个SqlSession的实例sqlSession,相当于得到一个数据库的连接,通过sqlSession的方法执行在映射文件中指定的SQL语句。
- 查询:sqlSession.selectOne()
- 添加:sqlSession.insert()
- 修改:sqlSession.update()
- 删除:sqlSession.delete()
TestStudent.java
package com.test;

import java.util.List;

import org.apache.ibatis.session.SqlSession;
import org.junit.Test;

import com.po.Student;
import com.utils.StudentUtils;

public class TestStudent {
//	@Test//获取表student的一行数据
//	public void selectOneStudentBy() {
//		SqlSession sqlSession=null;
//		sqlSession = StudentUtils.getSession();
//		Student student = sqlSession.selectOne("com.mapper.StudentMapper.selectOneStudentById",1);
//		System.out.println(student.toString());
//	}
	@Test
	public void selectAllStu() {
		SqlSession sqlSession = null;
		sqlSession = StudentUtils.getSession();
		List<Student> student = sqlSession.selectList("com.mapper.StudentMapper.selectAllStudent");
		System.out.println(student.toString());
	}

}
其中
SqlSession sqlSession=null;
sqlSession=SrudnetUtils.getSession();
sqlSession._......
sqlSession.commit();//这行代码不写则无法使用添加修改删除的功能
| 元素名称 | 备注 |
|---|---|
| select | 可自定义参数,返回结果集 |
| insert | 执行后返回一个整数,代表插入记录数 |
| update | 执行后返回一个整数,代表更新记录数 |
| delete | 执行后返回一个整数,代表删除记录数 |
MyBatis的结果映射
结果映射(< resultMap >)。
简单得使用
	<select id="selectOneStudentById" resultMap="stuResultMap">
		select * from student where id=#{id}
	</select>
	<resultMap type="com.po.Student" id="stuResultMap">
		<!--当数据库列名和实体类属性名一致时,以下代码可以省略  -->
		<id property="id" column="id"/>
		<result property="loginname" column="loginname"/>
		<result property="username" column="username"/>
		<result property="age" column="age"/>
	</resultMap>
一般实体类的属性和数据表的列名都是一一对应的,但是难免会出现不能对于的情况,这个时候就需要配置resultMap,使得实体类得属性和数据表列名保持一致
另一种使用resultMap地方在多表关联操作,此时由于时对表关联,查询得结果集会非常得复杂,包括多个表得字段和表达式,此时只有用resultMap在外部重新定义一个结果映射。
resultMap元素得结构:
(POJO(Plain Ordinary Java Object)简单的Java对象,实际就是普通JavaBeans)
<resultMap type="映射的pojo对象" id="唯一得标识符">
	<!--当数据库列名和实体类属性名一致时,以下代码可以省略  -->
	<id property="映射pojo对象的主键属性" column="表的主键字段" jdbcType="字段类型"/>
	<result property="映射到pojo对象的一个属性(须为type定义的pojo对象中的一个属性)"
		column="表的一个字段(可以为任意表的一个字符)"/>
	//更多元素在关联映射中在说~
</resultMap>
注意(突然发现遗忘的点):在mybatis-config.xml中记得在< mappers >元素中注册新创建的映射文件!
动态SQL
| 元素 | 介绍 |
|---|---|
| if | 类似于java语句中的if语句,根据实际需求给出的条件组成所需的查询语句 |
| choose(when,otherwise) | 类似于java中的switch语句,有时不想应用到所有的条件语句,只想从中选中一项 |
| where | |
| set | |
| foreach | |
| bind | |
| trim |
MyBatis的关联映射
-
掌握一对一的关联映射操作:在任意一方引入对方主键作为外键
-
掌握一对多的关联映射操作:在多方添加另一方的主键作为外键
-
掌握多对多的管理映射操作:创建第三张表,另外两张表的主键作为第三张表的外键
-
了解MyBatis的缓存机制,掌握其设置方法。
一对一的关联映射
我们这里使用tb_clazz和tb_student两张表
其中tb_clazz的列名为id,cname
tb_student的列名为id,loginname,username,password,class_id
首先在com.po包中创建实体类Student.java和Clazz.java
Student.java
public class Student {
	private Integer id;
	private String loginname;
	private String username;
	private String password;
	private Clazz clazz;//班级类,与关联的一方对应的实体类
	...
	//set,get
	...
	@Override
	public String toString() {
		return "Student [id=" + id + ", loginname=" + loginname + ", username=" + username + ", password=" + password
				+ ", clazz=" + clazz + "]";
	}
}
Clazz.java
public class Clazz {
	private Integer id;
	private String cname;
	...
	//set,get
	...
	@Override
	public String toString() {
		return "Clazz [id=" + id + ", cname=" + cname + "]";
	}
}
配置映射文件
映射文件结构如下
<resultMap type="映射的pojo对象" id="唯一得标识符">
	<!--当数据库列名和实体类属性名一致时,以下代码可以省略  -->
	<id property="映射pojo对象的主键属性" column="表的主键字段" jdbcType="字段类型"/>
	<result property="映射到pojo对象的一个属性(须为type定义的pojo对象中的一个属性)"
		column="表的一个字段(可以为任意表的一个字符)"/>
	<association property="pojo的一个对象属性" javaType="pojo关联的pojo对象">
		<id property="关联pojo对象的唯一标识符" column=""关联pojo对象对应表的主键字段 jdbcType="字段类型"/>
		<result property="关联pojo对象的属性" column="任意表的字段" jdbcType="字段类型"/>
	</association>
</resultMap>
Student类的映射文件
<mapper namespace="com.mapper.studentMap">
		<select id="selectStuById" resultMap="resultMapStu">
			select * from tb_student where id=#{id}
		</select>
		<resultMap type="com.po.Student" id="resultMapStu">
			<id property="id" column="id"/>
			<result property="loginname" column="loginname"/>
			<result property="username" column="username"/>
			<result property="password" column="password"/>
			<!-- 关联的班级类clazz,对应student表中列为class_id 。
			将class_id的值传给selectClazzById查询使用-->
			<association property="clazz" javaType="clazz" column="class_id"
			select="com.mapper.clazzMap.selectClazzById">

			</association>
		</resultMap>

  </mapper>
Clazz类额映射文件
<mapper namespace="com.mapper.clazzMap">
		<select id="selectClazzById" resultMap="resultMapClazz">
			select * from tb_clazz where id=#{id}
		</select>
		<resultMap type="com.po.Clazz" id="resultMapClazz">
			<id property="id" column="id"/>
			<result property="cname" column="cname"/>
		</resultMap>
  </mapper>
一对多关联映射
以班级表tb_clazz和学生表tb_student为例的一对多关联操作
在实体类Clazz2中
public class Clazz2 {
	private Integer id;
	private String cname;
	private List<Student2>students;//List集合中的每个元素为student对象,用来存放多方的student对象
	get和set
	toString
	}
在实体类Student2中
public class Student2 {
	private Integer id;
	private String loginname;
	private String username;
	private String password;
	get和set
	toString
	}
然后创建班级的映射文件clazzMap2.xml
<?xml version="1.0" encoding="UTF-8"?>
<!DOCTYPE mapper
  PUBLIC "-//mybatis.org//DTD Mapper 3.0//EN"
  "http://mybatis.org/dtd/mybatis-3-mapper.dtd">

  <mapper namespace="com.mapper.clazzMap2">
		<select id="selectClazzById" resultMap="resultMapClazz">
			select * from tb_clazz where id=#{id}
		</select>
		<!--resultMap中的type为班级的实体类。
			collection中的property为Clazz2实体类中定义的List<Student2>students集合
			column为班级的id,不为学生外键class_id
			ofType为学生实体类Student2 -->
		<resultMap type="com.po.Clazz2" id="resultMapClazz">
			<id property="id" column="id"/>
			<result property="cname" column="cname"/>
			<collection property="students" column="id" ofType="com.po.Student2" javaType="ArrayList"
				select="com.mapper.studentMap2.selectStudentByClazzId">
			</collection>
		</resultMap>
  </mapper>
创建学生类的映射文件studentMap2.xml
<?xml version="1.0" encoding="UTF-8"?>
<!DOCTYPE mapper
  PUBLIC "-//mybatis.org//DTD Mapper 3.0//EN"
  "http://mybatis.org/dtd/mybatis-3-mapper.dtd">

  <mapper namespace="com.mapper.studentMap2">
		<!-- 根据clazz_id外键班级id,查询tb_student表中的学生信息 -->
		<select id="selectStudentByClazzId" parameterType="int" resultType="com.po.Student2">
			select * from tb_student where class_id=#{id}
		</select>

  </mapper>
最测试类
//一对多根据班级id查询所有班级id的全部学生信息
@Test
public void selectClazzById() {
	SqlSession sqlSession = Utils.getSession();
	Clazz2 clazz2 = sqlSession.selectOne("com.mapper.clazzMap2.selectClazzById", 1);
	System.out.println(clazz2.toString());
}
多对多关联映射
课程表tb_course和学生表tb_student的多对多关联映射
在数据库中又建立第3张表student_course
表student_course由列id,courseid,studentid组成
tb_course表
| id | cname |
|---|
tb_student表
| id | loginname | password | username |
|---|
student_course表
| id | studentid | courseid |
|---|
根据学生id查找学生信息以及学生所选全部课程信息
学生类com.po.Student3.java
public class Student3 {
	private Integer id;
	private String loginname;
	private String username;
	private String password;
	private List<Course3> courses;
	getset
	tostring
	}
课程类com.po.Course3.java
public class Course3 {
	private Integer id;
	private String cname;
	private List<Student3> students;
	}
学生的映射文件studentMap3.xml
<?xml version="1.0" encoding="UTF-8"?>
<!DOCTYPE mapper
  PUBLIC "-//mybatis.org//DTD Mapper 3.0//EN"
  "http://mybatis.org/dtd/mybatis-3-mapper.dtd">

  <mapper namespace="com.mapper.studentMap3">
		<!-- 根据学生id查找学生信息以及学生所选全部课程信息 -->
		<select id="selectStudentById"  resultMap="resultMapStu">
			select * from tb_student where id=#{id}
		</select>

		<resultMap type="com.po.Student3" id="resultMapStu">
			<id property="id" column="id"/>
			<result property="loginname" column="loginname"/>
			<result property="username" column="username"/>
			<result property="password" column="password"/>

			<!--property为学生实体类中定义的课程List集合
				column为学生类id,并把学号id传给下面的课程映射文件进行查询
				ofType为课程实体类-->
			<collection property="courses" column="id" javaType="ArrayList" ofType="Course3"
			select="com.mapper.courseMap3.selectCourseByStudentId">
			</collection>
		</resultMap>
  </mapper>
课程的映射文件courseMap3.xml
  <mapper namespace="com.mapper.courseMap3">
		<!-- 使用学生映射文件传来的学生id,
		在第三张表student_course中查询到courseid -->
		<select id="selectCourseByStudentId" parameterType="int" resultType="Course3">
			select * from tb_course
			where id in(select courseid from student_course where studentid=#{id})
		</select>
  </mapper>
最后进行测试
	@Test
	public void selectStudentById() {
		SqlSession sqlSession = Utils.getSession();
		Student3 student3 = sqlSession.selectOne("com.mapper.studentMap3.selectStudentById", 1);
		System.out.println(student3.toString());
		sqlSession.close();
	}
同理也可以使用相同的方法:根据课程id查询课程信息以及选中该课程的全部学生信息
.........................
课程的映射文件courseMap3.xml
<select id="selectCourseByid" resultMap="courseMap">
			select * from tb_course where id=#{id}
		</select>
		<resultMap type="Course3" id="courseMap">
			<id column="id" property="id"/>
			<result column="cname" property="cname"/>
			<collection property="students" column="id" javaType="ArrayList" ofType="com.po.Student3"
				select="com.mapper.studentMap3.selectStudnetByCourseId">
			</collection>
		</resultMap>
学生的映射文件studentMap3.xml
<!--根据课程id查询选中该课程得全部学生  -->
		<select id="selectStudnetByCourseId" resultType="Student3">
			select * from tb_student
			where id in(select studentid from student_course where courseid=#{id})
		</select>
.....

 浙公网安备 33010602011771号