Tensorflow Object_Detection 目标检测 笔记
Tensorflow models
Code:https://github.com/tensorflow/models
编写时间:2017.7
记录在使用Object_Detection 中遇到的问题及解决方案
+++++++++++++++++++++++++++++++++++++++++++++++++++++++++++++++++++++++++++
Creating accurate machine learning models capable of localizing and identifying multiple objects in a single image remains a core challenge in computer vision. The TensorFlow Object Detection API is an open source framework built on top of TensorFlow that makes it easy to construct, train and deploy object detection models. At Google we’ve certainly found this codebase to be useful for our computer vision needs, and we hope that you will as well.

Installation
Dependencies
Tensorflow Object Detection API depends on the following libraries:
- Protobuf 3.0.0
- Python-tk
- Pillow 1.0
- lxml
- tf Slim (which is included in the "tensorflow/models/research/" checkout)
- Jupyter notebook
- Matplotlib
- Tensorflow
- Cython
- contextlib2
- cocoapi
For detailed steps to install Tensorflow, follow the Tensorflow installation instructions. A typical user can install Tensorflow using one of the following commands:
# For CPU
pip install tensorflow
# For GPU
pip install tensorflow-gpu
The remaining libraries can be installed on Ubuntu 16.04 using via apt-get:
sudo apt-get install protobuf-compiler python-pil python-lxml python-tk
pip install --user Cython
pip install --user contextlib2
pip install --user jupyter
pip install --user matplotlib
Alternatively, users can install dependencies using pip:
pip install --user Cython
pip install --user contextlib2
pip install --user pillow
pip install --user lxml
pip install --user jupyter
pip install --user matplotlib
Note that sometimes "sudo apt-get install protobuf-compiler" will install Protobuf 3+ versions for you and some users have issues when using 3.5. If that is your case, you're suggested to download and install Protobuf 3.0.0 (available here).
COCO API installation
Download the cocoapi and copy the pycocotools subfolder to the tensorflow/models/research directory if you are interested in using COCO evaluation metrics. The default metrics are based on those used in Pascal VOC evaluation. To use the COCO object detection metrics add metrics_set: "coco_detection_metrics" to the eval_config message in the config file. To use the COCO instance segmentation metrics add metrics_set: "coco_mask_metrics" to the eval_config message in the config file.
git clone https://github.com/cocodataset/cocoapi.git
cd cocoapi/PythonAPI
make
cp -r pycocotools <path_to_tensorflow>/models/research/
Protobuf Compilation
The Tensorflow Object Detection API uses Protobufs to configure model and training parameters. Before the framework can be used, the Protobuf libraries must be compiled. This should be done by running the following command from the tensorflow/models/research/ directory:
# From tensorflow/models/research/
protoc object_detection/protos/*.proto --python_out=.
# 备注:这里因为protoc 更新可能已经无法使用 需要安装新版的protoc版本
    参考:https://github.com/tensorflow/models/issues/4002
#Make sure you grab the latest version
curl -OL https://github.com/google/protobuf/releases/download/v3.2.0/protoc-3.2.0-linux-x86_64.zip

#Unzip
unzip protoc-3.2.0-linux-x86_64.zip -d protoc3
change your protobuf to protobuf3

#Move protoc to /usr/local/bin/
sudo mv protoc3/bin/* /usr/local/bin/

#Move protoc3/include to /usr/local/include/
sudo mv protoc3/include/* /usr/local/include/

#Optional: change owner
sudo chwon [user] /usr/local/bin/protoc
sudo chwon -R [user] /usr/local/include/google
Add Libraries to PYTHONPATH
When running locally, the tensorflow/models/research/ and slim directories should be appended to PYTHONPATH. This can be done by running the following from tensorflow/models/research/:
# From tensorflow/models/research/
export PYTHONPATH=$PYTHONPATH:`pwd`:`pwd`/slim
Note: This command needs to run from every new terminal you start. If you wish to avoid running this manually, you can add it as a new line to the end of your ~/.bashrc file, replacing `pwd` with the absolute path of tensorflow/models/research on your system.
Testing the Installation
You can test that you have correctly installed the Tensorflow Object Detection
API by running the following command:
python object_detection/builders/model_builder_test.py
==================================================================================
No.1收集数据
待检测目标:外观不良中的缺损
数据数量:100张
数据来源:相机2拍摄的10+张照片
图片处理:
利用OpenCV编写Python脚本将图片格式从bmp修改为jpg;从灰度图(gray)修改为三通道图(RGB);分辨率从(1600,1200)修改为(1000,750);
利用软件Paint,对每一张图片进行几次旋转(每次90度或45度),水平/垂直翻转,平移;共得到10张处理后的图片,10张原图就得到100张图片;
(2018.03.02) add : above data set seems very small and not work well. it's better using 200+ different picture to training without rotation, flip,translation
No.2图片标注
标注软件:LabelImg
下载链接:https://tzutalin.github.io/labelImg/
使用方法介绍:https://blog.gtwang.org/useful-tools/labelimg-graphical-image-annotation-tool-tutorial/

标注后的图片都会对应生成.xml文件
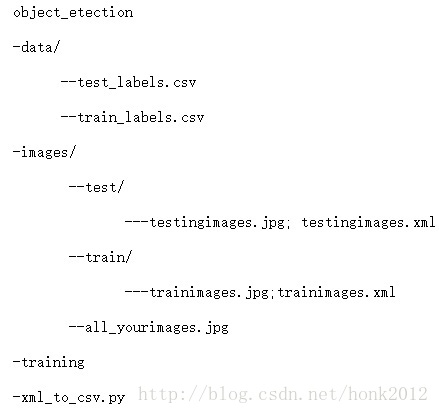
No.3将数据集分成训练数据集,测试数据集;
文件目录树结构如下:
object_detection/images
-train(90张图片(.jpg文件),对应的xml文件)
-test(10张图片(.jpg文件),对应的xml文件)
No.4生成TFRecords文件
github:https://github.com/datitran/raccoon_dataset
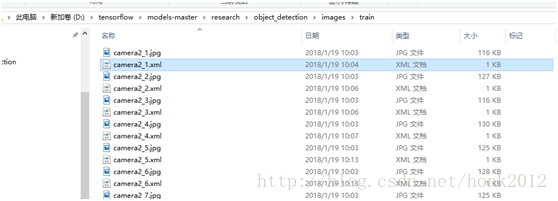
用脚本 xml_to_csv.py将xml文件转换成.csv文件;按照下图修改脚本中的xml文件路径以及输出的csv文件的路径;
使用脚本 generate_tfrecord.py,将csv文件,以及图片信息生成TensorFlow训练需要的TFRecord 文件;
需要在脚本里设定目标检测的类别

下载TensorFlow的models文件:https://github.com/tensorflow/models
下载protoc-3.4.0-win32.zip;网址:https://github.com/google/protobuf/releases/tag/v3.4.0;安装后将“D:\software\protoc-3.4.0-win32\bin”加入系统环境变量;
在控制台输入命令,将*.proto文件编译成*_pb2.py文件;注意编译的路径需要在research下,因为有文件导入的模块从object_detection/开始

在research目录下面安装object_detection库;
python setup.py install
设置PYTHONPATH的系统环境变量
D:\tensorflow\models-master\research
D:\tensorflow\models-master\research\slim
在控制台object_detection目录下执行下面的命令生成TFRecord文件
python generate_tfrecord.py--csv_input=data/train_labels.csv --output_path=data/train.record
python generate_tfrecord.py--csv_input=data/test_labels.csv --output_path=data/test.record
注:如果图片放到 imges/train; images/test;则执行脚本的时候 path的路径需要修改,train为 os.getcwd()+'images/train'; test也需要修改。。。
No.5配置训练用.config文件
在models-master\research\object_detection\samples\configs路径下拷贝ssd_mobilenet_v1_pets.config文件到models-master\research\object_detection\training路径下;
下载预先训练好的模型:http://download.tensorflow.org/models/object_detection/ssd_mobilenet_v1_coco_11_06_2017.tar.gz;解压缩到路径models-master\research\object_detection;
在配置文件ssd_mobilenet_v1_pets.config里设置相关参数;含有字符串“PATH_TO_BE_CONFIGURED”的地方都需要设定;
num_classes: 1
fine_tune_checkpoint:"ssd_mobilenet_v1_coco_11_06_2017/model.ckpt"
train_input_reader:{
tf_record_input_reader {
input_path: "data/train.record"
}
label_map_path:"data/object_detection.pbtxt"}
eval_config: {
num_examples: 96 # 需要测试的图片数量
# Note: The below line limits the evaluation process to 10 evaluations.
# Remove the below line to evaluate indefinitely.
max_evals: 1000 # 测试多少轮
num_visualizations: 96 # 在导入的文件夹路径下可以看多少张测试图片
visualization_export_dir:"Faster_RCNN_inception_resnet_v2_atrous/test_imgs" # 导入测试图片结果的路径
}
eval_input_reader: {
tf_record_input_reader {
input_path: "data/test.record"
}
label_map_path:"training/object_detection.pbtxt"
shuffle: false
num_readers:1}
batch_size:5;(每一次迭代处理的图片数量为5,与GPU,CPU,内存性能有关)
learning_rate:0.004;(初始的学习速率)
No.6 训练
在控制台object_detection路径下输入下面的命令:
python train.py--logtostderr --train_dir=training/ --pipeline_config_path=training/ssd_mobilenet_v1_pets.config
训练目标:loss降到1以下;中途可以中断,重新运行命令会在之前的基础上继续训练;
训练完成后,可以在object_detection路径下执行下面的命令查看训练情况
tensorboard --logdir='training'

No.7导出训练后的graph;
在控制台object_detection路径下运行下面的命令:
python export_inference_graph.py \
--input_type image_tensor \
--pipeline_config_path training/ssd_mobilenet_v1_pets.config \
--trained_checkpoint_prefix training/model.ckpt-10856 \
--output_directoryoutput_model
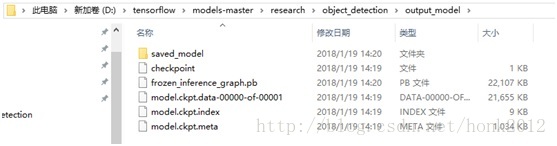
说明:
model.ckpt-10856 是训练结果文件,需要根据训练结果修改
output_model 是输出路径,需要设定
脚本运行时可能报错(ValueError:Protocol message RewriterConfig has no "layout_optimizer" field),可参考下面的方法修改
注释掉object_detection下exporter.py文件的下面这行:#layout_optimizer=rewriter_config_pb2.RewriterConfig.ON)
增加下面这行:
optimize_tensor_layout=True)
No.8 测试
在控制台object_detection路径下运行命令:jupyter notebook

选中object_detection_tutorial.ipynb
修改下面的内容:
MODEL_NAME = 'output_model'
注释掉下面的下载模型代码
#opener =urllib.request.URLopener()
#opener.retrieve(DOWNLOAD_BASE+ MODEL_FILE, MODEL_FILE)
#MODEL_FILE='D:/tensorflow/models-master/research/object_detection/ssd_mobilenet_v1_coco_2017_11_17.tar.gz'
#tar_file =tarfile.open(MODEL_FILE)
#for file intar_file.getmembers():
# file_name = os.path.basename(file.name)
# if 'frozen_inference_graph.pb' in file_name:
# tar_file.extract(file, os.getcwd())
将要测试的图片放到下面的路径,并设定好序号
PATH_TO_TEST_IMAGES_DIR = 'test_images'
TEST_IMAGE_PATHS = [os.path.join(PATH_TO_TEST_IMAGES_DIR, 'image{}.jpg'.format(i)) for i inrange(1, 13) ]
运行Cell/Run All
部分测试结果如下图所示:

附录:上述方法依据的教程:https://pythonprogramming.net/introduction-use-tensorflow-object-detection-api-tutorial/
测试的比较直接的方法是:训练生成checkpoint文件后就可以运行 eval.py
python eval.py \
--logtostderr \
--checkpoint_dir=object_detection/training \
--eval_dir=object_detection/eval \
--pipeline_config_path=object_detection/training/faster_rcnn_inception_resnet_v2_atrous_coco.config
在测试结果的文件夹下可以直观的看到有框的图片显示。。。

 浙公网安备 33010602011771号