

Nginx是一个开源的、支持高性能的、高并发的WWW服务和代理服务软件。
Nginx影剧院与高并发(特别是静态资源)、占用系统资源少等特性且功能丰富而逐渐流行起来。它不仅是一个优秀的web服务软件,还具有反向代理负载均衡功能和前端业务缓存服务功能。在反向代理负载均衡功能方面,类似于大名鼎鼎的LVS负载均衡以及Haproxy专业代理软件,但Nginx部署起来更加简单方便;在缓存服务功能方面,他又类似于Squid等专业的缓存服务软件。
Nginx的重要特性主要有:
可针对静态资源高速并发访问及缓存
可使用反向代理加速,并且进行数据缓存
具有较完善的负载均衡、节点健康检查和容错功能
支持远程FastCGI服务的缓存加速
支持FastCGI、Uwsgi、SCGI、and Memcached Servers 的加速与缓存
支持SSL、TLS、SNI
具有模块化的架构:过滤器包括gzip压缩、ranges支持、chunked响应、XSLT、SSI及图像缩放等功能。在SSI过滤器中,一个包含多个SSI的页面,如果经由FastCGI或反向代理处理,可被并行处理。
Nginx所具备的其他WWW服务特性如下:
支持基于名字、端口以及IP的多虚拟主机站点。
支持Kepp-alive和pipelined连接
可进行简单、方便、灵活的配置与管理
支持修改Nginx配置,并且在代码上线时,可平滑重启,不中断业务的访问
可自定义访问日志的格式,临时缓冲写日志的操作、快速日志轮询及通过rsyslog处理日志
可利用信号控制Nginx进程
支持3xx-5xx HTTP状态码重定向
支持rewrite模块,支持URI 重写及正则表达式匹配
支持基于客户端IP地址和HTTP 基本认真的访问控制
支持PUT、 DELETE、 MKCOL 、COPY以及 MOVE 等较特殊的HTTP请求方法
支持FLV流和MP4流技术产品应用
支持HTTP 响应速率限制
支持同一IP地址的并发连接或请求数限制
支持HTTP、 TCP 、UDP、邮件服务等多种协议服务代理能力
Nginx HTTP服务器的特色及优点
支持高并发:能支持几万并发连接(特别是静态小文件业务环境下)
资源消耗少:在3万并发连接下,开启10 个Nginx线程消耗不到200MB内存
可以做HTTP反向代理及加速缓存,即负载均衡功能,内置对RS节点服务器健康检查功能,这相当于专业的Haproxy软件或LVS功能
具备Squid等专业缓存软件等的缓存功能
支持异步网络IO事件模型epoll
准备安装Nginx,Linux系统下安装软件的方式很多比如:
rpm安装:简单、快捷,但是需要找rpm包,解决依赖关系困难,无法定制化
yum安装:简单、易用、高效、自动解决依赖关系但是不能选择软件版本或软件存放路径(无法定制化)
编译安装:可以自定义安装(选择版本、软件路径、针对性优化),但是很慢、安装复杂,需要GCC编译器等环境
综合安装:将源码制作成rpm,然后放到本地yum仓库,实现yum自动安装,综合了yum安装与编译安装的所有优点但是需要提前制作,复杂,对技术人员要求高
二进制安装:MySQL软件一般会提供这种二进制安装方式,其他软件很少用
在这里,我采用编译安装的方式安装Nginx,首先需要安装Nginx所需要的PCRE库,PCRE意为perl 兼容正则表达式,安装PCRE库是为了使Nginx支持具备URI重写功能的Rewrite模块,如果不安装PCRE库,则Nginx无法使用Rewrite模块功能,Nginx的Rewrite模块功能几乎是企业应用必须的。
首先检查当前Linux的系统环境
[root@web1 ~]# cat /etc/redhat-release
CentOS Linux release 7.9.2009 (Core)
[root@web1 ~]# uname -r
3.10.0-1160.25.1.el7.x86_64
[root@web1 ~]# uname -m
x86_64
第二采用yum的方式安装PCRE ,并检查安装结果
[root@web1 ~]# yum install -y pcre pcre-devel
已加载插件:fastestmirror, langpacks
Loading mirror speeds from cached hostfile
* base: mirrors.aliyun.com
* extras: mirrors.aliyun.com
----------------------------------------------------------------------------------------
省略部分输出信息
----------------------------------------------------------------------------------------
[root@web1 ~]# rpm -qa pcre pcre-devel
pcre-devel-8.32-17.el7.x86_64
pcre-8.32-17.el7.x86_64
第三检查Nginx的基础包是否都已经安装
[root@web1 ~]# rpm -qa openssl-devel openssl
openssl-1.0.2k-21.el7_9.x86_64 发现没有openssl-devel 的包,需要重新安装一遍,并再次检查,发现openssl-devel的包安装完成。
已加载插件:fastestmirror, langpacks
Loading mirror speeds from cached hostfile
* base: mirrors.aliyun.com
* extras: mirrors.aliyun.com
-------------------------------------------------------------------------------------------------------------
省略部分输出信息
--------------------------------------------------------------------------------------------------------------
[root@web1 ~]# rpm -qa openssl-devel openssl
openssl-devel-1.0.2k-21.el7_9.x86_64
openssl-1.0.2k-21.el7_9.x86_64
现在开始安装Nginx,首先创建存放软件的目录
[root@web1 ~]# cd /home/wangju/tools
[root@web1 tools]# wget -q http://nginx.org/download/nginx-1.16.0.tar.gz #下载软件包
[root@web1 tools]# echo $?
0
[root@web1 tools]# ls -lh
总用量 1012K
-rw-r--r--. 1 root root 1009K 4月 23 2019 nginx-1.16.0.tar.gz
[root@web1 nginx-1.16.0]# ./configure --user=nginx --group=nginx --prefix=/application/nginx-1.16.0/ --with-http_stub_status_module --with-http_ssl_module
checking for OS
+ Linux 3.10.0-1160.25.1.el7.x86_64 x86_64
checking for C compiler ... not found
./configure: error: C compiler cc is not found #出现报错,解决办法是安装gcc
[root@web1 nginx-1.16.0]# yum install -y gcc
已加载插件:fastestmirror, langpacks
Loading mirror speeds from cached hostfile
* base: mirrors.aliyun.com
--------------------------------------------------------------------------------------------------------------------------------
省略部分输出信息
-------------------------------------------------------------------------------------------------------------------------------
现在在重新执行上面的命令
[root@web1 nginx-1.16.0]# ./configure --user=nginx --group=nginx --prefix=/application/nginx-1.16.0/ --with-http_stub_status_module --with-http_ssl_module
checking for OS
+ Linux 3.10.0-1160.25.1.el7.x86_64 x86_64
checking for C compiler ... found
+ using GNU C compiler
+ gcc version: 4.8.5 20150623 (Red Hat 4.8.5-44) (GCC)
---------------------------------------------------------------------------------------------------------------------------------
省略部分输出
---------------------------------------------------------------------------------------------------------------------------------
[root@web1 nginx-1.16.0]# echo $? #确认是否下载成功
0
[root@web1 nginx-1.16.0]# make #编译
make -f objs/Makefile
make[1]: 进入目录“/home/wangju/tools/nginx-1.16.0”
cc -c -pipe -O -W -Wall -Wpointer-arith -Wno-unused-parameter -Werror -g -I src/core -I src/event -I src/event/modules -I src/os/unix -I objs \
-o objs/src/core/nginx.o \
src/core/nginx.c
-----------------------------------------------------------------------------------------------------------------------------------
省略部分输出
----------------------------------------------------------------------------------------------------------------------------------
[root@web1 nginx-1.16.0]# echo $? #再次检查是否下载成功
0
[root@web1 nginx-1.16.0]# make install #安装Nginx
make -f objs/Makefile install
make[1]: 进入目录“/home/wangju/tools/nginx-1.16.0”
test -d '/application/nginx-1.16.0/' || mkdir -p '/application/nginx-1.16.0/'
test -d '/application/nginx-1.16.0//sbin' \
|| mkdir -p '/application/nginx-1.16.0//sbin'
test ! -f '/application/nginx-1.16.0//sbin/nginx' \
[root@web1 nginx-1.16.0]# ln -s /application/nginx-1.16.0 /application/nginx #生产软链接
[root@web1 nginx-1.16.0]# ls /application/nginx
conf html logs sbin
[root@web1 tools]# ls -l /application
总用量 0
lrwxrwxrwx. 1 root root 25 6月 2 19:43 nginx -> /application/nginx-1.16.0
drwxr-xr-x. 6 root root 54 6月 2 19:42 nginx-1.16.0
到此Nginx的安装就完成了。
编译软件时,使用./configure --help 查看相关参数帮助,下面是本次编译时指定的参数及简单说明
--user=nginx #设置安装路径
--group=nginx #进程用户权限
--prefix=/application/nginx-1.16.0/ #进程用户组权限
--with-http_stub_status_module #激活状态信息
--with-http_ssl_module #激活ssl功能
现在启动并检查安装结果
[root@web1 tools]# /application/nginx/sbin/nginx -t #启动之前先检查语法
nginx: the configuration file /application/nginx-1.16.0//conf/nginx.conf syntax is ok
nginx: configuration file /application/nginx-1.16.0//conf/nginx.conf test is successful
[root@web1 tools]# /application/nginx/sbin/nginx #启动Nginx
为了减少输入Nginx启动命令的路径,可以将路径加入PATH环境变量里
[root@web1 nginx-1.16.0]# cd /application/nginx/conf
[root@web1 conf]# echo 'export PATH="/application/nginx/sbin:$PATH"' >> /etc/profile #在换件变量中写入内容
[root@web1 conf]# tail -1 /etc/profile #查看写入的内容
export PATH="/application/nginx/sbin:$PATH"
[root@web1 conf]# source /etc/profile
[root@web1 conf]# echo $PATH
/application/nginx/sbin:/usr/local/sbin:/usr/local/bin:/usr/sbin:/usr/bin:/root/bin
[root@web1 conf]# nginx -t #写入环境变量后查看是否有语法错误就很简单
nginx: the configuration file /application/nginx-1.16.0//conf/nginx.conf syntax is ok
nginx: configuration file /application/nginx-1.16.0//conf/nginx.conf test is successful
[root@web1 conf]# netstat -lntup|grep nginx #查看端口是否启动成功
tcp 0 0 0.0.0.0:80 0.0.0.0:* LISTEN 8037/nginx: master
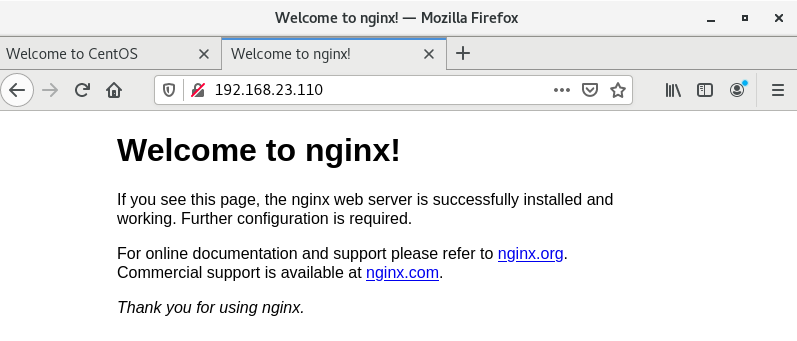
检查Nginx启动的实际效果,在浏览器中输入http://192.168.23.110,即可看到Nginx的首页,表示Nginx已经启动了
同样我们也可以用wget或curl命令监测
[root@web1 ~]# wget 127.0.0.1 (此地址是回环地址)
--2021-06-02 20:53:17-- http://127.0.0.1/
正在连接 127.0.0.1:80... 已连接。
已发出 HTTP 请求,正在等待回应... 200 OK
长度:612 [text/html]
正在保存至: “index.html”
100%[=============================================================>] 612 --.-K/s 用时 0.008s
2021-06-02 20:53:17 (79.6 KB/s) - 已保存 “index.html” [612/612])
[root@web1 ~]# curl 127.0.0.1
<!DOCTYPE html>
<html>
<head>
<title>Welcome to nginx!</title>
<style>
body {
------------------------------------------------------------------------------------------
省略部分输出
------------------------------------------------------------------------------------------
以上的三种方法都可以检测Nginx的安装及浏览是否正常。
利用安装好的Nginx部署一个简单的web站点
[root@web1 tools]# sed -n '43,46p' /application/nginx/conf/nginx.conf #查看Nginx的配置文件中的网页部分信息
location / {
root html;
index index.html index.htm;
}
[root@web1 tools]# cd /application/nginx/html/
[root@web1 html]# ls
50x.html index.html
[root@web1 html]# rm -f index.html
[root@web1 html]# ls
50x.html
[root@web1 html]# vi index.html
[root@web1 html]# cat index.html
<html>
<head><title>The World</title></head> <body> Hello,I am the world.Nice to meet you</body>
</html>
重新打开浏览器,看到如下的信息
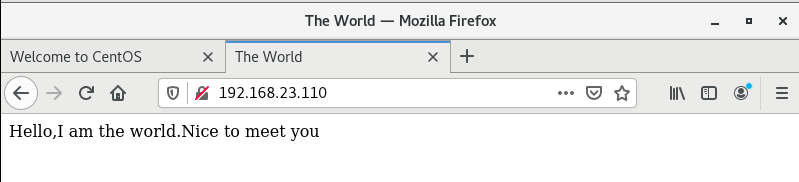
到这里简单的Nginx就配置完成了。

 浙公网安备 33010602011771号