es+kibana安装
ES+Kibana安装步骤(Linux版本)
转自:https://www.cnblogs.com/DidiLiu/articles/10843248.html
ES安装步骤总览
- 安装JDK环境(省略安装步骤)
n 安装JDK是由于ElasticSearch是由Java语言编写的
- 安装ElasticSearch.
n 注意事项:ES非常占内存,默认启动占1G,可修改为512m
- 安装Kibana
1. 安装ElasticSearch
简介:ElasticSearch是一个基于Lucene的搜索服务器。它提供了一个分布式多用户能力的全文搜索引擎,基于RESTful web接口。Elasticsearch是用Java开发的,并作为Apache许可条款下的开放源码发布,是当前流行的企业级搜索引擎。设计用于云计算中,能够达到实时搜索,稳定,可靠,快速,安装使用方便。
1.1修改配置文件

- (root) 解压压缩包
tar –zxvf elasticsearch-7.0.1-linux-x86_64.tar.gz
- (root)解压后新建目录
mkdir /usr/elasticsearch
- (root)将家目录下的elasticsearch-7.0.1文件夹放入新建目录下
mv elasticsearch-7.0.1 /usr/elasticsearch
- (root)修改所属组和所属用户(注意:当前目录所属一定不要是root)
chown –R didi-liu /usr/elasticsearch 和 chgrp –R didi-liu /usr/elasticsearch
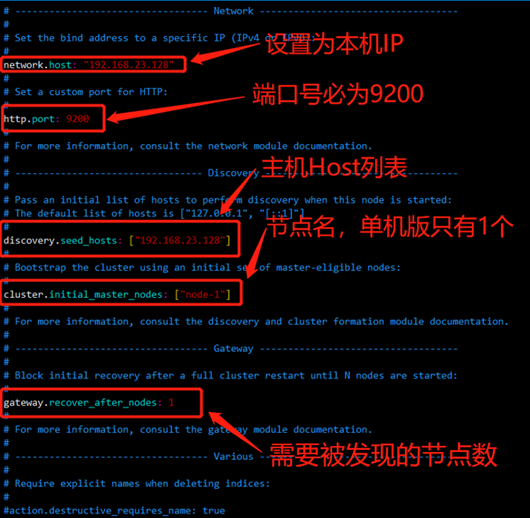
- (didi-liu)切换到/usr/elasticsearch/ elasticsearch-7.0.1/config/ 下
vi elasticsearch.yml
配置入下图

1.2可能回报如下错误
1.2.1 容量过小错误
max file descriptors [4096] for elasticsearch process likely too low, increase to at least [65536]
max number of threads [1024] for user [lishang] likely too low, increase to at least [2048]
max number of threads [1024] for user [lish] likely too low, increase to at least [2048]
- 解决方案:(切换到root用户下)
- vi /etc/security/limits.conf (中添加)
* soft nofile 65536
* hard nofile 131072
* soft nproc 2048
* hard nproc 4096
- vi /etc/systemctl.conf (中添加)
vm.max_map_count=655360
- 修改后, :wq进行保存
sysctl -p
1.2.2不支持SecComp报错:
ERROR: bootstrap checks failed
system call filters failed to install; check the logs and fix your configuration or disable system call filters at your own risk
解决方法:
在elasticsearch.yml中配置bootstrap.system_call_filter为false,注意要在Memory下面:
bootstrap.memory_lock: false
bootstrap.system_call_filter: false
解决以上错误需关闭防火墙,才可访问到对应端口(service iptable stop),并重启
1.2.3主机名配置错误:
[rest.suppressed ] /_cat/health Params: {h=node.total}MasterNotDiscoveredException[waited for [30s]]
解决方法:这个报错可能是因为主机名未改成配置的节点名(我这里把主机名改为:node-1)
1.3启动elasticsearch
切换到elasticsearch的bin目录下,执行
./elasticsearch
启动完成且成功截图(没有在一直跳日志)

2. 安装Kibana
简介:ElasticSearch是一个基于Lucene的搜索服务器。它提供了一个分布式多用户能力的全文搜索引擎,基于RESTful web接口。Elasticsearch是用Java开发的,并作为Apache许可条款下的开放源码发布,是当前流行的企业级搜索引擎。设计用于云计算中,能够达到实时搜索,稳定,可靠,快速,安装使用方便。
2.1修改配置文件
Kibana相对于elasticsearch来说简单许多。只需要修改Kibana中间配置即可
- (root) 解压压缩包
tar –zxvf kibana-7.0.1-linux-x86_64.tar.gz
- (root)修改所属组和所属用户(注意:当前目录所属一定不要是root)
chown –R didi-liu kibana-7.0.1-linux-x86_64 和 chgrp –R didi-liu kibana-7.0.1-linux-x86_64
- (didi-liu)切换到/home/didi-liu/kibana-7.0.1-linux-x86_64/config/ 下
vi kibana.yml
配置文件如下:
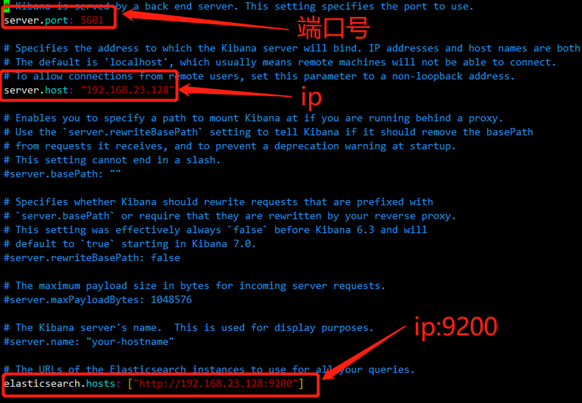

修改后,:wq 保存并退出
2.2启动kibana
切换到kibana的bin目录下,执行
./ kibana
启动完成且成功截图(监听启动[listening]/所有启动项都显示Status changed from yellow to green - Ready)


 浙公网安备 33010602011771号