
week03
1.http交互过程
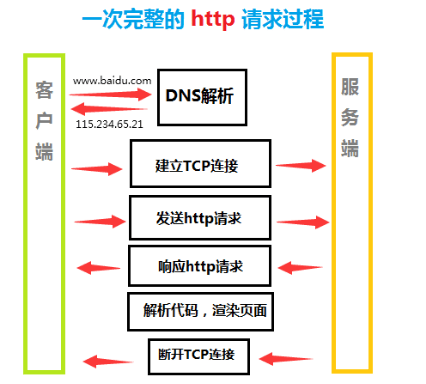
过程说明
-
在浏览器键入要访问的URL如http://www.baidu.com
-
浏览器自动解析URL的构成,取出域名部分,去本地缓存中首先查找有没有对应的解析条目
-
如果有则直接根据解析出的IP访问目标主机,没有则需要走公共DNS的解析过程,从而获得对应的公网IP地址
-
通过IP地址和对应协议的端口(http默认80)与服务器端建立TCP连接(三次握手)

-
接着发送http请求(请求行+请求头+请求体)
-
服务器收到请求后,响应对应的代码和资源


-
浏览器根据返回的结果解析代码,渲染页面,展示出来
-
请求的资源都返回完成后,断开TCP连接

2.lnmp环境搭建
2.1 安装nginx
1.配置官方yum源
[nginx-stable]
name=nginx stable repo
baseurl=http://nginx.org/packages/centos/$releasever/$basearch/
gpgcheck=1
enabled=1
gpgkey=https://nginx.org/keys/nginx_signing.key
module_hotfixes=true

2.安装并启动nginx
yum install nginx
systemctl start nginx
[root@master php]# netstat -tnlp  | grep nginx
tcp        0      0 0.0.0.0:80              0.0.0.0:*               LISTEN      11516/nginx: master
3.
2.2 安装php
1.配置yum源
[root@master php]# cat /etc/yum.repos.d/php.repo
[webtatic-php]
name = php Repository
baseurl = http://us-east.repo.webtatic.com/yum/el7/x86_64/
gpgcheck = 0

2.安装php相关安装包
yum  install php71w php71w-cli php71w-common php71w-devel php71w-embedded php71w-gd php71w-mcrypt php71w-mbstring php71w-pdo php71w-xml php71w-fpm php71w-mysqlnd php71w-opcache php71w-pecl-memcached php71w-pecl-redis php71w-pecl-mongodb

如果本地有安装包,也可以手动安装,节省时间:
[root@master php]# cd ~/php/
[root@master php]# yum localinstall ./*.rpm

3.启动php服务
[root@master php]# systemctl start php-fpm
[root@master php]# netstat -tnlp | grep php
tcp        0      0 127.0.0.1:9000          0.0.0.0:*               LISTEN      10359/php-fpm: mast
2.3 安装mariadb
1.安装
yum install mariadb-server mairadb
systemctl start mariadb
[root@master php]# netstat -tnlp  | grep mysql
tcp        0      0 0.0.0.0:3306            0.0.0.0:*               LISTEN      1619/mysqld

2.安全配置(初次安装mysql默认没有root密码)
[root@master conf.d]# mysql_secure_installation   #根据提示添加配置

[root@master conf.d]# mysqladmin password "******"  #也可以用该命令直接给root修改密码
2.4 配置部分
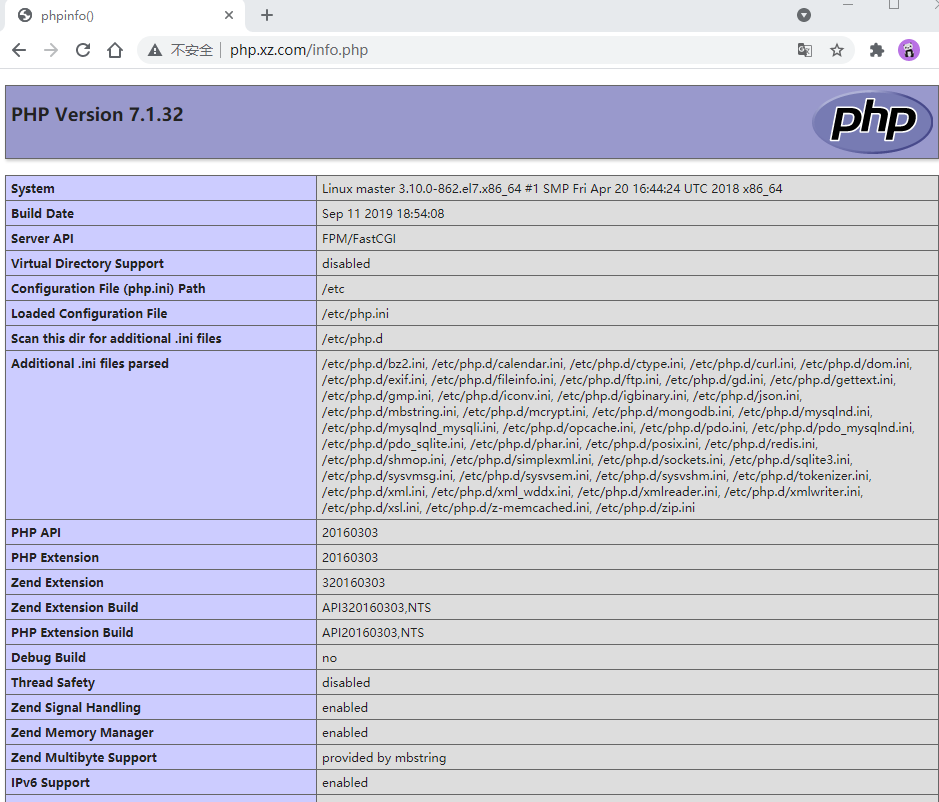
1.准备测试php文件
[root@master code]# cat /code/info.php
<?php
	phpinfo();
?>

#可以用php命令直接测试一下,防止有语法错误
[root@master code]# php info.php  | more
phpinfo()
PHP Version => 7.1.32

System => Linux master 3.10.0-862.el7.x86_64 #1 SMP Fri Apr 20 16:44:24 UTC 2018 x86_64
Build Date => Sep 11 2019 18:49:41
Server API => Command Line Interface
Virtual Directory Support => disabled
Configuration File (php.ini) Path => /etc
Loaded Configuration File => /etc/php.ini
Scan this dir for additional .ini files => /etc/php.d
Additional .ini files parsed => /etc/php.d/bz2.ini,
2.测试nginx访问php页面
[root@master code]# cat /etc/nginx/conf.d/php.conf
server {
  server_name php.xz.com
  listen 80;
  root /code;
  index index.php index.html;

  location ~ \.php$ {
    fastcgi_pass 127.0.0.1:9000;          #这里转发给上面启动的php服务
    #这里SCRIPT_FILENAME的值是/code/info.php,由上面的root路径和要访问的页面index.php拼接而成
    fastcgi_param SCRIPT_FILENAME $document_root$fastcgi_script_name;
    include fastcgi_params;            #将nginx自带的fastcgi参数配置文件引用进来
  }
}
3.测试数据库连接
[root@master code]# cat /code/mysql.php
<?php
	$servername = "localhost";
	$username = "root";
	$password = "******";
// 建立连接
	$conn = mysqli_connect($servername, $username, $password);
// 检测连接
	if (!$conn) {
		die("Connection failed: " . mysqli_connect_error());
	}
	echo "MySQL连接成功";
?>
2.5 测试截图
- php页面访问截图
- mysql连接测试截图

3.wordpress搭建
3.1 准备统一的用户和组
新建一个用户www,因为不同的服务默认启动用户不同,代码目录权限也不统一,为了防止因权限统一而导致的访问问题,需要准备一个公共的用户。
[root@master ~]# groupadd -g 888 www
[root@master ~]# useradd -u 888 -g 888 -s /sbin/nlogin www
[root@master ~]# id www
uid=888(www) gid=888(www) groups=888(www)
3.2 下载wordpress并更改数据库配置
#下载wp安装包并解压
wget https://cn.wordpress.org/latest-zh_CN.tar.gz
tar -zxf latest-zh_CN.tar.gz

#更改代码目录权限
[root@master code]# chown -R www.www /code

#修改数据库配置
[root@master wordpress]# mysql -uroot  -p
Enter password:
Welcome to the MariaDB monitor.  Commands end with ; or \g.
Your MariaDB connection id is 20
Server version: 5.5.68-MariaDB MariaDB Server

Copyright (c) 2000, 2018, Oracle, MariaDB Corporation Ab and others.

Type 'help;' or '\h' for help. Type '\c' to clear the current input statement.

MariaDB [(none)]> CREATE DATABASE wordpress;
Query OK, 1 row affected (0.00 sec)

MariaDB [(none)]> CREATE DATABASE wordpress;
Query OK, 1 row affected (0.00 sec)

MariaDB [(none)]> GRANT ALL ON wordpress.* TO 'test'@'192.168.1.45';
Query OK, 0 rows affected (0.01 sec)

MariaDB [(none)]> FLUSH PRIVILEGES;
Query OK, 0 rows affected (0.00 sec)

MariaDB [(none)]> GRANT ALL ON wordpress.* TO 'test'@'192.168.1.45' IDENTIFIED BY 'test';
Query OK, 0 rows affected (0.00 sec)
3.3更改nginx和php-fpm的配置
#添加nginx配置,并修改默认启动用户为www
[root@master code]# cat /etc/nginx/conf.d/wordpress.conf
server {
	listen 80;
    server_name blog.xz.com;
    root /code/wordpress;

    location / {
   		index index.php;
	}

    location ~ \.php$ {
        fastcgi_pass 127.0.0.1:9000;
        fastcgi_param SCRIPT_FILENAME $document_root$fastcgi_script_name;
		include fastcgi_params;
    }
}

#更改php-fpm的启动用户,默认是apache
[root@master code]# vim /etc/php-fpm.d/www.conf
user = nginx
group = nginx

#改完后,检查一下
[root@master code]# ps -ef | grep www
www      25352 25351  0 15:36 ?        00:00:00 nginx: worker process
www      25353 25351  0 15:36 ?        00:00:00 nginx: worker process
www      25354 25351  0 15:36 ?        00:00:00 nginx: worker process
www      25355 25351  0 15:36 ?        00:00:00 nginx: worker process
www      25356 25351  0 15:36 ?        00:00:00 nginx: worker process
www      25357 25351  0 15:36 ?        00:00:00 nginx: worker process
www      25358 25351  0 15:36 ?        00:00:00 nginx: worker process
www      25359 25351  0 15:36 ?        00:00:00 nginx: worker process
www      25724 25716  0 15:37 ?        00:00:00 php-fpm: pool www
www      25726 25716  0 15:37 ?        00:00:00 php-fpm: pool www
www      25727 25716  0 15:37 ?        00:00:00 php-fpm: pool www
www      25728 25716  0 15:37 ?        00:00:00 php-fpm: pool www
www      25729 25716  0 15:37 ?        00:00:00 php-fpm: pool www
3.4 启动并配置wordpress
-
配置连接数据库

-
发布测试文章

4.对称加密与非对称加密
为什么要进行加密?加密的目的就是为了保证数据在传输过程的安全,即使数据被截获也无法破解。
常用的加密方式有两种,即对称加密与非对称加密。
4.1对称加密
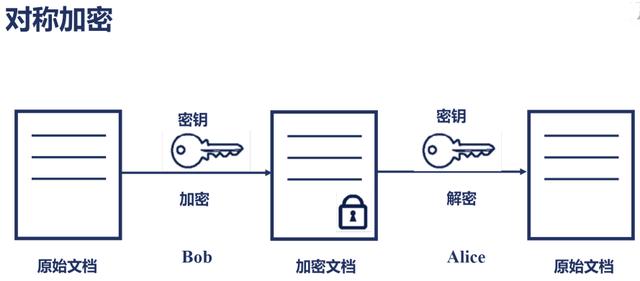
对称加密采用了对称密码编码技术,它的特点是加密和解密使用相同的密钥,用这个密钥都能去加密或解密 。
-
基本过程
在传输数据前,发送方会生成加密密钥,并将密钥私下共享给接收方,当需要传输数据时,发送方用该密钥加密明文,接收方收到后再用同样的密钥解密即可获明文数据。
-
优缺点
效率高,速度快,但是安全性一般,如果密钥被第三者获得,数据就不在安全。
4.2 非对称加密
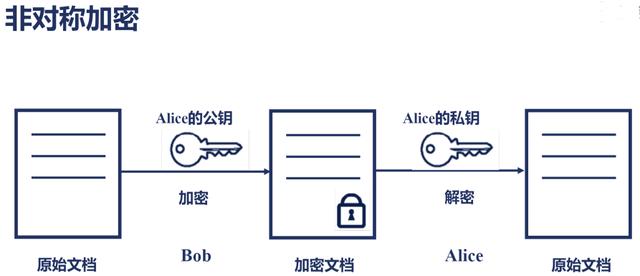
非对称加密使用一对密钥对进行加密和解密,公钥用于加密,私钥用于解密。其中公钥是公开的,私钥只存在本地,不需要传输,可靠性高。
-
基本过程
接收方(一般是服务端)生成一对密钥对,数据发送方首先获取接收方的公钥,因为公钥是公开的,然后用公钥加密要发送的数据后发送到接收方,接收方收到后用自己的私钥解密即可获取明文数据。
-
优缺点
安全性更高,但加密和解密花费时间长、速度慢,只适合对少量数据进行加密。
5.keepalive高可用配置
5.1 安装配置
yum install -y keepalived
配置node1
[root@node1 ~]# cat /etc/keepalived/keepalived.conf
! Configuration File for keepalived

global_defs {
   router_id lb01                 #路由id,全局唯一
}

vrrp_instance VI_1 {
    state MASTER                  #角色主或者备,说明作用
    interface eno33554984         #对外访问接口,测试环境建议配置和本接口原来ip同网段的ip,方便测试
    virtual_router_id 51          #虚拟路由器ID,同一个集群ID一致
    priority 100                  #优先级,越大优先级越高
    advert_int 3                  #通告间隔,检测互相之间的状态
    authentication {              #认证信息,加入keepalived集群需要
        auth_type PASS
        auth_pass 1212
    }
    virtual_ipaddress {           #漂移ip地址
       192.168.0.110
    }
}
配置node2
[root@node2 html]# cat /etc/keepalived/keepalived.conf
! Configuration File for keepalived

global_defs {
   router_id lb02
}

vrrp_instance VI_1 {
    state BACKUP
    interface ens37
    virtual_router_id 51
    priority 99
    advert_int 3
    authentication {
        auth_type PASS
        auth_pass 1212
    }
    virtual_ipaddress {
        192.168.0.110
    }
}
启动服务
systemctl start keepalived
systemctl status keepalived
5.2 ip漂移测试
测试环境以node1为master,所以初始虚拟ip会配置在node1的指定接口上,如下图:
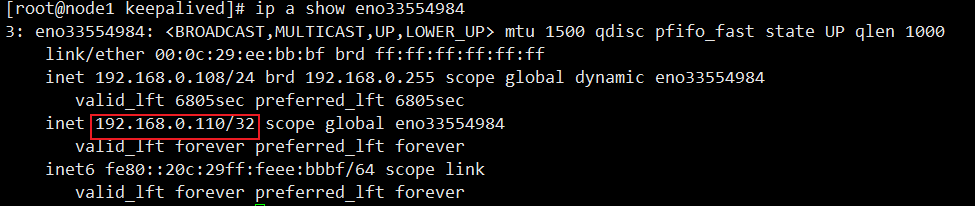
在windows上使用arp -a命令查看虚拟ip对应的mac地址,发现跟node1的外网接口mac地址相同,说明配置在该接口上。
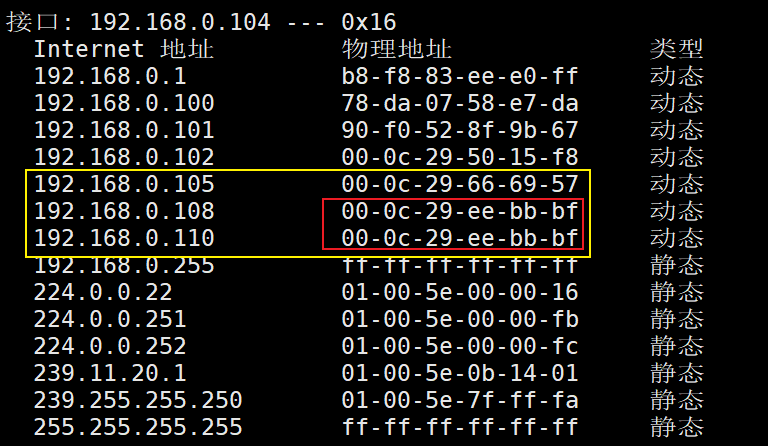
测试停掉node1的keepalived服务,然后检测虚拟ip漂移情况,如下图,ip漂移到node2上对应的接口了。


 浙公网安备 33010602011771号